
Chapter 3: Working with Charms and Notifications
In This Chapter
![]() Charmed to meet you
Charmed to meet you
![]() The Windows 8.1 Smart Search is smart — for Microsoft
The Windows 8.1 Smart Search is smart — for Microsoft
![]() The anatomy of a notification
The anatomy of a notification
![]() Limiting notifications
Limiting notifications
The new tiled Windows 8.1 Metro interface brings two completely new solutions to Windows age-old problems.
The problems? Telling Windows what you want it to do, quickly and easily, and receiving messages from Windows about something you need to do. In the past, people have been treated to all sorts of warnings and bubbles and bleeps and blops.
The solutions? Charms and notifications. These two new features not only address the two aforementioned problems, but also set up Windows to accomplish both of those goals in a touch-friendly universe.
This chapter gives you a quick overview of the Charms bar — the quick and dirty way you can interact with the most exposed parts of Windows — and notifications, which are notices from Windows to you, delivered in a very specific way. Er, ways. It also warns you about the new-to-Windows 8.1 Smart Search, which brings a whole new dimension to privacy concerns.
Bringing on the Charms
The desktop has its Control Panel — a central point to access all the pain-inducing instruments every diabolical 19th-century dentist may gleefully deploy. By contrast, the newer version of Windows has a simple bar with a charming name, the Charms bar (see Figure 3-1), and a somewhat limited repertoire. You can get to the Charms bar from either the desktop or the Metro side of Windows 8.1. Unfortunately, on the desktop, it doesn’t do much.
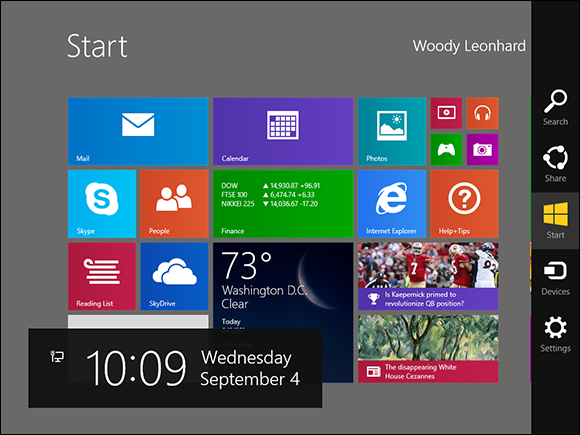
Figure 3-1: The Charms bar on the right side of the screen.
As long as the Charms bar is up, you see the system time and date, and the system badges that appear on the lock screen (for example, network status or battery charged — see Book II, Chapter 2) in a big black box on the lower left of the screen, which you can see in Figure 3-1.
 Here’s what you do to bring up the Charms bar, which you can do when you’re on the Metro Start screen, on the desktop, or inside any running program, any time:
![]() On a touch-enabled screen, slide a finger or thumb from the right toward the center of the screen.
On a touch-enabled screen, slide a finger or thumb from the right toward the center of the screen.
![]() With a mouse, hover it in the upper-right or lower-right corner of the screen, and wait until you see a ghost outline of the charms. Then move your mouse along the right edge toward the middle of the screen. When the charms have fully materialized and the background has turned black, you’re ready to click a charm.
With a mouse, hover it in the upper-right or lower-right corner of the screen, and wait until you see a ghost outline of the charms. Then move your mouse along the right edge toward the middle of the screen. When the charms have fully materialized and the background has turned black, you’re ready to click a charm.
Several of the charms lead to powerful programs inside Windows, others can take you interesting places, and a couple are just dullards. I go into great detail about the powerful charms (Search, Settings) in Book III, but here I just want to give you an overview and a bit of a teaser about what lies ahead for the interesting ones.
Search charm
The hardest thing to understand about the Search charm is its semblance to a chameleon: Search changes depending on where you are when you bring it up.
If you think of Search as being a global endeavor — something you perform over your entire PC — you miss the important nature of the Search charm. Although you can search your whole PC — just as Windows has done for ages — using the Search charm targets your search. For example
![]() When you’re on the Metro Start screen, if you haven’t enabled Smart Search (see the next section), Search looks for “hits” on all types of programs, settings, and files (see Figure 3-2). You can narrow the search down to just settings or just files by clicking on the Everywhere link.
When you’re on the Metro Start screen, if you haven’t enabled Smart Search (see the next section), Search looks for “hits” on all types of programs, settings, and files (see Figure 3-2). You can narrow the search down to just settings or just files by clicking on the Everywhere link.
 If you just type when you’re looking at the Metro Start screen, Windows behaves as if you brought up the Search charm and runs a search on whatever you type.
![]() When you’re in the Mail app, Search can look for text in your messages: Click Everywhere and choose Mail. The Search charm works similarly in the People, Photos, and Video apps.
When you’re in the Mail app, Search can look for text in your messages: Click Everywhere and choose Mail. The Search charm works similarly in the People, Photos, and Video apps.

Figure 3-2: Search from the Start screen.
![]() When you’re in the Store app, that app takes over the search function, with a search box in the upper-right corner (see Figure 3-3). Several of the other Microsoft Metro apps work that way. I guess the people at the Windows Store don’t trust the Win8.1 Search charm.
When you’re in the Store app, that app takes over the search function, with a search box in the upper-right corner (see Figure 3-3). Several of the other Microsoft Metro apps work that way. I guess the people at the Windows Store don’t trust the Win8.1 Search charm.
![]() While you’re using the tiled, Metro full-screen version of Internet Explorer, the Search charm has an option — under the Everything link — to search using your default search engine. But while you’re using the desktop version of Internet Explorer, the Search charm just does a regular desktop search.
While you’re using the tiled, Metro full-screen version of Internet Explorer, the Search charm has an option — under the Everything link — to search using your default search engine. But while you’re using the desktop version of Internet Explorer, the Search charm just does a regular desktop search.
![]() When you’re on the desktop, no matter what applications you may be running, bringing up the Search charm runs a search in exactly the same way as searching on the Start screen.
When you’re on the desktop, no matter what applications you may be running, bringing up the Search charm runs a search in exactly the same way as searching on the Start screen.
There are many, many nuances.
For example, if you run Search on the Metro Start screen, as in Figure 3-2, and choose Settings under the Everything link, Search shows you results for searching specific kinds of Windows programs and settings. Choose Files, and you see all the files on your system that match the search criteria, including, unexpectedly, music files.
I go into more detail about the Search charm in Book III, Chapter 2.
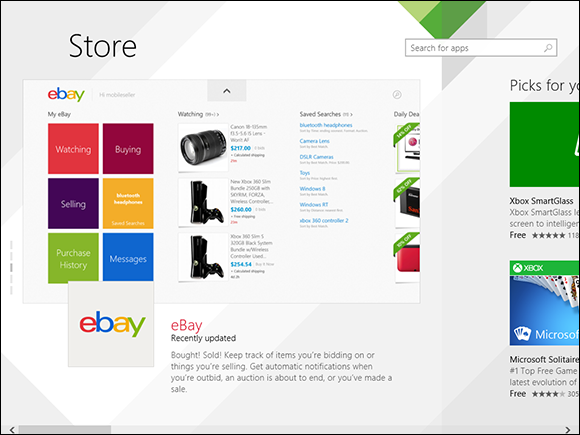
Figure 3-3: Windows Store doesn’t use the Search charm, relying instead on its own Search for apps box in the upper-right corner.
The problem with Smart Search
Try a little experiment.
Go to the Metro Start screen and type an odd word — one that probably doesn't exist in any of your documents — and press Enter or tap the magnifying glass icon. In Figure 3-4, I typed the word flugelhorn.
If you don’t see a screen like the one in Figure 3-4, congratulations! You have Smart Search turned off. If you followed my instructions for installing Windows 8.1, and refused to accept the default settings, you may have turned it off already. But if you run a local, computer-only search, and you get a screen “Powered by Bing” that’s obviously fed your search criteria to the Bing data gathering cloud in the sky, you’ve been Blinged.
 The new Win8.1 Smart Search — invoked by default through the Windows 8.1 Search charm — not only searches your computer for the string you specify. It also, all by itself, gathers up the terms and runs them through a Bing search. Making this cool new feature all the more lovable, Microsoft has officially announced that advertisers will be able to dish up advertising to your computer, based on the searches you perform on your computer.

Figure 3-4: Smart Search gives Microsoft free access to all your local, PC-only searches, leaving records in Bing.
In the case of Figure 3-4, Bing has not only made note of the fact that you searched for flugelhorns, it’s also dished up the opportunity for you to buy flugelhorns, on both eBay and Amazon. How considerate. If you logged on to Windows with a Microsoft account, you just told Microsoft that your e-mail address is desperately seeking flugels. And you’ll no doubt be plagued by flugelhorn ads for the rest of your natural days.
 Scary? Yeah, I think so. If I use Microsoft Bing or Google search — or almost any other search engine — you already know that Microsoft and/or Google can and do keep track of your searches. That’s why a casual web search for “flugelhorn” will result in you seeing targeted ads for flugelhorns on almost every site you visit for the following month.
But running a search on your Windows 8.1 PC — not a web search, but a search on your computer — sends Microsoft the same information.
You can turn Smart Search off by bringing up the Settings charm, clicking or tapping Change PC Settings, and then choosing Search and Apps and moving the Use Bing to Search Online slider off.
Share charm
Over on the desktop side of the fence, it’s easy to copy stuff: The (largely fictitious) Clipboard acts as intermediary if you copy, cut, and paste; clicking and dragging copies or moves files, pictures, or text; and you can even embed some documents inside other documents with a click and drag.
Not so on the tiled Metro side of the Windows 8.1 fence. There’s no desktop-style Clipboard (beyond very rudimentary cut and paste), no intermediary to handle that translation from one application to another, and no way to drag and drop from here to there. Even if you get two apps running side by side with a Tiled Snap, the two apps don’t communicate and you can’t move stuff from one app to the other.
That’s why Microsoft had to invent this new approach to sharing and the Share Contract, which I explain in the sidebar, “What’s a Share Contract?”
The general approach to sharing goes like this: Select something, bring up the Share charm, and choose which app you want to share it with. The prototypical example: Choose a picture in the Photos app, bring up Share, and attach the photo to a Metro Mail message. If you bring up the Share charm while working on the old-fashioned desktop, you’re given an opportunity to attach a full-screen screenshot to a Metro Mail e-mail message. Not overly inspiring.
Sharing is the most common way to add items to your Reading List — which is a Microsoft version of Instapaper or Evernote. Open a web page, click the Share charm, and save it to the Reading List so you can pick it up later.
As you install more applications on your computer, you’ll find more and more ways that you can use the Share charm. Who knows? Maybe someday Microsoft will build a Share app for the desktop’s Clipboard.
Start charm
The Start charm, right in the middle of the Charms bar, behaves precisely the same way as pressing the Windows button on your PC (if you have one) or pressing the Windows key on your keyboard (if you have one).
Tap or click the Start charm, and you cycle between the Start screen and the last app that you were using. If the last app you used was on the desktop, you get the entire desktop back in the state it was in when you left.
Devices charm
People are just beginning to see how much can be done with the Devices charm. I expect that, over the next few years, hardware manufacturers are going to come up with amazing capabilities.
The Devices charm is where hardware meets the new tiled software.
When you bring up the Devices charm from most locations on the Metro tiled side of Windows 8.1, you’ll see separate entries for Play, Print, and Project. In theory, clicking the Play icon is supposed to play a media file, but in practice, you may or may not get a wonderfully salubrious error message such as, “You can only play from apps” or “This app can’t play to a device right now.” Which begs the question of why the Play option appears at all.
If you want to print something in Internet Explorer, for example, bring up the Devices charm and click the link marked Print. You see entries for all the printers that are accessible from your PC. Click a printer, and you see the Print dialog box like the one in Figure 3-5.
Want to connect to a projector? If Windows can figure out how to connect to the projector, the Devices pane has an icon for project connections, too.
 That said, the Devices charm on the desktop isn’t very useful at all. Even if you have, say, Internet Explorer running full-screen, the Devices charm doesn’t give you any options. If you want to print from IE 11 on the desktop, you have to choose Tools⇒Print.

Figure 3-5: While in the tiled, full-screen Internet Explorer, the Devices charm Print entry brings up a list of printers, and if you choose to print, this dialog box guides your way.
Settings charm
The Settings charm is where Alice fell down the rabbit hole.
Seriously, the Settings charm leads you to a myriad of screens that may or may not hold the settings you seek.
The most important detail about the Settings charm? It’s different on the Start screen, as opposed to the desktop:
![]() If you bring up the Settings charm from the Start screen, you have access to a limited number of settings, as shown in Figure 3-6. Choosing Change PC Settings at the bottom gets you to many options, but they’re oddly disjoint from settings in the desktop Control Panel — some settings are in the PC Settings screen, others are in the Control Panel, and many are in both.
If you bring up the Settings charm from the Start screen, you have access to a limited number of settings, as shown in Figure 3-6. Choosing Change PC Settings at the bottom gets you to many options, but they’re oddly disjoint from settings in the desktop Control Panel — some settings are in the PC Settings screen, others are in the Control Panel, and many are in both.
![]() If you bring up the Settings charm from the desktop, you’re given the keys to the city. As shown in Figure 3-7, you gain access to the full Windows Control Panel, right there on the top.
If you bring up the Settings charm from the desktop, you’re given the keys to the city. As shown in Figure 3-7, you gain access to the full Windows Control Panel, right there on the top.
Every tiled Windows 8.1 application has its own settings — Internet Explorer, for example, gives you options on the Settings charm to delete browsing history. In the desktop version of IE, you need to tap or click Tools, inside the browser.
In general, settings for tiled apps are accessible through the Settings charm. Settings for desktop programs are typically inside the program — although there are exceptions. It’s very confusing.

Figure 3-6: The limited selection available from the Start screen.

Figure 3-7: The desktop options may not look so impressive, but they’re very capable.
Setting and Responding to Notifications
The desktop side of Windows allows all sorts of notifications: blinking taskbar tiles, balloon messages over the system time (in the lower-right corner, dire-looking icons in the system notification area, near the system time), or dialog boxes that appear out of nowhere. However, the tiled full-screen side is very conservative, and in my opinion, much more effective because of it.
These new notifications — the things that can happen when Windows or one of the tiled, full-screen apps wants your attention — fall into three broad categories:
![]() They can put rectangular notices, usually gray, in the upper-right edge of your screen, with a few lines of text. Typically the notifications say things like
They can put rectangular notices, usually gray, in the upper-right edge of your screen, with a few lines of text. Typically the notifications say things like Tap or choose what happens when you insert a USB drive, or Turn sharing on or off.
These notifications are toaster notifications (or sometimes just toast), and they’re a core part of Windows on the tiled side of Windows 8.1. It’s a fabulous name because they pop up, just like toast, but on their sides.
![]() They can show toaster notifications on the lock screen. This is considered direr than simply showing the notifications on tiled apps or the desktop. Why? Because the apps that create lock screen notifications may need to run, even when Windows is sleeping. And that leads to battery drainage.
They can show toaster notifications on the lock screen. This is considered direr than simply showing the notifications on tiled apps or the desktop. Why? Because the apps that create lock screen notifications may need to run, even when Windows is sleeping. And that leads to battery drainage.
![]() They can play sounds. Don’t get me started.
They can play sounds. Don’t get me started.
Windows lets you disable all notifications rather easily, or you can pick and choose which apps can send notifications and which just have to stifle their utterances.
Here’s how to disable all notifications:
1. Swipe from the right or hover your mouse in the upper-right corner to bring up the Charms bar, and then at the bottom, choose the Settings charm.
The Settings pane, as shown in Figure 3-8, appears.
2. At the bottom of the Settings pane, tap or click the Notifications icon.
From there you can hide all notifications, of all kinds — noisy ones, flashy ones, drab “you’re toast” notifications, whatever — for 1, 3, or 8 hours.
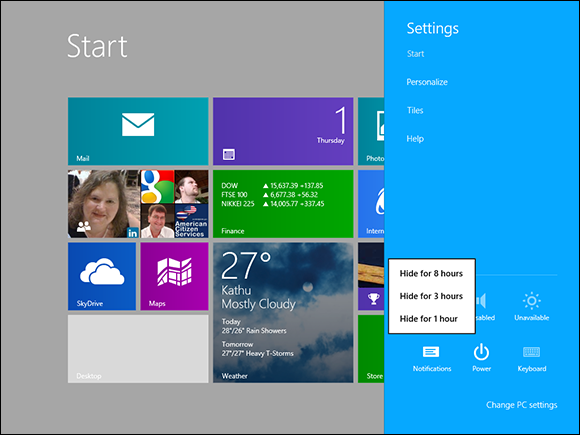
Figure 3-8: Disable all notifications here.
Windows also lets you disable specific kinds of notifications (I’m a big fan of turning off notification sounds) or notifications from select apps.
If you want to permanently disable notifications from just one application — say, you aren’t a big fan of Messaging and you definitely don’t want to see its notifications — here’s how to do it:
1. Swipe from the right or hover your mouse in the upper-right corner to bring up the Charms bar, and then at the bottom, choose the Settings charm.
2. At the bottom of the Start Settings pane, tap or click the Change PC Settings link, then on the left, click or tap on Search and Apps.
The Search and Apps setting screen, as shown in Figure 3-9, appears.
3. Select Notifications on the left.
4. Switch off the specific kind of notification that you don’t want to see or, if you only want to silence a particular app, switch it off at the bottom.
You’re done. There’s no Apply or OK button to tap or click.
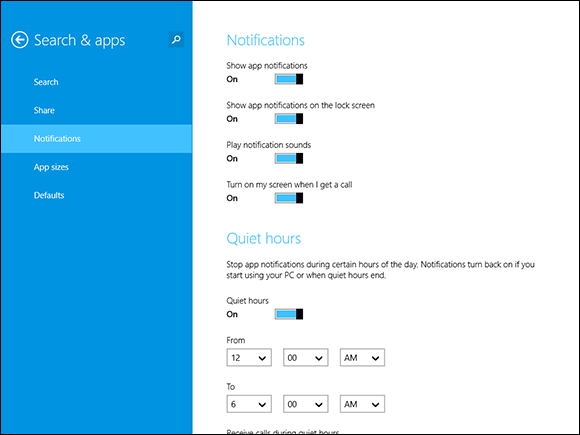
Figure 3-9: Silence notifications from one or more Windows apps here.