
Chapter 2: Changing the Lock and Logon Screens
In This Chapter
![]() Creating your own lock screen
Creating your own lock screen
![]() Putting apps on the lock screen
Putting apps on the lock screen
![]() Changing the way you log on
Changing the way you log on
![]() Setting a picture password or PIN
Setting a picture password or PIN
![]() Avoiding logon altogether
Avoiding logon altogether
Windows presents three hurdles for you to clear before you can get down to work (or play, or whatever):
1. You have to get past the lock screen. That’s a first-level hurdle so your computer doesn’t accidentally get started, like the lock screen on a smartphone, say, or an iPad.
2. If there’s more than one person — one account — set up on the computer, you have to choose which person will log on. I go into detail about setting up user accounts in Book II, Chapter 4.
3. If a password’s associated with the account, you have to type it into the computer. Windows allows different kinds of passwords, which are particularly helpful if you’re working on a touch-only tablet or a tiny screen like a telephone’s. But the idea’s the same: Unless you specifically set up an account without a password, you need to confirm your identity.
Only after clearing those three hurdles are you granted access to the Start screen and, from there, to everything Windows has to offer. In the sections that follow, you find out how you can customize the lock screen and the login methods to suit yourself.
Working with the Lock Screen
The very first time you start Windows, and any time you shut it down, restart, or let the machine go idle for long enough, you’re greeted with the lock screen, such as the one in Figure 2-1.

Figure 2-1: The Windows lock screen.
You can get through the lock screen by doing any of the following:
![]() Swiping up with your finger
Swiping up with your finger
![]() Dragging up with your mouse
Dragging up with your mouse
![]() Pressing any key on your keyboard
Pressing any key on your keyboard
You aren’t stuck with the lock screen Microsoft gives you. You can customize your picture and the little icons (or badges). The following sections explain how.
Using your own picture
Changing the picture for your lock screen is easy. (See the nearby sidebar “Individualized lock screens” for details about the difference between your lock screen and the system’s lock screen.) Customizing the picture is a favorite trick at Windows demos, so you know it has to be easy, right? Here’s how:
1. On the Start screen, swipe from the right or hover your mouse in the upper-right corner to bring up the Charms bar, and then at the bottom, choose the Settings charm.
2. At the bottom of the Start Settings pane, tap or click the Change PC Settings link. Then, on the left, click or tap the PC and Devices link.
The Lock Screen Preview window, as shown in Figure 2-2, appears.
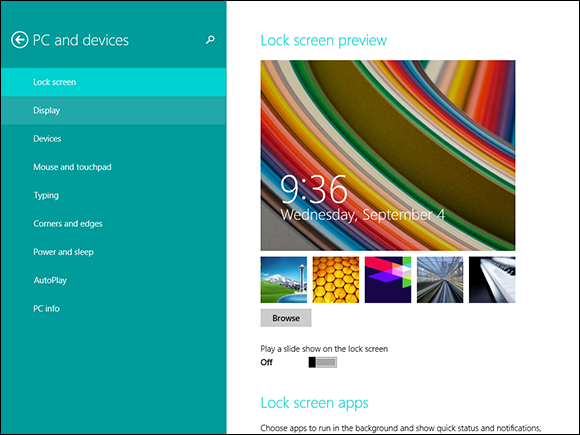
Figure 2-2: Change your own lock screen here.
3. If you see a picture you like, tap or click it. If you want to look for your own picture, tap or click Browse.
If you tap or click Browse, Windows takes you to your Pictures library.
4. Tap or click a picture and select Choose Picture.
You’re done. There’s no Apply or OK button to tap or click.
Alternatively, you can choose to show a slide show on the lock screen. Move the slider to On, and choose a folder that contains the pictures you want to see on the screen.
Test to make sure that your personal lock screen has been updated. The easiest way is to go to the Metro Start screen (press the Windows key on the keyboard, or tap or click the Windows button on your PC), tap or click your picture in the upper-right corner and choose Lock.
Adding and removing apps on the lock screen
Badges are the little icons that appear at the bottom of the lock screen. They exist to tell you something about your computer at a glance, without having to log on — how many e-mail messages are unread, whether your battery needs charging, and so on. Some badges just appear on the lock screen, no matter what you do. For example, if you have an Internet connection, a badge appears on the lock screen. If you’re using a tablet or laptop, the battery status appears; nothing you can do about it.
Mostly, though, Windows lets you pick and choose quick status badges that are important to you. The question I most often hear about badges is, “Why not just choose them all?”
Good question. The programs that support the badges update their information periodically — every 15 minutes, in some cases. If you have a badge on your lock screen, the lock screen app that controls the badge has to wake up every so often, so it can retrieve the data and put it on the lock screen. Putting everything on the lock screen drains your computer’s battery.
 Corollary: If your computer has a short battery life, whittle your needs down as much as you can, and get rid of every quick status badge you don’t absolutely need. But if your computer is plugged in to the wall, put all the badges you like on the lock screen.
Here’s how to pick and choose your quick status badges:
1. On the Start screen, swipe from the right or hover your mouse in the upper-right corner to bring up the Charms bar, and then at the bottom, choose the Settings charm.
2. At the bottom of the Start Settings pane, tap or click the Change PC Settings link. Then, on the left, click or tap the PC and Devices link.
The Lock Screen Preview window appears (refer to Figure 2-2).
3. Select Lock Screen on top.
 At the bottom of the screen are three rows of grayed-out icons.
The first row of seven icons corresponds to seven badge quick status locations on the lock screen. They appear in order from left to right, starting in the approximate location you see in Figure 2-1. In theory (this doesn’t always work), you can choose which badges appear, and where they appear, in order from left to right.
4. Tap or click one of the icons, and then choose which display badge you want to appear in that slot on the lock screen (see Figure 2-3).
If you don’t want any badge to appear in that slot, choose Don’t Show Quick Status Here.
Apps have to be specially designed to display the badge information on the lock screen. You’re given a choice of all the apps that have registered with Windows as being capable of displaying a quick status badge on the lock screen. As you add more apps, some of them appear spontaneously on this list.

Figure 2-3: Choose which app’s badge appears in a particular slot on the lock screen.
If you choose Don’t Show Quick Status Here, the gray icon gets a plus (+) sign, indicating that it isn’t being used. No badge appears in the corresponding slot on the lock screen.
5. At the bottom of the page, you can choose which app(s) displays the extra-large detailed status, corresponding to the date and time in Figure 2-1. You can also choose an app to show alarms, which appear as toaster notifications on the lock screen. (Toaster notifications pop out from the right edge of the screen, just like toast from a toaster. Well, OK, a toaster standing on its side. In zero gravity.)
The detailed status app has to be specially designed to display the large block of information shown in Figure 2-1. The alarm app has to be able to create alarm notifications.
You’re done. There’s no Apply or OK button to tap or click.
Go back out to the lock screen — press the Windows key or button; tap or click your picture; choose Lock — and see whether you like the changes. If you don’t like what you see or you’re worried about unnecessarily draining your battery with all the fluff, start over at Step 1.
Somewhat bizarrely, this is also the location where you tell Windows that it’s okay to take a picture while the lock screen is locked. Just slide the Use Camera from the Lock Screen slider to On. The method for taking a picture varies depending on your computer. If it isn’t obvious, you’ll have to look at the owner’s manual for help.
Logging In Uniquely
In this section, I step you through setting up picture passwords and PINs, and I give you a little hint about how you can bypass logon completely, if you aren’t overly concerned about other people snooping around on your PC. Yes, it can be done, quite easily.
Using a picture password
If you follow the instructions in Book II, Chapter 4, set up an account, and the account has an everyday, ordinary password, you can use a picture password.
It’s easy.
A picture password consists of two parts: First, you choose a picture — any picture — and then you tell Windows that you’re going to draw on that picture in a particular way, such as taps, clicks, circles, and straight lines, with a finger or a mouse. The next time you want to log in to Windows, you can either type your password or you can repeat the series of clicks, taps, circles, and straight lines.
So, for example, you may have a picture of an old gold mill, as shown in the upper-left corner of Figure 2-4, and you may decide that you want your picture password to consist of tapping the higher roof peak, tapping the lower roof peak, and then drawing a circle around the door.
That picture password is simple, fast, and not easy to guess.
Everybody I know who has a chance to switch to a picture password loves it. Whether you're working with a mouse or a stubby finger, a few taps or slides are sooo much easier than trying to remember and type a17LetterP@ssw0rd.
Microsoft has a few suggestions for making your picture password hard to crack. These include the following:
![]() Start with a picture that has a lot of interesting points. If you have just one or two interesting locations in the photo, you don’t have very many points to choose from.
Start with a picture that has a lot of interesting points. If you have just one or two interesting locations in the photo, you don’t have very many points to choose from.
![]() Don’t use just taps (or clicks). Mix things up. Use a tap, a circle, and a line, for example, in any sequence you can easily remember.
Don’t use just taps (or clicks). Mix things up. Use a tap, a circle, and a line, for example, in any sequence you can easily remember.

![]() Don’t always move from left to right. Lines can go right to left, or top to bottom. Circles can go clockwise or counterclockwise.
Don’t always move from left to right. Lines can go right to left, or top to bottom. Circles can go clockwise or counterclockwise.

Figure 2-4: Photo in the upper left, in my Pictures folder, will make a great picture password.
![]() Don’t let anybody watch you sign in. Picture passwords are worse than keyboard passwords, in some respects, because the picture password appears on the screen as you’re drawing it.
Don’t let anybody watch you sign in. Picture passwords are worse than keyboard passwords, in some respects, because the picture password appears on the screen as you’re drawing it.
![]() Clean your screen. Really devious souls may be able to figure out that trail of oil and grime is from your repeated use of the same picture password. If you can’t clean your screen and you’re worried about somebody following the grime trail, put a couple of gratuitous smudges on the screen. I’m sure you can find a two-year-old who would be happy to oblige.
Clean your screen. Really devious souls may be able to figure out that trail of oil and grime is from your repeated use of the same picture password. If you can’t clean your screen and you’re worried about somebody following the grime trail, put a couple of gratuitous smudges on the screen. I’m sure you can find a two-year-old who would be happy to oblige.
Here’s how to change your account to use a picture password:
1. On the Metro Start screen, swipe from the right or hover your mouse in the upper-right corner (or type Windows Key + C) to bring up the Charms bar, and then at the bottom, choose the Settings charm.
2. At the bottom of the Start Settings pane, tap or click the Change PC Settings link.
The PC Settings screen appears. If you’re looking at the PCs and Devices window (see Figure 2-2), tap or click the arrow to the left of PCs and Devices, to go back to the full PC Settings screen.
3. Select Accounts on the left, and then Sign-in Options.
The password settings for your account, as shown in Figure 2-5, appear.
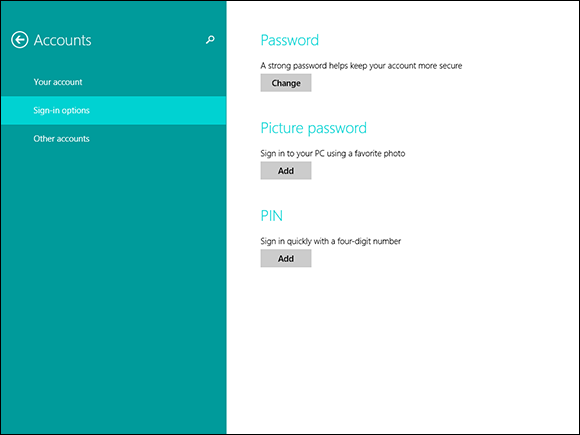
Figure 2-5: Your account’s password settings.
4. Under Picture Password, tap or click Add.
If your account doesn’t yet have a password, you’re prompted to provide one. If you do have a password, Windows asks you to verify your typed password.
 You must have a typed password — the password can’t be blank — or Windows will just log you in without any password, either typed or picture.
5. Type your password, and then tap or click OK.
Windows asks you to choose a picture.
6. Tap or click Choose Picture, find a picture (remember, with ten or more interesting points), and tap or click Open.
Your picture appears in a cropping bucket. The picture has to conform to an odd shape, or it won’t fit on the logon screen.
7. Slide the picture around to crop it the way you want it. Then tap or click Use This Picture.
Windows invites you to set up your gestures, as shown in Figure 2-6.
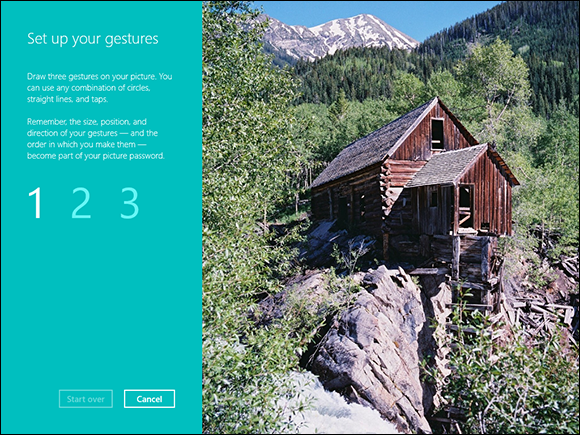
Figure 2-6: Here’s where you draw your three taps/clicks, lines, and circles.
Windows then asks you to repeat your gestures. This is where you get to see how sensitive the gesture-tracking method can be.
8. Repeat the gestures. When you get them to match (which isn’t necessarily easy!), tap or click Finish.
Your new picture password is ready.
9. Go to the Start screen, tap your picture, choose Lock, and make sure you can replicate it.
If you can’t get the picture password to work, you can always use your regular typed password.
Creating a PIN
Everybody has PIN codes for ATM cards, telephones, just about everything.
Reusing PIN codes on multiple devices (and credit cards) is dangerous — somebody looks over your shoulder, watches you type your Windows PIN, and then lifts your wallet. They can have a good time, unless the PINs are different. Word to the wise, eh?
Creating a PIN is easy:
1. On the Start screen, swipe from the right or hover your mouse in the upper-right corner to bring up the Charms bar, and then at the bottom, choose the Settings charm.
2. At the bottom of the Start Settings pane, tap or click the Change PC Settings link.
The PC Settings screen appears. If you see the PCs and Devices pane (as in Figure 2-2), tap or click the arrow to the left of PCs and Devices. If you see the Accounts pane, skip to the next step.
3. Select Accounts on the left, then Sign-in Options.
The password settings for your account appear (refer to Figure 2-5).
4. Under PIN, tap or click Add.
Windows asks you to verify your password — it has to be your typed password; a picture password won’t do.
5. Type your password, and tap or click OK.
Windows gives you a chance to type your PIN, and then re-type it to confirm it. Note: The PIN must be four digits.
6. Type your PIN, confirm it, and tap or click Finish.
You can log on with your PIN.
Bypassing passwords and logon
So now you have three convenient ways to tell Windows your password: You can type it, just like a normal password; you can click or tap on a picture; or you can pretend it’s a phone and enter four digits.
But what if you don’t want a password? What if your computer is secure enough — it’s sitting in your house, it’s in your safe deposit box, it’s dangling from a vine over a pot of boiling oil — and you just don’t want to be bothered with typing or tapping a password?
As long as you have a Local account, it’s easy. Just remove your password. Turn it into a blank. Follow the steps in Book II, Chapter 4 to change your password but leave the New Password field blank. (Shortcut: In Figure 2-5, tap or click the Change button under Password.)
Microsoft accounts can’t have blank passwords. But local accounts can.
If you have a blank password, when you click your user name on the logon screen, Windows ushers you to the Start screen.
If there’s only one user on the PC and that user has a blank password, just getting past the lock screen takes you to the Metro Start screen.