
Chapter 1: Getting Around Windows 8.1
In This Chapter
![]() Dr. Jekyll, meet Mr. Hyde
Dr. Jekyll, meet Mr. Hyde
![]() Navigating via your fingers or via a mouse
Navigating via your fingers or via a mouse
![]() Getting to know shortcuts
Getting to know shortcuts
![]() Switching among apps
Switching among apps
![]() Turning the dern thing off
Turning the dern thing off
If you’re an experienced Windows 7 or XP user, I can almost guarantee that you won’t like Windows 8.1, until you have a chance to work with it for a while.
Even after you’re used to it, there’s at least a 50/50 chance you won’t like it.
On the other hand, if you’re new to Windows — or you just love your Windows Phone — you’re going to appreciate that Windows doesn’t force you to learn all that arcane stuff that’s in the second half of this book.
 Former Microsoft General Manager and Distinguished Engineer Hal Berenson said it best: “Consumers increasingly reject the old experiences in both their personal and work lives. For the 20-something-and-under crowd, the current Windows desktop experience is about as attractive as the thought of visiting a 19th-century dentist.”
Windows 8.1 is Microsoft’s first step out of the 19th-century dentist’s office. It’s long, long overdue.
 I figure that 90 percent of the stuff that 80 percent of the people do with a computer, runs just fine on a tablet. So why put up with all the hassles of running Windows on a piece of iron that weighs more than your refrigerator, and breaks down twice as often? Maybe you’re addicted to blue screens and frozen mice. Or maybe you’re ready to leave it all behind and tap your way to something new.
In this chapter, I show you what’s to like about the new Metro side of Windows, how to get around if you’re new to Windows, and if you’re an experienced Windows hand, how to reconcile your old finger memory with the new interface. It isn’t as hard as you think.
Really.
I also show you how to be input-agnostic — how to use either your fingers or your fork, er, mouse to get around the screen. And I give you a few not-at-all-obvious tips about how to get the most out of your consorting with the beast.
Windows’ Jekyll and Hyde Personality
The way I look at it, almost all the people starting with Windows 8.1 start in one of four groups, with the largest percentage in the first group:
![]() Somewhat experienced at some version of Windows and primarily comfortable with a mouse and keyboard. (More than 1.4 billion people have used Windows.)
Somewhat experienced at some version of Windows and primarily comfortable with a mouse and keyboard. (More than 1.4 billion people have used Windows.)
![]() Experienced at Windows but want to learn touch input.
Experienced at Windows but want to learn touch input.
![]() New to Windows, prefer to use touch.
New to Windows, prefer to use touch.
![]() New to Windows and want to visit the 19th-century dentist’s office to see what all the screaming’s about.
New to Windows and want to visit the 19th-century dentist’s office to see what all the screaming’s about.
 If you fall into that final group, you need to learn to use the antique interface apparatus known as a mouse and keyboard. I’m reminded of Scotty on the Enterprise picking up a mouse and saying, “Computer! Computer! Hello computer . . .” When Scotty’s reminded to use the keyboard, he says, “Keyboard. How quaint.”
So this section offers a whirlwind tour of your new Windows 8.1 home that helps you start clicking and tapping your way around.
A tale of two homes
As you undoubtedly know by now, Windows 8.1 has two faces. They’re designed to work together. You can be the judge of how well they live up to the design.
The first face you see when you start Windows is the tiled Start screen, as shown in Figure 1-1.

Figure 1-1: The tiled Metro Start screen.
I call this the Start screen because it’s identified in various places (not the least of which is on the screen itself) as “Start” and, uh, well, it’s a screen. Microsoft used to call the style used here “Metro,” but an apparent conflict with the name has led it to an oblique reference to its tiled interface. I still call it Metro, as does most of the Windows world.
I think of Figure 1-1 as the Mr. Hyde face of Windows 8.1.
On the other hand, the old-fashioned Dr. Jekyll (was Jekyll a 19th-century dentist?) looks like Figure 1-2.
The Dr. Jekyll version of Windows 8.1 looks almost exactly like the Windows 7 desktop, except the Start button in the lower-left corner looks different. In fact, if I couldn’t see the lower-left corner, I’d be very hard-pressed to tell the Windows 7 and Windows 8.1 desktops apart.
I call the screen in Figure 1-2 the Windows 7–style or old-fashioned desktop. Microsoft uses the term “legacy” to describe programs that run on the old-fashioned desktop — thus, for example, legacy Control Panel or legacy Office — but there doesn’t seem to be an official name for this desktop. I can’t call it the “desktop” because the Metro Start screen is a desktop, too, although it works quite differently. So I’ll just settle for “old-fashioned” or “Windows 7–style.”
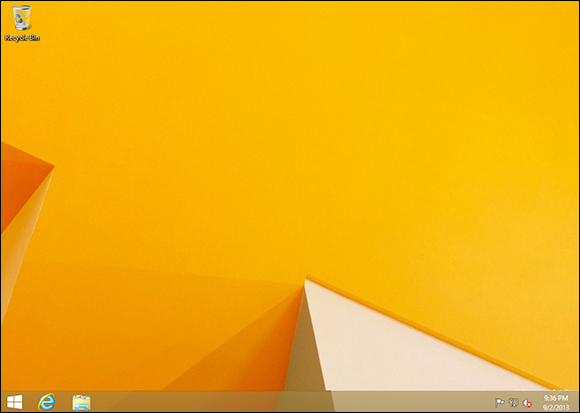
Figure 1-2: The old-fashioned desktop.
 Legacy, in Microsoft-ese means “something that it supports because it has to, but will drop it like a hot potato as soon as it can.” That’s an important lesson for you folks who have some experience with Windows. The Windows programs you know and have sworn at for years are now “legacy” programs — in official parlance.
Switching from the Start screen to the old-fashioned desktop and back
Get your computer going. Go ahead. I’ll wait.
You’re looking at the Metro Start screen, right?
The very first question I get from new Windows 8.1 users is (more or less): “How do I get my desktop back?” The answer’s easy. When you’re in the Metro Start screen, just click or tap the big Desktop tile.
Returning to the Metro Start screen is easy — just do one of the following:
![]() Click the Windows button in the lower-left corner of the old-fashioned desktop.
Click the Windows button in the lower-left corner of the old-fashioned desktop.
![]() Press the Windows key on your keyboard or tap the Windows button on your tablet computer.
Press the Windows key on your keyboard or tap the Windows button on your tablet computer.
![]() Click the Start charm on the Charms bar. The Charms bar is a small pane with a handful of icons, on the right (see Figure 1-3; more about charms in Book II, Chapter 3). You access it by swiping the right edge of the screen until the Charms bar appears: Put your finger off the screen on the right side and drag it toward the center. The Start charm is in the middle.
Click the Start charm on the Charms bar. The Charms bar is a small pane with a handful of icons, on the right (see Figure 1-3; more about charms in Book II, Chapter 3). You access it by swiping the right edge of the screen until the Charms bar appears: Put your finger off the screen on the right side and drag it toward the center. The Start charm is in the middle.

Figure 1-3: The Charms bar on the right side of the screen.
If you can get from the old desktop to the Metro Start screen by pressing the Windows key, you’d think that you could go the other way — get from the Start screen to the old desktop — by pressing the Windows key. Unfortunately, it doesn’t always work that way. There’s a reason why, but it’s a bit complicated. I talk about that reason in the next section.
To summarize, to get from the Metro Start screen to the old-fashioned desktop, tap or click the Desktop tile. To get from the old-fashioned desktop to the tiled Start screen, press the Windows button or tap the Windows key on your tablet, or click the Start button in the lower-left corner of the old-fashioned desktop.
It’s visually perturbing: One second you’re on the (old-fashioned) Windows desktop; and the next second you’re playing with telephone buttons. The old desktop Start menu’s gone, and in its place is a big black hole. Believe me, the Metro Start screen doesn’t act anything like the venerable Start menu. But, from Microsoft’s point of view, that’s the point.
Now I take a look at many of the other navigation choices that are available to you, whether you eat with your hands or with a mouse.
Navigating around a Touchscreen
This section is all about navigating with your fingers on a touchscreen. In the land of tiled Windows Store Metro programs, the one-finger swipe (dragging your finger across the touchscreen) is king.
Here’s a guided tour of your PC, using only your fingers:
1. Go to the Metro Start screen, as shown in Figure 1-1.
If you can’t see the Start screen, press the Windows button on your tablet (or press the Windows key on your keyboard, if you have an attached keyboard).
2. Tap or click the down-arrow in the lower-left corner.
You see an oddly organized, kind of grouped and alphabetized list of all the programs (or apps) on your computer, per Figure 1-4.
3. If you have a touch-sensitive screen, pinch the screen and then unpinch the screen. If you only have a mouse, hover your mouse near the bottom of the screen, and then click the minus sign (–) in the far right.
If you’ve never done a pinch, this is a good place to practice. Stretch two fingers out, put them on the screen, and pull your fingers together. Think of pinching a baby’s butt. Gently.

Figure 1-4: A list of all the programs on your computer, sort of categorized and alphabetized.
You see the same weird alphabetized list and groups, but instead of seeing all the apps, you just get the first letters — A, B, C, and so on. This view of all apps is uninteresting but can be useful if you group apps appropriately (see Book III, Chapter 1, where I talk about Semantic Zoom). Right now, I sent you here only for a good exercise in pinching that won’t mess up anything.
To reverse the action and expand (variously called unpinch or spread) the screen, stick two fingers together, touch the screen, and move them out. With a mouse, just click the Start screen. Voilà — you’re back to the screen in Figure 1-4.
4. To get back to the Start screen, press the Windows button on your tablet (or press the Windows key on your attached keyboard).
Back on terra firma, per Figure 1-1.
5. Tap the Internet Explorer tile.
IE appears, filling the screen.
6. Swipe from the bottom or from the top. If you have a mouse, right-click anywhere.
Either way, you get an App bar on the bottom (see Figure 1-5).
The App bar on the bottom is called a navigation bar. The IE navigation bar has thumbnails of all of your open tabs, a place to type an address or search terms, and icons to reload and pin a location to the Start screen.

Figure 1-5: The navigation bar at the bottom of the “immersive” Internet Explorer 11 screen.
7. While you’re still in Internet Explorer, swipe from the right or hover your mouse in the upper-right corner.
The Charms bar appears, as shown in Figure 1-6.
Charms bar is a strange name, and the execution is also, uh, strange. The basic idea is that the Charms bar gives you quick access to certain functions common in many applications and Windows. The Charms bar has links to the following functions:
• Search lets you search inside the application, or in Windows as a whole. If you’re sitting in Internet Explorer, swipe from the right and tap the Search charm to bring up the Bing search engine. If you’re in the tiled Metro Mail app, the Search charm lets you search through your e-mail — or at least, the e-mail that’s on your computer; Search in the tiled Metro Finance app asks you to type a stock symbol; and so on.
The Charms bar is a good concept but doesn’t carry through to the old-fashioned desktop. For example, if you’re using File Explorer and right-swipe and choose the Search charm, you aren’t put into Explorer search. Instead, you get tossed into the Metro Start screen search.
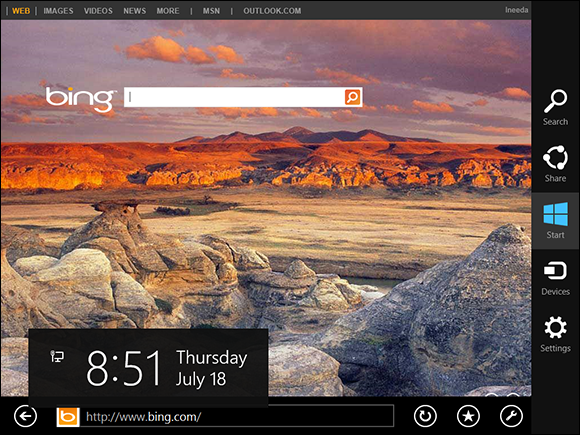
Figure 1-6: The Windows Charms bar is available anywhere in Windows.
• Share, in theory, lets you take items from one tiled Metro app and put them in another. In practice, the inter-connections that you would expect may or may not exist — for example, you can’t Share a contact from your People list in an e-mail message. There are many more examples in Book IV.
• Start takes you to the Start screen, duplicating the function of the Windows button on your tablet. See “Switching from the Start screen to the old-fashioned desktop and back,” earlier in this chapter for details about this charm.
• Devices is a system-wide charm that lets you control your system’s devices — printers, scanners, and so on — directly. For example, if you’re looking at your Calendar, bringing up the Devices charm should let you print the current Calendar. (As of this writing, it doesn’t, but that’s pretty typical for the tiled Metro apps.)
• Settings brings up settings that are apropos for the app in particular, and for your system in general.
Details vary from application to application, but you get the general idea: When you’re working with your thumbs in the tiled side of the fence, swipe from the bottom or the top or the right to get more options that are tailored for the program you’re using.
I take a deep dive through the Charms bar in Book II, Chapter 3.
8. Press the Windows button on your tablet (or press the Windows key on your attached keyboard) to go back to the Metro Start screen.
Take a breather.
Now that you’ve seen the basics of what the Start screen and tiled Windows 8.1 applications have to offer, you’re ready take a look at the controls built into Windows 8.1 that let you switch programs. The controls work even when you’re running a “legacy” program on the old-fashioned desktop. In my experience, the controls frequently work when Windows itself has frozen — that’s quite an accomplishment.
Follow these steps to switch Windows 8.1 tiled programs:
1. Go to the Start screen, as shown in Figure 1-1.
If you can’t see the Start screen, press the Windows button on your tablet (or press the Windows key if you have an attached keyboard).
2. To start a few programs, tap Store, tap the Windows button to return to the Start screen, tap the Desktop tile, tap the Windows button again, and tap, oh, News.
That gives you some apps to work with.
3. This step is tricky: Swipe from the left, but not very quickly, and not too far.
If you swipe the sweet spot, you see thumbnails of every running program, as shown in Figure 1-7. This part of the tiled interface is the Switcher.
As you can see, Switcher treats the entire old-fashioned desktop like it’s one app, no matter how many programs are running on it simultaneously.
4. Tap one of the Switcher apps.
Not unexpectedly, you switch to that app.
5. Slide quickly from the left. Wash, rinse, repeat.
Windows switches you from app to app, going in the same sequence that appears in the Switcher pane.
6. Slooooooowly drag from the left.
The new app appears in its own window, to the left of the main window, as shown in Figure 1-8. The new window takes up about one-half of the screen. Microsoft calls this Snap — I call it Tiled Snap so as not to confuse it with a legacy desktop feature called Aero Snap. (Yes, Aero is gone in Windows 8.1, but Aero Snap lives on.)
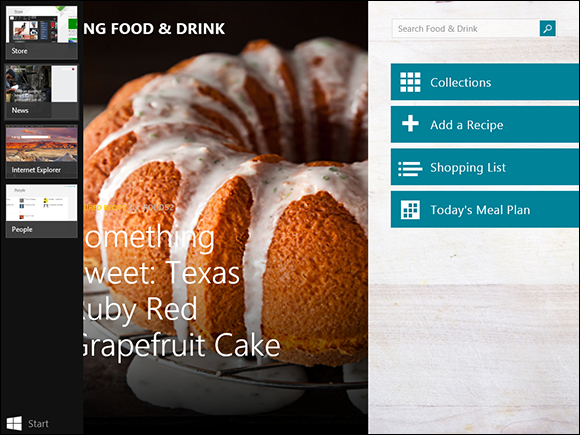
Figure 1-7: Switcher shows thumbnails of every running program.

Figure 1-8: Tiled Snap lets you place two apps side-by-side.
Note that you can Tiled Snap with the whole old-fashioned desktop, as if it were just one running app, which, in a sense, it is.
7. Slowly drag the vertical bar between the snapped apps to the right.
You can also snap the apps so the small piece appears on the right, which can be helpful. Solitaire has the built-in intelligence to turn the deck of cards sideways, so you can play it while another app is snapped.
8. Press the Windows button on your tablet (or press the Windows key on your attached keyboard).
You’re back to home base.
In some cases, you can replicate a right-click by tapping and holding your finger on the touchscreen. That is, if you ever encounter a situation where a right-click might’ve worked in Windows 7 and you don’t have a mouse handy, try putting your finger on whatever you would’ve clicked and just leave your finger there for a while. Sometimes this brings up an option menu that’s identical to the old right-click.
I talk about many variations on those themes in the remainder of this chapter.
Navigating with a Mouse and Keyboard
Microsoft has been very careful to ensure that anything you can do with a finger can also be done with a mouse. You have to make sure that you run your mouse properly, but the general gist goes like this:
1. Go to the Start screen, as shown in Figure 1-1.
If you can’t see the Start screen, press the Windows key on your keyboard.
2. Click the down arrow at the bottom left of the screen.
You see the oddly organized list of all your programs (refer to Figure 1-4). If you followed along with the finger-based exercises, you should see a pattern here.
3. Click in the lower-right corner. There’s a tiny icon down there — it looks like a minus sign. Trust me.
The effect is the same as pinching the screen with your fingers.
4. To get back to the Start screen, press the Windows key on your keyboard.
Your screen should look, once again, like Figure 1-1.
5. Click the Internet Explorer tile.
IE appears, full-screen.
6. Right-click inside Internet Explorer.
You see the navigation bar at the bottom, and (if more than one tab is open) the tab switcher at the top, as shown in Figure 1-5.
This is fairly common behavior in tiled Windows Store apps. On a touchscreen, you slide up from the bottom to get the lower App bar, and slide down from the top to get the upper App bar. (Although some apps show both top and bottom bars when swiped any which-way.) When you’re navigating with a mouse, right-click, and both bars appear simultaneously.
7. Hover your mouse in the upper-right or lower-right corners, and then move your mouse along the right edge.
The Charms bar appears (see Figure 1-6), first as a silhouette, and then as you move your mouse along the edge, with a solid background. The behavior of each of the charms — Search, Share, Start, Devices, and Settings — is exactly as you would expect, based on the description in Step 8 of the earlier “Navigating around a Touchscreen” section.
If you’re on the old-fashioned desktop and hover your mouse in the lower-right corner, you trigger an old Windows behavior known as Show All: Windows creates outlines of all the open windows on your desktop. That’s why I recommend that mousers generally hover in the upper-right corner to bring up the Charms bar. You won’t see your screen go bananas if you stick to the upper-right corner.
8. Click in the lower-left corner to go back to the Start screen.
Usually if you aren’t on the Start screen, clicking in the lower-left corner takes you back to it. Or you can get there by pressing the Windows key on your keyboard, or bringing up the Charms bar and choosing Start. You can also get there if you click your heels together three times and repeat, “There’s no place like home.”
9. Hover your mouse in the upper-left or lower-left corner and then slowly drag your mouse along the left edge.
The Switcher appears with thumbnails of all running programs, as shown in Figure 1-7.
Again, it’s important to note that the entire Windows desktop is treated as one app.
If you want to cycle through all running apps — both tiled and Legacy desktop apps, one at a time, hold down the Alt key and press Tab. You may be familiar with the Alt+Tab trick from Windows 7 or earlier. In Windows 8.1, the selection of running apps you see after pressing Alt+Tab includes all the running tiled Metro full-screen apps.
10. To switch to a new app in the Switcher, click it. To set up a Tiled Snap arrangement (see Figure 1-8), slowly drag the app to the right.
11. Click in the lower-left corner to get back to the Start screen.
There’s one more, very important mousing action you should memorize. To get to the Power User Tasks menu (I know, what a name, huh? Most people call it the WinX menu), right-click in the lower-left corner, where the Start icon sits. If you right-click in the lower left, you get the (impressive!) menu shown in Figure 1-9. You can see the same menu by holding down the Windows key and pressing X.

Figure 1-9: The Power User Tasks menu, accessible by right-clicking in the lower-left corner or with the Windows key+X.
Keying Keyboard Shortcuts
Windows 8.1 has about a hundred zillion — no, a googleplex — of keyboard shortcuts.
I don’t use very many of them. They make my brain hurt.
Here are the keyboard shortcuts that everyone should know. They’ve been around for a long, long time:
![]() Ctrl+C copies whatever you’ve selected and puts it on the Clipboard. On a touchscreen, you can do the same thing in most applications by tapping and holding, and then choosing Copy.
Ctrl+C copies whatever you’ve selected and puts it on the Clipboard. On a touchscreen, you can do the same thing in most applications by tapping and holding, and then choosing Copy.
![]() Ctrl+X does the same thing but removes the selected items — a cut. Again, you can tap and hold, and Cut should appear in the menu.
Ctrl+X does the same thing but removes the selected items — a cut. Again, you can tap and hold, and Cut should appear in the menu.
![]() Ctrl+V pastes whatever is in the Clipboard to the current cursor location. Tap and hold usually works.
Ctrl+V pastes whatever is in the Clipboard to the current cursor location. Tap and hold usually works.
![]() Ctrl+A selects everything, although sometimes it’s hard to tell what “everything” means — different applications handle Ctrl+A differently. Tap and hold usually works here, too.
Ctrl+A selects everything, although sometimes it’s hard to tell what “everything” means — different applications handle Ctrl+A differently. Tap and hold usually works here, too.
![]() Ctrl+Z usually “undoes” whatever you just did. Few touch-enabled apps have a tap-and-hold alternative; you usually have to find Undo on a Ribbon or menu.
Ctrl+Z usually “undoes” whatever you just did. Few touch-enabled apps have a tap-and-hold alternative; you usually have to find Undo on a Ribbon or menu.
![]() When you’re typing, Ctrl+B, Ctrl+I, and Ctrl+U usually flip your text over to Bold, Italic, or Underline, respectively. Hit the same key combination again, and you flip back to normal.
When you’re typing, Ctrl+B, Ctrl+I, and Ctrl+U usually flip your text over to Bold, Italic, or Underline, respectively. Hit the same key combination again, and you flip back to normal.
In addition to all the key combinations you may have encountered in Windows versions since the Dawn of 19th-Century Dentistry, there’s a healthy crop of new combinations. These are the important ones:
![]() The Windows key opens the Start screen or the last app. See the next section for details. In general, if you aren’t looking at the Start screen, pressing the Windows Key will take you there.
The Windows key opens the Start screen or the last app. See the next section for details. In general, if you aren’t looking at the Start screen, pressing the Windows Key will take you there.
![]() Windows key+D takes you directly to the old-fashioned desktop.
Windows key+D takes you directly to the old-fashioned desktop.
![]() Alt+Tab cycles through all running Windows programs, one by one — and each running Legacy desktop app is treated as a running program. (Windows key+Tab treats the entire desktop as one “app.”)
Alt+Tab cycles through all running Windows programs, one by one — and each running Legacy desktop app is treated as a running program. (Windows key+Tab treats the entire desktop as one “app.”)
![]() Ctrl+Alt+Del — the old Vulcan three-finger salute — brings up a screen that lets you choose to lock your PC (flip to Book II, Chapter 2), switch the user (see Book II, Chapter 4), sign out, or run the new, much improved Task Manager (see Book VIII, Chapter 4).
Ctrl+Alt+Del — the old Vulcan three-finger salute — brings up a screen that lets you choose to lock your PC (flip to Book II, Chapter 2), switch the user (see Book II, Chapter 4), sign out, or run the new, much improved Task Manager (see Book VIII, Chapter 4).
![]() Just type on the Start screen to begin a search of all your apps (see Figure 1-10).
Just type on the Start screen to begin a search of all your apps (see Figure 1-10).

Figure 1-10: On the Start screen, start typing to search for Windows programs.
The following keyboard shortcuts may come in handy:
![]() Windows key+C opens the Charms bar.
Windows key+C opens the Charms bar.
![]() Windows key+F opens the Search charm, specifically to start searching for files.
Windows key+F opens the Search charm, specifically to start searching for files.
![]() Windows key+X opens the Power User menu (refer to Figure 1-9).
Windows key+X opens the Power User menu (refer to Figure 1-9).
![]() Windows key+O locks the screen rotation.
Windows key+O locks the screen rotation.
Working with the App Bar
You’ve already seen how tapping or clicking a tile runs the associated program. Not exactly surprising. But there’s more to the story.
On the Start screen, you can select a tile, and the App bar at the bottom appears. To select a tile with a mouse, right-click it. To select a tile with your finger, you have to drag it down just a little bit — nope, tap and hold doesn’t work.
After you’ve selected an individual tile, depending on which tile you’ve chosen, you may be offered the opportunity to open the program in a new window, change the size of a tile, or turn off automatic Live Tile updates.
Shutting Down Apps
Windows 8.1 has been designed to minimize battery drain, and a big part of the optimization involves curtailing programs that aren’t actively running. There have to be a few exceptions — some legacy desktop programs, for example, have to keep working even when you’re playing Solitaire. But most apps go into a quiet phase where they don’t take up any battery time at all.
Sooner or later, Windows completely turns off idle apps. The exact timing and details seem to vary with the program and how many other apps are running, but in general, you don’t need to worry about it.
Every once in a blue moon, though, you may want to turn off an app. If you have an app that may be crashing Windows, for example, you can give it the heave-ho and turn it off completely. If there are too many apps along the left side of your Switcher screen, you may want to kill one of them. To turn off — or shut down — a running tiled full-screen style app, do the following:
![]() On a touchscreen, drag your finger slowly down from the top and keep dragging it all the way to the bottom of the screen.
On a touchscreen, drag your finger slowly down from the top and keep dragging it all the way to the bottom of the screen.
![]() With a mouse, hover your mouse up at the very top of the screen until it turns into a fist. Click and slowly drag the whole window down.
With a mouse, hover your mouse up at the very top of the screen until it turns into a fist. Click and slowly drag the whole window down.
It probably won’t surprise you too much to know that you can shut down the whole old-fashioned desktop using that exact technique.
How Do You Turn This Thing Off?
“Jane! Stop this crazy thing! Help! JANE!”
George Jetson had the same problem.
Among the thousand ways to turn off Windows 8.1, none of them are obvious or intuitive.
If you’re looking at the old-fashioned desktop, you can turn the machine off by right-clicking the Start icon in the lower-left corner, and then choosing Shut Down/Shut Down or Shut Down/Restart.
If you’re looking at a full-screen Metro app (or snapped multiple apps), I recommend you bring up the Charms bar by swiping from the right or hovering your mouse in the upper-right corner. Tap or click Settings. At the bottom of the Settings pane, you see the Power button (see Figure 1-11). Tap or click Power and choose Shut Down.
You can also shut down from the old-fashioned desktop using the Settings Charm in the same way.
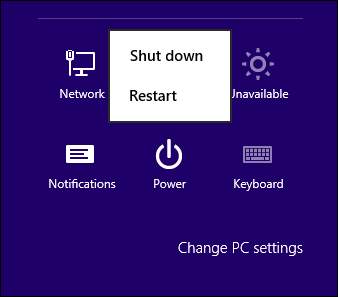
Figure 1-11: So that’s where they hid the Off button.