
Chapter 3: Metro Mods for Desktop Users
In This Chapter
![]() Installing new programs and dealing with their tiles
Installing new programs and dealing with their tiles
![]() Getting rid of the Metro Start screen chaff
Getting rid of the Metro Start screen chaff
![]() Finding and adding programs to the Start screen
Finding and adding programs to the Start screen
![]() Organizing the Start screen for a lean, mean desktop
Organizing the Start screen for a lean, mean desktop
![]() Alternatives to the Metro Start screen
Alternatives to the Metro Start screen
When the Windows 8 design team took a look at how people were using the Windows Start menu, the team decided the Start menu wasn’t being used as originally intended. Windows has changed, programs have changed, and users have changed. The design team felt it could do a better job by turning the menus into a field of tiles, going from cascading menus featuring dull straight text to the colorful but not hierarchical “live” tiles of the Metro Start screen interface. The change persisted in Windows 8.1.
 You may agree with their choices; you may disagree (as I do). The fact is that the Metro Start screen is malleable enough that you can turn it into just about anything you want — except for cascading menus. In Windows 8.1, Start doesn’t have cascading menus: All the tiles sit on the Metro Start screen, and you have to scroll to find them.
 I’m a desktop user, and I’m not afraid to say it. If you’re like me, I bet you’ll like this chapter. Here, I show you how I use all the tools at hand to make the Metro Start screen launch programs on the desktop, so the new Start screen works kind of like the old Start menu. A little bit. I concentrate on using the mouse and keyboard — not the touch interface — and look hard at how to bring back the programs you may’ve used in previous versions of Windows.
Windows 8.1 isn’t quite as parochial as Windows 8. Microsoft backed down a little bit. While you won’t see any vestiges of the Windows 7 Start menu, there are ways to trim back some of the worst fangs in Windows 8, from a mouse user’s point of view.
 This chapter’s approach is different from all the other chapters in this book. While the rest of the book offers references, such as jump in here, jump out there, this chapter’s designed as a tutorial, a step-by-step guide to modifying your Metro Start screen and Windows itself, so it helps you get work done on the desktop.
In Figure 3-1, you can see the Start screen that I, uh, started with. By the end of the chapter, you’ll see how it’s morphed into something considerably less of a what-can-we-buy-from-Microsoft oriented experience and considerably more of a get-some-work-done tool.
I change my Metro Start screen so I can start the programs I frequently need quickly, can find programs that I occasionally want with a little bit of hunting, and relegate most of the rest of the stuff to the back of the bus — or at least the far outer reaches of the Start screen. Along the way, I show you how to do the following:
![]() Organize tiles that appear when you install new programs
Organize tiles that appear when you install new programs
![]() Sort through the tiles you need and those you don’t
Sort through the tiles you need and those you don’t
![]() Add tiles for the programs you want
Add tiles for the programs you want
![]() Organize the tiles into groups
Organize the tiles into groups
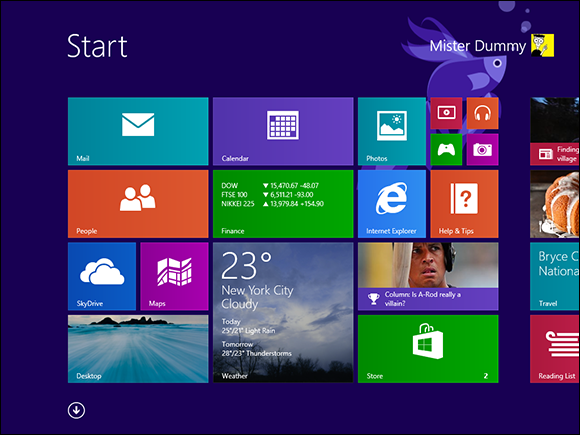
Figure 3-1: A bone stock Start screen. Let’s build it from here.
Drop That Stupid Background
First things first. Maybe I’m too old or too educated, but I hate the swirly designer backgrounds and squiggly things (is that an Angry Birds pig?) that lurk underneath the Metro tiles.
It astounds me that Microsoft did away with the snazzy and functional Windows 7 Aero glass — see-through borders and glowing “X” box — and gave us boxy, staid Metro plus this gag-me-with-a-modern-fork array of Metro Start screen backgrounds. But I digress.
I show you later in this chapter how to change the background on the Metro Start screen so it matches your desktop background (formerly known as “wallpaper”). For now, let’s just get rid of the swirlies. Here’s how:
1. From the Metro Start screen (press the Windows key or Windows button if you aren’t already there), slide your mouse to the upper-right corner of the screen or push Windows key+C to bring up the Charms bar.
2. Click Settings.
3. At the top, choose Personalize.
Windows responds with the Personalize pane shown in Figure 3-2.

Figure 3-2: The hard-to-find place to change the Metro Start screen background.
4. If you want to get rid of those swirly thingies and pick a solid color for the Metro Start screen background, click or tap the second tile from the right on the bottom (it’ll probably look like a dull black blob).
If you want to get ahead of yourself, you can tell the Metro Start screen to match its background with your old-fashioned desktop background by choosing the tile at the bottom right.
5. Slide and click to choose the background color (which appears as the “wallpaper” for the Metro Start screen) and the accent color (which doesn’t show up much).
You’re done. Nothing to click or accept.
By the end of this chapter, you may choose to have the Metro Start menu background match the old-fashioned desktop background, but personally, I like to have a simple solid color that tells me immediately I’ve ventured into the dark side.
Installing New Programs and Dealing with Their Tiles
When you install a new program in Windows 8.1, the installer throws a bunch of tiles up on the All Apps screen. They’re disjointed and unorganized and can be a massive pain to sort through.
To illustrate the point, I take my fresh clean version of the Start screen (refer to Figure 3-1) and install the following, using only default settings:
![]() Office Professional Plus 2010
Office Professional Plus 2010
![]() 7Zip
7Zip
![]() Secunia PSI, the software version checker (see Book X, Chapter 5)
Secunia PSI, the software version checker (see Book X, Chapter 5)
![]() Google Chrome — and I made it the default web browser (see Book IV, Chapter 1)
Google Chrome — and I made it the default web browser (see Book IV, Chapter 1)
The installers have tossed the tiles for all those programs onto the Metro All Apps page — and, if you click on the down arrow at the bottom of the Metro Start screen, it ain’t pretty. See Figure 3-3.

Figure 3-3: The sorry state of the Metro All Apps screen after installing Office 2010, Secunia PSI, 7-Zip, and Chrome.
 If you’re an experienced Windows XP, Vista, or Win7 user, you may notice that Windows 8.1 has grouped these little tiles, organizing them in the same way that older versions of Windows would’ve tossed them into the old Start menu. For example, if you installed 7-Zip in Windows 7, you would’ve received a Win7 Start menu item called 7-Zip (see the upper-left corner of Figure 3-2), and it would’ve had two items underneath, 7-Zip File Manager and 7-Zip Help. Win8.1 uses the old installation settings but puts them in a tiley sorta place.
The New flags you see scattered hither and yon in Figure 3-2 are reminders that Windows hasn’t put links to any of these programs anywhere. You won’t find the NEW programs on the Metro Start screen, on the old-fashioned desktop, or on the desktop’s taskbar. They’re stuck back here in the lower forty, waiting for you to bring them out.
Yes, you’re supposed to know that by osmosis. The program installers don’t warn you, “Hey, go to the All Apps screen to stick these programs someplace useful.”
Here’s the general procedure:
1. From the Metro Start screen (get there by pressing the Windows key or the Windows button on your computer), click the down arrow.
The first screen you see includes all the Metro apps that appear as tiles on the Metro Start screen, plus a few others that seem to be sprinkled in there to keep you guessing.
2. Scroll right.
That takes you to the blob of programs that haven’t been assigned to the Metro Start screen or to the old-fashioned desktop’s taskbar. See Figure 3-2.
3. Look through the items marked NEW. If you find one that you want to put on the old-fashioned taskbar, right-click it.
An Option bar appears at the bottom of the screen.
4. Click on the icon that says Pin to Taskbar.
5. If you really want a Metro Start screen tile for that particular program, click Pin to Start as well.
Each new program that you Pin to Start gets tossed into a glob at the right side of the Metro Start screen. Don’t worry about organizing the mess just yet. We’ll get to it shortly.
Some programs install themselves on the old-fashioned taskbar and/or on the desktop. Those programs aren’t marked with NEW in the Metro All Apps list. (See, for example, Google Chrome in Figure 3-3.) It’s just as well, because the installer has already done what needs to be done, without making you manually sort through the nitty-gritty.
Finding and Adding Programs to the Start Screen
Before I start grouping the tiles and making them a bit more accessible and generally prettify the Metro Start screen, I need to bring back many of the programs that used to be on the Windows Start menu — you know, the old stalwarts such as Notepad, Paint, and Calculator, that you may use once or twice a week or even once or twice a day.
Here’s an easy way to do it, using the Metro All Apps list:
1. From the Metro Start screen (get there by pressing the Windows key or the Windows button on your computer), click the down-arrow.
You see the Metro All Apps list, similar to the one shown in Figure 3-4.
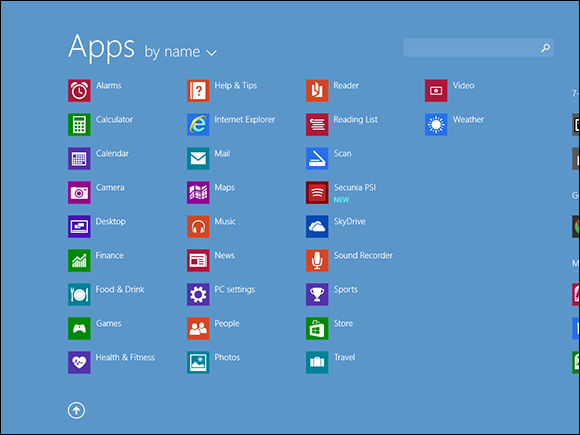
Figure 3-4: Unless you’ve changed a setting, the main Metro All Apps list shows you all the apps on the Metro Start screen, more or less.
2. If you see any programs that you absolutely don’t want on your Metro Start screen, right-click on the program and, at the bottom, choose Unpin from Start.
Don’t go overboard. By the time you reach the end of this chapter, you’ll shuffle the programs you don’t like off the right edge of the Metro Start screen, so they’ll be out of the way but still be around if you really want them.
3. Scroll right. If you see any programs that you definitely do want on the Metro Start screen or on the old-fashioned taskbar, right click and choose either Pin to Start or Pin to Taskbar, or both.
The program’s tile is tossed on the Start screen, into the hodgepodge group on the right.
Windows is loaded with “legacy” programs that deserve to be considered for inclusion either on the taskbar or on the Metro Start screen. This is the easy way to put them on either or both: Scroll around on the All Apps screen and pick and choose.
When I’m trying to decide whether to put a legacy program on the Start screen and/or the desktop taskbar, I keep three things in mind:
![]() When I’m working on the desktop, it’s a whole lot easier to run a program from the taskbar than it is from the Metro Start screen. That’s why I put programs that tie in to the desktop — the Snipping Tool being an obvious example because it only works on the desktop — on the taskbar.
When I’m working on the desktop, it’s a whole lot easier to run a program from the taskbar than it is from the Metro Start screen. That’s why I put programs that tie in to the desktop — the Snipping Tool being an obvious example because it only works on the desktop — on the taskbar.
![]() When I’m working on the tiled Metro side of the fence, it’s a little bit easier to click or tap a tile and flip over to run the program on the desktop. That’s why I put the Office programs that I use all the time on the Metro Start screen.
When I’m working on the tiled Metro side of the fence, it’s a little bit easier to click or tap a tile and flip over to run the program on the desktop. That’s why I put the Office programs that I use all the time on the Metro Start screen.
![]() The most constraining fact of all is that there’s a very limited amount of space on the desktop taskbar and endless vistas of space on the Metro Start screen. So if there’s a program I use once in a blue moon, such as the Character Map, I’ll stick it on the Start screen. That way I can find it if I go looking for it, but it won’t get in the way most of the time.
The most constraining fact of all is that there’s a very limited amount of space on the desktop taskbar and endless vistas of space on the Metro Start screen. So if there’s a program I use once in a blue moon, such as the Character Map, I’ll stick it on the Start screen. That way I can find it if I go looking for it, but it won’t get in the way most of the time.
You may wonder why I put Character Map on the Start screen at all. That’s easy. If it isn’t on the Start screen, I’ll either forget that it exists, or I’ll forget the name and spend a lot of time trying to find it. That kind of “discoverability” is something that the old Windows Start menu had in spades. With the demise of the old Windows Start menu, the only other option is to stick a tile on the Start screen and hope that I bump into it at the right time.
See Table 3-1 — quite possibly the most important table in this book — for details on what programs you should consider for inclusion on the Start screen and on the desktop taskbar.
Table 3-1 Legacy Programs to Consider for the Start Screen and Desktop Taskbar
|
Type This in Search |
Where I Pin It |
Why |
|
Calculator |
Taskbar |
The desktop calculator, not the Metro version. It’s under the Windows Accessories group. I use it all the time. |
|
Character Map |
Start screen |
Very helpful for inserting odd characters. |
|
Command Prompt |
Start screen |
Also on the Power User Menu, but I forget. |
|
Control Panel |
Taskbar |
I use this one all the time. |
|
Default Programs |
Start screen |
Accessible from the Control Panel, but it’s easier to find here. |
|
Magnifier |
Start screen |
Hard to find otherwise. |
|
Math Input Panel |
Start screen |
Obscure but a lifesaver if you work with equations. |
|
Windows Media Player |
Start screen |
I tend to use VLC to play media files, but if you use Media Player frequently on the desktop, put it on the taskbar, too. |
|
Notepad |
Start screen and Taskbar |
Another ancient program I use all the time. |
|
On-Screen Keyboard |
Start screen |
Just in case you need a keyboard on the desktop. |
|
Paint |
Taskbar |
Although I usually use Paint.net. |
|
Run |
Start screen |
It’s hard to use because in many cases you have to know the exact name of the file, but I put it on the Start screen anyway; also appears on the Power User Menu. |
|
Snipping Tool |
Taskbar |
It’s one of the most useful Windows tools. |
|
Sticky Notes |
Start screen |
I don’t use them very often, but if I really need one, I know where to look — on the Start screen. |
|
Task Manager |
(None) |
Microsoft’s new and greatly improved Task Manager (see Book VIII, Chapter 5). It’s on the Power User Menu, but you may want it on the taskbar, too. |
|
Windows Easy Transfer |
(None) |
Particularly useful when setting up new machines, but Microsoft is hiding it away now. |
|
Windows PowerShell |
Start screen |
A real power user’s product. |
|
WordPad |
Start screen |
I don’t use it very often, but sometimes it comes in handy. |
Now, finally, I have all the pieces in place to assemble a genuinely useful Start screen for desktop aficionados. The pieces are just all jumbled together, as you can see in Figure 3-5.

Figure 3-5: The mass of tiles on the right side of the Start screen, waiting to be organized.
Sorting through the Metro Start Tiles
Before I show you how I rearrange the tiles to best suit me — and hopefully give you a few useful ideas for your situation at the same time — there’s one more group of tiles you should consider: The tiles that originally came on your Start screen.
Generally, you can do one of four things with the original Start screen tiles, which are shown in Figures 3-1 and 3-5:
![]() You can drag the important ones toward the left, so they’re easier to find when you land on the Start screen.
You can drag the important ones toward the left, so they’re easier to find when you land on the Start screen.
![]() You can drag the less important (even the downright useless) original tiles to the right, so they don’t get in the way of tiles that you use all the time. Stick them out in the back forty, as it were, so you can find them if you need them, but keep them out of the way of your normal day-to-day use.
You can drag the less important (even the downright useless) original tiles to the right, so they don’t get in the way of tiles that you use all the time. Stick them out in the back forty, as it were, so you can find them if you need them, but keep them out of the way of your normal day-to-day use.
![]() You can make some tiles bigger (double-sized rectangle) or smaller (single-sized square), or very big (four single squares) or very small (one-quarter of a normal square). To do so, right-click the tile or nudge it down with your finger, and then at the bottom, choose Larger or Smaller.
You can make some tiles bigger (double-sized rectangle) or smaller (single-sized square), or very big (four single squares) or very small (one-quarter of a normal square). To do so, right-click the tile or nudge it down with your finger, and then at the bottom, choose Larger or Smaller.
![]() You can delete the tile entirely — remove it from the Start screen. I rarely recommend doing so because a wayward tile waaaaay off on the right doesn’t take up real estate or mindshare — and some day you may wish you had the tile back.
You can delete the tile entirely — remove it from the Start screen. I rarely recommend doing so because a wayward tile waaaaay off on the right doesn’t take up real estate or mindshare — and some day you may wish you had the tile back.
Here are the tiles that ship on the Start screen and what I generally do with them. Your preferences may differ, of course:
![]() Mail: I use Gmail, so this one gets dragged to the right. If your e-mail needs aren’t particularly voluminous, the tiled Windows 8.1 Metro Mail app may be a good solution. See Book IV, Chapter 2. If you’re going to use it, keep it on the left. Otherwise, make it smaller and drag it to the right.
Mail: I use Gmail, so this one gets dragged to the right. If your e-mail needs aren’t particularly voluminous, the tiled Windows 8.1 Metro Mail app may be a good solution. See Book IV, Chapter 2. If you’re going to use it, keep it on the left. Otherwise, make it smaller and drag it to the right.
![]() People: I’ve switched over to using Google Contacts, and updating the Microsoft Contacts list is a pain. I move the People tile to the right. Again, you may find that the Metro People app works just great for you, in which case, keep it on the left.
People: I’ve switched over to using Google Contacts, and updating the Microsoft Contacts list is a pain. I move the People tile to the right. Again, you may find that the Metro People app works just great for you, in which case, keep it on the left.
![]() SkyDrive: I usually access SkyDrive through the desktop — and I use Google Drive, Dropbox and iCloud, too. The tiled Win8.1 Metro SkyDrive app doesn’t really do much for me, but if you spend a lot of time on the Metro side, keeping this tile may be worthwhile for you.
SkyDrive: I usually access SkyDrive through the desktop — and I use Google Drive, Dropbox and iCloud, too. The tiled Win8.1 Metro SkyDrive app doesn’t really do much for me, but if you spend a lot of time on the Metro side, keeping this tile may be worthwhile for you.
![]() Maps: This one’s handy, but I prefer Google Maps, which I also use on my Android phone and iPad. I drag this tile to the right.
Maps: This one’s handy, but I prefer Google Maps, which I also use on my Android phone and iPad. I drag this tile to the right.
![]() Desktop: Yeah, I use this one all the time. After some experimentation, I drag it to the lower-left corner. It’s easier to find down there, I think.
Desktop: Yeah, I use this one all the time. After some experimentation, I drag it to the lower-left corner. It’s easier to find down there, I think.
![]() Calendar: I tend to use the Google Calendar, but it’s convenient to have the date displayed on the Start screen. The only downside? In order to get the tile to show the date, you have to sign on to Windows with a Microsoft Account. Go ahead if you want to. Because I don’t maintain appointments in the tiled Windows 8.1 Metro Calendar app, there’s no particular advantage to having a large tile. (The large tile shows you a day’s appointments.) So on machines where I log on with a Microsoft Account, I make the tile smaller and keep it visible, just to show the date. Book IV, Chapter 2 introduces what the Win8.1 Calendar can do.
Calendar: I tend to use the Google Calendar, but it’s convenient to have the date displayed on the Start screen. The only downside? In order to get the tile to show the date, you have to sign on to Windows with a Microsoft Account. Go ahead if you want to. Because I don’t maintain appointments in the tiled Windows 8.1 Metro Calendar app, there’s no particular advantage to having a large tile. (The large tile shows you a day’s appointments.) So on machines where I log on with a Microsoft Account, I make the tile smaller and keep it visible, just to show the date. Book IV, Chapter 2 introduces what the Win8.1 Calendar can do.
![]() Finance: I’ve tried and tried to use this tile but finally gave up. The stock quotes are delayed, so if I’m interested in seeing how the market’s doing or an individual stock is doing, I flip over to the desktop and use a web browser. Unless you can live with stale stock prices, move this tile to the right.
Finance: I’ve tried and tried to use this tile but finally gave up. The stock quotes are delayed, so if I’m interested in seeing how the market’s doing or an individual stock is doing, I flip over to the desktop and use a web browser. Unless you can live with stale stock prices, move this tile to the right.
![]() Weather: With this tile set to very big (“Large”), I can see the current weather, as well as a two-day forecast. That’s actually useful to me. I move it left.
Weather: With this tile set to very big (“Large”), I can see the current weather, as well as a two-day forecast. That’s actually useful to me. I move it left.
![]() Photos: The tiled, Windows 8.1 Metro Photos app isn’t much of an app, but it does cycle through many of my photos nicely, which makes the large tile a welcome addition to my Start screen.
Photos: The tiled, Windows 8.1 Metro Photos app isn’t much of an app, but it does cycle through many of my photos nicely, which makes the large tile a welcome addition to my Start screen.
![]() Video — Music — Games — Camera: Microsoft’s trying hard to put a prettier face on its movie and music marketing business, but I don’t buy it. Literally. If I want a full-screen video, I’ll use VLC on the old-fashioned desktop, and there are many better ways to play music — the Windows Store has several good alternatives. Move ’em all to the right.
Video — Music — Games — Camera: Microsoft’s trying hard to put a prettier face on its movie and music marketing business, but I don’t buy it. Literally. If I want a full-screen video, I’ll use VLC on the old-fashioned desktop, and there are many better ways to play music — the Windows Store has several good alternatives. Move ’em all to the right.
![]() Internet Explorer: I generally use Chrome for my default browser, so I drag the Internet Explorer tile way off to the right.
Internet Explorer: I generally use Chrome for my default browser, so I drag the Internet Explorer tile way off to the right.
![]() Help & Tips: I keep hoping this app will get better. Maybe someday; for now, it’s banished to the right.
Help & Tips: I keep hoping this app will get better. Maybe someday; for now, it’s banished to the right.
![]() News: I keep this tile where I can see it, in the off chance that it’ll flash a news headline that I don’t pick up earlier on some other media — notably Twitter (see Book V, Chapter 4). I don’t think that’s ever happened — a zombie apocalypse could unfold, and it’d take Bing at least a day to catch up — but hope springs eternal. I turn the tile smaller and keep it to the left where I can see it.
News: I keep this tile where I can see it, in the off chance that it’ll flash a news headline that I don’t pick up earlier on some other media — notably Twitter (see Book V, Chapter 4). I don’t think that’s ever happened — a zombie apocalypse could unfold, and it’d take Bing at least a day to catch up — but hope springs eternal. I turn the tile smaller and keep it to the left where I can see it.
![]() Sports, Travel, Food & Drink: They’re gorgeous tiles with pretty pictures, but if I want to see great sports or travel photography, I’ll go on the web. These get dragged off to the right.
Sports, Travel, Food & Drink: They’re gorgeous tiles with pretty pictures, but if I want to see great sports or travel photography, I’ll go on the web. These get dragged off to the right.
![]() Store: Note that the Windows Store holds updates to all your basic tiled Metro apps: The updates are free, but they come through the Windows Store. So you may end up using the Store more frequently than you may otherwise think — and it may be worthwhile moving the Store tile to the left, where it’s easier to find. I make the tile Medium size and keep it on the left.
Store: Note that the Windows Store holds updates to all your basic tiled Metro apps: The updates are free, but they come through the Windows Store. So you may end up using the Store more frequently than you may otherwise think — and it may be worthwhile moving the Store tile to the left, where it’s easier to find. I make the tile Medium size and keep it on the left.
![]() Reading List: I use Evernote, which works more like the way I work. Evernote’s free, and it’s available as a website, a browser add-in, and as a Metro app. This tile gets the heave-ho.
Reading List: I use Evernote, which works more like the way I work. Evernote’s free, and it’s available as a website, a browser add-in, and as a Metro app. This tile gets the heave-ho.
![]() Health & Fitness: I figure the best way for me to enhance my health and fitness is to put the bloody computer down and walk away. A tile? Nope.
Health & Fitness: I figure the best way for me to enhance my health and fitness is to put the bloody computer down and walk away. A tile? Nope.
Starting to Form Your Metro Start Screen
The general approach of whipping this mess into shape is to click and drag tiles into groups that make sense, and then use the customizing tools to assign names to the groups. Finally, we’ll move the groups around so they appear in the correct sequence from left to right.
Start with putting a few tiles in their proper places.
One cold hard fact about the Metro Start screen: When you bring up the Start screen, you can only see a handful of tiles. There are (almost) always more tiles than will fit on the screen: A Metro blivet, if you will. If you aren’t careful, every time you go to click an often-used tile, you may have to scroll and scroll and scroll to find it. Moral of the story: Put your frequently used tiles on the left, where they’re easy to find.
Also, for those rare times when you actually do venture to the Metro Start screen, you may want to see the weather report or maybe some news. I include those tiles in a separate group.
My first iteration at a custom Metro Start screen combines the moving of apps from the All Apps list, with the careful vetting of the tiles that ship on the Start screen. The result looks something like Figure 3-6.
So now you have a basic idea of how to move tiles around and where to dredge up tiles for important programs — such as Calculator and Notepad — that otherwise wouldn’t have any. At least they’re important to me, and if you have much experience at all with older versions of Windows, I bet they’re important to you, too.
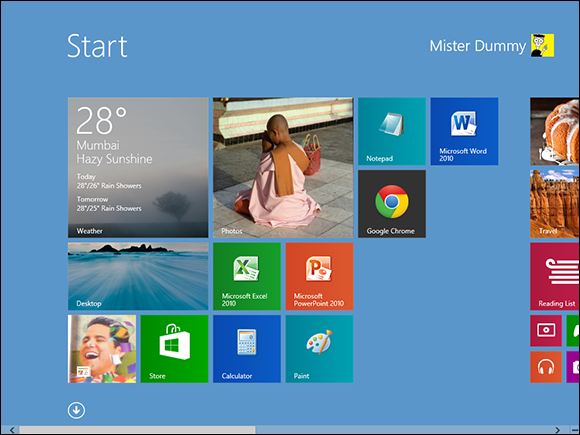
Figure 3-6: Start moving programs that you use commonly toward the left, so they’re easier to see when you jump to the Metro Start screen.
Organizing the Start Screen for a Lean Mean Desktop
Now to bring a little order to the tile chaos. Remember that I’m building the Start screen specifically to help me use the old-fashioned Windows desktop as effectively as I can. I click and drag the tiles into these groups:
![]() Core Desktop Apps — Word, Excel, PowerPoint, Google Chrome, 7-Zip (which is very handy for putting together password-protected Zip files; see Book X, Chapter 5). I have an extra spot, so I dragged over the desktop calculator. See Figure 3-7.
Core Desktop Apps — Word, Excel, PowerPoint, Google Chrome, 7-Zip (which is very handy for putting together password-protected Zip files; see Book X, Chapter 5). I have an extra spot, so I dragged over the desktop calculator. See Figure 3-7.
![]() Useful, tiled Windows 8.1 apps — yes, some of you will chide me for an oxymoron, but it’s true. These are apps that serve a useful purpose (or at least serve up some nice eye candy) whenever I’m on the Start screen. Turns out that I had some extra room, so I resurrected the Travel and Finance apps. See Figure 3-8.
Useful, tiled Windows 8.1 apps — yes, some of you will chide me for an oxymoron, but it’s true. These are apps that serve a useful purpose (or at least serve up some nice eye candy) whenever I’m on the Start screen. Turns out that I had some extra room, so I resurrected the Travel and Finance apps. See Figure 3-8.

Figure 3-7: The most used desktop programs go on the far left, so I can get to them quickly if I find myself in the Start screen.

Figure 3-8: The next group, tiled Metro apps that serve a purpose — and some leftovers that fit.
![]() Utilities — the next bunch of programs (Secunia PSI, Notepad, Paint, Internet Explorer, Windows Media Player) come in handy from time to time.
Utilities — the next bunch of programs (Secunia PSI, Notepad, Paint, Internet Explorer, Windows Media Player) come in handy from time to time.
![]() The dregs — programs that I want to keep on the Start screen because I may use them once in a while, but I don’t use them frequently enough for them to occupy an important spot.
The dregs — programs that I want to keep on the Start screen because I may use them once in a while, but I don’t use them frequently enough for them to occupy an important spot.
Finally, if I right-click on any tile, Windows opens up a grayed-out window above each group, inviting me to Name Group. I type in some suitable names, click once on the Start screen itself, and it’s done. See Figure 3-9.
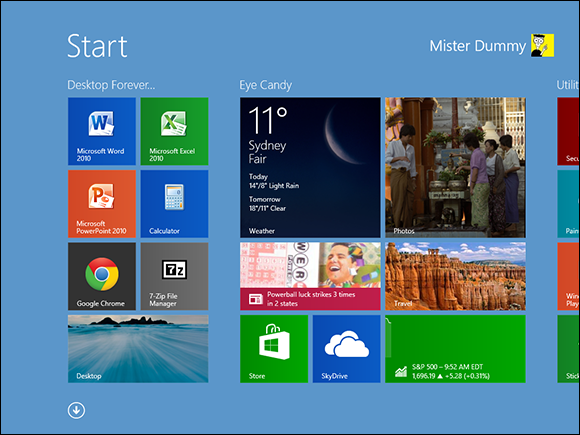
Figure 3-9: Grouping and naming for speed.
And my desktop taskbar — created while stepping through Table 3-1 in this chapter — works just great. See Figure 3-10.
![]()
Figure 3-10: My no-nonsense desktop taskbar.
One of the nicest features of the Metro Start screen? You can change it easily, any time. Just click and drag tiles to wherever you want them.
Booting to the Desktop
On more step, and you’ll have done everything you can to keep your focus on the old-fashioned desktop — so you can flip to the Metro Start screen on your terms. As much as possible, anyway.
Windows 8.1 includes the ability to tell Windows that, when it starts, it should show the old-fashioned desktop, not the Metro Start screen.
That was one of the most annoying features in Windows 8.
Windows 8.1 also lets you desensitize the upper-left and upper-right corners of the screen. If you don’t turn off those “hot” corners, every time you hover your mouse in the upper-right corner of the screen — perhaps to click the “X” on a window to close it — Windows thinks you want to bring up the Charms bar. Blech.
Here’s the rest of the desktop-over-Metro story:
1. Go to the old-fashioned desktop — click the Desktop tile, if you aren’t there already — right-click any empty piece of the taskbar and choose Properties.
2. Click the Navigation tab.
You see the Taskbar and Navigation properties dialog box shown in Figure 3-11.
3. Here are my recommendations for the settings:
Off: When I point to the upper-right corner, show the charms. No thank you. If I want to see the Charms bar, I’ll type Windows key+C.
Off: When I click the upper-left corner, switch between my recent apps. No thank you. That’s why the Windows gods created Alt+Tab.
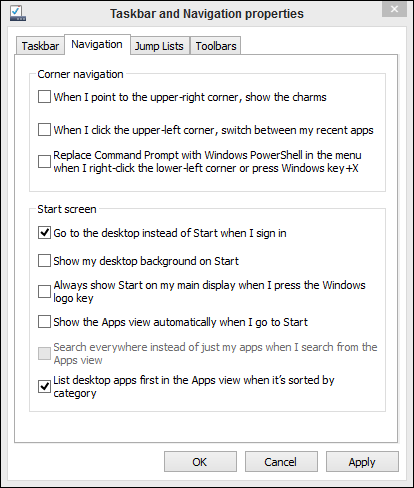
Figure 3-11: Declare your desktop supremacy.
On: Go to the desktop instead of Start when I sign in. Of course. Do I look like a Metro fanboy?
Either: Show my desktop background on Start. Personally, I like to make the Metro Start screen a single understated color. Microsoft says that if you change the Metro Start screen background to match the old-fashioned desktop background, the result is less jarring. I find it jarring anyway, but it’s easier for me to get oriented if I see tiles on a plain background.
Either: Always show Start on my main display when I press the Windows logo key. For those of you with more than one monitor, this is worth trying. I don’t see where it makes much difference, but your mileage may certainly vary.
Off: Show the apps view automatically when I go to Start. If you take the time to put together a great Metro Start screen, turn this off. But if you want to hunt and peck through the All Apps screens, turn it on.
4. When you’re done, click OK.
Your changes take place immediately. Try running your cursor up in the upper-right corner and see if the Charms ghost creeps in.
If you’re using a Microsoft Account, remember that these changes will travel with you when you sign in to a different computer using the same Microsoft Account.