
Chapter 2: Personalizing the Desktop
In This Chapter
![]() Tricking out your taskbar
Tricking out your taskbar
![]() Taking control of each desktop level
Taking control of each desktop level
![]() Traipsing through themes
Traipsing through themes
![]() Controlling the notification area
Controlling the notification area
It’s your desktop. Do with it what you will.
You may think it’d be easy for a computer to slap windows on the screen, but it isn’t. In fact, the Windows desktop uses six separate layers to produce that window, er, vista. However, you can take control of every layer. I show you how in this chapter.
Most importantly, in this chapter, I show you the quibbles and quirks of the Windows 8.1 taskbar. Now that the old Windows Start Menu has gone the way of the do-do, the taskbar takes on new importance as the most accessible way to control programs on the desktop. The taskbar occupies a key piece of real estate.
I also include a discussion of desktop background, themes, and screen savers. Pretty cool stuff.
Recognizing Desktop Levels
The Windows desktop — that is, the collection of stuff you see on your computer screen — consists of six layers (see Figure 2-1, which shows four of the six layers).
For a quick change of pace, desktop themes change five of the six layers, all at once. I talk about desktop themes in the section “Using Desktop Themes,” later in this chapter.
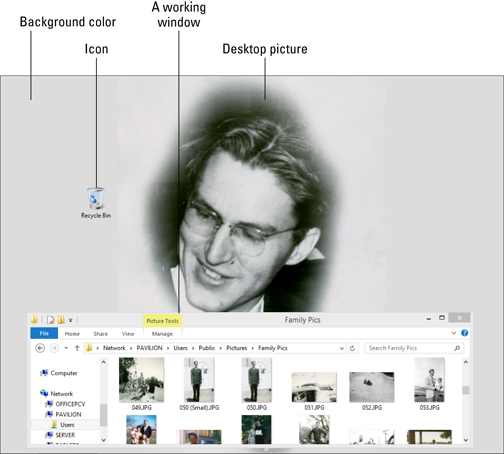
Figure 2-1: The Windows 8.1 desktop.
These six layers control how Windows dishes up your desktop:
![]() Level 1: At the bottom, the Windows desktop has a base color, which is a solid color that you see only if you don’t have a desktop background picture or if your chosen desktop picture doesn’t fill the entire screen. Most people never see their Windows base color because the desktop background (often a picture) usually covers it up. I tell you how to set the base color and all the other Windows colors — for dialog boxes, the taskbar, the works — in the next section of this chapter.
Level 1: At the bottom, the Windows desktop has a base color, which is a solid color that you see only if you don’t have a desktop background picture or if your chosen desktop picture doesn’t fill the entire screen. Most people never see their Windows base color because the desktop background (often a picture) usually covers it up. I tell you how to set the base color and all the other Windows colors — for dialog boxes, the taskbar, the works — in the next section of this chapter.
![]() Level 2: Above the base color lives the Windows desktop background. (Microsoft used to call it wallpaper, and you see that name frequently.) In Figure 2-1, my dad’s photo appears as the desktop background. It isn’t stretched to fit the full screen, which is why you can see the base color.
Level 2: Above the base color lives the Windows desktop background. (Microsoft used to call it wallpaper, and you see that name frequently.) In Figure 2-1, my dad’s photo appears as the desktop background. It isn’t stretched to fit the full screen, which is why you can see the base color.
 The people who sold you your computer may have placed some sort of dorky ad on the desktop. I tell you how to get rid of the ad and replace it with a picture you want in the section “Picking a Background,” later in this chapter.
![]() Level 3: Windows puts all its desktop icons on top of the desktop background layer and underneath everything else. Bone-stock Windows 8.1 includes only one icon, the Recycle Bin. If you bought a PC with Windows preinstalled, the manufacturer probably put lots of additional icons on the desktop. You can easily get rid of them. I tell you how in the section “Controlling Icons,” later in this chapter.
Level 3: Windows puts all its desktop icons on top of the desktop background layer and underneath everything else. Bone-stock Windows 8.1 includes only one icon, the Recycle Bin. If you bought a PC with Windows preinstalled, the manufacturer probably put lots of additional icons on the desktop. You can easily get rid of them. I tell you how in the section “Controlling Icons,” later in this chapter.
![]() Level 4: Above the icons you find (finally!) the program windows. These are the windows in which the likes of Word, File Explorer, and Media Player all run.
Level 4: Above the icons you find (finally!) the program windows. These are the windows in which the likes of Word, File Explorer, and Media Player all run.
The old-fashioned window design — rounded corners, an affinity for blue, and transparency in wide window borders — came to be known as “Aero.” Now Aero is out of style, and flat, boxy, minimalist tile-like outlines are in.
![]() Level 5: Then you have the mouse, which lives on the layer above the program windows. The mouse shares its level with the odd Windows Notification — specifically, toaster notifications can slide onto the screen in the upper-right corner, as the need occurs. They appear above the program windows.
Level 5: Then you have the mouse, which lives on the layer above the program windows. The mouse shares its level with the odd Windows Notification — specifically, toaster notifications can slide onto the screen in the upper-right corner, as the need occurs. They appear above the program windows.
![]() Level 6: At the top of the desktop food chain sits the screen saver. It kicks in only if you tell Windows that you want it to appear when your computer sits idle for a spell. I talk about that beast in the section “Selecting Screen Savers,” later in this chapter.
Level 6: At the top of the desktop food chain sits the screen saver. It kicks in only if you tell Windows that you want it to appear when your computer sits idle for a spell. I talk about that beast in the section “Selecting Screen Savers,” later in this chapter.
If you have more than one user on your PC, each user can customize every single part of the six layers to suit her tastes, and Windows remembers every setting, bringing it back when the respective user logs on. Much better than getting a life, isn’t it?
Setting Color Schemes on the Desktop
Windows ships with 16 prebuilt designer color schemes. “Automatic” (which has a propensity to sky blue) is the scheme of choice. You can change to a different designer scheme or invent one all your own. To change color schemes, follow these steps:
1. Right-click any empty part of the Windows desktop and choose Personalize.
The Personalize dialog box appears.
2. At the bottom, click the link that says Color.
Windows opens the Color and Appearance dialog box (see Figure 2-2).

Figure 2-2: The 16 designer color schemes — and a nearly infinite array of alterna-tives — appear here.
3. Choose the window color scheme that suits your fancy.
The Automatic color setting — the one with a fanned out swatch in the upper-left corner — takes its cues from the background image.
4. Click Save Changes.
Your chosen window color scheme takes effect immediately.
Picking a Background
There’s nothing particularly magical about the desktop background. In fact, Windows can put any picture on your desktop — big one, little one, ugly one — even a picture stolen straight off the web. If you have more than one picture you fancy, Windows can put together a running slide show. And if you have two monitors, side-by-side, Windows can put separate pictures on each. Here’s how to personalize your desktop background:
1. Right-click any empty part of the desktop and choose Personalize.
The Personalization dialog box appears, as shown in Figure 2-3.
 If you want to use one of the built-in combinations of the Windows desktop background, window color, sound scheme, and screen saver, you can simply choose among the offered themes. Scroll down in the box on the top and choose the one you like.
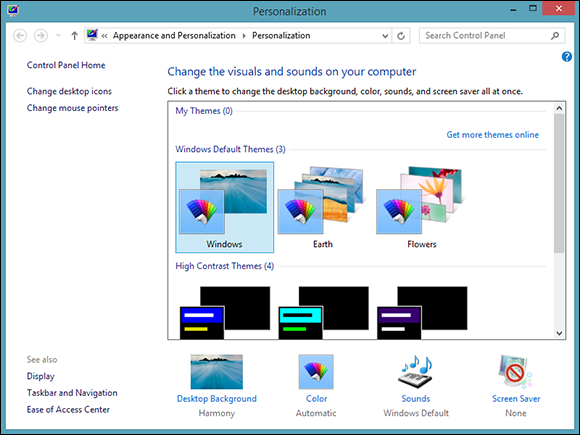
Figure 2-3: Change your desktop background here.
The Synced Theme (if you have one or more) that appears in the top part of this dialog box comes from other Windows 8 and 8.1 PCs, where you’ve logged on with the same Microsoft account ID.
The Get More Themes Online link takes you to a Microsoft website that has a huge variety of themes, which will work on Windows 7, 8, and 8.1. There are some truly astounding themes for two-monitor Windows 8.1 setups, with half of the background showing in one screen and half in the other. The Nightfall & Starlight Panoramic theme is one of those gorgeous two-monitor themes. See the section “Using Desktop Themes,” later in this chapter.
2. At the bottom, click the Desktop Background link.
 Remember, this is just the desktop. Nothing here changes the tiles or the background on the Metro Start screen.
Windows shows you the Desktop Background dialog box, shown in Figure 2-4.
3. Select the Picture Location drop-down box and choose from many different wallpapers that ship with Windows. You can also click the Browse button and choose any picture you like.
If you hover your mouse over a picture, Windows shows you a description of the picture, and a check box appears in the upper-left corner. If you select the check box, Windows adds that particular picture to its background slide show. You can put dozens, hundreds, or even thousands of pictures in your slide-show collection. And, at the bottom of the screen, you can change the speed of the slide show.

Figure 2-4: Pick a wallpaper or a collection of wallpapers.
Keep in mind that cycling through desktop backgrounds quickly can create noticeable delays in your daily activities. Notebook and netbook owners should avoid setting the delay to high levels because of the additional, completely unnecessary, battery drain.
The Solid Colors category changes the base color of the desktop (see the section “Recognizing Desktop Levels,” earlier in this chapter). The base color is what shows through if your desktop background doesn’t fill the whole screen.
4. If your picture is too big or too small to fit on the screen, you can tell Windows how to shoehorn it into the available space.
Use the drop-down Picture Position list at the bottom of the Desktop Background dialog box.
Details are in Table 2-1.
5. Click the Save Changes button and then the X button to close the Personalization dialog box.
Your desktop slide show begins immediately.
Windows lets you right-click a picture — a JPG or GIF file, regardless of whether you’re using File Explorer or Internet Explorer or even Firefox — and choose Set As Desktop Background (in File Explorer or Firefox) or Set As Background (in Internet Explorer). When you do so, Windows makes a copy of the picture and puts it in the C:UsersusernameAppDataRoamingMicrosoft folder and then sets the picture as your background.
Table 2-1 Picture Position Settings
|
Setting |
What It Means |
|
Fill |
Windows expands the picture to fit the entire screen and then crops the edges. The picture doesn’t appear distorted, but the sides or top and bottom may get cut off. |
|
Fit |
The screen is letterboxed. Windows makes the picture as big as possible within the confines of the screen and then shows the base color in stripes along the top and bottom (or left and right). No distortion occurs, and you see the entire picture but you also see ugly strips on two edges. |
|
Stretch |
The picture is stretched to fit the screen. Expect distortions. |
|
Tile |
The picture is repeated as many times as necessary to fill the screen. If it’s too large to fit on the screen, you see the Fill options. |
|
Center |
This one is the same as the Fit setting except that the letterboxing goes on all four sides. |
Controlling Icons
Straight out of the box, the Windows desktop ships with exactly one icon: the Recycle Bin. Microsoft found that most people appreciate a clean desktop, devoid of icons — but it also found that hiding the Recycle Bin confused the living daylights out of most everyone. So Microsoft compromised by making the desktop squeaky clean except for the Recycle Bin: Tiles on one side and a Recycle Bin on the other. Who can ask for more?
If you bought a PC with Windows preloaded, you probably have so many icons on the desktop that you can’t see straight. That desktop real estate is expensive, and the manufacturers receive a pretty penny for dangling the right icons in your face. Know what? You can delete all of them, without feeling the least bit guilty. The worst you’ll do is delete a shortcut to a manufacturer’s tech support program, and if you need to get to the program, the tech support rep can tell you how to find it.
Windows gives you several simple tools for arranging icons on your desktop. If you right-click any empty part of the desktop, you see that you can
![]() Sort: Choose Sort By and then choose an option to sort icons by name, size, or type (folders, documents, and shortcuts, for example) or by the date on which the icon was last modified.
Sort: Choose Sort By and then choose an option to sort icons by name, size, or type (folders, documents, and shortcuts, for example) or by the date on which the icon was last modified.
![]() Arrange: Choose View⇒Auto Arrange Icons. That is, have Windows arrange them in an orderly fashion, with the first icon in the upper-left corner, the second one directly below the first one, the third one below it, and so on.
Arrange: Choose View⇒Auto Arrange Icons. That is, have Windows arrange them in an orderly fashion, with the first icon in the upper-left corner, the second one directly below the first one, the third one below it, and so on.
![]() Align to a grid: Choose View⇒Align Icons to Grid. If you don’t want to have icons arranged automatically, at least you can choose Align Icons to Grid so that you can see all the icons without one appearing directly on top of the other.
Align to a grid: Choose View⇒Align Icons to Grid. If you don’t want to have icons arranged automatically, at least you can choose Align Icons to Grid so that you can see all the icons without one appearing directly on top of the other.
![]() Hide: You can even choose View⇒Show Desktop Icons to deselect the Show Desktop Icons option. Your icons disappear — but that kinda defeats the purpose of icons, doesn’t it?
Hide: You can even choose View⇒Show Desktop Icons to deselect the Show Desktop Icons option. Your icons disappear — but that kinda defeats the purpose of icons, doesn’t it?
![]() Delete: In general, you can remove an icon from the Windows desktop by right-clicking it and choosing Delete or by clicking it once and pressing the Delete key.
Delete: In general, you can remove an icon from the Windows desktop by right-clicking it and choosing Delete or by clicking it once and pressing the Delete key.
The appearance of some icons is hard wired: If you put a Word document on your desktop, for example, the document inherits the icon — the picture — of its associated application, Word. The same goes for Excel worksheets, text documents, and recorded audio files. Icons for pictures look like the picture, more or less, if you squint hard.
Icons for shortcuts, however, you can change at will. (I talk about shortcuts in Book VI, Chapter 1.) Follow these steps to change an icon — that is, the picture — on a shortcut:
1. Right-click the shortcut and choose Properties.
2. In the Properties dialog box, click the Change Icon button.
3. Pick an icon from the offered list or click the Browse button and go looking for icons.
Windows abounds with icons. See Table 2-2 for some likely hunting grounds.
4. Click the OK button twice.
Windows changes the icon permanently (or at least until you change it again).
Table 2-2 Places to Look for Icons
|
Contents |
File |
|
Windows 8.1, 8, 7, and Vista icons |
C:Windowssystem32imageres.dll |
|
Everything |
C:WindowsSystem32shell32.dll |
|
Computers |
C:Windowsexplorer.ex |
|
Household |
C:WindowsSystem32pifmgr.dll |
|
Folders |
C:WindowsSystem32syncui.dll |
|
Old programs |
C:WindowsSystem32moricons.dll (Quattro Pro, anybody?) |
Lots and lots of icons are available on the Internet. Use your favorite search engine to search for the term free Windows icons.
Selecting Screen Savers
Windows screen savers are absolutely, totally, utterly, 100 percent for fun. Ten or 15 years ago, screen savers served a real purpose: They kept monitors from “burning in” the phosphors in frequently used parts of the screen. Nowadays, monitors aren’t nearly as prone to burn-in (or burnout — as can be the case with humans!), and saving screens rates right up there with manufacturing buggy whips on the obsolescence scale. Flat-panel LCD monitors don’t have phosphors, so there’s nothing to burn.
Now that Windows itself can run a slide show of desktop backgrounds, the demand for screen savers has taken a big hit. Screen savers delay the countdown for turning off the display, so you’ll use a little more electricity with them than without them, but otherwise they’re basically harmless.
Follow these steps to select a screen saver:
1. Right-click any empty part of the desktop and choose Personalize. In the lower-right corner of the screen, click the Screen Saver link.
Windows shows you the Screen Saver Settings dialog box (see Figure 2-5).
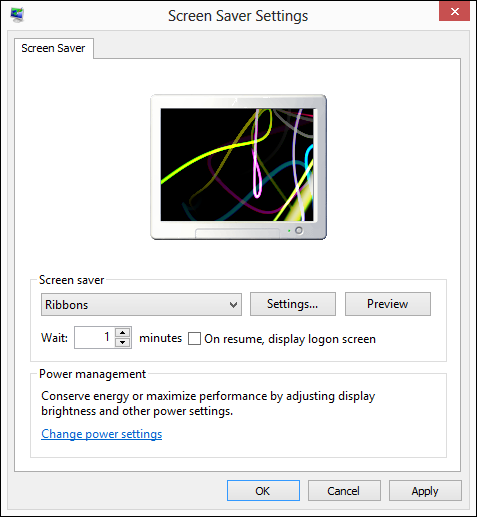
Figure 2-5: Choose and configure a desktop screen saver here.
2. Choose a screen saver from the Screen Saver drop-down list. Click the Preview button and take the screen saver for a test drive.
Don’t like it? Jiggle your mouse or tap on the screen to return to the Screen Saver Settings dialog and pick another one, or click the Settings button to make adjustments to the current screen saver.
3. Choose the number of minutes you want to wait before the screen saver kicks in.
Note that the screen saver will kick in after the given number of minutes of inactivity, whether you’re looking at the desktop or the tiled Start screen.
4. Select or deselect the On Resume, Display Logon Screen check box.
This setting can be a bit confusing. Basically, it controls what happens when the computer “wakes up” after the screen saver kicks in:
• When the On Resume, Display Logon Screen check box is selected: When there’s some activity on the PC, Windows reverts to the Windows lock screen. If the user who was logged on has an account that requires a password, she must reenter her password to get back into Windows. (I talk about passwords in the section on changing user settings in Book II, Chapter 2.)
• When the On Resume, Display Logon Screen check box is deselected: When there’s some activity on the PC, Windows returns to the state it was in when the screen saver started: either the tiled app or desktop. The user who was logged on remains logged on.
5. When you’re happy with your screen saver settings, click the OK button.
The screen saver kicks in whenever a sufficient length of time passes with no activity on the desktop.
To get rid of your current screen saver, right-click an empty spot on the desktop, choose Personalize, click the Screen Saver link at the bottom of the dialog box that appears, and select None in the Screen Saver drop-down list. Click the OK button, and your screen will never be saved again.
 If you want to download screen savers from the Internet, be aware of one painful fact: The overwhelming majority of “free” screen savers you find on the web carry spyware, adware, and various kinds of scumware, which are installed when you install the screen saver. While Windows 8.1 does a reasonably good job of protecting your PC (see SmartScreen, Book IX, Chapter 3), don’t let your guard down, and don’t agree to install anything that seems even the least bit dicey.
Using Desktop Themes
Windows desktop themes incorporate many settings in one easy-to-choose package. The themes revolve around specific topics that frequently (and refreshingly) have nothing to do with Windows (say, cars with carapaces, cavorting carnivores, or carnal caruncles). A theme includes five of the six desktop levels I discuss earlier in this chapter plus a few extra goodies: a base color for the desktop, a background, settings for fonts and colors of the working windows, pictures for the reserved Windows icons (Recycle Bin and Documents, for example), a set of mouse pointers, and a screen saver. A theme can also include a set of custom sounds associated with various Windows events.
To bring in a new theme, follow these steps:
1. Right-click any open spot on the desktop and choose Personalize.
Windows shows you the Personalization dialog box.
2. On the right, click the Get More Themes Online link.
Windows opens the Microsoft Windows Themes home page, shown in Figure 2-6. At least as of this writing, it contains free themes that work well with Windows 7, 8, and 8.1, along with a host of other Windows-centric items.
Lately, Microsoft has started adding some amazing dual-monitor themes. If you have two monitors installed on your PC, and both have the same resolution setting, the backgrounds take up the full panorama of both monitors. Even if you don’t have two matched monitors attached to one PC, the themes show the “middle part” of the two pictures. Quite spectacular.
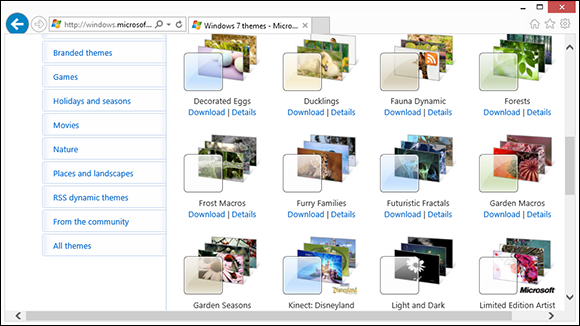
Figure 2-6: Adding new themes is easy, if you use Microsoft’s download page.
3. If you can find a theme you like, click the Download link underneath it. In Firefox, tell the downloader that you want to open the file by using the themepackfile program. In Internet Explorer, just click Open and then Allow, if prompted.
The themepackfile program adds the downloaded theme you selected to the My Themes collection. After the new theme has been downloaded, you’re sent back to the Personalization dialog box.
4. Choose the theme you downloaded. Then click X to close the Personalization dialog box.
After you switch themes, the old background, icon pictures, mouse pointers, and screen savers all remain on your PC. The new theme doesn’t delete them, but if you want to get any of them back, you have to go through the customization steps you followed earlier.
Zillions of Windows desktop themes are available on the web, many of them quite good, and most of them can work with Windows 8.1. My comment in the screen saver section of this chapter applies here in spades: Watch out for scumware. To be on the safe side, visit http://wincustomize.com/ or http://themeworld.com/ for thousands of free themes. Remember that Windows 7 themes work just fine on the Windows 8.1 desktop.
Seeing Your Desktop Clearly
The best, biggest monitor in the world “don’t mean jack” if you can’t see the text on the screen. Windows contains a handful of utilities and settings that can help you whump your monitor upside the head and improve its appearance.
With apologies to Billy Crystal, sometimes it is more important to look good than to feel good.
Setting the screen resolution
I don’t know how many people ask me how to fix this new monitor they just bought. The screen doesn’t look right. Must be that %$#@! Windows, yes? The old monitor looked just fine.
Nine times out of ten, when somebody tells me that a new monitor doesn’t look right, I ask whether the person adjusted the screen resolution. Invariably, the answer is no. So here’s the quick course: the answer to one of the questions I hear most.
If you plug in a new monitor (or put together a new computer) and the screen looks fuzzy, the most likely culprit entails a mismatch between the resolution your computer expects and the resolution your monitor wants. To a first approximation, a screen resolution is just the number of dots that appear on the screen, usually expressed as two numbers: 1920 × 1080, for example. Every flat-panel screen has exactly one resolution that looks right and a zillion other resolutions that make things look like you fused your monitor with the end of a Coke bottle.
Setting the screen resolution is easy:
1. Right-click any empty place on the desktop and choose Screen Resolution.
You see the Screen Resolution dialog box, shown in Figure 2-7. (If you have more than one monitor or certain kinds of video cards, you may see multiple monitors in the top box.)
2. Click in the Resolution drop-down list and pick the resolution you want.
That’s the easy part.
The hard part? Figuring out which resolution your monitor likes: its native resolution. Some monitors have the resolution printed on a sticker that may still adhere to the front. (Goo Gone works wonders.) All monitors have their native resolutions listed in the manual. (You do have your monitor’s manual, yes? No, I don’t either.)
If you don't know your monitor's native resolution, Google is your friend. Go to www.google.com and type native resolution followed by your monitor's model number, which you can (almost) always find engraved in the bezel or stuck on the side. For example, typing native resolution U3011 immediately finds the native resolution for a Dell U3011 monitor.

Figure 2-7: Tell Windows which screen resolution works best on your monitor.
Activating and adjusting ClearType
Misbehaving text can make your monitor look fuzzy, too.
ClearType, the proprietary Microsoft method of sharpening the appearance of text on a screen, has been a fix-up fixture of Windows for many years, since Windows XP. Simply put, ClearType gets the sharpest text possible out of just about every monitor made in the past ten years. (Industry icon Steve Gibson has an excellent description of ClearType and its supremacy on LCD displays at www.grc.com/cleartype.htm.)
In Windows 8.1, Microsoft uses ClearType on the desktop but not on the tiled Metro Start screen, the Charms bar, or in any of the tiled Metro apps, whether they’re made by Microsoft or not. It isn’t available inside the tiled Metro Internet Explorer either. ClearType just isn’t an option. Why? The theory goes that making type look good on the tiled side of the fence isn’t important enough to weigh down the computer.
You can adjust ClearType so that it works best on your monitor under your lighting conditions. Just remember that ClearType doesn’t change anything inside the tiled Metro part of Windows: It’s the desktop only. Here’s how to run the ClearType Text Tuner:
1. Right-click the Start screen in the lower-left corner of the screen to bring up the Power User Menu. Choose Control Panel.
That puts you on the desktop inside Windows Control Panel.
2. On the right, click Appearance and Personalization.
You see the Appearance and Personalization dialog box.
3. At the bottom, under Fonts, click the link to Adjust ClearType text.
Windows brings up the ClearType Text Tuner, shown in Figure 2-8.
4. Ignore the comment about Pocket PC screens, select the check box marked Turn On ClearType, click Next, and go through the calibration steps.
“Pocket PC” is the old name for Personal Digital Assistants that run the Windows Mobile Classic operating system, which is an operating system that has almost nothing in common with Windows itself. Microsoft dropped the name in 2007, shifting to Windows Mobile, which became Windows Phone, and then Windows Phone 8. Wonder how long it’ll take it to update this screen?

Figure 2-8: You can adjust ClearType for your desktop.
Showing larger fonts
If your eyes aren’t what they used to be (mine never were), you may want to tell Windows to increase the size of text and other items on the screen. It’s just enough boost to help, particularly if you’re at an Internet cafe and forgot your glasses.
To adjust the size of fonts (actually, everything), follow Steps 1 and 2 in the preceding section to bring up the Appearance and Personalization dialog box. Under the Display icon, click the Make Text and Other Items Larger or Smaller link. You see the choices shown in Figure 2-9.

Figure 2-9: Windows itself has a setting that resembles the “zoom” you find in many programs.
Programs running on the desktop generally won’t recognize your preference for larger text; the Start screen or tiled style apps won’t, either.
Using magnification
If you need more “zoom” than the font enlarger can offer, click the Magnifier link (refer to Figure 2-9; the link is in the first paragraph), and the Windows Magnifier appears. The Magnifier lets you zoom the entire screen by a factor of 200, 300, or 400 — or as high as you like.
Note that magnifying doesn’t increase the quality or resolution of text or pictures. It makes them bigger not finer. That CSI “David, can you make the picture sharper?” thing doesn’t work with Windows. Sorry, Grissom.
If these nostrums don’t do the job, you should take advantage of the Windows high-contrast themes. They use color to make text, in particular, stand out. High-contrast themes are available from the Themes list (refer to Figure 2-3) and are described in the section “Using Desktop Themes,” earlier in this chapter.
Tricking Out the Taskbar
Microsoft developers working on the Windows 7 taskbar gave it a secret internal project name: the Superbar. Although one might debate how much of the Super in the bar arrived compliments of Mac OS, there’s no doubt that the Windows 8.1 taskbar is a key tool for anyone who uses the desktop. In fact, with the demise of the old Start menu, the taskbar and shortcut icons on the desktop are your only ways of getting at programs, without slipping into the Metro Start screen.
The next chapter covers slicing and dicing the Metro Start screen to support your desktop inclinations. This section shows you how to take full advantage of the taskbar’s capabilities.
The Windows Super, uh, taskbar, appears at the bottom of the screen, as in Figure 2-10.
If you hover your mouse over an icon and the icon is associated with a program that’s running, you see thumbnails of all the copies of the program. For example, in Figure 2-10, Internet Explorer 10 is running, and two tabs are open. Hover your mouse over the IE icon, and you can click a thumbnail to bring up the specific tab.

Figure 2-10: The taskbar juggles many different tasks.
Anatomy of the taskbar
The taskbar consists of two different kinds of icons:
![]() Icons that have been pinned there: Windows ships with two icons on the taskbar, one for Internet Explorer and one for File Explorer — three, if you count the Start screen as an icon. You can see them on the left in Figure 2-10. If you install a program and tell the installer to put an icon on the taskbar, an icon for the program appears on the taskbar. You can also pin programs of your choice on the taskbar.
Icons that have been pinned there: Windows ships with two icons on the taskbar, one for Internet Explorer and one for File Explorer — three, if you count the Start screen as an icon. You can see them on the left in Figure 2-10. If you install a program and tell the installer to put an icon on the taskbar, an icon for the program appears on the taskbar. You can also pin programs of your choice on the taskbar.
 Some older programs have installers that offer to attach themselves to the Quick Launch Toolbar. It’s a Windows XP–era thing. If you agree to put the icon on the Quick Launch Toolbar, the icon for the program actually gets put on the far-more-upscale taskbar.
![]() Icons associated with running desktop programs: Every time a program starts, an icon for the program appears on the taskbar. If you run three copies of the program, only one icon shows up. When the program stops, the icon disappears. Tiled apps don’t appear on the taskbar at all.
Icons associated with running desktop programs: Every time a program starts, an icon for the program appears on the taskbar. If you run three copies of the program, only one icon shows up. When the program stops, the icon disappears. Tiled apps don’t appear on the taskbar at all.
In general, you can’t differentiate between the pinned icons and the ones that are just coming along for the ride, except by noting which ones are on the right (the running programs) and which ones are on the left (the pinned programs). You can, however, tell which icons represent running programs: Windows puts a little box around the icon for any running program. If you have more than one copy of the program running, you see more than one line on the right. It’s subtle. In Figure 2-10, the second icon has two running programs.
Jumping
If you right-click any icon in the taskbar or tap and hold, whether the icon is pinned or not, you see a bunch of links called a Jump List, as shown in Figure 2-11.
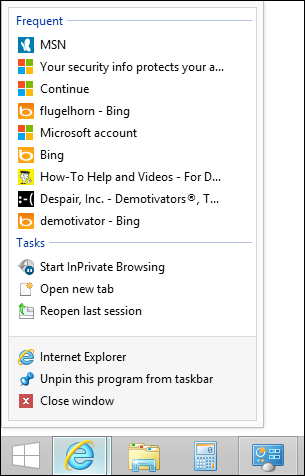
Figure 2-11: The Jump List in Internet Explorer.
The contents of the Jump List vary depending on the program that’s running, but the bottom pane of every Jump List contains the name of the program and the entry Unpin This Program from Taskbar (or conversely, Pin This Program to the Taskbar, if the program isn’t pinned).
Jump Lists were new in Windows 7, and they haven’t taken off universally. Implementation of Jump Lists ranges from downright obsessive (such as Internet Explorer 10) to completely lackadaisical (including most applications that aren’t made by Microsoft).
Here are the Jump List basics:
![]() Jump Lists may show your recently opened file history. For example, the WordPad Jump List (see Figure 2-12) shows you the same Recent Documents list that appears inside WordPad. The currently open document(s) appear at the top of the list.
Jump Lists may show your recently opened file history. For example, the WordPad Jump List (see Figure 2-12) shows you the same Recent Documents list that appears inside WordPad. The currently open document(s) appear at the top of the list.

Figure 2-12: WordPad’s Jump List shows recently opened documents.
![]() It’s generally easy to pin an item to the Jump List. When you pin an item, it sticks to a program’s Jump List whether or not that item is open. To pin an item, run your mouse out to the right of the item you want to pin and click the stick pin. That puts the item in a separate pane at the top of the Jump List. In Figure 2-12, if I click the pin next to World Domination.txt, that document gets pinned to the top of the list. In the future, if I want to open World Domination.txt, I just right-click the WordPad icon and select the document.
It’s generally easy to pin an item to the Jump List. When you pin an item, it sticks to a program’s Jump List whether or not that item is open. To pin an item, run your mouse out to the right of the item you want to pin and click the stick pin. That puts the item in a separate pane at the top of the Jump List. In Figure 2-12, if I click the pin next to World Domination.txt, that document gets pinned to the top of the list. In the future, if I want to open World Domination.txt, I just right-click the WordPad icon and select the document.
The Jump List has one not-so-obvious use. It lets you open a second copy of the same program. Say you want to copy a handful of albums from the music library to your thumbdrive on F:. You start by clicking the File Explorer icon in the taskbar, then on the left, click the Music Library. Cool.
You can do the copy-and-paste thang — select an album, press Ctrl+C to copy, use the list on the left of File Explorer to navigate to F:, and then press Ctrl+V to paste. But if you’re going to copy many albums, it’s much faster and easier to open a second copy of File Explorer and navigate to F: in that second window. Then you can click and drag albums from the Music folder to the F: folder.
To open a second copy of a running program (File Explorer, in this example), you have two choices:
![]() Hold down the Shift key and click the icon.
Hold down the Shift key and click the icon.
![]() Right-click the icon (or tap and hold) and choose the program’s name.
Right-click the icon (or tap and hold) and choose the program’s name.
In either case, Windows starts a fresh copy of the program.
Changing the taskbar
The taskbar rates as one of the few parts of Windows that are highly malleable. You can modify it till the cows come home:
![]() Pin any program on the taskbar by right-clicking the program (see the next chapter of this minibook for a tricky way to find many programs) and choosing Pin This Program to Taskbar. Yes, you can right-click the icon of a running program on the taskbar.
Pin any program on the taskbar by right-clicking the program (see the next chapter of this minibook for a tricky way to find many programs) and choosing Pin This Program to Taskbar. Yes, you can right-click the icon of a running program on the taskbar.
![]() Move a pinned icon by clicking and dragging it. Easy. You know — the way it’s supposed to be. You can even drag an icon that isn’t pinned into the middle of the pinned icons. When the program associated with the icon stops, the icon disappears, and all pinned icons move back into place.
Move a pinned icon by clicking and dragging it. Easy. You know — the way it’s supposed to be. You can even drag an icon that isn’t pinned into the middle of the pinned icons. When the program associated with the icon stops, the icon disappears, and all pinned icons move back into place.
![]() Unpin any pinned program by right-clicking it and choosing Unpin This Program from Taskbar. Rocket science.
Unpin any pinned program by right-clicking it and choosing Unpin This Program from Taskbar. Rocket science.
Unfortunately, you can’t turn individual documents or folders into icons on the taskbar. But you can pin a folder to the File Explorer Jump List, and you can pin a document to the Jump List for whichever application is associated with the document. For example, you can pin a song to the Jump List for Windows Media Player.
Here’s how to pin a folder or document to its associated icon on the taskbar:
1. Navigate to the folder or document that you want to pin.
You can use File Explorer to go to the file or folder or you can make a shortcut to the file or folder.
2. Drag the folder or document (or shortcut) to the taskbar.
Windows tells you where it will pin the folder, document, or shortcut, as shown in Figure 2-13. For example, if you are dragging a .docx file, Windows will let you pin it to WordPad, Word, File Explorer, or any program that can open a .docx file.

Figure 2-13: Drag a file or folder to pin it to a taskbar icon.
3. Release the Mouse button.
That’s all it takes.
A little-known side-effect: If you pin a file to a program on the taskbar, the program itself also gets pinned to the taskbar, if it wasn’t already.
Making your own little toolbars
You can turn your own folder into a toolbar, which sits on the taskbar. It’s a cool tool if you frequently need to navigate around a hornet’s nest of folders and don’t want to do the navigating from inside a specific program (such as Word or Excel). Instead, you can put a pop-up menu — a new toolbar, in Windows parlance — on the taskbar. This toolbar whisks you directly to a folder, and from that point, subfolders turn into submenus. You can navigate through the folder maze to individual files.
The terminology here is confusing because the custom pop-up toolbar you create sits on top of the Windows taskbar. Your folder doesn’t show up as an icon; it appears on the right side of the taskbar with the name of the folder. When you click the name of the folder, you see a navigable list of all subfolders and documents. Confused? Take a look at Figure 2-14. When you create your own toolbar, the entries on the toolbar match the underlying folder structure.
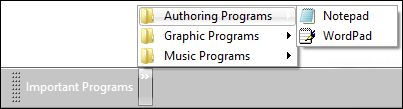
Figure 2-14: The toolbar entries match the underlying folder structure.
To create the file structure you see, I put a folder on my desktop called Important Programs. I put three folders inside that folder, called Authoring Programs, Graphic Programs, and Music Programs. In the Authoring Programs folder, I put shortcuts to Notepad and WordPad.
After I pinned the Important Programs folder to the taskbar, clicking the double-right wedges to the right of the name of the folder brings up a pop-up list of subfolders. Clicking one of the subfolders brings up a list of files in the subfolder.
Making your own toolbars is a reasonable way to create your own Start Menu substitute. I prefer using the tiled Start screen, as I show in the next chapter. But keep these toolbars in mind if you want certain items to be a click away without switching to the tiled side of the force.
To put a new toolbar on the Windows taskbar:
1. Right-click any unused part of the taskbar and choose Toolbars⇒New Toolbar.
You see the New Toolbar — Choose a Folder dialog box, shown in Figure 2-15.

Figure 2-15: Choose the root folder to place on the taskbar.
2. Navigate to the folder you want as the root of the pop-up menu, click it once, and click Select Folder.
The contents of this folder appear on your new toolbar. Figure 2-14 shows the result of my placing the Important Programs folder on my taskbar.
3. If you want to relocate the toolbar, make sure the taskbar is unlocked (right-click an empty part of it and deselect the Lock the Taskbar option). Then click and drag your new toolbar wherever you want.
If you play with the toolbar, you see that Windows restricts the placement and sizing of the toolbar quite drastically. It also has a habit of dragging out subfolders and files.
4. When you’re happy with the result, right-click an unused spot on the taskbar and select the Lock the Taskbar check box.
Try using the new toolbar and see if you get used to it.
If you change your mind and want to get rid of the new toolbar, right-click an open place on the taskbar, choose Toolbars, and deselect the option that mentions the new toolbar.
Working with the taskbar
I’ve discovered a few tricks with the taskbar that you may find worthwhile:
![]() When you hover your mouse over an icon, you see thumbnails of the running copies of the program (refer to Figure 2-10). Normally, the thumbnails disappear when you move the mouse, but if you click the icon once, the thumbnails stay until you click somewhere else.
When you hover your mouse over an icon, you see thumbnails of the running copies of the program (refer to Figure 2-10). Normally, the thumbnails disappear when you move the mouse, but if you click the icon once, the thumbnails stay until you click somewhere else.
![]() Sometimes you want to shut down all (or most) running programs, and you don’t want Windows to do it for you. It’s easy to see what’s running by looking at the boxes around the icons (refer to Figure 2-10). To close down all instances of a particular program, right-click its icon and choose Close Window or Close All Windows.
Sometimes you want to shut down all (or most) running programs, and you don’t want Windows to do it for you. It’s easy to see what’s running by looking at the boxes around the icons (refer to Figure 2-10). To close down all instances of a particular program, right-click its icon and choose Close Window or Close All Windows.
Sometimes, if a program is frozen and won’t shut itself down, forcing the matter through the taskbar is the easiest way to dislodge it.
The terminology is a bit screwy here. Normally, you would choose Exit the Program, Choose File⇒Exit, Click the Red X, or some such. When you’re working with the taskbar, you choose Close Window or Close All Windows from the choices that pop up when you right-click the icon on the taskbar. Different words, same meaning.
![]() This doesn’t work for all programs, but for some (including Word), if you hold down the Ctrl key and click the Taskbar icon, the program will open with the most recently viewed document open.
This doesn’t work for all programs, but for some (including Word), if you hold down the Ctrl key and click the Taskbar icon, the program will open with the most recently viewed document open.
If you drag your mouse to the lower-right corner and then click, Windows minimizes all open windows. Click again, and Windows brings back all minimized windows. You can also right-click and choose Peek at Desktop or Show Desktop.
Controlling the Notification Area
Windows gives you some specific control over the contents of the notification area — the glob of icons down near the clock that used to be known as the system tray.
Windows ships with a small handful of visible notification icons — for the Action Center, the Network Center, and the master audio volume control slider. That’s it. If you see any additional icons, your computer’s manufacturer probably put them there. When you install a new program that has an icon for the notification area, the icon is placed in the box that you can see when you click the up arrow at the left edge of the icons.
If you’re tired of seeing a useless icon in the notification area — or if you know that you want to see an icon all the time — you can take control. Here’s how:
1. Click the up arrow at the left edge of the icons.
You see all the notification icons available for you. If you don’t see an up arrow, congratulations! You don’t have any notification icons gumming up the works.
If you see an icon in the box that you absolutely must have visible all the time, simply click and drag it into the notification area, near the clock. If you later change your mind, you can click and drag the icon back from the notification area into the box.
2. Choose Customize.
Windows shows you the Notification Area Icons Zapper box. That’s what I call it, anyway (see Figure 2-16).

Figure 2-16: Control notification area icons here.
3. Find the icon you want to zap and, in the drop-down list, choose Hide Icon and Notifications (to turn off the beast completely) or Only Show Notifications (shows the balloon warnings but doesn’t show the icon).
4. Click OK.
The icon changes its wayward ways immediately.
Windows has some fairly sophisticated notification methods these days, much more usable than the old notification area icons. In particular, there are notifications on the lock screen and “toaster” notifications that appear floating on the upper-right side of the screen, just like a piece of toast popping out.
I talk about those other tile-like notifications in Book VIII, Chapter 4.