
Editing within a Shot: The Art of Pre-Compositing
Before dividing the visual effects editing process into various procedures, it is important to first explain what visual effects editing is exactly and how it began.
VFX Editors actually do edit, just not in the traditional sense. They edit shots, not sequences. A traditional editor, called a picture editor, cuts together scenes by editing together different camera angles, called shots, to tell a story. For example, a scene may begin with a close-up of a general’s face looking through a telescope followed by a wide shot of a group of soldiers marching toward him on a battlefield and finally ending with a medium shot of the general riding away on his horse. By contrast, a VFX Editor edits within an individual shot by compositing together different elements and assembling them one on top of the other. Pacing and composition within a shot need to be experimented with and locked down before they can blend seamlessly into the larger context of an edited sequence. This process is called pre-compositing.
To illustrate pre-compositing, let’s say the wide shot of the battlefield sequence described before is a visual effects shot containing multiple elements requiring compositing: a BG (background)36 plate of the battlefield, several small groups of soldiers marching on different areas of the field (that when composited together give the impression that hundreds of people were filmed marching at the same time), and pyrotechnic (pyro) elements of shells exploding in the distance. The VFX Editor works with the VFX Supervisor, the Director, and the picture editor to decide which takes of the BG plate, soldier, and pyro elements work best in the shot and on what frames the different pyro elements should enter the shot. The selected elements are layered on top of each other in a digital editing program starting with the BG plate, then the shells, and concluding with the soldiers. To make the shot work, some, or all, of the elements may require a combination of cropping, keying, keyframe animation, resizing, repositioning (repoing), scaling, or retiming.
In essence, the VFX Editor’s job is to help determine what elements are needed for a shot and how they are to interact with each other. The information describing how elements interact with each other in a shot, as referenced in a precomposite (precomp), is called line-up information. Once the Director approves precomps, the line-up information must be delivered to the visual effects facility.
To help facilitate precomping, the VFX Editor should carefully track and organize elements as they are shot so they can be easily located when needed. This is especially important when the Director or VFX Supervisor needs to quickly see alternate takes for a given element. Knowing where all of the elements are ahead of time speeds up the process greatly.
Multiple tools are available to the VFX Editor: nonlinear editing software such as Avid’s Media Composer, Apple’s Final Cut Pro, and Adobe’s After Effects. All or some of these tools may be used on a show. So the more platform-neutral an editor is, the better.
How It Came to Be
In the beginning (circa 1910s), visual effects editing was accomplished in-camera. The Director, actors, and cinematographer would film an action and then literally backwind (rewind) the footage in the movie camera to expose another piece of action over the first. The Director and crew would have to roughly estimate when the second piece of action should start in relation to the first before the camera began rolling again for a second pass. As time went on, this practice of in-camera double exposure soon established itself as an accepted form of trick photography from which more elaborate techniques and hardware would be built. The process was originally crude and imprecise, but it did acknowledge that pacing within a visual effects shot was important to its overall impact.
From the mid 1930s on, visual effects editing was accomplished using the optical printer. The optical printer allowed for individual elements to be composited together photochemically, using a precise projector-to-camera photography setup. The results were exposed onto a new piece of film stock, which then had to be processed at a laboratory in order to be seen. Because visual effects no longer had to be done in-camera, actions intended for a visual effects shot could now be filmed separately to be combined later via optical printing. The VFX Editor could examine the projected pieces of film individually on a viewing device, such as a moviola,37 to get a feel for each element’s timing. The elements could then be placed side by side on a light table to determine exactly how each piece of action should line up, frame for frame, in relation to one another.
Once a locked-sync between elements was determined, the VFX Editor ran test composites on the optical printer, or literally overlaid one piece of film over another on a moviola (a process called bi-packing), while keeping track of how the elements lined up. The routine was time consuming and contained errors that could not be detected until the film was processed overnight and screened the next day, but it was still a huge leap forward from the early days of in-camera compositing.
The digital revolution of the 1990s, with computer graphic animation and digital compositing, not only opened the floodgates on visual effects in general, but also changed the way visual effects editing would be performed from that point forward. Just as most traditional hand-drawn and stop-motion animation would be replaced with computer graphic animation, visual effects editing would no longer be hand tooled using moviolas, light tables, and optical printers. Instead of actual footage to hold up to a light source, photographed imagery could now be digitized into a nonlinear file format to be used with a computer.
As a result, precomposites could now be rendered electronically in minutes as opposed to overnight. Nonlinear editing software allowed the VFX Editor, VFX Supervisor, and Director the ability to closely collaborate in formulating the pacing of a visual effects shot and determine what elements would be required in a fraction of the time it took using the optical printer.
Note also that at this time visual effects editing did not come without its own set of unexpected challenges. For example, Avid’s Media Composer was originally introduced via commercial television as opposed to feature filmmaking. As such, feature picture editors and VFX Editors both had to adapt to the new digital technology. Hence, the VFX Editor was given the challenge of performing multiple checks simply to keep the flow of visual effects editorial information running as smoothly as possible throughout the production pipeline; from visual effects facility to client cutting room (and vice versa), from one visual effects department to another, and from one format to another.
Today, visual effects editors are at a point in which the responsibility of tracking numbers equals or even supersedes the editing process itself. Modern technology allows for the making of visual effects shots to be shared across all visual effects disciplines in order to yield the best results possible for the project at hand. Out of production necessity, the role of the VFX Editor has evolved. The VFX Editor is still responsible for adapting to new techniques and collaborating with all key contributors in order to decipher the most precise visual effects shot count information.
Modern Day Tracking and Disseminating of Information
The Cutting Room’s VFX Editor
As mentioned before, dissemination of information is one of the most important tasks of a VFX Editor. Gathering this information begins when a sequence is far enough along in the editing process, as determined by the Director, VFX Supervisor, or in some cases, the Producers and or the studio, to be turned over38 to a visual effects facility so that artists may begin working on the shot(s). While the type of work for some shots may be obvious, other shots may not be so obvious. Therefore, the VFX Editor must carefully look through the sequence, examining all shots for any potential work, and then check with the VFX Supervisor or picture editors to notify them of what was found that they may not have been aware of.
Before an artist can begin working on a shot, the required elements must be scanned (if they were filmed as opposed to digitally captured) and delivered to the visual effects facility. Some shots may only have a BG plate, while others may have many elements. In addition to the elements visible in the shot, there may also be reference spheres,39 clean plates,40 and various other references that need to be scanned. These may be selected by either the production’s VFX Editor or the visual effects facility’s VFX Editor. The two editors should discuss who should select the pertinent reference elements before the first turnover. Regardless of which editor selects these elements, it is the VFX Editor in the cutting room who will request the scans from the scanning facility.
The scanning facility usually requires key numbers, lab roll numbers, and possibly timecode numbers, which can be exported from the VFX Editor’s editing system into a database, such as FileMaker Pro. How the scanning facility wants the information delivered and in what format can vary. Therefore, the VFX Editor should establish a procedure with the facility ahead of time. The naming convention of scanned files is crucial. As mentioned before, some shots may have multiple elements; therefore, the VFX Editor must distinguish between the different BG, BS (bluescreen) elements, and reference scans to ensure that it is clear to the visual effects facility what each scanned element is for. A typical filename is as follows:
BF010.bg1.1-125.cin
where
BF010 = the shot name41 (i.e., BF = Battle Field and 010 = the tenth shot in the sequence),
bg1 = the element (i.e., background plate #1),
1-25 = the frame range (i.e., 125 frames, starting on frame 1 and ending on frame 125), and
cin = the format extension (i.e., the element was scanned in Cineon format).
Some visual effects facilities and cutting rooms require specific naming conventions. Therefore, how elements are named should be discussed with the facility’s VFX Editor prior to scanning. Some sequences may also have shots going to different visual effects facilities. It is the responsibility of the VFX Editor to ensure that the scanning facility knows exactly where to send the scans.
In addition, not all shots within a sequence are ready to be turned over at the same time. When this happens, the situation is referred to as a partial turnover. The VFX Editor must keep track of which shots have been turned over versus which shots are still being edited or undergoing the bidding process.

Figure 6.44 Sample count sheet. (Image courtesy of Tom Barrett and Greg Hyman.)
Once scanning is complete, it is time to deliver all relevant information to the VFX Editor at the visual effects facility. This information comes in two forms: count sheets and media consolidation. A count sheet is a document that contains all relevant information about a visual effects shot including the total length, handle lengths, key number range scanned, scene and take information, camera report, and lab roll number. It is usually generated from the VFX Editor’s database.
Some shots will be built entirely in the computer (called virtual shots or all-CG shots) and, therefore, won’t have any elements or plates to be scanned. In those cases, the only information on the count sheet might be the length of the shot and any specific notes from the Director or VFX Supervisor. In cases where it may not be clear what needs to be done with a shot, it is essential to highlight that information on the count sheet. Count sheets may be delivered either as part of a database file, as printed documents, or both. The VFX Editor should check with the visual effects facility on what they prefer.
The second requirement for a visual effects facility is an exact copy of the sequence being turned over. This is achieved with a “consolidation” from the picture editor’s editing system that copies all media files associated with the sequence, including picture, sound, and visual effects renders. With these files, the visual effects facility can look at the cut exactly as it is seen by the picture editor. This allows the facility’s visual effects editor access to all metadata (numbers) found on the count sheets that is needed when requesting scans from the cutting room. The consolidation also allows the visual effects facility’s VFX Editor to deconstruct the precomps created by the cutting room’s VFX Editor, thereby, in turn, allowing him or her to pass the line-up information to the artists. If the visual effects facility is small and does not have a VFX Editor or an editing system, then a consolidation is not useful. In those cases, the precomp line-up information must be included in the count sheets.
The Visual Effects Facility’s VFX Editor
Once a sequence has been turned over, the job of the facility’s VFX Editor really begins. After receiving the count sheets and consolidation from the client, the VFX Editor must distribute all pertinent information about the shots to the show’s producers and artists. This usually begins by entering shot information from the count sheets into the facility’s database system. (How much information a production needs is company specific.)
If the visual effects shots have not already been titled by the production’s VFX Editor, the facility’s VFX Editor will need to do that so crew members know what shots in the sequence correspond to which count sheets. QuickTime files of the sequences are usually put online so the artists working on the show may reference them. If the show is heavy with animation requiring lip sync, audio files for each shot will also need to be created and put online for animators to reference for lip sync.
Once scans start arriving from the scanning facility, the VFX Editor must import each element into the editing system and check it against the cut to ensure that the correct number of frames was scanned and delivered. If a problem is discovered with any of the scans, the production’s VFX Editor should be notified so that the problem can be corrected as soon as possible.
Line-up information from the precomps may be the most complicated to pass on to the visual effects crew. This is because the metadata found in the timeline contains numbers that mean nothing to most other crew members: timecode, key numbers, and scene and take numbers. It is the job of the VFX Editor to translate this information into numbers that the visual effects artists and production personnel can use. The best way to do this is to re-create the precomp using the scanned files brought into the project. Basically, layer the elements as they appear in the cut, and reapply all of the effects from the precomp to the scanned elements. Once done, it becomes much easier to tell the artists where each element appears in the shot and when it enters and exits the frame, because the scanned elements are a common point of reference for all involved (i.e., they contain the same set of numbers). This is done in terms of frames, not time. For example, let’s return to the battlefield shot described earlier: Frame 7 of a pyro element explodes on frame 25 of the shot. The line-up note for this element may look like this:
BF010.fg1.1-52.cin
Element frames 7–52 sync up with comp frames 25–70.
(Please scale down to 70% and repo screen right to match reference movie.)
Matters can get complicated when elements need retiming using curve ramps, so using precise language in the instructions is essential. Talking with artists directly about how they prefer to have instructions worded will also help avoid miscommunication. How line-up information is made available to the artists differs with each visual effects facility. It is best to have a database track this information, or at least a spreadsheet that the artist can view easily.
Once all of the information has been distributed to the appropriate people on a show, work on the shots can begin. As different departments (i.e., animation or compositing) run takes,42 the VFX Editor imports them (from digital files) into their editing system so they may be cut into the appropriate sequence(s) and, if need be, exported as an updated QuickTime file for review. This is the dailies process for the VFX Editor and allows artists and supervisors to see their work in context with the rest of the sequence. It is important to make sure that all of the shots received are the correct length and that specific line-up info has been followed correctly. If something is wrong, the artist needs to be informed as soon as possible.
Sometimes the facility’s VFX Editor needs to precomp shots as well. A visual effects facility is often responsible for shooting elements on a stage (miniature elements like ships or planes, debris and smoke), which need to be incorporated into a shot. The VFX Editor will go through the same process as the production’s VFX Editor in determining, with the VFX Supervisor, which takes should be used and how they will interact with the other elements in the shot. For scanning, the VFX Editor may have a counterpart in the production’s cutting room order the scans, or the VFX Editor may communicate with the scanning facility directly. As always, all appropriate line-up information must be communicated with the artists.

Figure 6.45 4-perf 35mm versus 8-perf 35mm film formats. (Image courtesy of David Tanaka.)
When preparing scan requests the VFX Editor must make sure that all key numbers are being tracked correctly in the editing program in case a nonstandard film format was used to shoot the elements. For example, the standard film format used today is referred to as 4-perf 35mm. This means that there are four perforations per frame of film (16 frames per foot) that run vertically (top to bottom) through a projector. However, some films shoot VistaVision, which is 35mm film but with eight perforations per frame (8 frames per foot) that run horizontally (left to right) through a projector. As a result, if the VFX Editor orders a scan from an 8-perf element using 4-perf key numbers, the scan will be wrong.
Periodically, shots need to be sent to the cutting room for the production’s VFX Editor to cut into the movie for the Director to review and give feedback. These files are usually delivered as QuickTime movies. It is the VFX Supervisor’s responsibility to determine what files should be delivered, and it is the facility’s VFX Editor who must keep track of what versions, or takes, of shots are sent and when. If there is a problem with a shot, such as an incorrect length, that information must be communicated to the production’s VFX Editor.
While working with film is becoming rarer because of the dominance of digital editing and compositing, it is still necessary. Some directors prefer to view visual effects shots in a theater on film rather than from HD tape. This is because film is the medium on which most people will watch a movie theatrically, making some directors feel that it is the best context in which to evaluate the quality of the work. Therefore, instead of sending down digital files, the VFX Editor may send film rolls that need to be prepared for projection. As such, it is important for all VFX Editors (whether working in the production’s cutting room or visual effects facility) to understand how to use a traditional flatbed,43 rewinds, and a sync block.44
As the Shot Changes
Even though a sequence may be far enough along in the editing process for delivery to a visual effects facility, the cut is by no means locked.45 The Director and VFX Editor continue cutting the film even as visual effects shots are being worked on and delivered. Because the cut is always fluid, many shots will change in some way, requiring updated information be sent to the visual effects facility. Sometimes a change can be as simple as a shot being shortened by several frames at the head or tail. Other times a shot may be extended or new elements added, requiring new scans. Shots could also be omitted and new ones added. In all of these cases, new count sheets, called change notes (paperwork describing the changes), and new consolidated media need to be sent to the visual effects facility. It is essentially the same process as a turnover only more focused on the changes.
Depending on the Director’s editing style, changes may come weekly or even daily. As a result the VFX Editor must stay on top of cut changes and ensure that the visual effects facilities are updated with the latest information. While picture editors try to inform the VFX Editor of any changes, they are often too busy editing the film to keep track of everything. Therefore, the only way to know for sure what has been changed in a sequence is for the production’s VFX Editor to go through the updated sequence, shot by shot, and compare it against the previous cut. As a double check, the facility’s VFX Editor should do the same when an updated cut is received just to make sure that no changes have inadvertently slipped through the cracks.
It is not only the production’s VFX Editor who has to communicate changes. Oftentimes the visual effects facility is also making changes that need to be communicated back to the cutting room. If a sequence requires a lot of animation or has many all-CG shots, the VFX Supervisor may suggest length changes to better accommodate the wishes of the director. For example, a 50-frame shot was turned over to the visual effects facility with an animatic46 of a CG character reacting to something off screen. But once the actual animated character is added to the shot the animation supervisor realizes that 50 frames are not enough time for the reaction the Director requested. In this case the shot would have to be extended to accommodate the action. In cases like these, the facility’s VFX Editor must inform the production’s VFX Editor of the change needed and why. The production’s VFX Editor then must inform the Director and/or the picture editor to get approval.
Wrapping It Up
As the show approaches completion, much of the production’s VFX Editor’s job is dealing with final renders (called finals47) from the visual effects facility. This can be made more challenging if the director is still making cut changes. On large shows the facility’s VFX Editor may send dozens of shots to the cutting room every day in order to finish the show on time. The VFX Editor in the cutting room cuts these shots into the movie so the Director and the picture editor can evaluate them in context. However, the Director will not be finaling shots in this context because the files are compressed and lack detail. Instead, the Director will look at the shots in a theater, projected from film or an HD format.
Oftentimes the Director sends the shots back to the visual effects facility for additional fixes or changes. It is usually the VFX Coordinators, at both the visual effects facility and the cutting room, who track which shots are finaled and which still require work. But the facility’s VFX Editor still needs to keep track of everything sent to the cutting room and when.
All during this process the production’s VFX Editor is communicating with the digital intermediate (DI) facility to ensure that they have accurate edit decision lists (EDLs) and corresponding film negative from which to conform the movie. As the cut changes, or new shots are delivered, new EDLs may be required.
The frantic and harried nature of the show’s final weeks can lead to mistakes and confusion. Both VFX Editors, with help from the VFX Producer(s), VFX Coordinator(s), and VFX Supervisor(s), need to make sure the DI facility is working with the correct finals to avoid problems during the conform process. Shot lengths are especially important to check during the final weeks of a show. If a short shot is sent to the DI facility, an uncomfortable and costly delay may result.
Conclusion
Over the years a VFX Editor’s job, like many other jobs in the visual effects film industry, has changed, evolving from handling film on flatbeds to punching pixels on a computer. Yet through all the changes, the core responsibility of disseminating vital editorial information regarding visual effects shots to all necessary parties has remained the same.
Not long ago a movie with 200 shots was considered large. Now a large movie exceeds 1000 shots, which in turn translates into a great many precomposites, scans, count sheets, consolidations, and change notes. In other words, a lot of numbers! It is the commitment to keeping these numbers accurate and understood by all involved that has remained a constant to the VFX Editor’s contribution to the art of visual effects. As visual effects movies continue to grow in size, the role of the VFX Editor will continue to grow with it and become all the more essential to the filmmaking process.
COMMUNICATION WITH ARTISTS
Eric Durst
Starting
Visual effects in motion pictures are often the combined work of hundreds of people. The responsibility of the VFX Supervisor is to guide and lead the communication between all of these artists, focusing on a single goal: the visual effects blending seamlessly into the final film.
Because visual effects is a subjective art form, combining aesthetics with large doses of science and mathematics, there is no exact formula. There are, however, certain principles that one can look to for guidance in order to succeed in this process. Regardless of the number of artists involved, whether it is one individual or a massive team, these methods of navigation are similar.
People trying to describe how they want visual effects to look often use words and phrases like “magical,” “ethereal,” and “something that we’ve never seen before.” But in truth, these words and phrases do not represent how things look; they represent how one feels once one has seen them. When guiding artists, it is essential to define the difference between what it takes to manufacture the image and the feeling the image emotionally projects.
A visual effect, regardless of how fanciful or “otherworldly” it may appear, is always made up of specific, definable, and tangible elements from the real world. Color, light, and movement are what the film displays and this is the palette the artist has to work with. So the building blocks are specific descriptions that show the range of colors, the properties of light and how it reacts within the image, and the way these elements move through the frame.
How the viewer responds to this color, light, and movement is an emotional response to the shot and this is independent from the building blocks used to construct the images. This response is what gives the shot meaning and understanding, and the impact these elements produce drives one’s decisions and judgments about what does and does not work.
For every shot and sequence that has visual effects, one must have answers to three basic questions: What? Why? and How? These answers give a context for the visual effects and a supervisor uses this to guide all the artists working on the project
What?: What is the effect is being created? What does it look like? What are the attributes that make it up, and what are all the specific details about the visuals that are being constructed? What are the emotional beats of the shot? What is the feeling that one has when one sees it?
Why?: Why do these visual effects exist? Why is it important in the story? Is it a transition, punctuation, or a seamless shot that goes by without calling any attention to itself?
How?: How can it be achieved? This involves all of the technical and logistical aspects of visual effects pre-production, production, and post-production. This includes how to design the shots and sequences, the principal and visual effects photography, and any elements and source materials that are needed. This also includes all camera equipment, software, workstations, personnel, pipelines, and finances that are required to produce the visual effects shots.
Based on the complexity of the visual effect shots, answers to these questions range from very simple decisions to something short of a Ph.D. thesis.
Working with Teams
Communicating with a team over a period of time can be a little like the Telephone Game, where a message is passed around a circle of people—one by one—only to get a distorted version of the original message at the end. It is important when translating information through a group of people to make sure it is done in a way that is clear and understandable, so the message remains intact. However, communication is often much harder than duplicating a sentence correctly because visual effects must carry both dramatic impact along with visual perfection.
Consider this example: A statement, “THERE’s A FIRE IN THE BACKYARD!!!!,” is passed around a circle of people, delivered with a sense of passion and urgency. This travels around the group and the last person is told, “There’s a fire in the backyard,” delivered in a complete monotone. This is mechanically accurate, but because the delivery is flat and nonemotional, it is not a completely acceptable interpretation of the original statement. In visual effects terms, the shot is technically perfect, but does not work because it lacks the intended impact.
The game is played again, but this time the message at the end of the circle is “THE BACK OF THE HOUSE IS ABLAZE! WE MUST GET OUT IMMEDIATELY!,” delivered with the original sense of passion and urgency. Even though the words are different, the message is more thoroughly understood. In visual effects terms, the shot may not look exactly like the original design, but it feels right so it is successful.
The point is that it is essential to communicate both the visual and emotional parts to get a result that truly works. The supervisor needs to understand how to read between-the-lines and have great insight into what is needed and expected from the shots they are delivering.
Reference and Perspective
To give the clearest possible direction to the artists constructing the shots, many resources need to be brought to the table:
1. Gather and review specific images and reference material that visually describe the shot(s).
2. Gather and review specific motion reference material that describes the kinetic feel of the shot(s).
3. Review all production artwork, pre-production templates, and animatics.
4. Make sure the artists understand the context of their shot(s) by reviewing edited sequences, especially showing the shots surrounding the ones they are working on.
5. Review the expectations of each shot and the degree of detail that is required.
6. Describe the properties of the objects in the frame as being:
• Transparent, translucent, or opaque.
• How visible—do they stand out or do they recede?
• How does light interact—do they emit, absorb, or reflect light?
• What materials are they similar to (plastic, metal, glass, crystal, gas, etc.)?
7. Describe the emotional feeling of the shot in terms of volume. Use phrases that express the visual effect’s impact outside of technical or artistic language that everyone understands.
• How hot or cold is this shot?
• Does the visual effect whisper, speak normally, shout, or scream?
• How bright or dark is it, going from total blackness (0) to the sun (10)?
8. Describe the intent of the visual effects in the sequence.
• Are the visual effects used to punctuate a sequence?
• Are the visual effects a transition?
• Are the visual effects introducing a new idea or concept?
9. Separate technical and artistic considerations to gain an understanding from each perspective.
• Describe the shot from the artistic viewpoint (without any technical considerations).
• Become the disciplined technician and figure out how to accomplish what the artist needs for the shot to work.
• Become the problem solver and create the best result knowing all sides.
10. See the work with fresh eyes, as if one were a member of the audience.
• View shots from how they look and feel, not from how much money or effort was required to create them.
11. Understand all of the visual firepower that can be utilized:
• Software—what software tools are available?
• Machine power—what hardware resources are needed to complete the shot(s)?
• Team—what individual artists are ideal for each shot/sequence?
• Experience—how much artist experience is needed for each shot?
• Time—what is the time needed and allocated for each shot?
• Finances—what are the financial resources for the project?
Shot Production
Filmmaking is evolutionary, and changes and adjustments often occur throughout the post-production process that alter the original plan. The artists follow the lead of the VFX Supervisor, so during this phase it is essential to maintain a clear perspective at all times to keep everyone focused in the right direction.
The VFX Supervisor heads the shot review process, where each shot is analyzed and critiqued on an incremental basis as it progresses to its final state. During this process, his or her thoughts are communicated, as well as those of the director and others, in the clearest manner possible. This is most often accomplished with a phone/video conference call or a face-to-face meeting with the artists.
These reviews also include written, audio, or visual notes to further specify and clarify particular points, ensuring that everyone is in full understanding with each other. A dated record of all comments for each shot should be maintained throughout the production. Because shots can take weeks or months to produce, this history of information can be enormously helpful to everyone in the production pipeline.
Communicating with Artists in Other Departments
Visual effects often join with other departments to help expand their work into the digital realm. Communication of the VFX Supervisor with the artists in these departments is important, so there is a direct connection between the visual effects and live-action areas.
Digital Sets, Environments, and Extensions
When new environments are needed, whether they are sets or locations, visual effects are often used to create them digitally. In live-action production this is the domain of the Production Designer, so good communication between the art department and visual effects is essential to bring the physical and digital worlds together successfully.

Figure 6.46 Visual notes from the film Knowing (2009) with review comments. (Image courtesy of Buf and Summit Entertainment, LLC.)
Digital Actors
Actors and stunt actors are often enhanced or created digitally through the visual effects process, whether with full figures or partial figures (face replacement, etc.). The use of digital techniques is frequently underestimated during live-action photography. The VFX Supervisor should make sure that all needed resources are available, so if digital replacements are required later in the post-production process, the visual effects team is prepared. To ensure this, make certain that extensive photographic reference of the actors, their costumes, and any relevant performance material has been collected. Reference of extras for crowd enhancement is also extremely useful. Communication and coordination with the assistant directors, stunt coordinators, costume designers, and actors are essential for this to go smoothly.
Digital Cinematography
Visual effects shots that require digital lighting and camera moves are extensions of the roles of the Director of Photography and camera operator. Maintaining consistency and visual style in digital shots is enhanced greatly by communication with the DP and camera department. Understanding the look and feel of the original live-action photography goes a long way toward helping the visual effects blend in with the live-action footage.
Digital Sequences
Visual effects is often called on to perform the role of a digital 2nd unit. This is parallel to the work performed by a live-action 2nd unit. By having the ability to generate total environments as well as digital actors, visual effects often creates complete sequences for the film, along with digital shots that cut within the live action. These shots also extend the special effects department’s role by expanding, or digitally manipulating and enhancing practical effects.
Completion
The visual effects in a film represent the efforts of many artists and technicians who have worked together to create images that form a unified vision. This is a challenging task. To succeed requires great communication skills, the ability to motivate and guide a wide variety of personalities, and a high degree of patience and persistence between all parties. The end result, the reward of seeing the final visual effects shots cut into the completed film, is a spectacular thrill that continues to inspire visual effects artists worldwide.
THE HISTORY OF COMPOSITING
Jon Alexander
The History of Optical Technique
In the 1920s simple optical printers were made to duplicate exposed movie film. They consisted of a camera with raw film stock and a projector with previously exposed film that needed to be duplicated. Using machine tool technology, a camera, projector, and lamp house were placed on a lathe bed with mounting platforms that allowed for precision alignment. The camera was focused on the movement of the projector that held the exposed film.
In the 1930s at RKO Studios, Linwood Dunn used traveling mattes to create some of the earliest motion picture special effects. Examples of those effects were basic wipes used as transitions from one scene to another. Using a second projector on the printer to hold traveling mattes, he could expose part of the raw stock film frame, roll it back to a starting frame, and then put the inverse of the matte in the second projector and expose the raw stock a second time without double exposing the originally exposed portion of the film. Although the black-and-white matte film was not totally opaque, it held back enough light that the raw stock would not get any exposure.
In 1940 Larry Butler expanded on this basic premise of holding out one part of a film frame from exposure with a second opaque piece of film. He won an Academy Award for inventing the blue-screen technique to make traveling mattes of moving objects photochemically. This technique would pretty much be the only way to efficiently composite moving objects into film scenes for the next 50 years. It was not until the early 1990s that it made economic sense to move away from film compositing to digital compositing on computers.
Traveling Matte Technique and the Digital Age
In the simplest film composite, one photographed object is cut out so as not to double expose the film and is put over a different background. To cut out an object on film, the object needs to be photographed in such a way that it can be separated from its original background. To do this, the foreground action phase is photographed against a plain backing of which there are various types and colors and methods of illumination. The goal is to create a duplicate negative with a composite of the foreground object over another piece of film of the background. This requires a traveling matte that is a silhouette hold-out that can change from frame to frame with the action of the foreground object. Then the foreground object can be put over the new background without double exposing that area.
Figures 6.47, 6.48, and 6.49 show images used in making a composite. This is not a very good composite. The foreground character does not integrate well with the background. The mat is a bit dense and the beauty lighting of the model does not match the background. One doesn’t have to be an expert to recognize a bad composite. A perfect composite is one that gives no clue to its separate origins.
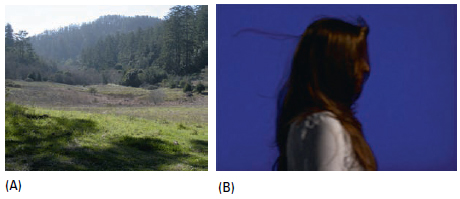
Figure 6.47 (A) Background. (B) Blue screen. (Image courtesy of Jon Alexander.)

Figure 6.48 (A) Extraction. (B) Matte. (Image courtesy of Jon Alexander.)
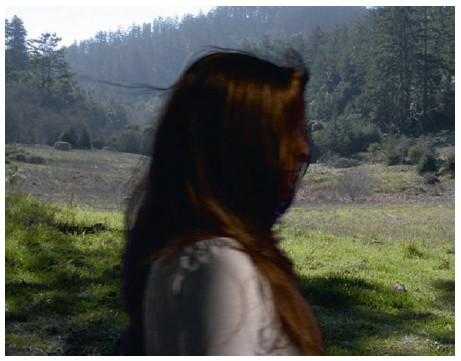
Figure 6.49 Composite.(Image courtesy of Jon Alexander.)
The basic technique for shooting images with the objective of making traveling mattes from the negative for computer graphics compositing is the same as it was for making mattes for film compositing. The nature of computer graphics, however, is such that there is much more latitude in what is acceptable exposure of the original negative.
Making precise mattes with film requires a very specific and narrow range of the color spectrum. If one looks at a perfect blue screen through a corresponding red glass, no color will be seen. The eye (or the camera) just sees black. If that blue does not exist anywhere else in front of the camera, then the rest of the film will get some bit of exposure from which a matte can be made.
It is pretty easy to test for the perfect blue photochemically. A series of exposure wedges reading the processed negative with a densitometer is run. Kodak published AIMs48 for their films. Kodak’s AIMs were suggested values read from the densitometer that, depending on the film stock, would give the maximum separation of the blue screen in order to make hold-out mattes. Through trial and error one can come up with the best negative film exposure AIMs to get the cleanest most precise mattes for the filters. The ideal negative AIMs for digital compositing are still the same as they were with film. The closer to the AIMs, the easier it is to get a perfect matte result. Deviations to a certain extent will make pulling the matte more difficult, but not necessarily impossible as it was in film compositing. Optical compositing techniques might be able to get a reasonable matte even if one-half stop off on film. But values beyond that just can’t get a clean edge. However, the complex algorithms of digital compositing allow for much more latitude.
Once the mattes are extracted, the second and perhaps more important step is replacing the color of the matte screen. Better blending is possible in computer graphics compositing than optical compositing because of the ability to replace the color regionally and to choose the hue of the replacement color. With good mattes and replacement color, making the actual composite is a simple final step.
The advent of computer graphics compositing has also made it possible to use colors other than blue for the matte screen. In older types of films the emulsion layer that was sensitive to blue light always had the biggest grain because silver halide reacts the least to those wavelengths. The larger film grain allowed for a balanced response to the emulsion layers that were sensitive to red and green light. Skin tones also have little blue in them, so if a blue replacement is performed to get rid of the screen those tones will be affected to a lesser extent than a green replacement will. In addition, the blue replacement will have less apparent film grain. Since it is easier now to isolate edges in digital compositing there is more latitude in choosing a background screen color. However, the color replacement of the edge still needs to be dealt with.
Historical Notes on Blue Screen
A short review of some of the requirements for shooting with optical compositing in mind should be of value since these are basically using the same techniques as digital compositing. This will also give an opportunity to comment on requirements that used to be mandatory and are now just suggested. Most of the current confusion in shooting stems from misunderstandings about what is possible today versus what was possible yesterday.
The original traveling-matte system was based on consistency, quality control, and the limits of the optical-photochemical process and dictated by the limitations of three little square pieces of glass in the filter set of the optical printer. These red, green, and blue filters were used to make the bluescreen extractions, mattes, and separations from the original negatives. The resulting elements were used to make the composites.
The biggest problem with the optical-photochemical compositing process was that one fit for the whole matte was necessary. There was really no practical way to make different fits for different parts of the object being matted (although this is something that is done on nearly every digital extraction shot today). Because the matte needed to fit as one, that meant that the colored screen had to have a very consistent exposure over the width of the screen. In addition to the requirement of being evenly lit, a very narrow range of exposure was allowable on the original negative for successfully pulling a matte. Variations in the exposure would mean variations in the density of the mattes and thus dark or light fringing in the composite.
Not only was a good original negative needed, but there also had to be incredible care taken while making the elements, so that all wedge picks49 would match into the final composite. Both wedge and element obviously have to go through chemical development, often several days apart. If the processing were not in control during developing, the elements would have to be made again from the start. Black-and-white film processing has greater tolerance to mixing and temperature variations than color film in general. The tricky part was the close tolerances needed to develop the various gammas of the black-and-white elements. Lack of control in developing could come from any number of reasons. The chemical mixing needs to be extremely consistent. Care needs to be taken not to use the chemicals too long before refreshing. Controlled bath temperature can be tough if the room temperature fluctuates too much. The mattes could not be easily tweaked with additional rotoscoped elements like they can today.
In the years before compositing on computers, most composites were done on optical printers. The exception at ILM would be shots done completely in camera in the matte painting department. In the optical department at ILM, the vast majority of the original elements for the composites were made on the Anderson Printer in a VistaVision format.50
The majority of the final composites were delivered as normal 4-perf 35mm images. Working in the larger VistaVision format helped to compensate for the natural loss of quality in film as it is duplicated. Manipulation of the images was completely photochemical and optical as opposed to mathematical as it is in the computer graphic world. (The math of course is based on the same physical laws of light that dictated the optical printing process.)
The goal in optical compositing was for one matte to work overall to isolate the object in front of the blue screen. This way the optical camera operator could make one fit of the mattes. This matte fit was a visual adjustment and its repetition over a series of takes was based on the skill of the operator to exactly repeat the same placement with the same elements. If the element was damaged it would have to be remade and a different fit would be necessary. This refitting each time the comp is done no longer happens. In computer graphics, once the matte is blended successfully, a compositing script exists that will exactly repeat the line-up. That precise refitting on the optical printer was up to the camera operator.
The other aspect of compositing an element shot in front of a blue screen is replacing the blue of the screen. Ultramarine blue is a natural pigment historically used to give the richest blues to paintings. Because it can eliminate the yellow of white light, it is ideally suited for bluescreen work. The pigment choice has been refined somewhat over the years depending on the medium with which it is to be used. More common terms today are chroma or digital blue. Ultramarine blue was a good choice for pre-Vision films. A considerable amount of light could be thrown on an actor or model without washing out the rich blue hue.
In optical compositing replacing the blue was accomplished by rephotographing the image through a red filter, which would, in a perfect world, make all the blue disappear into black and thus not be carried to the new duplicate negative. Assuming the elements were made successfully, the composite was then in the hands of the optical camera operator. The composite would have to run at least several times. Each time the operator had to line up the camera and elements exactly the same way, and then hope the lab processing was consistent. Each composite was created on film and projected because there was no other way to preview the composite. Today, composites are previewed on computers or servers.
Ideally, a compositor would like to have a bluescreen negative with as much information in it as possible for the sake of pulling a matte with as many details as available. Using the color-difference matting technique means the optical printer compositor will be pulling the mattes from a protection interpositive51 of the original negative. Blue light is the hardest part of the visible spectrum to capture on film and as such the blue record52 silver halide crystals53 are proportionally bigger than those found in the green or red records. The blue resolving power of the film is never as good as the green or red records. Thus, there will not be as much detail in the blue record as in the red or green. In any color-difference matting system, the underlying premise is that the color of the screen that is being used is thrown out. With the exception of rich blues or violet little is lost. Furthermore, little is lost chromatically by throwing out the blue channel and a greater detail of the red and green channels is retained.
The perfect blue color for the screen lies at the center of the blue region of the film spectrum. (The blue region runs between 400 and 500 millimicrons, green 500 to 600, and red 600 to 700.) The peak transmission of a blue screen lies at 450 millimicrons. For practical purposes this color is referred to as ultramarine blue. Because ultraviolet light has a shorter wavelength than visible light, which contaminates the blue record, the photographed matte image will be slightly smaller than the color action image. Thus an enlarging compensation must be made in the printing steps unless corrected lenses are used on the camera to offset image reduction. This aberration often shows up in older lenses whose coatings have deteriorated. But, unlike in the old optical compositing days, this chromatic aberration is easy to fix in computer graphics compositing. A histogram of an image with ultramarine blue shows almost no red or green. In the mathematical world of computer graphics, it is thus easy to isolate and eliminate this color. If there are no transparent objects in the scene or a great amount of motion blur, the threshold of recognition of the color-difference matte can be raised to reproduce medium blues and violets while still maintaining a major discrimination against the blue backing. This means pure blue is not necessary to pull a satisfactory matte digitally. That latitude is very narrow when extracting blue photochemically.
Green screen works the same way as far as color-difference matting (with the obvious subtraction of green rather than blue). The problem with green screen, especially with anything other than fine-grained film, is that by subtracting the green record an incredible amount of detail around the edges is lost. There is also the problem that the green record lays physically below the blue layer and the yellow filter layer. Because of this it is very common to see halation in the optical composite from a greenscreen extraction.
A densitometer can measure how far off the blue/greenscreen AIM54 on the negative is. Following are the neg AIMs with the less than sign (<) indicating that the goal is to get that AIM below the number following it. For example, at ILM’s optical department the bluescreen AIM was “Red 20, Green less than 100, and Blue 235.” The AIMs can vary per film stock and with the red, green, and blue filters used to pull the separations. These ILM values have been adapted from Kodak’s suggestions. They worked with ILM’s particular filters and processing techniques. They would be a good place to start but should certainly be adapted to give the best results for specific red, green, and blue filters, as well as the lab where the film will be processed. Following the AIMs is a little chart that shows how far off in stops the blue or green screen would be based on the densitometer readings.
Bluescreen Neg AIM 20 <100 235
Greenscreen Neg AIM 20 180 <145
Green screen/blue screen
20 120 85 –3 stops 20 40 175
40 140 105 –2 stops 20 60 195
60 160 125 –1 stop 20 80 215
80 180 <145 AIM 20 <100 235
100 200 165 +1 stop 40 120 255
120 220 185 +2 stops 60 140 275
The old rule of thumb for shooting in front of a self-illuminated blue screen55 was that the subject should be shot about 25 feet in front of it to prevent, or at least reduce to a minimum, the blue spill that occurs if the subject is closer. Self-illuminated blue screens are wonderful for the compositor because they tend to be the most even across the field. Of course, this implies availability and by the nature of how they are built, the field of view can be fairly limited. The blue spill is not nearly the problem today that it was in the photochemical compositing world because now a large inner matte can be used to isolate just the edge of the object for the mattes. The color difference of the blue spill to the screen color tends to be severe enough to allow a successful edge blend matte between the spill area and the edge.
In motion control work where there is the luxury of repeating the action, it is always helpful to the compositor to use strong yellow light on the models during the matte pass in order to reduce the amount of blue spill. Since this pass is only shot to make the matte and not to color or shade the model, a strong yellow light will not hurt anything.
It has become more popular to shoot with a frontlit screen (blue or green) during the past few years. As far as compositing goes, there is no advantage to this other than the reduction of potential blue spill. The most important thing about the frontlit screens is that they be consistent side to side. If they are not, problems could occur. For example, assume a screen is uneven; that is, it has seams or is fluttering in the wind. Depending on the object being matted, some allowances are possible. If it is impossible (or not economical) to have a flat consistent screen, then a bit of common sense should rule. For objects with no solid shape (smoke or dust, for example), a screen with a wavy blue would be better than one with seams because it is nearly impossible to separate the seam without leaving some remnant. Conversely, a seam behind a model is easier to deal with because the roto work can be done the same way connection points are matted on bluescreen models. If the perfect chroma AIM can’t be met, then it is better for the screen to be lighter if the foreground object is darker; conversely, the screen should be darker if the foreground object is light. These suggestions applied in the past when the shots were going to be optically composited as well as today. Unlike digital compositing, it was certain that straying too far from the ideal exposure would make it impossible to successfully create a good, clean photochemical separation of the blue screen.
Another large change from days past is the ability of rotoscoping to fix matte problems fairly interactively. In the past it could take days, if not longer, from the time mattes were ordered to when they were drawn and processed. Nowadays if the mattes have problems, it is easy to go back and tweak the specific sections that have problems rather than having to start all over again. Medium to close-up full-body articulation is still very labor intensive, but many other types of roto help are relatively cheap compared to the cost of the time a crew may take on the set or on location. Today, there are a number of good edge-detection algorithms, and short of that there are different ways to extract elements digitally that just were not possible photochemically. Keep in mind that the farther off the target the AIMs are, the less relevance there is to even set up a screen. A lot of money could be wasted lighting a screen that doesn’t ever get used.
Probably the biggest improvement in compositing in computer graphics over the old optical compositing is in matte color replacement. In optical compositing the technique was to attempt to turn the blue screen to black so there would be no exposure added to the final comp due to the blue of the screen. The problem with this approach is that light naturally wraps itself around any edge it encounters. The edges on any image contain contamination of the edge foreground object by whatever color is directly behind it. Obviously as the object travels in front of lighter or darker objects, the light wrap changes. Also all blue cannot be completely eliminated from the foreground objects or their colors won’t look correct. The midtones especially will look processed and have too much contrast.
In optical compositing, an attempt was made to solve the foreground blue replacement problem by using a color-difference matte. The color-difference matte is produced by bi-packing a black-and-white green color separation56 positive with the original negative. This matte registers as density only in those areas of the scene where the blue content is less than the green content. This matte, together with the green positive, represents a faithful duplication of the blue color content within the scene (except of course where the blue content does not exceed that of green). All colors except blue and violet will therefore reproduce in normal values. Desaturated blues (like blue jeans) reproduce acceptably. The blue backing reproduces as black and makes possible normal reproduction of transparent objects in the scene such as smoke, glass, etc., without fringing. But that system is based on the necessity of tying the composite to a single blue replacement.
Due to the interactive nature of matte manipulation within CGI composite scripts, different areas can be tweaked with different screen color replacements. Generally the screen color is only digitally replaced with a dark or a light value run through a luminance mat. In theory, the whole edge could be queried, detecting the color of all regions and replacing the screen color appropriately. It is this ability to manipulate the screen color replacement that allows computer graphics to accept less than perfectly chromatic screen colors. Matte lines do still exist because the extractions are not perfect. But now the screen color is replaced with more appropriate colors behind the objects, so what used to appear as matte lines now appears as nearly correct color edge wrap.
Film versus Digital
One historical advantage of film over digital images is tonal range, in particular detail at the low end. As file size transfer becomes less of an issue with better technology, this difference is disappearing. For the longest time nothing has looked better than a new print in a large format projected to SMPTE57 standards. And nothing has been more disappointing than viewing that same film print after it has been run several hundred times.
Optical compositing obviously was all about manipulating a collection of original negatives. The first step was always to make an interpositive to work from, so the original (read “irreplaceable”) was touched as little as possible. Over the years Kodak, in a nod to the marketing advantage of being involved in the Hollywood film industry, developed and changed film emulsions to suit the needs of visual effects. No one has pressed the limits of film manipulation like the visual effects industry. The old standard film emulsions had huge blue grain compared to the modern Kodak Vision films. And certainly the bottom line for shooting is that no matter how much performance is desired of a piece of film, it is still a photochemical reaction that has absolute limits in science.
In optical compositing the bluescreen negative is re-created using fine-grain black-and-white films. Red, green, and blue records were made and recombined on a new piece of color negative. Mattes were also made on black-and-white acetate or Estar-based film.58 It was a laborious process that required a very precise choreography by the printer operator. Something as simple as a change in the order of placement of color correction filters from one take to another could make the composite unusable.
For years the standards were Panchromatic Separation Film 5235 and SO202 (Estar base). These are no longer being produced by Kodak (2238 is the replacement). The first color negative Vision films greatly reduced grain if properly exposed. They did help, but reacted just like any other film if under- or overexposed. Kodak’s 5277 film59 in particular exhibited very ugly blues if underexposed. The blues were so bad that the blue channel needed to be reprocessed with a mix of the green in order to get any sort of definition. It also got very milky in the blacks when underexposed. The S0214 film was developed to get rid of halation,60 especially when using green screens (but it is not yet in wide use). The 5245 film got contrasty outside but could look great with the use of some scrims. The 5274 film was punchier but tended to be a bit contrasty, whereas 5293 film was pretty predictable for a midspeed film. The 5298 film probably shouldn’t have been used for visual effects, unless the visual goal is that 16mm look (i.e., very grainy).
Optically speaking, some of these adverse film characteristics were impossible to overcome since the frame needed to be dealt with as one image. Area mattes could be made but the process of hand drawing and photographing them could take days, so it was not economically feasible. Artists were quite particular in optical compositing about the AIMs and requirements for how things were shot because there truly were physical limits as to what could be fixed. These requirements would translate back to greater expense on the set because of care needed in shooting. That is probably the ultimate reason for the death of optical compositing because even though it is not necessarily any quicker, digital compositing doesn’t have the photochemical restrictions. And one poor digital compositor laboring away to fix a less-than-ideal blue screen is far less expensive than holding up a complete first unit while the backing gets perfectly lit.
Optical Underexposure Generalizations
• More apparent grain,
• less saturated colors,
• smoky blacks,
• lower contrast, and
• less sharpness.
Optical Overexposure Generalizations
• Less apparent grain,
• more saturated colors,
• richer (blacker) blacks, and
• increased contrast.
Vision films replaced the old standard emulsions of the 1980s and 1990s. Currently Kodak has pushed out Vision 3 emulsions. Sadly, in some respects, the end of shooting on film is in the not too distant future. But just as digital compositing is a vastly superior technique to optical compositing, one would hope HD cameras will eventually have the same latitude as film, with manageable file sizes.
As romantic as it may appear to have been compositing on film, the physical restrictions were a huge detriment to the artistry of making a movie. A printer breakdown in midshot or a mistake at the photo lab could mean hours or days wasted and no quick way to recover. Because of deadline restrictions that meant a limited number of effects shots per movie. A huge show in the 1980s might have had 300 to 400 shots, nothing like the several thousand of today’s big shows.
COMPOSITING OF LIVE-ACTION ELEMENTS
Marshall Krasser
Modern Digital Compositing
With the release of Star Wars in 1977, the magical world of compositing was introduced to the masses on a scale not seen before. In fact, most of the digital artists practicing the trade today were influenced and inspired by this movie. A great deal of the current bluescreen/greenscreen (BS/GS) methodology and technology stemmed from the groundbreaking optical processes that were developed and refined in the 1970s. As just discussed, the photochemical process remained the leading form of screen compositing for feature films until the early 1990s, when more affordable desktop computers became available. The software engineers utilized the knowledge of the photochemical process and developed methods that would allow the same type of work to be done digitally. This opened the door to unlimited possibilities and development.
Prior to this adoption by the film industry, a great deal of groundwork had been developed in the commercial production facilities and broadcast video networks. A simple example was the real-time keying of the local weather forecaster over the weather map. Since film required more resolution than video, it took the development of high-resolution, pin-registered scanning equipment to finally allow the migration from film stock to pixels.
Regardless of the medium, the processes that are in use today are very similar, but the final techniques vary depending on the specifications of the final image (i.e., Film, PAL, NTSC, HD, IMAX, etc.).
Capturing the Image to Composite
Chapter 3 of this book focuses on how to properly acquire/shoot an image for visual effects work. The section titled Bluescreen and Greenscreen Technology specifically delves into great detail on BS/GS methodologies and technologies. Therefore, the topic is only touched upon here in a general way.
Thanks to computer and digital technology, many problems with badly lit or shot elements can be corrected. However, a properly shot element will save time and resources that translate into costs and quality. Having the proper color screen, evenly exposed with a subject the correct distance away from the screen, can only help deliver a better composite—on time and budget.
Emerging Capture Technology Issues
Be aware that most, if not all, video cameras utilize an edge enhancement feature to artificially sharpen the image. This sharpening adds edge ringing artifacts that will result in very undesirable results when keying. Make sure this feature can be disabled on any HD system that is being used. If there is a sharpness issue with the image, it can be corrected in the composite later. Other cameras, such as DVCAM, have very low sampling in chrominance and tend to heavily compress the video data. This adds even more artifacts (noise) to the image that cannot be corrected and makes screen extraction difficult, if not impossible. (Please refer to the section Digital Cinematography in Chapter 3 for more detailed information.)
Emerging Approaches
A new emerging technique, which adds to the BS/GS set of tools, is the retroreflective curtain approach. This uses a retroreflective curtain in the background and a ring of bright LEDs mounted around the camera lens, which mitigates the need for any additional lights to illuminate the background. The advantage is that an extremely small amount of power is used and the LEDs require little or no rigging. This new approach stems from the invention of blue LEDs in the 1990s, which also allow for green LEDs. This process is still being developed but shows excellent potential for small-scale productions and has already been used on a few major projects.
Another emerging technology is color keying that uses a part of the light spectrum that is invisible to the human eye. Called Thermo-Key, it uses infrared as the key color. It isolates the living subject from the background and allows the artist to create a matte of the subject without the need for a screen. This is still in an early stage of development but could hold vast potential in specific situations.
As the capture side of the technology continues to advance, so will the compositing side of technology. But regardless of where the state of the art is at present, one thing remains constant: the need to create a believable composite that is of high quality and is on time and on budget.
After the Shoot
After the files are scanned and loaded online, a first pass at primary color correction to achieve a consistent and standard color basis for compositing is highly recommended.
One approach is to load all of the screen shots into a color correction application that allows images to be viewed sequentially in a thumbnail proof sheet mode. By conforming and setting a base color for the screens, a set of default extraction values can be set for the sequence, which can save time. However, the final subject color conform will need to be handled later in the final composites.
Another approach is to conform all of the subjects in the first pass and let the screens fall as they may. This allows the timer to set the primary color of the subject(s) and removes the need for individual artists to attempt color conforming on their own.
Extractions and the Magic Bullet
The general consensus is that there is no magic bullet when it comes to extractions. All of the techniques and tools available today have strengths and weaknesses. Ultimately, a combination of several techniques is usually most successful. Granted, at times quick and easy extractions can be made on perfectly lit and stationary subjects. However, those are the exception to the norm when budgets and time constraints are factored in. Ultimatte and Primatte are two well-known and powerful extraction tools and, when used alone or combined, can provide excellent results. The Image Based Keyer (IBK) is another tool that is quickly gaining popularity.
One widely used method for keying BS/GS photography involves pulling three primary keys:
1. Inner key: for the inside of the subject, which involves getting a solid interior matte that does not bleed out to the edge. This is a core matte in essence and should be solid enough to kill any small internal errors in the extraction. A good trick to eliminate any stray holes: Max filter the matte +11 and then Min filter it by −11 (values are an example only).
2. Outer key: for the exterior of the image that removes the exterior of the subject and does not bleed into the subject. This is a looser version of the next key below, the edge key, and is there to provide a good edge base on which to build.
3. Edge key: consists of a finer detailed key for the edge material, including hair or clothing fibers. These mattes might be built from a combination of luminance mattes isolated from the individual RGB channels.
These keys should then be used in combination to preserve fine edge detail while maintaining a pure clean and clear core matte.
Other Factors
There has been a recent trend to shoot “dirty,” which is the introduction of elements such as rain, smoke, and dust into screen shoots. This can result in an interaction that cannot be achieved in a sterile screen shot and is increasingly becoming the norm. Shallow focus is another area that can cause special handling of the extractions. These and other factors can force an artist into isolating different areas in a frame (with a garbage matte) and pulling a separate extraction that is later combined into an extraction composite matte.
In the case of smoke being shot in the background plate, the ideal situation is to have the smoke contained spatially behind where the subject needs to be composited. Later in post, additional smoke can be added in front of the screened element. But this cannot always be controlled, so in situations where there is foreground smoke, this smoke should be isolated if possible. Difference matting can work if there is a locked-off camera and action and a clean, smoke-free frame.
Difference matting can only really work in limited situations but is a good first approach. Other options include simply placing the element over the background and then layering additional or “matching” smoke to blend it into the scene. This will cause some modification to the existing look of the plate but is necessary. There have been situations, in extreme conditions, where the entire background scene has been digitally re-created and then the smoke was reintroduced in the composite using CGI or practically shot elements.
Motion Blur
Motion blur can be difficult in any composite. For the best looking composite, one needs to retain as much of this motion blur as possible to avoid strobing. As with most screen extractions, first extract a good core matte and mix it with a softer edge matte extraction. This method will allow the edges to be processed and treated differently and will provide the most flexibility in the end. It is this control and flexibility that discourages some artists from using tools that prebake the “composite” inside of the plug-in. For many reasons, the safest route is to never “composite” in the plug-in.
If motion blur is still an issue, evaluate all of the channels separately to see if the motion blur can be isolated with a luminance extraction. Once it has been isolated and restricted to the desired areas, create a color card that best represents the original color of the subject(s) edges. Composite the color card into the matte, place this result over the background, and composite the keyed subject over this. In special cases, and if the action allows, the element that is being keyed can be translated to fill the motion blur matte. This will give a more accurate and complex color than what may be achieved with a single color card. This trick can work and save the artist from having to resort to the final option of manually re-creating motion blur by painting on the final composite. This method can also be used to capture extremely fine edge detail that the keyer cannot isolate.
Incorrect Exposure
If a subject or the blue or green screen is improperly exposed, there will more than likely be some noise or chatter occurring along the extraction edges. The solution in the past was to expose the screen one stop under the foreground subject to get the greatest saturation and minimize screen spill. Currently, there has been a trend to expose the screen at the same exposure as the foreground subject. This will help eliminate grain issues unless the subject is being lit for nighttime or a darkened environment. Ideally it is better to shoot these dark scenes a stop or two brighter than the target and later reduce the exposure in the composite. The key to this working is having good communication with the Director of Photography prior to the shoot. (Please refer to Digital Cinematography in Chapter 3 for more information on this topic.)
Spill Suppression
With the exception of a black screen, all screens will have a certain amount of color pollution (spill bounce) affecting the subject. Even if the distance from subject to screen is set correctly, some amount will always be there. Most software packages have spill suppression options built in, and these are fairly effective in eliminating the spill. Do not suppress too much of the target color when utilizing this option. This overuse of suppression is one of the big giveaways when it comes to being able to visually detect screen composites. If the plate has been color timed, work should be done in the core color-corrected image. Spill suppression should only be performed on the edges if necessary.
In extreme cases of spill where the image is compromised beyond a process’s reach, a skilled artist can synthetically re-create the bad channel by blending the other channels together and then reintroducing this result into the original RGB file. It is not easy, but it can be done.
Several packages are available that handle edge spill quite well. Most of them use 3D color algorithms to isolate and replace the spill with the color that is appearing behind it. This will not work if further post-processing is required, since it will not allow the use of the process’s composite option.
Degraining Running Footage/Still Images
Adding grain to CG images was discussed in CG Compositing in Chapter 7. When dealing with shot images, it never hurts to run a low-level degraining or blurring pass on an image prior to extracting. The extraction might lose a little detail but the result could be worth the loss. However, the original image should be used for the subject in the composite and not the processed one. In extreme cases, re-creation of the image in areas of fine detail (i.e., a sailing ship’s rigging) may be necessary by tracking in a still image. This tracked piece can be a big time-saver and should be on the list of possible solutions to try. A clean degrained image can be created if there are several frames to work with. By aligning them, adding them together, and doing some math, a very clean and degrained image can be obtained (i.e., for 10 added images simply multiply by 0.1). Remember to add grain back into the final composite to match the surrounding images.
Starting the Composite
It is always beneficial to have access to the individual layers that go into a composite. Current tools may make it difficult to get in and really alter the pieces that go into the composite, but this is an individual decision that needs to be made at the artist’s level.
Generally speaking, today’s screen composites are rarely simple “A over B” processes—and sometimes it appears that the entire alphabet is now involved. This alphabet includes such things as relighting the foreground (FG) element in CG (to simulate outdoors), adding interactive light modulation (sun/shadows), plate flashing, edge warp/spill, edge blending, and chromatic edge work, to name a few. It is also critical that any surrounding live-action shots, or reference images shot at the time of filming, be closely analyzed. Since the ultimate goal of the shot is to cut seamlessly into the movie, all of the tricks and techniques at hand— unorthodox or otherwise—might be needed to achieve this result.
Relighting
Relighting can be rather tricky at times, but it can be worth the effort if the element is not appropriately lit. If an element was shot indoors, but is supposed to be outdoors, one solution is to add contrast to the element to simulate the outdoor look. Another option is to isolate the highlights and boost their values and modulate them if the scene can justify this.
Modulate Lighting
Sometimes adding some light/dark modulation to an element will add a little extra life to the image. By using either generated or practical smoke/dust elements a color correction can be run through this matte and achieve a nice and simple interactive lighting effect. In extreme cases (i.e., traveling through a jungle), a more heavy-handed approach can be added to simulate pools of light and shadows.
Plate Flashing/Spill (Standard and Multiweighted)
This technique is one that should not only be used for CGI elements but should also be applied to live-action elements as well. The color spill that was removed from the live-action element is similar to what needs to be added back to bring the element to life. A good visual example is what is seen in a dark room looking at a bright window; the bloom/flash that is spilling into the room is an extreme example of what must be replicated.
A good way to simulate this is by taking the background plate, applying a large blur, and then adding a small percentage back over the FG element (aka, plate flash).
The effect can be improved by performing a secondary, multiweighted plate flash that adds more flash based on the background’s hotter areas. This can be accomplished by pulling a high-contrast luminance matte that isolates the hot spots. A Sobel matte61 is then created of the subject matter, and then the high-contrast matte is placed into the Sobel matte. The resulting matte is composited with the background plate into it. Next, apply a large blur to this image and then screen, or plus it, back over the extraction (compositing order: BG, Extraction, Edge Sobel comp). This should be handled very delicately and can easily be controlled by adding a comp multiplier and adjusting the earlier parameter values.
Edge Wrap
Edge wrap is an element integration technique that is meant to simulate what would happen to a foreground element that was photographed in the real plate environment (i.e., the background bleeding and wrapping over it). This is one compositing technique that must be used correctly, because it can easily be applied incorrectly and overdone. The simplistic approach is to create a Sobel matte from the extraction or CGI element and use this matte to drive the edge wrap. It is very similar to the plate flash/spill technique but more contained along the edge of the element that is being composited. The saying “less is more” really does apply here. The “snail trail” look of a soft even line around the entire element is to be avoided. Using the above-mentioned multiweighted trick can reduce this problem.
Edge Blending
This is more relevant to CGI elements, but external edge blending is something that can help add that final 5% to push the element into the composite. As with edge wrap, this technique simulates the light scattering and edge softening/blending that is seen when analyzing photographic images. Hard edges on extractions are one of the keys that will give away a screened composite; this technique can help to eliminate this issue.
Using a tighter Sobel matte than the edge wrap, a side composite is created where the element is placed over the background (BG). It is then blurred, regrained, and placed into the Sobel matte. Next, add a percentage of this edge element back over the main portion of the composite. A similar trick can be used to add internal edge blending to CGI renders (utilizing a normals or Fresnel render pass) in order to lessen their hard lines.
Compositing Screen Elements in Stereoscopic 3D
The recent rebirth of stereoscopic movies has added a new twist to compositing. Since the requirements are to create two identical composites, some issues can cause breaks in the convergence. One such issue is specular highlights and reflections. These will need to be isolated and conformed to match in the left and right channels to eliminate the problem. Packages such as Nuke may be configured to create left and right composite trees in tandem with the capability to split the composite tree into a left/right branch and rejoin it after the corrections. Certain fractal/noise-based operators create issues as well. It is not without its issues, but with the advent of new compositing packages, the process is not nearly as complicated and cumbersome as in the past. With some work, even elements that were shot without a 3D camera can be converted into passable 3D elements.
Rotoscoping
Brief History
In 1917 Max Fleischer patented the technique of rotoscoping after inventing and using it on his 1915 series, Out of the Ink Well. The method involved using a movie projector to project a single frame onto a surface. The projected image(s) were then traced by hand onto paper and rephotographed frame by frame.
Early visual effects artists used a variation of this method to create their mattes as well. This process involved an animation camera focused on a special table. The camera was loaded with already processed footage. By installing a light behind the camera, it was converted into a projector that would project a single image down onto the pin-registered camera bed, where the artist would pencil trace the image onto a peg-registered62 sheet of paper. This pencil work was rephotographed frame by frame and tested for its integrity against the original. If additional work was needed they would go back and readjust the pencil drawings. After final buy-off was received, the images were then transferred and inked onto peg-registered animation cells and rephotographed onto high-contrast black-and-white film.
In today’s visual effects rotoscoping process, digital footage is loaded into a rotoscoping software package and the artists use splines63 to trace the required articulated mattes. Dependent on the roto software, the splines can be converted into matte images and read into the compositing package. In some cases the compositing software can import the roto spline files directly and allow their editing.
Rotoscope Approaches and Techniques
The best way to begin the task of rotoscoping is to review and study the footage of the subject to be articulated. Things to look for: Can any of the roto be done procedurally (i.e., stabilize the plate and use the inverted data to apply the motion to a single frame)? Will any sections require frame-by-frame hand articulation? Can fine hair detail be extracted using luminance matting?
After the plate has been analyzed, select the frame that has the most complex edge to use as the starting point. One big shape is not the ideal method; rather several smaller key shapes are the preferred approach. This allows each shape to be keyframed independently. In most cases, this is needed especially when major motion is involved (i.e., like a running person) and frame-by-frame keying is required.
Sometimes the most difficult task can come from the need to rotoscope a person who appears to be motionless. Film weave and small movements are always occurring in this situation. Prestabilizing the plate to remove this is helpful, but if that is not a possibility, begin by hand articulating key frames as far apart as possible—then go back and refine as needed. For example, key the spline on 16’s,64 then refine on 8’s, and if needed, continue on 4’s, then 2’s, and if absolutely necessary, on 1’s. To avoid matte chatter, floating, or popping, the fewer key frames used the smoother and better the mattes will look. Key frames that are divisible by 2 will allow for a more mathematically even keying (i.e., 32, 16, 8, 4, 2). Using odd, or random, key frames makes final refinement more difficult and inconsistent.
Some applications provide automated forms of rotoscoping and can be utilized with varying results. But most rotoscoping is still done by hand and is the unsung hero of the visual effects industry. Every day new techniques are being developed and refined as technology advances. Some newer packages utilize 3D layout data to help automate some of the process.
Using the Articulated Mattes
Once the mattes are complete they can either be converted to black-and-white images on disk or imported into the compositing package. If they can be imported in a native format that allows editing of the splines from within the compositing package, it can speed up slight alterations that might need to be done. Otherwise, it is usually best to edit them in their native package and reimport them.
Processing the Articulated Mattes
The addition of blur to articulated mattes is a standard and necessary practice. An unprocessed matte is rarely used in a shot due to the fact that the resultant image would be too sharp and strobe. If the splines contain vector data for motion blur, they should be switched on for the best results. In addition, post-processing the matted edges by adding some dithering, or randomizing, in the composite will provide a more natural and organic look to spline-based mattes. Depending on the software package, some roto will need to be done to the center of the live-action blur. Other roto tools allow the artist to grow or shrink selected areas of the mattes edges with a built-in fall-off. This can be useful when one side of the matte needs to be softer for extensive motion blur.
Garbage Mattes
Garbage mattes65 are simpler roto mattes that do not follow a detailed edge but merely serve to isolate a specific area. These are usually used to isolate areas for color correction and can be combined with specific keys to apply the key only in specific areas (hair on a head, etc.). Their use usually requires a very large blur since they are not tightly articulated.
Digital Painting and Plate Reconstruction
Motion Blur Correction with Paint
“When in doubt, paint it out” has been a saying since the migration to digital compositing. At times hand painting can be a good solution for fixing extraction issues. However, the time needed to fix an extraction should be weighed against how much time is saved by painting away the problem on the final composite.
Cloning and the smudge/drag tool are suggested methods for adding motion blur back to elements shot on a BS/GS. There are even situations when actual hand painting of mattes is still done for motion blur, but for the most part, paint on the final comp is the preferred method.
Plate Reconstruction
The lines become blurred when discussing the plate reconstruction aspect of the visual effects workflow. Each facility may treat it differently. Plate reconstruction can be classified under such areas of responsibility as rotoscoping, compositing, or even layout. Most of the techniques are utilized across several disciplines. A good solid 3D or 2D track solve is very helpful in the process. Once this has been created, a paint package that can read this data is a truly powerful tool that will allow an artist to automate the track, paint, and cloning process.
A first approach should try a fully procedural process in a composite package. It is an excellent introduction to compositing for the junior artist as well. The use of clean plates (shot on location or painted to be clean) is the backbone of plate reconstruction. If one is on location during the shoot, gather as many reference images as possible (see the Plate Stitching section below).
After clean frames are obtained, or created (remember to de-grain), the next step is to utilize the tracking data. The data should provide the necessary track to split the clean frame into the moving scene with soft splits and/or articulated mattes, adding the final part of the equation. Running grain should be added to the re-constructed image area, closely matching the existing footage.
If the procedural approach does not solve the problem, moving to a procedural hand-painting method is the next step. By using a track paint solution, the amount of flutter/chatter that could be introduced with a frame-by-frame painting approach can be reduced. In the end, frame-by-frame painting might be the only solution. Keep it simple as it is easy to paint a single frame, but in motion, things can go horribly wrong. This type of painting work requires extreme patience and talent and is not something to be approached lightly.
Rig Removal
Off-the-shelf packages exist that are made to automate the process of rig removal, and at times they work quite well. If not, other methods, like those mentioned in the plate reconstruction section, may be utilized. A standard wire removal technique involves generating a matte for the wire and filling that area with the directly adjacent pixel data. This may cause ghosting at times and should be reviewed closely.
Plate Stitching
Plate stitching is a powerful way to generate new backgrounds, or clean plates, and is used in digital matte paintings as well. At times the original plate shot might be too problematic to work for the final effects shot for any number of reasons. A total reconstruction might be the only option. Hopefully frames can be isolated to help re-create the plate.
Any location images may be very handy and should always be a consideration. The HDRI66 images are very easy to capture and usually do not require the assistance of the film crew. However, the multiple frames from a film camera, if on a dolly or stabilized arm, will allow an artist to frame average and degrain the image producing a high-quality source image. HDRI frames will likely contain some form of digital noise/grain, but shooting a few frames with the camera mounted on a tripod and a remote shutter release will allow the same degraining capabilities.
Several applications exist that will stitch these images together. Each works with different algorithms, so other packages should be explored if the first package fails. Recent projects have utilized proprietary software that uses running footage (captured from six synchronized running cameras) to create virtual backgrounds to travel through. The VES’s (Visual Effects Society) award-winning shot from War of the Worlds (2005), where the actors are fleeing down the freeway in a van, is an example of this technique. The stitching for these require complicated 3D tracking and motion solving and image re-projection, but the flexibility it affords is priceless.
Scene Tracking
3D Layout
Layout, also referred to as matchmoving, is the building block in today’s modern CGI shot production. With its origins in CG feature animation, the 3D layout team creates the scene and camera that will be the foundation for a fully CG shot. Almost every shot, be it a 2D screen shot or a massively complex 3D shot, can and does utilize a properly solved 3D scene. The process may sound relatively simple in the following paragraphs. However, the required user knowledge of lenses, cameras, field of view, image distortion, and numerous other factors make this a very challenging and complicated discipline.
Methods and Data Acquisition
Most of the tracking packages are based on a pattern recognition algorithm that was developed in the late 1980s and published at SIGGRAPH. This is a reference-based system that does subpixel matching using a fast Fourier transform (FFT) on a pixel-by-pixel basis. It is usually based on multiple individually defined search patterns. This data is then translated into 3D special coordinates. This allows the shot to be re-created accurately in the computer. At this point, the layout scene can be passed on to an animator who can correctly place the CGI character in the proper spatial location. This 3D scene and animation can also be loaded into compositing packages for accurate tracking and placement of practical elements.
Utilizing the Data
Almost all of the professional software packages today allow for the importation of 3D scenes (or 2D corner pin/track point data). This data allows the artist to correctly add elements in 3D space that tracks along with the plate (i.e., adding smoke, steam, explosions, etc.) and may be attached to CGI elements as well. The most powerful systems allow for the repositioning of elements in 3D space, which opens the door to the world of 2.5D and, ultimately, 3D compositing. This flexibility eliminates the need to move back and forth between the separate packages, thus saving time. Currently software is in development that combines all of this into one package and will ultimately bridge the gap between all of the disciplines. Specialization is one method that has been proven over time to facilitate and move large volumes of work through a facility. The right tool for the right job is still the most efficient use of resources at this time.
MATTE PAINTINGS/CREATIVE ENVIRONMENTS
Craig Barron, Deak Ferrand, John Knoll, Robert Stromberg
Matte Paintings: Art of the Digital Realm
A matte shot is designed to be on quickly, to be part of the picture. You are not creating a pretty painting—you are making a part of an integral piece of film. It should serve the purpose of carrying the transition between the scene before and the scene after; in other words, be part of it. It is not put there to run for 10 minutes, so that you can study it to see if it’s a painting. It just serves a purpose, so that the whole picture can be a successful entity in itself.
—Matthew Yuricich

Figure 6.50 Matthew Yuricich in his studio, working on a matte painting for Ben-Hur (1959). (Image courtesy of Matthew Yuricich.)
What Is a Matte Painting?
Although matte shots are one of the oldest visual effects techniques in film, the reason for having a matte painting has basically not changed over the years. Filmmaking is telling stories and stories take place in settings that must be depicted visually. Sometimes these settings exist in reality, and the filmmaker can travel to that location to shoot, but in many cases the setting must be fabricated in some way. Very early on, matte painting became an important tool to create settings in a cost-effective and efficient manner. Matte paintings help tell stories that would be impossible without them for technical, logistical, and budgetary reasons.
Matte painting has been and always will be a vital ingredient in expanding the scope of filmmakers’ visions, regardless of technology. It is a necessary element in the filmmaker’s toolbox. Matte paintings transport the audience to past eras or take them deep into the future to discover new and exciting worlds. They make it possible for filmmakers to keep production costs down and to give scale and importance to settings. Matte paintings are needed so viewers can see clearly. They are needed to tell viewers where they are.
Matte Painting Pioneers and History
It is generally accepted that Norman Dawn is the pioneer who first used glass-matte trickery, such as his visual “repair” work on the historic but dilapidated churches seen in the 1907 film, California Missions. The aptly named Dawn ushered in matte painting as a new cinematic art form, mentoring artists who subsequently produced thousands of matte paintings throughout four decades. Dawn has been strangely overlooked, perhaps because the matte painting effect itself has always been designed to be invisible.
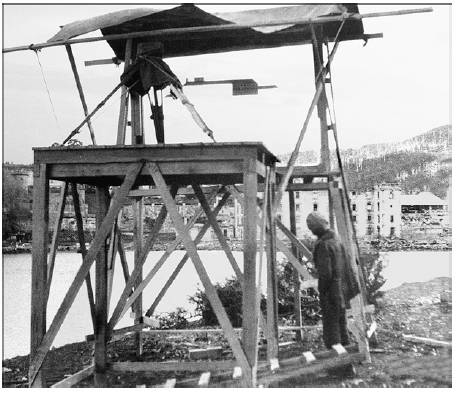
Figure 6.51 A matte-painting-on-glass setup used by director Norman Dawn on location in Tasmania for the silent film For the Term of His Natural Life (1927). (Image courtesy of Professor Raymond Fielding.)
Even with today’s technology, one cannot assume that creating a matte painting is any easier or automatic. Whether using paint or pixels, matte painters have always had the same creative problems at hand. The great artists and pioneers from Norman Dawn to Albert Whitlock have paved the way for a new generation of young talent. Armed with only a piece of glass and a paintbrush, these early explorers of visual effects were given the same set of creative issues that today’s artists face and yet they were successful using only the simple tools available to them. What this conveys is that it doesn’t matter what is used—what matters is how it is used. It is and always will be the artist and not the machinery that determines a successful shot.
A simple example would be the addition of a second story to a one-story building. Rather than spend the money with the art department to build a two-story building, just build the first floor and add on the second floor with a matte painting. By understanding this basic concept, adding a matte painting to a shot has the potential for being the answer to numerous creative production problems.

Figure 6.52A To add height to an existing set of buildings, digital wireframes were applied to this shot in The Truman Show (1998). (Image courtesy of Paramount Pictures © Paramount Pictures Corp. All rights reserved.)

Figure 6.52B The final cityscape, combined with live-action footage in the foreground, was completed at Matte World Digital by Brett Northcutt. (Image courtesy of Paramount Pictures © Paramount Pictures Corp. All rights reserved.)
A very important consideration in order to fully utilize matte paintings is the skill of the matte artist. He or she must be able to “paint” (using paints, digital technology, or both) a painting that replicates photographic reality perfectly. Not almost perfectly but perfectly! This is no easy task and anything less than 100% is failure. So taking into regard the cliché of “failure is not an option,” there are few tasks as demanding as doing a matte shot. It is a fine line since one cannot do “better than reality” and any-thing less than reality is obvious to the viewer. Only perfection goes unnoticed.
The need for perfection was not always required in the early days of cinema. Sets were obvious, overacting was sometimes needed for silent films, and even hand-cranked cameras made movement unreal. So miniatures and matte paintings were often recognized by the viewer but still easily accepted as part of the film. However, as filmmaking became more sophisticated, so did the audience and today’s best films look and feel real.
Visualizing the Matte Painting Shot in Pre-Production
In recent years matte paintings and overall environment designs have become essential parts of pre-production. Understanding the film world that is about to be created is crucial for budgets and general production costs. How much needs to be built? What does this world look like? More and more the artist’s importance comes to light.
Now more than ever, films are made or not made based on costs. A good artist working with a production designer and director can be a pivotal factor in whether a film ever gets made. A matte painter who creates his or her own concepts can save time and money for production by knowing the technical requirements needed, not only for the complexity of the shot, but also for the amount of set that has to be built. This becomes very apparent in set extensions where the matte line is defined by what will not be physically built. The film’s producer will find that the ideas and research required for a good concept is priceless. When the concept is right, the matte painting becomes very easy to execute.
On-Set Supervision for Matte Painting Shots
The matte painter should always be on set whenever a live-action plate is photographed for a matte shot. Advice and guidance to the director may be required in order to ensure that a final shot will be correct and within budget. Planning is key. Understanding the story point of the shot is perhaps the most important consideration. Why is the shot in the film? How will it advance the narrative? Where should the viewer look while the shot is on the screen? These questions severely complicate the process. Only by creative collaboration with the filmmakers and by hard work can matte shots become a welcome addition to a film.
A matte artist should have a multitude of skills. He or she should have a basic understanding of cameras, lenses, lighting, and composition. Stages of today are filled with blue or green screens. The matte artist can be extremely helpful in composing shots to give the filmmakers an understanding of what will eventually be added. Highly refined illustrations have become a critical element on set.
The set is a battleground where every minute costs a lot of money, so extreme awareness is required when stepping in as the on-set matte painting supervisor. Most likely an on-set matte painter will work under a VFX Supervisor hired by the studio whose job is to deal with any technical issues pertaining to visual effects. Almost any camera move that can be imagined can be used in conjunction with a matte painting. All that’s needed is time and money. The on-set matte painter should be able to give the director a solution for creating his vision of the shot while keeping it on or under budget.
Some of the factors to consider when choosing a matte painting technique on set are cost, levels of interactivity between performers and their environment, and the level of realism in the production design. Is it cheaper to build a set physically for principal photography or later in post-production? Depending on the design and surfacing complexity, it could go either way. For example, a short sequence featuring complex articulated machinery would almost certainly be less expensive to create in post-production. On the other hand, having significantly fewer effects shots in post can sometimes pay for money invested in a set for a lengthy sequence.
How extensively do the performers interact with the environment, both from a lighting and physical interaction standpoint? While many types of interactions can be faked in post, they increase the complexity for everyone involved, especially for the actors. Nothing looks more realistic than photography of a real object. Depending on the skill of the artists involved and the post-production budget, sets created in post will range anywhere from perfectly realistic to significantly less so. What level of stylization is acceptable to the production? It is frequently difficult to light the actors for their intended environment and to light the process screen for good extractability at the same time. Usually this ends up being a compromise and may result in plates where it is extremely difficult to achieve perfect realism.
Very often the answer to these trade-offs is to strive for the best of both worlds by building a partial set with extensions to be made in post. This allows full interactivity both from physical contact and interactive lighting and shadows. It also frees the director of photography from the dual constraints of lighting the set for look, as well as the technical requirements of lighting a process screen for extractability. Portions of the set that will be seen infrequently, or would be prohibitively expensive to construct, can be made in post using less expensive techniques.
How much set is it smart to build? This division is usually determined during discussions with the director and production designer. One fundamental difference between physical sets and post-production set extensions is that once a physical set has been constructed, the production can shoot as much material on that set as desired without incurring additional cost. But every shot of a set extension will require labor to be expended, making longer sequences with more shots more expensive than shorter sequences. This trade-off is usually factored in to the decision so that some portion of the sequence can be played mostly or entirely on set once a scene shifts to dialog exchange.

Figure 6.53A In Star Trek IV: The Voyage Home (1986), ILM’s matte department filmed extras on an airport runway.(Image courtesy of Paramount Pictures © Paramount Pictures Corp. All rights reserved.)

Figure 6.53B For the final shot, Chris Evans’ matte painting of Star Fleet Command Headquarters was composited with the live-action element. (Image courtesy of Paramount Pictures © Paramount Pictures Corp. All rights reserved.)
Very often on a set-extension shot, the Director of Photography will have the tendency to frame according to what he can physically see. That becomes a problem when the shot requires the addition of a castle on a hill in the background, and the framing is focused on the beautiful street merchants and buildings in the foreground, cutting off almost completely the top portion needed to insert the castle. Repo is the word, but sometimes the action in the foreground will prevent that. An on-set matte painter can show the film crew the concept and even use a grease pencil to draw directly onto the video monitor.
The days of the static establishing shot are almost gone. The majority of shots now use a camera on a moving dolly or a boom arm. This is not so much a problem now that software allows for changing perspectives within matte shots. Creating reference points for tracking software makes these moves possible within a shot.
The on-set matte painter can accomplish tracking by placing little crosses everywhere, or colored spheres, some lighted, on set. But placement of all of that hardware takes time, something there isn’t much of during production. And the amount of work in post, digitally removing all of these trackers, translates into more time. Today, most 3D tracking software doesn’t need much on-set placement to track a shot. Some architectural elements in frame will be enough to give perfect tracking. Some matte painters don’t use trackers and prefer to let the crew shoot clean, as long as there are enough tracking elements in the shot. This allows the production designer and the crew to work faster, saving costs.
Basic Skills and Tricks of the Trade
The matte painter must master all of the basic skills that are required in fine art and create elaborate environments, while keeping costs down. A large portion of digital matte painters could not compete in matching the skills of a traditional matte painter of the optical era. Now, even with the ease of use of Photoshop and the photo-montage approach that most matte painters use, some basic knowledge of fine art is still required for a successful matte painting.
Good composition requires a mastering of perspective. This should be a natural skill where an artist can extend any plate by following vanishing points and finding the horizon line. Three-point perspective is required, even the ability to bend lines to match the lens distortion. Again, in the digital age, the use of 3D software can help with mapping correct perspective for complex shots. This often saves time during production.
Composition is the first thing that will make the difference between a total failure and a flowing shot. Composition is the very subtle craft of creating a pleasant balance of elements that will ultimately harmonize a painting and at the same time allow the audience to focus on a chosen element without being forceful. If a matte painting isn’t working, most of the time it’s because of bad composition.
There are two ways to prepare for composition. The first one is to use a black-pencil line without any shading, like a drawing. The other is to block the color by volume without ever outlining anything. The latter should be used over the former because the harmony of a good composition is also achieved with tones and colors.

Figure 6.54A Albert Whitlock’s matte painting of a mountaintop holy city.

Figure 6.54B The final shot with live action in the foreground. Whitlock centered the city to make it a prominent feature in a shot for The Man Who Would Be King (1975). (© 1975, renewed 2003 Columbia Pictures Industries, Inc. All rights reserved. Courtesy of Columbia Pictures. THE MAN WHO WOULD BE KING © Devon Company. Licensed by: Warner Bros. Entertainment Inc. All rights reserved.)
The only way to create volume is to have light. The artist needs to understand how light reacts, bounces, and affects other objects. The live-action plate to be matched has all this information, especially when shot outdoors. There is no excuse for mismatched light when the reference is right in front of the artist’s eyes. At this point only the light and shadows should be the focus; forget about texture and details. This will come after. No amount of details can save a badly lit matte painting.
At this stage, the work will look real, even without the details. It’s quite amazing how the brain will process the information. What is not working can be seen right away. This will be much harder to do after details are added. Remember that a matte painter is matching a live-action plate that is degraded by the amount of information that it can record, its grain, and its depth of field. The quality of the optics plays a large part as well. There’s no need to waste time adding details where they are not needed.
Considerations for Interior Scenes
Interiors are usually dominated by indirect light. When rendering interior scenes using computer graphics, the most realistic results are obtained by systems that can efficiently handle multibounce radiosity calculations.

Figure 6.55A The fictional New Orleans train station in The Curious Case of Benjamin Button (2008) was shot on a sound stage with a minimally constructed set.

Figure 6.55B Matte World Digital completed the 3D environment using physics-based lighting, seen from dozens of camera angles throughout the film. (Images courtesy of Paramount Pictures. THE CURIOUS CASE OF BENJAMIN BUTTON © Paramount Pictures Corporation and Warner Bros. Entertainment Inc. All rights reserved.)
Considerations for Exterior Scenes
Exterior scenes are usually dominated by the need to synthesize natural phenomena, such as terrain of varying types, the sky, clouds, water, and plants. This is such a complex task for computer graphics that a number of specialized products have come to market specifically to create these effects.
Two-Dimensional Flat Extensions
When the camera is fixed in position, the simplest extension technique is often the use of a 2D image. This image could originate from a variety of sources, including a painted image, still photos of existing sets or locations, miniatures, and computer-generated models. This is often the best choice for low-budget projects and one-offs because it is very direct and requires very little setup.
Camera Projection Techniques
One way to get the most bang for the buck is CG camera projection. By creating a single matte painting and dissecting it into layers, the matte artist can project separate elements onto simple geometry in the computer. This allows the artist to achieve the sense of dimensionality without a tedious model build and long render times. It also allows the art to dictate the look of the shot and keep in play a single vision.
The technique of CG camera projection is very simple. It basically allows any painting to stick on a given geometry through the lens of the virtual camera. Some camera moves will increase the amount of work needed to complete the work. Any shift in perspective in a camera move will introduce parallax. What was hidden at one point in the shot will be revealed later on.
A dolly moving sideways creates a lot more work than a vertical boom. In a dolly shot, everything, from foreground to background, will reveal a hidden side. On the other hand, a boom up or down will only show 100% of all the elements at its top position, thus making it very easy to paint since the camera will move to hide what is behind the objects.
Miniatures and Computer-Generated Sets
Miniatures and computer graphics are widely used to extend sets. Miniatures have been used for this purpose since the early 1900s because of their relative simplicity and high level of realism. Both miniatures and computer graphics have advantages over 2D techniques in that generating additional views and altering lighting are small incremental costs, while 2D images must be created anew.
Integrating partial miniature models in a matte painting is a great way to ensure realism. One can also use very crude models to understand the interaction of the light on a given subject. The value of using miniatures becomes very clear when dealing with very specific lighting scenarios on midground objects. The cost of building a miniature has very little impact on the budget as long as it can be used for several shots. Shooting the miniature for an outdoor scene is very rewarding since the sun is the main light source.
It is essential for the orientation of the sun to be matched to the plate, and that the elevation and angle are the same, as well as the field of view. It is also important to keep the image sharp by utilizing good depth of field, which is achieved by using small-aperture settings (such as f16 or f22) on the lens. The setup must always be photographed on a tripod, and the exposures must be bracketed, even in raw mode. This will give the greatest range to play with to match the plate.

Figure 6.56A This miniature of Nockmaar Castle was created by Paul Huston for Willow (1988). (Willow ™ & © 1988 Lucasfilm Ltd. All rights reserved. Used under authorization.)

Figure 6.56B Chris Evans painted the dark sky for the final composite. (Willow ™ & © 1988 Lucasfilm Ltd. All rights reserved. Used under authorization.)
A miniature that is not highly detailed may become more effective after the matte artist adds necessary detailing in the painting. Atmospheric perspective may also be required by reducing contrast in the miniature and the painting. Another good thing about miniatures, when dealing with projection matte paintings, is that all of the hidden sides of the projection can be photographed and patched without having to repaint. Camera projection has become the main tool of the matte painter who in the past decade had to compete with the rise of 3D environments and complex radiosity algorithms that allow filmmakers to move their camera freely in a synthetic landscape. Only with the development of projection tools in 3D packages was the matte painter able to stay in the forefront of today’s demands for such shots.
Computer graphics have one large advantage over miniatures when working on large sequences within a short post period. The advantage is that once the asset has been created, any number of artists can use it to create shots simultaneously, while miniature elements must be photographed one at a time and may require a longer post.

Figure 6.57A Projection matte painting techniques were used to create the Bureau for Paranormal Research and Defense (BPRD) building for Hellboy 2 (2008). The projected matte painting only covers a specific camera move. Different angles will reveal texture smearing as seen in Figure 6.57B. Painting by Deak Ferrand for Hatch FX. (Image courtesy of Hellboy © 2008 Universal Studios Licensing, LLLP. All rights reserved.)

Figure 6.57B A top view of the building shows that the projection falls apart when the camera is moved off its set path. Painting by Deak Ferrand for Hatch FX. (Image courtesy of © 2008 Universal Studios Licensing, LLLP. All rights reserved.)
Finding the Best Frame
A time-saving tool when dealing with projection matte painting is the ability to find the best frame. The best frame is the moment when the camera shows most of the sides that have to be painted. There will always be such a frame—it just needs to be found. That frame will become the main painting, with all the layers needed. That painting will be projected at that specific frame and will cover the entire view.
Figure 6.58A Live-action footage of the Las Vegas strip for Casino (1995). (Image courtesy of Casino © 1995 Universal Studios Licensing, LLLP. All rights reserved.)

Figure 6.58B Matte World Digital topped the buildings using radiosity software to create the realistic bounce-light reflections of the 1970s-era strip. (Image courtesy of Casino © 1995 Universal Studios Licensing, LLLP All rights reserved.) needed. Three passes might be necessary, or 20 sets of patches on 20 different frames might be necessary. It depends on the complexity of the shot.
After that initial setup comes the task of patching. Patching is like filling gaps on a cracked wall. Any time in the sequence before or after the best frame, one will see two things happen. First, the sides of objects that were previously hidden will be revealed. Second, the horizontal plane will be stretched. That is when the work begins. The artist must find a frame that shows the unprojected elements and then render it; then bring it back in Photoshop to paint over any gaps on separate layers. The layers must be saved with the corresponding alpha channel, before going back to the 3D software. At that frame, the patches are re-projected on the same objects that have the main projection, but this time using the alpha channel to reveal only the area
Another trick for lowering the number of patches needed on the perimeter of the image is to render the 3D layout with a wider lens and render it at a higher resolution. Then in Photoshop, the live-action portion is replaced in the exact position of the original view. The artist can then paint with this wider angle and project the painting this way. After this is done, the camera is reset to the original lens. Now there exists a projection that covers far beyond the camera view on all sides, allowing the artist to skip the patching of the sky and background hills.
Digital painting has made it easy to merge imagery from photographic sources, greatly improving realism, while saving vast amounts of time. Layers have made it easy to try out new ideas without committing to a particular path and to easily create multiple versions of a painting. Digital compositing means that tasks like creating invisible blends between paintings and live action, and matching color across the split, have become relatively effortless and can now be taken for granted. The artist is free to focus on aesthetics.
Re-Projected Photo Survey
When the set to be extended consists of repeated elements, like a long corridor, for example, an extremely effective way to create extensions is to photograph the set pieces to be replicated and then build low-detail polygonal geometry to match. The artist projects the photography onto the CG model and renders as needed. This technique is very powerful and flexible and can be used anywhere a set, miniature, or location exists that can be photographed.
This technique was used extensively in Transformers (2007) to extend city-street plates shot on the Universal Studios backlot to make them appear to have been shot in downtown Los Angeles. Carefully photographed stills were gathered at the actual Los Angeles location, and these stills were projected onto geometry to replace skylines and extend streets off into the distance.
The objective of re-projecting photographs onto geometry is to be able to render them from a different camera position and have the result look somewhat correct. The geometry is essentially being used to perform a perspective-correct image warp. To reduce labor, it is desirable to avoid building every detail in the object to be re-projected, so generally the minimum amount of geometric detail is built to satisfy the desired illusion. This means that the results are most accurate when the synthetic camera is near the center of projection and becomes less accurate as the synthetic camera moves farther from the center of projection. For this reason it is desirable to photograph the re-projection subject from a perspective relatively close to that needed in the final film.
Because rough geometry must be built to match the re-projection subject, the photo survey should include additional photography to assist that process via image-based modeling techniques. Some basic measurements of a handful of objects in the scene can greatly assist the accuracy of the modeling process.
The Need for Creative Compositing
Part of being a good matte artist is seeing things that others don’t. This is something that comes from within and is hard to teach. It’s a basic understanding of the surrounding world. Why does the light do that? What happens if atmosphere is added? What happens when it’s windy? These are just a few of the thousands of questions a matte artist asks him- or herself, starting as a child growing into an adult. It’s looking at the world and trying to understand it while others just walk by.
Having “an eye” cannot be taught. An artist is either blessed with it or not. It is the ability to step back and spot what is wrong in a painting or a finished shot, to self-criticize the work. This is important when trying to figure out why shots don’t work: the slightest difference in color, brightness, or softness—there are hundreds of reasons why a shot isn’t working. A skilled matte artist can usually zero in on the problem quickly. This can be a tremendous value in times of pressure and frustration.
A great matte painting doesn’t always ensure a successful shot. As the artist hands her work over for compositing, many things can go wrong. The need for a compositor with an artistic sense is crucial in taking the shot the full distance. Compositing is an extension of the process of making the painting look alive. A good matte painter needs something essential to successfully create a painting—the eye. It’s also applicable to the compositor.
A skilled compositor can make or break the final product. It is also critical for the matte artist to understand how the shot cuts into the film. This means having an understanding of the flow of the shots that precede it and the ones that follow it. There should be a relationship within the entire sequence. Having an edit of at least three shots before and after the matte painting helps make sure that continuity is kept. It’s important to know the film. Is it meant to be absolutely real? Is there room for dramatic interpretation?
The matte artist needs to know when to simplify and when to push the drama. Not every sky is perfectly composed. Not every tree is perfectly arranged to fit a frame. There are imperfections everywhere and this should be reflected in the work. Otherwise the audience will know that they are being fooled.
1 1:85 and 2:35 are ratios of width to the height of the image.
2 Super 35 takes advantage of the full 35mm image area, including what would have been the optical soundtrack.
3 IMAX is a 70mm film running horizontally through the projector to provide a very large image projected onto a very large screen.
4 Codec refers to the specific type of compression used on images.
5 DPX: Digital Picture Exchange format based on the original Cineon format. ANSI/SMPTE (268M–2003).
6 EXR: image format; also known as OpenEXR since it’s an open standard. It is a flexible and high-quality raster image format.
7 Film-out: the actual recording of the digital image data onto motion picture film.
8 In fact, if the lowest or highest possible value occurs a lot in a photographic image, then that image is generally underexposed or overexposed. Many digital cameras can display a histogram of the pixel values in captured images; a fairly flat histogram without tall spikes at the left or right end is a sign that the image has been exposed correctly.
9 Scanning is needed only when starting with film, an analog process. There is no need for scanning when a project originates in digital form.
10 Note that “tracking” of a plate is not the same as stabilizing the image.
11 The exact measurements are 2028 × 1556 pixels for a full-aperture (Super 35) frame.
12 E-film website: www.efilm.com.
13 However, it is increasingly more common to hand the digital files over to the digital intermediate (DI) facility here they are inserted into the DI version of the project, timed, and then output to film as the final step of the DI process. This topic is covered in the Digital Intermediate section later in this chapter.
14 Merriam-Webster’s Dictionary.
15 See http://www.adobe.com/digitalimag/pdfs/AdobeRGB1998.pdf.
16 Physical device measurement is not the only basis for color systems; some spaces are defined in perceptual terms and thus include color processing done by the brain. All of the color spaces listed in this section are measurable; that is, they represent color stimuli, not perceptions of color stimuli.
17 sRGB: a color space designed to support the use of desktop displays.
18 Note that the comparison adds a new dimension (luminance) and is thus volumetric. Gamut comparisons based on chromaticity diagrams alone (in CIE x, y space, or related planar spaces) are extremely misleading and benefit only marketers and vendors, not artists.
19Linear here means radiometrically linear: Double the luminance reflected or emitted by an object, and the code value representing that luminance doubles as well. This is how users of CGI renderers understand the term linear; it is not how video engineers understand the term—they believe linear implies a power function.
20 See “Appendix H: Color-Primary Conversions,” in Edward J. Giorgianni and Thomas E. Madden, Digital Color Management: Encoding Solutions (2nd ed.) (John Wiley and Sons, 2008).
21Color Gamut Mapping (Jan Morovic, Wiley, 2008) provides a comprehensive treatment of gamut mapping strategies.
22 As can be found by searching for "color management” on http://www.sourceforge.net.
23 For more detail on the use of ICC profiles, see Phil Green (ed.), Color Management: Understanding and Using ICC Profiles (New York: Wiley, 2010); also see the ICC website’s white papers, available at www.color.org.
25 Both provide downloadable white papers describing not just their products, but their take on the industry problems they are attempting to address. In evaluating the utility of commercial or open-source color management, all of this documentation—proprietary and open-source alike—should be considered required reading.
26 Mark Fairchild, Color Appearance Models (New York: Wiley, 2005) covers this topic in depth; see also the previously mentioned Digital Color Management: Encoding Solutions by Giorgianni and Madden.
27 Wikipedia’s “Correlated Color Temperature” article has a particularly good section showing many different chromaticity coordinates mapping to the same CCT.
28 Inappropriate color cues can also result when on-screen elements that the artist traditionally regards as neutral (such as gray-colored system or application menus) have their displayed color changed by color management systems that rewrite low-level 1D lookup tables in the graphics card. Such low-level manipulations unfortunately affect all on-screen elements, not just the image data being color-managed.
29 This also accounts for a mismatch in vividness when a monitor is brought into a screening room for a misguided side-by-side comparison.
30 This spectral condition is sometimes mistakenly termed DPX density because it was intended to define a densitometric data metric to be used with SMPTE 268M, “File Format for Digital Moving-Picture Exchange (DPX).”
31 ADX also offers finer granularity in encoding densities (a single-bit change represents an increment of 0.000125 in density) and per-channel scaling factors to maximize encoding efficiency while preserving the property that equal encoded values imply neutral colors.
32 Note that IIF building and unbuilding transforms produce and consume colorimetry that includes the unique per-stock characteristics of the film. If a DP chooses an OCN stock for its warm highlights, that warmth will be in the ACES RGB relative exposure values resulting from the unbuild.
33 Handles are extra frames scanned at the beginning and end of a shot that don’t appear in the cut. They give the picture editor additional frames to work with when finessing the cut after visual effects shots begin arriving from the visual effects facility.
34 Key numbers (also called Keykode by Kodak): latent numbers printed onto the edge of film negatives that are used to identify and distinguish between individual frames for 35mm, 70mm, and 16mm film. The numbers progress in terms of feet (as in distance). KU 22 7711 1842 is an example of a key number. Like fingerprints no two key numbers are ever the same.
35 Timecode: used to identify and distinguish between frames on videotape. It progresses in terms of time: hours, minutes, seconds, and frames (01:41:10:05, for example). Unlike the key numbers, timecode is never unique and can be duplicated across multiple tapes. Because of this, the tape names must be unique in every case.
36 Background (BG) plate: the farthest background element in a visual effects shot on which all other elements, like bluescreen elements, are layered. BG plates can be anything from a single wall to a desert vista.
37 Moviola: a mechanical viewing device that allows film editors to project film on a small screen, also allowing for convenient stopping, reversing, vari-speeding, editing, and playback of film.
38 Turnover: an official handing off of visual effects work from a film’s editorial department to the visual effects facility. The work usually consists of individual visual effects shots from a specific sequence.
39 Reference spheres: globes, about the size of a human head, that come in chrome and neutral gray. When filmed on the set, they visually record the placement of lights within a scene. CG artists later use the sphere reference as a guide for placing CG lights within the shot to help make CG and live-action objects appear to be from the same environment.
40 Clean plate: a captured element containing the same camera composition and movement as the recorded main action footage, but does not include any actors or props. It is used to digitally erase unwanted rigging and to correct mishaps inherent in the selected action footage during the visual effects compositing stage.
41 Sequence names and abbreviations are usually determined in pre-production by producers in the budgeting process. However, the shot numbers are officially assigned by the Director and Producer prior to the sequence being turned over to the visual effects facility.
42 Run takes: in-progress versions of a shot, designated by specific numerical take numbers, that serve as a record of the shot’s progress at a particular point in its production history.
43 Flatbed: a picture and sound playback machine on which multiple film and audio tracks are loaded separately and arranged flatly on a motorized table-like surface, allowing film editors easy access to hand-edit all materials.
44 Sync block: a device used to measure film in total number of frames. Film is loaded onto a cylinder that is calibrated at 1 foot per rotation. An attached counter reads and updates the total amount of footage that winds through.
45 A locked cut means that the Director has determined that no more editing is needed; the edit is 100% complete.
46 Animatic: a series of illustrated or animated images run together, in sequence, in order for filmmakers to previsualize a scene ahead of time. They are usually created in the early preplanning stages of visual effects development.
47 Final: a shot that no longer needs any work as determined by the Director. It is 100% done.
48AIM refers to a value measured in the Laboratory Aim Density (LAD) printing control method. By exposing a LAD patch, the value of the exposure of that piece of film can be determined. Kodak publishes suggested density tolerances for each type of film in the duplicating and print system.
49 Wedge: a series of test frames varying the exposure slightly of a single frame.
50 The 8-perf format with the image sideways on 35mm film versus 4 perfs vertical as in traditional movie film.
51 Interpositive: a positive film copy of a negative. It is used to protect a negative from overuse. From this interpositive, a duplicate negative could be made, if necessary.
52 Blue record: the layer of the film that captures blue light.
53 An enlargement of a piece of film shows thousands of little sand like particles. They are commonly referred to as film grain. What is being seen are the silver halide crystals.
54 The “AIM” refers to a value measured in the Laboratory Aim Density (LAD) printing control method. By exposing a LAD patch there is a way to determine the value of the exposure of that piece of film. Kodak publishes suggested density tolerances for each type of film in the duplicating and print system.
55 A self-illuminated blue screen is one that would have a series of lights behind the translucent blue screen that would illuminate evenly. They are very easy to use because in general an “on” switch turns on all of the lights sitting in a fixed position. But due to their design they are not very flexible or portable.
56 Optically speaking, a color separation positive is one of three black-and-white pieces of film that will be exposed to recreate the red, green, and blue layers on the original piece of film.
57 SMPTE: Society of Motion Picture and Television Engineers. It was founded in 1916 and works to establish industry-wide technical standards for every aspect of the motion picture industry.
58 Estar: a polyester film base that is much more rugged than acetate film base. It is thinner and much stronger than acetate. It can damage the moving parts of a camera or projector if it jams, whereas acetate films will just tear. Its durability allows its use for compositing many takes of a scene.
59 Kodak films have four-digit labels with different stocks for specific purposes (e.g., shooting outdoor live action, under tungsten, or in the optical printer or film laboratory processes).
60 Halation: the spreading of light beyond where one would like the film to be exposed. Most films have an anti-halation backing to keep the light from the exposure from bouncing around in the camera and adding additional unwanted exposure.
61 A Sobel matte is a discrete differentiation operator, computing an approximation of the gradient of the image intensity function. In simplified words, it uses an edge detection algorithm to create an outline around the edge. This is more relevant to CGI elements
62 Peg-registered paper: special animation paper with registration holes that fit over pegs on an animation stand to ensure line-up.
63 A series of points connected by a line or curve.
64“On 16’s” is a common animation phrase meaning use every 16th frame. For example, traditional cell animation is done on 2’s, meaning that the image changes every 2nd frame.
65 A garbage matte is a simple shape that is placed around the subject to be matted to isolate it.
66 High-dynamic-range images, or HDRI, are a series of photographs taken that cover the entire range of stops. They are usually used to re-create the set in CG, allowing the set to be relit in post.