
164 Tivoli Business Systems Manager Version 2.1: End-to-End Business Impact Management
13.In the services accounts dialog shown in Figure 6-11, select Use the same
account for each service. Auto start SQL Server Service. Then select Use
the Local System account for the Service Settings. Click Next.
Figure 6-11 Services Account dialog

166 Tivoli Business Systems Manager Version 2.1: End-to-End Business Impact Management
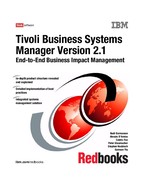
15.From the collation setting dialog shown in Figure 6-13, select Latin1_General
from the Collation designator pull-down menu. Select Binary as the Sort
order. (These selections must be made as specified, or IBM Tivoli Business
Systems Manager will not work properly.) Click Next.
Figure 6-13 Collation Settings dialog

Chapter 6. Base services implementation 167
16.For the Network Libraries dialog shown in Figure 6-14, keep the default
settings in the Named Pipes and TCP/IP Sockets boxes. Check
Multi-Protocol and Enable Multi-Protocol encryption. Do not check the
other three boxes. Click Next.
Figure 6-14 Network Libraries dialog

168 Tivoli Business Systems Manager Version 2.1: End-to-End Business Impact Management
17.In the start copying files dialog shown in Figure 6-15, click Back now if you
need to change any parameters. When you are ready to continue with the
installation, click Next.
Figure 6-15 Start Copying Files dialog
..................Content has been hidden....................
You can't read the all page of ebook, please click here login for view all page.