5
INTRODUCTION TO DYNAMICS
In order to fully understand the dynamic plug-ins in Soundtrack, we are going to explore them in two stages. In this chapter we will introduce each dynamics plug-in and in the next chapter we will get under the hood and grapple with level standards. While understanding how to use your tools is of the utmost importance, the foundation for Soundtrack’s dynamics capabilities starts with understanding general concepts and exploring the functionality of each specific plug-in.
Defining Dynamics
Think of dynamics as the audio level of your project. In fact, you may think ‘audio level’ in your head whenever the term ‘dynamics’ is written on the page. The reason that I have not simply used ‘audio level’ is that it is important that you begin to think more like an audio engineer. The type of project you are working on will define what you should do with your dynamics (audio levels). If you are preparing audio for broadcast, the resulting dynamics will be very consistent and you will not have a lot of loud and soft sections. When viewers watch the end product on a television, the dialog needs to be at a level that can easily be understood. If you are preparing audio for a feature film, there is a lot more room for flexibility in your dynamics usage because the audience will be in a controlled environment and you can use a greater variety of sound levels. Dialog in a feature film can be both quite soft and extremely loud without being a problem.
Dynamics Processors
Soundtrack offers a number of processors, which are used to manipulate the dynamics of sound. Most of them operate in a similar manner, which is nice when trying to master them. In fact, there are a few concepts that are key to understanding most of the plug-ins, so they are presented here as an overview.
Dynamics Concepts
The concepts listed here are not necessarily complex but are not usually explained on the interfaces of the tools themselves. While this section will not cover every single standard feature, it does cover the most obvious ones.
Ratio
The ratio parameter describes the difference in level between the input and output audio levels for one section of the dynamics processor. The ratio setting is typically measured in dBFS, which stands for Decibels Full Scale. This is the standard digital audio metering system, which uses 0 as the very loudest the audio can get. It is the unit of measurement that Soundtrack uses. So, if the ratio is set to 5 : 1, for every 5 dB that enter over the set threshold (see below), the audio level is turned down so that only 1 dB passes through. You could also make the same adjustment using automation or rubber banding, but the ratio allows for levels to be more precisely controlled. Still using a 5 : 1 ratio, if the audio that enters is measured at 15 dBs, then the output will be reduced to 3 dBs. You can calculate it by dividing the input audio level by the first number in the ratio: 15 ÷ 5 = 3, which means that we are turning the level down by 12 dB. In other words, a 5 : 1 ratio is quite steep. A ratio such as 20 : 1 is considered a brick wall and has the ability to remove all dynamic variance in the audio signal.

Figure 5-1
Ratio.
Threshold
The threshold sets the level at which the dynamics processor will be activated. A threshold can either be a ceiling that must be passed over or a floor that must be passed under. If the threshold is set to - 24 dBFS and it is a ceiling, then the audio must be louder than -24 dBFS in order for the processor to be activated. If the threshold is a floor, then the audio must be below - 24 dBFS in order for the processor to be activated. The type of threshold is specific to the processor you are using and will be described on an individual basis later in this chapter.

Figure 5-2 Threshold.
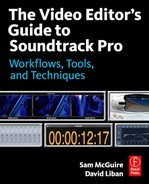
Attack and Release Times
Once a threshold is crossed, there is a period of time before the full strength of the processor is in place. This is called the ‘attack time.’ While it is not possible to have an instantaneous attack, it is possible to have an extremely short time, less than a single millisecond. The longer the attack time, the longer the transition will be into full dynamic alteration. The release time determines how quickly the compressed audio transitions back to its natural state.
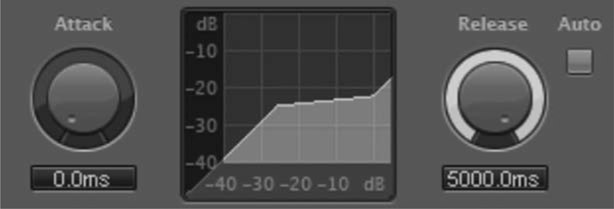
Figure 5-3 Attack and release.
The Knee
The shape of the knee affects the transition of the dynamic change when the level crosses the threshold and passes through the attack time. A hard knee creates a linear transition that sharply moves into active dynamic changes, while a softer knee offers a non-linear fade through the attack phase.

Figure 5-4
The knee.

Figure 5-5
The entire compressor.
Soundtrack’s Dynamics Processors
Now that some of the basic principles of dynamics processors have been covered, it is time to look at the specific dynamics processors available in Soundtrack. The available tools form a comprehensive dynamics tool kit that has every area covered in a myriad of ways. The four types of dynamics tools are compressors, limiters, expanders, and gates.
The Compressor
The compressor is probably the most used dynamics tool. Just as the name implies, a compressor squishes or compresses the dynamic range and makes it less ‘dynamic.’ Once the range is compressed, the entire sound can be turned up even louder than before because the result has more headroom. Of course, it can also be left at a lower level with a certain amount of perceived loudness gain. In other words, even though the level hasn’t been turned up overall, a compressor can make the audio seem louder. The dynamics are altered by turning down the louder peaks while leaving the tails of the sounds at the same level.

Figure 5-6
Uncompressed versus compressed audio.
Threshold
The threshold sets the level that the audio must go above to turn on the compression. If you pull the threshold down too low, you run the risk of pulling up any ambient noise. This happens when the compressor is reducing the dynamic range and then raising the overall level. Ideally, you will set the threshold so that the compressor is only active while the audio input is receiving the loudest sound and becomes inactive when the sound is only ambience and background noise. This way, the softer sounds will remain unaltered.

Compression demo.
In addition to the basic threshold, there is an additional switch that changes the fundamental way in which the threshold analyzes the audio input. The two choices are Peak and RMS, which stands for root mean square. When set to Peak, the compressor looks at the very loudest peaks of the audio and uses them to determine when the threshold is crossed. When set to RMS, the compressor looks at the equivalent of an average of the audio signal to determine the threshold. The result is a snappier response when set to Peak and a slower response when set to RMS.

Figure 5-7
Threshold set too low.
Gain
Another thing to watch out for is the Gain control, especially Auto Gain. The compressor is most often used to compress the dynamic range in order to make more room so that the audio can be turned up even louder without clipping. Many compressors have auto gain makeup controls, which allow the compressor to always have a loud output, even when you are really cranking down with the threshold and ratio. With sounds such as sound effects and dialog, you do not want to push it as loud as it can get, so you should turn off the Auto Gain and adjust the gain manually. This gives you the most flexible control over the newly compressed audio.
Attack/Release Times
If the attack time is set very short, you run the risk of blunting the start of any audio that has a sharp attack, such as words with T sounds or sound effects such as a door closing. If we compare the two waveforms in Figure 5-8, we see that both are compressed. The first is compressed with an attack of 0 ms and the second is compressed with an attack time of 100 ms. Notice the spike at the beginning of the second file. The attack time allows the attack through before the compression is fully activated. The first clamps down on the sound before the initial spike makes it through. The end result is inevitably duller-sounding, and should only be sought when the original attack is not wanted.
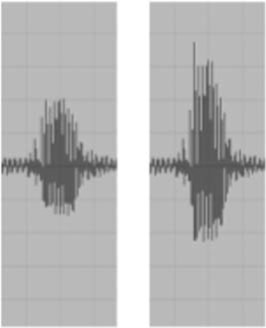
Figure 5-8
Comparison of waveforms.
The release time involves the same concept, but takes place when the threshold is crossed and the compressor lets go of the audio. A longer release time can bring up ambience that is present in the sound, but a very short release can sometimes be audible as the sound springs back to its original level. To find an appropriate release time, set a very long release time and then listen to the tail ends of sounds. If the ambient floor seems to get louder, try a shorter release time and/or a higher threshold. Shorten the release time until the tails seem natural. The resulting release time will not be a distraction. An additional feature is the Auto Release button. This is handy when you are not sure about the appropriate release, because it automatically adjusts the release time to match the audio passing through the compressor. Be sure to listen to the end result because sometimes the auto feature gives you unpredictable results.
Ratio
If you need a sound to fit into a specific volume range, such as dialog for broadcast, the ratio is one parameter that is important to adjust. The problem is that compressors often bring up the ambient noise when they are set to bring the overall sound into a very specific range. It is possible to avoid this, but extra care must be taken not to pull the threshold in the audio range below the desired sound. Ultimately, use the ratio to adjust the amount of audible change in the dynamic range. If you want a mild change that is transparent, use a lower ratio. If you want a highly controlled range, use a much higher ratio.
The Knee
The knee parameter provides additional control over the transition levels as the compressor kicks into action. A low knee setting creates a linear transition – one in which the ratio is taken at face value. If there is a 3 : 1 ratio, then for every 3 dB over the threshold, only one gets through. The higher the knee setting, the less linear the transition is, creating a smoother transition. If you want absolute control, a linear knee is suggested. If you are looking for softer and more transparent compression, try a higher knee setting. A softer knee provides a slightly more organic result.
Circuit Type
The Soundtrack compressor offers a special feature. Through the history of hardware compressors there have been a number of methods for reducing the dynamic range. The Circuit Type dropdown menu allows you to pick from six different types, and these are modeled after hardware types. It is impossible to describe each different type because the general results are still quite close. However, you should experiment with these to see which gives you the results you are looking for.
The Limiter
The compressor also has a limiter built in. The section immediately following describes the limiter plug-in and contains explanations and descriptions. The reason it is included with the compressor is to provide additional flexibility and efficiency – it’s nice to have an additional ceiling on your compressor to make sure the gain never reaches distortion.
The Limiter Plug-in
Limiters are very similar to compressors. In fact, most of the dynamics tools are similar, so you may notice these descriptions getting progressively shorter. One of the primary differences is that limiters do not have an adjustable ratio. Instead, they are set to the highest possible ratio and are designed to perfectly prevent sound from passing above an adjustable loudness level. Limiters also don’t have a parameter called a threshold. Instead, a limiter has an output level. The idea is that nothing should be able to leave the limiter at a level louder than the output level. Basically, the output level is the same parameter as the threshold on a compressor. Interestingly enough, instead of pulling the threshold into the audio when you use a limiter, you will push the audio up against the output level of the limiter. In the case of the limiter in Soundtrack, the output level can be lowered to only - 10 dB. However, the gain fader adjusts the input level up to + 20 dB. That is plenty of adjustment within which to push even softer signals up against the output level.

Figure 5-9 The limiter.
The other three parameters on the limiter are the Lookahead, Release, and Softknee.
Lookahead
The Lookahead feature allows the limiter to take extra time while analyzing the signal. Using the Lookahead feature is useful when the waveform is complex with a lot of sudden peaks, because it allows the limiter to see them coming and react appropriately.
Release
The release parameter is conceptually the same as the release on the compressor. When the audio falls below the output level, the limiter continues to work for a specified amount of time. This helps to make the transition from limiting to not limiting much smoother.
Softknee
Normally, a limiter acts as an unbreakable ceiling, preventing the audio from going past a specific level. When the Softknee function is turned on, the limiter ramps into action, creating a smoother result. Using a softknee is better for things that have a little wiggle room in terms of dynamics, and that you want to keep sounding natural. If you need the sound to be limited to a specific level and never budge, then turn off the softknee. One of the main reasons a limiter is used as opposed to a compressor is that the limiter is really good at setting a specific output level while leaving the softer parts alone.

Figure 5-10
Before and after limiting.
The Expander
Expanders are not going to be hard to understand after looking at compressors and limiters. In the simplest of descriptions, a limiter is the opposite of a compressor. Instead of making the dynamic range smaller, an expander specializes in making the dynamic range wider.

Figure 5-11
Before and after expansion.
The primary difference is the ratio parameter. Instead of going from 1 : 1 and up, the parameter is 1 : 1 and below. The expander doesn’t really make the louds louder and the softs softer in one step; it in fact brings the softs that are below the threshold down and then brings up the overall gain. The end result is a wider dynamic range.

Figure 5-12
The expander.
The Noise Gate
The noise gate is a potentially dangerous tool. It is designed to be an automatic mute control. When the input sound falls below the set threshold, it is turned off. It can also be turned down instead of off, but the potential problem is focused around the material being gated. If you are trying to gate something like dialog with noise that is audible while the dialog is present, then the gate will often accentuate the fact that there is noise. If you are gating sound effects or other material that will be mixed into a bed of other sounds, then the gate might work fine. Instead of using a gate, you can always edit the files by cutting out the noise and using fades. The noise gate is an automated method of doing just that.

Figure 5-13 The gate.
Reduction
There are several parameters that are different from the other previously discussed tools. The first is the Reduction slider. This tells the gate how much to remove when the sound input falls below the threshold. When it is set to - 100 dB, expect all sound to be removed when the input level is below the threshold. The threshold on a gate sets the point the sound must break through in order to open the gate.
Attack, Hold, and Release
The attack and release parameters are the same as above, with the addition of the hold, which keeps the gate working for a set period of time after the threshold is re-crossed. The point of this is to retain the natural decay of the sound even if it is below the threshold. An example of this would be reverb decay on a sound. If the hold and release are set short, the natural decay is cut off.
Hysteresis
The gate in Soundtrack has a specialized function called ‘hysteresis.’ This sets a range around the threshold to prevent the gate from opening and closing in rapid succession. This is a typical problem with gates that have to be set at a threshold that is similar to both the material you want to gate and the material you want to keep. In other words, the noise is very similar in level to the rest of the audio and a gate may be hard pressed to know which is which. If the gate did not have this function, then you would have to edit the noise out manually.
Side Chain
The Side Chain function allows you to alter the way in which the gate looks at the signal that is triggering the threshold. You can make the gate look at only the higher frequencies of the incoming signal by using the High and Low Cut filters. To hear what you are doing you can press the Monitor button. This lets you hear exactly what you are using to trigger the gate. Using a gate and side chain controls requires a lot of tweaking and adjusting to get the gate just right. Plus, you will need to listen through the whole thing every time you make a change to ensure you have the right gate settings. In the end, more often than not it is better to do the same thing by cutting manually and not using a gate at all.
Advanced Dynamics Plug-ins
The compressor, limiter, expander, and gate are the primary dynamics tools you will use in the realm of audio post. However, there are several other tools that Soundtrack offers which take the concepts listed above to new heights and which have very special applications.
The Adaptive Limiter
The adaptive limiter is very similar to the traditional limiter. Instead of using a linear wall to stop the sound from passing a specific level, the adaptive limiter models an analog amplifier. It rounds out the peaks and the results are based on the input signal. Different material will be affected differently as it passes through. The key to setting the three parameters is quite simple. Set the input scale so the audio input is as close to 0 on the left meter as possible without clipping. Next, set the out ceiling to somewhere between - 2 and 0. Lastly, turn up the gain to a level of pushing that sound right to you. It is highly recommended that you place a gain plug-in immediately after the adaptive limiter on your channel strip to control the level of the resulting audio. The adaptive limiter can create a dangerously loud signal.

Figure 5-14 The adaptive limiter.
The Multipressor

Figure 5-15
The multipressor.
The multipressor is a conglomeration of most of the different dynamics plug-ins. It is a combination of an expander, a compressor, and a limiter. The primary difference is that the audio input is split into four different frequency bands, and each band is processed separately. This is a great way to control the dynamic range of specific parts of the audio while leaving other parts alone. It is common to compress the bass frequencies while leaving the rest untouched. One powerful aspect of the multipressor is that the most used parameters can all be controlled graphically. The frequency bands can be changed as well as the compressor/expander parameters. This means that you can make changes quickly and efficiently even though there are a lot of different things to set. I highly recommend using the band Solo buttons to hear the specific bands you are working with separately from the entire audio track. This plug-in is one of the rare ones in that it allows such intricate monitoring of audio processing.
The Surround Compressor

Figure 5-16 The surround compressor.
The surround compressor is another example of a specialized plug-in that is really just an expanded version of one of the basic plug-ins. In this case it is just a surround version of the compressor. It is a useful tool for when you need to compress a surround stem, surround submix, or the entire surround output. Refer to the compressor explanation above for details on the inner workings of the surround compressor.
The Enveloper

Figure 5-17
The enveloper.
The enveloper is a unique dynamics processor. In a nutshell, it gives you the ability to boost and cut the attacks and releases of your audio’s peaks. This is useful to punch up the attacks of sounds or pull down ambience as a sound is ending. The specific settings on the enveloper are fairly straightforward. The left half represents the attack and the right half represents the release. To boost or cut either side, adjust the sliders up or down. The time knob allows you to adjust the length of the change as the transients come and go. The threshold should typically be left at - 100 dB because that keeps the enveloper constantly working. However, you may need to change this when seeking specific results with audio that has a narrow dynamic range.
General Application of Dynamics
In this last section of the chapter, the tools described above are looked at in a more practical light. Knowing what each does is important, but knowing when to use them is even more so. This section is split into three areas that reinforce a practical approach: audio preparation, micro-dynamics, and general dynamics.
Audio Preparation
Before you even use a dynamics plug-in, the audio can be prepared to make the process as seamless as possible. The preparation phase includes setting independent clip loudness and manual editing.
Clip Loudness

Figure 5-18
Normalization.
There are two general ways to adjust independent clip volume. One is to change the actual clip level and the other is to automate the volume of the track on which the clip resides. In Figure 5-18 you can see both of these methods at work. The volume lane area demonstrates drawn in automation that is changing the level of the track above it. The window that is displayed above the clips is a non-automated volume change that is being applied to the Scottish bagpipe loop. It has it’s current level listed and allows you to change the level to any you choose.
The reason for leveling the clips is to help optimize the dynamics tools’ effectiveness. Problems occur when audio clips of varying levels enter a dynamics tool. You can set a compressor to work on all of the levels, but the audio that is more compressed may sound distorted and/or worse than the audio that is better optimized. One of the goals of altering the clip levels is to create a set of audio files that are all of a similar level.
Manual Editing
Another part of the preparation phase is to edit out any audio that will inappropriately trigger or affect a plug-in’s efficiency. If you are working with dialog, for example, a cough or extra breaths may inappropriately trigger a compressor and result in an uneven sound. To avoid this, manually edit out such sounds.
Micro-dynamics
Figure 5-19
An audio file that has been edited to remove an unwanted section. This helps prepare the files for dynamics processing.
Micro-dynamics are defined as clip- and track-specific dynamics; the next section, general dynamics, refers to dynamics placed on submixes and master tracks. Micro-dynamics help to sculpt rough edges and individual sounds, while general dynamics finish off the project and level the overall sounds all together.
Clip Dynamics
One thing to remember about post audio is that you’ll be working with a lot of different audio elements. It is impossible to assign each element to its own track, so you will inevitably be placing unrelated sounds on the same tracks. One way to deal with this is to process the dynamics directly to each clip. In Soundtrack, you can process clips and then tweak them using the Actions List.
In Figure 5-20 you can see the Process menu structure in Soundtrack Pro. You select the audio file you want to process and then choose the tool you want to use. Once you apply the effect, you can add more and then later make adjustments using the Actions menu. The really efficient thing about this is that you can adjust any of the items in the Actions List and the changes will automatically ripple through the other effects. Additionally, you can change the order and the change will be rippled as well. Best of all, this list is stored with the audio clip and Soundtrack never forgets what you have done to each and every clip.

Figure 5-20
Accessing the limiter in the Process menu.

Figure 5-21
The Action List.
Track Dynamics
If you have a track with all related items, such as dialog, then you may consider placing a real-time dynamics effect on the track. This will affect everything on the track. This only works if the track is appropriately prepared (see audio preparation, above). As an additional level of control, you can automate the inserts and change things at different points on your timeline.
In Figure 5-22 you can see automation curves for the compressor that is inserted in the first track. This is an extremely flexible way to control your dynamics tools, but you will need to stay organized with what you are doing because automating plug-ins often removes the ability to tweak the effects on their graphic user interfaces.

General Dynamics
This is the final layer of dynamics control. If you take care of the preparation and micro-dynamics appropriately, the final layers of dynamics will be much easier to set in place. The two places this applies are on submixes and master tracks.
Submixes

Figure 5-23 Mixer with submixes.
A submix is an audio funnel. You might send all of your dialog tracks through a submix track. You might send all of the sound effects from a scene through a submix. You will definitely want to send all of your music through a submix. By that point you will probably have leveled out and prepared all of the individual clips and tracks. Once that is done, you will be able to set overall levels for each of the specific submixes. If the goal is to prepare for broadcast, then the submix is where you will set the overall dialog levels to keep them to station standards. It is possible to do such a detailed job at the micro level that setting the general level on the submix might not be required. However, it is never a problem to set up a limiter on the submix as a safeguard against clipping and distortion.
Master Tracks
The master track is the final pipeline for the audio of your project. The primary goal of using dynamics tools at this phase of the project is usually to set the output to a specific loudness range. Using a limiter to set the output ceiling is standard. However, it is not recommended that too much limiting is used here. Make the project sound good and let the delivery format define what you do, but remember that the master track is the best place to affect the project as a whole.