
Appendix C UDK Tips
No doubt you are going to want/need to familiarize yourself with a number of level design techniques in UDK to prototype your own systems. The www.UDK.com website has a huge range of advice and tutorials that will take you through everything you need to know, and there’s 1,001 tutorial videos on YouTube. We’d also recommend the Mastering Unreal Technology books (Busby, Parrish, Wilson) published by Sams Publishing.
There’s little point to replicating this material here, so we’re just going to present a few specific examples of techniques used in the book to get you started. The best way to learn is by playing around with the existing systems.
When testing/prototyping mechanisms, it is often a good idea to do this in a small “test” level. This saves on load and build times when you make any changes. You can copy and paste things from your “test” level into the final level very easily. You can’t copy both in-game assets (Geometry/Actors/etc.) and Kismet sequences simultaneously, but if you copy the in-game assets and paste these into your final level and then go back for the Kismet, then all references will be maintained and everything will work as it did before.
Running Slowly
UDK is demanding in terms of processing, and demanding on your graphics hardware. If you are building a large level then you may find things slowing down to the point where it becomes difficult to work. In the top menu bar there is a slider called ‘Distance to far clipping plane’. If you reduce this you will see that more distant objects are not displayed. As these are no longer taking up memory and processing power you should find that the game runs more smoothly. Rebuilding the lighting regularly will also help (see Building below), as will unloading any packages that are not in use (right click/unload). When working on a large level you should also investigate splitting the level into smaller units. See the ‘Streaming’ section of Appendix B. If you are still experiencing problems then check the UDK forums for specific advice for your graphics card.
Importing Sounds
When you import a sound using the Import button in the Content Browser, you also have the option of selecting multiple files to import simultaneously and of automatically creating [SoundCue]s for each of these sounds.
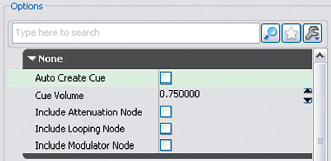
You can see from the check boxes above that you can also add [Attenuation], [Looping], or [Modulator] nodes during this process. Most [SoundCue]s will probably contain multiple elements, so this is not always appropriate but it can be a real timesaver in some instances.
Bulk Importing of Sounds
From the right-click menu in the Content Browser’s Package Tree, you have the option to Bulk Import Sounds. If your sounds are stored in a folder structure like the one shown here (obviously you can change the names to suit), then this Bulk Import option will import them and create a corresponding structure of folders, subfolders, packages, and groups for the sounds within UDK. See the Bulk Importer documentation on the UDK.com site for further details if required.

Fast Creation of [SoundCue]s
We’ve mentioned this in the text but it’s so useful that we’ll mention it here again. When creating a [SoundCue], most of the time you will probably want it to contain more than one SoundNodeWave. You do not have to add them one at a time. Select all the SoundNodeWaves you want and then by right-clicking in the SoundCue Editor window you can add them all at once. It will appear to only be adding the name of your first sound but in fact does add them all. You can also choose the second option down (Random: (***)), which will add them all preconnected to a [Random] node. Very useful.
Basic Folder Guide
The folder structure of UDK is fairly straightforward, and you will probably not need to go into some of them, unless things go terribly wrong!
Here’s a brief description of each of the main folders and its content:
• Binaries: Contains the game.exe, and the UnRealFrontEnd (used for compiling scripts). You don’t need to go in here, other than perhaps to create a shortcut to UnRealFrontEnd to put on your desktop.
• Development: Contains all the source code, both those supplied with the engine and your own custom scripts in the SrcMyMod folder.
• Engine: Files required by the engine to function correctly.
• UDKGame: Files for the game (maps, packages, etc.).
• Autosaves: Contains all automated saves and backups.
• Config: Contains .ini files, which direct the engine to specific files and settings.
• Content: Contains levels and packages.
• Localization: Contains all language-specific files.
• Logs: Contains automated log files, which can be useful for identifying problems.
• Movies: Contains intro movies, loading screens, and so on.
• Script: Contains the compiled UnRealScripts.
• Splash: Contains the splash (loading) image.
Creating Levels
Creating a level allows you to make your own environments to really show off your use of interactive sound and music.
Within your level you will need to create some geometry (this can be rooms, walls, floors, etc.). This is done using binary space partitioning (BSP) and is created using the builder brush (discussed later).
From the CSG menu of the left hand side of the screen; CSG Add is used to create rooms, walls, floors, etc.; CSG Subtract is used to ‘punch’ holes through the solid geometry for doors, etc. There’s lots of documentation on the UDK.com website about building your own levels. It’s easier than you think!
Once you’ve created your level you can then apply materials to it in order to produce richer environments. You will also make use of other placeable Actors such as static meshes and particle systems (discussed later) to flesh out your levels.
When you have created your level using geometry and placeable Actors, you will need to set up your lighting so that you can actually see within your level.
The easiest way to get started is to hold down the ‘L’ key on your keyboard and left click on the floor of a room with your mouse. This will create a standard light that you can then grab and move up to the correct position using the Blue arrow. (See the Lighting section below for more.)
The Builder Brush for Geometry, Trigger Volumes, and Reverb Volumes
The builder brush is the tool you use to create the geometry of your level. It is depicted by a dark red cube. The idea is that you adjust the dimensions of the builder brush (using the widgets—discussed later) to the correct size and then generate your geometry in its place.
The builder brush can be toggled on and off using the B key. You can select the builder brush by pressing F2 on your keyboard or Ctrl + clicking in an empty space in the viewports. You can then find it by pressing the Home key to snap the viewports to look at your selection.
You can resize the brush using the widgets, or you can also set the builder brush’s dimensions manually by right-clicking any of the shape icons (e.g., the cube) on the left-hand screen menu. For creating volumes (such as [ReverbVolume]s or [TriggerVolume]s), it’s often easier to make the builder brush automatically mold to an existing volume or piece of geometry. If you click on an existing volume or piece of geometry and press Ctrl + P, the builder brush will automatically resize itself to the same shape and position itself on top of the selected volume. Again for a good introduction to using the builder brush see the UDK.com website.
Scaling and Other Widgets
If you need to alter the size or rotation of an object within UDK, you need to use one of the three available widgets. With the object selected, the space bar will cycle through these modes:
Translation. Used for moving an Actor within the X, Y, or Z planes.
Rotation: Used for rotating an Actor around the X, Y, or Z planes.
Scaling: Scales an Actor in all three planes simultaneously (maintains scale).
In addition, nonuniform scaling is available from the top toolbar, which scales an Actor in a single plane. Right-clicking directly on one of the widget icons will enable you to directly set values.
![]()
There are separate snap values for each of the three widget modes in the bottom right corner of the editor window. The snap values are used to force the amount of movement available to you (depending on your widget) to incremental steps. It is usually a good idea to make use of snap values as they ensure that your world geometry, for example, is aligned correctly. It also ensures that any rotational translation applied is correct.
Saving
We recommend that you save your work often, as any computer program is capable of crashing just as you complete your third hour of consecutive work and usually just after you’ve solved some fiendishly difficult problem. If you adopt an incremental saving policy (MyWork_V01, MyWork_V02, etc.), then you can always roll back to a previous version should you need to.
It’s worth pointing out that UDK has an auto-save function, which will automatically save and back up your work at regular intervals. The time interval can be set in the bottom right-hand corner of the editor window (near the snap values); you can also, if you’re feeling brave, turn off the auto-save. If you need to access them, the automatically saved files are in the Auto-saves folder (C:UDK(***)UDKGameAutosaves). This folder can get pretty full pretty quickly, especially if you’re auto-saving every five minutes, so it’s worth keeping an eye on the size of the folder and deleting any old files to free up hard disk space.
Lighting
There are two modes of lighting within UDK. By default it uses “Lightmass,” which looks great but can take a long time to build out. If you are making lots of changes while building your level and having to re-render your lighting a lot, it might make sense to switch to the older lighting algorithms because they render faster. Once you’re finished building and ready to play, you can turn Lightmass back on again.
To turn Lightmass on/off:
View – World Properties – Lightmass – Use Global Illumination = True/False
Alternatively you can uncheck the Lightmass flag in the lighting build options (the bulb icon in the top tool bar).
You can also change the quality of the rendering process by right-clicking on the Light Quality Settings button (within the Build buttons).
It is fairly easy to change the color of any of your lights. Simply access the light’s properties and expand the Light Color property and then either enter RGB (red, green, blue) settings directly or double-click and select a color. Various types of light are available, and the type you choose will depend on the light’s location and purpose:
[Point light]
[Skylight]
[Directional light]
[Spotlight]
Each type can come in different “flavors”: toggleable, movable, and “standard.”
It is worth bearing in mind that dynamic Actors (such as InterpActors) require dynamic lighting. This often appears as an error after building your level (discussed later) and can be fixed fairly easily by modifying the light’s properties (Light – Force Dynamic Light).
Static Meshes
The majority of the objects that go into making your level will be Static Meshes (walls, rocks, etc.). You can browse available assets using the Content Browser (filter by Static Meshes).
With a static mesh selected you can right-click in the editor and select Add Actor/Add Static Mesh: (name of your static mesh). If the package containing the static mesh is not fully loaded, you may have to load the Actor before you can add it. (You can also drag and drop static meshes from the content browser into your level.)
If you need an InterpActor (for use with a matinee) or a KActor (for physics-based purposes), you can right-click your Static Mesh and use the Convert option.
As all the [Trigger]s should be invisible within the game, we’ve used static meshes to indicate buttons of things to interact with. You might want to add some other graphics to indicate where your triggers are instead of making the actual triggers visible. (For testing purposes, it’s often useful to have them visible. In the [Trigger] properties, check/uncheck the Hidden option.) Once in the game, you can resize and move these static meshes by using the Widget tool.
Materials
All Static Meshes and Geometry make use of Materials. These are the textures that are applied to your in-game objects. You can browse available Materials using the Content Browser (filter by Materials). The method for assigning a particular Material to an object depends on your object. With the Material selected in the Content Browser, you can right-click an asset and for Geometry select Apply Material, for Static Meshes select Materials/Assign from Content Browser.
Terrain
Terrain is used for outdoor surfaces (e.g., grass) and can be shaped to create hills and valleys. To add a new Terrain, go to the Actor tab of the Content Browser, expand the Info Actor menu, and select Terrain. Then right-click in the editor and select Add Terrain Here. If you want to resize it, you can either use the scaling widget or access the Terrain’s properties and under Terrain change the Num Patches X and Num Patches Y values. You need to assign a Layer to the Terrain so that it looks like grass, for example:
• Within the Terrain’s properties create a new Layer (green plus icon). Expand the new Layer.
• Find a Terrain Layer in the Content Browser (filter by Terrain Layers [All Types]).
• Move back to the Terrain’s properties and assign the selected Layer to the Setup field.
• To create a 3D Terrain, use the Terrain Editing mode (the mountain icon).
• With one of the brushes selected, you can Ctrl + LMB to raise a portion of the Terrain and Ctrl + RMB to lower the terrain. The Tessellation options are used to increase/decrease the size of the grid.
Emitters + Particle Effects
These are useful for adding additional visual effects to your level. Filter the Content Browser by Particle Systems, and then right-click in the editor to add them. Some Emitters are constantly on, whereas others will need to be toggled on/off within Kismet. Use a [Toggle] object with the Emitter connected to the target input and then either a trigger or a looping delay to activate the Toggle input.
Weapons
If you don’t want the player to have any weapons on startup, you can use the No Default Inventory for Player option within the World Properties. You may need to provide a weapon locker with some weapons depending on your game (Actor Classes Tab/Pickups/Weapon/UTWeaponLocker_ Content). Once your weapon locker has been created go to its properties (F4), use the green + sign to add a weapons slot and then choose the desired weapon from the drop down menu.
Water
Water can be used relatively easily within your level. Create the space you wish to be water (using either the Terrain or Geometry features). Add a plane (using the Builder Brush) and resize it to fit your space.
Find a water Material within the Content Browser (e.g., UN_Liquid package) and assign the Material to the Plane. Add a water volume by setting the Builder Brush to be the size of your water space and creating a [UTWaterVolume]. This already has sounds for entry and exit. You can also create a [PostProcessVolume] (using the builder brush) to apply visual effects to simulate being underwater. You can also experiment with depth of field (DOF) and its associated settings.
Building
When you make any significant changes to a level, you will need to “build” it. You have various options when building your level and it makes sense to only use the one that is most appropriate at any given time in order to reduce building times:
![]()
Build Geometry: Builds all geometry only. (Also used to build [ReverbVolumes]).
Build Lighting: Builds all lighting only.
Build Paths: Builds all navigation paths ([PlayerStart], [WeaponLocker], [PathNode], etc.) only.
Build Cover Nodes: Builds all cover nodes only (used for AI).
Build All: Builds everything within the level (can take a while).
Light Quality Settings: Used to determine the quality of the lighting build and therefore the time taken.
After building you will be presented with a dialogue window that displays any error messages generated during the build process. The following link contains some of the more common map errors and probable solutions: http://udn.epicgames.com/Three/MapErrors.html.
Some of the most common errors are the following:
• Only 0 PlayerStarts in this level (you need at least 1). This can be solved by creating a [PlayerStart] (Actor Classes Tab/Common/PlayerStart).
• BRUSH_9: Brush has NULL material reference(s). Caused when a geometry brush has been created without a Material assigned. This can be solved by assigning a Material
• Map should have KillZ set. Killz determines the height at which the player will be killed if the player falls off the map. This can be solved by setting the KillZ property (World Property –ZoneInfo – Kill Z).
If you double-click on an error, the editor will jump to the Actor that is causing the error. You can then open its properties and fix the problem. The Refresh button within the Map Check dialogue can then be used to see if the error has been resolved
Kismet Tips
A comprehensive list of all Kismet objects can be found at http://udn.epicgames.com/Three/KismetReference.html.
Kismet System Debugging
Be patient and systematic in tracking systems that do not appear to work. The bad news is that it’s almost always your fault. Add [Log]s (hold L then click in the Kismet window) to your system in key places and use the Output to screen option within their Sequence Object properties to check that they are receiving a message. You can also expose the variables within a [Log] and this will output the values of the variables you attach. The sometimes annoying thing about [Log]s is that they output a beep. This can be problematic when you’re trying to check audio systems. You can turn this off by editing the utgame.ini file (C:UDK(***)UDKGameConfig). Set the bmessagebeep to false. The other useful thing to do with Kismet systems is to disable links. You don’t need to delete your links during testing, just right-click/Toggle Link/Disable.
Sequences/Subsequences
To keep your Kismet sequence tidy and easy to read (a good idea to aid troubleshooting), make use of subsequences. You can create an empty sequence and then start building within it or, if you’ve been busy creating interesting sequences, you can select a collection of objects and then right-click and select Create New Sequence. This will create a new subsequence containing the selected objects, which can then be given a meaningful name
If the objects selected were passing or receiving signals, these will be preserved automatically. However, variables are not always preserved.
If you need to extend a subsequence so that it is capable of doing the following:
• Receiving a trigger (event) signal – Then use New Event – Sequence Activated
• Passing a trigger (event) signal – Then use New Action – Finish Sequence
• Passing and receiving an external variable – Then use New Variable – External Variable
Copying and Reusing Sequences
All Kismet sequences are essentially just a visual representation of the underlying code. This means that if you select a collection of objects and then paste them into a text editor such as Notepad, you will see the UnRealScript code for those objects and how they are connected. The following code is an example (a [Player Spawned] connected to a [Delay]):

This facility allows you to create text files containing Kismet sequences that can be reused at any time by copying and pasting. Doing this via text files is quicker than opening a variety of UDK levels.
Runtime versus Placeable Actors
Within UDK you have placeable Actors, such as [Trigger]s and Static Meshes, as well as runtime Actors, such as bots and the player. As you will have seen throughout the book, we can create a variety of events using things like [TriggerVolumes]s (such as Touched, UnTouched, etc.). However there is no way of doing this for a runtime Actor as we can’t actually select it within the editor because it doesn’t yet exist.
If you wanted to create an event based on a runtime Actor, such as the death of a bot, you need to use the [Attach to Event] object (New Action – Event). When this object is activated it attaches the Attachee Actor (e.g., the bot that has just been spawned) to the Event connected to the Event input (e.g., Death). See the tutorial level for several examples of this.
Instigators
Anytime an event is activated, it also passes a variable called “Instigator.” This is the Actor that caused the event to be activated. So in the case of a [TriggerVolume], the Instigator would be the Actor that walked into the [TriggerVolume] and caused the Touched Event to be activated (usually the player). This can be used, for example, to identify whether it was an NPC (bot) or the player that just walked into a [TriggerVolume]. You would compare the Instigator variable with a Player variable using a [Compare Object] feature.
Take Damage
This provides a trigger if the associated Actor has taken some damage (usually from being shot). As with all events you get the instigator as an output variable. You also get the amount of Damage Taken (as a Float variable). This variable is cumulative, so it increases every time you shoot the Actor.
Within the [Take Damage] function, you have the following properties:
Damage Threshold: The amount of damage required to activate the event.
Damage Types: The types of damage/weapon to respond to.
Ignore Damage Types: The types of damage/weapon to ignore.
Max Trigger Count: How many times this event can be activated (0 for infinite).
Retrigger Delay: The time between activations.
Most placeable actors (e.g., static meshes) will work with a [Take Damage] event, although you may have to change their collision properties to Block All or Block Weapons in order to get them to respond to being shot. If you want to use a runtime Actor such as a bot to trigger a [Take Damage] event, you will need to “attach” the actor to the event using the [Attach to Actor] object. You could trigger the [Attach to Actor] object using the Finished event from the [Actor Factory].
[TriggerVolume]s and [DynamicTriggerVolume]s are slightly more complex to set up as these appear to only respond to certain types of damage by default (e.g., the LinkGun AltFire).
A [DynamicTriggerVolume] is easier to set up to take weapon damage. In it’s properties make sure it’s collision is set to Collide_blockWeapons and the blockrigidbody flag is checked. Then within the Collision Component menu check the flag named Block Complex Collision Trace.
[TriggerVolume]s can be set to generate a Touch event when shot (these need additional properties to be set):

Named Variables, and Remote Events
Once you start doing interesting things within Kismet, your sequences will get quite unwieldy with connections all over the place. This can make reading your systems and troubleshooting quite difficult. You can create wireless connections using [Named Variables]s, which can really help tidy things up.
Create a “normal” variable of any type and then within its properties change its Var Name to something meaningful (remember, no spaces). This is your wireless “send.” Then where you want to receive your variable, create a [Named Variable] (new Variable – Named Variable), and within its properties change the Find Var Name to be the same as the Var Name of your “send” variable. You should also set the Expected Type property to be the type of variable you are sending (Float, Object, etc.). Using [Remote Event]s can also help avoid a spiders web of connections. Set the Event name within their properties to be the same and you can pass a signal from an [Activate Remote Event] Action (New Action/Event/Activate Remote Event) to a [Remote Event] Event (New Event/Remote Event) without the need for connecting cables.
Spawning and Controlling Bots
The default AI behavior of the bots is a little unreliable, so we tend to just set up basic movements and “force” their actions using Kismet commands.
Bots are created using the Kismet [Actor Factory] Action. Within this object you need to expand the Seq Act_Actor Factory properties and select a Factory type. To spawn Bots you use the UTActorFactoryAI. Once you have selected your Factory type, you can then expand the Factory properties field and start setting up how you want your bot to behave.
The Controller Class field determines whether or not the Bot is spawned with a particular AI. If you want the Bot to be able to move around independently then choose AI Controller, if you want to have full control over the bots movements then choose None. If you want the Bot to have Deathmatch AI, which means that it will move around independently and attack any other bots and/or the player, then you can over-ride AI settings by selecting the Force Deathmatch AI option. (Obviously you will need to give the Bot a weapon of some sort for this to be useful.)
In terms of weapons, you have two choices, you can either use the Give Default Inventory to spawn the Bot with the default LinkGun weapon, or you can use the Inventory List to give the Bot a specific weapon or set of weapons.
You can experiment with the other property fields (such as Pawn Name) but they can be left as their default settings.
Once you have set up the [Actor Factory]’s properties you need to set up your Kismet system. You need to connect an Actor to the Spawn Point variable input so that the engine knows where to spawn your Bot. This can be any Actor, but it makes sense to use [PathNode]s as these are used by Bots to navigate around a level.
It is useful to connect an empty Object variable to the Spawned variable output as this will enable you to use the ID of the spawned Bot in other sections of your Kismet systems.
You will need to connect some form of Event trigger to the Spawn Actor input of the [Actor Factory], such as a [TriggerVolume]’s Touch event.
You can use the Finished output of the [Actor Factory] to trigger other actions, such as:
• [Attach to Event]: For example, [Take Damage], [Death], [See Enemy]
• [Move To Actor]: Needs to be used if you want to control the bots movement (ie. Controller Class = None)
• [Start Firing]: Needs to be used if you want to control the bots movement (ie. Controller Class = None)
If you want a Bot to automatically move and attack the player, then use:
• Controller Class = None
• Force Deathmatch AI = True
The Bot will then move around a network of [PathNode]s shooting at the player.
If you have multiple Bots active at the same time within your level, then you will need to make use of ‘forced’ actions (Controller Class = None; Force Deathmatch AI = False). (Force Deathmatch AI doesn’t work for many situations as the Bots will attack each other as well as the Player.)
To use ‘forced actions’ to control how the Bot moves use the following Actions within Kismet:
• [Move To Actor] (Kismet/Action/AI) Used for moving Bots around between [PathNode]s If you connect multiple [PathNode]s to the Destination input the object will randomly select one and route the Bot to that one. A combination of random Destinations and randomly timed [Move To Actor]s can give the appearance of self-directed Bots. (You will need to make sure the Interruptable property is set to True.)
• [Start Firing At] (Kismet/Action/AI)
• [Stop Firing] (Kismet/Action/AI)
See UDK.com for more tutorials and advice regarding Bots and AI.
Key Binding
To create new input keys, you need to edit the UDKInput.ini file (C:UDK(***)UDKGameConfig.) Find the line
“Bindings=(Name=“E”,Command=“GBA_Use”)”
It sets the E key to be the default “Use” key within the game. Add a new line and enter
“Bindings=(Name=“H”,Command=“causeevent HPress”)”
where “H” is the key you want to use and “HPress” is a unique name that will be used to identify the event. If you want a key to do something when it’s released, you need to add the “OnRelease” keyword preceded by the pipe operator (|). For example,
Bindings=(Name=“H”,Command=“causeevent HPress | OnRelease causeevent HRelease”).
Reopen UDK.
In Kismet create a [Console Event] (Event/Misc/Console Event) object. In its properties, do the following:
• Check “Client Side Only.”
• Enter the Console Event Name field to the name of your new event (e.g., Hpress).
This event trigger can then be used to trigger any event/action within Kismet.
Scripting
Setting Up UDK for Custom Scripts
To enable UDK to use your custom scripts you will need to make a change to one of its .ini files. Navigate to the Config folder within the UDK folder structure (UDK(***)UDKGameConfig).
Right-click the “DefaultEngine.ini” file and access its properties to uncheck the “Read only” option.
Open the “DefaultEngine.ini” file within Notepad. Move down to the “UnRealEd.EditorEngine” section.
Either (1) remove the null pointer (“;”) from the start of the “ModEditPackages = MyMod” line or, if that line is not present, (2) create a line “ModEditPackages = MyMod” at the bottom of that section. This means that now UDK will also check this folder for scripts in addition to its own. (If you have used the GAT Setup.exe then this should already be done this for you.)
Editing Scripts
Script files consist simply of text, so any basic text editor will do. If you’re anticipating doing a significant degree of scripting, you may want to investigate other options.
Free text editors such as Notepad++ or ConText provide add-ons that enable syntax coloring, which can really help with reading scripts. They also provide good search facilities within both single files and folders:
Notepad+ +: http://notepad-plus-plus.org
Syntax addon: http://notepad-plus.sourceforge.net/commun/userDefinedLang/UnrealScript.zip
ConText: www.contexteditor.org
Syntax addon: http://cdn.contextstatic.org/downloads/highlighters/UEDScript.chl
What’s in a Script?
Every script begins with a line that defines the name of the scripts (e.g., class GATPawnSoundGroup extends UTPawnSoundGroup). The class variable (GATPawnSoundGroup) is the name of the script file.
All classes “extend” from a “parent” class; in this case the GATPawnSoundGroup is an extension of the UTPawnSoundGroup class. This system is useful when creating modified classes (such as the GATPawnSoundGroup).
When extending an existing class, you only need to provide references to properties or functions that you want to override. If you are happy with any of the existing properties or functions, then simply leave them out of your custom class and the engine will use the “parent” script.
This idea of “inheriting” properties and functions from parent classes continues all the way up the hierarchy of classes. For example, GATPawnSoundGroup extends UTPawnSoundGroup, which extends Object.
A pretty short hierarchy, for example, would be UTWeap_One_Shot_Pistol extends UTWeap_ ShockRifle, which extends UTWeap_ShockRifleBase, which extends UTWeapon, which extends UDKWeapon, which extends Weapon, which extends Inventory, which extends Actor, which extends Object. The Object script is the overall parent of all classes within UDK.
If you look at the GATPawnSoundGroup class, you will see that it only contains a “defaultproperties” section. This is because we did not need to change anything about how the UTPawnSoundGroup functions—we just wanted to be able to define our own sound cues for the various footstep sounds.
The same can be said for the various weapons we have created for the tutorial. Most of their functionality is handled by the parent classes (such as UTWeap_ShockRifle). All we have added to the extension class is a change to some of the default properties (e.g., sounds, firing rates) and some minor tweaks to some of the functions in order to alter how the weapons actually fire or trigger sounds. For example, taken from UTWeap_One_Shot_Pistol:

As you can see, the code has been fairly well commented so you can see what is happening within the script. The only modification that has been made to this particular function is the line “ForceEndFire().” This does not appear within this function within the parent class; it has been added here so that the weapon will not continuously re-fire while the mouse button is held down.
Using comments is a really good way of annotating script files. They can be used to remind yourself of things to do. They can also be used to describe what certain parts of your class do.
There are two ways of creating comments. A single line can be done like this:
//this is a comment
Multiple lines can be done like this:
/** This is a comment
* So is this
*/
Immediately after the class and parent-class have been defined, you will find any variables that need declaring. There are two ways of doing this:
// taken from SeqAct_GATPlaySound.uc
var() name CMParamName;
var float CMParamValue;
In the preceding example, you can see that the CMParamName is declared using the var() statement, whereas CMParamValue only uses the var statement. As a result, the var() CMParamName is available for modification by the user from within the editor (right-click properties). The var CMParamValue can only be set or modified by the program itself.
The default properties section of a class is always found at the bottom of the file and is where all references to external files such as materials and sounds are called.
Within the default properties you can also “import” functionality from another class. For example,
// taken from SeqAct_GATPlaySound
Begin Object Class=AudioComponent
Name=YourSoundSound //“imports” AudioComponent functionality
End Object
In this example, the AudioComponent class has been imported via the “Begin Object Class” statement. This allows us to make use of some of the functionality offered by the AudioComponent class; in this case the ability to apply realtime volume fades to a SoundCue.
You will find that a lot of the more complex classes, such as vehicles, make use of additional imported functionality. This is helpful as it means that a single class (e.g., UTVehicle_Scorpion) doesn’t become too unwieldy. Plus it means that if you need to change the behavior of a component element (e.g., the wheels), you can do this in a smaller, more manageable script without affecting the main class script.
If you want to experiment with script files, it is generally better to extend an existing class rather than to modify one of the standard classes as you may make changes that have unseen effects on how the game functions. Plus you may forget what changes you’ve made and struggle to restore them after you’ve finished.
If you must modify an existing class rather than extend, make sure you keep backups of the files you modify so can revert easily, or use comments to comment out the line you want to change. For example,
// FireInterval(0) = 0.5 // original property
FireInterval(0) = 0.1 // new modified property
Don’t forget there’s lots more on scripting (including a proper introduction) on the UDK.com website.