
6
Making it Sound Good
Now we’ve got all the elements (sound, music, dialogue), we can start to bring them together. Before you begin you should always ask, “What am I trying to achieve?” Ideally you’re asking this question alongside the game producer and game designers in weekly design meetings. Even if you are working without this kind of support, you need to have a good understanding of the intended purpose of the gameplay from moment to moment, and the type of emotion you want your player to experience so that your soundscape can effectively support it.
For a long time sound has developed with the aim of matching the increasingly photo-realistic look of games, hence “making it sound real.” It’s true that to some extent the role of sound is to support the visuals by creating a sense of “reality,” adding weight and substance to what are, after all, simply a bunch of pixels. However, the exclusive pursuit of realistic sound displays a lack of understanding about how the human brain deals with sound. Here’s the key point, and it’s a biggie. With regard to the human sensory system, there’s no such thing as “reality” when it comes to sound. Take a moment, breathe deeply, and we will explain.
If you had 40,000 speakers, then it might be worth trying to accurately represent a real sound field; then we could use our perceptual mechanisms in a way that is akin to how we use them in the real physical world. As this isn’t realistically possible (yet), we need to realize that the usual ways of listening do not apply. The phenomenon described as the “cocktail party effect” explains how the brain uses the difference in the time between the sound arriving at each ear and the difference in the sound itself (that results from the head filtering one ear’s version depending on the direction of sound) to enable us to tune in or focus our aural attention on things of interest. For example, at a cocktail party where there are many sound sources, you can still tune in to the fascinating conversation of the couple by the door who are discussing what an idiot you are.
Without a fully functional sound field, the listener is no longer able to do this. Therefore, it is our job, whether as a film sound designer or game sound designer, to decide from moment to moment what the most important sounds are for the listener/player. If we try and play all of the sounds all the time, then we’re going to end up with sonic mud that the user cannot decipher. If were to you put a microphone in the middle of the cocktail party, make a recording, and listen to it, the result would be chaotic (unless it was a very boring cocktail party). With your own subjective listening, you can choose to tune into different voices; with the microphone’s objective hearing, however, when you listen back to the recording, you won’t be able to make anything out. In other words, microphones hear, people listen.
The realization that it’s our job to control and manipulate the sound track actually opens up a range of creative opportunities for giving the player a better emotional experience. The emotional use of sound in games is currently limited when compared to the creative use of sound in movies. This is in part because of a lack of sophistication in the tools available but also because of the inherent conflict that arises from the dual function of sound and music in games, where we have to balance the role of providing information to the player with the aesthetic role of communicating emotion.
Audio Concepting
People, including sound designers, are generally not very good at talking about sound. Instead of writing design docs and talking about it, do it. If you’ve got a great idea about a gameplay mechanic based on sound or an audio feedback mechanism that you think would work really well, don’t tell your producer about it, make a mockup and show her.
You need to understand your tools well enough to break them, use and abuse them in ways not intended in order to illustrate your point. Whatever the engine you will eventually be using, if you can mock the idea up in UDK or Cycling 74’s Max, then if the idea gets accepted the programmers can implement it properly for you later.
As well as understanding the game’s mechanics, you should also get your hands on any early concept visuals as soon as possible. In Windows Movie Maker or iMovie, take a still image of this concept art, drag it across the timeline, and add an audio track to it. Try creating a one-minute environment ambience for this location or do the same with an animation. With just the still image on the screen (or a series of images), create an imagined scenario where a character or creature will interact with things. Get the movement sounds and vocalizations in. To try out visual concepts quickly, sometimes artists will grab a bunch of imagery or video clips from a variety of sources and roughly put them together (sometimes referred to as “ripomatics”). If you’re pushed for time you could take a similar approach, taking bits of the sound track from your favorite films or games and blending them together to see quickly if this is the direction that people are after.
Putting in the extra effort early on to provide audio concept tracks will achieve a number of objectives:
1. It will tell you quickly what people don’t want. People are generally not good at articulating what they do want (particularly in terms of audio where most people lack the vocabulary) but are very good at telling you what they don’t like when presented with an example. Don’t get too precious or attached to your sound ideas, because they will no doubt change a number of times. (Always keep them, though, for when the producer comes around in six months’ time looking for some “new” sounds for one of the creatures. That’s when you play your original sounds, which the producers had rejected earlier. This time around, they’ll probably think the sounds are perfect. Either that or they’ll sack you.)
2. The great thing about making mockups and concept tests is that they can feed into other areas. If you make a concept sound for the creature that you’ve got some art for and then show it to the animator the chances are that consciously or not, some of your elements will influence the final animation.
3. Providing early concept sounds will also form an early association with particular characters or objects. People will get used to hearing them with your sounds, so that the game will begin to sound “not quite right” without them.
4. Using sound to illustrate aspects of gameplay will get other people interested in the sound of the game, to realize its potential impact, to get into discussions, and to offer input and ideas. This increase in communication is what you want if you are to have a positive impact on the game design. Of course, the element that will drive your concepts more than anything is an understanding of the nature of the game itself and of the roles and functions you want the sound and music to achieve.
Spotting, Roles, and Functions of Sound in Games
When talking to designers about the goal of the player in a particular scenario or the arc of emotion they want the player to experience, you should have a good understanding of how sound can contribute to gameplay and emotion so that you can help achieve their goals and, where appropriate, make the case for using sound more creatively. This chapter deals with the crucial issues of how sound can support gameplay and narrative not only by adding characterization to objects and characters but by also being responsive to game events via the use of interactive mixing.
Sound obviously shares many roles and functions with music. Unlike music, which frequently falls outside of the reality of the game world (as non-diegetic audio), sound tends to derive mainly from objects and characters within the game world. (Although there can be considerable crossover between music, musical sounds, and sounds that play the role of music.)
Reality, Mood, Information
A primary function of sound that differs from that of music is to make the sometimes-unconvincing two-dimensional image feel real. It also provides information to the players, both in terms of aiding navigation and describing what is around them in the off-screen space, and in terms of providing feedback about their actions and their status. Sound not only reinforces the image to make it more convincing but also describes the image, giving it a substance and character. Sounds can have strong links to memory and therefore to the feelings evoked by those memories. In addition to giving the player a sense of presence in the world, it also immerses the player, setting the mood and guiding the player’s emotions, most powerfully experienced through the subjective point of view of the character. From the pleasing reward of the coin successfully collected to the shocking boom of your BFG, sound makes things cool. (Put this book down and play your favorite game—only with the sound switched off. See what the experience is like without the audio there to provide immersion and feedback.)
Too often the process of adding sound to a game level turns into the simple routine of supplying a list of assets that are checked off a spreadsheet. As with music, it’s important to spend time with the designers or the producer “spotting” the level for sounds you will need. But as you do so, you should have uppermost in your mind the purpose or function of the sounds you are intending to implement. What does this sound bring to the game experience?
Make sure you have thoroughly familiarized yourself with any design documents available so that you have a proper awareness of what’s actually going to be taking place within the level. (You’ll often be starting to implement sound before many of the game mechanisms or scripting are in place.) This way you can talk about how they want the player to feel at a given place/moment and what’s happening with the gameplay or narrative. Consequently you can try and avoid the spreadsheet mentality of “See a ventilation shaft, hear a ventilation shaft.” As discussed later in “Interactive Mixing and the Power of Subjectivity,” you should look for opportunities for the player to experience subjective or interpretive audio, sound that is heard via your character’s emotional state or focus, as opposed to the strict “realism” of simply representing what’s there. Don’t be afraid to let go of the “real.”
We’ll deal with each of these topics in more detail through the examples that follow.
Reality and Characterization
When we see and hear something at the same time the brain automatically fuses the object itself and the sound the object makes into one event. Sound gives us information about the material and nature of objects and this fusion (sometimes referred to as synchresis) between the audio and visual aspects allows us to get away with layering different sounds together for a specific object to give it a different feel or character, while still convincing us that it originates from that object. When game reviewers talk about the relative weight and power of weapons, they are getting most of this information from the sound.
600 Characterization Corridor
The first thing to remember when designing the sounds for your game is that sound has the power to change what we see. By choosing the sound to put together with a certain image (or object/animation), you can make this object feel very different. It’s interesting to note that when films are rated for age appropriateness, it is often the sound effects that are revised to make the action feel less violent. (Appendix E on the website offers some tips on sound asset creation/design.)
Along these corridors you will pick up three weapons in turn. Although graphically they all look exactly the same, they are characterized as different by the sounds that are attached to them. By choosing how to characterize a weapon, we can affect how the player feels. The choice as to whether you give the player a big, powerful sounding weapon, or a weaker sounding one will affect not only the players emotion but will also probably affect their gameplay style.

(To make sure that the player only has the weapon we want him or her to have, we are providing an inventory that is empty just before the player arrives at each weapon’s locker. We do this by using the [Give Inventory] Action (New Action/Pawn/Give Inventory).)
The locker for each of the three weapons contains a shock rifle. We have swapped out the usual sounds and replaced them with our own. (For more on weapon sounds, see Chapter 7.)
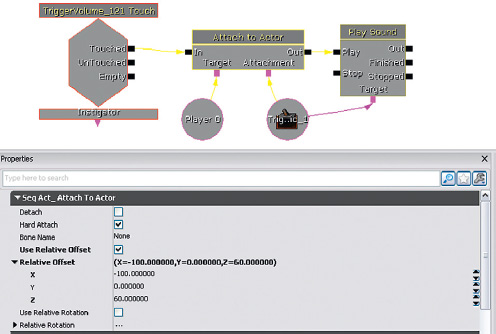
At the end of the weapons corridor, the light flickers and goes out; we attach a light to the player to act as a torch using the [Attach to Actor] object (New Action/Actor/Attach to Actor). In the next room the floor drops away and the player enters the spooky tunnels under the level. The falling floor is actually a [KActor] that you’d usually control with the [Matinee] feature. In this case, it’s simply in its original position as a floor; when the player enters the [TriggerVolume], its physics is changed to PHYS_Falling (New Action/Physics/Set Physics), which means it will fall until it hits the surface below.
Define the Environment: Immersion and Emotion
Immersion in a game is when the player loses sense of the outside world and is, for a moment, “lost in the flow.”
601 Spooky Sounds

As well as characterizing particular objects, sound also characterizes an environment both through acoustic properties such as reverb and through the sounds and their location in the off-screen space. We’ve looked already at how even a simple room tone can have a significant aesthetic and emotional effect. Ambiences and sound environments do not have to be real to be immersive, but sounds that might have a source in reality (however strange) are often the most convincing.
Many games aim at the visceral thrills of fear and excitement. As you walk through the maze of corridors that make up Area 601, you’ll hear a variety of sounds that are aimed at immersing the player in this environment.
Symbolic Sounds
The first approach to creating a spooky atmosphere is to use sounds that have become synonymous with danger. The sounds used in this area are either triggered via the usual [Trigger] or [Trigger Volume] Actors or are produced by [AmbientSoundNonLoop]s. The ambience contains some of these elements:
Dogs barking = Danger
Glass breaking = People doing things they shouldn’t
Whispers = Ye olde reverse reverb effect (see Appendix E), a horror staple
People in pain = Danger
Low-frequency bangs, groans, or rumbles = Danger. (These types of sound often mean that something significant or structural is breaking; either that or something large is coming our way to have us for breakfast.)
Baby crying = This sound produces a natural tension. (Not many babies were harmed in the making of this book!)
Expect the Unexpected
Tension is created by playing with expectations. It is the unknown or unexpected that often generates a fear response. As illustrated in the level, sudden sounds can produce a shock effect but what is also effective, and used much less often, is to actually stop a sound. As you enter one of the areas, a room tone that has been present since the start suddenly stops for no apparent reason. This change leads the player to expect something to happen, and there’s a tension in this anticipation.
Space, the Final (Technique) for Tears
For sound to be immersive, of course, it’s important for it to be all around you, with no gaps or holes, to literally “immerse” you, but its direction and source can also have a powerful emotional effect. Evolution has conditioned us to be aware of danger, and we rely on our hearing to inform us of things that are either out of our field of view, hidden, or at a great distance. Sounds that are placed behind the player increase the perception of threat, and any sound source whose location is hard to identify also boosts tension. If a sound source is large enough for there to be ambiguity as to its point of origin, this can be as effective as sounds from the rear. (You’ll obviously only notice this effect in the level if you’re listening via a 5.1 or above surround sound setup.)
One way to achieve this effect would be to mix a surround ambience in your DAW and then import it as a multichannel sound source as described in Chapter 3. In this instance, however, we’re illustrating a different approach.
To put a sound behind the player in order to spook them out we use the [Attach to Actor] object again. This time a [TriggerDynamic] is attached at an offset to the player (behind and above), and the sound is played back through this trigger.
Characterization through sound design is, of course, absolutely key to the sound designer’s job. We’ve only touched on a few ideas here (and there’s more discussion in Appendix E), as other books already cover this aspect comprehensively. See the bibliography for further reading.
Exercise 601_00 Characterization
Make two versions of this exercise room to characterize it in two different ways. Firstly as a normal office, then as the setting for a new comedy horror game, ‘The Office, a Transylvanian workplace’.
Tips
1. The easiest mood to evoke in sound is a disturbing one. Think of sounds that evoke this particular feeling.
2. Consider the strategies used in the tutorial level.
3. To generate shocking sounds, use sudden changes in volume and experiment with expectations. For example the first time you open the door it opens simply, the second time when the player presses open there is a dramatic scream !
4. Position sounds in space to have an unnerving effect and create some movement with [AmbientSoundMovable] Actors.
5. Add some low-frequency sounds for their “threatening” connotations.
Information and Feedback
One of the crucial differences between sound in film and in games is the reliance on sound in games to give the player critical gameplay information.
All of the points below relating to sound’s role in providing information to the player apply equally to all games, but some are more equal than others. Multiplayer gaming is a special case in that information, both in terms of what the sound or music represent and in terms of its spacial location, is critical. A good multiplayer-level designer will use sound as a design tool, using footsteps to indicate not only location but character type, and placing items and weapons in areas that the designer knows will give off audio cues (such as in water) to alert the other players as to the first player’s location. For now, consider how the following points apply particularly to multiplayer games. As soon as we can play for longer than 15 seconds without receiving a headshot and a derogatory remark from an 11-year-old American boy, we’ll write a book specifically about multiplayer sound too (probably never).
Instruction
In its simplest form, sound often directs you to objects of interest through speech. Through Room 601, you were guided by various direct (specific instructions via an imaginary “headset”) and indirect (via overheard comments, items on the radio) speech. These examples have been “futzed” to make them sound like they are being played back through these various playback media. (For more on how to create these futzed effects yourself, see Appendix E.)
Games often put a heavy burden on dialogue to instruct the player, either directly or indirectly and this can impact negatively on the “realism” or naturalness of the dialogue. (See Chapter 5 for more discussion on dialogue.) There are many ways to convey information without instructional dialogue, but it remains a fundamental part of many games. The most obvious (but sometimes overlooked) concept to bear in mind is that your instructional dialogue must be audible. In some circumstances you will have control over all the sound sources in a room, in which case you can balance them so the dialogue is easily heard. However, there may be other situations (in the heat of battle, for example) where the audibility of dialogue is more problematic.
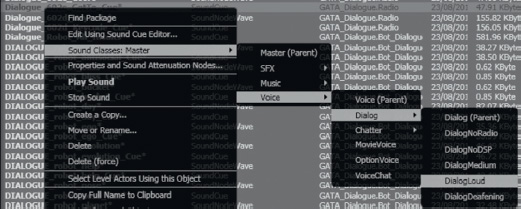
One approach is to designate your dialogue [SoundCue] as belonging to the DialogLoud SoundClass. This technique boosts the volume of the dialogue in the center speaker, which can help it cut through a busy mix.
It may also be necessary to turn down the volume of other sounds that are playing to ensure that the player is able to hear the dialogue. The final room before exiting Room 600 provides an example of this approach, where the sounds in the area are “ducked” so that the player can hear the lines. We’ll look at both SoundClasses and ducking in greater detail later in the chapter.
Feedback
In addition to the very direct form of instructional dialogue, a great deal of other information is fed back to the player through sound.
Confirmation of Action Feedback
In the physical world sound is often used to provide a user with a confirmation of their action. Think of your mobile/cell phone or the ATM machine. Sound gives you the message that the button you’ve just pressed has in fact been acknowledged. This kind of confirmation sound is even more important in games, where the amount of feedback you get through their physical interface is often limited. Some interfaces may have “rumble” functionality where you can get some (haptic) feedback to confirm your actions, but many have none. Therefore, it’s important to have the player’s interactions confirmed with sound as a proxy for the tactile feedback of the physical world.
602 Weapons Locker Room
There are two doors leading into the weapons locker room. To open the door, you need the keycode that you overheard in the previous area. (If you’ve forgotten already it’s 1, 2, er 3, … 4.)

The panel on the left is silent. The panel on the right has sounds attached so that when you “press” the buttons your choice is confirmed with a beep. Which one is more satisfying to use?

The interface for the Keypad is created using Adobe Flash and accessed via the [Open GFx Movie] Action. When you click on each number pad on the screen they output an [FsCommand] event. These go through a series of [Gate]s. As you get each stage of the combination right, the next [Gate] is opened until finally a [Matinee] object is triggered, which opens the door.
HUD/UI Feedback
This kind of audio feedback on your actions is equally important as part of any menu navigation user interface (UI) or heads-up display (HUD) that you interact with.
602a (in Room 602) HUD
In the room next to this one there are turrets that are protecting the weapons locker room. If you attempt to enter this room, you will undoubtedly get killed. The good news is that the weapons locker in this room carries a modified shock rifle with a grenade launcher attachment—handy, eh? When you’ve picked it up, press F10 to activate your inventory. Navigate this menu to select the new weapon.
When designing sounds to be used for menu navigation, you need to use sounds that somehow convey the notions of:
“Forward”/“Backward”
“Accept”/“Decline”
It is difficult to generalize about which sounds might have these kind of positive (forward/accept) or negative (backward/decline) connotations. A rule of thumb from speech patterns might be that positive meanings are often conveyed by a rise in pitch, whereas negative meanings are suggested by a fall in pitch. By using slight variations on a few sound sources, it is easier to produce a “positive” or “negative” version that conveys this meaning than it would be to use completely different sounds. This method also gives these sounds an identity as a family of related sounds rather than simply a collection of unrelated ones.
Your sounds will have more coherence and unity if you link them with the theme of the game world itself or with an aspect of the object that you’re interacting with. If your game is set within a dungeons-and-dragons type of world, then the sounds on the UI menu might be made of armour and sword sounds; if your game is set in a sci-fi world, the sounds might be more electronic in nature. If you’re going to have menu music playing while the game is in this mode, then you might consider how the UI sounds will fit with this. You can pitch-shift your UI sounds so that they are in the same key as the music so that they do not sound too abrasive against it, or you can use musical tones that fit with the style and notes of the background music. This option may not be appropriate in all cases, but it can add a nice sense of polish to your menus.
Look in the Sound Library “Feedback” folder to see if these items fit any pattern in regard to their positive or negative feedback.
As noted in Chapter 5, UDK’s system for UI menus is based around Scaleform’s GFx plug-in that allows developers to port across interfaces constructed in Adobe’s Flash motion graphics software. This technique is a little too involved to deal with here, but all you need from your designer is the names of the events that the buttons on the interface will call. With a GFx movie opened (New Action/GFx UI/Open GFx Movie), you can get named events from the interface to trigger your sounds using the [FSCommand] (New event/GFx UI/FS Command).

You can also do this via UDK’s SoundThemes. Using a SoundTheme, you can then attach these to specific [SoundCue]s. You can see the SoundTheme for the UDK front-end menu system by using the Search toolbar in the Content Browser (search “Soundtheme”).
To create your own, you need to go to the Actor Classes tab of the Content Browser. Uncheck the two boxes at the top (use “Actor” As Parent and Placeable Classes Only?), navigate down to the UTUISoundTheme Actor, right-click, and select Create Archetype.

See the UDK documentation for more on SoundThemes.
Exercise 602_00 Simple HUD
This exercise presents you with two game menus. The first menu is for a weapon selection menu in a MMOTDG (Massively Multiplayer Online Time Decimating Game) set in the ancient world of Turgeron. The second is the menu for selecting the super nano enhancements in the game “Star Paws”, which revolves around the exploits of a genetically modified dachshund set in the year 2215. Create and add appropriate sounds for both these UI’s.
Tips
1. The systems are already set up for you in this exercise. Simply replace the sounds in the appropriate [SoundCue]s.
2. Try to choose sounds that might somehow relate to the theme of the games.
3. Try using variations of one or two elements instead of a completely different sound for each action.
4. Test your sounds with your friends to see if you can get people to agree on what sounds right for forward/back/positive/negative feedback sounds.
NPC Status Feedback
One of the most essential pieces of information that sound often provides us with is that of the current status of enemies or other non-player characters (NPCs) in the game world.
602b Turret Guards
If you confront the turrets in the next room head on, they will kill you immediately; so you need to select the grenades weapon (via the inventory menu F10 or keyboard key 1) and fire at them from around the corner.
In many circumstances it’s important for the player to get feedback on the enemy’s status, and sound can be the most effective way of providing this information. Obviously the speech (or dying gasps) of your enemy give you an indication of the enemy’s health, but other more symbolic sounds are also often used. In this example, when a turret is fully destroyed it emits a high-pitched whine like a heart monitor “flatline” sound. This is relatively straightforward to do and gives useful information to the player. However, there are two turrets in this room, and you need to know whether you have successfully disabled both.
If we kept the system as it is and the two turrets were destroyed simultaneously or immediately after one another, the two tones would overlap and blend in to appear like one constant tone. For the feedback to be clear, we must monitor if the first turret’s tone is still playing. If it is, we should alter the second tone so that it is differentiated from the first and we can clearly tell that a second turret has also been destroyed.
When an enemy is killed, an integer of 1 is added to a variable. When this sound has finished playing, an integer of 1 is taken away from the variable. This variable will therefore only become 2 when two enemies have been killed and the first enemy’s flatline sound effect is still playing. Because a single pitched tone combined with another tone at the same pitch will blend into one another (and just sound like a slightly longer single tone), we play the second tone at a slightly higher pitch if they are sounding simultaneously.

When the variable is greater than 1—that is, two enemies have been killed within this time period (and so their flatline sound would be overlapping)—the [Gate] to the “Single” is closed and the [Gate] to the “Multiple” [SoundCue] is opened. This is a second version of the original sound; the only difference is that its pitch has been raised within its [SoundCue] properties.
The default bot NPCs have some sound feedback already built in with their pain reactions. You can see these in the following folder within the Content Browser: UDK Game/Sounds/INT/A_Character_ CorruptEnigma_Cue. You could change these to your own by altering the references in the script:
C:UDKUDK(***)DevelopmentSrcUTGameClassesUTPawnSoundGroupLiandri.uc

Don’t forget that any changes to a script will need recompiling and will affect all players on your version of the game from now on. For a reminder about basic scripting, go back to the “Scripting 101” section in Chapter 3 and see the “Scripting” section in Appendix C.
Player Status Feedback
Sound is often used to inform the player about his or her own character’s status and health.
602c Ammo Storage Basement
By going down the ladder, you will find yourself in the ammo storage area. You’ll need to pick up the weapon here and some additional ammo for the next section. However, the dastardly enemies have stored all their ammo in a radioactive liquid. You should be all right as long as you don’t stay in too long. As soon as you hit the water, the danger beep starts. Pick up as much ammo as you can before the radioactivity irreparably damages your health.
As you enter the radioactive liquid, a [TriggerVolume] starts the health damage system. After a delay of five seconds, the looping [Delay] starts. Each time this [Delay] completes, it increments a variable by 0.02. This is then subtracted from a constant of 1 to give a new delay time (0.98, 0.96, 0.94, etc.). The result is that the warning beep emitted by the [PlaySound] object gets faster and faster the longer the player is still touching the [TriggerVolume] (i.e., still in the radioactive liquid).

If the player stays in the water too long, a pain [SoundCue] is played and the player has a short time to get out before being killed. A [Compare Float] object compares the [Delay] variable to 0.2; if this is true, then a [PlaySound] leads to a [Modify Health] to kill the player.

You’ll note that if you stay actually under the water too long, the built-in damage of the UDK [UTWaterVolume] also takes effect. The [UTWaterVolume] (added like a [TriggerVolume] from the Volumes menu) also has enter and exit sounds.
A second [TriggerVolume] just under the surface of the water is used to fade in and out the underwater bubbling sounds.
Exercise 602a_00 Health Feedback
In this exercise you are faced with wave upon wave of enemy bots. Give players some audio feedback on the state of their health.
Tips
1. Use some maths to scale the Player Health variable in Kismet to an appropriate value to apply to the exposed Volume Multiplier of the heartbeat [PlaySound].
2. You could also scale this to affect the delay time of the [Delay] object that is controlling the speed of the heartbeat playback.
Weapon Status Feedback
Do you watch the ammo counter on your HUD when you’re in the heat of battle? Most people don’t, so it’s up to the sound to give them feedback on the status of their weapon, such as its condition and how full the clip is.
602d Weapons Target Practice
When you shoot the weapon you pick up in this firing range, you will get audio feedback to let you know the status of the weapon. In this case, the weapon uses a new variation of its firing sound when the ammo count gets below 25.
We’ll look at how this is done in the weapon script presented in the “Weapon Systems” section of Chapter 7. This example reflects the way that some real weapons firing sound changes in character depending on the number of bullets left in the clip. You could also adapt this system so that a weapon’s sound alters as it gets damaged with over-use, or there could be a sound for the clip ejecting when empty. Whether it represents the reality of the weapon itself or not, getting audio feedback from their weapon is very useful to a player.

Symbol/Punishment/Reward
In certain genres of games (particularly platformers), the repetitive nature of the pickup sounds serves as a kind of conditioned response to punish or reward the player. Whether it’s picking up stars, coins, or powerups, the sounds are there to reward the player with a pleasurable confirmation of achievement.
602e Punishment/Reward
You need to regain some health, so go through these corridors and pick up the, er, pickups. Beware! Some have degraded and therefore will actually damage you.
Rather like the UI menu sounds, it is hard to generalize as to what makes a satisfying reward or punishment pickup sound that will withstand being listened to for thousands of repetitions. The repetition makes the sound drive a conditioned reflex to seek/avoid certain sounds. You need each one to have a clearly different sound so that you can recognize what it is; at the same time, the sounds cannot be so varied that they feel part of a different game.
Although we have droned on a great deal about the need for variation in your sounds, these type of feedback sounds are an exception to the rule. These sounds are the equivalent of “earcons” in computer software that tell you you’ve got mail, in that they are sounds that carry specific meaning. Although a typical “coin” or “star” pickup sound may go up in pitch if you collect more within a given period of time, for symbolic sounds like these we are interested in the information they convey rather than the sound itself, so the repetition of the same audio sample is less of a problem than it has been in other circumstances. The player is concerned with the learned meaning of the sound rather than any information conveyed by the nature of the sound itself. We don’t want the distraction of variation where the player might be forced to think about the sound more. If there were variations in the sound, the player would be forced to consider “Why is this sound different? What is it trying to tell me?” rather than simply being able to acknowledge the information that the presence of the sound has provided.
The existing health pickup script is here:
C:UDKUDK(***)DevelopmentSrcUTGameContentClassesUTPickupFactory_HealthPack.uc
Try the following exercise to create your own health pickups, and add different sounds to give each one a different meaning or character.
Exercise 602e_00 A Quick Pick-Me-Up
Your player has been trapped in an electromagnetic pulsar field. Help is on its way, but the only way for the player to survive the next three minutes is to continually replenish his or her health. Luckily, the health pickups are being continually regenerated around the room.
Tips
1. Add lots of health pickups to the level. In the Content Browser/Actor Classes tab navigate to Pickups/Health/UTPickupFactory_Healthpack.
2. Attach these to the [Toggle] objects in the Kismet system provided so that they will randomly appear.
3. Extend this by now adding your own pickup sounds through creating some new Health pickups. Close the editor.
4. Navigate to the C:UDKUDK(***)DevelopmentSrcUTGameContentClasses folder and open the UTHealthPickupFactory.uc script with the Windows notepad. Edit the references to [SoundCue]s and replace them with your own. Now save the file with a new name in your My Mod/Classes folder: (C:UDKUDK(***) DevelopmentSrcMyModClasses). For example we would name ours GATHealthPickup.
5. Make sure your new name for this pickup is reflected within its own script file—that is, for our new pickup ‘GATHealthPack’ the third line down of the script would read class UTPickupFactory_GATHealthPack extends UTHealthPickupFactory.
6. Using the Unreal Front End, recompile your scripts using the Script/Compile Scripts command.
7. Now re-open the editor and you should see your new pickups in the menu of the Content Browser/Actor Classes/Pickups/Health/.
Navigation
Attract
Part of the challenge of designing games based in three-dimensional (3D) worlds is helping your player to navigate the world without becoming lost or frustrated. Subtle visual clues can be effective in attracting players toward certain areas without being as clumsy as a big pointing arrow. Sound and music can also play a specific role in helping players navigate the space or in drawing their attention to certain objects. This technique is all the more effective if the players are unaware that they are being manipulated.
603 Navigation
As you enter this area, you will hear a distant beeping. Without needing to give any specific instructions to the player, all but the most perverse will probably be attracted to seek out the source of this sound.

When you touch the [TriggerVolume] leading outside, an [AmbientSoundSimpleToggleable] is switched on. This starts the beeping sound, which is located in the same place as the pickup the player is being encouraged toward. Upon reaching the destination ammo pickup, this is toggled off and the [KActor] is hidden.

This is an example of how sounds can be used in simple but effective ways in the level design to help navigate players toward areas or objects of interest.
Repel
603a Radioactive
As you navigate your way to the mysterious beeping object, the player’s path will also be to some extent dictated by the audio from the “radiation” zones.
In addition to attracting players, sound can also guide them away from potentially hazardous areas. As a player passes the initial [TriggerVolume], a low Geiger counter (radiation monitor) crackle is started along with a camera animation and motion blur effect to indicate that the presence of this sound is not a good thing.

Around each radiation area are two [Trigger]s. The outer [Trigger] plays back a Geiger_High [SoundCue] to warn the player of the danger. If the player chooses to ignore this warning and continues, then the inner [Trigger] applies a [Modify Health] object to damage the player.

When a player leaves the immediate proximity of a radiation area, the [Trigger] is “UnTouched” and turns the Gieger_High [SoundCue] off. When the player finally leaves this area, another [TriggerVolume] turns the low Geiger counter and camera animations off to let them know that they are now in the clear.
Exercise 603a_00 Manipulate
This series of rooms represents a maze. Guide your player through the maze using sound as the only navigation device.
Tips
1. Try using [AmbientSoundSimpleToggleable]s to lead your player in certain directions.
2. Set up [TriggerVolume]s to toggle these like the example in Area 603.
3. You could also use [Trigger]s to warn of danger or to act as rewards.
Tracking Devices
Some games make use of an audio tracking device to enable the player to locate objects or NPCs. These kinds of audio tracking devices are often at their most effective (and scary) when the visuals are deliberately obscured either through fog or darkness. This forces the player to rely more on the audio and taps into the tension of knowing that there’s something there, but not knowing quite where it is.
603b Enemy Tracker
At the ammo drop you pick up an enemy tracking device. This emits a beep that changes in rate, pitch, and volume the closer you get to the enemy. Find the enemy.
The enemy is spawned at the location of [Note_8] and the distance from the player to this point is used to control the duration of a [Delay] object. The [Get Distance] object is rechecked and updated every 0.1 seconds by a looping [Delay]. To use the distance variable directly would lead to the [Delay] duration being 1,000+ seconds, so it is scaled by the [Divide Float] object (/1000) to get it into a more useful range of values.

This number is then also subtracted from 1.4 to give the [PlaySound]’s volume multiplier, and it is subtracted from 1.6 and then divided by 2 to give the [PlaySound]’s pitch multiplier. This means that the volume gets louder, and the pitch higher, the closer you get to the enemy. Either of these feedback mechanisms can also work well in isolation.
You could extend this system so that the [SoundCue] changes depending on the player’s distance from the enemy using a series of Compare subsequences like the system in the Physics area (Room 304b). This would play a different [SoundCue] when the player’s distance from the enemy fell between different ranges.
Exercise 603b_00 Tracker
The player has to find the red keycard to get out of this area. It must be on the body of one of the guard bots, which have been deactivated. Fortunately, players have a tracking device to help them find it. Use the player’s distance from the guard holding the keycard to control the speed of the tracking device beeps.
Tips
1. The guard’s location is marked with a [Note] object.
2. Use a [Get Distance] action with inputs A being the player (New Variable/Player/Player) and B the [Note] (select the note in your viewport, then right-click the B input of [Get Distance] to create a New Object Var using Note (***)).
3. Set up a [Delay] that retriggers the [Get Distance] action to update the distance from the player to this [Note] every 0.5 seconds.
4. Create another [Delay] object that retriggers a beeping [SoundCue].
5. Create a New [Float] variable for the duration of this [Delay] (right-click the duration input and select Create New Float Variable).
6. Use some maths (Right-click/New Action/Math) to scale the values you are getting from the [Get Distance] Distance output into ones that are appropriate for the varying length of the beeping [Delay]. (Send the float result of this math to the [Delay]’s duration variable.)
Orientation
We have already discussed the importance of sound in describing off screen space in reference to ambient sounds, but knowing where your enemies are coming from in games is crucially important.
603c Town Square showdown/Orientation
After you have found and shot the Rebel leader in the town square, you will find enemies charging toward you from various directions. The vocalizations will cue you as to the direction of their approach before you are able to see them. Note how we need to return to the concepts around sound sources and spatialization in order for the directional cues given by these sounds to be clear enough.
The bot dialogue here uses two different [SoundCue]s, each with different Distance Algorithm and Radius Min/Radius Max settings (from the [SoundCue]’s [Attenuation] node). The player’s ability to judge the direction from which the enemy is coming will depend on the settings you choose.
Interactive Mixing and the Power of Subjectivity
In order for any of the intended functions of sound or music to be achieved the audio mix needs to be considered. Before you start thinking about the various audio elements and their appropriate volume level you need to be clear on what you want to be heard, and why.
In the opening to this chapter we discussed how the sound field within a game differs from that in the real world and how consequently we need to actively control the mix of the different audio elements in order for the player to be able to make sense of them.
The mix on sounds and music that we hear at any one time is the product of several factors:
• The volume of the sound sources
• The number of these sound sources
• The timbral nature of the sound sources (their frequency content)
• The spatial nature of the sound sources (3D spatialized, stereo, multichannel)
• The attenuation over distance settings of the sources
• The reverberant environment in which they take place
• The impact of occlusion systems like ambient zones
• Global, group, or bus-level volume controls
When considering these factors, the key is to be conscious of what you want the player to hear and why these things are important. It may be appropriate at times to have a very dense mix with lots of activity; at other times it will work better if the mix is sparse.
The first requirement that will force you to consider these questions is the fact that there is a hard limit on the number of sound channels, or voices, that you are actually able to play back at any one time.
Voice Instance Limiting and Prioritization
All game engines have a limitation on the number of sound channels or voices they can play simultaneously. Although in exceptional circumstances this can be a problem (see the retriggered weapons examples in Chapter 7), it actually works in our favor most of the time because whether we have 48 or (theoretically) 512, it forces us to think about which sounds should be the highest priority.
Before we consider a hierarchy of types of audio to decide which can be lost, or culled, if the voice count gets too high, we should take steps to try to make sure that it doesn’t get too high in the first place. Within the properties of each [SoundCue], the setting for Max Concurrent Play Count allows us to determine the number of times this cue can play simultaneously before instances are culled. (Right-click/Properties and Sound Attenuation Modes/Max Concurrent Play Count.)
The default is 16, but for some sounds you may wish to consider setting this variable lower. How many instances of the same [SoundCue] you hear will be significantly affected by the attenuation over distance curves you apply.
Depending of the nature of the scenario, you may want to be able to hear NPC footsteps from a significant distance, in which case you could potentially get a high number of concurrent instances.

Alternatively there may frequently be many NPCs within a confined area, in which case you may want to reduce their Radius Max or lower the Max Concurrent Play Count for the footsteps [SoundCue]. You might consider swapping between two or more [Soundcue]s, that actually reference the same sound wave but have differing Max Concurrent Play Counts, depending on the circumstances.
It might be appropriate to consider grouping your [SoundCue]s into different categories and devising some general rules as to the number of voices you will allow for each one depending on its importance to the game or the particular scenario. You can select multiple [SoundCue]s at once in the Content Browser and adjust their Max Concurrent Play Counts simultaneously.
One, Two, Few
The other thing to remember here is the idea we discussed with regard to cascading physics in Chapter 3. Perceptually we tend to view things as a group when there are more than two of them, so it’s worth considering if you need specific instances of a sound to sync precisely beyond a certain number, or whether it would be better to discuss a method with your programmer of switching instead to a different “group” sound file.
Prioritization
Given the interactive and dynamic nature of games, no matter how carefully you plan there will always be instances where the system becomes overloaded. When this happens, you don’t want to be listening to the great ambience and footsteps all around you while the player weapon is actually the voice that is being culled.
Along with the voice instance limiting systems, all audio engines have some way of making sure that there is a hierarchy of sounds so that in such circumstances the lower-priority sounds are culled but the high-priority sounds continue to play. Typically you’d consider your sounds in groups such as Mission Dialogue, Player Weapons, NPC Weapons, Explosions, Dialogue Chatter, Ambience, and so on, and then you would tag these groups by their relative importance. In UDK, things are somewhat less sophisticated than this at the moment. What we do have is an option within the SoundClasses to choose “Always Play,” which will prioritize any sound assigned to this SoundClass above others in a limited voice count situation. SoundClasses are discussed again later in the chapter.
With the advances in the capabilities of current gaming platforms, the use of a simple limiting system on the number of concurrent versions of a particular sound is usually sufficient. However, with the expansion in the number of voices available, we are faced with this dichotomy: now that we can play everything, perhaps not playing everything is the way forward. Read on.
(Also see “Audio Optimization and Tracking the RAM Budget” in Appendix B, for instructions on how to track your voice count.)
Listening Levels
Mixing for cinema has long established a reference level to mix at, which is then replicated exactly in the cinema. Within this controlled environment, you know that the audience is going to be experiencing the film at exactly the same level at which you are mixing. Unfortunately, as of yet, games have no established reference level for mixing but it’s important to bear in mind that games are a home entertainment medium and as such should be considered alongside similar media such as TV or DVD. People play games in a variety of environments and circumstances, and through a variety of mediums, from a mono television to a 7.1 THX-certified surround-sound setup. If you are not mixing within a professional environment (and as beginners we’ll assume that most of you aren’t), then one reference level it is worth paying attention to is the console’s startup sound and any dashboard/interface sounds (on the PC, people usually set their default volume levels according to the notify sounds, such as that used for incoming mail; unfortunately, particularly on older versions of Windows, these are blisteringly loud). People are not going to want to have to jump up and down (or even reach for the remote) to adjust the volume for your game, so setting your own playback levels to a point where these sounds are comfortable can give you an indication of the volume at which a significant proportion of people are going to be listening to your game. (For a proper discussion of game mixing levels, see the links in the bibliography for this chapter.)
Planning for a Dynamic Mix
The concept of “mixing” actually starts with the design of the game itself. The events in the game will govern the density and nature of the sound and music at any given moment. In the past, game audio was too often treated as a fixed system, a network of processes put in place and then left to get on with it. Mixing a game needs to be integrated with the game design and should be dynamic and responsive to gameplay. We don’t mix to make sure that everything is heard (we’ve established that in terms of presenting a “reality” that is impossible); we mix to make sure that the sounds we want to be heard are heard. Our choices are based on the gameplay or narrative function of the sound or music at that moment.
The first issue to consider is that not only does our perception of the frequency content of sound change depending on the volume at which it is played back, but our perception of volume is actually very subjective. Humans do not have an built-in reference level for sound, and so perceive loudness as a comparative level, not an absolute. We will compare the volume of a sound to the volume of the other sounds we have heard within a recent time window. If you are sitting quietly in the kitchen in the middle of the night trying to finish writing a book and accidentally knock your cup of coffee off the table, sending it crashing to the floor, this is loud. As you walk over to the aircraft that is warming up on the runway, then you will also consider this to be loud. Intellectually you know that the jet engine is probably a lot louder than the cup breaking, but psychologically, at the time, the cup felt louder.
You will want to use the full dynamic range that you have available in order to highlight the differences between your quiet sounds/music and your loud sounds/music. In order for an event to feel loud, the other events around it must be by comparison relatively quiet. Unfortunately, in some genres there can be an expectation that loud equals good without an understanding that if everything is loud all the time then (1) your players will simply turn the volume down and (2) nothing will actually feel loud because your players have not experienced a quiet sound to compare it to. Increasingly people are using visual maps of the events in the game to help plan these moments of light and shade, these peaks and valleys. Here’s what a map of activity in a game might look like.
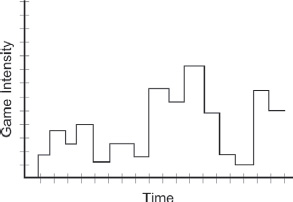
Gradually game designers are realizing that in order to have an impact, the loud/intense sections of a game need to be balanced with quiet/tense sections. (These intense sections are sometime referred to as an “action bubble”.) In terms of audio, this is helpful but we need to consider the timescales over which to plan these dynamic contrasts. If we were to parallel a film approach, we might decide to save our loudest, most dramatic, sounds and music for a key climactic point in the game. This might happen, for example, at around eight hours into play. The difference is that the volume levels within cinema are known and controlled so members of the audience will know/feel that this section is really loud/intense compared to what they saw before within a relatively narrow timescale. A game player, however, may be returning to the game after several weeks away and will also likely be playing the game at a different volume level than he or she was using before. So in terms of a dynamics map for the mix of a game, we need to work over smaller contained time windows. These might be delineated by save points, levels, or exploration/conflict sections.
Planning for a Full Mix
So you’ve set up some voice limiting and prioritization systems, you’ve set the volume of your menu music and UI sounds so the players will set their volume levels appropriately to give you some dynamic range to play with, and now you’re looking at your action bubble in which pretty much everything is going to kick off. Where do you start?
Although we’ve tried to make the case for variety in terms of having less and more dense periods of activity, and consequently thinner and thicker sound textures, there are some genres that by their nature are typically intense for a significant proportion of the time. There are some parallels to be made between the discipline of mixing sound for films and that of mixing for games, but perhaps a more fruitful one is to look toward music production. Film’s language of distant, medium, and close-up shots means that the nature of the sound track is often that of a shifting focus rather than an attempt to represent the soundscape as a whole. If you listen to an action sequence in a film, then you will notice that the mix is radically altered from moment to moment to focus on a particular sound or event; therefore, it is actually quite unlike the mix for games where, as the player is in control and the perspective fixed, we sometimes need to try to represent many events simultaneously. We can use focus for specific effect (see “Subjective Sound States” presented later in the chapter), but in the main, the need to provide information to the player means many elements will be present and that the challenges are more akin to those of music production than film production.
In a music mix, you have a number of simultaneous elements that you want the listener to be able to hear and choose from. You are allowing the listener the possibility of selective listening. To achieve this goal, you might think in terms of the arrangement, the panning, the relative volumes of instruments, compression/limiting, EQ, and reverb. In a typical soundscape for a game, our concerns are similar:
Arrangement. The number of simultaneous sound sources; a product of the game’s activity map, voice instance limiting, and occlusion.
Panning. The spatialized nature of the sound sources.
Volume. A product of the actual volume of the source together with the source’s attenuation curve.
Compression/limiting. The overall headroom limitations of combining 16-bit sound sources.
EQ. The design and nature of the sound sources themselves in terms of their frequency content.
Reverb. The different game environments and their reverberant nature.
Some of these aspects are predetermined (i.e., they are set in place before the game runs), some can be automated by processes at run time, and some are best controlled via triggers (triggered) from specific events or variables at run time. (The latter are sometimes referred to as active mixing types and the two former types as passive.)
Predetermined Mix Elements
This would include the arrangement (amount of activity) that is predetermined depending on the game design. The panning and reverb are also determined by the game’s system for spatializing sound and the design of the level. The sound source’s attenuation curves are also typically predetermined before run time. Although EQ can be varied during gameplay, the fundamental nature of the sound and its frequency content is predetermined.
All of these factors will impact upon the mix and need to be considered in light of the circumstances within the game. For instance, it might be more realistic to have a long hall reverb type in a particular game location, but if you know that the game design decisions mean that there’s going to be a battle taking place, then this will affect (1) your decision to have the reverb there at all and (2) your decision regarding the wet/dry mix of the reverb. You will also make different decisions about attenuation curves and panning depending on the number of potentially simultaneous events, the distances involved, and the relative importance of being able to identify point sources.
If you know that a set of 40 sounds and a specific piece of music are to be used in one area, then you should consider the frequency content of those sounds and perhaps identify different bands of frequency for different types of sound so they’re not all fighting for space. A typical example would be to dedicate certain ranges for the music and other ranges for the main power of the sound effects. In the sound field represented here, the different elements have some overlap in terms of their frequency range but are different enough so that when they are heard at the same time (imagine the image being squashed in from each side), each one still has some (vertical) room.
Plan the frequency ranges for elements that you know are likely to be played simultaneously.
At a very basic level, it’s worth considering the relative volumes of the different elements of your soundscape. Some have approached this by setting some general ground rules for different types of sound; for instance, the UDK guidelines suggest the following volume levels: dialogue ~1.4, music ~0.75, weapons ~1.1, and ambience ~0.5. This is, of course, based on the premise that the raw sound files are themselves at equal volume in the first place. We know that there’s no such thing as “equal” volume because our perception of loudness is (1) subjective and (2) dependent on the frequency content of the sound, not its amplitude. Having said this, most people find that some kind of normalization strategy applied to groups of sounds in their DAW can save a lot of individual tweaking later. (Normalization is a basic function of any DAW that will scan the audio file to find the peak value then increase the gain of the whole file so that this peak does not exceed a given value.)
Theoretically you should normalize all assets to 100%, as every good sound engineer knows that mixing should be a process of gain reduction, not boosting, but in reality it’s quicker and easier to run a batch process on a folder of sounds to set some general ballpark levels within your DAW than it is to edit the properties of each sound wave after it’s been imported into UDK. (For tips on batch processing, see the online Appendix F.)
All these things are examples of how you should always be considering the final mix and making mix decisions before you even get near what is typically characterized as the mixing stage.
Automated Mixing Systems
All platforms have some sort of built-in limiting system to stop distortion. These are often clumsy and unpredictable, so it’s really best to avoid having to apply these systems in the first place. There are also, however, increasingly intelligent systems of automation that can really help the overall mix of the game. Given the huge dynamic range of sounds in the physical world and the limited dynamic range that can be represented by 16 bits of information, it is not surprising that achieving the feeling of a wide dynamic range in games is a particular challenge. We’ve discussed how the level design can contribute to this effort, but we also need systems in place that will allow the intelligent management of which sounds are playing, and how many, so that the combinations of these sounds do not cause clipping and bring in the blunt instrument of the limiter. Chirping insects may add an important element of immersion to a game environment when you are creeping around, but in the midst of battle you will not hear them because they will be masked by the louder sounds. An automated system that monitors the current levels of the sounds at the player’s location and culls the quieter elements, which you won’t hear anyway, will both clean up the mix in terms of frequency content and create some additional headroom for the sounds you do want to hear.
A considerable amount of clever work has been done on interactive mixing for games audio in recent years that falls outside of the introductory parameters of this book. We would encourage you to undertake some further reading in this area, starting with the bibliography for this chapter.
(Various mixing-related changes such as volume ducking may be implemented as an automatic process for a particular subset of sounds, but as this is still a triggered event—albeit an automated one—capable of being overridden during run time, rather than a constant background process, we are going to consider it within the Triggered mixing category.)
Triggered Mixing Systems
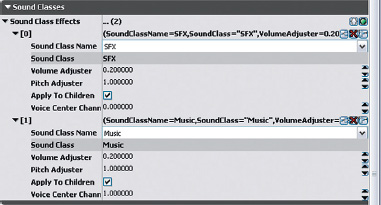
Obviously we do not want to have to specify mix settings for every single sound or music element in game, so like a traditional mixing console we can use the idea of a group or bus that will control the volume of a given subset of sound types. By routing several channels to a group (or, in our case, routing the sounds themselves), you have quick and easy control over their volume. Rather than having to move 10 faders while maintaining their relative volumes to each other, you can just move the Group fader. A typical use in music production would be to have a group for drums to control the overall volume of the kit as a whole in relation to the other elements. The default groups (SoundClasses) in UDK are listed in the figure below.
A collection of mixer settings is sometimes referred to as a mixer snapshot or mixer state. These will contain the volume levels for each group or bus together with other mix settings such as EQ or FX. When triggered, mixer values will be set to any of the different states or snapshots you have defined. These might be aligned to specific modes (such as in-game or menu), locations, or events (power up, shellshock, etc). In our initial discussion we will assume that only one mixer state (or SoundMode in UDK) can apply at any one time and that when called it will override the current mixer state. The changes between states, however, may be applied immediately or over a transition period.
An interactive game level speaks a thousand words, so we will look at these principles in more depth via UDK’s mixing system of SoundClasses and SoundModes.
SoundClasses and SoundModes
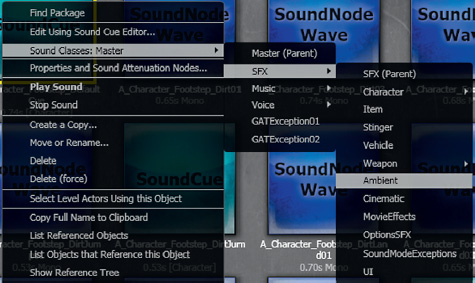
Each [SoundCue] in UDK can be assigned to a Soundclass (we looked at this briefly when discussing AmbientZones). To see which class a [SoundCue] is currently assigned to, select the cue in the Content Browser, right-click, and select Properties and Sound Attenuation Nodes.

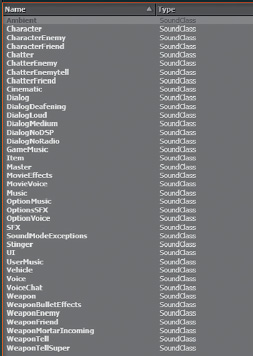
For instance, in the A_Character_Footsteps package (in the UDKGame/Content/Sounds folder), you can see that the A_Character_Footstep_Default [SoundCue] is set to belong to the SoundClass called Character.

In List view in the Content Browser you can also scroll to the right to see which SoundClass the cues are assigned to by looking at the Custom 1 column. To assign your own [SoundCue]s to a SoundClass, use the right-click menu on the [SoundCue] which allows you to select from the existing list of SoundClasses.
Note that any sounds that do not belong to a [SoundCue] and are played back by the objects below are automatically designated as belonging to the Ambient SoundClass:
[AmbientSoundSimple]
[AmbeintSoundNonLoop]
[AmbientSoundSimpleToggleable]
[AmbientSoundMovable]
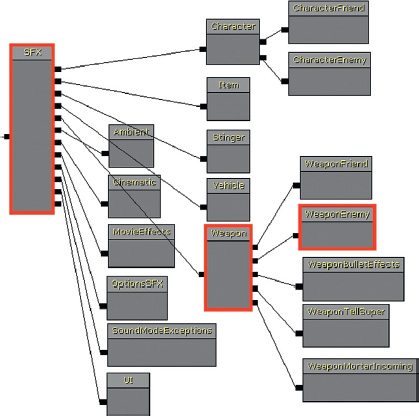
SoundClasses are UDK’s equivalent of a mix group or bus. If you navigate to the SoundClassesandModes package, you can see how they work (UDKGame/Content/Sounds/SoundClassesandModes).
Double-click on any of the SoundClasses here to open the Sound Class Editor. Here you can see all of the available SoundClasses/Groups/Buses together with a tree structure that defines their hierarchy. It defines the SoundClasses in terms of “Parents” and “Children.” (Although there appears to be a separate SoundClass object for each SoundClass, they actually all reference the same hierarchy tree and any changes made in one will be duplicated in all.)
By using this parent/Child grouping system, we can choose to change the parameters of an individual SoundClass, or by going to a higher-level group/parent we can specify a setting for the group as a whole. The default SoundClass hierarchy is shown overleaf.

For example, we might choose to change the volume of the enemy weapons (WeaponEnemy), or the volume of all the weapons (Weapon), or the volume of all of the sound effects (SFX).
We do this by selecting the option Apply to all Children within a SoundMode, which we’ll come to shortly.
The existing parent/child hierarchy is a reasonable place to start; however, if it makes sense for your particular situation, you can edit this tree to set up your own parent/child relationships and create new SoundClasses to position within them. See the SoundClass Bunker example that follows.
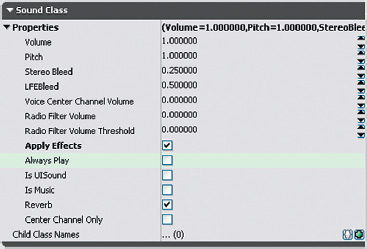
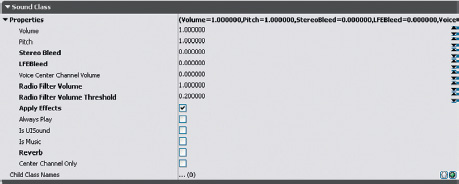
Within the Sound Class Editor there are additional properties that will apply to any [SoundCue] assigned to these classes:
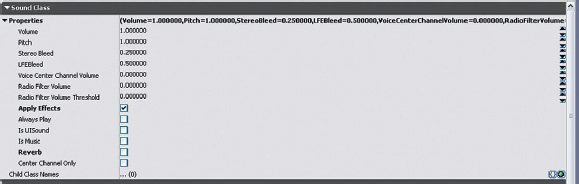
• The Volume and Pitch apply a master control to anything attached to this class.
• Stereo Bleed refers to the amount of a stereo sound source that should “bleed” into the surround speakers.
• LFE Bleed is the amount of sound to bleed to the LFE channel (the Low-Frequency Effects channel that goes to the subwoofer speaker). A portion of the low end frequencies of your sounds is already sent to the subwoofer via the Dolby bass management system so routing additional elements like this can cause a problematic comb filtering effect. If your system allows the sending of unique sounds to the LFE channel then you are better advised to make use of this.
• Voice Center Channel Volume is the volume of the source that will go to the center channel or center speaker in a 5.1 and 7.1 speaker setup. This is traditionally reserved for dialogue in the cinema and it can be useful in games if it is more important that the dialogue is heard than spatialized.
• Radio Filter Volume is the volume of the radio filter effect. Within the [SoundCue]’s Radius Min the sound behaves as normal. Outside of this the signal is treated as if it is now heard over a personal radio by the player i.e. it is heard through the center speaker with ‘radioized’ effects and does not attenuate over distance. Radio Filter Volume Threshold is the volume at which the radio filter starts.
• Apply Effects governs whether sounds belonging to this class have effects such as filtering applied.
• Always Play prioritizes the sound above others in a limited voice count situation.
• IsUISound determines whether or not the sound will continue to play during the pause menu.
• IsMusic designates the class as being music or not.
• Reverb controls whether reverb is applied to this class.
• Center Channel Only forces the sounds to appear only via the center speaker of a 5.1 or 7.1 system. This can be useful for dialogue.
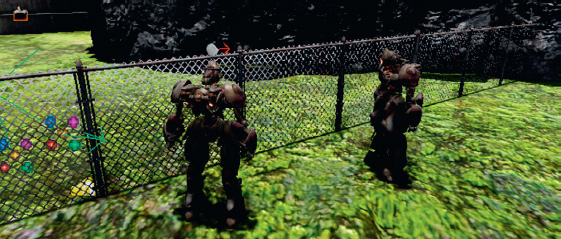
604 SoundClass Bunker
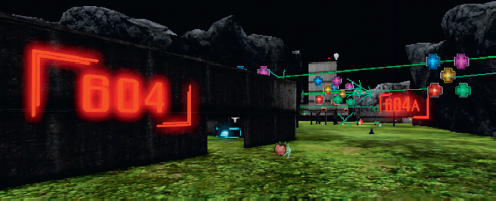
In Bunker 604, the [Trigger] alternates the voice sample among three different [SoundCue] versions. The [SoundCue]s are exactly the same except that they have been designated as members of the following three SoundClasses, each of which has different properties. In the tutorial level, walk toward and away from the sound source to hear the effect of these properties. Note that these will only be obvious if you are listening on a 5.1 or 7.1 sound system.
GATRadio01
GATVoiceCenterChannel

GATVoiceBleed


Soundmodes
SoundModes in UDK represent a type of snapshot or state mix described previously. Using these features you can define the volume (as well as the pitch and EQ) to apply to particular SoundClasses or groups of sounds. To explore these items, go over to the fence to (Area 604a) and wait until the cutscene is finished.

There are a number of sounds and music elements here, and you can hear the effect of some different SoundModes while in the Play in Editor mode by opening the console command (press the Tab key or @ key depending on your keyboard language).
In the console dialogue, type “setsoundmode” then type “GATMusicOnly” next.

The mix should then change so that you are only hearing the music. Now open the console again and try the following in turn:
• SetSoundMode:
• GATSFXOnly
• GATDefault
• LowPass
These ‘Only’ instances are useful for troubleshooting because they enable you to isolate different parts of the mix, but you can also see that having control over the volumes of different groups of sound can be very useful in terms of responding to gameplay and implementing the type of subjective sound scenarios discussed in this chapter.
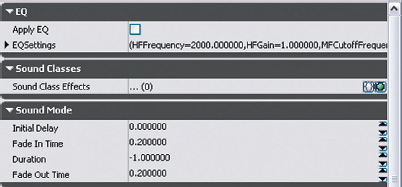
In the Content Browser, navigate to the UDKGame/Content/Sounds/SoundClassesandModes package. Double-click on a SoundMode to open its properties menu.
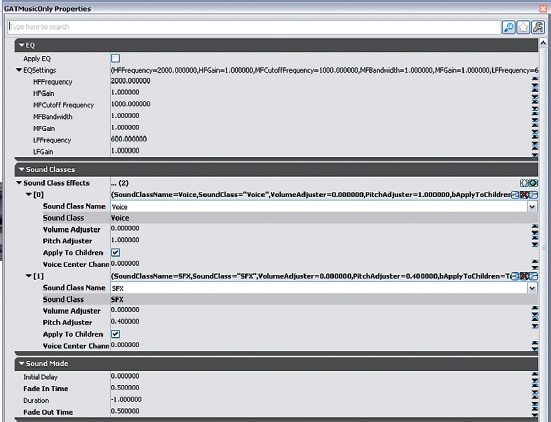
In this example, you can see the GATMusicOnly SoundMode. The three main parents in the SoundClass hierarchy tree are Music, Voice, and SFX. All of the other SoundClasses are children of these parents. By choosing the Voice and SFX classes, giving them a volume adjuster of 0.0, and ticking Apply to all Children, you effectively isolate just the Music SoundClass (and all of its children).
In the bottom SoundMode menu, you can choose whether this takes place immediately (Initial Delay), how long it takes to gradually be applied (Fade In Time), and what time period to undo the changes over (Fade Out Time). You can also set it to last a designated amount of time before switching itself off by entering a time in the duration slot. A duration of –1 means that it will last until a new Set Sound Mode action is triggered.
Also bear in mind that the changes you apply to SoundClasses within a SoundMode are cumulative. In other words, you can apply changes to all children, but you can apply a separate change to one of those children as well. The volume (or pitch) at which the child is heard is the result of combining both these values; see the “super-sense” example presented later.
We will continue to explore interactive mixing, SoundClasses, and SoundModes through the examples that follow.
Ducking
Ducking for Dialogue 01: Volume Ducking
As 5.1 or even 10.2 cannot represent a real sound field, we need to use mixing to focus the player’s aural attention on what is important. Typically one of the most important sounds to a player is instructional dialogue. We can ensure this is audible by “ducking” out the other sounds.
604a Electrified Fence
As you approach the electrified fence, a cinematic cut-scene is triggered. In the immediate vicinity of where this dialogue is taking place are several other Sound Actors; crickets, electrical cracking of the fence, and some music. Although not overly loud like some battle sequences might be, we want players to focus their attention on the dialogue, so we use the [SetSoundMode] object within Kismet to change the mix.
The [TriggerVolume] turns on the Cinematic mode, which stops all input from the player while the cut-scene is taking place. The [Matinee] feature handles the camera movement and also includes an Event track that outputs an event we’ve called TriggerSoundModeChange just before the dialogue starts.

This event leads to a [SetSoundMode] Action that sets a mode called GATDuck, then when the dialogue has finished, the completed output of the [Matinee] feature calls another SoundMode called Default.

You can see in the figure below that the GATDuck SoundMode applies a volume of 0.2 to the SFX SoundClass (and all its children) and 0.2 to the Music SoundClass (and all of its children). The bot dialogue belongs to the Dialog Medium SoundClass, so it is left unaffected.
The Default SoundMode does not refer to any specific SoundClasses. In cases where no SoundClass is specified, default settings of 1.0 are applied to all SoundClasses.
This approach is similar to “ducking,” which you will be familiar with from radio. With this technique the presenter’s voice is used as a controller to duck down the volume of the background music. This enables the voice to always be the loudest sound in the mix. This is particularly important in games where vital gameplay information may be being imparted. (Real ducking works by using the side chain input of a compressor so the speech acts as the control input while the compressor is actually applied to the music signal.)
When the cut-scene has ended you can walk up to the fence and hear that each sound layer has returned to its original volume.
To finish this sequence press H when near to the fence to place and start a small explosive device. This beeps four times and explodes on the fifth, destroying the fence.

An [Int Counter] is used to count the beeps; it then turns off the [Delay] and triggers the explosion [PlaySound]. At the same time, the Fence Panel itself is hidden and its Collision properties changed so the player can walk through the gap where the now invisible fence is.

Another method for highlighting critical dialogue is to send it to the center speaker of a multichannel speaker set up. In the SoundMode settings we have the option to apply a multiplier to the SoundClasses default Center Channel Speaker Volume via the Voice Center Channel Volume Adjuster. For example the SoundClass that the [SoundCue] belongs to may have a Voice Center Channel Volume of 0.2. By applying a SoundMode that has a Voice Center Channel Volume Adjuster of 10 the result will be a Voice center channel volume of 2.0.
Exercise 604a_00 Ducking
This room represents a noisy power plant. You need to duck the machinery sounds so that the player can hear the foreman when he gives instructions as to the order of switches needed to turn the machine off. You’d better get it right, or you’re history.
Tips
1. The Kismet system will start the dialogue after 4 seconds. Link the output of this [Delay] object to a [SetSoundMode] (New Action/Sound/Set Sound Mode) Action.
2. Choose one of the existing SoundModes from the SoundClassesandModes package that will duck the volume of the SFX or Ambient class while not affecting the Dialogue class.
3. When the [PlaySound] for the dialogue has finished, remember to [SetSoundMode] back to default.
4. Some of the SoundModes may only last a limited amount of time (see the duration variable), not long enough for the dialogue to finish. Choose one with a –1 (infinite) duration or edit the existing one. Be aware that any edits made to the SoundClassesandModes package will affect any other part of the game that calls this SoundMode in the future, so it’s best to edit it back to the original state when you’re done.
Ducking for Dialogue 02: Notching
As well as ducking volume, we can be a bit more subtle by applying EQ to certain groups of sounds to create a “notch” or gap in the frequency range for other important sounds to come through.
604b Notching Out

Once you’re through the fence, of course, it all kicks off. So that you’re not too busy fighting bots to concentrate on the audio, we’ve imitated some battle ambience in this area. As you can hear, there’s a lot going on so the chances of understanding any important dialogue in this environment are slim.
Over the player’s personal radio headset come some important instructions. A ducking technique has been used again here so that you can hear the dialogue. This time instead of simply ducking the volume of all the sounds (a slightly artificial effect), we are using the filter (EQ) within the SoundMode object to notch out the frequencies where our dialogue is centered. This allows the dialogue to poke through the mix in a slightly more elegant way.

The SoundMode applies to the SFX, ChatterFriend, ChatterEnemy, and Music Soundclasses (all [SoundCue]s playing at this time belong to one of these classes). There is no reduction in volume via the volume adjusters but instead we are making use of the EQ available.

By looking at a frequency spectrum view of the radio dialogue, we can see that its power lies between 500 Hz and 4,000 Hz.
The EQ in the SoundModes properties is a three-band EQ with a high and low shelf, and a parametric mid shelf. The frequency is in Hz, the gain is from 0.0 to 1.0 and the Mid Frequency Bandwidth ranges from 0.1 to 2.0. The precise nature of the filters (and in particular the meaning of the numbers applied to the bandwidth of the mid shelf) remains shrouded in mystery for non-developers, so it will require a bit of experimentation. If you want to get it right, we’d recommend creating a [SoundCue] of white noise, applying your SoundMode, and recording the output. You can then see in the frequency spectrum how the SoundMode EQ has affected the sound. In this case, we’ve created a hole in the frequency spectrum that approximately matches that of the dialogue range. This will allow the dialogue to “punch through” the mix without the need for an obvious duck in overall volume.

A white noise source with alternating SoundMode off/on.
Although we’ve used it here for dialogue again, this technique is equally applicable when you want to highlight a big sound effect event while music is playing. Music, particularly a dense orchestral arrangement, often takes up a large range of frequencies so the use of the EQ within the SoundModes function is valuable for notching out a range for a specific sound effect to momentarily shine through without disrupting the musical flow. Record a sequence of your gameplay, and then import this audio track into your DAW. There you can play around with the EQ within a slightly more friendly environment before attempting to imitate these settings within UDK.
(Of course, you won’t need to do this as you’ve meticulously planned your music and sound effects to sit within different frequency ranges so that you have a clean and uncluttered mix—see the “Planning for a Full Mix” section presented earlier.)
Preduck for Dynamic Range
604c Blockage
As we discussed at the opening of this chapter, we notice changes and differences in volume but do not have an awareness of absolute values. If you have a big event happening that you want to have real impact, then the best effect is going to be achieved by preceding it with a quiet section to make the dynamic contrast more dramatic. Of course, this is not always possible, but you can affect a “preduck” strategy that momentarily brings all the sounds down in volume immediately before your loud event.
To get to the tower, you need to trigger another explosive device to get through the wall. Walk up to the device and press the E key. Then move back.

This system is exactly the same as that used for the explosion to get through the electric fence, only this time a SoundMode is triggered immediately before the explosion. The [PlaySound] of the explosion has an extra delay built into it so that the SoundMode has time to quickly duck down all other sounds, giving the explosion sound a bigger impact through the contrast in volume levels when it comes in.

Subjective Sound States
One of the most powerful ways to engage a player’s emotions is to present, not a representation of the “reality” of the soundscape as heard from a particular point in 3D space, but one version of reality as experienced through the character’s eyes and ears. You might argue that in a first-person perspective game this is true automatically, but hearing is subjective in that we can choose what to focus on, or to listen to. This approach, which is so successful in film, has barely begun to be exploited in games. By changing the mix to focus on or highlight specific elements or to play subjective sounds, we can actually start to really experience the world from the character’s point of view (or point of audition) and therefore become further involved and immersed in the game.
Shell Shock (SoundModes +)
In addition to allowing us to focus the player’s attention through mixing/ducking, the SoundModes system also allows us to set up some more radical examples of subjective sound such as altered physical or psychological states.
605 Trip Wire

As you pass through this area, you unfortunately set off a tripwire (yes, I know—we tricked you). The explosion deafens your ears, so the sounds around you become muffled and you hear the high-pitched whine of a perforated eardrum. Alongside the whine you hear, the top end comes off the sounds and after a few seconds they return to normal.

This system combines the ducking and EQ of the SoundModes with additional sounds for a specific circumstance. The [TriggerVolume] sets a new SoundMode GATShellShock, plays an explosion, and then plays a high-pitched whine. After three seconds the player regains his or her hearing and the SoundMode is reset to the default. The GATShellShock SoundMode applies both EQ and attenuation to all the SoundClasses (Ambient and Voice) present in the area.
Although we are having to trigger this instance manually, a more typical approach would be to have this kind of effect hard coded so that if an explosion occurred within a given radius of the player, a shell-shock type of filtering and tone would be triggered automatically.
Sniper Focus (Cumulative Effects within SoundModes)
This system simulates how we can block out extraneous sounds when we need to really focus our attention.
605a Sniper
At the top of the tower is a sniper rifle. As every good sniper knows, it takes concentration and attention to your breathing to get the perfect shot. In this instance, you can hold your breath momentarily by pressing the H key to steady your sights. When you do, the player character focuses their attention and the other sounds are filtered out, as they are not important to the character at this moment.
We’ll discuss the sniper system itself in further detail in the weapons section of Chapter 7. For the moment we will focus on the use of SoundModes.

When the H key press is received for the player to hold his or her breathing in Sniper mode, the SoundMode GATSniper is called, and when released, the Default SoundMode is called. The GATSniper Soundmode reduces the SoundClasses Voice, Music, and SFX volumes by half (X 0.5) and does the same to their pitch. So that we don’t have to laboriously apply this to every other child of these SoundClass parents, the “Apply to all children” option has been checked.

We want the Sniper weapon sound itself to be unaffected, but the problem is that the Weapons SoundClass is a child of SFX and so will be attenuated by 0.5 like all the others. There’s a way around this dilemma if we appreciate that within the SoundModes, values act as multipliers, not absolute values. By adding an additional effect to multiply only the Weapon Soundclass by 2.0, we are effectively putting it back to its normal volume as
1.0 (normal volume) × 0.5 (SFX parent value applied) × 2.0 (additional multiplier applied to weapon only) = 1.0 (Back to normal volume)
Using the nature of the values applied within SoundModes (acting as multipliers of volume or pitch levels) allows us to combine several commands that affect different SoundClasses in specific ways without having to necessarily refer to each individual SoundClass. (Note: You may have read about ducking snapshots or multiplier snapshots. This is not an example of these. See the discussion at the end of this chapter).
Listen—Don’t Hear (Exception SoundClasses)
This is similar to the sniper example presented earlier, but this time we are creating our own SoundClass that we can use as an exception SoundClass to stand outside of the normal parent/child hierarchy. Think of this as your slightly odd uncle who pretty much just does his own thing no matter what everyone else is doing.
605b “Listen” Mode
When you enter the building, the doors close and lock behind you. We’ve received information that a bomb has been planted by the terrorist organization known as the “Leeds People’s Front” (not to be confused with the “People’s Front of Leeds”) at this location. You’ve got two minutes to find and defuse the bomb.
This room is full of noisy ambient sounds, so identifying the location of the bomb by listening for its ticking sound is not easy. Fortunately, you were pricked by a radioactive cuckoo clock when you were on holiday in Switzerland at the age of 12, so you’ve developed a “Super-sense” for ticking sounds. To enable this Super-sense mode, press the H key. Unfortunately, this depletes your energy so you can only use it for four seconds at a time, and you will then take four seconds to recover (you knew there had to be a catch).
This time we are focusing our attention on a specific object or source. This is useful if you want to draw attention to a particular object when entering a room or area, or to highlight a particular overheard piece of dialogue. For the ticking bomb, a new SoundClass has been created that stands apart from the parent/child tree.
When the player enters the room, the [Matinee] closes the door and the ticking starts. A [Delay] counts the 60 seconds, then if it is not stopped it outputs to an explosion event. If the player manages to find the bomb, then he or she can “use it to defuse it.” This plays a bomb defused sound and stops the [Delay].

The “Super-sense” [Console Event] “H” changes the SoundMode to GATSuperSense, closes the [Gate] so this can’t be retriggered, and holds this mode for four seconds before setting the SoundMode back to the default. The final delay holds for four more seconds for the player’s energy to recharge before allowing another “Super-sense” call through. The Super-sense SoundMode could have been set to simply last for four seconds, but generally it is safer to reset to default manually. (If the [Delay] finishes and the bomb goes off, the SoundMode is set to default as well so the bomb blast is not affected by the Super-sense SoundMode.)
The MECHNICAL_Bomb_Tick_01 [SoundCue] is designated as belonging to our new SoundClass GATException01. The GATSupersense SoundMode applies to all the main Parents, Voice, Music, and SFX categories with the “Apply to all Children” option selected, but the GATException01 SoundClass is not attached to this tree hierarchy and therefore is not affected. Creating these exception SoundClasses is useful for specific maverick sounds that operate outside the usual laws (on their last day before retirement, etc.).

Exercise 604e_00 SoundModes: Children Should Be Seen and Not Heard
Try creating your own SoundMode. When the player approaches the computer in this room, you want to highlight its importance. Create a SoundMode that keeps the computer (which belongs to the Item SoundClass) at its normal volume but slightly ducks all the other sounds in the room.
Tips
1. Your new SoundMode needs to be created in the SoundClassesandModes.upk package. Make sure you make a backup of the original package file before altering it.
2. Select New in the Content Browser and select SoundMode from the Factory menu.
3. After creating or editing SoundModes, you may sometimes find that you need to close down and restart UDK for the changes to take effect.
4. You’ll need to find out what SoundClasses the other sounds in this room belong to. (Right-click the [SoundCue]s and select Properties and Sound Attenuation Nodes to find out.)
5. Add a SoundClass effect in your SoundMode for each of these types using the green plus symbol to lower their volume.
6. Either set the duration of your SoundMode so that it switches off after a few seconds or use an additional [Set SoundMode] Action to return to the default mix settings.
Player Health (Adding to the Mix)
605c Unhealthy Mix

In this area a squadron of bots attacks the player to allow us to demonstrate a couple of reactive mix approaches. The first mode uses the addition of sounds to indicate player health, referred to as “Health”, and the second uses the subtraction of sounds (lowering volume and filtering) for a special play mode we’re going to refer to as “Fury!!”
In the first part of the system, the player’s health is compared to a value of 20 by a [Compare Int] object. If this is found to be less than or equal to 20, then a [PlaySound] plays a looping heartbeat (we had to get it in somewhere) and also toggles on a [PostProcessVolume] and [Reverb VolumeToggleable].
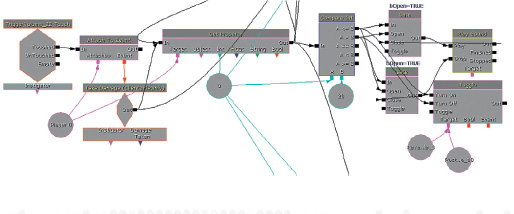
Both of these volumes cover the entire area of play and when they are switched on when the player’s health is low, they give feedback to alert the player to this perilous state. They also reinforce the feeling of low health by blurring the image and metaphorically “blurring” the sound through the addition of reverb.
The second part of the system also checks the player’s Health property and then scales this to control the volume of a musical choir sound that fades up as the player’s health gets lower (inverting the value of the health by taking it away from 1).

There’s also a health recharge system built in here so that if the player is able to evade the bots and remain un-hit for five seconds, the player’s Health property is gradually incremented.

By bringing in or fading up the volume of sounds or music in response to game events or variables, we can change the mix to feel more like the subjective experience of the player character. We can also have an equally powerful effect by taking elements away.
“Fury!!” Mode (Taking Away)
605d Don’t Get Mad, Get Mildly Irritated
If the player manages to kill a given number of bots (two) within a certain period of time (10 seconds), then the Fury!! mode is enabled. When the player then presses the H key to instigate the Fury!! mode, the player’s weapon becomes super powerful and various effects are applied for this special state.

The signals coming into the system from the left are notifications that appear if the player kills any of the bots in the area. An [Int Counter] compares the number killed against its variable B (2); if it matches, then an [Announcement] is made that prints text to the screen to say, “Fury Ready.” The [Int Counter]’s variable A is reset every 10 seconds, meaning the player must have killed the two bots within a 10-second time interval to unlock the Fury!! mode.
The announcement also plays an alert sound (you can add SoundNodeWaves to [Play Announcement]s) and a looping [Delay] is started to retrigger a beeping [PlaySound] to also alert the player.
The second part of the system now waits for the player to press H to start the Fury!! mode itself. Once it is pressed, another [Announcement] informs the player that he or she is in this mode, Fury!! (this feature also plays a sound to indicate that the player is in Fury!! mode). A new [SoundMode] is set to apply a filter to all sounds except the player weapon and music. While in Fury!! mode, a solo voice music piece is played via a [PlaySound]. At the same time a [Modify Property] action is sent to the player’s weapon to increase its power.
After a [Delay] of 10 seconds, the Fury!! mode wears off. Another announcement, Fury Off! this time, plays a winding down sound, the [SoundMode] is set back to Default, and the modified weapon returns to its normal state. There’s also a [Console Command] within the system to turn on (slomo 0.5) and off (slomo 1.0), a slow-motion effect during Fury!! mode.

Both the Choir sound from the Health system and the Solo Voice sound from the Fury!! system belong to SoundClasses excluded from the SoundMode change (and they are composed to work together) so they should remain unaffected by either.
Automation
There have been huge strides in the development of processes that can analyze the actual audio output of a game for the purpose of evaluating automatic aspects of the mix. An intelligent system could conduct a frequency analysis of the current mix and from the results decide whether or not you’d actually hear a new sound given the current range of frequencies. It could then decide not to play it or to use a filter or multiband compressor to enable it to come through. These systems are entirely possible on the current generation of consoles and are no doubt being developed as we write. But in the meantime, you don’t need to be an audio programmer to implement a bit of intelligent automation.
Like all the best concepts, this next example is very simple but very useful. When the player enters the Health and Fury!! Area, a [DynamicTrigger] is attached and moves with the player. It receives Touch events whenever a bot enters its radius (of around 900 units). The system keeps track of the number of bots within this radius and if this number is greater than 2, the ambient sounds in the area are turned off (by stopping one via its [PlaySound] and by toggling off the other two [Ambi entSoundSimpleToggleable]s).

We don’t need to conduct real-time signal analysis to appreciate the logic behind this system. If there are more than two bots in close proximity to the player, the number of sound events (weapons firing), and the volume of these events (weapons are loud), means that any quiet ambient sounds will be masked by these louder sounds. As the player will not hear them anyway, we can clean up the mix and provide additional digital headroom by turning them off. Another idea would be to have an ambient sound establish the feel for an area as they player enters but then gradually fade back a little to a lower level, in-keeping with the principle of “make a point, then go away”. You could do this with an [AmbientSoundSimpleToggleable] or an [AmbientSoundNonLoopingToggleable] both of which allow you to fade out to a given volume level. When you’re working with intense periods of the game, try to think about simple systems such as this one to keep your mix focused.
Simultaneous SoundModes and the Modifier Mix
Although more flexible than it might first appear, the Soundmodes system is very much that of a Snapshot or Event mix in that only one state can be applied at any given time. (Although you can have multiplier operations within the SoundMode itself, as we saw in the Sniper Focus example, this is more to do with providing a workaround for making the SoundClass tree bus structure more flexible.) The problems with this option are apparent when there are two (or more) simultaneous mix requirements.
While you’re battling with the bots in the Health and Fury!! sequence, you’ll notice that you also stumble across some carelessly placed landmines. These mines produce an explosion, physics push (via an [RB_ RadialImpulseActor]) and a health damage. As you might expect, they also produce a shellshock effect via a low-pass SoundMode and a high-pitched whine. We’ll call this the “ShellShock mix.”
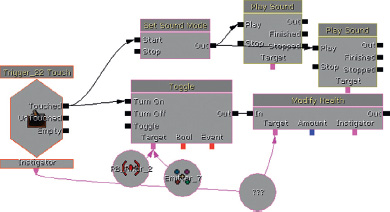
This SoundMode applies an EQ to all classes and takes effect over two seconds (so you have time to hear the initial explosion). It then lasts for three seconds before withdrawing the EQ.

Here’s the problem. What if you’re in Fury!! mode when this goes off?
With the current SoundModes system operating as a Snapshot mix, the current SoundMode will simply be overridden whenever a new SoundMode is called. Although the [SetSoundMode] action within Kismet appears to have a Top Priority option to mitigate against the worst results of this effect (if perhaps a less important SoundMode is triggered while a mission-critical dialogue SoundMode is in place), this appears to be nonfunctional in the current build. What we would need is some kind of system of [Gate]s to block the application of a lower-priority SoundMode if a primary SoundMode were still applied.
It would be possible to construct the settings of the Shellshock mode so that it duplicated that of the Fury!! mode with some specific exceptions. This would mean that the change of situation would be noticeable but would still feel like an extension of the Fury!! mode we were already in. The problem is that the system does not keep track of the previous SoundMode state. So when the Shellshock feature turns off, we do not return to the Fury!! mode that should still be continuing but instead go to the Default SoundMode. Again, it would be possible to construct a Kismet system that held a variable relating to our current SoundMode and made sure we returned to that state if interrupted by a different SoundMode event. This is, however, already starting to look like a bit of a headache.
In discussions around a mix type that could operate in combinations, there is sometimes reference to a “Ducking” or “Multiplier” snapshot. The concept is that you can have “Multiplier” mixes occurring simultaneously and the sounds volume/settings are scaled by a factor produced by the combination of the two mix settings. (Please read the bibliography for this section for articles that have a fuller explanation.) We’re going to avoid these terms here and propose some new ones because, although the concepts are sound, the terminology can be confusing. To scale the volume of a sound, channel, or group, we are multiplying the numbers that represent the sound’s waveform. To make it louder, we multiply by numbers greater than 1.0, and to make it quieter we multiply by numbers less than 1.0. Therefore, the use of the terms “snapshot” and “multiplier” (implying that snapshot is not a multiplier) can be misleading.
In the preceding examples, we have seen situations where we need a hierarchy of mixer states, a tracking system so that we can (easily) return to previous mix states if required, and potentially the ability to have more than one game mode or event (and its related mixer settings) occurring simultaneously.
We’d propose the following solutions.
Primary Snapshot
There can be any number of primary snapshots for a game. However, only one is applied at any one time.
Snapshot Priorities
Each primary snapshot is designated a priority value. If a snapshot with a lower priority is triggered, it will not override the current snapshot; if higher, then it will.
The currently loaded primary snapshot must be tracked. If a subsequent snapshot is triggered (and is of a higher priority), then this is applied, but if it is then switched off (rather than another snapshot being triggered), we return to the previous primary snapshot.
Modifier Mix
These mix modes can apply to specific groups in response to game events but do not override the primary snapshots. Rather they scale the values of specific groups (SoundClasses) within the primary snapshot. They can occur in combination and the resultant mix will be the outcome of the product of their mix values.
For example, a Weapons modifier may duck the player’s Foley sounds, and a Mission dialogue modifier may apply an additional scaling to duck Weapon sounds.
If we ever recover from writing this book, we’ll see what we can knock together along these lines to improve the potential for mixing in UDK. In the meantime if you have a little spare time then let us know when you’ve cracked it.
Interactive Mixing Conclusion
The UDK method of implementing interactive mixing via SoundClasses and SoundModes is perhaps not the most transparent and certainly has its weaknesses as discussed earlier. Having said that, we do have a tendency to crave more “tech” solutions, when actually there remains a wealth of creative opportunities to engage and excite players within even the most simple systems. Although we will always have to reconcile the sometimes competing demands of providing information and providing emotion, there remains a huge amount to be learned from almost a hundred years of film sound in terms of the power of the subjective mix.
Conclusions
Making it sound good is about using sound and music to chart the emotional landscape of a game (and yes, even Mario has an emotional landscape). Although there are great and compelling game sound tracks out there, we would advise that you also look to other less obvious sources. Play games and learn from games, but try to also bring something new to the creative mix by looking for inspiration in Film, Literature, and Art in all its forms.