
3
Making it Sound Real
Many game environments are imitations or at least hyper-real versions of environments that might be found in the real world. Therefore, a player will have pretty clear expectations of what they will sound like, having experienced these environments in some form before. Even if the game is set in a fantasy world, the player will still have expectations about the way sound will behave that has been developed through a lifetime of experience in the physical world. Although we shouldn’t always necessarily focus on realism (see Chapter 6), the way things sound needs to be consistent and believable if the player is going to become immersed in the game world.
For a long time, game audio has sought to accurately represent real-world sound to support the verisimilitude (the appearance or semblance of truth or reality) of the experience. To do this, games developers need some understanding of the physics of sound in the real world.
Sound Propagation
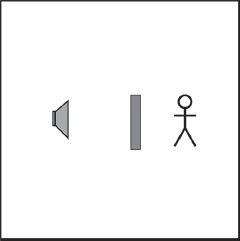
Sound emanates from a source and travels through matter in waves. Your ears either receive the sound directly (dry) or indirectly (wet) after it has passed through, or bounced off, the various materials it comes into contact with. Typically you’d receive both these types of sound, and this gives you important information about the environment you are in.
Reverb
300 Sewer Pipe
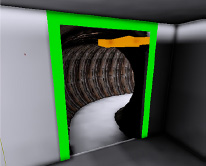
As you descend into the sewer pipe in Room 300 you should hear that your footsteps have more echo to their sound. This is because we have applied a [ReverbVolume]. Reverb is short for “reverberation,” and it refers to the way that sound reflects and bounces around the surfaces with which it comes into contact. People tend to use the word “echo” to describe this effect, but unlike an echo, which is a distinct separate version of the sound being reflected, reverberation is a much more dense collection of reflections.

Direct and reflected versions of a sound source.
The character of reverberation can change dramatically depending on the nature of the space. If there are lots of distinct echoes, then this might be an outdoor space, with the sound perhaps reflecting off distant mountains or buildings. If there are lots of reflections within a short time, then this might be a confined space, like a bathroom or tunnel. Fewer reflections over a longer time might represent a large room, and lots of reflections over a long time would be typical of a large cave or hall.
Reverb for a typical room might look something like this.

Constructing a reverb that sounds good is a hugely complex task in itself. Trying to model the way sound would actually reflect around a specific space in a game would require a significant amount of computing power, so in games you usually have some precalculated reverb effects available to choose from. You define the area within which your reverb will be applied and then choose the specific type of reverb that’s appropriate to the space.
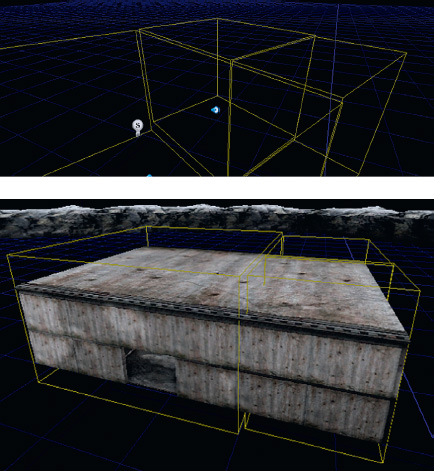
Reverbs are applied in the Unreal Development Kit (UDK) using a [ReverbVolume]. This is much like the [TriggerVolume] you have come across already. The Builder Brush is used to define a rectangle of the appropriate size around the area you want the reverb to apply in. Then you right-click on the AddVolume button and select [ReverbVolume] from the list. (For more on building volumes with the Builder Brush feature, see Appendix C: UDK Tips).
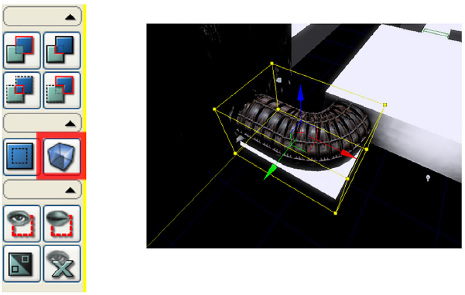
Adding a reverb volume.
By clicking on a [ReverbVolume] in the editor and selecting its properties (F4), you can choose which reverb type to apply. For the first pipe, we have chosen the appropriately named Sewer Pipe reverb.

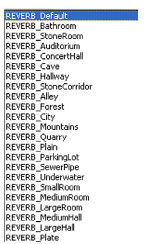
In many editors you will have access to the reverb parameters themselves to adjust them in detail, but within UDK we have a collection of presets.
A sudden change between the reverb of two rooms can sound unnatural and jarring, so a fade time is provided for you to bring the reverb gradually into effect if you wish, and the volume controls how much of the effect you hear.
Reverb Prioritization
300a Cave
In the main room with the waterfall the [ReverbVolume] has been set to Cave. In this room you can hear clearly how any ambient sounds playing back within the [ReverbVolume] also have the reverb applied to them. In many circumstances you will have awkwardly shaped rooms that make your [ReverbVolume]s overlap, or as in this case a room within a room.
300b A Cave Within a Cave
Behind the waterfall is another cave area. This is obviously smaller than the large chamber, so we want a different reverb for it, in this case it’s set to StoneCorridor. Although this [ReverbVolume] actually falls within the larger [ReverbVolume], we can tell the system to override the reverb settings of the larger volume by using the Priority setting. The priority for this [ReverbVolume] is set as 5.0, and the priority for the larger volume is set as 0.0; therefore, this smaller cave’s reverb settings will take precedence because its priority value is greater than the other.

Exercise 300b_00 Reverb
This exercise “room” has a series of spaces of different character. Use [ReverbVolume]s with appropriate reverb types to make them feel more authentic.
Tips
1. In the same way as you might use a Builder Brush to create a [TriggerVolume], you can also create [ReverbVolume]s.
2. To make the [ReverbVolume] exactly the same size as the geometry brush for a room, select the geometry (shown in blue in the Top Down view) and press Ctrl + P; the Builder Brush will mould to exactly the same size. It’s then advisable to make your Builder Brush a little bigger than your room using the Scaling widget, so that when you create the [ReverbVolume] you can see it and select it more easily.
3. If you do leave the Builder Brush, and hence the [ReverbVolume], the same size as your room, you may find it hard to select; use Q to hide BSP (the level geometry) to see it.
4. Now that your Builder Brush is the right size, go to the left-hand panel and right-click on the Add Volumes icon like you did when creating [TriggerVolume]s.
5. Move the Builder Brush out of the way, and then you can then select the [ReverbVolume] itself. Press F4 to enter its properties. Under Reverb Type, you can select lots of different types of rooms or spaces. Try different options to hear their effect.
6. If you have smaller rooms within larger areas, you can have a large [ReverbVolume] for the whole area and then put the smaller ones within it. Change the Priority settings so that the smaller rooms take priority over the large one.
Sound Sources and Spatialization
Sound spatialization in games is literally a matter of life and death. The field of view for a typical first-person shooter is between 65 and 85 degrees, so most things in the world are actually off-screen. Sound plays a vital role in describing this off-screen space for the player and providing vital information about the direction and source of other characters or objects in the game. Sound sources might be stereo, mono, or three-dimensional (3D). They might originate from a single point source or actually come from a large area. Deciding what is appropriate for each sound and “faking” the physics of how sound behaves in the natural world is an important task in building a convincing and effective audio environment.
Types of Sound Source
Stereo Sources
301 Stereo Sources

In Chapter 2, we saw some examples where a [SoundCue] was set to be played back to the Player variable (i.e., directly to the player’s ears). This gives us a normal stereo image that does not pan as the player rotates but remains constant. This is an appropriate method to use for game music that is not coming from a specific object, such as a radio, and also for distant stereo ambiences.
If you stand on the first disc in area 301, you will hear some music. As you look and rotate around, you should hear that the music remains consistently still in the stereo field. As you enter the disc, a [Trigger] touch is used to trigger a [PlaySound]; this targets the player (Right-Click/New Variable/Player/Player). The properties of this variable have also been edited so that it does not play back to All Players but only the player. As it is played back to the player’s ears, you will hear it as a two-dimensional (2D; in this case a stereo sound file) stereo sound.
Playing Back Sounds from Objects
301a Stereo Attenuation Only
If you now walk over to the next disc (301a), you can see that this music emanates from the static mesh in the center. The [SoundCue] has an [Attenuation] node with Radius Min/Radius Max settings as usual, so you can hear the music attenuate over distance from the sound source. Whether or not the Spatialize option within the [Attenuation] node is checked will not make a difference in this case, as the sound file being played is a stereo sound file. Stereo sound files do not spatialize (pan) in UDK but will attenuate over distance if the [PlaySound] is targeting an object within the game.
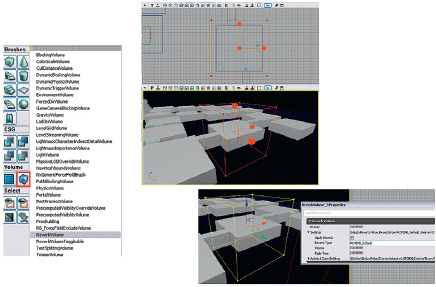
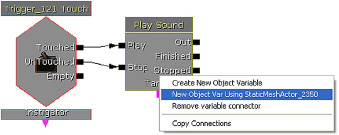
You can play back a sound to emit from any object/Actor in the game world by adding it to the target of a [PlaySound]. In the case of 301a, we used a [Static Mesh]. With the object selected in the level, just right-click on the target of the [PlaySound] in Kismet and select New Object Var using (***).
Many designers in UDK like to use the [Note] Actor as a useful source to play sounds from, because it is visible within the editor but not in the game. Select [Note] in the Actor Classes tab of the Content Browser, right-click in the Perspective viewport, and select Add Note Here. In the properties of the [Note], you can also add text (to remind yourself what they are) and a tag (Properties Object/Tag). In the drop-down Show menu in your viewports, you can select the option to Show Actor Tags. This means that the text of your tag will be visible in the editor and is useful for finding things.
301b Mono Attenuation and Spatialization
The next disc (301b) presents the same setup, except this time the [SoundCue] is using a mono sound file. Now you can hear that in addition to being attenuated the music is also spatialized. If you were playing music through an object in the game such as a radio or television, it would be appropriate to spatialize it so that it pans around the speakers according to the player’s rotation as you would expect. If you were playing a more film-type score over the top of the action, then non-spatialized stereo files would be more suitable. The nonspatialization of stereo files also extends to any used in [AmbientSoundSimple] category Actors or any [SoundCue] without an attenuation object.
301c Stereo Ambience
Disc 301c is an example of a streaming stereo ambience. If you have the capacity to stream long ambient sound files, then this can sometimes be a good solution. However, these sound odd if the panning is too obvious. It’s often better to combine a nonspatialized stereo ambience with more local spatialized spot effects.
3D Point Sources and Attenuation Curves
Unlike some types of music and stereo ambiences, most sounds within the kind of 3D game environment we’ve been dealing with emanate from specific points within the 3D world. We provide mono assets and the game system uses the position of these assets to decide how to pan the sound depending on your playback system. If you have a 5.1 or 7.1 speaker setup, then you will hear the sound come from all directions as you rotate around in the game world. If you have a stereo setup, then this information needs to be folded down into a meaningful stereo panning arrangement. Some engines and soundcards also implement HRTF systems for headphone listening. HRTF stands for head-related transfer function and attempts to describe the spatialization cues we get from the way that sounds reaching our ears arrive at slightly different times and are filtered by our head. By applying the same changes to the left and right versions of a sound reaching our ears through headphones, a convincing re-creation of a sense of location for the sound can sometimes be achieved. (Because our heads are all different sizes, the effect is based on an average; therefore, it is not as successful as it could be.) Spatialization gives vital information about the direction of the sound source, so it is particularly important for sounds like enemy weapon fire, footsteps, and dialogue.
301d Point Sources
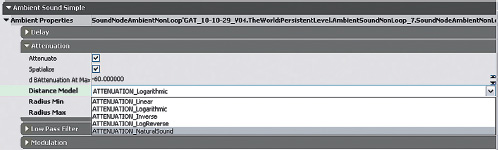
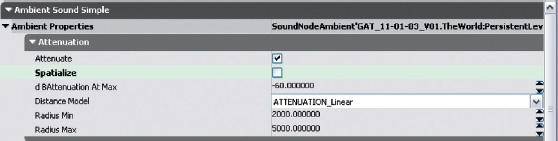
We looked briefly at how sound attenuates over distance in Chapter 1 (when we discussed the Radius Min and Radius Max settings). Many engines simply have min and max radii with a fixed attenuation curve calculated between them. You may have noticed that UDK offers further options for controlling the way that the sound attenuates over distance under the Distance Model dropdown menu. (This is referred to as the “roll-off factor” in many other engines.)
These differences may be easy to overlook and may appear at first glance to be slightly academic, but choosing carefully which model is most appropriate for which sound is critical, both for creating a clean mix within your environment and for giving the player vital audio cues about the location of events and Actors within the game world.
You may be asking yourself at this point why we don’t simply replicate the curve of the way sound attenuates in air. We know that in normal outside conditions, the sound pressure level is inversely proportional to the square of the distance from the sound source. “Normal” conditions are actually very rare, and the way sound attenuates is also affected by air pressure, temperature and humidity. In audio terms, a basic rule of thumb is that sounds halve in volume (approx –6 db) every time the distance from the sound source is doubled.
There are a number of reasons why this won’t work for games:
• As we observed in Chapter 2, the recording, storage, and playback of sound cannot replicate the dynamic range of the physical world. Typically we record and store sound in 16 bits. The range of numbers this allows does not come anywhere near representing the huge dynamic range of the physical world. (The oft-quoted comparison is the difference between a pin drop and a jet engine.)
• As discussed earlier, game distances are not the same as real-world distances—partly because operating a game character is a lot more clumsy than you think (so they need additional space to avoid getting stuck in furniture all the time) and partly because this would make many games an endlessly boring trudge.
• If we were to imitate the natural attenuation curve of sound, then we would have a lot of very quiet, very distant sounds playing almost all the time, as the Radius Max value would be very large. This would have negative implications for the mix (the addition of all these quiet sounds would take up “headroom,” a significant chunk of our available 65,565 numbers) and for the number of voices (simultaneous sounds) we were using (which, as you will discover later, is quite limited).
There is no substitute, when deciding which attenuation curve to use for which sound, to actually previewing it in the game engine itself. Depending on the nature of the sound source itself and the specifics of what’s going on at the time, you will find it more appropriate to use your ears than to use these starting points. (The following graphs are reproductions of items in the UDK documentation.)
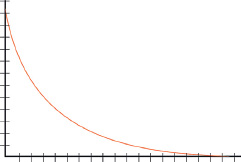
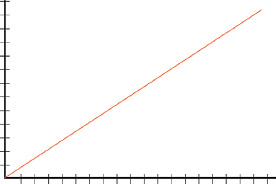
301d Linear
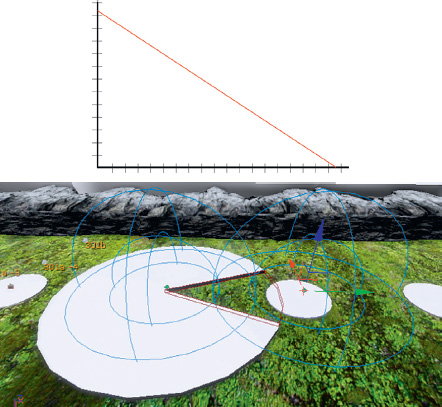
This is a simple linear drop-off over distance. It can be good for looping room tone–type ambiences where you want the fall-off to behave in a predictable way. Sound does not attenuate like this in the real world and this will sound unrealistic for most sounds, but it can be useful for more predictable overlapping/crossfading between ambient loops.
![]()
The combination of these two overlapping sounds dropping off to the Radius Max setting should produce a result that does not significantly drop in volume as you pass across the two, as the addition of the two always produces an equal value.
301e Logarithmic
This is a good choice for sounds that you only want to hear within a relatively short distance from their source. Depending on the exact circumstances, this may be a good option for enemy weapon sounds where you have multiple enemies within a relatively small area. The curve will give you a precise idea of the position of the sound source without allowing the sounds to be heard too far from the source, which might muddy the mix.
301f Inverse
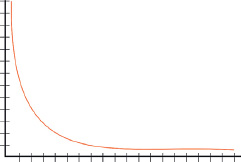
As you can see, this sound can be heard from a significant distance away, but the amplitude only really ramps up when very close. This is good for very loud and distant objects. They will feel really loud up close, and will be heard from a distance as you would expect, but won’t completely dominate the mix as they might otherwise do.
301g LogReverse

These sounds will be loud right up to their Radius Max value and then suddenly drop off. They are useful for stopping sounds up against walls where other solutions (see occlusion, discussed below) are not practical.
301h NaturalSound

This is an attempt at a more realistic attenuation curve that may be appropriate for certain sounds.
301i Non-point Sources
In some cases, a sound source will not come from a specific point but from a larger area such as a large piece of machinery or a waterfall.

In this case, it may work to have a quite large Radius Min value. Having a linear or log reverse curve and a larger Radius Min value will make the sound less directional so that it doesn’t pan as much. Remember that we can also remove spatialization, even for mono files, within the Attenuation function of both [AmbientSound]s and [SoundCue]s. This means that the sound will attenuate over distance but will not pan. This is much more convincing for larger objects where the sound shouldn’t appear to be originating from a specific point.
You can turn off spatialization in either the [AmbientSoundSimple]
or in the Attenuation object of the [SoundCue]

Exercise 301i_00: Sound Sources
Put the sources from Exercise 301i_00 folder into the supplied game level. Choose the appropriate 2D or 3D playback method for each, and adjust the attenuation curves appropriately to create a convincing game environment.
Tips
The sounds consist of a large machine sound, some radio dialogue, and some stereo music. Read back through the previous pages to choose the most appropriate method of attenuation for each.
Multichannel Surround Sources
301j Multichannel Sources
UDK also offers the opportunity to import multichannel files. Like stereo files, these are locked to particular speakers on playback and don’t pan. One use of these files might be for big explosions or for events that you want to really envelop the player. You could also use these for distant ambiences, but if you have good multichannel recordings you may do better by attaching the individual files to invisible objects in the game so that as the player rotates the sounds move accordingly. The most common usage would be for surround music files.
The [Trigger] in the middle of this bridge starts a [PlaySound] that contains a [SoundCue] referencing our multichannel file. You’ll notice that this SoundNodeWave contains all the channels as they are encapsulated into one file on import.

When importing your files, you need to follow a specific naming convention so that the tracks will be panned to the correct speaker. In this case there is a 5.1 piece with each instrument attached to a specific speaker for illustration.

These relate to the typical setups for surround-sound speakers.

The good thing about surround sound in games is that it’s optimized for one person, unlike in the cinema where anyone sitting outside the “sweet spot” is getting a different experience. The problem is that although multichannel music has been used effectively in games, the kind of specific spatialization as heard in this example would be very distracting. The surround channels in games play a vital role in terms of immersion and to provide the player with vital gameplay information (such as the location of NPCs), so any distinct spatialized sound is usually considered to be part of the game world. In situations where you want the music to unnerve the player, it can work well to play on this ambiguity; in general, however, the more subtle approach of putting some of the music’s reverb in the surrounds often works better.
Exercise 301j_00: Multichannel Ambience
Try out a multichannel ambience in this factory room.
Tips
1. In the Sound Library there is a quad ambience of a factory. Import these files into a UDK package:
AMBIENCE_factory_fl.wav
AMBIENCE_factory_fr.wav
AMBIENCE_factory_sl.wav
AMBIENCE_factory_sr.wav
2. You should find that because they have the correct file extensions, they will be automatically combined into a single soundnodewave called AMBIENCE_factory. Create a looping [SoundCue] using this file and place it in the level. Walk around the level to see how this sounds.
3. Now take it out. Remove the file extensions (_fl, _fr, etc) from the AMBIENCE_factory files and import each to a separate sound file.
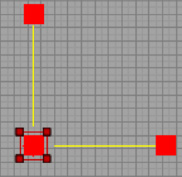
4. Add some [Note]s to your level (from the Content Browser/Actor Classes tab), and place them in a quad (4.0) configuration (see the preceding diagram). Use a [SoundCue] (including an [Attenuation Node]) and a [PlaySound] object for each sound, and target the appropriate [Note] in the level to re-create the surround-sound ambience.
Directionality
Sounds often have a particular direction in which they are loudest/unfiltered. Few actually emit equally in all directions. Think of your voice, for example, or a megaphone. Using these controls can greatly help the “reality” of your soundscape.
Many game engines offer the opportunity to specify a directional cone for each sound source. This more accurately represents the directional quality of sound from many types of source. Many sound sources have a clear “front” where the sound is clear and “back” where the sound may be attenuated in or filtered. These cones usually take the following form:

Within the inside cone the sound is at its maximum volume; in the outer cone it drops to a given volume. Outside of the outer cone it is set at this given volume and has a low-pass filter applied. This will give an effect that is similar to walking around behind someone who’s speaking. (Try it to see what it sounds like; you’ll definitely freak them out). Unfortunately, UDK does not have this functionality as of yet, so we cannot give you a practical example. If this feature becomes available in the future, we’ll provide an update on the website, as this is of key importance for being able to localize sound sources.
Filtering Over Distance
301k Attenuate with Low Pass Filter
In addition to the volume of sound attenuating over distance, air also acts a little like a low-pass filter, removing the higher frequencies over distance, as well. Some game engines automatically apply a filter to sound over distance. In others you will have hands-on control of this effect to simulate the absorption of sound into air.

You’ve already used a low-pass filter in the Aircon room (Room 202) and exercise, but this time we’re not just using it to add variation to a sound; this time we’re trying to approximate the real-world physics.

If you use the [Trigger] shown in the previous illustration, a randomized explosion will begin in the distance above where the arrow is located. Leave the explosions going and walk toward them. You will hear that not only does the volume get louder, but the filter is gradually removed, going from a “duller” sound to a “brighter” sound.
This has been achieved by using the LowPassFilter option within the [Attenuation] node of the explosions [SoundCue] (GATA_Sound.Explosion.Explosionfilt).
You can also see other examples where this filter-over-distance technique has been used, such as for the existing Shock rifle weapon. If you look at this [SoundCue] (UDKGame/Content/Sounds/Weapon/A_Weapon_Shockrifle), you can see that the high frequencies begin to roll off starting at 2,400 units away from the source.
Applying a low-pass filter over distance in this way is very effective in creating a sense of distance, making sounds appear far away or close by. If you were going to get slightly obsessive about it, you could even have different versions of [SoundCue]s (using the same Sound Wave but with different Low Pass Filter settings) playing depending on the atmospheric conditions (e.g., hot sunshine or dense fog).
Exercise 301k_00: Filter Over Distance
The bot on the hill over yonder is shouting for some assistance. Remake the [SoundCue] so that the voice is correctly spatialized and attenuates over distance with filtering to make the sound more realistic.
Tips
1. Make a copy of the existing [SoundCue], and re-reference the [PlaySound] to your new cue.
2. Edit the [Attenuation] node settings to enable Spatialization, Attenuation, and Attenuate with LPF.
3. Experiment with different LPF (Low Pass Filter) Radius Max and Min values.
Faking Filter Over Distance
In some game engines, you need to fake the way that air filters sound over distance. You might do this by apply filtering in your digital audio workstation (DAW) and then crossfading between the “dry” normal sound and the filtered “wet” one over distance.
If your game engine does not have a filter-over-distance setting, such as the one in UDK, then you can fake it by crossfading between two wave files depending on your distance from the source. Although the Attenuate with LPF features can be very effective, the way that the frequencies of sound are affected over distance is much more complex than applying a simple low-pass filter, and you may want more control. You could use your audio editor to filter your sounds more precisely and then combine two or more versions within your [SoundCue].
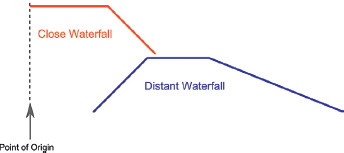
301l Propagation Filter
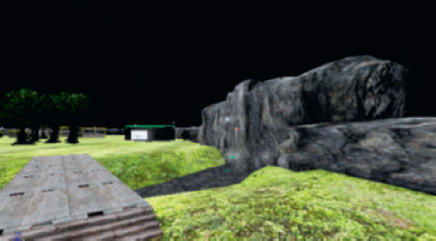
You can see an example of this technique in the outside of area 301a. As you walk up to the waterfall, you are actually crossfading between two prerendered files. The more distant sound is a version that has already been filtered in an audio editor.
To control the way these sounds crossfade over distance, use the appropriately named [Distance Crossfade] node in the [SoundCue] (GATA_Sound.Liquid.WaterfallFakeOverDistance).

For each input to the [Distance Crossfade] node, you apply the following settings:


As you can see from the waterfall example, it would be usual for your first sound, the one closest to the point of origin, to have both “Fade in distance start” and “Fade in distance end” values set at zero.
The [Distance Crossfade] node has many other applications that we will be exploring later.
Reveal Detail Over Distance
To simulate some of the effects of sound in air, you may also want to add/remove layers of detail from the sound depending on our distance from it. Typically you would add smaller high-frequency details the closer you got to the sound source. This can also be useful for weapons to keep the mix cleaner when you have multiple enemies.
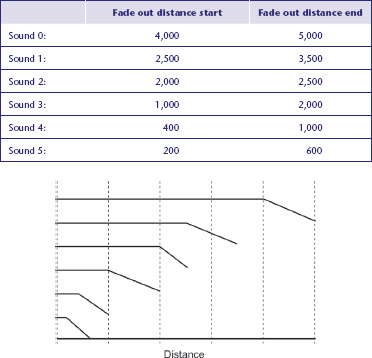
301m Propagation: Crossfade Detail
Crossing over the bridge by the waterfall, you come to a switch that will power up a large machine at a distance down the river. As you approach the machine, you can hear that the sound not only gets louder, and reveals more high frequency elements, but actually reveals additional details to the sound.

Rather than simply crossfading the machine’s sound with a filtered version of itself here, we are adding sounds so you only get the full combined machine sound when you are right up against it. A large and complex sound source would in reality be made of many separate components, each attenuating over distance differently given their volume, position, and frequency content. The [Distance Crossfade] node is used again here to reveal this detail as you get closer to the sound source.
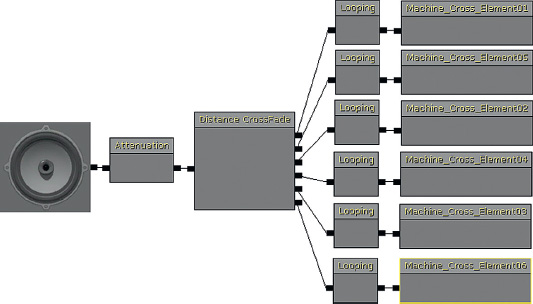
All of these elements are at their maximum volume at the sound source and so the “Fade in distance start” and “Fade in distance end” values are set at zero.
Exercise 301m_00 Propagation Crossfade
The Temple of Ra is set upon a hill. In the center of the temple, a roaring jet of burning plasma shoots skyward. The low rumble of this furnace can be heard for miles around. As worshipers approach the temple, the hissing of the air fills their senses. Make it so.
Tips
1. Place an [AmbientSound] object in the center of the temple, and use this to reference your [SoundCue].
2. Within your [SoundCue], use the [Distance Crossfade] object to crossfade between a number of sounds depending on the distance from the source.
3. Make sure that your [Attenuation] matches up with your farthest sound.
4. Consider also using the LPF over distance if appropriate.
Occlusion, Obstruction, Exclusion
It’s a great deal cheaper in computational terms to “fake” the occlusion that takes place when you hear (or don’t hear) sound through walls.
We’ve looked at how sound describes the characteristics of a room as it is reflected around (reverb) and how the effect of sound traveling through air (attenuation and filtering) gives a sense of distance and localization. The other aspects of the acoustics of sound that we have to engage with when designing and implementing sound for games are occlusion, obstruction, and exclusion. As we saw in Chapter 1, “The Walls Problem,” by default many engines do not take account of walls/windows to apply the natural changes in volume and filtering that would occur within the real world.
The problem we are dealing with here is occlusion—when a object or surface comes between the listener and the sound source, completely blocking the path so that the sound must pass through the obstacle.

When a sound is occluded, both the dry and reflected sounds are muffled. The extent to which the sound is attenuated in volume and altered in frequency content will depend on the material of the obstacle. Brick has a pretty significant effect as you can imagine, whereas if the sound were occluded by the paper walls of a traditional Japanese house, the effect would be different. In Chapter 1 we looked at the problems that can arise when an [AmbientSoundSimple] overlaps a wall, and we looked at two possible solutions:
1. Using multiple smaller sounds, you can better shape these around the geometry and avoid overlapping walls. This is time consuming to implement, uses up lots of voices, and can in some instances lead to phasing issues.
2. Using a [TriggerVolume] to toggle sounds depending on whether the player is “inside” an area or “outside,” we can switch on and off the ambiences for each area, creating the impression of a change in the environment.
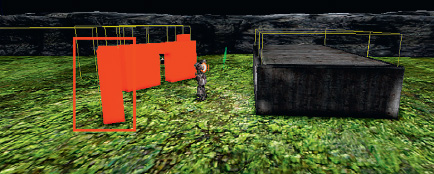
302 Occlusion: Switching Sounds On/Off
Area 302 replicates the techniques we came across in Chapter 1. This one is a real cheat but can work surprisingly well. To simulate occlusion when you are inside a room or outside, have one group of sounds for the inside, one group for the outside, and simply switch between them.
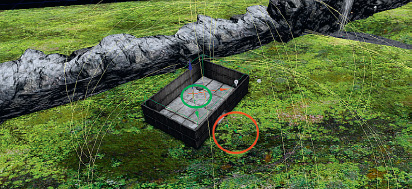
Area 302 has three [AmbientSoundSimpleTogglable]s (shown in the red circle) for the wildlife sounds of outside the building and one (shown in green) for an internal room tone. As the player enters or exits the room, a [TriggerVolume] in the doorway is used to toggle off/on the [AmbientSoundSimpleToggleable]s.
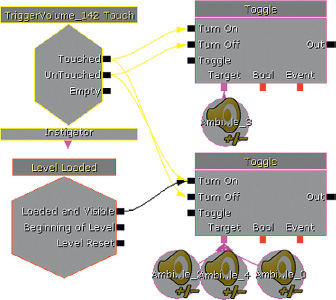
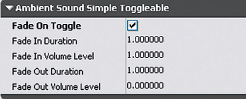
These [AmbientSoundSimpleToggleable]s also have a short fade in/out to ease the transition.
Of course, there are a number of drawbacks to this approach:
• Unless you’re going to make your own filtered/attenuated versions of the inside and outside sounds, then you will either get only the inside sounds or only the outside sounds, which is not the most realistic occlusion. This can be absolutely fine for some environments where because of the noise levels, or the degree of occlusion, you wouldn’t hear these anyway.
• If the players are quickly entering and exiting rooms, then they can become aware of this trickery and this can affect their immersion in the game.
• The nature of a switch is that it is either one or the other; there is no midpoint. So a player hovering in the doorway is going to have a pretty odd experience of constant switching between the two states.
Most modern game audio engines do ray-tracing for detecting occlusion. A simple path is traced between the sound emitters and the listener. If any geometry or objects interrupt this path, then a filtered version of the sound is played (either by filtering in real time or by playing a prerendered filtered version of the sound). Other engines require us to define the geometry for them. Making these calculations in real time to apply changes to the sounds with any degree of real accuracy is beyond the scope of the amount of processing power currently dedicated to audio, so, like we did with many other areas discussed in this chapter, we have to fake it.
Ambient Zones
The games engine often has no awareness of the positions of walls in regard to occluding sound, so even if you do have a built-in occlusion system, you will have to do some work to define “rooms” for this system to work.
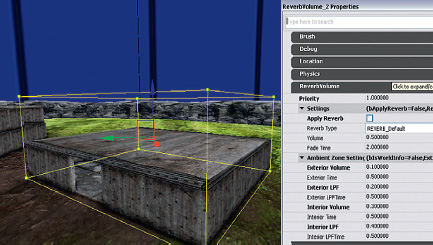
UDK provides a system for occlusion called Ambient Zones, which will allow you to avoid many of the issues outlined earlier. This functionality is actually available as a subsection within the [ReverbVolume]s that we’ve already come across.
Using these volumes, you can specify the geometry for the audio system so that it will attenuate and filter sounds depending on whether you are inside or outside of this volume. For example, you could have a rain sound that covered your entire level and add Ambient Zones placed around each building in the level.
Old way: Trying to use multiple rain sound emitters around the building’s geometry:
New way: Using Ambient Zones to define the building geometry for occlusion:

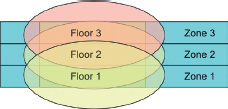
If you had an underground laboratory or a tower block, you could have one ambient sound for the whole of each floor and use the Ambient Zones to separate them out horizontally so that they do not overlap or “bleed through.”
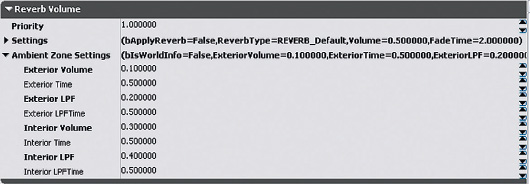
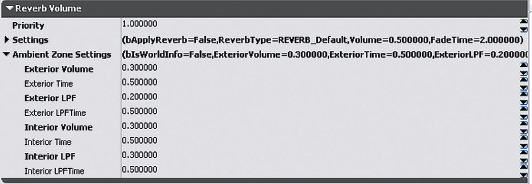
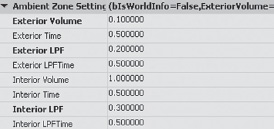
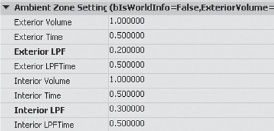
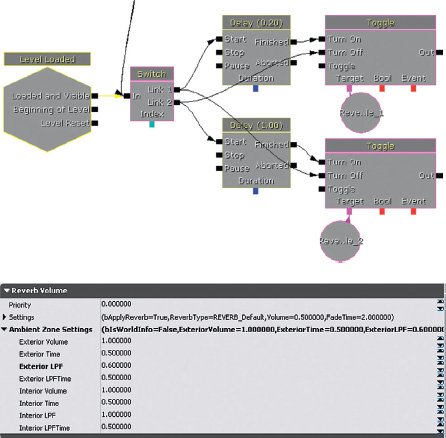
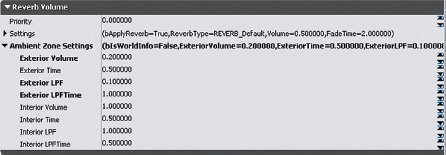
The settings for the Ambient Zone are as follows: Exterior Volume, Exterior LPF, Interior Volume, Interior LPF, and the times it takes to transition between the effect of each one. These settings are explained in the following diagram.

Ambient Zones Only Affect Ambient Sounds
Before we go rushing off in giddy excitement at all the possibilities this feature presents, we should remember an important caveat with the Ambient Zones system in UDK. It will only affect Actors from the [AmbientSound] category, or sounds belonging to the Ambient SoundClass.
Any sound waves attached to these Actors will work without any adjustment:
[AmbientSoundSimple]
[AmbientSoundNonLoop]
[AmbientSoundSimpleToggleable]
However, if you are using anything that references a [SoundCue], ([AmbientSound], [AmbientSoundMoveable]), or a [PlaySound] from Kismet, then that [SoundCue] must be defined as belonging to the Ambient SoundClass.
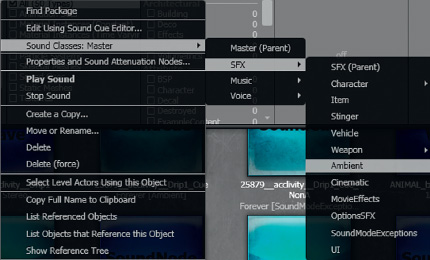
We’ll be looking at SoundClasses in more detail in Chapter 6, but for the moment it’s enough to know that if you want your [SoundCue] to work with Ambient Zones, you should right-click it within the Content Browser and select Sound Classes: Master/SFX/Ambient. Then save your package. This will define the [SoundCue] as belonging to this SoundClass. We do not advise that you change the SoundClass of any of the existing UDK or tutorial-level assets, as this can have unintended consequences later on.
Ambient Zones: Simple
302a Ambient Zones Simple

In this area there are some birdsong [AmbientSoundSimple]s outside the building and a room tone [AmbientSoundSimple] inside the building. Using an Ambient Zone, we have specified that the sounds outside of this zone (defined by a [ReverbVolume]) will be quiet when we are inside the volume/building, and when we are outside the volume/building the room tone from inside will be attenuated.
You’ll see from these settings that we have also applied a low-pass filter so that things sound slightly muffled. Start the level and walk in and out of this building to hear the effect.
Exercise 302a_00 Ambient Zones Exercises
In this exercise we have an outside area where aircraft are flying past and an inside hangar area. Using Ambient Zones ensure that the sounds are correctly attenuated when inside or outside the hangar.
Tips
1. Add a mechanical room tone to the inside of the hangar as a looping [AmbientSoundSimple].
2. Now you will want to create a [ReverbVolume] around the hanger, as this is what also defines the Ambient Zone.
3. Select the hangar in the Top viewport and press Ctrl + P to mould the Builder Brush to its shape.
4. Now select the [ReverbVolume]. Because it’s exactly the same size as the building itself, you may find it tricky to select. Press W to hide the [StaticMesh]s (what the building is made of) to make it easier to select.
5. Alter the Interior/Exterior settings. Remember to also apply some filtering.
6. You will not hear your Ambient Zones take effect until you rebuild the geometry for the level. Do this from the top menu bar: “Build/Build geometry for current level.”
Multiple Ambient Zones
302b Ambient Zones Room Within a Room
You will often have multiple rooms within a building and you may want to use Ambient Zones to stop sounds from leaking from one room to another. Unlike [ReverbVolume]s, which can overlap (although you can then use a priority system to decide which will apply), you cannot have overlapping Ambient Zones therefore, you need to carefully sculpt them to the size of each room.
In these rooms there is a separate room tone for the large main room and for the room at the back, together with an outside ambience.
It is possible to edit the shape of the [ReverbVolume] into more advanced shapes using the Geometry tool. See the UDK documentation for advice on how to do this.
Additive Effects of Ambient Zones
302c Ambient Zones Area
In Area 302c, the building on the left has a loud alarm sound in it, and the building on the right has a quiet insect. There is also the continuing outside ambience of birds.
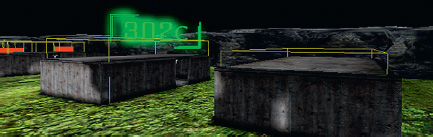
Note that the Interior settings (the volume and filtering of things inside the zone when heard from the outside) are not reset by entering a new zone but instead are combined with the exterior settings of that zone. For example, when you leave the alarm building on the left, the alarm sound is attenuated to 0.3 along with a LPF setting of 0.3.
This continues to apply when you enter building 2 on the right, but this Ambient Zone has an Exterior setting of 0.2, so this will also now be applied to attenuate the sound further. This is consistent with what would happen in the physical world.

Ambient Zones and Filtering
302d Ambient Zones Area
So far we’ve used the attenuation of volume and the low-pass filter in combination, but there are particular circumstances in which you may wish to apply the filter without significant volume attenuation.
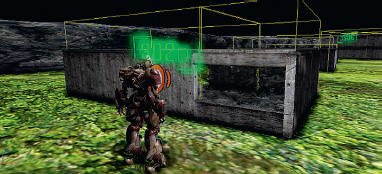
In the building in Area 302d, there is a window. For this case, two Ambient Zones have been set up. The one by the window just filters the sound without attenuating the volume and the one where the character’s voice would be occluded by the wall has additional volume attenuation. For cases in which the engine does not support native occlusion, it may be useful and effective to take the time and effort to set up specific details like this for particular circumstances.
Exterior volume is attenuated when hearing the bot through the wall:
Exterior sound is only filtered, not attenuated when hearing the bot through the window:
Obstructions and Exclusions
We’ve looked at how sound is affected when the path between its source and the listener is blocked by an obstacle of some sort. In addition to occlusion we must also consider two other scenarios. The first are Obstructions, which occur when there is an obstacle between the listener and the sound object but the reflected sound, emanating from the object and bouncing off the walls, still reaches the listener.
302e Obstruction
Often there may be an obstacle between the source and listener, but the sound reflected around the room from the source still reaches the listener. This sound obviously differs from the one you hear when all the sounds are on the other side of a wall, for instance. As we’ve discussed, the calculations for implementing this properly in real time are demanding. However, because the chief effect is a filtering of the sound, it can be worth, under circumstances that demand it, applying the Ambient Zones system.
In this instance, the wall is blocking the direct path of the sound, so an Ambient Zone is created behind the wall with a filter applied to Exterior sounds. This produces a rough approximation of an obstruction effect. Take a look at this in area 302e of the tutorial level.
302f Exclusions

Exclusions are when the sound reaches the listener directly from the sound source, but the reflections hit the obstacle. This would typically occur if a sound and listener were lined up through a doorway, for example.

As 302f demonstrates, you can produce a cheap imitation of the effect by having an Ambient Zone for each of the walls while leaving the sound coming through the doorway itself unattenuated. We’ve made the two zones slightly narrower than the walls to feel more natural, as sound will only gradually be attenuated and filtered as you go around a corner due to refraction.
Summary
• Occlusion: Both the direct and reflected sound are muffled.
• Obstruction: Only the direct sound is muffled.
• Exclusion: Only the reflected sound is muffled.
Although the processing requirement of calculating real-world physics in real time for sound currently means that we have to fake it, we’ve looked at many examples that demonstrate the importance of understanding sound propagation and occlusion for your game audio design.
Exercise 302f_00 Ambient Zones 02
This environment presents many challenges for the sound designer. Use Ambient Zones where appropriate to better recreate a more real (and better sounding) audio environment.
Tips
1. Use the [ReverbVolume]’s Ambient Zone settings to isolate sounds in different areas.
2. Consider where it is appropriate to attenuate the volume, filter the sounds, or do both.
3. Look for areas where you might also attempt to imitate obstruction or exclusion effects.
“Real” Sound for Gameplay
Stealth 101
303 System-Based Occlusion Fudge
One limitation of our use of the Ambient Zones system so far is that it is fixed. If the player could open a window or door (or blow a massive hole in the wall), then the sounds would no longer be occluded and therefore we would no longer apply the Ambient Zones settings. This kind of thing is especially important if the artificial intelligence (AI) of your nonplayer character (NPC) is going to demonstrate any awareness of sound.
In stealth-based games, it is important that players have a sense that their actions can be “heard.” A player may then need to adopt a range of strategies in response to this awareness:
1. Choose a “silenced” pistol.
2. Be aware of what surfaces the they are jumping/walking on.
3. Be aware of the different volume of sound produced by running, walking, or “sneaking.”
4. Close doors to attenuate sound.
5. Distract enemies by deliberately causing sound (e.g., knocking on the wall, throwing objects, or placing sound-emitting objects to draw the NPC to the sound source).
Room 303 demonstrates a more dynamic use of Ambient Zones for occlusion to illustrate case 4).
You need to sneak into the room behind the guard and steal the plans from the safe (press E to open the safe). If you attempt to do this without first closing the door of the inner room, the guard will “hear” you and come running (and shooting). If you use the button on the wall (by pressing E) to close the door first, then you should be able to open the safe and make your escape without being detected.

As you enter the inner room, you should hear some LPF applied to the room tone of the outside room. This is done using the Ambient Zone settings of the first [ReverbVolumeToggleable]. (Note that this volume differs from the standard [ReverbVolume] we have been using up until now.)

As you close the door to the inner room, you can hear that the outer room tone is occluded more, with volume attenuation and additional low-pass filtering being applied. When you open the door again, this effect is then removed as you might expect. We are able to do this because we are using two overlapping [ReverbVolumeToggleable]s in this room. We have made them slightly different sizes so they are easier to see; refer to the yellow cubes in the previous picture.
When the level starts up, the second one is toggled off and the first is toggled on.
When the door is closed, the first one is then toggled off and the second one applied. As you can see, this attenuates the exterior volume and applies a more significant low-pass filter.
In some game systems you can trace the actual volume heard at a specific geographic point in the game (i.e., the enemy “hears” the player). Accessing this functionality is not straightforward in UDK, but we can “fudge” it so that this appears to be happening, when actually the system is a great deal more straightforward. You’ll often read articles in magazines about how advanced the AI is in the latest game, and sometimes there is some genuinely clever stuff going on, but you’d also be surprised by how a lot of it is faked under the hood with simple scripting. In this case, the [Trigger] that you use to open the safe also alerts the guard to start shooting at you. If you close the inner door first, a [Gate] (New Action/Misc/Gate) is applied to the message, meaning that it no longer reaches the guard.
You can set a [Gate] to be initially open or closed within its properties, and you can set it to close after it has received a given number of messages. We will be seeing more of the [Gate] as we go on.

(For advice on setting up and manipulating your own bots, see Appendix C: UDK Tips.)
Exercise 303_00 Dynamic Ambient Zones
In the second room of this exercise, there is an annoying song playing on the radio. Go and close the door!
Tips
1. Add a [ReverbVolumeToggleable] to the room with the radio in it.
2. From the [Trigger] that closes the door, toggle the [ReverbVolumeToggleable] to become active.
3. Set its interior volume (the volume at which things inside are heard when outside) and filter to attenuate the sound when you close the door.
4. Set it to toggle off again when you open the door.
5. Experiment with different times and delay settings until you achieve a natural result.
Stealth and Distraction
303a Stealth and Distraction
Sneak over to the door, taking care of surface types (stepping on a metal surface will alert the guard). When you get near, you can throw a coin to distract the guard from his position so you can get into the building unnoticed.
On entering the first [TriggerVolume], players are warned about taking care of what surface they walk on so as not to alert the guard. At the same time, a [Delay] loop is started, which resets the [Int Counter] every second by using a [Set Variable] object (New Action/Set Variable/Int). The [Set Variable] action allows us to change the value of an existing variable.

Every time an [Int Counter] receives an input, it increments its Value A by the increment amount (in this case set to 1). It then compares its current Value A with Value B, which is set in its properties. In this example, Value B is set at 2. This means that if the [Int Counter] receives more than two inputs, then a signal will be output from A==B. In the Kismet system, this is then set to “alert” the guard (i.e., move and start firing at the player). However, you’ll remember that the Value A of the [Int Counter] is being reset to 0 every second. This means that the player who moves slowly can get away with walking on the “noisy” surface, as long as this isn’t done twice within one second.
Each “noisy” surface increments the [Int Counter], as it has a [TriggerVolume] around it.
Top-down view of the different surfaces.
If the player reaches the end [TriggerVolume] nearest the guard without “alerting” him, then the [Play Announcement] “Well done! Throw something (“H”) to the left to distract the guard” is triggered, which begins the next system that makes the bot go over and investigate, allowing you to sneak past.
As you can see, all of this is yet again faked. The guard doesn’t really “hear” the player or the distraction. Although, as we’ve explained, there are systems set up in some game engines to enable this type of AI “hearing,” the reality is that the combination of the lack of sophistication of the audio physics systems and complexity and unpredictability of the AI systems often mean that it’s simply a lot easier to “script” specific scenarios such as this one.
In this example, you’ll notice that the metallic floor materials that caused the “noise” problem did in fact have a different footstep sound from the other “grass” materials around them. Let us now look at collisions.
(As we’re getting into more complex Kismet systems, now would be a good time to read Appendix C: UDK Tips/Kismet.)
Collisions and Physics
Manual Collisions: Using [TriggerVolume]s
304 Manual Collisions
In the entrance to this large hangar, you will come into contact with various objects and they will produce a suitable “collision” sound. Using [TriggerVolume]s to call a [SoundCue] for your collisions is probably the simplest (but possibly most laborious) approach to collisions.
These [TriggerVolume]s have been created in the usual way (using the Builder Brush). As the objects you’re going to collide with are rarely nice rectangles, we’d had to then edit the shape of some of the [TriggerVolume]s to approximate the boundaries of these objects. (To make more detailed changes to the shape of your [TriggerVolume]s than is possible with the resize widget, you have to use Geometry mode). Note that the [PlaySound] in Kismet targets the static mesh of the objects themselves so that the sound appears to emit from the objects.

Pressing the key ‘C’ whilst in the Perspective Viewport shows you that these Static Mesh Actors actually already have Collision boundaries, so you might be wondering why we are going to the effort of adding [TriggerVolume]s instead of using a touch event from these. Unfortunately collisions only work if the object is converted to a KActor or Mover (which we’ll come onto soon), however the by-product of this is that the player can then pass through the object.
Although you will want your [TriggerVolume]s to trigger every time the player collides with them, you may wish to add a retrigger delay to avoid multiple collision sounds being played quickly in succession.
This is easy to implement, but obviously we don’t want to have to do this for every possible collision in the game. More importantly, this system will not work for what is probably the most frequently heard collision, player footsteps.
Exercise 304_00 Clumsy
Add [TriggerVolume]s to this room so that the player is more aware of colliding with the objects in it.
Tips
1. Create a [TriggerVolume] around the area or object where you want the impact to take place.
2. Edit the [TriggerVolume]s shape in Geometry mode if necessary.
3. In Kismet, right-click to create a [TriggerVolume] Touch event, and link this to a [PlaySound] that references your collision [SoundCue]s.
4. Use some of the methods discussed in Chapter 2 to ensure sufficient variation in your impact/collision sounds.
Automated Collisions: Footsteps and Surface Types
304a Collision Room Surface Types
Along with providing information about the location of NPCs, footstep sounds are often important in games for giving the player a sense of presence in the world. Without them, the player can feel disconnected and “floaty.” However, given the frequency with which you will hear them, footsteps can make sound designers curse. Often the overly repetitive footsteps are not the sound designers’ fault. In addition to throwing assets at the problem, a wider variety of surfaces and animations in the game can resolve this dilemma.
In Room 304a (the large warehouse), you can see that there are numbers on certain areas of the floor. When you walk on these numbers, you can hear that the sound of your footstep changes. This is because these materials have different surface types. Whether it’s the Level geometry (BSP), a Static Mesh, or Terrain, each of these has a “Material” that designates the image displayed.

To make it easy to find the materials, these floor tiles are actually BSP (see Appendix C: UDK Tips) so you can find their material by right-clicking on them and choosing “Find in content browser.” This will take you straight to the material they are using.
To find the material that a BSP surface or Static Mesh uses:
• Select the BSP or Static Mesh, right-click and “Find in Content Browser” or “Materials/Find Material in Content Browser.”
• Select the Terrain and press F4 to open its properties. Then, in the Terrain menu, go to Layers/Setup.

Find this TerrainLayerSetup in the Content Browser and open it. You will see that it references a material that you should again find in Content Browser. Open this TerrainMaterial and you will finally find a normal material that references a physical material in the usual way. Phew!
Go back to the material of one of the numbered floor areas (right-click/Find in Content Browser). Double-clicking this material will now open the Material Editor.

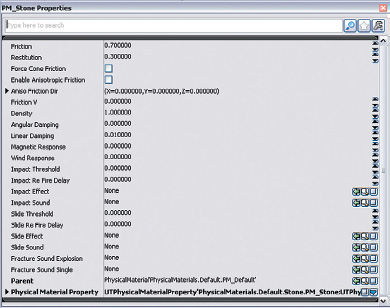
In the Material Properties window at the bottom of the screen, you can see that this references a physical material. If you click on the magnifying glass (select “Find object in content browser”), then you will be navigated to the Physical Materials package (UDKGame/Contents/Environment/PhysicalMaterials).
The physical materials you have available by default in the game are the following: Default, Dirt, Energy, Foliage, Glass, Liquid, Metal, Sand, Stone, Water, Water_Shallow, Wood. Any new material added to the game needs to reference one of these (or a new physical material) if it is to play back an appropriate footstep sound when stepped on (collided with).
Exercise 304a_00 Footloose
Open the package Ex304a_00 Materials, then open the exercise level. The materials in the level have not been set up to reference the correct physical materials so every surface sounds the same. Fix this.
Tips
1. Select a surface on the floor, then right-click and select Find in Content Browser.
2. In the Content Browser, right-click and select Edit using Material Editor.
3. In the materials Properties menu, you can see an entry for Physical Material.
4. Navigate to the Physical Materials package (UDKGame/Content/Environments/) to choose an appropriate material for this surface. When this is selected in the Content Browser use the green arrow to add it to the materials Properties.
5. Exit the Material Editor and save.
6. When you now play the level, the surface should respond with the appropriate footstep sound.
The materials in a level are usually set to reference a particular physical material by the artists or designers. In turn, these physical materials reference the [SoundCue]s for footsteps for each different material or surface type. If you look into the properties of the physical materials (Right-Click/Properties), you can see that they theoretically reference [SoundCue]s for impacts (UDKGame/Content/Environments/).
You can also see, however, that these are blank. Adding your own sounds here will not work, as these are actually hard-coded within the player’s script file. If you want to add your own footsteps sounds to a game (and of course you do), there are two ways to do it. The first is simple, but potentially problematic.
The [SoundCue]s referenced by the Physical Materials script are actually here: UDKGame/Content/Sounds/A_Character_Footsteps. You could open these [SoundCue]s, import your own wavs, and then save them.
Although this might work very well for you, the unfortunate by-product will be that whoever uses this copy of UDK from now on will have your [SoundCue]s playing rather than the default ones.
If you’d rather not upset people, get confused yourself, or if you want to add your own custom physical materials (you may be working on a game level where the floor is made of thick yogurt, for example), then you’re going to have to delve into the script files. Don’t worry. It’s going to be scary and intimidating at first, but we’re right behind you.
Scripting 101
Most games engines, although built on a foundation of C++ code, have some kind of higher-level programming language, or scripting, to add or modify features in the game. Although we’d encourage you to investigate it further if programming appeals to you, this mostly falls outside of the remit of this book. So despite the outcries of any programmers out there, we are not going to take you through basic programming concepts. Instead, we’re going to dive straight in and tell you what you need to know to achieve what you want. Normally, of course, you would be working with a team of programmers, but even if you are, it’s worth getting your hands dirty when working and prototyping by yourself. Like natives of a foreign country, programmers always appreciate it when you try and learn a little bit of their language.
Before you continue, you’re going to need to go to Appendix C: UDK Tips/Scripting to confirm that you’ve got UDK set up correctly for scripting. Read this section before continuing here.
Custom Footsteps Sounds
The default player character in UDK uses the UTPawnSoundGroup.uc script (C:UDKUDK(***)DevelopmentSrcUTGameClasses) to determine its sounds, including the footstep sounds we’re currently interested in.
Navigate to this folder now and double-click the file. This should open by default in Windows Notepad or Wordpad.
At the top of the page you should see the following:
![]()
This simply means that this UTPawnSoundGroup class extends the Object class (i.e., it inherits all the properties of the class named Object but also extends these with additional properties of its own). (If you want to have a look at the Object class, it’s here: C:UDKUDK(***)DevelopmentSrcCoreClasses. Good luck!)
Looking down to the bottom of the script we can see where the player character calls the different footstep sounds depending on the physical materials the player is currently walking on:

When the Player Pawns feet come into contact with a material, a function is called within the UTPawn.uc script (also in the C:UDKUDK(***)DevelopmentSrcUTGameClasses folder) that identifies the material (and therefore the physical material) and then passes that information to this script, which then defines which [SoundCue] to play. (Stay with us, it gets harder.)
You could edit this script to point toward your new [SoundCue]s to implement your own footstep sounds, but this would then apply also for any levels you opened.
So that you don’t cause untold havoc with the default UDK settings, we’ve actually set up the Game Audio Tutorial Level to reference a different version of this called GATPawnSoundGroup.uc (C:UDKUDK(***)DevelopmentSrcUTGameClasses).
If you open this script, you can see that the process looks a lot simpler. This is because this script extends the UTPawnSoundGroup class. When you extend a class, you only need to provide references to properties of functions that you want to override. (If you’re confused, this is normal. Go back and read Appendix C: UDK Tips/Scripting again.)
You can see here that we’ve extended the range of surface types to include a couple of new ones (11 and 12).
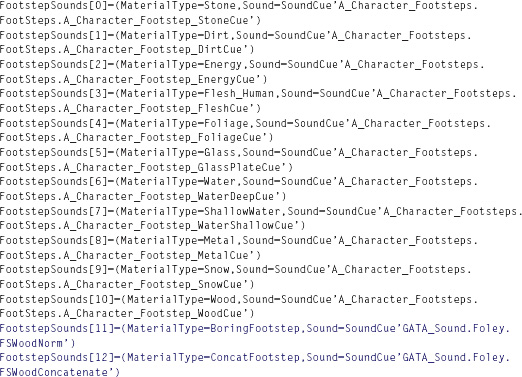
(If no physical material has been applied to a material, then a default [SoundCue] will be called. This setting actually resides in a different script: C:UDKUDK(***)DevelopmentSrcUTGameClassesGATPawnSoundGroup_GATCharacter.uc.)
Instead of overwriting the existing types to reference our new [SoundCue]s, we are using a couple of new physical materials. This way, all the existing materials in UDK will continue to work as normal, but we can also choose to define some, or all, of the materials in our level as belonging to our new types, and therefore get new footsteps.
Before we go on, it’s worth making a copy of the GATPawnSoundGroup.uc and putting it somewhere safe. That way, if things do go pear shaped, you can always just put this back to set things back to normal.
Exercise 304a_01 Custom Materials for Custom Footsteps
Open the Exercise 304a_01 room. This is simply an empty room for you to use to create your own custom physical materials for footsteps. When a pawn (player) steps on the surface, UTPawn.uc identifies the material being stepped on. This material’s properties reference a physical material and the GATPawnSoundGroup.uc then looks through its array of physical materials to find the matching one and play the appropriate [SoundCue].
Tips
1. First you will want to create a new physical material. Within the Content Browser, select New and choose Physical Material to create a new named Material in one of your packages. (You can also do this by right-clicking in the Thumbnail view of the browser.)

2. Right-click your new physical material to open its properties, then add a UTPhysicalMaterialProperty using the blue arrow. Enter a name that you will use for your material type (we’ve chosen “Test1”).
3. For the parent, browse to and choose UDKGame/Content/Environments/PhysicalMaterials/PM_Default. This means that if there are any problems, it will return to the default sound.
4. If you add your new physical material to an existing material within the game, then all other instances of that material will be affected, so for now we’d recommend that you choose one of the GATSpareMaterials (within the GATG_ Graphic_Assets package) and drag and drop this onto the floor. Now double-click this material to open the Material Editor. With your new physical material selected in the browser, use the green arrow to assign it to this material.

5. Open the script: C:UDKUDK(***)DevelopmentSrcCoreClassesGATPawnSoundGroup.uc. To create a new entry for your new material type, you will need to add a line at the end of the existing footsteps list. For example, here we’ve increased the array value [13], as the previous existing one (ConcatFootstep) was [12], referenced our new Physical Material Property (“Test1:) and the [SoundCue] we want to play:

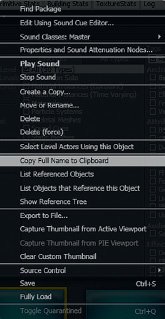
Replace this with your physical material name and the [SoundCue] you want to reference. The reference to the [SoundCue] needs to be the full path, so right-click on your required [SoundCue] in the Content Browser and choose “Copy Full Name to Clipboard.” Then use Ctrl + V to paste this into your script.
6. When you’ve made any adjustments to a script file, you will need to recompile the game in order for them to take effect. Save the script file. Close the UDK editor.
Now navigate to C:UDKUDK(***)Binaries and open the program UnrealFrontEnd.exe.

Clicking on the Script/Compile Scripts button will now compile your new script. When you reopen the editor and play the room with your new material, you should hear your chosen [SoundCue] being played for the footstep sounds.
Well done! You’ve just done you first bit of scripting. We hope you’ve enjoyed the feeling of smug satisfaction when it works. If you didn’t enjoy this process, then the bad news is that there’s plenty more coming in Chapter 7. The good news is that it is really no more difficult than what you’ve just done.
(To add footstep sounds to newly imported characters, you would need to be supplied with a script along the lines of the UTPawnSoundGroup that can receive a call from an AnimNotifyFootstep attached to the animation itself. See the section titled “Adding Sounds to Animations” in Chapter 7.)
Custom Movement Sounds
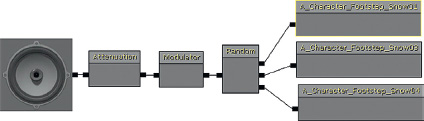
Repetitive footstep sounds do seem to irritate people more than most aspects of game audio. The first thing to do is to stop thinking of them as footstep sounds. Unless you have a particularly unusual anatomy, you do not take steps in isolation from the rest of your body. Therefore, we should consider them “movement” sounds, not footstep sounds. Here are our top tips for avoiding FRM (Footstep Repetition Madness).
1. Obviously we start with several wavs, randomly chosen with a little pitch and volume variation (don’t overdo the pitch). If you’ve got the option, then try other DSP effects like varying the ADSR (Attack, Decay, Sustain, Release) envelope or the filter on each repetition.
2. Try concatenating heel/toe samples (see Chapter 2, the section titled “Concatenation: Footsteps”).
3. We don’t want each wav to sound identical, nor do we want them to sound too different. A particularly characteristic footstep will jump out noticeably and make the system feel more repetitious than it is. Either don’t use it or set its weight in the [Random] node to be low.
4. You may want to set up a left/right foot rhythm using slightly different samples for each one (people do lean more heavily on one side). A [Random] node with two inputs and “Randomize without replacement” checked will in fact alternate between its two inputs.
5. As stated earlier, movement is about more than feet. You should layer in randomized Foley cloth sounds together with weapon/items jangling together with your footsteps. Alongside a friendly programmer you could layer in different sounds depending on the equipment that the player is actually carrying, such as the type of armor. This would not only vary the footstep/movement sounds but would also provide useful feedback to the player.
6. People don’t just walk. Sometimes they have been known to run, jump, slide, trip, and to do all these things with a variety of velocities. All of these will result in different sounds. Running tends to have only one impact, rather than the heel-toe rhythm of walking, for instance. The more developed the animation system you’re working with, the better you can make your movement sounds. If you do have walk-run animations, then also try a “start to run” and a “slowing down” sound or crossfade sounds depending on the player’s velocity. Look at the real world. People do not suddenly run at full speed.
7. Think about when sounds should and when they shouldn’t be there. Be flexible in your mixing (see Chapter 6). If there’s a firefight, you won’t hear the movement sounds and they are just taking up valuable headroom and channels (voices). Perhaps play the sound louder when surface type changes to provide the feedback needed, but then drop the volume. When it comes to sound it often works well to “Make a point, then go away”. (© r.c.stevens 2011:)
8. It’s not actually about the footsteps, it’s about the variety of surface types and how often they change. Distances are not the same in games as the real world. I can walk around my living room in five paces (and that’s not just because of my salary). For various reasons (not least the relative clumsiness of the control mechanisms), the spaces between objects in games need to be much larger than in reality, hence more footsteps. This already puts us at a disadvantage when it comes to repetition, but we rarely have continuous surface types in the real world. If you recorded yourself walking at the same speed on a continuous surface (if you can find one), then you would probably find the sounds very repetitive. Work with your artists to create and define a larger number of surface types and change them more frequently.
9. Think about how your walking or running changes depending on how you are feeling. Perhaps there’s opportunity for some more subtle feedback to the player than a health bar here. Your footsteps could transition to a heavier set, depending on player health.
10. Any repetition in footstep sounds will be particularly acute if you have multiple NPCs all referencing the same [SoundCue] within a confined area. Here are a few approaches to discuss with your programmer.
• Have a priority system for NPC footsteps. Limit the number of footsteps that can play at any given time (see Chapter 6, the section titled “Voice Instance Limiting”) or keep the one nearest to the player (or the one the player is actually looking at) at normal volume but slightly attenuate the others.
• Along the same lines, perhaps you could have adaptive distance attenuation curves. When X number of bots are within a certain radius of the player, swap their attenuation curves so that their footstep sounds are a lot tighter to the center of origin. (Definitely consider different attenuation curves for single player versus multiplayer games.)
• In terms of our perception, we usually class things as one, two, or many (i.e., if there are more than two things we consider them to be a group rather than individual units). Again, you (and your programmer) could develop a system whereby if there are more than X number of NPCs within a given area, you will not actually play their individual footstep (movement) sounds anymore but will instead play the [SoundCue] “ManyNPC’sMovement.” This will not work under all circumstances (as the player will often need to locate individuals), but it could save on the number of voices used and make them more convincing than the tat, tat, tat of repetition that you sometimes get.
Exercise 304a_02 Footloose 2: Bigger, Cornier, and More Callous
This room has four different surface types: custard, gravel, springs, and a hydroquantumpseudoscientifc electric field (sounds a bit like electrified glass). Create a new physical material and sound cue for each material.
Tip
1. See Exercise 304a_01 for a guide to creating and adding your own physical materials.
Physics
304b Physics
Scaling and setting thresholds for variables are extremely important tasks when dealing with physics variables.
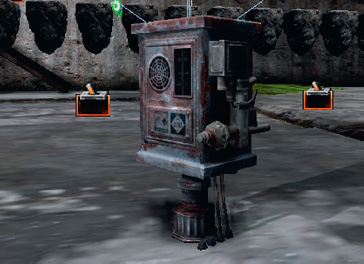
Using your mouse wheel, switch to your physics gun. Walk over to this object in the hangar 304b, and use the left mouse button to push it or the right mouse button to pick it up and throw it around.
What the game system is attempting to do here is to somehow replicate the interactions of different materials that produce sound. A great deal of research is available on the physical processes that create sounds, and there is an increasingly important branch of game audio research that looks at how these sounds can be implemented in games without the vast processing overheads of truly accurate simulations. The detail of this subject, termed procedural audio, is for another book (see the bibliography for a good one). The reality is that within the processing power currently available for games audio, we are only at the earliest stages of this brave new world; so once again for us, there is the need to fake it.
The object you have just been throwing around is a [KActor]. A [KActor] is essentially a [Static Mesh] that has additional properties so that it is movable and it uses the physics engine to enable collision with the world’s geometry (and other [Kactor]s). Any [Static Mesh] can be converted to a [KActor]. This Actor can then send out events when it collides with another rigid body. The event [Rigid Body Collision] within Kismet will output the collision event together with the Impact Velocity.
When dealing with variables arising from games physics, it is important to be able to scale these variables into a useful and meaningful range of numbers for your audio. To scale means simply to take an incoming range of numbers and convert it into another range of numbers. In addition to scaling the variables from physics events, it’s also often useful to set thresholds (a “cap” for the numbers) so that the sometimes extreme numbers that might appear unpredictably do not result in an extreme audio event.
In this example, you can see that the impact velocity of the collision of the object passes through a [Divide Float] object where it is divided by 100 to scale the numbers into a useful range for the [PlaySound]’s Volume Multiplier. This means that we not only get a sound when the [KActor] collides with something, but we are also adjusting the volume of this sound depending on how fast it was going when it collided (and consequently how loud the impact sound will be).
Exercise 304b_00 Bang! Physics Impacts for Dummies
This room currently contains three [Static Mesh]es. Alter them so that the player can interact with them using the physics gun. Give each one an appropriate impact sound.
Tips
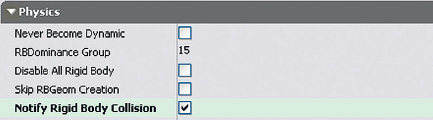
1. Right-click the [Static Mesh] and select Convert/Convert Static Mesh Actor to KActor.
2. Open your new [KActor]’s properties (F4), and within the DynamicSMActor/Static Mesh Component/Physics menu enable Notify Rigid Body Collision.
3. With your [KActor] still selected in the viewport, right-click in Kismet and select New Event Using KActor (***)/Rigid Body Collision.
4. Right-click on this event’s Impact Velocity output and select Create New Float Variable.
5. Create a [Divide Float] (New Action/Math/Divide Float) and a [PlaySound] (hold the S key and click).
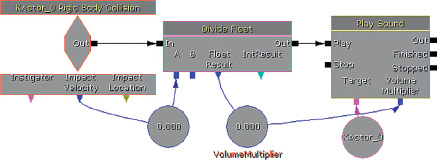
6. Set the [Divide Float] object’s Value B initially to 100 in its Properties window (Seq Act_Divide Float). (You may want to experiment with this later.)
7. Expose the [PlaySound]’s Volume Multiplier (right-click the [PlaySound] object).
8. Create a New Variable/Float/Float and connect it up to the Result of the [Divide Float] and the [PlaySound] Volume Multiplier.
9. Do the same for the Impact Velocity output of the [Rigid Body Collision] and the Value A of the [Divide Float].
10. Select your [KActor] in the viewport, and right-click the [PlaySound]’s target to create a New Object Variable using this so the sound is played back from the origin of the [KActor] itself.
11. Construct an appropriate [SoundCue] and reference it from your [PlaySound].
12. Test and adjust the [Divide Float] values and the properties of the [Rigid Body Collision] events to get a satisfactory result.
Of course, the velocity of an impact changes considerably more than simply the volume of the sound produced, and you could extend this system to play different [SoundCue]s for different ranges of Impact Velocity.
By law you are not allowed to call your game a “game” unless it has a barrel in it.
The second object in this location, the barrel, goes through the same scaling process to change the range of values of the impact velocity (approximately 0 to 2,000) into an appropriate range for volume, but then it decides which impact sound to play: hard, medium, or soft, depending on this range.
(As our systems are getting complicated now, we’ve started to use subsequences to avoid a spider’s web of connections. When you create an External Variable within a subsequence (New Variable/External Variable), an input to that sequence appears so you can attach your variable to pass it through. See Appendix C, the section titled “Kismet Tips,” for more.)

The subsequences contain a compare system that looks to see if the velocity/volume falls within a given range. Two [Compare Int] objects look at an inner and outer range. If both conditions are satisfied, then both the A and B input of a third [Compare Input] will be 1, and therefore the A==B output is triggered. The [Finish Sequence] (New Action/Misc/Finish Sequence) object outputs back up to the upper sequence to then trigger the appropriate [PlaySound].
Other physical interactions such as Sliding/Scraping or Rolling are accessible within many game engines. Theoretically they are available in UDK via the Physical Materials, but this feature is currently not supported.
Although dependent on many variables (and the robustness of your game engine’s physics), both sliding and rolling are usually implemented with a relationship between velocity and both volume and pitch.
Although the values from the impact velocity are being scaled, they still have a linear relationship with the volume of the impact. For a more sophisticated audio response to physics events, we would need to start looking at the use of curves so that the changes in velocity are not directly related but instead read through a curve that we can control. You can use some simple maths to transform the velocity-to-pitch relationship within Kismet. Better still, talk to your programmer about accessing a range of distribution curves.
Linear relationships
Square root relationship

Power of 2 (Squared) relationship

We’ll be dealing with another important type of collision in games (that of bullets with soft flesh) later in the Weapons section.
Cascading Physics
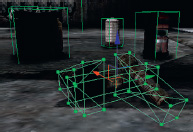
304c Cascading Physics
You’d imagine that if you take the sound of one rock falling and applied it to 20 rocks, when they fell you would have the sound of 20 rocks falling. You’d be wrong.

In this area you have four buttons from left to right:
Button 01 = One random rock falls.
Button 02 = Three to five rocks fall.
Button 03 = They all fall and the normal [Rigid Body Collision] triggers the [SoundCue].
Button 04 = They all fall but this time when the number of impacts get beyond a given threshold, a “Rocks falling” sound is played instead of the individual collisions.
When responding to physics, it’s easy for your sound system to become overwhelmed with the number of events. Simply reusing the same rigid body collision for each individual collision does not work beyond a certain density of events because (1) it can lead to too many voices being used, (2) it can lead to phasing, and (3) it just doesn’t sound right. You could limit the number of occurrences of this sound to stop it from taking up too many channels (using the [SoundCue]’s Voice Instance Limiting feature discussed in Chapter 6), but this would not improve the sound beyond perhaps eliminating some of the phasing. The complex interference of soundwaves when many collisions are occurring simultaneously means that any attempts to re-create 20 rocks falling, or 20 shards of glass, by playing back 20 individual impact sounds is doomed to failure.
What we need to do is to implement a system where we can monitor the number of collisions within a given time frame. If that number reaches our permitted threshold, we will then override the individual collisions system and instead play a prerecorded sound of these many collisions. (This is reminiscent of the one, two, many concept described in the discussion of footsteps presented earlier.)
Like the Stealth and Distraction system (303a), this system counts the number of individual collisions that occur within a given time period by using a [Delay] to reset the count of an [Int Counter]. In this case, if more than four individual rock collisions occur within a 0.3 second period then a RocksMultiple [SoundCue] is called instead of the individual ones.

Movers and [Matinee]
Whether the source is visible or not, making sounds move creates a more realistic and believable audio environment.
Sounds that Move
305 Moving Sound: Fly-by
As you climb the stairs (305) out of Room 304, you’ll notice that there are a number of pesky mosquitoes buzzing around your head. (This is another version of the flies [SoundCue] we came across in 209 that uses an oscillator to vary the pitch and volume). If you have a 5.1 or 7.1 sound system, you’ll really hear them moving around you; in stereo you’ll hear them pan left and right. These sounds are produced by the [AmbientSoundMoveable] Actor. Note that [AmbientSoundMoveable]s will loop their [SoundCue]s, irrespective of whether that [SoundCue] has a loop in it. This Actor allows you to define a movement path for your sound so that its movement can then be triggered or looped.
Adding an [AmbientSoundMoveable] is straightforward. Select the [SoundCue] you want in the Content Browser, then right-click in the Perspective viewport and select Add AmbientSoundMoveable: (***). To make it move, we need to look at UDK’s tool for any kind of movement, [Matinee].
Matinee
If we look at the Kismet sequence for Room 305, we can see that both of the [AmbientSound Moveable]s in this area are attached to a [Matinee] object. By double-clicking the [Matinee], we can see how this operates. In the [Matinee] there is a movement track that contains several Keys (shown by the small triangles). With the Matinee window open, click on the different Keys (triangles). You can see the [AmbientSoundMoveable] in the Perspective viewport move to these different locations:
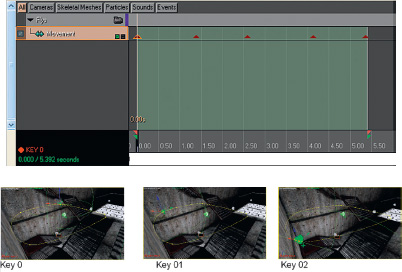
If you click on the Play looped Section button at the top of the window, you can see the whole movement sequence play out in the viewports.


The [Matinee] sequences here are triggered by a [Trigger] that covers the whole stair area, and when it is untouched they stop.

The best way to understand the [Matinee] system is use it, so have a go at the following exercise.
EX305_00 Moving Sounds Wooded Area
Using the bird sounds provided in the Sound Library, make this woodland area come alive with movement.
Tips
1. Add your sound at the position you want the movement to start from. Select the [Soundcue] in the Content Browser and right-click in your level. Choose Add AmbientSoundMoveable: (***) here.
2. With this [AmbientSoundMoveable] selected, open Kismet and right-click to select New Matinee.
3. You’ll want this [Matinee] to start up when the level starts, so right-click and create a new Event/Level startup and connect the Out of this to the Play of the [Matinee].
4. Now double-click on the [Matinee] to begin adding your movement.
5. In the bottom left of the [Matinee] screen, right-click and select Add New Empty Group and name it something appropriate. Right-click next to this name when you have entered it and select Add New Movement Track from the drop-down menu. You’ll see that this already has the first triangle or Key, which is your starting position.

6. With the Movement Track option selected on the left, click on the timeline at the bottom of the screen and press Enter. This will add a new Key. Now go back to your viewport and move your [AmbientSoundMoveable] to the position you’d like it to be at for this key (use the arrows of the movement widget). You can delete or move Keys (hold down Ctrl to move them) later but don’t attempt to move the first Key. Create some more keys, and move the sound to a new position for each Key. Press Play from the top toolbar at any time to check your movement sequence.
7. You’ll also see some green markers and some red markers on the timeline. The red markers indicate the start and end of your sequence, and the green markers indicate the part of the sequence that will be looped if you enable looping. For the moment, move both the green and red markers to encompass your whole sequence.
8. Once you’re happy, close the [Matinee] window, select the [Matinee] object, and in its properties (Seq Act_Interp) check the box marked Looping.
9. Now you should be able to play your level and hear the movement of the sounds.
Movers that Sound
Doors, elevators, and many other objects in the game make sounds when they move. These movable objects are called [InterpActor]s. Any [Static Mesh] in the level can be converted into an [InterpActor] and made to move. We can add these sounds in two ways, either directly into the properties of the [InterpActor] or via a Sound Track feature in a [Matinee].
Doors
305a Door
The button on the right controls the doors leading out to the roof area. The [Matinee] for these doors has been set up so that, instead of moving position, they rotate. This is done in exactly the same way as any other movement is established, by adding a Key to the Matinee Movement track and then moving the object to the position, or in this case, the rotation, that you want. To make both doors finish opening at exactly the same time, the Key in [Matinee] allows you to right-click and choose Set Time to enter a precise time for the key event.
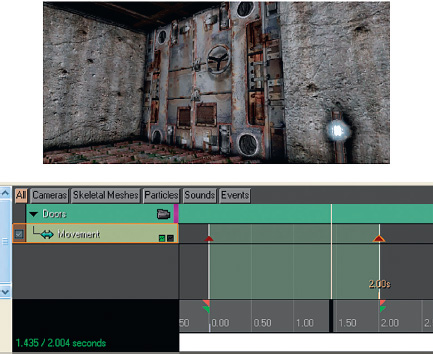
The sounds for these movements are defined within the door [InterpActor]s.

• Close sound: This is when it starts to close (when the [Matinee] is in reverse).
• Closed sound: This sound plays when it has finished closing.
• Closing: This sound is a loop that will play while the [InterpActor] is moving between Close and Closed.
• Open: This sound will play when you start to open—in other words, when the [Matinee] movement begins.
• Opened: This will play when the [InterpActor] has finished its movement, when you have gotten to the end of the [Matinee].
• Opening: This is a sound that will loop while the [InterpActor] is moving between Open and Opened.
All of these sounds are actually triggered from the timings of the [Matinee]. This is why it’s very important that the markers in your [Matinee] are in the correct position. If the red end marker, for example, is after the final Key where the [InterpActor] ends its movement, then you will not hear the Opened sound until it reaches this time—that is, it will not play simultaneously with the end of the movement.
Exercise 305a_00 Matinee Doors
In this room there are two types of door, a metal door and a stone door. Using the sounds from the Sound Library or your own, add sounds to these door movements.
Tips
1. The first door system (the metal doors) is set up for you. You just need to select the [InterpActor] and go to its properties (F4) to add the appropriate [SoundCue]s.
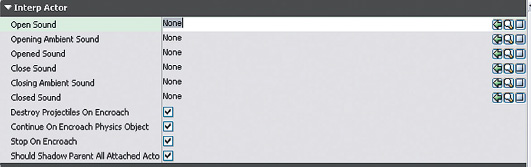
2. In the second system, the doors are not working yet, so you’ll have to use [Matinee] to make them rotate correctly.
3. Once the [Matinee] is working, you can add sounds via the [InterpActor]’s properties as you did earlier.
Elevators or Lifts
305b Elevator
The elevator that takes you back down to the ground is also an [InterpActor] whose movements are controlled by the [Matinee] and whose sounds are attached within its properties.
You’ll notice that the lift does not necessarily have to be triggered by the switch but will also work when the player simply steps onto it. You can sense these events by using a Mover Event feature. With the [InterpActor] selected in the viewport, right-click in Kismet and select New Event using (***)/Mover. This will bring up the Mover Event option, which will output when a pawn (player or NPC) is attached to (on) the [InterpActor]. This will automatically create a [Matinee] already set up with groups and a Mover Track control for this specific object, so you just need to double-click the [Matinee] to edit it.
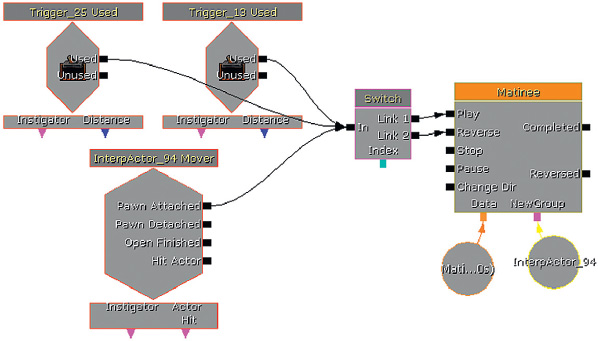
Exercise 305b_00 Pawn Attached Mover
In this exercise, there is a moving platform that will take you across the gaping chasm of death. Set up a system so that this starts automatically when the player stands on it.
Tips
1. Create a [Matinee] that moves the platform across the chasm.
2. Select your [InterpActor] platform, then right-click in Kismet to create a “New Event using (***)/Mover.”
3. Now open the [Matinee] (double click), click on the Timeline at the start and press Return to create the first Key. Create another Key later in time then drag the [InterpActor] to it’s new position for this Key. Continue to add Keys and positions until you are happy with the movement across the chasm. (Make sure that the red and green markers on the Matinee timeline encompass all your Keys.)
4. Now see if you can extend this system so that your player can get back.
Variable Speed Matinees
305c Speed Machine
By the river at the bottom of the elevator there is a machine that consists of several movers. By changing the play rate of the [Matinee], we can speed the machine up or down. The first switch starts and stops the [Matinee], and the other two increase (button A) or decrease (button B) its speed.
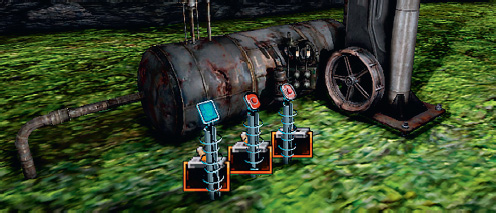
This time the sounds have been embedded within the [Matinee] itself by creating a Sound Track (right-click in a Matinee group/Add New Sound Track). When you have selected a [SoundCue] in the Content Browser press Enter while on the matinee timeline to add a Key, the [SoundCue] will be added at this point. You can also edit this Key to set the sound’s volume or pitch.

Because the sound is generated by individual samples triggered from the [Matinee], rather than a single longer sample, the sounds will match the speed of the machine as the [Matinee] is played back at different speeds.
The initial [Trigger] starts the [Matinee] and sets the variable play rate (1.0 is normal speed) via a [Set Float] object (New Action/Set Variable/Float).
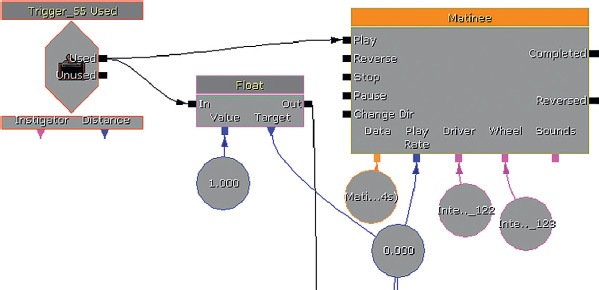
Input A to the [Add Float] object is the current Play Rate variable. The two other [Trigger]s set the B value and trigger the [Add Float] object so that it performs the calculation A + B. It then sends the Float Result back to the play rate of the [Matinee]. As a result, either 0.2 is added to the current speed or –0.2 is added (i.e., 0.2 is taken away).

Using separate sound elements to make up the complete sound of a moving object in your game means that you have variable control over the speed without needing to pre-make a separate sound file for each speed.
Interruptible Matinees
305d Crane
If you stand inside the area around this crane, you can use the H on your keyboard to switch it on. While the key is held down, the [Matinee] will play; when the key is released, it will stop.
(The magnet on the end of the cable is the only thing that actually moves. The cable is scaled within the [Matinee] to get shorter and longer.)
This system uses a combination of sound-producing systems. The Key Press event is used to trigger the [PlaySound] start and stop events, whereas the looping sound (while moving) is controlled by the [InterpActor] (or strictly speaking by the [Matinee] telling the [InterpActor] what state it is in and therefore what sound to play).
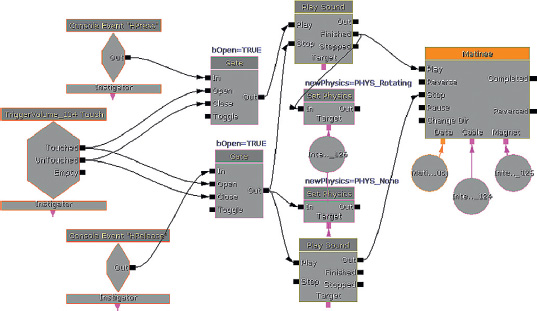
The reason it is necessary to use both of these systems is that we want to be able to stop and start the crane while it is midway through its [Matinee] sequence. As explained previously, the [InterpActor]’s Close/Closed and Open/Opened [SoundCue]s are only called when the red Keys (Sequence start/Sequence end) of [Matinee] are passed. As these are at the start and end of the sequence, this would not give us the starting/stopping sounds we wanted in this situation.
The [TriggerVolume] is there to control a [Gate] so that the Key Press messages do not get through to this system unless you are within the immediate area of the crane. We want to use the Key Press H elsewhere in the level too, so if we didn’t have this blocking the input, then a key press of H from anywhere in the level would have started this crane. (For more on adding and using your own custom keyboard keys, see Appendix C: UDK Tips.)
Funky Bridge
305e Bridge
Press the button and a bridge will construct itself in front of you to enable your passage across the river.
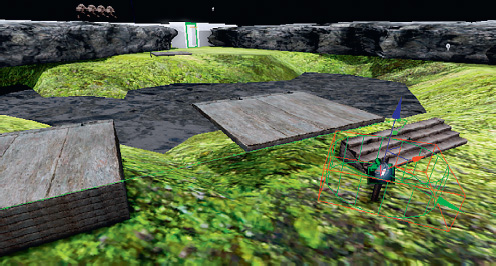
Each of these [InterpActor]s has the same movement sounds embedded within it. Rather than doing this multiple times, the original [InterpActor] was simply copied and pasted. For systems like this (where something is constructed for a change rather than destructed), it’s often easier to start with the complete object and work backward, then play the [Matinee] in reverse. When doing this, remember that the Open/Close sequence of the [InterpActor]s sound will also be reversed.
Cut-Scenes, Cameras, and Sound
Cut-Scenes with No Audio Control
Cameras and sound don’t follow each other naturally—what works visually often does not make sense for sound. You need separate control over these elements.
306 Cameras and Sound
The two buttons in this area will present two different versions of this cut-scene conversation between these two bots. One is heard from the default sound setting, which is from the point of view (location and view) of the camera. The other overrides this option to play the sound track via the matinee.
Cut-scenes and cinematic sequences in games use either prerendered video files or are created in real time within the game engine itself using scripted animation and movements. The ability to sound-design a linear sequence such as a prerendered cut-scene remains an important skill for the game sound designer. These skills are the same as those used for film or animation sound design, so we’re not going to dwell on them here. In-game engine cut-scenes do require some implementation knowledge on your part, so we’ll focus on them. As well as being the controller for character animations or object movements, Kismet also takes care of the camera during these sequences.
When the [Trigger] on the left is used, Cinematic mode is enabled, which switches the camera from the usual player’s perspective to that of whatever camera you designate.
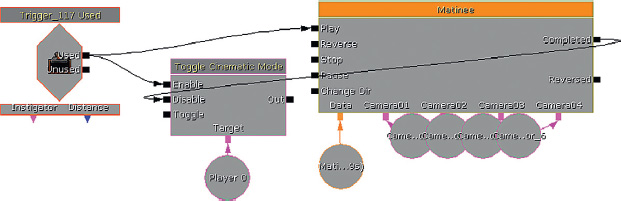
The cameras have movement tracks within the [Matinee] object like the other movements we have dealt with, but they also have a Director track, which controls how the cut-scene might switch, or “cut,” between cameras.

If you watch the cut-scene after clicking on the left-hand switch, you will notice an issue regarding the sound track. In this simple scene there are five sound sources: two characters, a machine, the electric field blocking the door, and the birds in the trees.
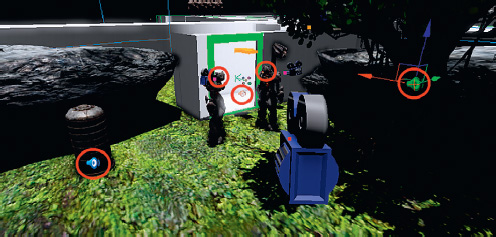
As the Director track cuts between each camera, the orientation of the sounds relative to each camera is different. This gives the effect of sounds suddenly panning from one side of the screen to the other. Although this may be strictly accurate, it is distracting to the player. The problem is, of course, well known in cinema, and to avoid it the sound track is often not panned according to the camera movements but instead maintains a separate continuity. For us to avoid this distracting panning during cutscenes, we need to essentially switch off the normal game sounds, which are heard from the point of view of the camera, and play a more cinematic sound track that we have more control over instead.
Cut-Scenes with Audio Control
Pressing the right hand switch will show you an example of the same scene where the in game sounds have been muted, and the audio has been re-created using a Sound Track in a [Matinee] instead. A new group and an Event Track has been added. This outputs an event from the Kismet object that you can link up to any other object in Kismet. In this case it has been linked to a [Set Sound Mode] object. We’ll be looking at Sound Modes in more detail in Chapter 6, but essentially this is going to silence all sounds in the game that have not been designated as belonging to the “Cinematic” SoundClass, and in this case this means that all of the ambient sounds in the area will be muted.

Another group contains the sound tracks where [SoundCue]s have been added to re-create the sound of the scene.
In the Director group you can also right-click and select Add New Audio Master Track. This will allow you to control the overall level of all your sounds in the sequence and also apply fades using the Curve editor. The Curve editor is enabled using the check box indicated in the following figure.

It is highly unlikely that you would be directly involved in directing the in-game cut-scenes. However, it’s important that you make the point that they need to be controlled and mixed just as carefully as a linear cut-scene would. Simply leaving it up to the automated 3D sound engine to provide a mix from the point of view of the camera is not going to produce polished results.
Exercise 306_00 Lights, Camera, Action
In this cut-scene, the sound is quite distracting as it pans according to the camera movement rather than being a more appropriately “Cinematic” sound. Re-create the sound for the cut-scene using the Sound Track feature of [Matinee].
Tips
1. Any [SoundCue]s that you want to hear during cut-scenes should be identified as belonging to the “Cinematic” SoundClass. Right-click them in the Content Browser and select SoundClasses/Master/SFX/Cinematic. You’ll have to duplicate the [SoundCue]s currently used to re-create the scene.

2. The [Matinee] and [Set SoundMode] are already set up for you, so you can focus your attentions on re-creating the scene. (The [Set SoundMode] is currently unattached so you can hear the scene first. Once you start work you should link it up so that it mutes the current sounds.)
3. Open the [Matinee], and in the left-hand panel right-click and choose New Empty Group. Then in this group right-click again and select Add New Sound Track.
4. With your [SoundCue] selected in the Content Browser, you can now click on Matinee Timeline and press enter to add the currently selected [SoundCue] at this position. You can move these around later by Ctrl + left-clicking on their Key points.
5. Try adjusting their Volume properties by right-clicking on their Keys; consider adding an audio master track in the Director group to control the Master Volume feature.
Level Fly-Throughs
306a Fly-Through
Of course, there may be situations when you want to hear the world from the camera’s point of view, in which case there is no need for this more “cinematic” approach. On a level fly-through, for instance, you’ll probably want to hear the sounds emitted by the Actors as you fly past them. Once you’re past the bots, try pressing the button in the corridor for a quick level fly-through example.
Where’s My Head At?
One issue that will require the careful consideration of your team is where the sound a player hears will come from. For a first-person game this is obvious—you will hear the world from the location of the player’s head (i.e., the camera’s location). For 2D, third-person, or fixed isometric view games, it is less clear. In some instances the sound remains attached to the player, but more often it is heard from a location in space somewhere offset from the players themselves (i.e., the camera’s position). Some games also allow you to swap from between different types of view.

When using a third-person camera, we get a wider perspective than we get in first-person view. We may see things that are out of sight of the player’s character. Sound from the camera’s point of view can lead you to hearing things that you can’t actually see, or to hearing the indoor ambience when the player character is still outdoors and vice versa. There is no single solution to this problem, and it often comes down to a matter of taste. It is, however, something you should be looking out for to avoid circumstances in which the sound track will be at odds with what the player sees.
If you want to see a simple example of where camera panning and sound can produce some unwelcome effects, then jump ahead to the racetrack in area 700 of the tutorial level. Pick the standard Scorpion vehicle on the right-hand side (shown in red in the image that follows) and use your mouse to move the camera (and the turret) around while driving. You’ll notice that as the engine sounds are spatialized, they pan around the stereo (or surround) field. In terms of the logic of the player’s position in the vehicle and in terms of the lack of elegance in the panning, this is less than ideal.

Conclusion
Although not yet fully implemented in UDK the power of the latest generation of consoles gives us the opportunity to replicate real-world physics as never before with ray tracing for occlusion, realtime delayed reflections, filtering, and convolution reverbs. As this technology continues to improve and become accessible, it will allow us to create a convincing and consistent impression of the “real” to validate and support what is, after all, just a 2D image of pixels changing color. Next we need to consider when and how to move beyond the “real,” to use the emotional impact of sound and music on the player to support the gameplay or narrative. We’ll return to this topic in Chapter 6: Making It Sound Good after a trip to the other end of the reality spectrum to consider the unfathomable power of music.