
2
How Big is the Truck?
This chapter deals with the issues of memory when developing audio for games. A number of solutions to nonrepetitive design are discussed and illustrated. These techniques and principles are particularly applicable to platforms where the memory or download size is a significant restriction, such as the Nintendo DS, Playstation Portable, iPhone/iOS, Android, or other mobile devices, but they are also equally important for other consoles such as the Wii, Xbox 360, and Playstation 3 albeit on a different scale.
How Big is the Truck?
When designing and implementing sound or music for games, obviously your uppermost thought should be “making it sound good” (see Chapter 6). However, unless your sound is going to actually work on whatever console or platform you’re using, this consideration is rather immaterial.
When starting a project, you should have this question in the back of your mind: “How big is the truck?” RS Writes:
When I went to university, I was fortunate enough to be surrounded not only by lots of musicians but also by Actors and “drama” people (although sometimes they were perhaps a little too dramatic). Every year they would take a play out on tour. This involved packing the set and costumes into a large truck and setting off across Wales. When designing the set, there were two important thought processes going on. The first was obviously how do we make this good? How do we use the set to tell the story and make it a more involving experience for the audience, etc., etc. The second, and equally important question was “How big is the truck?” You could design the most fantastic set in the world, but if you didn’t design it such that it could actually fit into the truck, then the whole exercise would be a waste of time.
The parallel I’m trying to make is this. On any games platform there will be limitations, usually chiefly in terms of the RAM [random access memory] available. Some of your sounds will play off disk, where they still have to compete for space with all the graphics assets, but many will need to be loaded up into RAM to be able to play instantaneously when needed. RAM costs money. RAM is limited. One of the chief differences between designing sound for film—where you can have practically unlimited channels and the highest quality sounds—and games is that in games the sounds you want available to play instantaneously (most of them) have to fit into the RAM available. On some consoles, particularly portable ones, this can be frighteningly small.
RAM Budgets and Streaming
Before starting work, you need to talk to your programmers to be fully informed as to the capabilities of the system they are using for your chosen platform. Understanding the way the system’s audio playback works in terms of its capabilities when playing back from RAM or streaming sound and music from disk will be fundamental to the approach you decide to take.
Unless you are a licensed developer, the actual specifications of some gaming systems can be shrouded in mystery, as much information is covered by the infamous nondisclosure agreement (NDA). There is fierce competition between gaming platforms, so information that might portray one as being somehow better or weaker than another is often a closely guarded secret, particularly early on in the console’s life cycle. If you haven’t got access to the specific information, then some careful reading of audio postmortems or articles (or this chapter) can give you some basic guidelines.
The current generation of portable consoles can be seen as pretty much the equivalent of previous generations of home consoles. For example, the PlayStation Portable is roughly equivalent to the PlayStation 2. This had 2 MB of RAM available for sound. You could also stream sound from the DVD disk itself, but this method required the use of some of your RAM as a buffer, so realistically you were looking at around 1.8 MB. This would get you about 10 seconds of audio at CD quality—for your entire level (CD quality audio taking up around 176 kB of memory per second). The good news was that compression was available that reduced your files to about 3.5 times smaller. (If this all sounds like complete babble to you, then it’s time to go to the website and read Appendix G: Digital Audio.)
| Memory: 1kB | = | 1,024 bytes |
| 1MB | = | 1,024,000 bytes |
| 1GB | = | 1,000,000,000 bytes |
The most popular portable platform, the Nintendo DS, is rather more limited, typically having no more than 500 kB of memory available for sound (although, again, you can “stream” a 10- to 30-second piece of stereo music or ambience from the “cart”). Games for mobile phones or web-based games are often even tighter.
In terms of home console systems, it’s very common for games to be developed for multiple platforms, so to save time you are often working within the lowest specs available. The Wii sits somewhat below the capabilities of the PlayStation 3 and Xbox 360, typically at around 8 MB of RAM, so the sounds will need to be rethought specifically for that system. Generally PS3 and 360 versions are developed with the same assets, which means that they have anywhere between 15 and 25 MB of RAM and three to six stereo streams available from the disk. PC games tend to be more generous but can be restricted both by the increased use of downloadable content (DLC) and by simultaneous development for consoles. These are ballpark figures, and this isn’t the whole story as sound and music can be streamed in and out of memory for specific areas of a game (see Appendix B, the section titled “Audio Optimization”). The specifics will very much depend on the priorities of the game (e.g., it might be a music-orientated game) and may need to be negotiated along with the rest of the assets competing for this precious resource. The point is that you need to know your RAM budget and how to get the best out of the system you’re working with, or else!
If you are more used to your audio sessions being measured in gigabytes rather than megabytes (or even kilobytes), then you may be having palpitations at this point.
Don’t panic!
The rest of this chapter is dedicated to offering some solutions.
A Lifetime’s Work
The greater the interactivity there is in your game, then the greater the number of possible outcomes and therefore the greater the number of possible sounds. Nothing breaks immersion in a game more than hearing exactly the same sounds/sample being used repeatedly, as few sounds in the natural world repeat in this way.
At this point, some Smart Alec will usually pipe up to say, “Yes, maybe repetition is a problem on the NDS or in a mobile phone game, but I play on a PS3 and a PC. We’ve got loads of RAM, so we can just add more sounds. It’s not a problem!”
First, let’s put stereo music, speech, stereo ambience, and all of the “big moments” that you can anticipate onto the DVD or Blu-ray so they can stream straight off of the disk. There’s a small time delay in getting the data off the disk before you actually hear it, but for these types of sounds this isn’t usually a problem.
That step got rid of a bunch of stuff to free up our RAM. Now find a nearby object. In my case, I have a pen on my desk. So this pen is going to be an interactive pen in a game. Here’s a list of what I might want to do with it and the subsequent sound files I will need to record and load into RAM:
Pick up pen from desk, put pen down on desk:
penup.wav, pendown.wav
Drop pen onto desk:
pendrop.wav
Drop pen from different heights onto desk:
pendrop01.wav, pendrop02.wav, pendrop03.wav, pendrop04.wav
Scrape pen along desk:
Penscrape01.wav, Penscrape02.wav
Tap pen on desk:
Pentapsoft01, pentapsoft02, pentaphard01, pentaphard02
So far we have 13 wavs. Now for the interesting bit. Look around where you are sitting and see how many different surfaces there are. From my desk I can see the following:
Paper, diary, speakers, monitor, keyboard, plastic wallet, kettle, book, cardboard folder, carpet, wooden desk, metal shelf, big sack of cash, pony, Aston Martin DB9
So for each of these surfaces I’d need all of the preceding sounds:
13 sound types × 15 surfaces = 195
So we have 195 sound samples sitting in RAM for my pen. Now look around you and find the next object. See the problem?
To record the sound of every possible interaction of my pen with its immediate environment, my office, would probably be a lifetime’s of work. As the pen example shows, simply adding more sounds is not always the solution because (1) you will never have enough RAM (or disk space) to store them all, and (2) life’s too short. (PS: If anyone is interested in developing an interactive pen game, then go and see your psychiatrist.)
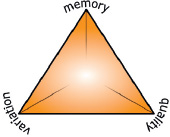
The Triangle of Compromise or “Triangle of Pain!”
To begin to look at some solutions to this quandary, let’s examine a useful concept from the industrial world. Imagine that you owned a factory that produced a revolutionary new gaming peripheral (a pair of “Reacto-Sound” glasses that automatically turn completely black whenever you get to an exciting part of the game—so that players can concentrate on how good it sounds). You’re talking to the distributor that’s hoping to get them into every corner shop in the country. Here’s what you might say.
• “You can have it fast and cheap, but it won’t be good because I’ll have to rush it and the quality will go down.”
• “You can have it made good and fast, but it won’t be cheap because I’ll have to employ extra labor to get it done quickly while maintaining quality.”
• “You can have it cheap and good, but it won’t be fast. I can maintain the quality standards without hiring extra people, but this will limit the speed of production.”
This can be represented by a triangle of the words “Good”, “Fast” and “Cheap”. The compromise is that you can only have two corners of the triangle simultaneously.
In terms of games audio, a similar triangle of compromise could be seen to apply. What we want is good-quality sounds, lots of variation in those sounds so that the game feels natural and we don’t get bored with the repetition, and that they fit into the truck. Sorry RAM.
• “You can have lots of variation with good-quality sounds, but this will take up lots of memory.”
• “You can have good quality sounds that will fit into memory, but there won’t be much variation as we can’t fit many of them in.”
• “You can have lots of variation within a small amount of memory, but the quality of our sounds would have to go down.”
To look at some solutions that might make this compromise less painful, we’re going to first need some understanding of digital audio. If you’re happy with digital audio, then please read on. It’s an important topic for game audio, so if you are not familiar with the principles of digital audio and sampling, or if you just want a quick reminder, then please turn to the online Appendix G: Digital Audio.
Squaring the Triangle: Basic Memory Saving Techniques
Before considering putting your sounds or music into the game, get the files in the best format and condition for doing so. Appropriate editing and sample rate choices for your sound files need to become second nature to you.
Here are the basics of keeping your sound files small. Before we even open their game level, we can tell quickly which of our students “get” game audio, and which don’t, just by looking at the sounds themselves. If you don’t demonstrate an awareness of these three basic concepts before you even put your sounds into the game, then you are guilty of schoolboy errors and will bring shame and humiliation upon yourself and your family for generations to come.
The Importance of Editing
Silence takes up the same amount of memory as sound. Get rid of what you can.
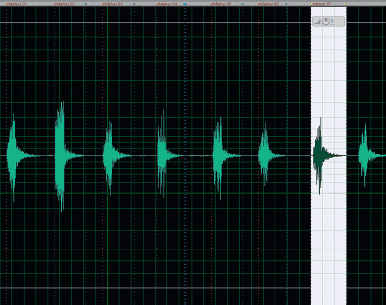
Look at the waveform of the two wav files shown here. They represent two different edits of the same sound.
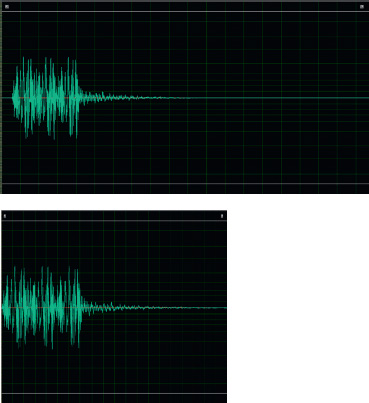
The first, the “schoolboy,” version is 34,688 bytes in size; the second, the “pro” version, is 17,576 bytes in size. They sound exactly the same. The only difference is that the first version has been lazily edited, leaving lots of silence in the file. Silence takes up the same amount of memory as sound. By trimming off the silence we’ve made a saving of nearly half. A saving of 17,112 bytes may not sound much to you, sitting there on your home PC with 6 GB of RAM and a 3-TB hard disk, but if you’re making a game for a mobile phone, it’s a different story.
If you’ve not done much audio editing before, then have a look at the online Appendix D: Audio Editing for Games for a quick introduction.
File Compression
The MP3 format has become synonymous with the ability to share small files over the Internet. In games audio, we want our files to be small too. There are some issues with MP3s in games, but there are plenty of alternatives that can save space while still sounding good.
We have looked at why CD-quality audio takes up about 10 MB of memory per minute (or at least we did if you did what you were told and read Appendix G). One way to help alleviate the compromises inherent in the “triangle of pain” is to make the files themselves smaller. Although in theory we need this memory to store this quantity of numbers, there are various methods by which we can actually make the file size smaller. These fall into two categories: “lossless,” in which no attribute of the sound is affected by the process, and “lossy,” in which the process does compromise the sound in some way.
The best known of these audio file compression methods, of course, is the MP3. This lossy format works on the principle of perceptual redundancy, using knowledge of psycho-acoustic principles to remove sounds (and therefore data) that are hard to hear, such as high-frequency sounds or sounds that are masked by other, louder, simultaneous sounds. The problem with many audio file compression formats, MP3 included, is that they take processing time and power to decode and are therefore rarely suitable for the kind of instantaneous playback required in games.
The good news is that both Microsoft (Xbox 360) and Sony (PlayStation 3) can use compression formats (XMA and Vorbis) that are appropriate for games and can achieve compression of up to 10:1.
In the Unreal Development Kit (UDK), right-clicking a wav from your package in the Content Browser will enable you to select Edit using Sound Previewer. Looking at the Vorbis Data Size column will give you an indication of the file savings possible.
Audio file compression can occasionally produce some unpredictable results or artifacts, so you should always check to see the impact on the final sounds in the game. After you’ve opened the Sound Previewer, you will see that it takes a moment to convert the files. Double-clicking on one of the sound quality settings in the Vorbis Data Size column will allow you to preview what it will sound like at this setting. Once you’ve decided on an appropriate setting, click OK to apply it to the SoundNodeWave. (In the current build, you will only be able to preview Vorbis compression). Warning: This quality setting defaults to 40 for all SoundNodeWaves. Even at this setting it can have noticeable effects on your audio, so don’t forget to check this setting for all your sounds.

Sample Rates
Lowering the sample rate of a sound can save huge amounts of memory. It can also ruin the sound. Learning to make the right choice of sample rate is a fundamental technique of producing game audio.
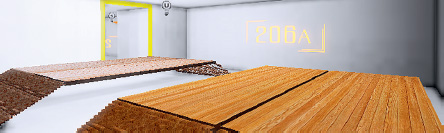
200 Triangle Room
Another way of making our sound files smaller is to reduce their sample rate.
In Room 200, go and “use” button A (key E to “use”).
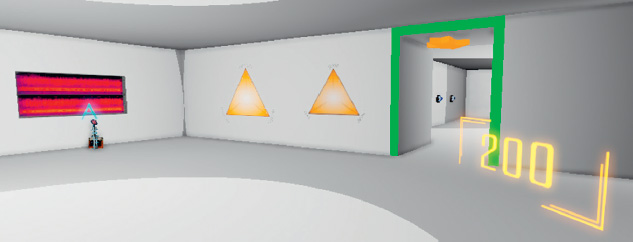
You should hear some crickets chirping along nicely. When you press the button again, you can hear another version of the crickets. This file is smaller because it has been downsampled. Press the button again and listen to the other versions. You can hear that the sound quality gets worse and worse.
Now walk up to button B; here is another sound, again followed by different versions and lower sample rates. This time, however, you will notice that although the sample rate goes down and the file gets smaller, the actual quality of the sound is not affected. What magic is this? Is there a way out of the triangle?
When discussing digital audio (Appendix G), we noted how we need to capture, or “sample,” a sound at twice its frequency in order to accurately reproduce it (as explained by the Nyquist-Shannon sampling theorem). In other words, to reproduce a sound containing frequencies up to 12 kHz you would need to sample it at 24 kHz. However, if your sound does not actually contain any frequency components at 12 kHz, then you can sample it at a lower rate (and therefore reduce the file size) without losing any quality.
Say we had 3 MB of memory to use (16 bit sounds):
A 44 kHz sample, taking up 88.2 kB per second, gives us 34 seconds
A 22 kHz sample, taking up 44.1 kB per second, gives us 68 seconds
A 11 kHz sample, taking up 22.05 kB per second, gives us 136 seconds
A 8 kHz sample, taking up 16 kB per second, gives us 187.5 seconds
So lower sample rates allow us to fit more sound into memory. You will, however, have heard the devastating effect that the wrong sample rate can have on the sound quality with the Crickets samples in Room 200, so you must carefully choose a sample rate that is appropriate to the frequency content of the sound itself.
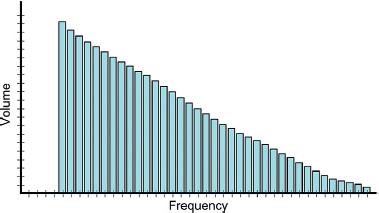
Let’s look more closely at sound A (the crickets) and sound B from this room. You can see that although the energy in the Crickets sample is focused around 6 kHz, it covers the full frequency range up to 22 kHz.

Downsampling to 22 kHz would indeed save half the memory (going from 369 kB to 186 kB) but would entirely remove the higher frequencies of the sound.
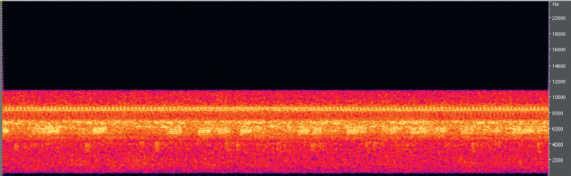
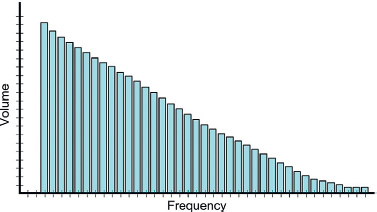
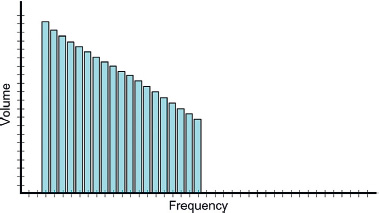
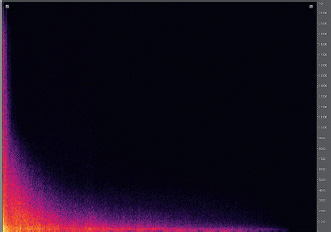
If we look at a frequency display of sound B (LowRumble01), we can see that most of its frequency content lies beneath 2 kHz. Therefore, this sound does not need to be sampled at a rate any higher that 4 kHz to be reproduced entirely accurately.
So the LowRumble01 sample will sound exactly the same at any of the sample rates we’ve chosen, and we will make significant savings in terms of the file size:
| Sample Rate | File Size |
| 44 kHz | 2,101 kB |
| 22 kHz | 1,050 kB |
| 11 kHz | 525 kB |
| 6 kHz | 285 kB |
(See online Appendix G: Digital Audio for more practical tips.)
Sample Rate Choices
Exercise 200_00 Sample Rate Room
In this exercise, there are two identical rooms. The first room is filled with [AmbientSoundSimple]s, but the overall file size for this room is too large. Using your knowledge of sample rates and file size, take the files provided in the exercise folder, downsample them appropriately (they are all at 44.1 kHz at the moment), then import them into the second room. Try to re-create the ambience of the first room as closely as possible but with as small a file size as possible.
Tips
1. Remember that to preserve the highest frequencies in the sound, the sample rate needs to be twice that of these frequencies.
2. Having said that, in a limited memory situation you can usually afford to lose a bit off the top end without affecting the nature of the sound too drastically.
3. Use your ears.
Speakers for portable consoles do not have a great frequency range, so there would be no point in using some sample rates for your audio (even the Wii is limited to 32 kHz output). If you get the opportunity, try running some white noise through the speakers of your platform and looking at the results. You may be unpleasantly surprised. These decisions are, of course, complicated by the fact that people can also switch to headphones, but when you look at the frequency response of most consumer headphones they’re not great either. (See online Appendix G: Digital Audio for some utilities that can help you to visualize the frequency spectrum of a sound.)
You should consider the playback medium that you’re developing for to inform your decisions on what sample rates to use. Also think carefully about the relative importance of the sounds in your game. Which sound will the player hear most often? Which sounds need to be at the highest quality? Sample rate choices are not always based solely on the frequency content of the sound. You might also decide on some specific rules regarding sample rates for different categories of sound.
In addition to using a frequency spectrum view (and your ears) to decide on the most appropriate sample rate for your sounds, you should also consider each particular sound’s importance within the game or how often the player will hear it. For example, the sound of glass smashing during each of 10 climactic boss fights might be preserved at a high sample rate. To achieve this effect, you may choose to lower the sample rate, and thus sacrifice the quality, of the distant background sound you hear only once in level 17d.
You might adopt a broad strategy such as the following:
44 kHz—High-frequency sounds of key importance to the game
22 kHz—Player weapon sounds
18 kHz—Dialogue
11 kHz—Distant ambience or room tones
Non-repetitive Design
Caveat—Sometimes repetition is OK
Our aim for most sounds in a game is that they are convincingly real (i.e., they respond in the way that we’d expect them to in the real world). This is a problem for many sounds, which in reality vary and change in subtle ways, but this does not necessarily apply to the same extent for all sounds. Sounds created by mechanical systems (for example, a weapon firing) are inherently similar each time they occur, as the mechanism producing them is the same, but we are also forgiving of repetition in sounds that carry meaning or convey information.
The chief criticism of game audio over the years has been its repetitive nature (this is not entirely our fault, as one of the fundamental traits of games is to make repeated use of a few basic mechanics). Sound sources that are varied in the real world can appear in games with one wav repeated over and over. Although we will devote a significant part of this chapter to avoiding this consequence, you should invest your time wisely by only applying these techniques to sounds that need it.
Repetition in Mechanical Systems
The first category of sounds that is less problematic when used repeatedly comprises sounds that are naturally repetitive, such as those created by mechanical systems. The majority of mechanical sounds will typically only have very small variations in their sound in the physical world, so overdoing the variation on these in games is (1) unrealistic (2) wasteful.
Repetition in Symbolic Sounds
The second category of sounds that you may wish to allow to be repetitive is made up of sounds that convey information in the game. This might be a pickup sound that tells you that you received an additional health or a bonus star powerup. The majority of the time these are symbolic sounds. Players need to be aware that the sound has occurred so that they can interpret its meaning. The nature of the sound itself does not provide any inherent information. We don’t want players to have to listen closely to the sound itself, we merely want them to be able to quickly acknowledge its meaning. Having variation in the sounds would be both confusing and distracting. See Chapter 6 for more discussion on this topic.
Reuse of Sounds: The Power of Pitch
Multiple Use Using Pitch Shift
When memory is important (and it’s always important), then try to use the same sound in different ways by changing the pitch at which it plays back within the game engine. The most obvious method is to use different pitched versions of a sound for different sizes of the same object, but you’ll also be surprised by how radically different things can sound when they are pitched up much higher or pitched down much lower. To reuse sounds and preserve memory, pitch shift is probably your greatest ally.
201 Pitch Shift 01: Multiple Use of the Same Sound: Size
In the physical production of sound, pitch is related to the size of the object. The larger or longer the pipe, the longer the string, the bigger the surface, then the deeper the pitch of the sound it produces. Given this fact, the most obvious application of using pitch shift to vary your sound file is when you have different sized versions of the same object.
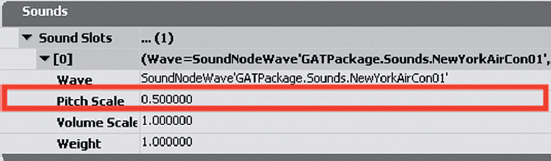
Take a look at Room 201. You can see that the same sound (NewYorkAirCon.wav) has been used for each fan. The pitch of this sound has been changed by using the Pitch Scale parameter of the [AmbientSoundSimple] properties.
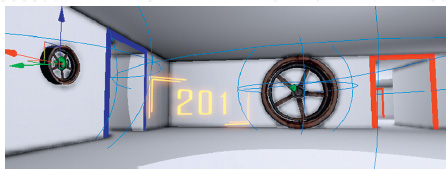
Small fan: Pitch scale = 1.8
Medium fan: Pitch scale = 1.0
Large fan: Pitch scale = 0.5
RS Writes:
The wonderful sounds you are hearing actually come from a recording I made of the air conditioning unit across the alleyway from a hotel room in New York. When I complained about the noise, the helpful manager suggested I try turning my own air conditioning unit on. “Why would I want to do that?” I naively asked. “To cover the noise of the other one,” he replied.
201a Pitch Shift 02: Multiple Use of the Same Sound: Character
In addition to changing the pitch for similar objects of a different size, sometimes a change in pitch can alter the sound’s character more significantly. If you’ve ever tried extreme changes of pitch in your audio editor, you know what a huge impact this can have on the nature of the sound itself. (The pitch shift in UDK works by playing back the sample faster or slower. Your digital audio workstation [DAW] may have other options.) Although the pitch shift range in UDK is relatively limited (one octave higher, at a pitch scale 2.0, to over half as low, at a pitch scale of 0.4), we can apply this method to reuse the same sample for different purposes.
In one corner of this room there is a group of chickens. In the other there is a group of rats. These are played back via two [AmbientSoundSimple]s, but both actually reference the same sound sample.
The original recording is of chickens. Because of the relatively restricted pitch shift available within UDK, it’s already been slightly pitched up in the DAW then played back at a pitch multiplier = 0.7 to get it back to its original pitch.
The Rats reference the same sound wav, but it is now played back with a pitch multiplier of 1.5.

If you’re working on a platform with relatively restricted embedded memory, or restrictions on the size of the download, then the ability to use pitch shift to change the character of a sound so it can be reused in different ways is a vital tool.
Exercise 201a_00 Multiple Use through Pitch Change
In this room you have several objects. Using only the sounds in the Exercise 201a_00 folder, ensure that each object has an appropriate sound. You will want to use pitch shifted versions of the sounds for large/small versions of the same object and also some more extreme pitch ranges to completely change the character of the sounds you’ve been given.
Tips
1. Use the Pitch Scale parameter within your [AmbientSoundSimple]s properties (F4).
2. Try to reuse the same samples so that you are keeping your memory footprint low.
Pitch Up/Play Down
To reduce the size of your sound file by half, you can pitch it up an octave in your audio editor (see Online Appendix D) before you bring it into the game editor. You can then use the editor tool to pitch it back down again. You will lose some quality, but it may be worth it if you’re really tight for memory space.
201b Pitch Shift 03: Pitch Up/Play Down

In addition to using pitch shift to change the character of a sound (making it sound smaller/larger or changing its character completely), you can also use it for a neat little trick to halve the file size of the sound you need to store in memory.
By pressing the button in Room 201b, you will hear three sounds:
1. The original sound (56 kB)
2. This sound after having been pitched up one octave in an audio editor (28 kB)

3. Sound number 2 again, but this time it uses the pitch change function within UDK to play it back down an octave, therefore re-creating the sound of the original (28 kB) (this example uses a SoundCue, which we’ll be coming to a little later).
If working on a game for a portable console or a downloadable game for a smartphone, these kinds of savings can be critical. The (nonscientific) diagrams that follow give you an idea of the losses. First is our original sample.
By taking it up an octave, we have a good chance of losing some frequencies at the top end.
But if we were to halve the file size by downsampling it to half the sample rate, the effects would be much worse.
Reuse of Sounds: Using Filters
Try using any DSP process your editor may include to change the sounds you hold in memory. For example applying filters to your sounds can change them significantly. This way you can make more use of the sounds that you hold in memory, perhaps using them multiple times in different ways.
202 Ambience + Filter
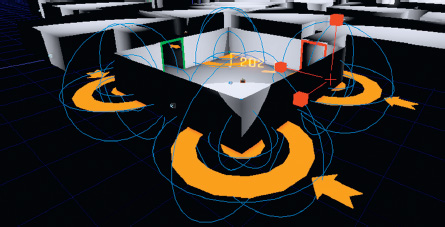
You’ll see that Room 202 uses [AmbientSoundSimple]s, but the sounds in the corners of the room appear to be different than that in the middle. As you have learned, the amount of memory you have to store sounds for games is always a problem, so here we have actually reused the same sound in all the [AmbientSoundSimple] Actors. You can see this by selecting their properties (F4), expanding the AmbientSoundSimple menu by clicking on it, and looking at the wave chosen in the SoundSlot. You’ll see that they all refer to the sound GATA_Sound.Mechanical.Aircon01.
The reason they sound different is that the central sound has had a low-pass filter applied to it. This means that the higher frequencies are removed, making the sound duller in tone (the low-pass filter allows the lower frequencies to pass through the filter unaffected). This gives us a low rumble room tone in the center of the room as well as the air conditioning sounds in the corners, all from one sound stored in memory.
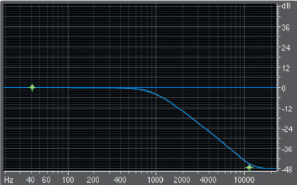
Function of a low-pass filter.
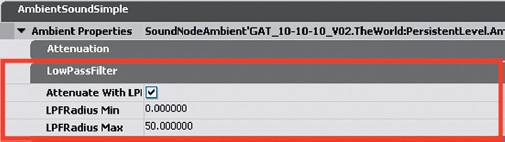
This property of the [AmbientSoundSimple] applies a low-pass filter fully at the given LPFRadius Max, gradually returning to an unfiltered version of the sound at the LPFRadius Min. In this instance, we have had to be slightly cunning and place the sound under the floor of the room so that the player never actually experiences the sound at the Min distance; therefore, the player never actually experiences the unfiltered version in the middle of the room.
Exercise 202_00 Multiple Use through Filters
In this exercise room, you’ll see that several dangerous gases are escaping from the pipes. Using only the sound Steamtest01.wav from the exercise folder, see if you can create a convincing ambience for the room and sounds for the different sized pipes.
Tips
1. Import and select the Steamtest01.wav file in the Content Browser, then right-click in the Perspective viewport and select Add Actor/Add AmbientSoundSimple (***).wav.
2. Edit the properties of the [AmbientSoundSimple]s you used (F4), and adjust the Low Pass Filter settings.
3. Remember to tick the check box Attenuate with Low Pass Filter.
4. Use a combination of filter, volume, pitch, and attenuation settings to derive variation from this one sound file.
Randomization in Time, Pitch, and Volume
Looping sounds are useful for room tones or machinery that is by nature repetitive. When we try to create in-game ambiences that are based on more naturally occurring sounds, the use of loops becomes a problem as we quickly spot them as feeling false and unnatural. We should save the disk space used by long loops for something better or more important. By re-creating ambiences through the random recombination of individual elements, we not only save on memory and avoid repetition but we also have more control over them.
203 Randomization: Pitch/Volume/Time

Apart from the obvious reuse of the same sample the main thing that will stop a game environment from feeling immersive and natural is any repetition of a series or sequence of sounds. These immediately jump out as being artificial. Imagine this scenario in the real world. A dog barks a few times, then a car door slams, somebody shouts, a helicopter flies overhead. If any of those sounds were to repeat but actually sounded pretty much the same (i.e., the same sample), then it might be unusual but you’d probably accept it. If they sounded again but with exactly the same timing in exactly the same order, then the next sound you might expect to hear would be from the big white van belonging to the men in white coats.
[AmbientSoundNonLoop] for Randomized Sounds
In Room 203 you can see that (finally) we have a new type of sound Actor. This is the imaginatively titled [AmbientSoundNonLoop] (and it’s friend the [AmbientSoundNonLoopingToggleable]).

The [AmbientSoundNonLoop] allows us to construct our ambience out of individual elements and adds aspects of randomization that give a more natural feel. These are much better at generating non-repetitive ambience, as they have a list of sounds that are played in a random order, at random time intervals (and can have random pitch and volume changes applied).
The Radius settings are the same as for the [AmbientSoundSimple] (shown now with red spheres), and at the bottom of the Actors properties is a list of SoundSlots. Here is where you can add a list of sounds to be randomly chosen.
If you listen in the area of the blue square floor tile, you can hear how the old [Ambient SoundSimple] would create this ambience. You can hear it looping around and around, and this repetition of the same sequence of sounds feels wrong and artificial. The red area creates the same ambience but this time it is randomized and so feels more natural.
In the red area, select one of the [AmbientSoundNonLoop] Actors. Go to its properties, expand the [AmbientSoundSimple] menu, and you can see that here the overall sound is created by the random playback of several individual sounds.
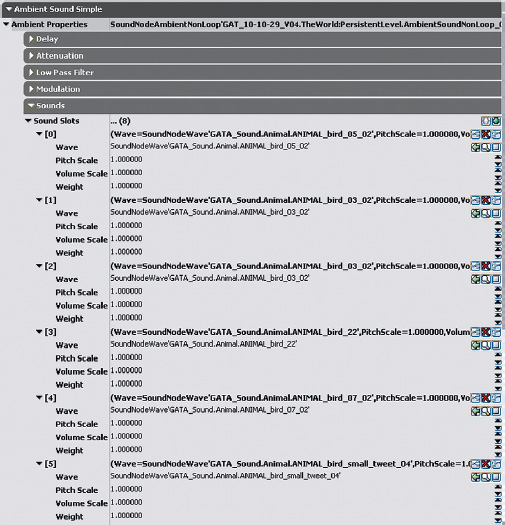
The Delay Min and Delay Max values control when the sounds are triggered. A random number between the Min and Max settings is chosen and used as a delay time between playing back the next sound from the SoundSlots. That is, if the Delay Min were 3 and Delay Max were 8, the sounds would not be triggered any more often than every 3 seconds, but you would also not have to wait any longer than 8 seconds. When this sound has played, a new random delay time is chosen and a new random SoundSlot selected.
The Weight component for each sound is important because you can use it to make certain sounds play more (or less) often than others. Currently they are all set to a weight of 1, so they all have an equal chance of playing.
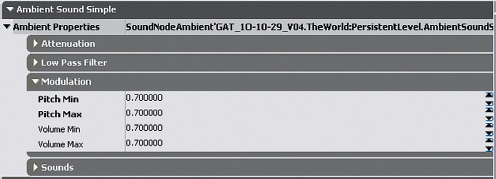
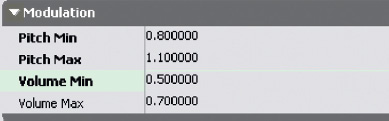
Now is also a good time to experiment with randomizing the volume and pitch of these sounds each time they play using the Modulation menu within the [AmbientSoundNonLoop] Actor.
Randomizing the time, pitch, and volume of sounds is a crucial method for building up non-repetitive ambient environments in games without the need for very long sounds in memory. Instead of taking up lots of memory with a long looping sound, we can re-create a more natural sense of random variation in the ambience by splitting it into individual elements and randomizing these. (Warning: Make sure you are only pitch-shifting in a subtle way sounds that would naturally have this kind of variation in them. Be particularly aware that this will not sound good if applied to voices!)
Exercise 203_00 [AmbientSoundNonLoop]: Wooded Area
Open the level Exercise 203_00. Here we are aiming for a more natural-sounding environment. Using [AmbientSoundNonLoop]s and the sounds from the Animal and Weather folders of the Sound Library, create a convincing audio environment for this location.
Tips
1. To add your own randomized [AmbientSoundNonLoop] Actor, go to the Content Browser and select the Actor classes tab.
2. Now select Sounds/AmbientSound/AmbientSoundSimple/AmbientSoundNonLoop.
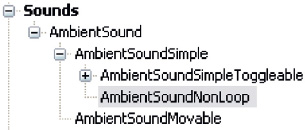
3. With this Actor still selected, right-click in your viewport to add it (Add AmbientSoundNonLoop here).
4. You will probably want to add several sound slots. In the Sounds menu you do this by clicking on the green plus sign.
5. Once you have added several slots, you can then select your sounds in the Content Browser and add them to the sound slots (using the green arrow in the normal way).
6. Now adjust the [AmbientSoundNonLoop]’s Delay Min and Delay Max settings to control how often the sounds are triggered.
7. You might also want to experiment with weighting (within the Sound Slots menu) if you want some sounds to appear more frequently than others. In addition to the [AmbientSoundNonLoop]s for randomized animal calls, have some [AmbientSoundSimple] loops for a background texture (wind etc.).
8. As well as setting the frequency with which the sounds play by using the Delay Min and Delay Max settings, try randomizing their pitch and volume levels a little using the Modulation settings. This will pick random values between whatever you set as the possible Min and Max values.
9. The most effective way to modulate pitch and volume for animal-type sounds is to have only small variations in pitch but larger variations in volume so that the sounds are varied but not too unnatural.
The related [AmbientSoundNonLoopingToggleable] Actor has additional controls to Fade in or Fade out to a given volume level. This can be useful in making your ambiences more dynamic or in fading them back a little once the location has been established (see the discussion in Chapter 06/Subjective Sound States).
Randomization in Time, Pitch, and Volume Using [SoundCue]s
In the immortal words of Brian Schmidt, “Anyone who still thinks there is a one-to-one relationship between a game event and a wav file just doesn’t understand game audio.” (Chris Grigg Project BBQ report 2001, http://www.project barbq.com/bbq01/bbq0185.htm). Most game editors will have a more abstracted layer for sound events. Rather than simply playing back one wav file, you are triggering a system that contains wav files. In UDK, this system is called the [SoundCue].
Most of the interactive sounds we’ll be dealing with from now on do not simply play wav files like the [AmbientSound] Actors. They play [SoundCue]s, which you can think of as a system of playback, rather than the playing back of a single sound.
You may find it useful at this point to use the search bar in the Content Browser. To see what [SoundCue]s already exist, select the Content folder within the Content Browser Packages menu.
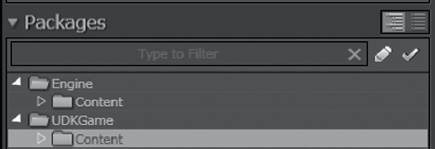
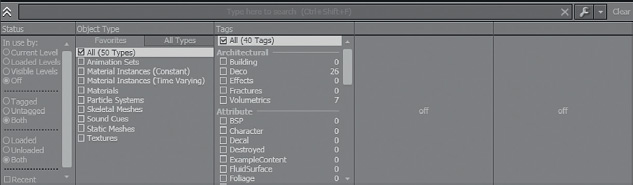
You can now use the check boxes in the Search Filter section (shown next) to define the type of asset that you are looking for so that only those are visible. You can also type your search words into the top box.
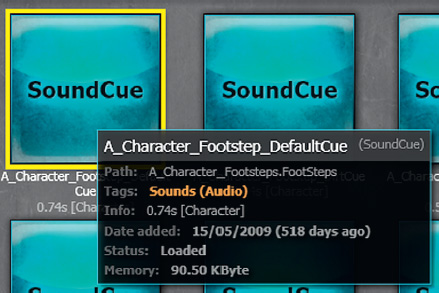
Search for the [SoundCue] A_Character_Footstep_DefaultCue using the text search box at the top. If you repeatedly double-click on the [SoundCue], you can hear that it actually swaps between three different footstep wavs.
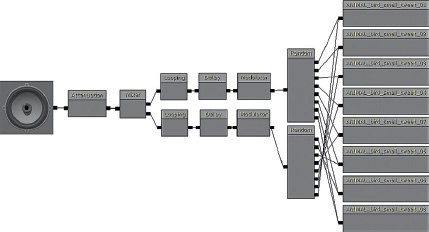
You can take a look inside this [SoundCue] by right-clicking and selecting Edit Using SoundCue Editor. Inside your SoundCue editor you will see the Audio Node Graph, which is where the different objects, or nodes, can be linked together to form systems.

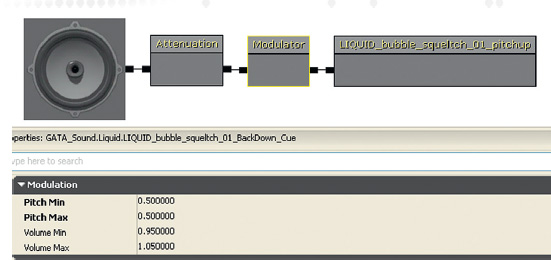
Like the systems in Kismet, [SoundCue]s are constructed by adding objects, and then chaining them together with wires. The systems operate from right to left and the objects within the [SoundCue] are referred to as nodes. In this case, the [Random] node is randomly selecting one of the sounds to play; this then has some slight variations in pitch and volume introduced by the [Modulation] node; finally the sound is attenuated and spatialized using the [Attenuation] node before going to the [Speaker] node, which contains the overall pitch and volume multipliers. This is useful for non-repetitive design. Instead of playing the same sample each time, we can randomly pick from a few and we can also modulate them in pitch and volume to create variation without necessarily needing many sounds in memory.
To add any of the various nodes available to your [SoundCue], right-click and choose them from the menu that appears. You can then drag the objects/nodes around the screen by clicking on them while holding down the Ctrl key. Try this in the A_Character_Footstep_DefaultCue you just opened.
Try adding a few nodes now (from the Right-Click menu) and linking them together by dragging wires to link their inputs and outputs. You can also break or change these wires by right-clicking on an input or output and choosing Break Link, or by Alt-clicking on them.
Delete any nodes you added to reset any changes you made to the A_Character_Footstep_ DefaultCue [Soundcue] before exiting. Now open some others to get an idea of how they work. To preview the [SoundCue] with the SoundCue editor, you can use the Play SoundCue button at the top of the screen.
![]()
You can also choose to preview a particular section or node of the [SoundCue] by choosing the Play Selected Node option.
![]()
Advantages of Using [SoundCue]s
Using multiple references to one sound system is a good time-saving strategy. If all of the trees in your level reference the same Birds_and_wind_Sound_System, then by making small adjustments to the one system or cue, all of the instances are updated. This is better than having to go around the level for hours tweaking each individual instance by hand.
The advantage of using [SoundCue]s is that we can use these multiple times throughout our level, and if we don’t feel it’s quite right we can adjust or change the [SoundCue] rather than having to go around and individually adjust each [AmbientSound] or [AmbientSoundNonLoop]. Any changes you make to the [SoundCue] will be applied to all instances.
[AmbientSound] Actor for Noninteractive [SoundCue]s
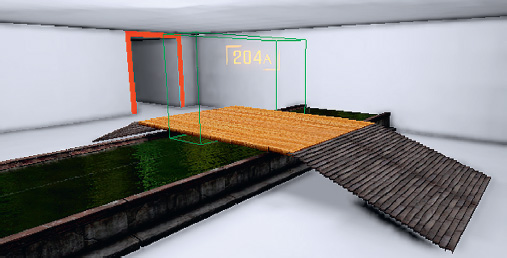
204 Reuse of Sound Cues
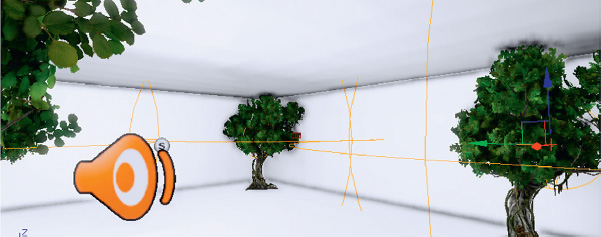
Room 204 is a good example of where you might want to use multiple instances of the same [SoundCue]. There are several trees in this area, so we can use the same sound cue for each. We could of course do this with an [AmbientSoundNonLoop] and copy it for each tree, but if we then wanted to adjust the timings or weightings, we would have to do this for each instance. By using a single [SoundCue], any adjustments made to this cue will be instigated wherever it is used.

In this room you can see that a new [AmbientSound] Actor has been used to play back the [SoundCue]s. As long as they include an [Attenuation] node and reference mono sound files [SoundCue]s played back via an [AmbientSound] will emit from the position of this Actor in the level. The sounds from this object will be either one shot or looping depending on the contents of the [SoundCue] selected.

Note that the [SoundCue] for the bird sounds in the trees is not simply playing a looping wav of bird sounds but instead is made up of individualized elements. These are played back using the principles for simple non-repetitive design outlined earlier (i.e., single wav elements are played back at random time intervals with randomized pitch and volume adjustments).
Exercise 204_00 Adding a SoundCue
Here is a simple outdoor area with some trees. Add a [SoundCue] directly to this level using an [AmbientSound] Actor and then reuse the same one for the other trees.
Tips
1. Navigate to the [SoundCue] GATA_Sound.Animal.Bird_Tweets_Reusable. (Either find it via the path given in the name or use the search toolbar of the Content Browser).
2. With this [SoundCue] selected in the Content Browser, right-click in the Perspective viewport and select Add Actor/Add AmbientSound: Bird_Tweets_Reusable.
3. You can copy this item by making sure the Move widget is selected (cycle through them with the space bar until the Move widget with arrows appears). Now hold down the Alt key while you select one of the arrows and drag with the mouse. This way you will make a copy and retain the correct references to sound files and settings.
4. Out of interest now try changing the [SoundCue] that this [AmbientSound] references.
5. Open the [AmbientSound] properties (F4) and use the green arrow within its Audio menu to attach whatever [SoundCue] you currently have selected in the Content Browser.
6. Note that unless the [SoundCue] you have chosen has a Looping object, then it will play once and stop.
Nodes and Functions within a [SoundCue]
We’ll be dealing with each of these elements in the following exercises, but for the moment here’s a list of the nodes available within the [SoundCue] and a brief description of what they do.
[Speaker]
This isn’t strictly a node because it contains the global properties of the [SoundCue] itself. Here you can set the overall volume and pitch multipliers together with the max concurrent play count (see the section titled “Voice Instance Limiting and Prioritization” in Chapter 6) and information relating to facial animations.

[Attenuation]
This node determines how the sound will attenuate over distance and spatialize. If your [SoundCue] has an [Attenuation] node, then you can also access these settings from the properties (right-click) of the [SoundCue] in the Content Browser.
[Concatenator]
This node will chain together a series of sounds attached to its input. As soon as the first has finished playing, it will play the next input and so on.
[Delay]
This node produces a time delay that can be randomized between min and max settings.
[Distance Crossfade]
Two or more sounds can have volume envelopes applied depending on their distance from the sound source.
[Looping]
This node will loop whatever enters its input a fixed, random, or indefinite number of times.
[Sound Node Mature]
This node designates the sound as belonging to the “Mature” category for age-appropriate reasons.
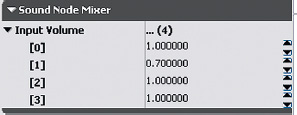
[Mixer]
The volume level of two or more inputs can be set using this node.
[Modulator]
This node can vary the volume or pitch of a sound with fixed or randomized settings.
[Continuous Modulator]
This node can be used to vary the pitch or volume of a sound in response to game variables such as the velocity of vehicles (see Chapter 7).
[Oscillator]
This oscillator can be applied to the pitch or volume of a sound.
[Randomized]
This node will randomly choose between two or more inputs to play.
[SoundnodeWaveParam]
This parameter refers to the sound sample or wave itself and uses the name of the SoundNodeWave when you add it to a [SoundCue].
[SoundCue]: [Attenuation]
You may have noticed that the [AmbientSound]s in the trees in Room 204 have their attenuation Radius Max marked by an orange circle, rather that the usual blue [AmbientSoundSimple] or red [AmbientSoundNonLoop]. Unlike these two Actors the [AmbientSound] attenuation and spatialization is set within the [SoundCue] it references, not within the Actor itself.
The [Attenuation] node within the [SoundCue] works in the same way that you’ve come across in the [AmbientSoundSimple]s.

When a [SoundCue] is placed directly into a level via an [AmbientSound] Actor, you can see its attenuation marked as orange circles. These are not adjustable in the level and do not always immediately update when you make changes within the [SoundCue]. It’s useful with these to use the middle mouse button technique for measuring distances in the level mentioned earlier.

Another reason we need [SoundCue]s is that these are the only types of sound that can be triggered by Kismet’s [PlaySound] object in response to game actions and systems.
[SoundCue]: [Random]
204a Soundcues 01
As you cross over the dangerous-looking liquid in this room, you should hear the creak of the wooden bridge. You will note that this does not always play the same creak sound. Navigate to the GATA_Sound.Collision package to find the [SoundCue]COLLISION_wood_creak_cue.
If you right-click the COLLISION_wood_creak_cue [SoundCue] and select Edit using SoundCue editor, you can see how it works.

Within the [SoundCue] you can select the nodes, and their properties will appear in the window below. Select the [Random] node. When the [SoundCue] is triggered, the Random node chooses randomly from any sound that is connected to one of its inputs. (You can create additional inputs by right-clicking the [Random] node and choosing Add Input.) The sounds can also be weighted to increase or decrease the chances of a particular one being chosen.
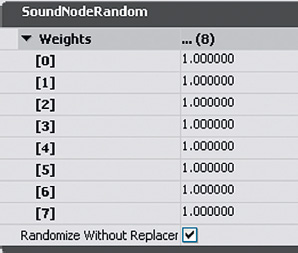
The “Randomize without replacement” option is a particularly useful one. This will keep track of which sounds have been played and randomly choose between only the sounds that have not been played recently. This is useful not only for avoiding the distraction of the same sound being played twice in succession but also for spacing out the repetition of sounds. For example:
1. The [Soundcue] is triggered and sound 3 (out of a possible 1, 2, 3, 4) is chosen and plays.
2. The [Soundcue] is triggered again, but this time the [Random] node will only choose from sounds 1, 2 and 4. Sound 1 is chosen and plays.
3. The [Soundcue] is triggered again. This time the [Random] node will only choose from sounds 2 and 4. Sound 4 is chosen and plays.
4. The [Soundcue] is triggered again and sound 2 is chosen to play. The [Random] node then resets itself so that all sounds are once again available.
This system is sometimes referred to as random cycle down in other engines to describe the random choice cycling down each time through the samples left available. Using this randomize without replacement technique is another key principle in non-repetitive design.
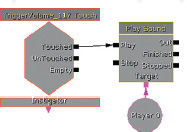
This [SoundCue] is called from a [PlaySound] action in Kismet (right-click/New Action/Sound/PlaySound). As one of the fundamental sound playback mechanisms in UDK, you can imagine that we will be seeing considerably more of this object as we go on. This [PlaySound] is triggered in Kismet from a [TriggerVolume] in the center of the bridge. At the moment the [PlaySound]s target is the player (right-click/New Variable/Player/Player), but as we will find out later, you can actually target any Actor in the level to be the point of origin of a sound in the level.
Exercise 204a_00 Randomized Spooky One Shot
Open Exercise 204a_00. The aim of this exercise is to create a randomized spooky sound when the player enters the inner room. You can use your own sounds or try the ones from the Sound Library Spooky folder.
Tips
1. You can see that there is a [Trigger] placed in the doorway leading into the inner room. This [Trigger] needs to respond to touch (i.e., when the player collides with it). With the [Trigger] selected open up Kismet (using the K icon from the top toolbar), right-click in an empty space and select New Event Using Trigger (***))/Touch.
2. With this event selected, change the value of its Max Trigger Count (from its Properties/Sequence Event Menu) to 0. This means it can be retriggered an infinite number of times.
3. Connect the Touched output of this event to a [PlaySound] (New Action/Sound/PlaySound or hold ‘S’ and left click in Kismet) and attach the target of the [PlaySound] to the [Player] (New Variable/Player/Player).
4. You now need to create a [SoundCue] to add to your [PlaySound].
5. From the Content Browser select New (bottom left). Choose the [SoundCue] from the Factory menu and use either one of your existing packages or create a new one. If you are in Thumbnails view in the Content Browser, you can also right-click to create a new [SoundCue]. It’s a useful habit to put the word “CUE” in the name.
6. Within your new SoundCue editor window, right-click and choose the [Random] object. By holding down Ctrl and clicking on them, select a few spooky sounds in your Content Browser (try the GAT_A_Spooky package), right-click in the [SoundCue], and choose the top option, SoundObjectWave: (your sounds). (You might want to change your search filter object type in the Content Browser so you can see only sound wave data.)
7. Connect your [Random] object to an [Attenuation] object then finally connect this to the [Speaker] node.
8. Preview your [SoundCue] before exiting the SoundCue editor and saving your package. Your new [SoundCue]s will not work until you save their packages.
9. Now select your new [SoundCue] in the Content Browser, open Kismet, and add it to the [PlaySound] object you created earlier using the green arrow in its Properties/Seq Act_Play Sound menu.
While using [Random] is good for avoiding repetition and creating variation and [Attenuation] is necessary for spatializing the sound correctly, they do not directly address our outstanding concern, which is to produce a nonrepetitive design within a given memory constraint. Fortunately, there are other nodes that do help in this regard, the most fundamental being the [Modulator].
[SoundCue]: [Modulator] for Variation
Like the settings in the [AmbientSoundNonLoop], the [Modulator] node within a [SoundCue] can add randomized variation to the sound files by altering their pitch or volume.

Each time the [Modulator] is called, it will pick a randomized value between the values you set for the minimum and maximum. In this instance, the pitch will not go further than the 0.4 to 1.05 range, and volume will vary between 0.1 and 1.0 of the full volume.
Exercise 204a_01 Randomized Spooky Ambience
Exercise 204a_01 is a replica of Exercise 204a_00. This time, however, you’re going to create a nonrepetitive spooky atmosphere rather than just a one shot sound.
Tips
1. Open the [SoundCue] you made earlier.
2. This time add a [Looping] and a [Delay] object.

3. Try swapping your current sounds for some others. A useful shortcut for adding sounds is to select them all in the Content Browser, right-click in the SoundCue Editor, and select Random: (your filename). This will actually insert all the sounds you have selected already pre-wired into a [Random] object.
4. For the moment, set the [Delay] object’s properties to 5 seconds for both Min and Max.
5. When you’re done, save your package.
6. Now use an [AmbientSound] Actor to play the [SoundCue]. With your SoundCue selected in the Content browser right-click in the level and select Add Actor/Add Ambient Sound: (***). (Or you can add an [AmbientSound] from the Actor Classes, then add your [SoundCue] to this.)
7. If it’s Auto Play is enabled (it is set by default) then it will begin immediately on the start of the level and be heard over whatever distance you apply in the [Attenuation] settings of the [SoundCue]. As you have a [Loop] in your [SoundCue], it will continue to play sounds at intervals designated by the [Delay] node.
Exercise 204a_02: Reuse of Randomized [SoundCue]s
For this exercise we’re going to re-use the natural ambience area of exercise 203_00. Try re-creating the ambience of animal noises that you created using [AmbientSoundSimple]s and [AmbientSoundNonLoop]s, only this time do it with a [SoundCue]. You’ll find that now you can use the same [SoundCue] around each tree, rather than having to re-create a new [AmbientSoundNonLoop] for each.
Tips
1. Import your own sounds or use some from the Sound Library/Animals folder.
2. Don’t forget the shortcut to add multiple selected waves to a [SoundCue] at once (with or without being attached to a [Random] object). Select multiple sounds in the browser, then right-click in the [SoundCue]. You have a choice to “add” or “add with attachment to random object,” and this will add all of the SoundNodeWaves you have currently selected. (There is also a function available from the Batch Process menu (right-click on a package or group) that does something similar. Cluster Sounds or Cluster Sounds with Attenuation will auto-create a [SoundCue] from consecutively named SoundNodeWaves (Sparkle01.wav, Sparkle02.wav, etc.) within a package or group (attached to either a [Random] or a [Random] and [Attenuation] node). We mention this just out of completeness as the preceding method (of just selecting multiple wavs, then right-clicking in your [SoundCue] to add them all) is actually quicker in the majority of cases.
You can automatically create [SoundCue]s when importing sounds. (See Appendix C: UDK Tips, “Importing Sounds.”)
The Combinatorial Explosion: Vertical Combinations
You don’t need thousands of sounds in memory to get thousands of different sounds out of your system. By combining sounds in randomized ways, you can create new combinations and therefore new sounds.
So far we’ve looked at using pitch, simple filters, volume, and time variations to create variety in our sounds without increasing their memory footprint. Another productive method is to use [SoundCue]s to randomly combine the sound elements we have. This will produce new combinations and therefore new sounds.
For example, if you had three sounds in memory you could hear the following:
Sound 1
Sound 2
Sound 3
Sound 1+Sound 2
Sound 1+Sound 3
Sound 2+ Sound 3
Sound 1+Sound 2+Sound 3
This will give us seven different combinations and seven different sound possibilities.
Suppose we had five sounds in memory:
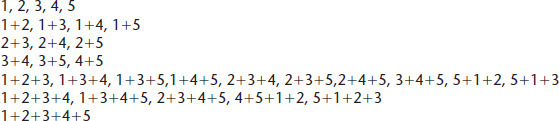
This would give us 31 different combinations. Seven sounds would give us 127, Ten would result in a possible 1,023 combinations.
(To find out the number of possible permutations, use 2 to the power of your number, then take away 1 [because playing 0 is not useful when it comes to sound]. On your scientific calculator, press 2, press the x^y button, then enter the number of sounds you have. Then take away 1. Then dazzle everyone with how clever you are.)
Layering for Variations (Explosion/Debris)
205 Explosion/Debris
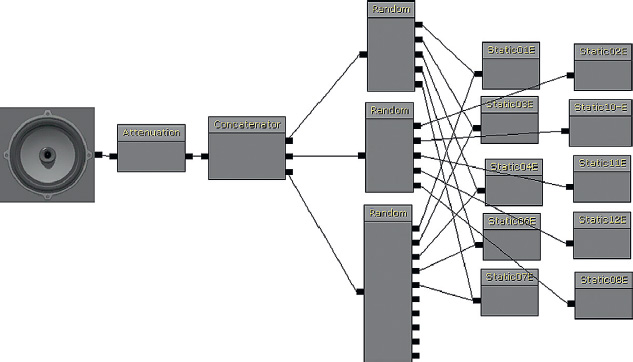
As you enter this bunker, an enemy artillery attack starts on your position. This consists of four explosion sounds, and three falling debris sounds. The explosion sounds can be layered in any combination with each other so, combined with the random debris sounds, this gives us 127 possible combinations (i.e., 127 possible sounds).
The combination of these sounds is taking place inside the [SoundCue] ExpDebris01 from the GATA_Sounds/Explosion package. If you open this in the SoundCue Editor (use the search box in the Content Browser then right-click the [SoundCue]), you can see that the [Mixer] node has been used to mix these randomly chosen sounds. This node allows you to control the relative volume levels of its inputs (right-click the node to add further inputs).
You can also see that there is a [Delay] node for the debris sounds so that they happen after the main explosion. The [Delay] node is generating a randomized delay amount, thereby further varying the combination of sounds. Finally, a [Modulator] node varies the pitch and volume slightly for further variation and an [Attenuation] node controls how the sound is heard over distance.

You could extend this system by having a [Modulator] for each individual sound element for greater variation. If this system were replicated within Kismet using separate [SoundCue]s, you could also have specific control over the volume of each element. This might be useful if you wanted a basic explosion system that could be varied by recombining individual elements according to what size the explosion was or what materials were involved.
You can also see how such a system of recombining elements could also be applicable to melee weapon impacts—creating a lot of variation in what are very repetitive motions (for your typical boxing or hack-and-slash game) without needing the large memory resources of dozens of sounds.
Exercise 205_00 Layering for Variation
You are working on a fighting game where players can enjoy fruitless hand-to-hand combat. Create a [SoundCue] that plays new variations for each punch.
Tips
1. [Trigger] your [SoundCue] so that when you walk up to the robot and press “Use,” it fires off a punch sound [PlaySound]. Create a [Trigger] around the bot (right-click/New Actor/Trigger), then right-click in Kismet and choose New Event Using Trigger (***)/Used. (Also link this to the existing bot animation we’ve already put in the exercise.)
2. Use your own sounds or sounds from the Collision folder in the Sound Library.
3. Create a [SoundCue] and use a [Mixer] to combine the outputs of several [Random] objects.
4. Experiment with adding [Modulators] and short [Delays] (with random Min/Max) to add further variation to your sounds.
The Combinatorial Explosion: Horizontal Concatenation
The process of recombining sounds to generate new variations can also be done in a horizontal way by changing the order in which segments of sounds are chained together.
Concatenation: Radio Crackle
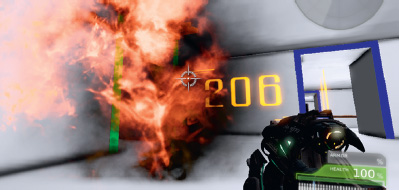
206 Concatenation Room: Radio Chatter
Every time you press the button in this room you can hear some radio crackles and a speech sample advising you to “Try again.” Every time you do this you will likely notice that the radio crackles are slightly different. Instead of having 30-plus different sounds for this operation held in memory, this process is actually generated from 10 sounds of less than 0.4 seconds long to create new variations on the fly. The total file size is 139 kB.
The chaining together of events, one after another, is referred to as concatenation. You can see from the radio crackle [SoundCue] that a [Concatenator] node is used within the [SoundCue] to chain up the different pieces of the radio crackle in a randomized order. You can add as many inputs as you like to the [Concatenator] (right-click/add input), and when the first has finished playing it will play the next and so on. (The [Concatenator] also has a volume control for each input).
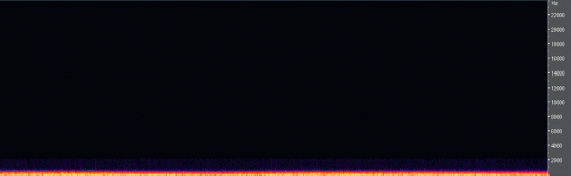
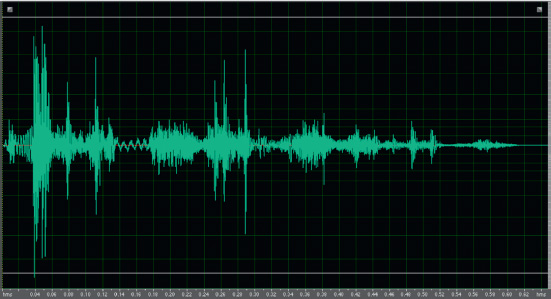
The image below represents the original recording of the radio crackles.
![]()
This recording was then edited into smaller sound files. (See Appendix D for editing tips.)
![]()
These small chunks are then reordered on the fly using the [Concatenator] node. For example:
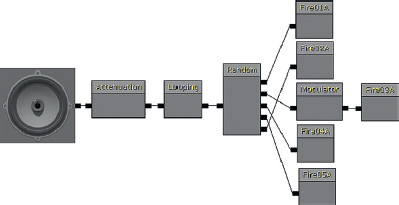
206 Concatenation Room: Fire
In Room 208 you can see a similar method adopted for a variable fire sound. Again, this is produced by randomly ordering five samples of less than a second long. You’ll note that one of the fire crackle samples also has some slight modulation on it to vary the pitch.
Concatenation: Footsteps
206a Concatenate Footsteps
One of the sounds that players will hear most in many games is the sound of their own footsteps. Although arguments rage (at least among game sound designers) about why these remain a particular problem (see the discussion presented later in the “Footsteps” section), we can increase the variation of these sounds by adopting the concatenate method just described.
Most footsteps when walking consist of two parts: part a, when your heel touches the ground, and part b, when your toes or the flat of your foot at the front touch the ground. With careful editing you can separate these two elements so that we have more possible sound combinations without increasing the memory required.
In this illustration, there were four original samples of a footstep on wood. These were edited into Heel/Toe sections (a and b). Each time the [SoundCue] is called, it will randomly choose one of the heel sounds, then randomly choose one of the toe sounds. Instead of playing back the four original heel + toe sounds, this system will give us more variation.
Original sounds:
1 (a + b), 2 (a + b), 3 (a + b), 4 (a + b)
= 4 possible footstep sounds
After concatenation:
1a – 1b, 1a – 2b, 1a – 3b, 1a – 4b
2a – 1b, 2a – 2b, 2a – 3b, 2a – 4b
3a – 1b, 3a – 2b, 3a – 3b, 3a – 4b
4a – 1b, 4a – 2b, 4a – 3b, 4a – 4b
= 16 possible footstep sounds
Exercise 206a_00 Broken TV Robot
In this game scenario the player is dealing with a recalcitrant robot. Unfortunately, it doesn’t speak English, just a series of beeps and bloops. So that it doesn’t reply in the same way each time you need to randomize it’s sounds. The wav you have been supplied with in the exercise folder is BrokenTVRobot.wav.
Tips
1. Open the BrokenTVRobot.wav in your sound editor (see Appendix D for tips on editing). You’ll see that it consists of a number of individual peaks with gaps in between. This makes it ripe for a concatenated approach.

2. Mark out the separate sounds and then save each as a separate file.
3. Create a [SoundCue] that concatenates these individual elements in a random order.
4. Create a [Trigger] “used” around the robot in the level to trigger your [SoundCue].
5. Perhaps extend the variation by trying [Modulation] or [Delay] objects in your [SoundCue].
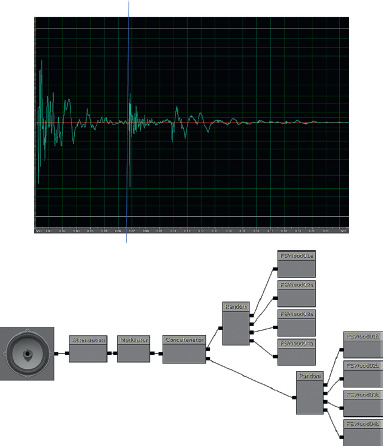
Concatenation: Multiple Sample Rates
206b Concatenation: Gunshots
We have discussed how it is possible to save memory by resampling our sounds at an appropriate rate given their frequency content. When looking at certain sounds in detail (in this example, a gunshot), it is clear that their frequency content varies considerably over time.
Here you can see that the part of the sound containing high frequencies is isolated to the first 400 milliseconds. After that, the remaining tail is mostly composed of low-frequency content. If we could chain these two together, then we could actually save the files at different sample rates because the latter part does not need to be anywhere near the same sample rate as the first.
The original weapon sample was at 44 kHz and was 397 kB. The initial part of the sound (referred to as the transient) is kept at 44 kHz (now 77 kB). The tail is resampled to 15 kHz (as it has little frequency content above 7.5 kHz) and is now 108 kB. The final file size for both combined is 185 kB—less than half the size of the original (397 kB) yet with little significant audible difference.

By pressing the switch you can compare the sounds:
1. The original 44 kHz sound file
2. The transient only
3. The tail resampled to 15 kHz
4. The new transient and tail recombined using a concatenated [SoundCue]
In circumstances where the memory is tight, this can be a very effective way to reduce file sizes. (For advice on visualizing the frequency content of your sounds, like in the preceding diagrams, see Appendix G.)
Exercise 206b_00 Concatenation of Multiple Sample Rates
Your producer has added the sound of her favorite dog whining to the game sound track as one of the creature sounds for your latest PSP game. The producer insists that it “works really well,” and because the deadline for the game beta is tomorrow morning, you should “try to find savings elsewhere.” Look in folder 206b_00. You will see several samples. Open these in your audio editor and examine the frequency over time of each sample. Is there a way to save some file space here?
Tips
1. Look at the frequency content of these files. Many of these files could be edited into two or more separate files, saved at different sample rates, and then concatenated back together in the game.
2. Make two [SoundCue]s for each, one with the original sound, and then a copy with a downsampled and concatenated version. Make a note of the memory you’ve saved.
3. Add a series of [Triggers] (used) to exercise room 206b_00 to illustrate the original then smaller sounds. You could use a multi output switch like the one in the tutorial room 206b. Add a button static mesh in the center of each [Trigger] to see where they are in game.
4. Punch a wall, not your producer.
Multiple Start Points
In some engines you can set markers within the wave file itself to have multiple possible start points—a little like what you could do with a concatenation system but without the hard work of chopping them up!
The sample that follows (of rocks falling) could be played all the way through. It could also be played starting at Marker 01, or Marker 02, Marker 03, or Marker 04. Each would have a different sound. If your audio programmer is very friendly, you might even be able to designate “end” markers as well; or if you have an envelope control, you could make the playback fade out before the end.

If you have a system like this available to you, then you will usually be asked to add the markers to your audio files in your audio editor. Wav files contain a header, which holds this information so that your programmer can access it. Talk to your programmer about their particular requirements for this.
Some DSP
As we mentioned earlier when discussing filters, you should use whatever digital signal processing (DSP) is available to create variations on the sounds you have rather than simply putting more sounds in memory.
Envelopes
207 Waves Envelope
In this room you should hear the gentle rise and fall of waves at the seaside (plus some randomized gulls). The waves vary in length and intensity but are all actually produced from the same sound source—a burst of brown noise (like white noise but with a 6 dB per octave low-pass filter roll-off).

This source is varied by using the Fade In and Fade Out values of the [PlaySound] object.

Many objects in Kismet have variables available that are not immediately apparent from the default outputs on the object itself. A variable is basically a number (or other parameter) that can be changed. If you right-click an object in Kismet, you get a list of the other variables it’s possible to expose.
By default the [PlaySound] object only has its Target variable (where the sound will emit from) exposed. Right-clicking will show you the others that it is possible to access.

In the Kismet system for Room 207, you can see that the “Fade In Time” and the “Fade Out Time” are exposed. The system uses a [Random Float] variable to alter these (right-click in Kismet: New Variable/Float/Random Float) to play the sound with a randomly generated fade-in length. As this happens, a [Delay] node (lasting the same length) is started. When the fade-in time has been counted, the [Delay] sends out a signal to stop the [PlaySound] object. When a [PlaySound] object receives the command to stop, it will start fading out (according to its fade-out value).

When the Stopped message leaves the [PlaySound] object, a new random variable is calculated to determine the fade-out length. This number also powers the delay that waits until the fade out is complete (–0.4 seconds so the sounds doesn’t drop to complete silence before starting again) before restarting the whole system for the next wave.
This system is also aided and abetted by the [SoundCue]’s pitch and volume variation. The use of randomized fade-in and fade-out lengths for a [PlaySound] allow you to alter the volume envelope of a sound to get a huge range of variation from one sound file in memory.
Exercise 207_00 Envelopes
This is the engine room of the Orbitron, the most sophisticated ship in the galaxy. At the moment there are several layers of sound looping around to produce the sci-fi-based sounds of the ship’s engine.
You need to make the ship feel more alive by adding movement and variation to these engine sounds.
Tips
1. Expose the Fade in and Fade Out variables of the [PlaySound]s from the right click menu.
2. Give them a [Random Variable] (right-click/New Variable/Float/Random Float) to create varying volume envelopes for the sounds in this room. (Note that these changes will only apply each time you trigger the Play of the [PlaySound])
3. Link the Finished output of these [PlaySound]s back to their Play inputs so they retrigger. (If you’re getting more confident also try a randomized [Delay] object).
Oscillators: Volume for Wind
208 Wind Oscillator
In Room 208 you can hear some wind that gradually sweeps up and down. In fact, the original sound itself is simply white noise. The variation in its volume is produced by using the [Oscillator] node within the [SoundCue].
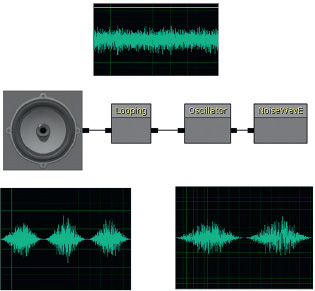
An [Oscillator] produces a continuously changing variable around a central value. In this case the oscillator uses a sine wave curve to determine the change in values over time. The [Oscillator] node in the [SoundCue] has a variable frequency (how often the oscillator cycles around), and so you can get a changing variation in the volume (or pitch) of the sound over time.
Because of the way our ears respond to frequencies and the volume of a sound, this not only has the effect of making the volume of the noise go up and down but there also appears (to our ears) to be a change in the spectral content on the sound. This is useful for noise-based sources such as wind and waves.
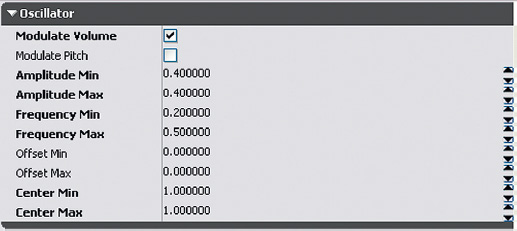
Modulate Volume/Modulate Pitch. Choose to modulate either or both.
Amplitude Min/Max. This is the amplitude of the oscillator’s modulation (following a sine wave pattern).
The wave is centered by default at around 1.0, so if this amplitude were set to 0.5 you would get a range of values from 0.5 to 1.5. There is both a min and max setting so you can also randomize this parameter between those two values.

Center Min/Max: You can offset the center of the modulation so that, for example, the sound does or does not drop to complete silence when at the lowest point of its cycle.
Frequency Min/Max: This value is twice the frequency of the sine wave’s modulation in Hertz. Again, the Min/Max designation is for the randomization of this value.
Offset Min/Max: Where the sine wave starts in its cycle is referred to as “phase.” This offset value allows you to shift the phase of the cycle. This value is multiplied by 2*Pi. Min/Max fields are for randomization.
In the case of the wind example, the amplitude will cycle from between 0.6 (center value 1.0 – 0.4) and 1.4 (center value 1.0 + 0.4). The frequency varies each time it is triggered from between 0.2 (0.125 Hz) and 0.4 (0.2 Hz) to give us different length wind sounds.
Applying an [Oscillator] to the volume of a looping sound is a good way to add some movement, variability, and life to it.
Oscillators: Pitch for Flies
208a The Flies
Shooting the glass box in this room (as you inevitably will) releases a number of flies. A short buzzing sound is looped, and the pitch and volume variation over time is produced by the [Oscillator] node.
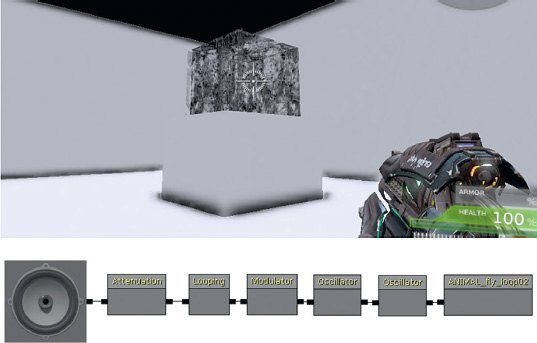
As you can see, this [SoundCue] uses a separate [Oscillator] for its pitch and for its volume. This enables them to modulate independently rather than both following the same cycle. The volume oscillator has varying frequency and the amplitude varies around a changing center point.

The pitch oscillates with varying frequency around a fixed center point with some slight changes in the amplitude of the oscillator.

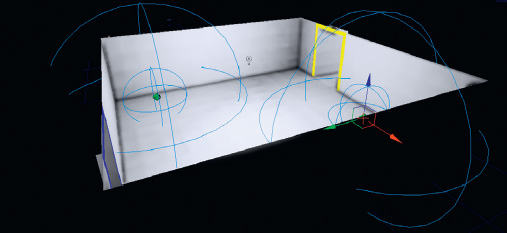
The trigger system uses the [InterpActor]s (the glass) Take Damage event within Kismet to play the flies [SoundCue]. (This is created in the same way that you created a Touch event for a [Trigger Volume].) For more on [InterpActor]s and Take Damage events, see Appendix C: UDK Tips.

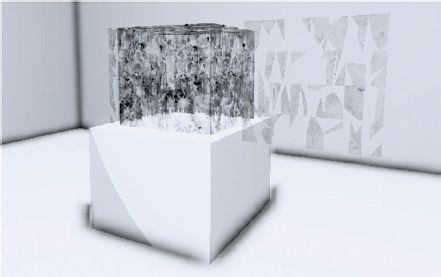
The old glass box in the level itself is actually made of two layers of [InterpActor]s representing broken and unbroken glass. These layers are shown here for illustration. When the unbroken [InterpActor] takes damage, these [InterpActor]s are destroyed, leaving the broken glass [InterpActor]s behind.
Exercise 208a_00 Kismet [Trigger Volume] Take Damage and [Oscillator]
The player has to shoot the three generators in this room so that the security door will overload and the player can escape. Each generator will take damage and needs to be shot 10 times. In response to this damage, each has an alarm sound (of increasing intensity). You have to create these alarm effects using the one-second triangle wav sample you have been supplied with.
Tips
1. Create three or more [SoundCue]s that all reference the same wav, but use the wav in different ways. (Use the Triangle.wav supplied).
2. Use the [Oscillator] to produce an alarm sound that changes in pitch from the triangle.wav tone.
3. For the frequencies of the three different [SoundCue]s, you could initially start with values of 0.2, 0.1, and 0.05.
4. The Take damage system has been already created for you using [DynamicTriggerVolume]s. Simply add your [SoundCue]s to the three [PlaySound] objects.
“Back to the Old Skool”
209 Wavetables
Taking memory-saving techniques to their (il)logical extreme, this room plays a couple of well-known tunes (badly). The total file size required to play these tunes (or any other you can think of) is little bigger than the size of the wave file used to produce it, 3.9 kB (which, as you will appreciative by now, is tiny).
We’ve included this example as a slightly perverse homage to the history of game audio when all of the sounds and music in a game might have been produced from a few very small samples (and a bit of FM synthesis if you were lucky). Although such lengths would not be necessary today, the principles behind this method will never be obsolete with regard to interactive music; we’ll be returning to this discussion in the Chapter 4.

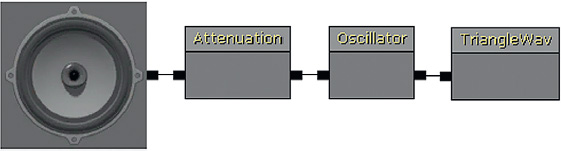
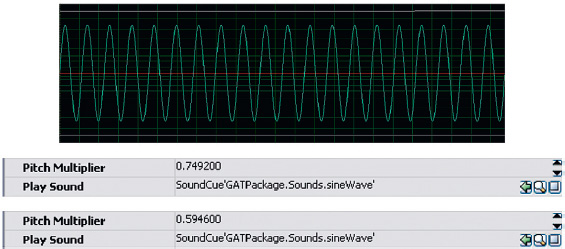
The method here is analogous to wavetable synthesis. The sound source is just 10 cycles of a sine wave (45 milliseconds of sample memory). The looping sine wave produces a tone (as any repeating wave cycle would). By using different [SoundCue]s playing the same tone with different pitch multipliers (playing the sample back at different rates), we can get all of the different notes we need.
In this instance, a [Matinee] object is used like a musical sequencer to start (and stop) each note at the appropriate time. We’ll be looking at the [Matinee] object in more detail later on in Chapter 3.

The original sample tone was generated at 220 Hz (pitch A3). To get the other notes, their pitch multipliers were scaled accordingly:
A4 (440 Hz): the pitch multiplier would be 440/220 = 2.0
C3 (130 Hz): the pitch multiplier would be 130.81/220 = 0.595
E3 (164 Hz): the pitch multiplier would be 164/220 = 0.74
If this kind of retro geekery floats your boat (like it does ours), then check out the bibliography for further reading and the MIDI + DLS tutorial on the GameAudioTutorial.com website.
Exercise 209_00 Muffin Trucker
Your highly successful game based around the exploits of a confectionery deliveryman is being ported to a mobile device. The muffin trucker needs to get across the road and return the muffins to his friends. He has to do so without getting hit by traffic and before their patience runs out. (A countdown timer is boosted with every successful delivery.) That’s the good news. The bad news is that they want you to replicate your original audio, but this time you only have 500 kB of memory to use. Using some of the techniques outlined in this chapter, see what you can do.
(PS: They want some music too.)
(PPS: The exercise README file contains a list of all [SoundCue]s referenced by the game.)
Tips
1. Go back and read this Chapter again.
Recap of Sound Actors
[AmbientSoundSimple]: Loops waves (or loops multiple waves).

[AmbientSoundSimpleToggleable]: Loops waves + toggle on/off via Kismet toggle.

[AmbientSoundNonLoop] and [AmbientSoundNonLoopingToggleable]: Random sounds chosen at randomized times (+pitch and volume variation).

[AmbientSound]: Plays a [SoundCue], either once on collision or looping if the [Soundcue] has a loop in it.

And coming up in Chapter 3, [AmbientSoundMoveable]: Plays a [SoundCue] and attaches to a matinee to move it around.

Conclusions
The nature of interactivity means that there will be a balance between what you can do to represent that interactivity in sound, and what you have in terms of resources to collect and hold in memory. Get as much variation out of as little material as possible and understand your tool in depth in order to fully exploit its potential. You may feel that this is a strange way to start a book, by immediately talking about problems rather than all the exciting things we can do with sound and music in games. However, by tackling these issues early, their importance will become embedded in your normal practice so that you are automatically making sensible decisions. That way you can concentrate on the real tasks at hand.
Firstly, making it sound real.