
Appendix B Troubleshooting and Optimization
Crashes
We can pretty much guarantee that at some point the game will crash. This will usually happen while you are building the level, and specifically during the lighting build phase. Always save your game before building. (See Appendix C: Building.)
If you’ve lost work, don’t despair. Unless you’ve turned it off, UDK will have auto-saved a backup level. These are found at C:UDKUDK-2010-08UDKGameAutosaves. You won’t be able to open the UEDPIE versions, but the other ones should mean you haven’t lost too much.
Version Control
If you find yourself working on a commercial game you’ll have to quickly get used to the idea of version control. Obviously in a multimillion Pound/Dollar business you cannot rely on the ‘I think Johnny has a copy of it on his pen drive’ approach to file management. Typically you will be using a version control software (such as AlienBrain or Perforce) that provides a networked system for backing up and tracking changes of all the game and development related data.
If you’re working by yourself or in a small team it is no less important to have your own version control system so that you don’t lose hours of work.
Incremental Naming
Don’t call your level ‘MyLevel’ and then keep saving your work over the top of the previous version. If something goes wrong or this file becomes corrupt you are back to square one. Every time you save a level (which should be often) use the date and an incremented file name, for example:
Mylevel _ 2011_01_01_V01
Twenty minutes later:
Mylevel _ 2011_01_01_V02
You’ll notice that we’re using Year_Month_Date_ as this makes it easy in Windows to sort by filename to see a historical record of your versions in order of date.
Do the same with your audio files and DAW sessions.
Backup
Once a day, back up your work to several locations. In addition to using different hard drives, this includes physical locations. Offices burn down/get flooded, so keep a copy in more than one place. Consider Cloud (online) storage so you can access your files from anywhere and also be (relatively) safe in the knowledge that the data is secure.
Author Richard Stevens writes:
I’ve had two serious (unrecoverable) hard drive failures. The first lost all the music I had written in the previous 18 months, the second destroyed all the family pictures I had taken in the last five years. Fortunately, I’d learned my lesson from the first experience and had a backup of the pictures online!
Hearing What’s Going On
Pressing the Tab key will bring up the console. (This varies on different language keyboards and can cause some confusion. On some the Tab key will bring down the console window. This will take up approximately half the screen. On others it will just bring up the console command line (a single line at the bottom of the screen). This single line is OK for testing but you won’t see the results printed to the console window. You may need to use the ‘@ key to see this.)
While the game is playing, you can enter a number of commands in the console to help you identify any problem areas in the sound. It is useful to set up a number of SoundModes that isolate certain classes of audio. For example, in the SoundClassesandModes package that came with the tutorial level, you should have the following modes:
GATMusicOnly
GATVoiceOnly
GATSFXOnly
In the console type ‘Set SoundMode’ and then one of these modes and you can isolate these different elements. Set up your own for your particular needs. You can also type ModifySoundClass (enter your soundclass name) vol=enter the volume, to set the volume of a specific class.
Here are some other useful console commands relating to hearing audio:
DISABLELPF: Disables the low pass filter on all sources for testing.
ISOLATEDRYAUDIO: Removes the reverb to isolate the dry audio.
ISOLATEREVERB: Removes the dry audio to isolate the reverb.
PLAYSOUNDCUE: Plays a SoundCue (you’ll need the full name).
PLAYSOUNDWAVE: Plays a sound wave (you’ll need the full name).
RESETSOUNDSTATE: Resets all volumes to their default values and removes all filtering.
TESTLFEBLEED: Sets the low-frequency effect bleed to maximum on all audio sources.
TESTLPF: Sets the low-pass filter to maximum on all audio sources.
TESTSTEREOBLEED: Sets stereo bleed to maximum on all audio sources.
(See http://udn.epicgames.com/Three/ConsoleCommands.html#Audio%20Commands.)
The quickest way to use the console is to start typing the command you want. A list of matching commands will appear. Use the up/down arrow keys to choose your command, then press the Tab key again to add it to the command line. Now press return.
Audio Optimization and Tracking the RAM Budget
To see some information about the current audio performance, open the console during play (press the Tab or ‘@ Key) and type:
STAT AUDIO
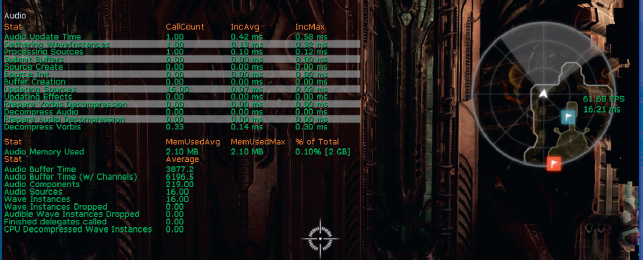
Here’s what the terms mean
(http://udn.epicgames.com/Three/StatsDescriptions.html#STAT%20AUDIO):
Audio Update Time: Total time updating all things audio (overall time taken in AudioDevice::Update).
Gathering Wave Instances: Collecting, sorting, and prioritizing all potential audio sources.
Processing Sources: Stopping and starting the sound sources that will be heard.
Source Init: Initialization of all sound sources.
Buffer Creation: Creation of a sound asset (e.g., upload of PCM data to OpenAL).
Updating Sources: Time taken to update the sound sources (position, velocity, volume, pitch, etc.).
Updating Effects: Time taken to apply audio effects (reverb, LPF, EQ).
Prepare Vorbis Decompression: Initializing the vorbis stream for decompression.
Decompress Audio: Time taken to decompress audio (currently, only vorbis).
Prepare Audio Decompression: Initializing of sound decompression in general (currently, only vorbis data).
Decompress Vorbis: Time taken to decompress vorbis data.
Audio Memory Used: Total amount of memory used for all sound assets. Does not include any workspace or internal buffers.
Audio Buffer Time: Number of seconds of stored sound data.
Audio Buffer Time (with channels): Number of seconds of stored mono sound data.
Audio Components: Number of active sounds being maintained for processing (ambient sounds all over the map, player sounds, etc.).
Audio Sources: Number of audio components that are audible and of a high enough priority to hear.
Wave Instances: Number of sound waves being processed.
Wave Instances Dropped: Number of sounds not allocated to a sound source (as they are inaudible).
The ones to pay particular attention to (especially for console development) are the Audio Memory used, which gives the total for the current audio loaded into memory, and audio components, which tell you the number of active sounds at any one time (this relates to the discussion of voice instance limiting in Chapter 6).
There are various other console commands relevant to audio listed here:
(http://udn.epicgames.com/Three/ConsoleCommands.html#Audio%20Commands):
LISTSOUNDCLASSES: Outputs a list of loaded sounds collated by class.
LISTSOUNDCLASSVOLUMES: Outputs a list of all the volume and pitch settings for each sound class.
LISTSOUNDMODES: Outputs a list of all sound modes.
SOUNDTEMPLATEINFO: Outputs information about each unique sound.
LISTAUDIOCOMPONENTS: Outputs a list of all audio components.
LISTSOUNDDURATIONS: Outputs a list of all sounds waves and their durations.
LISTSOUNDS: Outputs a list of all loaded sounds and their memory footprints.
LISTWAVES: Outputs a list of wave instances and whether they have a source.
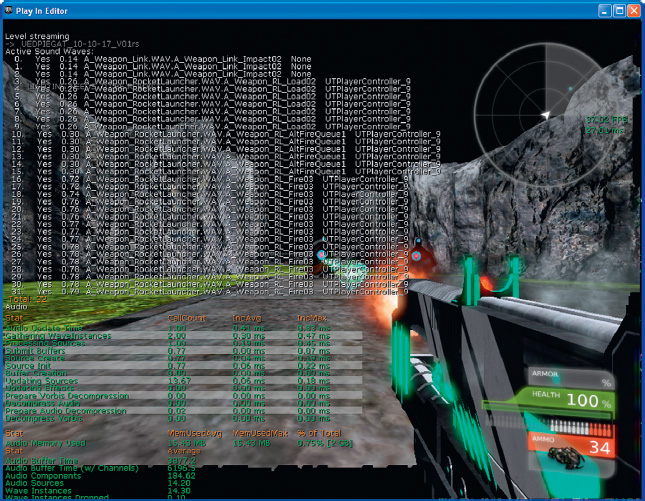
One useful command that is not listed is STAT SOUNDWAVES. After enabling this in the console window you can actually close the window (press the Tab or ‘@ key again to exit) and it continues to print a list to the screen of all the sounds that are currently playing.
This is hugely informative, and we’d recommend you spend some time running around various levels with it enabled to get a better idea of what is going on. As an example, the screenshot that follows immediately reinforces the issues we discussed regarding retriggered weapons, the overlap of the tails of their sound, and the subsequent impact on the number of voices used.
As well as what is currently playing we want to know what sounds are loaded into memory, and how much we may have left. The command LISTSOUNDS will show you all the sounds that are currently loaded into memory and their memory footprint (LISTSOUNDCLASSES will collate the list by Sound Class). This is probably your most vital audio troubleshooting tool. We spent some time in Chapter 2 discussing memory issues for game development so we won’t repeat these arguments again here but you will remember that, no matter how amazing your sound or music may be, if it doesn’t fit into the available memory it simply won’t work.
We know it doesn’t sound like a particularly exciting prospect but if you’re going to create Sound or Music for games you need to learn how to use a spreadsheet. Spreadsheets are your friend and will not only help you manage your projects, by knowing what is done/not done, but are vital in tracking the memory requirements of your assets. For working with our Sound Designer Andrew Quinn on the Sound Library we used the simple GoogleDoc spreadsheet below. With a few formulas you can calculate the size of the sound assets per level (and after different amounts of compression). The advantage of an online spreadsheet is that you all have simultaneous access to it and the version control is automatic (you can always go back to a previous version). You can see who’s using the spreadsheet at any time and instant message them directly. After our experience we’d say that if you’re not already working this way then it’s time to take a serious look!

Keeping your spreadsheet up to date is vital for tracking your assets and for ensuring that you’re not going to be trying to load more sounds into memory than you are allocated. Look at this in conjunction with the in-game tools for tracking audio memory usage (STAT SOUNDWAVES and LISTSOUNDS). Another good way of tracking your success in audio memory management is by noting the number and intensity of angry looking programmers marching towards you.
Streaming
If you are dealing with a large game level or world, then you will need to consider dividing this into separate parts that you can then stream in/out as needed to create the impression of a persistent world.
Run the tutorial level in the Play in Editor window and open the Console Command by pressing the Tab key. Type “Stat Audio” into this command line, and press return. (See the previous section “Audio Optimization” for more.)
If you look at the Audio Memory Used reading, you can see that there’s a constant base reading of several MB. This is mainly because of all the music that we are using. The use of this much music within a confined area is obviously a little unusual, as in a game you would be more likely to have music associated with particular levels or areas. Given the nature of the Tutorial level and to avoid confusion, we have not used the Streaming levels in this instance, but it is something you should be aware of, and use, in a more typical game level.
If you were to imagine a large sphere centered around the player as he or she moves through the level, you can appreciate that in many circumstances it is only necessary to load in assets such as music within a given distance from the player. Outside of this sphere would be assets the player simply would not see/hear. Given the fact that you would only need certain music tracks for certain areas, it is inefficient to hold all of it in memory.
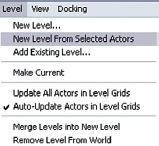
In the Levels tab of the Content Browser you can create new levels or export parts of your existing level to a new level. You can still experience the level exactly as you planned, but you can also think of this new level as a layer that you can have or take away. The basic level is referred to as the Persistent level, and this master level controls how the others stream in or out, either through Kismet commands (New Action/Level/Streaming Level), streaming volumes, or distance-based streaming. A common approach to music would be to have the separate music instances in their own streaming levels so that they are only loaded into memory when required.
To put the music for different areas of your level into separate streaming levels, you should select your music actors in the current level, then go to the Levels tab and choose New Level from Selected Actors.
You’ll then need to copy across any related Kismet systems by opening the Kismet for your new level using the K symbol.

When you’ve created as many streaming levels as you need (perhaps one for each area of piece of music), you can use the eye symbol to switch them on and off. This way you can see what’s included in each level to make sure you have them set up correctly.
You’ll now need to set up a system that loads in your music just before the area where it’s needed and unloads it outside of this area. This way you can keep the level of audio memory used to a minimum.
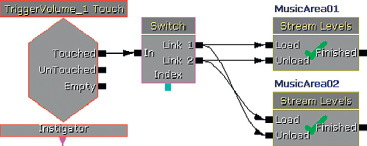
Here you can see a simple illustration using two rooms and a corridor. In the center of the corridor is a [TriggerVolume] that will control the streaming of the two [AmbientSound]s, which are in fact in two different levels.

The [TriggerVolume] is linked to a looping switch in the Kismet of the Persistent Level. As the player passes, the level (i.e., the music) of the first room is unloaded, and the second level (the music in the second room) is loaded. On the way back the opposite happens.
If you run this level in Play in Editor mode or the Start level on this PC mode and run the Stat Audio command, you will note that despite the levels apparently streaming in and out, the audio memory used does not change. Launch the full Game–Unreal Development Kit from your Program Files menu and run the same command. Now you can see that this has actually achieved what we wanted. The music is loaded in and out of memory per area and the audio memory used changes to reflect this. See the GATMusic_Streaming level(s) in the Exercise package for a practical example you can experiment with.
For more on level streaming see the UDK documentation http://udn.epicgames.com/Three/LevelStreamingHowTo.html.