
1
Basic Training
In this chapter you’ll be introduced to the chosen platform for demonstrating the principles within the book, Epic Game’s Unreal Development Kit (UDK, available to all readers for free at www.udk.com). We will also begin to look at the importance of ambient sound in adding character and immersion to game environments.
Opening the Tutorial Level
The first step is to download and install UDK. While you’re waiting, go to the companion site www.thegameaudiotutorial.com and download the tutorial files. Once downloaded, unzip the package by right-clicking and selecting “Unzip to” (Choose a folder). See the README file in the zip package for full instructions on how to get everything up and running.
You will need to remember the UDK install folder. This is typically C:UDKUDK-(Date of current version).
As the precise location may change depending on which version you are using we will simply refer to C:UDK(***) in the text.

The Game Audio Tutorial Level.
Before you start the tutorial level, we recommend that you play some of the levels that come with the UDK. From the Start menu, select Unreal Development Kit/Game–Unreal Development Kit. If you’re not used to this first-person-shooter style environment, then use the mouse to look around and to shoot and use the WASD keys to move.
When you’re done, exit the game and then from your Programs menu choose Unreal Development Kit/Editor–Unreal Development Kit. When this has started up, choose Open from the File menu and open the level GAT_V01_000. To play the tutorial level now, click on the Start this level on PC icon from the top menu bar.
![]()
Start this level on PC.
Spend some time exploring the level, and when you’re ready to move on press the Esc key on your computer keyboard then choose Exit Game to return to the Editor window. Before we start looking at the level, you should save it under a different filename. That way if you start playing around with it (which we would encourage you to do), you can always go back to the original version. Do this now from the File/Save menu in the main window.
It’s a good idea to get into good habits straight away, so start by having useful information in the filename, like today’s date and the version number: MyGame_1901_01_01_V01.
Then after making any significant changes, you can save it again, this time calling it MyGame_1901_01_01_V02. You’ll notice that we’ve used underscores (_) instead of spaces. You should do this with all your files including sound or music files. The general rule is that games software doesn’t like spaces!
Explore the Level: Navigation
If you haven’t used a game editor before, then simply navigating your way around is probably going to be your steepest learning curve. Most editors use a combination of mouse buttons to enable you (sometimes referred to as “the camera”) to move around in the 3D space. Some (like UDK) also allow you to also use the WASD keys that are typical of first-person shooter navigation.
In the tutorial level, we’ve put in some basic navigation points. Try jumping between these points by pressing the keys 1, 2, 3, 4, 5, 6, and 7 on your keyboard. These correlate to the start room for each of the chapters of the book. (You can override these or create your own by pressing Ctrl + the number key to set them up.)
You can see within the tutorial level that we have numbered all the rooms. These correspond with the room numbers in the text below. To help you navigate your way around the level, we’ve also added colored doorframes. Green is a room that moves forward in the order of the book, Red goes back. For annex rooms that come off the main rooms Blue takes you forward, and Yellow takes you back. We hope you don’t get lost!
Go back to navigation point 1 by pressing “1” and you should find yourself in the first room.

Views
You’ll see that you have four different viewports of the map: Front, Side, Top, and Perspective. (If the editor has started with one full screen view then click on Maximize Viewport—the square icon on the Viewport toolbar—to change to the view below.)

You can change these using the Viewport Options menu (the drop-down arrow on the left of each viewport) and choosing Viewport Type.
![]()
You can also cycle through the viewports by clicking on the button currently marked “P.”
![]()
Try changing the viewports for the bottom-left screen and then return to Perspective view “P.”
Navigation
Now try using your left mouse button, your right mouse button, your mouse wheel, and both mouse buttons together to start seeing how you can move around the level.
Left mouse button (LMB): Pan the camera left/right, Move forward/back
Right mouse button (RMB): Mouse look
LMB + RMB: Move left/right, Move up/down
If you hold down your right mouse button, you can also “fly” through the level by using the keyboard keys W, A, S, D and using Q and E to move up or down. It’s often easiest to use a combination of “flying” in the Perspective viewport and clicking and dragging in the Top viewport to navigate your way around.
If at any time you want to just start playing the game from a particular spot, then right-click on the floor and select “Play from here.” (Press the Esc key to return to the editor.) Or you can play the whole level from the beginning in the Editor window by clicking on the aptly titled “Play this level in an editor window” button.
![]()
Building
As you work your way through the book we’d encourage you to learn by playing around with items in the tutorial level and exercise rooms. As you do so you’ll quickly become aware that when you make a significant change to a level you need to “Build” it again. You can do this from the Build menu or the shortcut icons on the top toolbar. See Appendix C: Building for some specific guidance on this.
Actors
100 Start Room
Go back to the first room (Press 1 on your keyboard) and turn around using the left mouse button until you are looking behind you. If you press the G key a few times, you should see the small switch icon disappear and reappear. The G key hides everything that’s not actually visible in the game itself. These objects are what control the events in the game; they are called Actors.
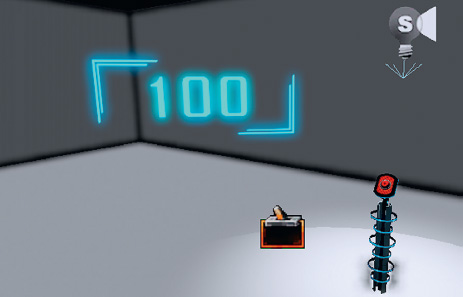
This particular Actor is called a [Trigger] and we will be seeing a lot more of it as we move forward. If you look up you’ll also see a Light Actor and the button is a Static Mesh Actor.
It’s possible that you might not be seeing these at all. The interface can get very complicated with many Actors and other objects on the screen, so you have the ability to Show and UnShow certain types of objects (you will also find that the number and types of things you display can have a significant impact on the smoothness of the system as well). This is again controlled from the Viewport Options menu (from the Show submenus). For the moment, select Use Defaults.
![]()
You can move the Actors in a couple of ways, either by clicking and dragging their arrows or by holding Ctrl and using the usual mouse combinations.
Ctrl + LMB = Moves on the X axis
Ctrl + RMB = Moves on the Y axis
Ctrl and LMB + RMB = Moves on the Z axis
Grab the [Trigger] or light and move it around. Notice how its movement has a different appearance in the different viewports because of their different perspectives. Now try selecting any random Actor in one of the viewports. Right-click and choose Go to Actor from the menu that appears (or press the keyboard shortcut Home key). You’ll see that all the viewports snap immediately to focus on the Actor that you have selected.
Using the Home key to make all the viewports focus on the Actor you have selected is very useful, particularly when used in combination with clicking and dragging to move around in the Top viewport. You can quickly move across your whole level, find an Actor in roughly the place you want to go, and then press the Home key to jump to that position.
You can select multiple items at once by holding down Ctrl while you click to select with the LMB or use Ctrl + Alt in any of the views (apart from the Perspective view) for a marquee selection (this creates a box and selects anything within that box). Try this in the Top viewport.
The Content Browser: Finding Actors
It’s easy to find Actors in the restaurants of most major cities (they’re the ones serving you the food), and in UDK it’s equally straightforward. You may already have seen a floating window that you haven’t used yet. If not, then either click on the icon indicated in the following figure or press the keyboard shortcut Ctrl + Shift + F to open it. This is the Content Browser that you will come to know and love.
![]()

You’ll notice that this browser has several different pages as shown by the tabs at the top. You can see these pages by clicking on the tab, but you may find it more convenient later to select them directly from the menu that comes up if your press the Ctrl key and the Tab key simultaneously on your keyboard.
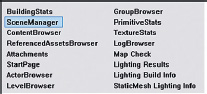
It’s from this browser that you can select the Actors you need to place in the level, and it’s also from here that you can open the packages that contain all of the assets that go into making a game (such as materials, meshes, and, of course, sound and music files). Select the tab called Scene.
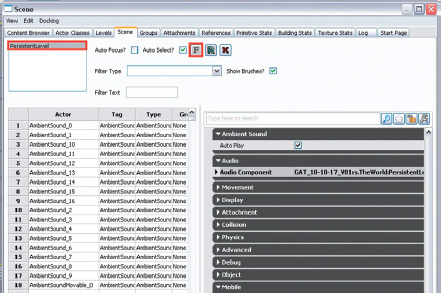
In the top-left box, select Persistent level. This will now show you a list of all the Actors in the level. At the top of the list, you should see some [AmbientSoundSimple] Actors listed. Select one of them by clicking on it, and the press the F (Focus) button.
So you can identify them more easily within the text, we will be placing the names of all the Actors or Objects we refer to within square brackets, such as [Actor].
Your viewports should then jump to focus on this Actor. Try this with a few other items from the list. You can also check (tick) the Auto Focus box to jump to any Actor you select automatically. When you’ve finished, press “1” to return to the first room, then follow the arrow pointing left into Room 101.
Every Room Has a Tone: Ambience
101 Room Tone
In the real world, there’s no such thing as silence (even in an anechoic chamber you can hear your blood and heart beat). In most buildings (or spaceships!), there will be some electrical or mechanical sound sources. These electric or mechanical sounds will often be either constant or repeating. We can replicate them by using looping sound files. These room tones not only make an environment feel more real, but they can also be used to set the mood of a particular place. Never use complete silence in an environment in your game unless it’s for an explicit aesthetic purpose (and even then, don’t).
[AmbientSoundSimple] for Looping Sounds
In Room 101, you should see the [AmbientSoundSimple] icon in the center of the room.

If you can already hear it, you will notice that this type of sound loops around to play continuously. In this case it’s a room-tone hum. If you can’t hear it, you need to try a couple of things.
To hear things live in the Editor windows, you need to enable Toggle Real Time Audio. This is the speaker icon in the top toolbar.
![]()
If it’s not already on you’ll also want to enable the Real Time option for the Perspective viewport using the joystick icon.
![]()
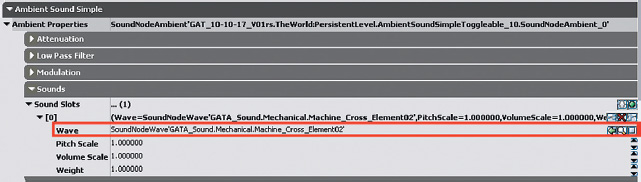
With the [AmbientSoundSimple] icon selected, press “F4” on your keyboard (or right-click and select Properties) to open its properties. (You can also double-click with the left mouse button). Now click on the AmbientSoundSimple menu bar to fully expand it. (You can also choose to right click to fully expand all the submenus).

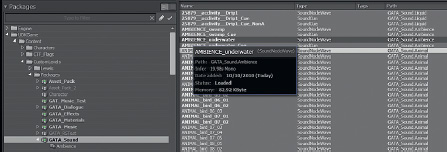
You can see in the Sounds section that at the moment this [AmbientSoundSimple] is playing the sound file MECHANICAL_machine_kitchen_aircon_fan_01. Before we can change this or add our own, we need to look at how these sound assets are stored in UDK.
Changing your First Sound
We’re going to try changing the sound of an existing [AmbientSoundSimple] to get used to some of the basic principles involved in using assets in UDK. When you import a sound file into UDK, it is referred to as a SoundNodeWave. We’ll be using the terms sounds, wavs, and SoundNodeWaves interchangeably.
Packages
All of the assets in UDK are contained in the Packages section. You’ll note that the [AmbientSoundSimple] you just looked at referenced GATA_Sound.Mechanical.MECHANICAL_ Machine_Kitchen_aircon_Fan_01. The part of the name before the first full stop/period is the name of the package that holds that sound file.
Open the Content Browser (Ctrl + Shift + F).
In the bottom-left window, you can navigate your folder structure (the package tree). The sounds in the tutorial level are in the GATA_Sound package within the UTGame/Content/CustomLevels/Packages Folder.
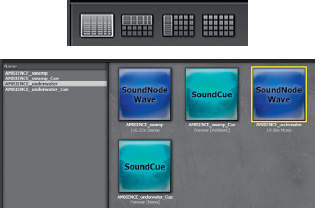
If you select this package (as in the preceding screenshot), you can see that we’ve sorted the assets into different groups within this package so it’s easier to find things. If you select the Ambience group, then you can double-click on the names of the sounds in the right-hand window to hear them. Try this now. You’ll see that at the bottom of this browser window you can also choose to view your assets using List view, Split views, or Thumbnail view.
Vertical Split view for packages.
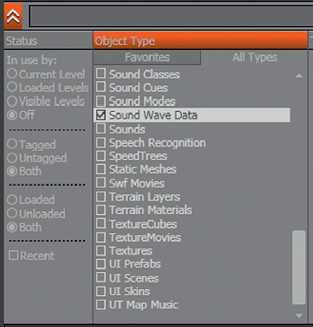
The top right-hand window serves as the search bar where you can search directly for named assets or filter the selections by specifying the type of asset you want, using either the Object Type or the Tags. For instance, you may only want to see Sounds, or Animation sets, or Fonts. You can do this by checking or unchecking the relevant boxes. Select the All Types tab initially, then try filtering the objects by different types to see how this works.

You can see that the UDK packages also have some sounds that come with them. In the bottom-left Packages window, expand the UTGame folder/Content/Sounds/A_Ambient_Loops/Interiors.
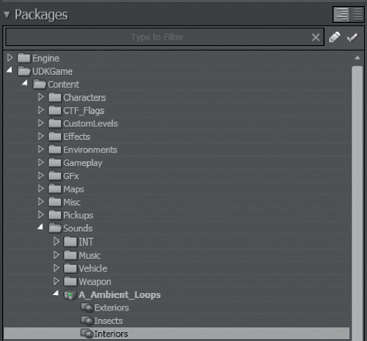
Then from the Search filter, choose to see only Sound Wave Data.
Preview these sounds by double-clicking on the name of the sound and settle on one you like. You can use this sound in your first exercise.
Exercise 101_00 Changing an [AmbientSoundSimple]
From the File menu, open Exercise_101_00.udk from the exercise folder.
Tips
1. Select the sound you want in the Content Browser (try one from UTGame/Content/Sounds/A_Ambient_Loops/Interiors).
2. Select the [AmbientSoundSimple] in the center of the exercise room and bring up its properties (right-click and select Properties, or choose Select and press F4, or just double-click).
3. In the AmbientSoundSimple/Sounds section of the properties, you should see the sound that’s already assigned to it, where it says “Wave.”

4. Click on the green arrow, and UDK will replace this sound with the one that you currently have selected in the Content Browser. (If it doesn’t work, then go back to the Content Browser and make sure the sound is still selected.)
5. You should now hear your sound from the Perspective viewport.
6. Now select “Play this level in an editor window” from the top toolbar (the Play icon) and walk around the room to see how your new sound works. (To jump into any room and play you can also right-click on the floor in the Perspective viewport and choose “Play from here.”)
7. Try changing to some other sounds like ones from the Fire, Machines, or Water groups.
Adding your First Sound
Exercise 101_01 Adding an [AmbientSoundSimple]
Open the Exercise file 101_01 and look at the first room that is empty. You’ll notice that actually there’s no ambient sound in this room. This makes it sound lifeless and unreal (pun intended). It needs a room tone. Add a bit of life by introducing an [AmbientSoundSimple] to the room.
Tips
1. In the Content Browser, select the sound file you want. (Try A_Ambient_Loops.Interiors.stereo_interior15; use the search bar.)
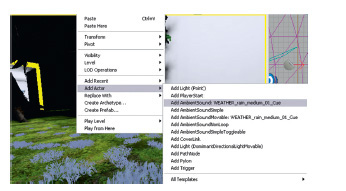
2. Now right-click on the floor of the room in your Perspective viewport.
3. Select Add Actor/Add AmbientSoundSimple: Stereo_Interior15.
4. Now play the level in the Editor window (right-click on the floor and select “Play from here”).
5. Sit back in smug satisfaction.
6. This was a shortcut. Later on you’ll need to know how to add different sorts of Actors; not all of these are available from the right-click menu. Go to the Content Browser (Ctrl + Shift + F), and select the Actor Classes tab. This is where all the Actor types hang out. Expand the Sounds menu and the AmbientSound menu, and select [AmbientSoundSimple]. Now in your Perspective viewport, right-click and choose “Add AmbientSoundSimple Here.” If you still had a sound selected in the Content Browser, then it will have been automatically selected to fill this [AmbientSoundSimple]; if not, then you’ll have to go back to the Content Browser and add one to your new [AmbientSoundSimple] using the green arrow (within its properties) as shown in Ex101.
Importing your First Sound
Exercise 101_02 Importing Your Own Sound
By now you’ll probably want to know how to start adding your own sounds to a level instead of using the ones that come with UDK or this tutorial. So you’re going to have to make your own package and import your sounds into it. You can download wavs from the Sound Library on the website, but also try this out with your own sounds as soon as you can.
Tips
1. Your sound files can be any mono or stereo 16-bit wavs (or waves) at any sample rate. Mono files will be spatialized in the game (pan around); stereo files will not.
2. First, make sure that in the Content Browser (Ctrl + Shift + F) window you have selected the Packages folder within the Custom Levels folder. We’re going to import the new sounds into this folder. Click Import at the bottom of the screen.
3. Browse to your Wavs folder and select the file you want. Remember, with your own sounds (or any other assets) you must not have any spaces in the filenames, so try to get into the habit of replacing these with an underscore (_).
4. You’ll now need to name your new package. UDK tends to call its audio packages by names starting with A_, so let’s adopt that convention. Name your package for example A_TutorialTestpackage. (Here’s where you also have the opportunity to create subgroups for your assets as well if you wish.)
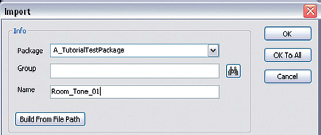
5. You’ll see that your package appears at the very bottom of the packages list under New Packages until you right-click and save it. Then it should appear within the Custom Levels/Packages folder where we want it.
6. When you import any new sounds, you should save the package (right-click/Save or Ctrl + S) before using them.
7. Now try adding this to an [AmbientSoundSimple] in a room like you did in Exercise 101_00.
(See Appendix C: UDK Tips, “Importing Sounds,” for some more very useful advice.)
Looping Sounds
Once you’ve imported some of your own sounds and added them to your level using an [AmbientSoundSimple], you may find that they sound a bit clunky, particularly at the point at which they end then go back and start at the beginning. Getting these loop points right can be tricky.
We’ve put tips related to audio editing, such as looping, in Appendix D on the website so if you’re familiar with this then you can just carry on with the book. If you want to look a bit more at how to get your sounds to loop nicely in game, then now’s the time to have a look at Appendix D at www.thegameaudiotutorial.com. We’ll refer to audio editing software and sequencer packages by the catch-all title of digital audio workstations (DAWs) from now on to keep things simple.
Exercise 101_03 Looping Machinery
Open Exercise room EX101_03. You’ll see that there are various pieces of machinery here. Using [Ambient SoundSimple]s, bring this room to life. Use existing UDK sounds or import your own.
Tips
1. Remember to make a new package and import your sounds into it. Use the Import button at the bottom of the Content Browser.
2. Save your package after you import anything new. (You’ll notice that unsaved packages are marked by an asterisk (*).
3. You will probably want to adjust the volume of each sound to create an effective mix. Use the Volume Scale adjustment to do this, using the value 1.0 as the maximum volume.

Ambient Sounds Case Study
To be good at designing sound and music for games, your most important skill is your ability to listen. Even a relatively simple game audio (or real) environment is made from layers of sounds. Paying close attention to sounds in the real world will allow you to develop the attention to detail you’re going to need if you’re going to get it right in the game world.
102 Ambient Sounds Case Study

In Yorkshire there are 24 different words for types of rain. This room demonstrates some of these types. You may be thinking this whole [AmbientSoundSimple] thing is pretty easy. Adding them to your level is easy, getting them right isn’t. This room is a simple demonstration using just rain sounds. If you look at it, you’ll perhaps begin to think about the thorough approach you need to re-create a convincing world.
There is not just one big rain sound for this area. In fact, there are six different types of rain because rain sounds different according to the surface it’s falling on.
1. General rain
2. Rain on trees
3. Rain on water
4. Rain on metal roof
5. Rain on hollow metal barrels
6. Rain on plants
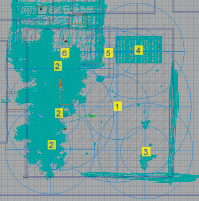
You can see from the diagram that these have had to be carefully arranged to make sure they cover the correct areas.
Attenuation and Radius Min/Radius Max
Attenuation refers to how sound gets quieter, in this case over distance. We can’t replicate the range of volume or the physics of the real world in games (for reasons explained later); therefore, we have to cheat. Most game editors deal with this by giving each sound a Min and Max radius. The sound is not attenuated (i.e., not made quieter) when the player is within the Min radius, but it gradually gets quieter until you reach silence at the Max radius.
In Room 102, you’ll notice that the blue circles around each [AmbientSoundSimple] are of different sizes. These represent the radius within which you can hear a sound and how the sound attenuates (gets quieter) over distance. Think of these as defining the size of two spheres surrounding the [AmbientSoundSimple]. Within the Radius Min sphere, the sound is at its loudest. The volume then drops as we travel out to silence at the Radius Max sphere.
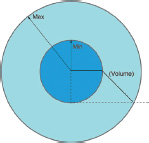
Within the Min area, the volume is at its highest. It then drops off to a volume of zero at the Max radius.
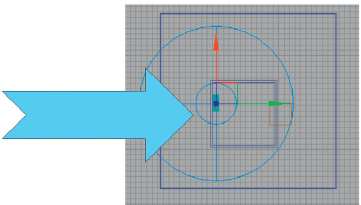
You can adjust the Radius Min and Radius Max settings from the AmbientSoundSimple/Attenuation menu in the [AmbientSoundSimple] properties (Press F4). You can either enter figures directly or use the arrows on the right-hand side.

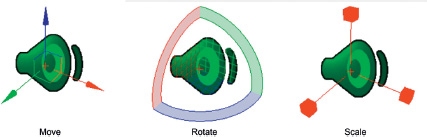
The other way to adjust them is to use the Scaling widget. When you have an Actor selected, the space bar on your keyboard will cycle through three functions: Move, Scale, and Rotate. For an [AmbientSoundSimple], the Scale mode allows you to click and drag the square blocks to adjust the Radius Max size. (For more on scaling Actors, see Appendix C: UDK Tips.)
A Word About Distances in UDK
When you are resizing the Radius Min and Radius Max values for your [AmbientSoundSimple]s, the numbers you are dealing with are the units of distance that UDK uses. (As a very general rule of thumb, you may typically be looking at a player height of 96 units, average room dimensions of 1024 × 1024 × 256, and a door height of 128.) The documentation states that 1 unreal unit is equal to 2 cm, but that’s not really the whole story. You may have noticed in the past that for a variety of reasons distances in games are not the same as distances in the real world. To measure a distance in the viewports, it’s easiest to use the Top view. By holding down the middle mouse button and dragging the mouse, you will get a distance readout. You can use these values to help you judge your Radius Min and Radius Max sizes.

A Word About Numbers in UDK
In computing terms, you have two types of number, integers and floating point numbers. Integers are whole numbers, and floating point numbers (or floats) are numbers with decimal points.
![]()
So the previous distances are integers, but the volume and radius numbers we’ve been looking at are floats. It’s important to get the type right in UDK, as objects are usually set to use one type or the other. Use the wrong type, and they will not work.
Exercise 102_00 Ambient Sound Radii
This room is a slightly different arrangement of the objects in the Tutorial Room 102. Using either the sounds provided in the GATA_Sounds/Weather group, or the Sound Library, add appropriate sounds to this level. You could also try adding your own rain sounds. (If you live in Wales or Seattle you’ll have a distinct advantage.)
Tips
1. Remember, for [AmbientSoundSimple]s just select the SoundNodeWave in the Content Browser then right-click in your level to add one with the sound already attached. (Make sure the package is fully loaded, Right Click/Fully Load).
2. Think carefully about the Radius Min/Radius Max distances of your [AmbientSoundSimple]s so that the sound is only heard around the objects you want, not across the whole area. To alter these settings, press F4 to access the selected [AmbientSoundSimple]s properties.
3. Within the AmbientSoundSimple section of the properties, expand the Attenuation settings by clicking on “Attenuation.”
4. Adjust the Min and Max numbers and note the change in size of the blue radius indicators in the Top viewport. You can adjust these values either by typing numbers directly into the boxes or by using the arrows on the right to scroll the values up or down.
5. Test your changes by right-clicking in the Perspective viewport and selecting “Play from here.”
6. Don’t forget to also use the volume settings of the [AmbientSoundSimple] in combination with your radii settings.
Toggle a Looping Sound
103 Toggle Sounds On/Off
If you take shelter from the rain of Room 102 in the small building hut (Room 103), you’ll see that there is an array of buttons on the right-hand side controlling a fictitious generator. Walk up to this panel and “use” it (E on your keyboard). To interact with things in UDK, the default is the E key. When we refer to “using” things from now on, what we mean is to walk up to them and press the E key. By “using” this, you “toggle” the generator sound on. “Use” it again to toggle it off.
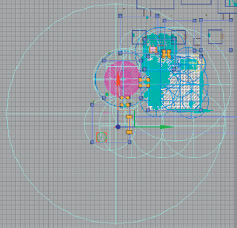
As we are now interacting with sounds, we need to look at UDK’s visual scripting system, called Kismet.
Kismet 101
The more you know about how actions are triggered within your game engine, the more understanding and control you have. It is essential that you can manipulate these triggering systems so that you are not just a passive sound designer handing over assets. Time to get your hands dirty.
Kismet uses a graphical object orientated programming paradigm. In other words, you have a bunch of objects that do stuff and by connecting these up with wires in the right way, you can build systems that do more interesting stuff. This is an increasingly common approach to many software packages, so even if you don’t anticipate using UDK in your next project, the concepts you will learn by using Kismet will be useful. If you press K on your keyboard, you will see all of the Actors in the game that are linked into a Kismet system. Now press K again to toggle them off.

Click the K button on the top menu bar to open Kismet.
![]()
(If you have an Actor selected in the viewport that is referenced by Kismet, you can also press Ctrl + K to open Kismet and jump straight to the system where it’s referenced. You will find this extremely useful.)
In Kismet you can have actions, conditions, variables, and events to create systems to perform certain functions in your level.
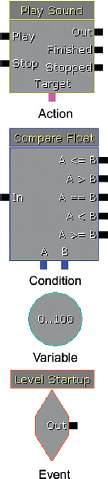
(Note that there are two types of number variable, integers and floats. These whole numbers or decimal numbers were described earlier. This is just a reminder to make sure you use the right type for the right object.)
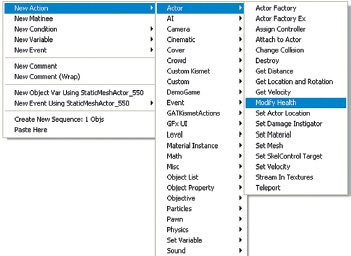
As you can see, right-clicking in an empty space within Kismet reveals that there are many of these objects to choose from, so the potential for creating your own systems is huge. (See Appendix C: UDK Tips for more on Kismet.) We’ll highlight the use of these objects in the text using [Action/Condition/Events], and we’ll highlight the variables by using italics.
In the Kismet window for the tutorial level, you’ll see several boxes. These are sequences where the systems have been packaged up to keep the screen from getting too cluttered. For the moment, choose the sequence named Room 103, and double-click to open it.

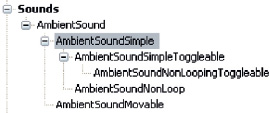
[AmbientSoundSimpleToggleable] for Toggleable Looping Sounds
The electrical unit on the wall in Room 103 is just a graphic, or to be more precise, a Static Mesh, and is not involved in the system. The switch icon represents a [Trigger] Actor. It is this [Trigger] that the player “uses” (by pressing E within a given proximity of it) to [Toggle] an [AmbientSoundSimpleToggleable] on or off.

The [AmbientSoundSimpleToggleable] is from the Sounds/AmbientSound menu within the Actor Class tab of the Content Browser (the same place as the [AmbientSoundSimple]s we’ve already been using).

After it has been added to the level (Right-click, Add Actor/Add AmbientSoundSimpleToggleable) sounds are added to this by opening its properties (F4), selecting the sound in the Content Browser, and using the green arrow in the same way we did when we selected a sound for an [AmbientSoundSimple].
You see that a cylinder appears around the [Trigger] when it is selected. This is its collision radius. It’s only when within this radius that the player can interact. The collision radius is set within the properties of the [Trigger] (F4) from the Trigger/Cylinder component using the Collision Height and Collision Radius featues. It can also be adjusted using the Scaling widget in the same way that we adjusted the Attenuation properties of the [AmbientSoundSimple] earlier. You may also want to use the Scaling widget (or the [AmbientSoundSimple Toggleable] properties) to set the Radius Min/Radius Max attenuation for the sound (shown now with yellow spheres).
Work through the following tutorial to get a better understanding of how to implement this simple Kismet system.
Exercise 103_00 Kismet [Trigger] “Used” to Toggle Sound
In this exercise, you should make a switch that turns the machine on and off. Create a Kismet system with a [Trigger] and an [AmbientSoundSimpleToggleable] to do this.
Tips
1. Right-click in your Perspective viewport and choose Add Actor/Add Trigger.
2. Select your chosen sound in the Content Browser then Right Click in the Perspective viewport and select Add Actor/All Templates/Add AmbientSoundSimpleToggleable : (***)
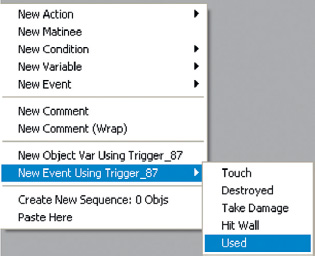
3. Open Kismet, and with your [Trigger] selected in the Perspective viewport, right-click in the Kismet window and select New Event Using (***)/Used.
4. Now create a [Toggle] object (right-click in the Kismet window and choose New Action/Toggle/Toggle). Connect the Used output of the [Trigger] to the Toggle input of the [Toggle] object by clicking on the input, holding down the left mouse button, and dragging a wire from one to the other.
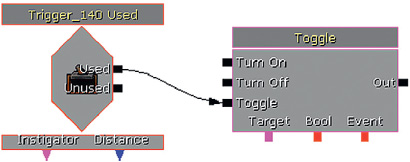
5. The [Toggle] object is going to toggle your [AmbientSoundSimple Toggleable] on and off, so select the [AmbientSoundSimpleToggleable] in your Perspective viewport, then right-click on the Target output of the [Toggle] object in Kismet and choose New Object Var using AmbientSoundSimpleToggleable_1.

6. There’s just a couple more things to do before you test it in the level. By default, [Trigger]s are invisible within the game, so in order for you to test this action, you need to see where your [Trigger] is. Select your [Trigger], go to its Properties (F4), and uncheck the Hidden box. You should now be able to see the [Trigger] in your level for testing purposes.

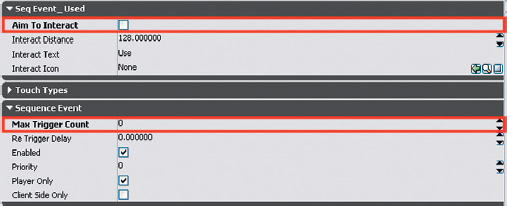
7. With your [Trigger Used] event selected in Kismet, look at its properties, shown in the section at the bottom of the Kismet window. You will probably want to uncheck the Aim to Interact option, as this can make it tricky to interact. While you’re there, you should also change the Max Trigger Count to 0. This effectively sets it to be able to be triggered an infinite number of times.
8. Now select Play from Here, walk up to your [Trigger], and press E on the keyboard to use it. You should now be able to Toggle this ambient loop on or off.
Exercise 103_01 Kismet [Trigger] “Touch” to Toggle Sounds
Open Exercise 103_00. You can see here that there is a precious energy crystal in the center of the room. However, it is protected by laser sensors. Create a “touch” [Trigger] so that when the player enters this area an alarm goes off. Then adapt it so that it stops when the player leaves the area. Extend your system so that the player is able to press the red button in the room to switch off the alarm.
Tips
1. Add a [Trigger] to the level. In the Perspective viewport, right-click and choose Add Actor/Add Trigger.
2. Adjust its collision to be the correct size (either via Properties (F4) or by using the space bar to select the resize widget).
3. Open Kismet using the K icon from the top menu bar.
4. With your [Trigger] still selected in the viewport, right-click in an empty space and select New Event using Trigger (***)/Touch.
5. Change its Max Trigger Count (from the Properties/Sequence Event menu at the bottom) to 0. This means it is able to be retriggered indefinitely.
6. Create a [Toggle] object in Kismet (New Action/Toggle/Toggle) and connect the Touched output of the Trigger Touch event to the Toggle input.
7. Back in your Perspective viewport, right-click to Add Actor/Add [AmbientSoundSimpleToggleable].
8. Choose an alarm sound from within the GAT_A_Alarm package.
9. Add this sound to the [AmbientSoundSimpleToggleable] by selecting the Sound wave in the Content Browser and using the green arrow within the properties of the [AmbientSoundSimple Toggleable].
10. With your [AmbientSoundSimpleToggleable] selected in the map go to Kismet and Right Click on the Target of the [Toggle] object. Choose “New Object Var using AmbientSoundSimpleToggleable_0”.
11. Play your level. When the player collides with the invisible [Trigger], the alarm should sound. When the player moves away, it should stop.
12. You could now extend this system by putting a [Trigger] around the button and creating a ‘Used’ action in Kismet to toggle off the alarm.
Ambient Loops and “Phasing Loops”
Looping sounds are good for things that produce sounds that are by their nature constant or repetitive. If you have a problem loop that sounds unnatural, you can break up the looping feel by having another sound of a slightly different length playing at the same time. These two loops will drift out of time with one another, so the resulting combination of the two sounds will be different each time.
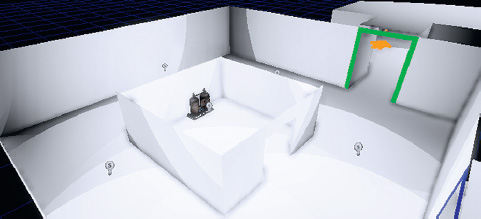
104 “Phasing” Ambient Loops

We’ve discussed how room tones and mechanical/electrical sources are often repetitive or constant in nature, and most of the time this is why the [AmbientSoundSimple] loops are appropriate. You may feel under certain circumstances that these loops are too repetitive. This is a particular problem when creating an ambient environment for more natural sounds. We’ll deal with other solutions later, but at this stage you’ll note that you can actually play more than one sound at once with an [AmbientSoundSimple] by adding another sound slot (using the + sign). It will then loop both (or more) of your sounds.
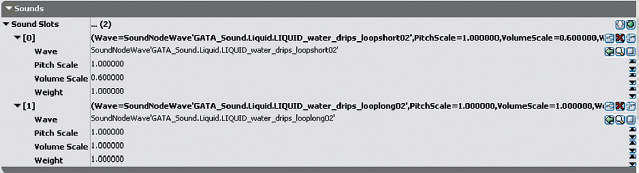
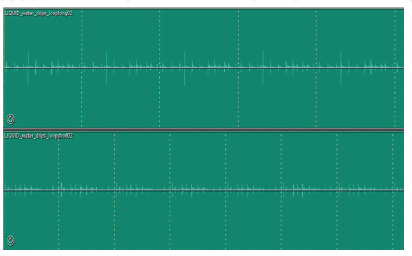
You can help to beat the sense of repetition by making these looped sounds different lengths. This means they will “phase” in and out of time with each other. As each sound loops around, it does so at a different time to the other loop, so you will get a new combination of the two sounds. In the tutorial-level example, there are two short loops of water dripping in a cave. As the two sounds loop around, they will be out of time with each other; this will create new rhythms and combinations of their drip sounds, which would otherwise be repetitive. In the following illustration you can see that the combination of the two sounds will not actually become the same as it was in the beginning (with the beginning of both sounds heard at the same time) for quite some time.
These are sometimes referred to as “phasing loops” as the two loops “phase” in and out of time with each other. This useful technique is not to be confused with “phasing,” which is actually a problem to avoid that we’ll be dealing with later. In the next chapter, we’ll also be looking in more detail at methods for dealing with the problems of repetition in game audio.
The “Walls” Problem
Accurately calculating and re-creating the physics of sound in the real world still remains out of the reach of modern consoles because of their current processing capabilities. In many games editors we still need to fudge things a little to make them sound right—little things, like the existence of walls!
105 Ambient Sounds “Walls” Problem
In Room 105, you can see that we have put an [AmbientSoundSimple] on the machine inside the smaller room. If you wander around the room in-game, then you will quickly notice the problem. When on the outside of this room (around the back) you can still clearly hear the machine that’s on the inside, despite the fact that there’s actually a wall in the way.
When standing here, you can still hear the machine on the other side of the wall.
For the machine to sound natural in the room itself, the Min/Max attenuation needs to be as it is, but the walls do not automatically block the sound as they would do in the real world. Trying to stop this overlap means moving the sound’s center of origin away from the object itself. This is not satisfactory. There are other solutions to this problem, but in some editors it is common for you to need to create several instances of the ambient sound so that it fills the room space but does not overlap the wall.
Multiple Sounds Solution to the Walls Problem
105a Multiple Sounds Solution

In Room 105a, you can hear that several smaller [AmbientSoundSimple]s have been used to give the impression of the room being filled with the sound of the machine. We no longer perceive the machine as a point source, but instead its sound fills the room. This approach requires care with the Radius Min and Max settings, as overlapping sources effectively double the volume. We can see that this is a partial solution but remains less than ideal. Fortunately, UDK offers another solution that we will look at in Chapter 3 (see the section titled “Ambient Zones”), but in some other editors you may need to continue to use this approach. If you do, then you should be conscious of some additional issues that may arise.
The Number-of-Voices Problem
We will discuss the numbers of simultaneous sounds you can have playing in your games later (Chapter 6, in the section titled “Voice Instance Limiting and Prioritization”), but be aware that it is a finite resource. Using multiple versions of the same sound will use up multiple voices.
Panning Problem
105b Panning
You’ll notice in Room 105b that each copy of the sound is spatialized. In other words, it pans from speaker to speaker as you move around. This will sound very strange, as you want to give the impression of one sound source, not many. If your editor supports it, then you can turn of panning/spatialization for these sounds. In UDK, you can do this in the [AmbientSoundSimple] properties by unchecking the spatialize box.

This has been done for Room 104b.
Phasing Problems
105c Phasing problem of overlapping sounds

When sounds are played simultaneously, their waveforms interfere with each other. If the same sound is played very slightly out of time with itself (anywhere between approximately 1 to 35 milliseconds), you get an artifact known as phasing. (This does not refer to the more useful Phasing loops techniques explored earlier.) If we have multiple versions of the same sound overlapping each other in order to fill a space, then the chances of producing phasing are significant. Listen to the effect on the sounds of running water in Room 105c. Sounds with greater high-frequency content are more susceptible to this problem, so avoid overlapping these sounds. If you have no other choice, then you can use the Pitch property of the [AmbientSoundSimple] to slightly detune them from each other to help alleviate this effect.

Exercise 105c_00 [AmbientSoundSimple] Test Area
Open the Exercise 105c_00 level. You will notice that there are a number of problem areas where the existing ambient sounds are appearing where they shouldn’t be. Edit their Radius Min/Radius Max settings or try re-creating the space using several more [AmbientSoundSimple]s to overcome these problems.
Tips
1. Try using multiple versions of the sound to fill the space.
2. Experiment with the Radius Min/Radius Max settings.
3. Switch off Spatialization if the panning of sounds is too distracting.
4. Slightly detune multiple instances of overlapping sounds to avoid phasing problems.
[Trigger Volume] Switching Solution to the Walls Problem
105d Inside/Outside Toggle

In 105d we can see the problem illustrated again as we have the machine tone inside the inner room and a general room tone for outside of this room. You can also see a green box surrounding the inner room. This is a [Trigger Volume], and it is going to help us avoid the issues that arise from the “multiple sounds” solution identified earlier. This time the sounds are using [AmbientSoundSimpleToggleable] Actors.
What the [Trigger Volume] is going to do is to toggle off the outside sound and toggle on the inside sound when the player is inside, and vice versa.

The [AmbientSoundSimple Toggleable] Actor has additional settings that can give it a more subtle fade in/out as we cross the threshold from inside to outside. In this case, the distance is so small it takes place over one second.

To create [Trigger Volume]s, we use an approach that is similar to that used for making level geometry. As this is a slight tangent to our main topic, we have put these level building tips and techniques into Appendix C: UDK Tips. Please read the section on the Builder Brush before attempting the next exercise.
Exercise 105d_00 Kismet [Trigger Volume] “Touch” Switching for Occlusion
In this exercise there is a city street and a cafe. Using sounds from the Sound Library (Cafe ambience // City ambience), or your own, implement a simple switching occlusion for this environment.
Tips
1. Use two [AmbientSoundSimple] toggleables one for the outside area and one for the inside. (Remember, these are found in the Actor Classes tab of the Content Browser). Select this Actor Class, then right-click in your Perspective viewport to add.
2. Add your sound waves to the [AmbientSoundSimple Toggleable]s in the usual way, by selecting them in the Content Browser then using the green arrow within the properties of the Actor.
3. Select the green [Trigger Volume] around the Cafe area we have provided for you then right-click in Kismet to create a New Event using Trigger Volume (***) Touch. Then use the Touched and Untouched outputs of this to toggle your inside and outside ambiences on and off. (Remember to set the Max Trigger Count within the Sequence Event properties of the Touch event to 0 so that it can be retriggered multiple times).
Exercise 105d_01 [Trigger Volume]s Exercise
Use [Trigger Volume]s to trigger the dialogue cues as described in the exercise README to help your players find their way through this maze.
Tips
1. Use the builder brush (select F2/then the Home key to find it) to make [Trigger Volume]s (see Appendix C: UDK Tips/Builder Brush).
2. Use the scale and rotate tools (space bar) to alter the Builder Brush’s size and rotation before right-clicking on the Volumes button to create the [Trigger Volume].
3. With the [Trigger Volume] selected in the Perspective viewport, right-click in Kismet to select New Event using Trigger Volume (***) Touch.
4. Link the Touch output to your [PlaySound] objects (right-click New Action/Sound/Playsound).
Ambience: A Painterly Approach
Much of this chapter has focused on creating background ambience to make your game world seem alive and real. A useful analogy when considering ambience is that of an oil painting. When you look at a finished oil painting, you get the impression of a complete and convincing picture. However, not one area of the painting is the result of a single brushstroke but instead is made up of layer upon layer of paint to achieve the final effect. You should think of you ambience in the same way. The final effect will need to be built of many different layers of sound, such as layers of distant, middle distance, and close.
Exercise 105d_02 Listen
There is no exercise room for this task. You will simply need a pen, a piece of paper, and some ears (preferably, but not exclusively, two). Listen to what’s around you right now and write down everything you can hear. Absolutely everything. Try this alongside someone else, then compare your findings. The hope is that you’ll be surprised by your findings (unless you happen to be sitting in an anechoic chamber, and even then ….).
Tips
1. Listen and write down what you hear.
2. Now draw a diagram of all the sounds around you. Put them in the location from which you hear them, and use different circles of different sizes to represent their relative volumes.

3. Now grab your audio recorder and record them. Get one of the previous exercise rooms, delete everything, and make a game level called “MyPlace.”