Lay out the long, rectangular canvas tarp on the floor horizontally, fold it in half once crosswise, and then again (also crosswise), so that it is a rough square with four layers of fabric. Your 4′ by 15′ tarp is actually a bit smaller than that (the finished size—the actual size of the tarp once it’s been hemmed at the factory—is usually closer to 3 3/4′ by 14 3/4′), so this square is roughly 44″ tall by 47″ wide. Now fold it once lengthwise, along the vertical axis, resulting in a packet of cloth that has eight layers and is 44″ tall by 23 1/2″ wide).
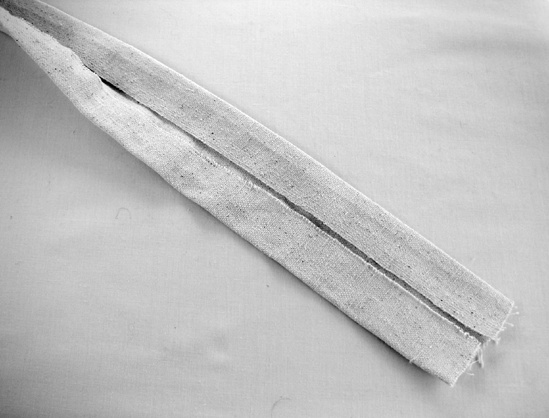
Starting at the folded edge, measure 5″ along the top of your folded canvas and mark this point. Draw a line from your mark to the opposite lower corner (the longest possible line that can be drawn from this point—see Figure 4-3).
Set the clothes iron to its “cotton” setting (usually the highest temperature). While the iron is warming up, find the mightiest scissors you can muster, and cut along the line from Step 2. This will probably be a royal pain in the ass; work slowly, and give your thumb a periodic break.
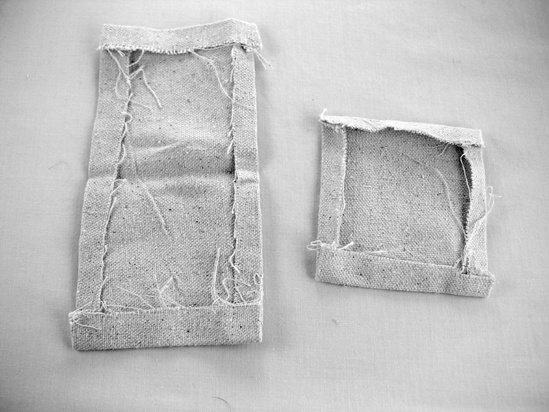
If you were to completely unfold the tarp right now, you’d have a set of simplistic canvas paper dolls. Do not do this! Unfold the final lengthwise fold of the tarp so that you have a trapezoid, slip the scissors into the creases at the top and bottom of your trapezoid, and trim the connecting edges. The result will be four identical trapezoids and a whole lotta scrap, as in Figure 4-4; save the scrap.
Prepare each trapezoid to be hemmed. Assign an outside (front) and inside (back) to each trapezoidal wall. Lay out one wall, front down, fold in roughly 1/2″ along the top edge of the trapezoid, and press it with the hot iron, making a nice sharp crease (see Figure 4-5; if your iron doesn’t have steam, then spritz the cloth with water before ironing). Repeat this on the bottom and then along each angled side (which will be a little trickier). Do this for each trapezoid. Leave the iron on the same setting, since you’ll be ironing again in a few minutes.
Pick one trapezoid to be the door wall (Figure 4-6). Find the center of the top edge of the trapezoid, measure roughly 9″ down, make a mark for your endpoint, and then cut up from the bottom of this piece (the crease from Step 1 makes a handy guide).
Time to return to the scrap pile. You are going to need the following pieces: two long rectangles that are 36″ by 4″ (you can probably find a 4″ strip that’s 72″ long; use it, as it will save you some time in Step 8), four rectangles that are 4″ by 8″, and one rectangle that’s 4″ by 4″ (this piece will reinforce the top of the door flap cut and can be replaced with a cool patch or other decorative flourish).
Start with your long strip, which will be the edging for the door flaps. If you found a 72″ long piece, then fold it in half so you have a 36″ long piece that’s double thick, and press the crease. Fold this long strip once along its length (i.e., make it into a 36″ long, 2″ wide strip that has a central crease and four layers) and press it again. Unfold it, bring both edges in to the center line as shown in Figure 4-7, press the long edge creases, then fold it closed again and freshen up the edge and central creases.
Unfold, slide your scissors into the short crosswise crease, and free the two 36″ strips from each other. Refold each and give them one more press for good measure. Set them aside carefully to preserve the creases and avoid crumpling.
The four 4″ by 8″ rectangles will be the pockets that hold the feet of your four teepee poles. For each of your 4″ by 8″ rectangles: Fold in 1/2″ on each side, press, then fold it in half (so that you have a roughly 4″ by 4″ square with two layers) and press the crease (the result is shown unfolded on the left side of Figure 4-8). If you’re going to use a plain piece of 4″ by 4″ canvas to reinforce the top of the door flap, then fold in 1/2″ along each of its edges and press them now. Set these all aside.
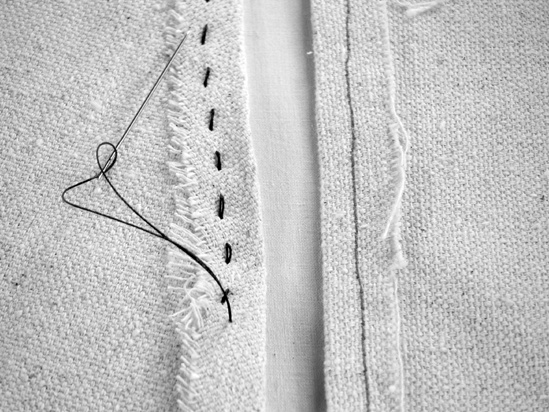
Time to sew! Start by sewing the top and bottom hems for each trapezoid. You can do this by hand using a running stitch (see Figure 4-9; the running stitch is the most basic stitch, the one a classic TV bachelor thinks of when you say “sewing”) or save time by running them through a sewing machine.
Add the edging to the door flaps: Lay the door wall out flat, and slip the long edging strip over the edge, pinning it down in several places along its length. Sew the edging in place, leaving roughly 3/4″ between your stitch line and the opening edge of the flap. As you sew, slip the magnets in against the crease of the edging (see Figure 4-10; you want one magnet near the middle of the door and one at the bottom)—you’ll do likewise with your magnetic bolts on the other flap. You can secure them for the time being with a little tape or fabric adhesive.
The edging will be 1″ or so longer than the door opening. Fold the excess up under the door, and stitch it to the inside of the flap. Some sewing machines can power through this many layers of canvas, but it might be easier to hand stitch. Finally, go back and add a line of stitching above and below each magnet or bolt, thus trapping it in a little pocket.
To finish the door, sew the 4″ by 4″ door flap reinforcement square (or awesome and culturally appropriate patch) over the top of the door flap cut, as in Figure 4-11; this covers the messy ends of the edging and keeps the cut from running.
Now you’re ready to construct the teepee body. Take two of the walls, lay them flat, place them front to front, and run a line of stitches down the left angled edge. Now take the other two walls and do likewise, this time running stitches down the right angled edge (resulting in the two sets of canvas batwings shown in Figure 4-12). Make sure that you are sewing them with the insides facing out!
Take your two halves, open them up, place the pretty front of one half to the pretty front of the other, and stitch up your last two sides. You now have an inside-out teepee. Leave it that way for the final bit of sewing.
Install the pole pockets. Center a folded pocket over the foot of one long seam, as close to the bottom as possible with its bottom toward the corner. Sew it down, leaving the top of the pocket open as shown in Figure 4-13. Repeat on the other three corners, then turn the teepee’s canvas body right side out, and set it aside.
Take each length of PVC, measure 3″ from one end, and drill a 1/4″ hole all the way through. Knot the end of your cord, and string the four poles on it loosely, like femurs on Kali’s necklace. Leave some slack (as shown in Figure 4-14), and knot the other end.
To pitch the teepee, slide the poles in through the “smoke hole” at the top of the canvas body, lining it up so that the pole cord follows an invisible line connecting the middle of the door wall and the middle of the back wall. Divide them into a pair of front poles and a pair of back poles. Flip the tent, then slip the front two poles into the front two pole pockets and the rear two into the rear two pockets. The teepee will now look a bit like a closed umbrella. Flip it back, set the feet of the poles against the ground, and slide them apart, so that each pair of poles makes an inverted V. Interlock the vertices of the two inverted Vs, as shown in Figure 4-15. Adjust as needed (you may want to add or take up slack in the cord). Now is a good time to snip any unsightly stray threads, before the local band of Lunar Lakota take possession of their new home.