
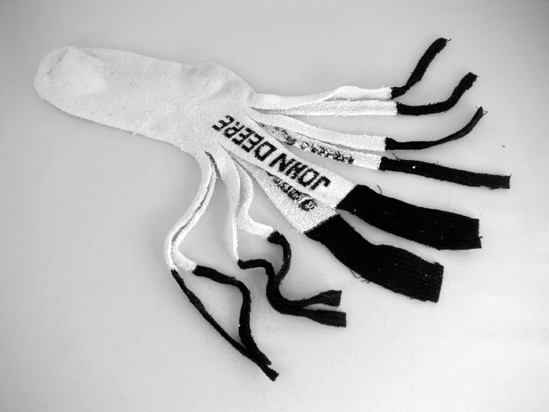
Lay your sock out flat and measure the width of the top (the sock’s opening). You are going to snip all of the sock above the ankle into strips, which will ultimately become our squid’s arms and tentacles. As Figure 3-3 illustrates, you’ll want each of the arms to be roughly half the width of the two big tentacles. If your sock is around 3 1/2″ wide (which isn’t unusual), you’ll want each arm to be about 1/2″ wide and the tentacles a bit over 1″ wide (wider tentacles will be easier to work with). To generalize this: In terms of squid appendages, the top of your sock is 6x inches across, where each arm is x inches wide, and the tentacles are 2x inches wide. If you do the math for this hypothetical sock, you’ll find that the arms should be 0.58″ wide each. This is a terrible number; round the arms down and the tentacles up, and be happier for it.
Picture an imaginary line across the ankle of the sock, and snip each squid appendage up to that point. Cut through both sides of the sock simultaneously (thus saving time and keeping the squid symmetrical), then cut up the folded sides (the arms at either edge in Figure 3-3), freeing the squid’s end arms, as illustrated in Figure 3-4.
Fold one tentacle (one of the two double-wide appendages) in half, with the inside out, and trim the tip to a point (hacking off the corner at 45 degrees is good enough). Starting about 1″ from the tentacle’s base (i.e., the point where it joins the sock), use matching thread to sew the tentacle edges together using a whipstitch (shown in Figure 3-5, this is a looping overhand stitch that passes over the edge of the seam, so that each stitch enters the same side of the cloth; the path of the thread describes a helix). Repeat on the other tentacle.
Carefully turn your tentacles right side out. This is much easier if you use a pair of needle-nose pliers. Starting where the tentacle meets the body, slide the tip of the pliers into the inside-out tentacle, open them gently to stretch out the tentacle, clamp a little bit of fabric about 1″ down, and slowly pull it through. Repeat until the whole tentacle is right side out. Then give the tentacle a few stretches and sew up the inch of seam you left open at the base of the tentacle. Repeat on the other hunting tentacle.
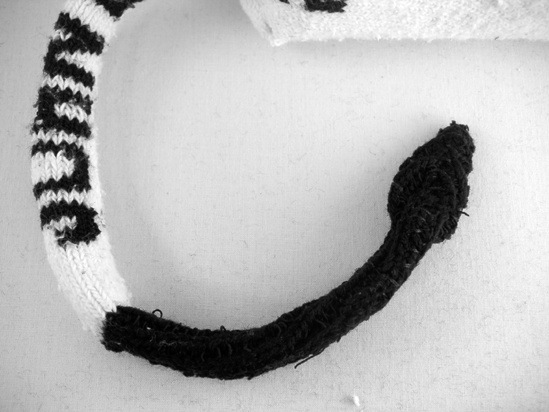
To give each tentacle its characteristic broad, spade-shaped tip, hold the tip of the tentacle with its seam toward you and running down the center (like the main vein on a leaf). Flatten the tip with your fingers, and then whipstitch around the edge using matching thread. To finish the tip, pinch the whipstitched edges together about 1″ below the tip, and use a few stitches to dart the sides together, forming a skinny “wrist” (as in Figure 3-6).
Now for the eight arms. Trim 3″ or 4″ from each arm, rounding the tips. We’re going to use the tapestry needle to finish the edges of the arms with the contrasting embroidery floss. Embroidery floss is colorful, shiny yarn composed of six cotton threads. For most embroidery projects you only use a few strands of floss at a time. Since we want a thick line to both decorate and reinforce the arms, we’ll use all six strands together. This will be easier if you use a tapestry needle instead of an embroidery needle, as the former is fatter, blunter, and has a nice big eye.
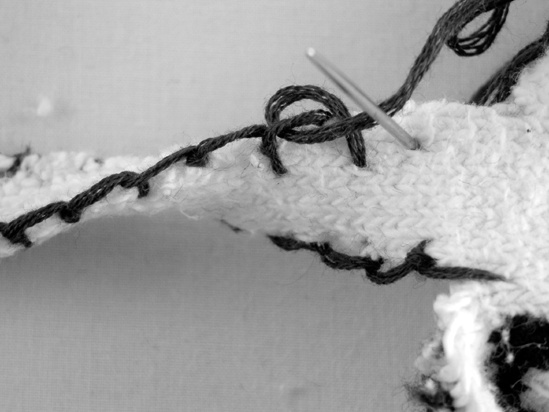
Finish the rough edges of the squid’s arms with a blanket stitch.[1] Pick up your sock and hold it so the appendages dangle down. Start at the base of one arm, with the inside (the ugly side) of the sock facing away from you. Thread your tapestry needle (as shown in Figure 3-7), tie a big knot in your embroidery floss, and then bring the needle up through the fabric, setting the knot on the inside of the sock. To execute your first blanket stitch, bring your threaded tapestry needle up through the fabric from the ugly side again and pull all of the slack through. Then thread your needle back under the stitch you just made, looping in from behind as shown in Figure 3-8. Take out all of the slack, and bring your next stitch up from the ugly side. Repeat, sewing down the arm, then flip the squid over when you get to the tip and continue down toward the arm’s base. Keep going onto the next arm until you are out of floss. As you get the hang of it, you’ll find that you can work quickly by starting the next stitch in the same motion that finishes the previous. (If the blanket stitch is stressing you out, you can always just whipstitch the edges; it will hold up but will tend to curl the arms along their length and won’t look as tidy.)
Add fins to the mantle (see Figure 3-9 for a close-up). Lay your sock down right side out, with the toe flattened, and imagine two lines giving the toe a triangular tip. Use your sewing needle and matching thread to sew a running stitch along these imaginary lines (the running stitch is a classic, simple stitch; see Figure 4-9 for an example).
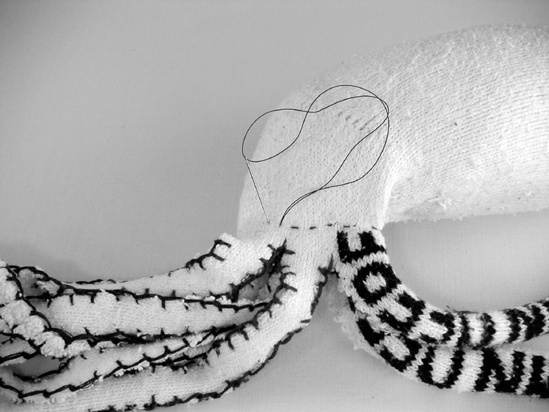
Stuff the squid’s mantle. You can buy brand-new fiberfill for this at any fabric store (it’s pretty cheap; three dollars’ worth will fill dozens of sock animals), pull a little out of a throw pillow, use some rags, or use the other sock of the pair, which you won’t be needing for anything else (unless you plan on making a Sock Cthulhu; see “Sock Cthulhu” on the next page). Once your squid is appropriately plump, press the mantle flat at the base of the appendages, so that the hunting tentacles are on the left and right. Pinch the fabric at the sock’s heel, and fold it so that the two tentacles come together behind the mantle. Now use your matching thread to sew a running stitch through all four layers of sock along the base of the tentacles as shown in Figure 3-10.
Add eyes. You can either sew on a pair of buttons or use more embroidery floss to craft whatever eyes you deem fit. Slightly mismatched eyes are slightly creepier.


[1] A blanket stitch is a fancified version of a whipstitch, usually used to finish the edge of a woven blanket so that it doesn’t unravel.