
4
Data Security Overview in SharePoint 2010
SharePoint 2010 has introduced new features to handle security. On the SharePoint Central Administration page is a section labeled Security that allows administrators to manage user access, user policies, and configure service accounts. You can view all the available options by clicking the Security link on the Central Administration page, as shown in Figure 4-1.

MANAGED ACCOUNTS
SharePoint 2010 introduced the concept of Managed Accounts. This provides administrators greater control over domain accounts that are assigned to services and components that are part of SharePoint. To configure the managed accounts, select the Configure Managed Accounts link under the Security category, as shown in Figure 4-2.

To add a new user, click the Register Managed Account link in the top-left corner of the Managed Accounts page and the dialog shown in Figure 4-3 will appear.

Enter the username and password for the user you would like to add. Click OK to add the user. You can also allow SharePoint to automatically manage and handle password changes for any domain account added as a Service Account. To do this, simply check the box labeled Enable Automatic Password Change. When this option is enabled SharePoint will generate a new strong password based on the schedule that you specify. In addition you can have an e-mail notification sent before the password is changed.
Please note that when you allow SharePoint to handle your password changes you will not know the password. Therefore, careful consideration should be taken when deciding whether or not to allow SharePoint to manage your passwords. If the password is changed in Active Directory you will be required to change the password from the Managed Accounts page. To change a password, click the Edit icon under the Edit column of the Managed Account list. Check the box labeled Change Password Now. You can either allow SharePoint to generate a password, set an account password to a new value, or use the existing password.
Finally, you can also remove the account from SharePoint by clicking the X in the Remove column of the Managed Account list. Prior to removing the account you must disassociate it from any SharePoint service. As mentioned earlier, if you allow SharePoint to manage the passwords for an account, you will not know them. Therefore, prior to removing the account you should change the password.
UNATTENDED SERVICE ACCOUNT
Before using PerformancePoint Services to access any external data you must configure the unattended service account. This is a single shared user account that is used to access data sources. Before you select an account you must ensure that is has access to all the data that will be used in your Dashboard.
To configure the account, click the Manage Service Applications link under the Application Management category. Select the PerformancePoint Service Application Service then click the PerformancePoint Service Application Settings link on the next page. On that page, as shown in Figure 4-4, enter a valid user name and password for the unattended service account.

Accept the defaults for the other settings and click OK. Your account has been configured and you can now start creating and deploying your PerformancePoint Dashboards.
OFFICE AUTHENTICATION OPTIONS
In SharePoint 2010 all of the Microsoft Office products are more integrated than in any of the previous SharePoint versions. As a result, this can increase collaboration and productivity across teams and departments. Individuals are now able to communicate seamlessly through the use of several of the new features. Because this book is focused on BI, this section primarily discusses Excel integration. However, you should note that because all the Office products have the same look and feel, once you are familiar with Excel it will be easy to switch back and forth between the various Office products.
Importing and exporting Excel workbooks into SharePoint enables end users to share work and data quickly and more efficiently. You can allow your users to save workbooks from Excel or upload workbooks directly into SharePoint. However, if the data in the spreadsheet is from an external source, SQL Server, or Analysis Services, you must ensure that you correctly configure the authentication options.
When data is imported into Excel from an external data source you must ensure that the correct authentication option is selected. To import data into Excel, first open Excel then select the Data tab on the ribbon. Finally, select From Other Sources and choose From SQL Server. The Data Connection Wizard will start, as shown in Figure 4-5.

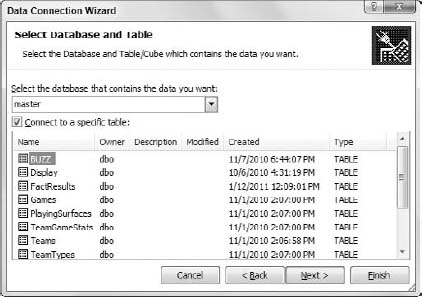
Enter an SQL Server that you have access to and select Windows Authentication or enter a valid user name and password. Then on the Select Database and Table screen, as shown in Figure 4-6, choose a database and a table that has some data.
Finally, on the Save Data Connection File and Finish screen you will configure how the data will be accessed. Click the button labeled Authentication Settings. You have three options. The first is Windows Authentication, which uses the logged-on user's identity to authenticate to the data source. This is typically the default method for connecting to an SQL Server or Analysis Services data source. It is also considered to be the most secure method for accessing external data.
The second choice is SSS, which is Single Sign On. This method relies on a database that stores the credentials for accessing the external data. In this case, Excel Services will obtain the credentials required to authenticate to the SQL Server. The final choice, None, means that credential retrieval should not take place. This does not mean that authentication will not occur. Because you have configured an unattended service account, the data will be accessed using that account. Therefore, you should select None. Once you have imported the data, you have two ways to publish the workbook to SharePoint. First, you can upload the workbook directly from SharePoint. Second, you can publish the workbook from Excel. To upload the workbook from SharePoint, open Internet Explorer and browse to the web application, 24HourSharePointBI, that you created in the Try It section of Lesson 3. Once there, click the All Site Content link in the left navigation pane, as shown in Figure 4-7.

Here you can create your own document library or you can select an existing library. For now, just select Documents from the list of available Document Libraries. Next, click the Add Document link and the Documents – Upload Document screen will appear, as shown in Figure 4-8.
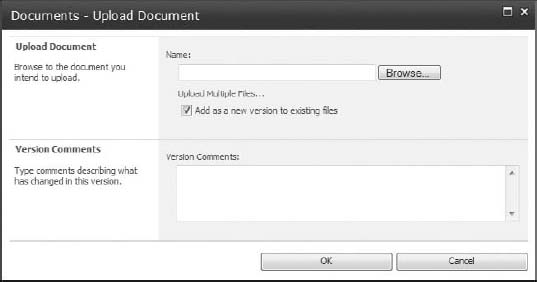
Before uploading the workbook, you must save it to a location on your machine. Save it as Lesson4Workbook. Back on the upload screen, browse to where you saved the workbook and select it. Then you can add versioning and version notes if you like. Finally, click OK to upload the workbook. The workbook is now available on the SharePoint site, as shown in Figure 4-9.

BEST PRACTICES
When storing Excel workbooks and accessing external data inside of SharePoint 2010, you should consider a couple of best practices before deciding on your methodology. First, in regard to storing workbooks, you should store them in the SharePoint 2010 content database. Excel workbooks can be accessed from UNC paths and HTTPS websites. However, by storing them in the content database, SharePoint will maintain an access control list for the files. Through the use of Excel Services, SharePoint will use claims-based authentication to improve security so that you can authenticate to various environments from Office applications, SharePoint services, and other web farms. In short, claims-based authentication is a method of authentication that is flexible and requires less specific information about the requesting user. This method of authentication trusts external systems by doing a proof of identity check instead of requesting a user name and password.
In addition to storage location of files, you should also consider your authentication method when accessing external data. As mentioned in the previous section, three types of authentication are supported by Excel Services. As a best practice, it is recommended that you use Integrated Windows Authentication because Excel Services depends on claims-based authentication. With this approach, data can be accessed by users without the need to provide their credentials more than once.
TRY IT
In this Try It you learn to configure the unattended service account for PerformancePoint Services. Then you upload an Excel workbook that contains data from the AdventureWorksR2 database into SharePoint.
Lesson Requirements
Before you set up the unattended service account for PerformancePoint Services, ensure that you have created an account that has the appropriate data access permissions. You will also need the AdventureWorks2008R2 database, which you can download from www.codeplex.com. You will also need to know the name of your SQL Server.
To complete this lesson, you configure an unattended service account. Then you export data from SQL Server into an Excel workbook. Finally, you publish the workbook from Excel to SharePoint.
Hints
- To configure the unattended service account, you have to successfully configured the Secure Store Service.
- In addition, you must generate a new key to ensure that the unattended service account can be configured.
- To publish the workbook from Excel to SharePoint, click the File tab in the Excel ribbon menu. Then choose the Save & Send option, which will expose several save options.
Step-by-Step
- Open SharePoint 2010 Central Administration.
- Click the Manage Service Application link under the Application Management category.
- Locate and select the PerformancePoint Service Application, as shown in Figure 4-10.
- Click the Manage button located on the menu bar.
- Click PerformancePoint Service Application Settings as shown in Figure 4-11.

- On the Application Settings page enter a valid user name and password.
- Accept all defaults for the additional items and click OK.
- Open Microsoft Excel 2010.
- Click the Data tab and select the From Other Sources option.
- Select From SQL Server in the drop-down list that appears.
- Enter a server name and either choose Windows Authentication or enter a user name and password.
- Click Next.
- On the Select Database and Table screen, as shown in Figure 4-12, choose AdventureWorks2008R2 and select the Employee table.

- Click Next.
- On the next screen click the Authentication Settings button.
- Select the radio button labeled None.
- Click OK.
- Click Finish.
- On the Import Data screen select Table and ensure that you specify $A$1 as the starting point for the table.
- Click OK.
- Click File in the menu bar.
- Choose the Save & Send option.
- Select Save to SharePoint, as shown in Figure 4-13.

- Double-click Browse for Location.
- In the URL bar type http://<yoursite>/Documents. Replace <yoursite> with web application URL that was created in Lesson 3.
- In the FileName textbox name the workbook Lesson4TryIt.xlsx.
- Click Save and the workbook is published to SharePoint.

 Please select Lesson 4 on the DVD to view the video that accompanies this lesson.