
Defining and Managing Indexes
Now that you have seen what indexes are and what they can do for the performance of your SQL queries, you will learn how to create and maintain any indexes on your database. Before you start creating indexes, you need to consider where you need indexes and on which columns. In addition, you also must decide whether to use clustered or nonclustered indexes. When considering whether to create an index on a column, you should consider whether and how an indexed column is going to be used in a query. What follows are some suggestions in deciding if indexes are useful in a query:
Searches for rows that match a specific search key value (an exact match query). An exact match comparison is one in which the query uses the WHERE statement to specify a column entry with a given value.
Searches for rows with search key values in a range of values (a range query). A range query is one in which the query specifies any entry whose value is between two values.
Searches for rows in a table that, based on a join predicate, match a row in another table.
Queries that produce sorted query output without an explicit sort operation.
Queries that scan rows in a sorted order to permit an order-based operation, such as a merge join.
Queries that scan all rows in a table with better performance than a table scan because of the reduced column set and overall data volume to be scanned.
Searches for duplicates of new search key values in insert and update operations, to enforce PRIMARY KEY and UNIQUE constraints.
Searches for matching rows between two tables, for which a FOREIGN KEY constraint is defined.
In the following sections, you will learn how to create an index and then how to set up automatic maintenance of an index.
Creating an Index
After you have determined what indexes you want, they can be created on the tables in a database. As you have probably figured out by now, this can be done is several different ways. The first way is to use the DDL SQL code to create a SQL script that will define an index on a table. The CREATE INDEX statement is used to create an index. The following is the syntax for this statement:
CREATE [UNIQUE] [CLUSTERED | NONCLUSTERED] INDEX <index name>
    ON [table name | view name]
       (column name [ASC | DESC] [,..n])
[WITH
    [PAD_INDEX | FILLFACTOR = fillfactor]
    [[,] IGNORE_DUP_KEY]
    [[,] DROP_EXISTING]
    [[,] STATISTICS_NORECOMPUTE]
    [[,] SORT_IN_TEMPDB]]
[ON filegroup]
Table 9.2 lists each argument and its description.
To create an index on the Employees table in the Northwind database, you could use the following SQL statement:
Caution
Don't try to actually execute this statement on the database. The Employees table already has a clustered index defined to it. You will receive an error from the server telling you that the index already exists.
CREATE UNIQUE CLUSTERED
  INDEX [PK_Employees] ON [dbo].[Employees] ([EmployeeID])
WITH
    DROP_EXISTING
ON [PRIMARY]
As you will see, the CREATE INDEX statement is a little more difficult to work with than the next two methods you will look at.
Creating an Index Using the Index Wizard
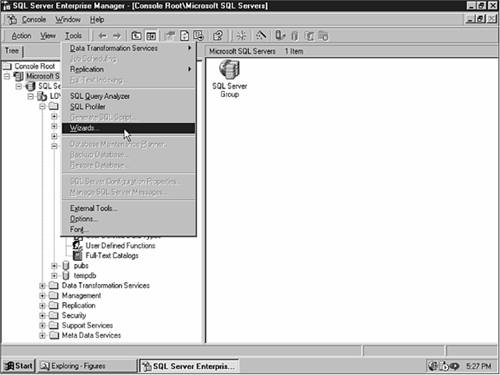
The Index Wizard in the Enterprise Manager will walk you through the process of creating an index on an existing table. To access the wizard, start the Enterprise Manager, and then either select Tools, Wizards from the menu, or click the Run a Wizard button. (Both are shown in Figure 9.4.)
Figure 9.4. Starting the Index Wizard.
Next, open the Database folder and click the Create Index Wizard. This will display the Welcome to the Create Index dialog form. Click the Next button to continue to the Select Database and Table dialog as shown in Figure 9.5.
Figure 9.5. Selecting the database and table to create an index on.

For this example, select the Northwind database and the Employees table, and then click Next to continue. The next dialog (see Figure 9.6) will display the current indexes on the selected table. This enables you to check whether the index you are creating already exists for this table.
Figure 9.6. Verifying the existing table indexes.

If you do not see an existing index that satisfies your requirements, click Next to continue on to the creation process. Figure 9.7 enables you to select the columns you want in the index. In addition, you can specify the sort order for each column.
Figure 9.7. Selecting the columns for an index.

For our sample index, select the FirstName and LastName columns as shown. Then click Next to continue. The next dialog (see Figure 9.8) enables you to specify the options you want for the index. Because there is already a clustered index, you can click Next to bypass this form.
Figure 9.8. Specifying the options for an index.

You are in the home stretch. This last form enables you to name the index and specify the order in which the columns you selected will be indexed, as shown in Figure 9.9.
Figure 9.9. Naming and ordering the index.

Click the Finish button to complete the process and add the index to the table in the database. To view the indexes for the table, open the Query Analyzer, the Northwind database folder, the Employees folder, and, finally, the indexes folder. You will see the new index that was just created (see Figure 9.10).
Figure 9.10. Displaying indexes in Query Analyzer.

Creating an Index in Enterprise Manager
Besides creating an index using the Index Wizard or the CREATE INDEX statement, you have a third way of performing this task. From Enterprise Manager, you can right-click the table that you want to add the index to and select All Tasks, Manage Indexes from the pop-up menu as shown in Figure 9.11.
Figure 9.11. Select Manage Indexes in Enterprise Manager to either modify an existing index or create a new one.

This will display the Manage Indexes dialog. This form will list all the current indexes for the selected table (see Figure 9.12). To modify an existing index, select the desired index and click the Edit button at the bottom of the form. To create a new index, simply click the New button to start the creation process.
Figure 9.12. Existing Indexes list is displayed by the Manage Indexes dialog.

You can see that when you have this form open, you can change either the database you are working in, or the table you want to add an index to, using the two drop-down selection boxes at the top of the form. Let us create another new index for the Employees table. To start, click the New button to display the Create New Index dialog as shown in Figure 9.13.
Figure 9.13. Creating a new index is as simple as filling in the blanks.

To create the index, enter the name of the index and then select the columns you want to include in the index as shown in Figure 9.14. On this same form, you can also change the order in which the columns are indexed using the Up and Down buttons.
Figure 9.14. Defining the new index.
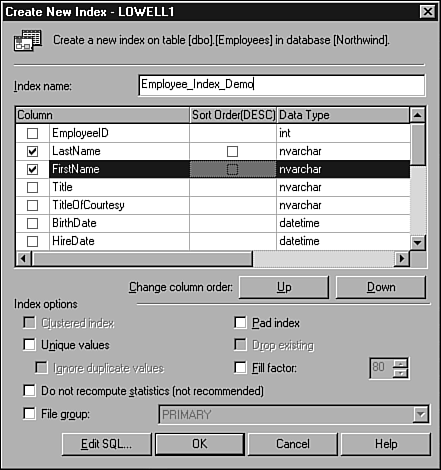
You should notice the Edit SQL button at the bottom of this form. This enables you to view and/or modify the actual SQL that will be used to create the index. Figure 9.15 shows the Edit SQL dialog. You can execute the CREATE INDEX statement right here, or close this form and click OK to have SQL Server do it for you automatically.
Figure 9.15. Working with the generated SQL for the CREATE INDEX definition you have just created.

After the Create New Index form is closed, you will see the new index appear in the Existing Index list.
Using Full-Text Indexing
As you have already seen in the previous lessons in this book, the WHERE clause enables you to reduce the amount of data returned from your database. By defining conditions in the WHERE clause, the server will then select the required rows of data from the database. However, when you use the CONTAIN keyword to look for a selection of text in a larger text column, the server must work harder. It must look at each value in the specified text column and then scan the text for the specified text. This is a time-consuming task. In SQL Server 2000, you now have the ability to create a full-text index on any text column in a table.
Note
This feature is installed by default unless you are running SQL Server on Windows 9x.
This feature is only possible because Microsoft has merged the Microsoft Index Server technology into SQL Server 2000. In addition, it also requires that the Microsoft Search service is running. (This is also installed and started as the default if you installed full-text indexing.) Finally, it requires a unique index be created on each table you want to use full-text indexing with.
Caution
Only the owner of the table can create a full-text index on it.
There can be only one full-text index on a table, and the index itself is stored outside of SQL Server (in mssql FTData). Unlike normal indexes, a full-text index does not update itself. After you create the index, it remains static unless you schedule a job to update it. (You will see how to do this in the next section.)
Creating a full-text index is a little different from creating a normal index. First, there is no DDL statement that you can use to create the index. However, there is a wizard available in the Enterprise Manager to take you through the process (of course!).
To start the wizard, in the Enterprise Manager, select the table for which you want to create the full-text index. You then have three ways of starting the actual wizard:
Right-click the table and select Full-Text Index Table, Define Full-Text Indexing on a Table from the pop-up menus.
Select Full-Text Indexing from the Tools menu.
Click the Wizard button on the Toolbar, open the Database folder, and click Full-Text Index Wizard.
For this example, I will be using the PUBS database table, Pub_Info. (This table contains a book title as a text data type column.) Although you can create indexes on columns with a data type of varchar, you cannot create one on a text data type. After you have started the wizard, click Next to bypass the intro form. The form shown in Figure 9.16 enables you to select the unique index to associate with this full-text index.
Figure 9.16. Specifying the unique index to be associated with the full-text index for the table.
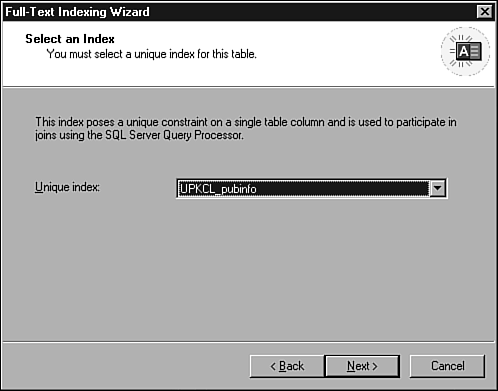
Select the unique index you want to use from the drop-down list. (There should be only one in the Pubs_info table.) Click Next to select the columns to index as shown in Figure 9.17.
Figure 9.17. Selecting the table columns you want to index.
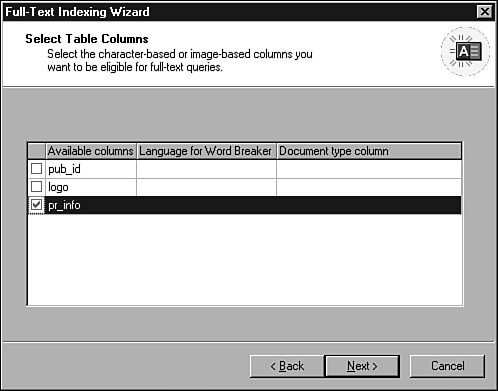
Select the pr_info column (this is the only text data type in the table) by clicking the box in front of the column name. The other options on the form are new features of SQL Server 2000. They enable you to index documents that have document filters available. An example would be a Microsoft Word document. You can even specify the language of the document. Click Next to select a catalog for the index as shown in Figure 9.18.
Figure 9.18. Selecting a catalog to store the index in.

If this is your first full-text index, then you probably do not have a catalog defined. Enter a name for a new catalog and, if you want, change the location of where you want to physically place it on the computer. If you had catalogs already created, you could have selected them from the drop-down list on the form. Now, click Next to display the optional schedules dialog. We are going to cover scheduling these tasks in the next section, so for now, just click Next to bypass this form. Click Finish to enable the wizard to perform the process of creating the full-text index. Figure 9.19 will be displayed when this process is completed. However, it also reports that your full-text index has yet to be populated.
Figure 9.19. The completion dialog from the wizard.

To populate the index manually, open the Pubs database, if it is not open, and then select Full-Text Catalogs. Now, right-click the catalog you just created (it should be displayed in the right pane), and select Start Full Population from the pop-up menu as shown in Figure 9.20.
Figure 9.20. Starting the population process for your new full-text index.

Congratulations! You have just created and populated the index and can now query against it. The following example shows a simple query using the full-text index:
use pubs
Select pub_id,
       substring(pr_info,1,50) as pr_info_50
From Pub_info
Where Contains (pr_info, 'sample')