
Using Views to Access Data
A view is nothing more than a virtual table whose columns are defined by using a SELECT statement. As with a real table, a view consists of a set of named columns and rows of data. However, a view does not actually exist as a physical table in the database. The rows and columns of data come from the tables referenced in the SELECT statement that defines the view, and are produced dynamically whenever the view is referenced.
Views enable you to look at data in the database without duplicating that data. A view provides you with a method to filter the data referenced in the SELECT statement used to define the view. This SELECT statement can reference one or more tables or other views in the current database or other databases.
Just about now, you might be wondering, "What can I really use views for?" The answer is, "Everything." Views can be used to limit the data that can be accessed by an application's process or as a way of simplifying access to the data.
Note
Because a view is defined in the database, a user or application program can access a view as if it were a regular table. So, views are used to restrict the data, or index the data, or even filter the data with a WHERE clause.
The types of views that you can create range from the very simple to the very complex. In the next several sections, you will see how to create and work with both types of views. Along the way, you will also see how to create and modify views by using both the Query Analyzer and the Enterprise Manager, which actually has two different ways of creating a view.
Creating a Basic View
A basic view is nothing more than a simple SELECT statement that retrieves data from a single table. When creating a view, you use a specific syntax, which is shown here:
Create View [<database name>.] [<owner>.] view_name
[(Column [ ,...n])]
[With <view_attribute> [ ,...n]]
As
Select_statement
Each of the arguments in this syntax is listed in Table 10.1 along with a brief explanation.
To understand views, we will start with a standard SELECT statement as shown:
use northwind
SELECT * FROM Employees
Results:
EmployeeID  LastName    FirstName  Region    (...)      Extension ReportsTo
----------- ----------- ---------- ----------(...)----- --------- -----
1           Davolio     Nancy      WA        (...)      5467      2
2           Fuller      Andrew     WA        (...)      3457      NULL
3           Leverling   Janet      WA        (...)      3355      2
4           Peacock     Margaret   WA        (...)      5176      2
5           Buchanan    Steven     NULL      (...)      3453      2
6           Suyama      Michael    NULL      (...)      428       5
7           King        Robert     NULL      (...)      465       5
8           Callahan    Laura      WA        (...)      2344      2
9           Dodsworth   Anne       NULL      (...)      452       5

(9 row(s) affected)
Note
Although I selected all the columns from the Employees table in this exam ple, I displayed only a few columns to keep the output readable and so that it would fit on one page.
As you can see, the SELECT statement returns all the columns requested in the Employees table. Now, let's trim this down a little. Suppose that the process you are working on needs only the name of the employee and his region. The new SELECT statement would look like this:
use northwind
SELECT EmployeeID, LastName, FirstName,
       Region
FROM Employees
Results:
EmployeeID  LastName             FirstName  Region
----------- -------------------- ---------- --------
1           Davolio              Nancy      WA
2           Fuller               Andrew     WA
3           Leverling            Janet      WA
4           Peacock              Margaret   WA
5           Buchanan             Steven     NULL
6           Suyama               Michael    NULL
7           King                 Robert     NULL
8           Callahan             Laura      WA
9           Dodsworth            Anne       NULL

(9 row(s) affected)
Okay, so far so good. But, what if you know that your application will need this selection of data over and over again? Well, one way to resolve this is to keep rewriting this SELECT statement whenever you need it. Or you can create a view that will return only this data. The following will create such a view when you execute this code in Query Analyzer.
USE Northwind
Go
CREATE VIEW Employees_VIEW
AS SELECT EmployeeID as Emp_ID, LastName as Lname,
          FirstName as Fname, Region as State
FROM Employees
The preceding CREATE statement consists of the CREATE VIEW command and the associated SELECT statement. You might notice that a new statement is included in this code. The GO statement tells the server to execute all the commands that precede it before continuing. This is required because a CREATE VIEW statement must be the first statement in a batch.
The preceding SELECT statement also provides alias names for the columns. When you use this view, you can reference those alias names as though they were the actual column names or use the star (*) notation to select all the columns in the view.
Use Northwind
Select * from Employees_View
Results:
Emp_ID      Lname                Fname      State
----------- -------------------- ---------- ---------------
1           Davolio              Nancy      WA
2           Fuller               Andrew     WA
3           Leverling            Janet      WA
4           Peacock              Margaret   WA
5           Buchanan             Steven     NULL
6           Suyama               Michael    NULL
7           King                 Robert     NULL
8           Callahan             Laura      WA
9           Dodsworth            Anne       NULL

(9 row(s) affected)
As you can see, the star (*) notation returns only the columns that were referenced in the creation of the view, not all the columns in the table.
Note
After you create a view, it will continue to exist in the database until you explicitly delete it.
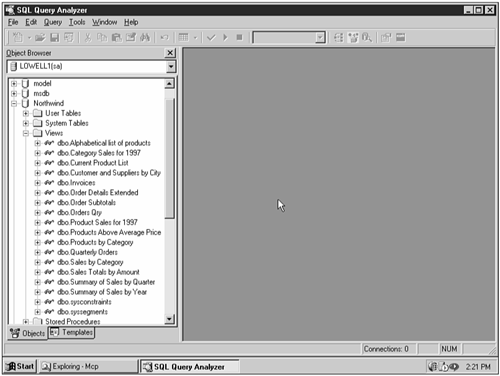
To see what views exist in the database, you can use the Object Browser in the Query Analyzer. When you start Query Analyzer, click on the database you are working with to expand its objects. Then, click on the folder named Views to see all the views in the database (see Figure 10.1).
Figure 10.1. Listing all views contained in a database.
Any syntax that you can use for accessing a table with a SELECT statement can be used to access a view.
When you create a view, you can create it with many of the options that are available in a normal SELECT statement. However, you should know about a few restrictions, which are
You may not use an ORDER BY or a COMPUTE clause when creating a view, but you can use one of them when accessing a view.
If you create aliases for the column names in a view, the aliases must be valid column names according to the naming rules.
Tip
As you can probably figure out, if you want to prevent a SQL query from accessing some of the columns in the database, you simply create a view that doesn't reference those columns.
Now that you have seen how to create a basic view using the CREATE VIEW statement, let's take a look at how the Enterprise Manager makes it easier to perform these actions.
Using Enterprise Manager Query Builder to Create Views
The Enterprise Manager actually has two different ways to create a view. The first method uses a SQL Query Builder, which provides you with a visual method of creating a view. To access this tool, start the Enterprise Manager and double-click on the database you are working with to display its objects. Then, right-click the Views node, and choose New View from the pop-up menu as shown in Figure 10.2.
Figure 10.2. Starting the CREATE VIEW process.

The next step is to add the table or tables that you want to include in the view. To do this, you click the Add Tables button on the toolbar as shown in Figure 10.3, which will display the Add Table dialog.
Figure 10.3. Displaying the Add Table dialog.

To build the same view as we did before, either double-click on the Employees table name or select the Employees table name and click the Add button. This will add a list of all the columns in the table to the SQL Builder (see Figure 10.4).
Figure 10.4. Tables added to the SQL Builder are displayed at the top of the screen and list all the available columns in the table.

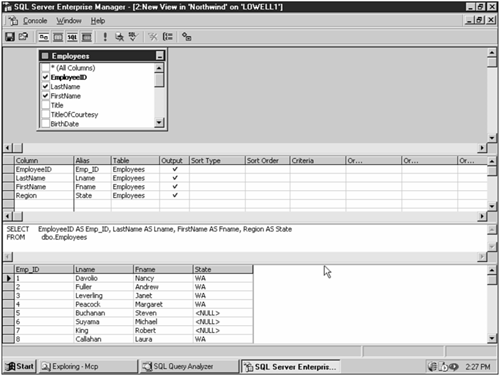
After you have selected all the tables that you need, click the Close button to close the Add Table dialog. Below the area where the tables are displayed are three distinct sections. The first section will display the columns selected for the view, and the second section will display the actual SQL code for the SELECT statement used in the view. The third and final section will display the data from the SELECT statement if you choose to run the SELECT statement to test the results (always a good idea!).
To select the four required columns, click the empty box next to the column names as shown in Figure 10.5. As you select these columns, you will see them displayed in the column list section below the tables.
Figure 10.5. Selecting the columns for the view.

Of course, we also want to change the names. To do this, you would simply type in the new names for each column in the Alias column of the Column List section as shown in Figure 10.6. Again, as you type in the aliases, you will see the SELECT statement code below it change to reflect your modifications.
Figure 10.6. Adding aliases to a view.

When you are satisfied with your selection, you should run the query to test it. Do this by clicking the Run button on the toolbar. You should see results similar to what is displayed in Figure 10.7.
Figure 10.7. Testing the final SELECT statement before creating the view.
If you are ready, click the Save button, and you will be prompted for a name for the view (see Figure 10.8). After entering a name, click OK to save the view and complete the process.
Figure 10.8. Specifying a name for a new view.

In addition to creating a view by using the SQL Query Builder, you can also modify a view with it. To do this, you simply right-click the view and select the Design View option from the pop-up menu. You are then placed back into the SQL Query Builder with the view displayed in the SELECT statement area as shown in Figure 10.9.
Figure 10.9. Editing a view by using the SQL Query Builder.

Using the Enterprise Manager Create View Wizard
The second method to create a view in Enterprise Manager is by using the Create View Wizard. To access this wizard, click the wizard button (which has a wand displayed on the button), which will display the Select Wizard dialog as shown in Figure 10.10.
Figure 10.10. Accessing the Create View Wizard tools.

Expand the Database object and select the Create View Wizard option as shown in Figure 10.11.
Figure 10.11. Selecting the Create View Wizard.

This will display the first page of the Create View Wizard (see Figure 10.12). This page describes the steps that you will be taken through to create the new view. Click Next to continue to the next page.
Figure 10.12. The first page of the Create View Wizard.

This page (see Figure 10.13) displays a drop-down list box that lists the available databases on the server to which you are connected. Select the database to which you want to add the view, and click Next to continue.
Figure 10.13. Selecting the database in which to create the view.

This page displays the available user tables in the selected database, as shown in Figure 10.14. To select the Employees table, simply click in the box next to the name. After you have selected all the tables you need, click Next to continue.
Figure 10.14. Selecting the tables required for the view.

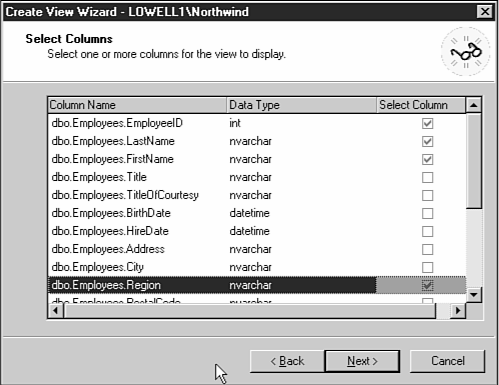
The next page is very similar to the preceding page; it displays all the available columns in the table or tables you have selected. Figure 10.15 shows this list and the columns that were selected for this view. After you have selected these columns, click Next to continue.
Figure 10.15. Selecting the columns to include in the view.
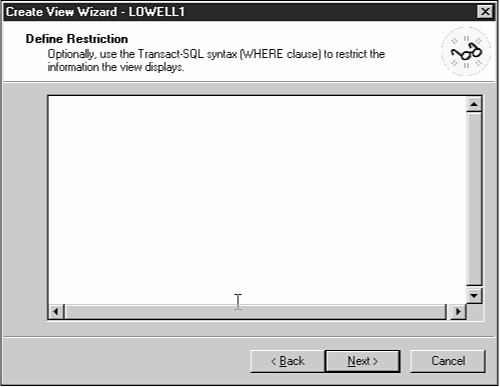
Next, you have the option of adding restrictions to the view by adding a WHERE clause to the SELECT statement you are building (see Figure 10.16). You do not need this option yet, but you will learn about the WHERE clause in a view later in this lesson. Click Next to go to the next step in the process.
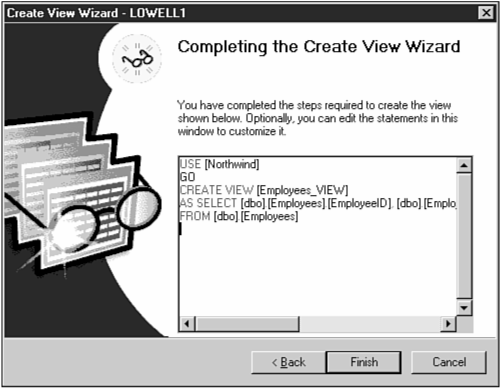
You are now asked for the name of this new view you are creating. Enter a name and click Next to continue. This final page displays the actual SQL code that will create the view. As Figure 10.17 shows, the syntax used by the wizard includes the database name, owner name, as well as the table names for each table and column in the view.
Figure 10.17. The final SQL code to create a new view.
You now have a choice in creating views. Depending on your level of knowledge and time, you could choose to create the SQL code yourself, use the SQL Query Builder, or use the wizard. For the remainder of this discussion on views, I will use the Query Analyzer and SQL code for the examples.
Editing Views in Query Analyzer
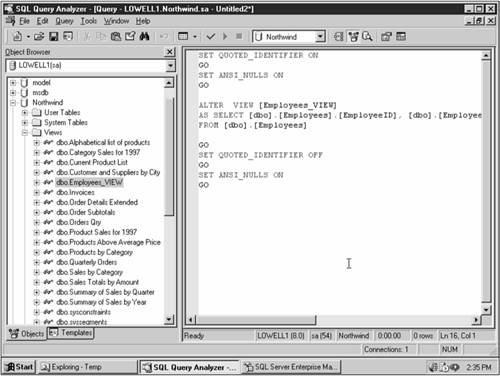
Although you cannot create a view in the Query Analyzer, you can edit one. To edit a view, right-click on the view name in the Object Browser and select Edit from the pop-up menu as shown in Figure 10.18.
Figure 10.18. Editing a view in Query Analyzer.

What will be displayed is the SQL code for the view, but instead of the CREATE VIEW statement, the code has been modified to an ALTER VIEW statement, as shown in Figure 10.19. The Query Analyzer assumes that when you selected the Edit option on the pop-up menu, you wanted to alter the view. In addition, a few other statements were added that assist in the alteration process.
Figure 10.19. Working with the view's SQL code in the Query Analyzer.
Using Views for Security
You have just learned how to create a basic view that limits the number of columns that can be accessed in a SQL query. Now, you will see how to further limit access by using the WHERE clause in the SELECT statement you used to create the view. To see how this works, assume that you want to retrieve only employees who are from the state of Washington. You would add a WHERE clause as follows:
USE Northwind
Go
CREATE VIEW Employees_WA
AS SELECT EmployeeID as Emp_ID, LastName as Lname,
          FirstName as Fname, Region as State
FROM Employees
WHERE Region = 'WA'
In the WHERE clause, you must still use the original names of the columns. When you execute this statement, you will receive no result set, only a message telling you that the command was processed. The Employees_WA view can now be used in lieu of the Employees table.
Tip
When you are altering a view using the Create View statement, you might get an error message as shown:
Server: Msg 2714, Level 16, State 5, Procedure Employees_VIEW1,
Line 3
There is already an object named 'Employees_VIEW1'in the database.
To prevent this, you should add the following code before the CREATE VIEW statement:
If exists (Select Table_Name from Information_Schema.Views
      Where Table_Name = 'Employees_VIEW1')
      Drop View Employees_VIEW1
This code will check whether the view name exists in the system table where view information is stored. If the view exists, it will be deleted. (The DROP statement will be discussed later today.)
Of course, this is true only if you are trying to create a new view and you did not realize that a view with that name already exists. If you are trying to modify an existing view, remember to use the ALTER VIEW statement instead. Using the ALTER VIEW statement will not produce this error message.
Note
A user could have permission to access only the view you have created, but not the original tables on the database. This enables the view to restrict access to specific columns or specific rows in the table.
Creating Views with Multiple Tables
You know how to create a basic view by using a single table, so now let's see how you can create more complex views using the JOIN syntax of a UNION statement. You have seen how to use these clauses on Day 5, "Joining Tables." Using them to create views enables you to create very specific access to the data.
Views and Joins
You can specify a SELECT statement in the view creation that joins tables together. Although this provides no real performance benefit when the view is executed, it does make your SQL code simpler to read and write. The following example shows how to bring together two or more tables but select only a few columns from each table:
SELECT LastName as Lname, FirstName as Fname, substring(Region,1,5) as State,
       substring(TerritoryDescription,1,15) as Terr_Desc,
       substring(RegionDescription,1,15) as Region_Desc
FROM Employees as E
     INNER JOIN
        EmployeeTerritories as ET
        ON E.EmployeeID = ET.EmployeeID
     INNER JOIN
        Territories as T
        ON ET.TerritoryID = T.TerritoryID
     INNER JOIN
        Region as R
        ON T.RegionID = R.RegionID
where (E.Region = 'WA')
In addition to the standard coding for the SELECT statement, I also added the SUBSTRING function to the three long strings to reduce the amount of blanks I am displaying. When this view is executed, the following output is returned:
Lname                Fname      State Terr_Desc       Region_Desc
-------------------- ---------- ----- --------------- ---------------
Davolio              Nancy      WA    Wilton          Eastern
Davolio              Nancy      WA    Neward          Eastern
Fuller               Andrew     WA    Westboro        Eastern
Fuller               Andrew     WA    Bedford         Eastern
Fuller               Andrew     WA    Georgetow       Eastern
Fuller               Andrew     WA    Boston          Eastern
Fuller               Andrew     WA    Cambridge       Eastern
Fuller               Andrew     WA    Braintree       Eastern
Fuller               Andrew     WA    Louisville      Eastern
Leverling            Janet      WA    Atlanta         Southern
Leverling            Janet      WA    Savannah        Southern
Leverling            Janet      WA    Orlando         Southern
Leverling            Janet      WA    Tampa           Southern
Peacock              Margaret   WA    Rockville       Eastern
Peacock              Margaret   WA    Greensboro      Eastern
Peacock              Margaret   WA    Cary            Eastern
Callahan             Laura      WA    Philadelphia    Northern
Callahan             Laura      WA    Beachwood       Northern
Callahan             Laura      WA    Findlay         Northern
Callahan             Laura      WA    Racine          Northern

(20 row(s) affected)
Refreshing this view would create a result set that contains only those columns specified, without requiring you to code the join in your SQL query.
Views and a UNION
Using a UNION when creating a view enables you to combine the results from multiple SELECT statements in a single result set. The following example shows how to combine the Employees table and the Suppliers table:
Create  VIEW vw_Name
AS
SELECT LastName + ''+ FirstName as Fullname, city
FROM Employees
UNION
SELECT ContactName as Fullname, City
FROM Suppliers
Results:
Fullname                        city
------------------------------- ---------------
Anne Heikkonen                  Lappeenranta
Antonio del Valle Saavedra      Oviedo
Beate Vileid                    Sandvika
Buchanan Steven                 London
Callahan Laura                  Seattle
Carlos Diaz                     Sao Paulo
...
Regina Murphy                   Ann Arbor
Robb Merchant                   Boston
Shelley Burke                   New Orleans
Suyama Michael                  London
Sven Petersen                   Cuxhaven
Wendy Mackenzie                 Sydney
Yoshi Nagase                    Tokyo

(38 row(s) affected)
Note
If you have any questions about using Unions, review the section on views in Day 5.
All the employee and supplier contact names are listed together. You can also combine multiple result sets with several UNIONs. The result sets that each SELECT statement returns must contain the same number of columns, and those columns must contain compatible data types.
A view that contains a UNION opens up some powerful opportunities. It is very useful in data warehousing operations. As an example, the following describes a real-life requirement. You have four databases, one for each region in the country where your company operates. These databases are named East, West, South, and Central. Each database contains identical table structures except that the data is relevant only to each region.
You need to produce reports on sales for October. Operating on just the base tables in each database would require you to run the following SELECT statement four times, one for each of the separate databases:
Select sum(Sales_amt) as Sales_Total
From Order_Detail
Where Order_Date >= '10/01/2000'
      And Order_Date < '11/01/2000'
You would then have to enter the data into another tool, such as Excel, and calculate the final total yourself. Instead of doing all that work, you could create a view similar to the following. This view uses a UNION to combine the four SELECT statements.
Create View vw_All_Sales as
     Select * from East.Order_Detail
     Union
     Select * from West.Order_Detail
     Union
     Select * from South.Order_Detail
     Union
     Select * from Central.Order_Detail
You now have a view that combines the data from all four regions, and you can use it to return the final sales total. The following shows the final result of this example:
Select sum(Sales_amt) as Sales_Total
From vw_All_Sales
Where Order_Date >= '10/01/2000'
      And Order_Date < '11/01/2000'
Modifying Data in a View
You are allowed to insert rows into a view. This actually adds rows into the table that the view references. Using the view Employees_WA from earlier, the following will insert a row into the Employees table:
INSERT vw_Employees_WA(Lname, Fname, State)
VALUES('Mauer', 'Lowell', 'WA')
To insert rows into a view, keep the following restrictions in mind:
If all the columns in the table are not listed by the view referencing it, you cannot insert data into those columns, and they must accept NULLs or have a default value defined.
If the view is performing a join, make sure that you are inserting into only one table at a time.
Updating a View
You may update data in tables by referencing the view, but restrictions apply here as well. You may not update columns in two tables at once. However, with UPDATE you can always run multiple updates on the same row.
The view cannot group or aggregate the data. Calculated results do not physically exist in a table. To update data in a view that joins tables together, you must execute an UPDATE statement for each table in the view independently of the others.
Tip
Most times, it is much easier to update the base tables themselves than to figure out all the restrictions on updating a view.
Deleting from a View
To delete data by using a view, the view must not perform any joins. If it did, you would be trying to delete rows from two tables at the same time, which is not possible at this time. In addition, the view cannot perform any groupings, aggregates, or unions.
Using INSTEAD OF Triggers and Views
The only way to update and delete rows from a view without worrying about restrictions is by using a feature called a trigger. A trigger enables you to intercept an action—an INSERT, UPDATE, or DELETE—and perform a process on the tables being accessed. You will learn all about triggers on Day 18, "Writing and Testing Triggers." This section is just to let you know that there is another way of modifying data in a view.
INSTEAD OF triggers can be created on a view to make that view updateable. These triggers are executed instead of the data modification statement that was originally executed. That means if you execute an INSERT statement on a view that uses a join, the trigger will be executed instead of the standard INSERT procedure. This enables you to write your own procedure for that join—executing multiple INSERT statements on each of the tables referenced in the join.
Modifying and Renaming Views
You have already seen how to modify a view by using both the SQL Query Builder in the Enterprise Manager, as well as by using the ALTER VIEW statement. To rename a view, you can use the Enterprise Manager, renaming the view just as you would a file name in Windows Explorer, or you can re-create the view with the new name. The easiest way is to use the Enterprise Manager, but I will show you how to re-create the view by using the Query Analyzer.
In the Query Analyzer, locate the view that you want to rename in the Object Browser and right-click on that view. Then select Script Object to New Window As from the pop-up menu, and select Create from the next pop-up menu, as shown in Figure 10.20.
Figure 10.20. Displaying a view's code for creation.

This will display the SQL editor with the view definition, as shown in Figure 10.21. Change the name of the view in the code and execute it to create the new view.
Figure 10.21. Modifying the view's SQL code.
The next step is to drop the old view. To see how this is done, continue to the next section.
Deleting a View
After you have created a view, you should delete it if it is no longer needed. When a view is deleted, the tables and the data are not affected. Any queries that use objects that depend on the deleted view will fail the next time they are executed. Before deleting a view, it is a good idea to look at the dependencies the view might have. To do this, you would use the Enterprise Manager. Find the view you want to delete and right-click on it. Select the All Tasks option from the pop-up menu and then select the Display Dependencies option, as shown in Figure 10.22.
Figure 10.22. Selecting the Display Dependencies option.

This will display a dialog (see Figure 10.23) that contains two unique lists. The list on the left side of the dialog displays all objects that depend on the selected view. The list on the right side displays all the objects on which the select view depends.
Figure 10.23. Displaying the dependencies of a view.

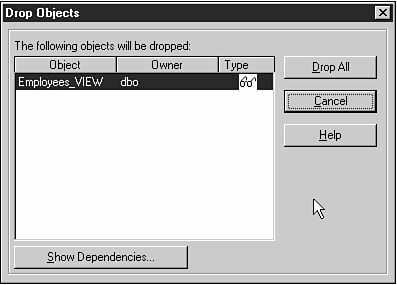
After you know whether you can really delete a view, close the Dependencies dialog and perform the actual deletion. You can, of course, select the view in the Enterprise Manager and press the Delete key. This will display the Drop Objects dialog as shown in Figure 10.24. If you agree with what is displayed, you can click the Drop All button to complete the process.
Figure 10.24. Deleting a view from the database.
Note
You must be careful when choosing to click the Drop All button. After you delete or Drop a view, it is gone forever.
You can display the view's dependencies from this dialog by selecting a view and then clicking the Show Dependencies button.
The other way of deleting a view is by using the DROP statement as shown here:
Drop View vw_Employees_WA