
5
Retargeting Animations with Mixamo
In the previous chapter, we were introduced to the idea of retargeting animations, as well as discussing IK Rigs, IK chains, and IK Retargeters.
In this chapter, we are going to go further afield and take animation from a third-party supplier, Mixamo, a very large online library full of motion capture files that you can preview on a web browser. You will learn how to use external resources such as Mixamo in order to give much more variety to your animations; this is important, as repurposing the same animations repeatedly makes for poor productions. We will also remain focused on working with body motion only in this chapter.
So, in this chapter, we will cover the following topics:
- Introducing Mixamo
- Preparing and uploading the MetaHuman to Mixamo
- Orienting your character in Mixamo
- Exploring animation in Mixamo
- Downloading the Mixamo animation
- Importing the Mixamo animation into Unreal
Technical requirements
To complete this chapter, you will need the technical requirements detailed in Chapter 1, and the MetaHuman and the Unreal Engine Mannequin that we imported into UE5 in Chapter 2. Both of these will need to be saved in the same project in UE, and you will need to have UE running for this chapter.
You will also need a stable internet connection, as we will be uploading a MetaHuman mesh and downloading numerous animation assets. We will effectively be repeating steps taken in Chapter 4, but instead, we will be retargeting motion capture from a third-party source.
Introducing Mixamo
For a lot of artists planning on using MetaHumans in Unreal, Mixamo could easily be all they need in terms of body animation. Mixamo is an online library of thousands of motion capture (mocap) files created over a number of years by motion capture performers. In addition to housing this extensive library of mocap files, Mixamo also has many premade characters. Mixamo allows you to upload your own characters, where it will run an automated process of applying a Mixamo Rig with skin weights. This automated process removes the need for a lot of tedious work that would normally be done in programs such as Maya or 3ds Max, which is beyond the scope of this book.
Many of the animations within Mixamo allow you to further refine the mocap animation and solve problems during the online session to avoid further editing in Unreal. As you already have experience using an online character creator such as the MHC, you will find Mixamo much less complicated to use and a very fast and efficient way of adding animation to your characters quickly.
The first thing you need to do is go over to www.mixamo.com. This is where you’ll see the landing page for Mixamo as per Figure 5.1:

Figure 5.1: Mixamo home screen
In the top-left corner, you will see an Adobe logo. Adobe, the maker of Photoshop and After Effects (to name but a few), acquired Mixamo but has kept it running, as it is a tremendous tool for character designers and animators.
You will also notice in the top-right corner that I have already signed in. Before you sign in, you need to create a Mixamo account. If you have an Adobe account, you can use that. If not, using an email and creating a password will suffice.
Once you’ve logged in, you’ll be taken to the main Mixamo interface:

Figure 5.2: The Mixamo interface
In Figure 5.2, you’ll see that the interface is made of two tabs: Characters and Animations. These two tabs will display thumbnails of the relative assets and a viewport for you to preview them. In this book, we are only concerned with animations and so you should select Animations (however, it is worth noting that regardless of which tab we are in, we can always upload our own characters).
Once the Animations tab is selected, we are greeted with an almost identical interface with the exception that our thumbnails on the left now feature animation assets rather than character assets. In most cases, the thumbnail characters are in the Mixamo Mannequin style.
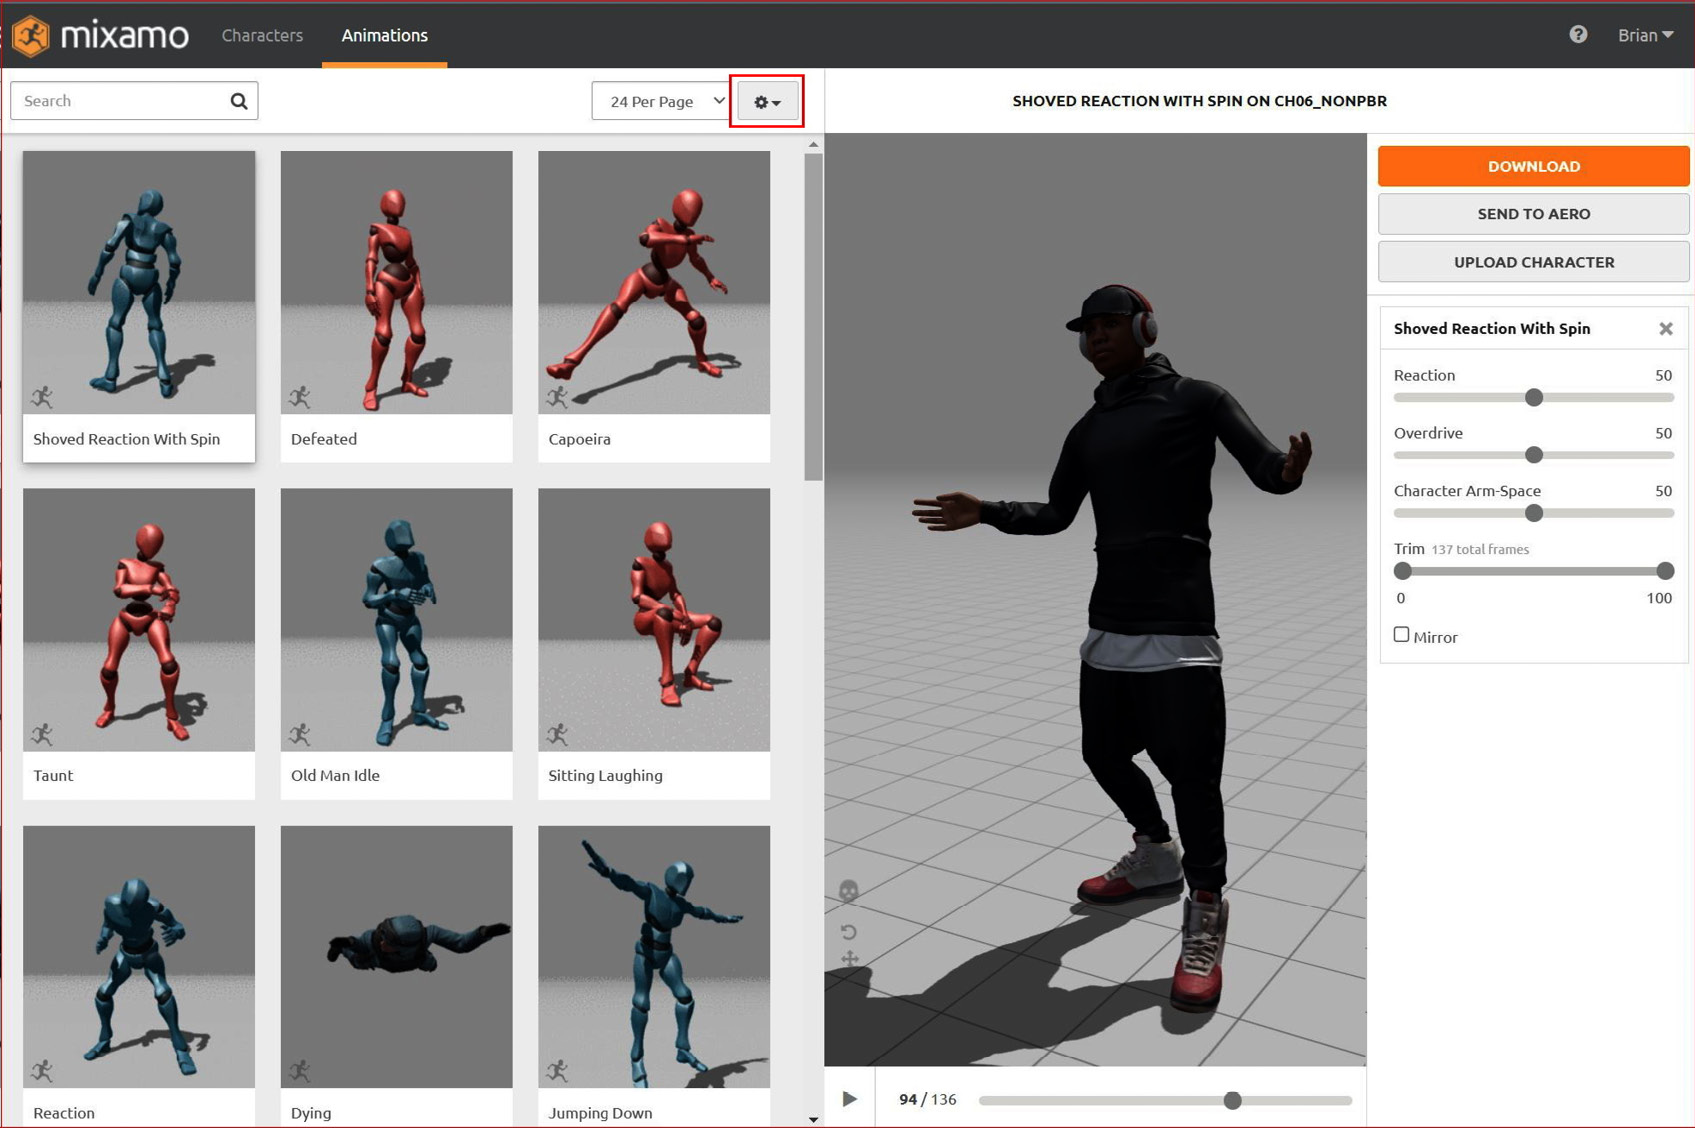
Figure 5.3: The Animations tab
Above the viewport, you can see the name: SHOVED REACTION WITH SPIN ON CH06_NONPBR. SHOVED REACTION WITH SPIN is the name of the animation that corresponds to the selected thumbnail, while CH06_NONPBR relates specifically to the character in the viewport.
If you click on the cog icon as highlighted in Figure 5.3, options to see previews of the animation thumbnails or static image thumbnails will appear (the first option is more taxing on your internet connection; however, it’s helpful to have them animated).
Before we download any animations, we first need to upload our MetaHuman character mesh into Mixamo to increase the chances of compatibility. To do that, we must prepare our MetaHuman first.
Preparing and uploading the MetaHuman to Mixamo
To prepare our MetaHuman for Mixamo, first, we must make sure that we are exporting our MetaHuman character with the correct body type. You may remember from Chapter 4, Retargeting Animations, that when we were retargeting our character directly from the animation asset, we had an option to preview the mesh of the MetaHuman. This is an important step because we need to use the preview mesh to tell Mixamo how much of an influence the bones will have. In addition, the step also gives us a visual idea of exactly how the motion capture animation we choose works with our mesh of choice.
My character had a particular description, being female, of medium height, and overweight; this was notated by F_Med_Ovw_Preview. We need to ensure that the exact mesh is what we are using to export from Unreal. So, to start preparing our MetaHuman, see the following:
- First, we need to find the right mesh. To do this, go to your character’s folder and then navigate to the Body folder. In my case, I need to go to the Glenda folder, then the Female folder, then the medium folder, then Overweight, and then finally, the Body folder.
- Next, drag the character into your scene. You’ll notice that your character isn’t being displayed correctly. In fact, it will most likely only display a portion of your whole character. That is because a MetaHuman is made of the following meshes:
- A head mesh
- Clothing meshes
- A full nude body mesh
- Now, very importantly, in the Details panel, under Mesh, you’ll see a drop-down menu allowing you to choose which mesh you want to be displayed for your character.

Figure 5.4: Using search to find the preview mesh
If you type in preview in the search bar, you will see a list of all the preview meshes available. It is important to select the correct one, as we are about to export that mesh for use in Mixamo. We’re only interested in the body when it comes to Mixamo because Mixamo doesn’t give us any facial animation data; for that reason, in my case, I will select f_med_ovw_body_preview.
When you select the mesh, you’ll see the mesh in the viewport change to that of a headless nude body. Despite not having a head, this is all we need for Mixamo, as we are only interested in body motion and that is all that Mixamo can offer us anyway.
- Before exporting this mesh, we need to ensure that the mesh is at the origin of the scene, or in other words, at the very center of the scene. By dragging the mesh from the content panel to the scene, we are merely placing it into the scene based on the mouse cursor position, which generally gives us a random result – but we can quickly fix that.
Back in the Details panel, just above where we chose the preview mesh, there’s a Transform section. Next to Location, you will want to set each of the x, y, and z coordinates to 0.0, and voila, your character will now be centered in the scene and ready to export.
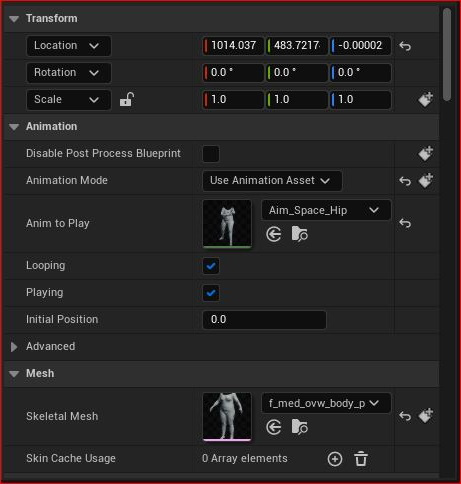
Figure 5.5: Setting the Location value in Transform to the origin
- Before exporting the mesh, be sure to have the preview mesh from your scene selected, then simply go to File, and click Export Selected…:

Figure 5.6: Export Selected…
Note
We need to have the preview mesh in the scene in order to export it as an FBX file. We can’t export the asset from within the content panel.
- Next, choose FBX as your file type and give it a name that you'll remember (such as GlendaToMixamo).
- Ensure you don’t have Map Skeleton Motion to Root ticked. Keep all the settings as their default settings and click Export, as seen in Figure 5.7:
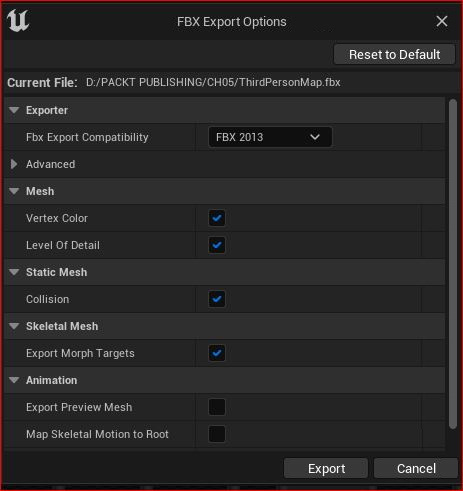
Figure 5.7: Map Skeletal Motion to Root unticked
Next, we will upload our character into Mixamo to apply animation to it.
- Regardless of whether you are in the Character or Animation mode in Mixamo, you will always have the opportunity to click on the Upload Character button; this will open the following interface:
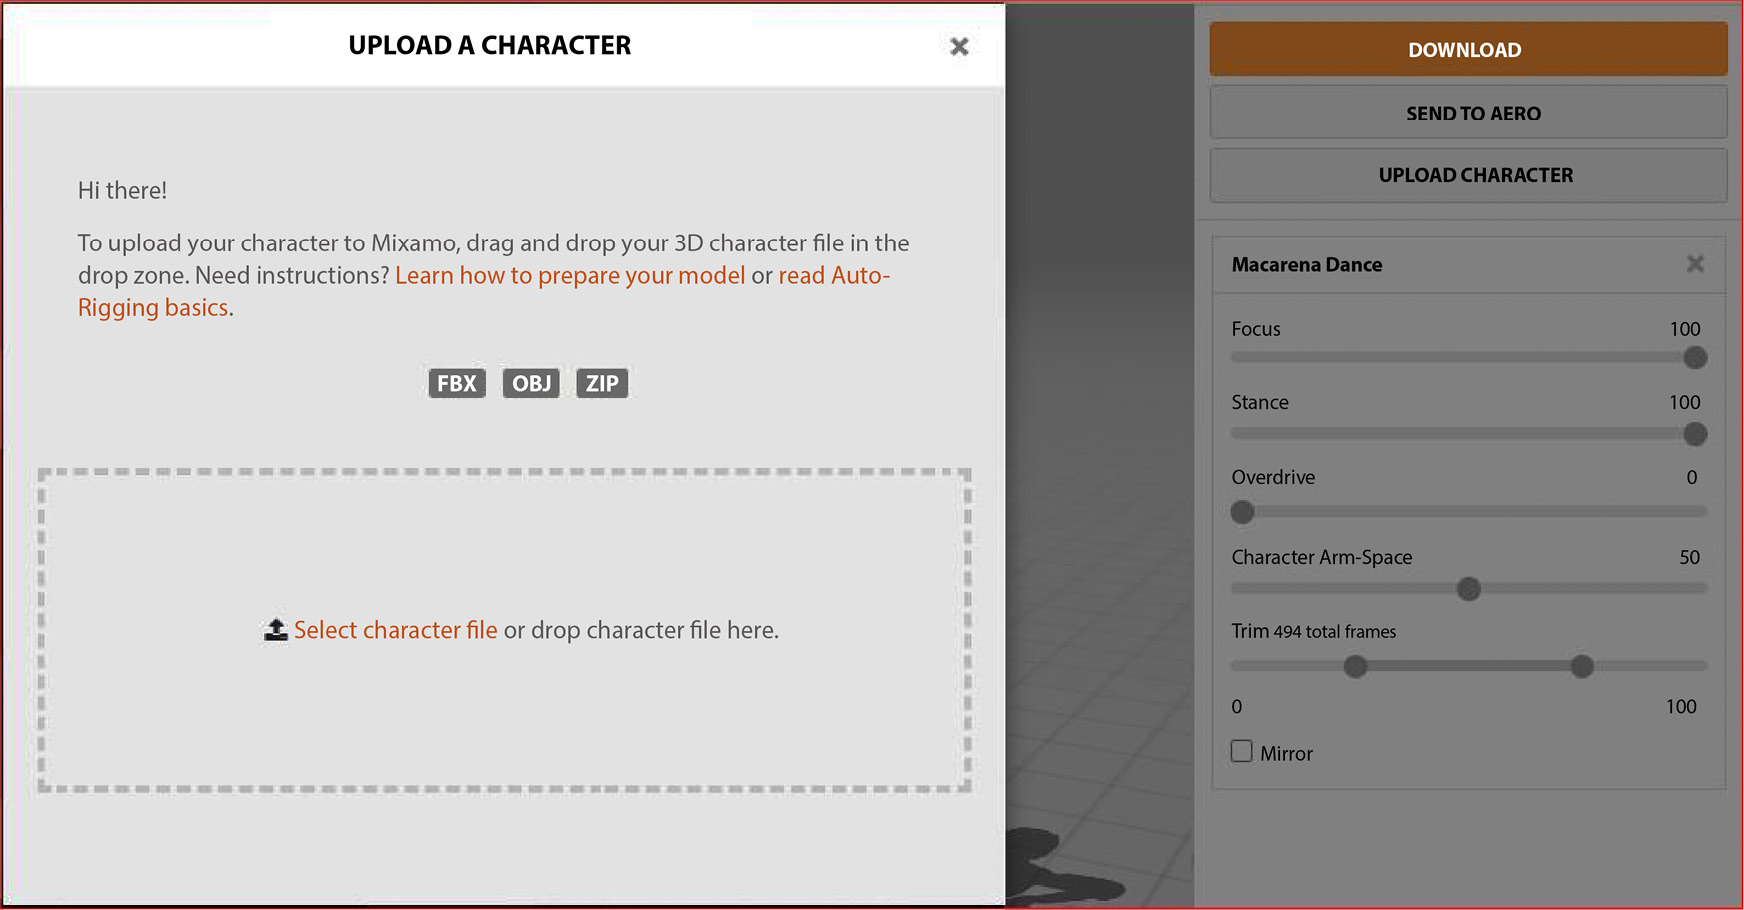
Figure 5.8: Uploading your MetaHuman preview mesh to Mixamo
- You have the choice of either dragging and dropping your mesh into the rectangle or clicking on Select character file. Either way, when uploading your file, be prepared to wait a while, as it can take a few minutes to process – in which case, you’ll see the following message on the screen:

Figure 5.9: Mixamo processing the mesh
When Mixamo has finished processing your mesh, you should be greeted with the interface shown in Figure 5.10:
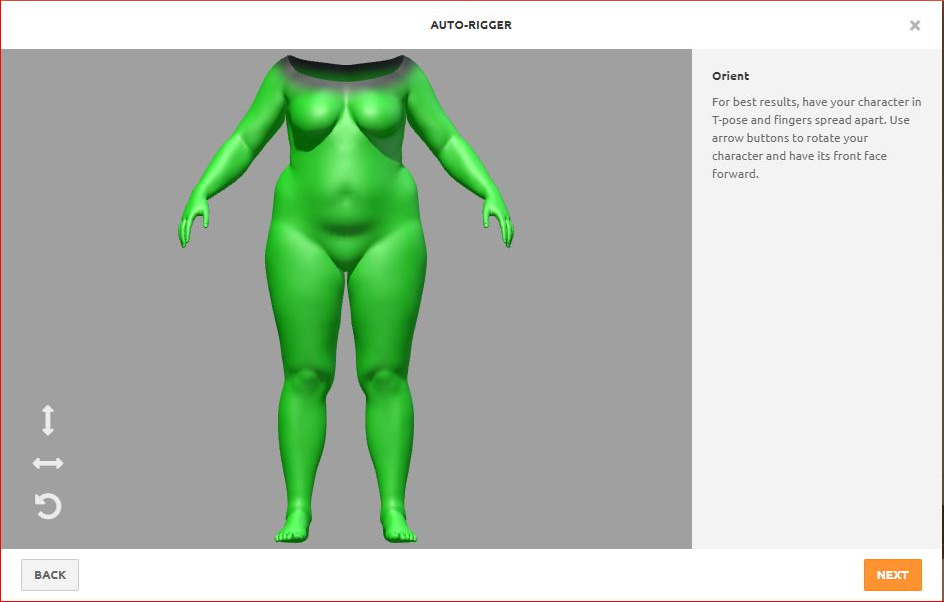
Figure 5.10: Mixamo has finished the processing phase
Now that we have our character mesh inside Mixamo, we are on our way to applying animation to it, but before that, we need to make a few adjustments and orient our character first.
Orienting your character in Mixamo
The next step is to orient your character so that it matches the orientation of all the Mixamo characters and their animations. Fortunately, Mixamo gives us the tools to do this rather than leaving us with a laborious trial-and-error process during the export stage.
Take a look at the three arrows at the bottom of the viewport in Figure 5.10. Each of the arrows is for rotating your character and each represents the x, y, and z axis respectively. On the right, you are also given instructions to orient your character; this is what I have done, setting the character to face forward and stand upright.
Now, you may have noticed from the on-screen instructions that Mixamo has asked for the character to be placed in a T-pose position for best results: a T-pose is where the character is in the shape of a T – that is to say, that their arms are straight out to either side, rotated at 90 degrees. In my case, and in the case of all MetaHumans, the default pose is A-pose, which is where the character’s arms are not fully extended and only rotated at approximately 45 degrees. However, Mixamo does a really good job at interpolating between the two and successfully aligns the Mixamo character rig to our preview mesh.
Note
We will be looking at modifying the MetaHuman from A-pose to T-pose in Chapter 6, Adding Motion Capture with DeepMotion.
Despite Mixamo taking care of most of the work, we still need to give Mixamo’s auto-rigger a bit of a nudge. When you click the NEXT button, seen at the bottom-right corner of Figure 5.10, you will be brought to the following page:
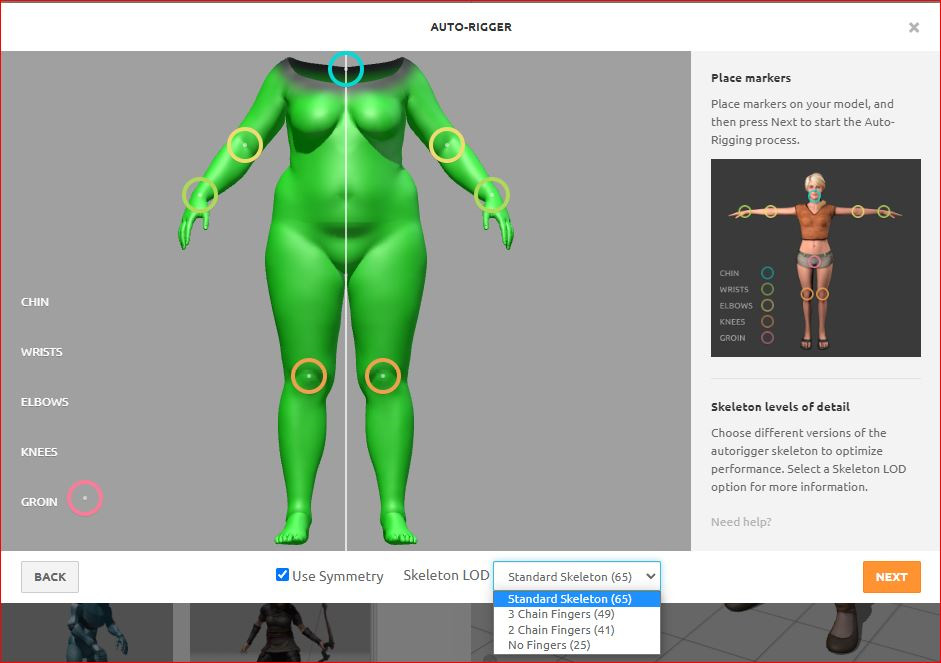
Figure 5.11: Auto-rigger marker placement
Effectively, this is a calibration tool where we get to ensure the proportions of the Mixamo character rig match that of our MetaHuman’s preview mesh. We get to make those fine-tuned adjustments by simply dragging the markers from the left of the screen to their associated body parts. With Use Symmetry left on, you’ll do this much faster and more accurately. Also keep Skeleton LOD as the default setting, Standard Skeleton (65), which has the highest number of bones; this makes a noticeable difference when it comes to finger articulation.
Once you’re happy with the placement of the markers, select NEXT, where you will see the character being processed; this can take a couple of minutes and you will see your character spinning while this happens.

Figure 5.12: Auto-rigging processing
Two things are happening here in the background:
- The generation of the Mixamo character rig to be proportional to your character preview mesh: We’ll be making use of the Mixamo character rig later in this chapter because it is effectively like Unreal’s own Mannequin Rig, but there are small differences. However, with the IK Retargeting work covered in the previous chapter, we’ll tackle the differences between the Mixamo Rig and the MetaHuman Rig.
- The adjustment of skin weighting regarding the rig aligning with the proportions of the mesh: Fortunately, we don’t have to know anything about skin weighting to progress further through this book, as Mixamo does this automatically. However, for those of you who have any experience manually rigging characters, you’ll be all too aware of the somewhat painful process of painting weight influences.
All this means is that we are telling each part of the mesh how much it is influenced by each bone; for example, a foot bone would have no skin weight influence over the mesh of the arm, but a foot bone could have a small degree of influence over the mesh covering the lower leg.
Note
For more seasoned 3D artists, there are methods to adjust the skin weights in third-party applications such as Maya, Blender, or Houdini.
When the auto-rigging process is complete, you should see your rig moving using a default temporary animation supplied by Mixamo, as shown in Figure 5.13:

Figure 5.13: Auto rigging completed
You’ll also notice that while most of the body is green, the top of the mesh is gray and black. This means that the gray and black area of the mesh isn’t being influenced by the Mixamo Rig as much as the rest of the mesh. This is good because we want our MetaHuman Rig to influence the head and we are only interested in Mixamo for body animation.
When you are happy with the rigging, click NEXT, and we can now get ready to apply animation from the huge Mixamo motion capture library.
Exploring animation in Mixamo
In the Mixamo motion capture library, you’ll see that all the animations are separated into different genres, just like in Figure 5.14:
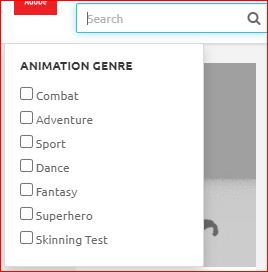
Figure 5.14: Animation genres
This list of genres is quite helpful but there’s also a handy search function. Using either option, find the Macarena Dance animation (I am using this because it’s a long animation and is great for testing how well the rig works with my character). Once you can see the thumbnail of your chosen animation, it just takes one left click on the thumbnail to apply it to your MetaHuman mesh.

Figure 5.15: Completed rig with articulated fingers
Take note of the sliders on the right-hand side, which you can manipulate to your liking. The parameters are not the same from one animation to the next. For example, in relation to the Macarena dance, Focus is the first parameter; however, this parameter isn’t available for most Mixamo animations.
When you play the animation with Focus at the minimum value versus the maximum value, you’ll see a slight difference. Most likely, you are just blending between two separate motion capture performances. The minimal value, in this case, is where the dancer is not focused very well on their dancing, or in other words, they are dancing badly with poor rhythm and timing. The maximum value is another take where they are dancing very well and on time with a good rhythm. Often, each motion capture file will have one or more bespoke parameters depending on the nature of the performance.
The three most useful parameters in all animations that you will find yourself editing are as follows:
- Character Arm-Space: This determines the distance between the character’s arms and its torso. When reviewing how your mesh performs within the Mixamo viewport, you may see moments where the mesh intersects with itself, such as an arm going through a waist. Of course, you’ll need to widen the arm space to accommodate that. For the Macarena dance, the mocap session may have been performed by a lean dancer rather than an overweight Glenda, so this intersection is likely to occur. With that said, there could be instances where the mocap performer and model are similar, but you still need to create a wider arm space to accommodate heavy clothing or armor, so it is worth being mindful of this when making these adjustments.
- Trim: This refers to how much of the animation clip we want to trim. You are simply editing out a portion of the original animation if you use the default setting. As a rule of thumb, it’s better to have more frames of animation than to not have enough.
- Overdrive: This will affect the speed. Overdrive simply means faster, so if you want to speed up, set the animation slider to a higher value in the Overdrive settings.
Go ahead and play with these settings until you’re happy with how it looks. When you are done, click DOWNLOAD. In the next section, we will explore some of the settings that you will see.
Downloading the Mixamo animation
Continuing from the last section, when you click DOWNLOAD, Mixamo will take you to the following dialog box illustrated in Figure 5.16:

Figure 5.16: DOWNLOAD SETTINGS
Let’s look at each of these options:
- Format: FBX is the same format you used when you exported from Unreal Engine; for the Unreal Mixamo pipeline, I strongly suggest you work with this preset. In the Format drop-down list, you will see other formats. Mostly, they consist of alternative and older versions of FBX. Another available format is DAE, however it is not compatible with Unreal.
- Skin: The default setting is With Skin; this means that when you download the file, it will contain your original mesh along with the Mixamo Rig and the animation all within the FBX file format. If you have multiple animations for your character, you only need to include the skin on the first animation you download. Choosing Without Skin will contain the animation data only.
Note
The first time that you download your animation, keep all of the default settings. However, once you’ve downloaded the first animation with Skin intact, you don’t need the skin for any subsequent animation downloads for the same character.
- Frames per Second: The options are 24, 30, and 60 fps. Higher frame rates are good if you wish to edit the timing of your animation within Unreal Engine, particularly if you want to slow it down. Most motion capture is captured at a higher frame rate, allowing for retiming of the motion. It is better to have that higher frame rate than to attempt to interpolate slow motion in Unreal synthetically in an advanced workflow. A lower frame rate would be good if you are taking in really long animations and running them on a substandard machine.
- Keyframe Reduction: This is best left alone. The data size of these files and Unreal’s ability to read them don’t require keyframe reduction or optimization. Without keyframe reduction, Mixamo bakes a keyframe for each joint rotation on every frame. With keyframe reduction, Mixamo adds a little math in order to reduce the data size and this can reduce the quality of the animation. It’s best for Unreal Engine to get that data to work. If there is any keyframe reduction required in Unreal, there are plenty of tools within Unreal to give you better and controllable results.
After clicking DOWNLOAD, Mixamo will ask you where you want to download your new FBX file; choose somewhere you will remember, ideally somewhere inside your project folder, as this will allow you to skip the following step.
If you save it directly to somewhere within your project Content folder and you have Unreal running, you will get a prompt as per Figure 5.18 (which you will see in a moment) to allow the import to take place.
However, let’s assume it’s saved somewhere else so we can now take a look at manually importing your animation in the next step.
Importing the Mixamo animation into Unreal
If you’ve downloaded your FBX to some arbitrary location, you will need to import it into Unreal from the same location. To do that, first, create a new folder inside your Unreal Project and call it MIXAMO_ANIMATIONS. Double-click the folder so that you are inside it and then right-click to see the following menu:

Figure 5.17: Importing FBX animation
To import the animation and the Mixamo Rig, choose Import to, along with the folder you are about to import the asset into. You can see from the highlighted text in Figure 5.17 that I am importing the asset into Game/MIXAMO_ANIMATIONS.
Once selected, it will bring up FBX Import Options, as shown in Figure 5.18:

Figure 5.18: FBX Import Options
In Figure 5.18, you can see that there is a wealth of options to edit. Ultimately, the FBX Import Options dialog box allows us to import the Mixamo Rig, the Mixamo animation, the geometry of our MetaHuman character, and the skin weights associated with it. Importing all these components into Engine is essential for us to retarget the animation onto our MetaHuman character correctly.
However, if you’ve followed all the previous steps mentioned in this chapter, you’ll find there’s very little to do here. The default settings will be enough, with the exception of the following two:
- Mesh Skeleton: You need to choose what skeleton you want to use the Mixamo Rig on. Unfortunately, we can’t use the MetaHuman skeleton with the Mixamo Rig directly, as it’s far too complex; instead, we will use the next best thing, SK_Mannequin, which will be available once you click on the drop-down list, as shown in Figure 5.18.
- Import Animations: It may seem a little obvious, but yes, we need to make sure that this Import Animations box is checked so that we can import the animation that has been embedded within the FBX file.
Note
If you have already gone through this process of downloading the Mixamo Rig, skin weights, and animation, you will see that your Mixamo Rig is now an option to choose from FBX Import Options instead of SK_Mannequin.
Once you have ensured you’ve selected the correct Mesh Skeleton and checked Import Animations, click on Import All. This will take a few minutes to load into your project. Once imported, you will find that you now have newly imported assets, looking similar to Figure 5.19:

Figure 5.19: Imported assets
At this point, we’ve just successfully brought in the Mixamo animation, along with a rig that has all the skin weights enabled to properly manipulate the MetaHuman body mesh. From Figure 5.19, you can see those assets; from left to right, we have the following:
- Fbx_Default_Material_0: This is the default material as exported from Mixamo. As we’re only interested in animation from Mixamo, we can ignore this.
- Macarena_Dance: This is the Mixamo Rig that has the skin weights that we need.
- Macarena_Dance_Anim: This is the actual keyframe data of each of the joints.
- Macarena_Dance_PhysicsAsset: This was created automatically by Unreal during the import process, containing physics simulations that are beyond the scope of this book.
Note
To learn more about PhysicsAsset in UE, you can review the following link: https://docs.unrealengine.com/5.0/en-US/physics-asset-editor-in-unreal-engine/
Currently, we have a Mixamo Rig but no skeleton, and because of this, we can’t apply the Mixamo animation to our MetaHuman Blueprint. So, just like in Chapter 4, we need to use two IK Rigs so that we can repurpose the Unreal SK_Mannequinn and retarget animation from it to the MetaHuman. While it may be familiar to you, I’ve outlined the process again for our new Mixamo assets:
- In the new Mixamo_Animations folder, create a new IK Rig and call it Source_RigMixamo. Then, create another IK Rig and call it Target_RigMeta.
As a reminder on how to do this, look at Figure 5.20; you can see that when you right-click anywhere within the Content tab, you can choose Animation and then select IK Rig from the list:
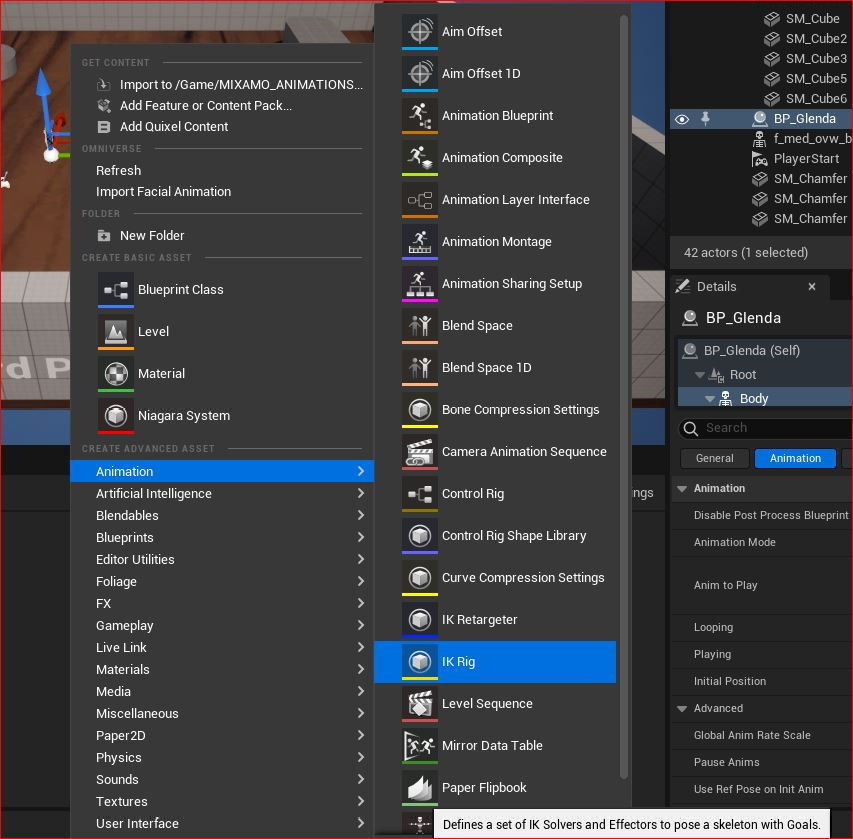
Figure 5.20: Creating an IK Rig
- With both IK Rigs created, the next step is to create five IK chains for each and ensure that the following chain order is completed:
- The spine to the head
- The left clavicle to the left hand
- The right clavicle to the right hand
- The left thigh to the left foot
- The right thigh to the right foot
- Using the IK Rigs, we need to use SK_Mannequin as the skeleton for the source and leave the Glenda_Med_Ovw skeleton as the target.
Just like in the previous chapter, I recommend opening up both the source and target IK Rigs and putting them side by side, as shown in Figure 5.21. This way, you can ensure that you are getting them to match as much as possible in terms of the IK chains and the order in which the IK chains are created.

Figure 5.21: IK Rigs side by side
- Next, you now need to create an IK Retargeter. To do this, right-click in the Mixamo_Animations folder, then under Animations, choose IK Retargeter. This creates a new IK Retargeter, which you can rename to something such as Mixamo_MetaRetargeter.

Figure 5.22: The IK Retargeter
- Once you’ve done that, open the IK Retargeter and you will see that at the top right, the source is ghosted out. This is because you already chose the source while you were creating the IK Retargeter. However, it is still waiting for you to input what the target is. Be sure to choose the new IK Rig you made for your target.
- Next, click on Asset Browser, as shown in Figure 5.23. You’ll notice that Export Selected Animations is green (if you hadn’t chosen a target, it would have remained ghosted). Click Export Selected Animations now.

Figure 5.23: Export Selected Animations
Once clicked, Unreal will write a new animation file; here, you will need to pick the destination, as shown in Figure 5.24. I recommend placing this new animation in the Mixamo_Animations folder. Don’t worry, you’ll be able to distinguish it from the original un-retargeted animation, as it also amends the animation name with the Retargeted suffix to make it easier for you to find it.
- Next, click OK, and you’ve just retargeted a Mixamo animation, ready to use on your MetaHuman character.

Figure 5.24: Select Export Path
- To test it out, ensure you have your character Blueprint in your scene. You can do this by simply dragging the character Blueprint from the Content folder and into the viewport. Then, with your character selected, click on Body in the Details panel.
Ensure you have selected Use Animation Asset as the Animation Mode setting, as shown in Figure 5.25. The animation asset it is referring to is any animation compatible with your MetaHuman Blueprint in the scene.

Figure 5.25: Setting Animation Mode as an animation asset
- Look for Anim to Play. Next to it, you’ll see a drop-down list. Use this to search for Retargeted. This will call up the only retargeted animation asset, which is the one you just created; in my case, it is called MacerenaDance_anim_Retargeted (remember, the name MacarenaDance was assigned to the file name by Maximo, and the Retargeted suffix was assigned by the IK Retargeter).
- Once the asset is selected, click Play above your main 3D viewport and you’ll see your animation come to life.
Now, you have successfully imported your animation into Unreal Engine, retargeted the animation using source and target IK Rigs, and used the IK Retargeter tool. You were also able to preview your animation inside the scene.
If you plan to bring in a lot of animations over a period of time, the IK Retargeter will become a frequently used asset.
Working with subsequent animations
For any subsequent animation downloads from Mixamo, you should download Without Skin (this option is available when downloading your animation in Mixamo, as per Figure 5.16). Then, when importing the new animations into Unreal, you can now choose the skeleton that was created when you created the source IK Rig (in my case, it’s called MaceranaDance_Skeleton). The headless thumbnail of the Glenda preview mesh dancing the Macarena is also visible, like so:

Figure 5.26: FBX Import Options for subsequent animation-only files
It would be good practice to download a batch of animations from Mixamo without skin. Then, you can drag and drop all of them directly from an external folder into your Content folder or import them using the File Import option and selecting multiple files rather than just one.
When importing multiple animation FBX files, you will get the dialog box shown in Figure 5.26. By clicking on Import All, the same setting will be applied to all of the animations you are importing. So, if you have 100 animations, you will apply this skeleton to all 100 assets in one single click.
In my case, I have downloaded five soccer animations and imported them into my Mixamo_Animations folder that I previously created in my Unreal project. To batch-retarget all these animations, I only need to open up the IK Retargeter.
Opening up the IK Retargeter that I created earlier, I can now see these animations and their skeletons ready to be retargeted to my MetaHuman character:

Figure 5.27: IK Retargeter with multiple animations available for retargeting
Because my new animations have been set to use the Mixamo skeleton upon import, they automatically become available in the IK Retarget list. You can see that list at the bottom of Figure 5.27. I have brought in five soccer animations and selected them all.
Using the Export Selected Animations button, I can now batch-convert multiple animations with just one click.
When exporting these animations, the IK Retargeter retains the animation name and automatically adds the Retargeted suffix to each animation asset. As before, you can go to your character Blueprint, and under Anim to Play, you can search for your new animations. In Figure 5.28, you can see that I searched for soccer and found that my new and retargeted animations were ready to apply to my character Blueprint already in the scene:
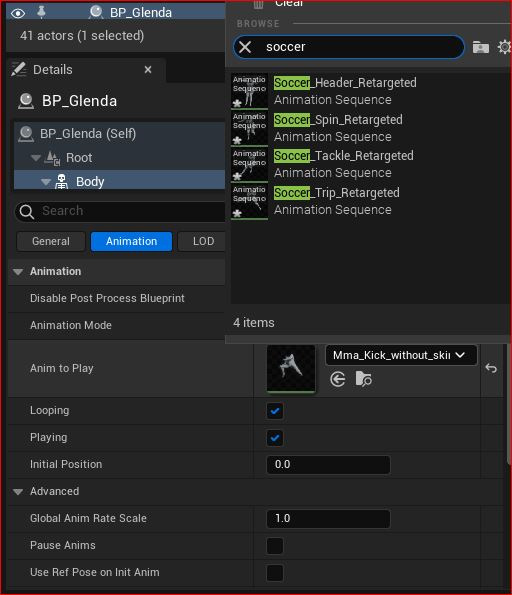
Figure 5.28: Retargeted animation available under Anim to Play
Because of the work done in the previous section, in this section, you were able to batch-import multiple animations and batch-retarget them using the IK Retargeter tool. This is a very efficient approach to creating an entire motion library dedicated to your MetaHuman character.
Summary
In this chapter, we learned about the fantastic and free resource, Mixamo, to bring hundreds of animations into your project. We learned how to best configure our character meshes to get the most out of Mixamo and we also got a little revision time on IK Rigs and the IK Retargeter.
As well as that, we learned about the importance of character proportions, a little about skin weighting, and their connection to character proportions and animation rigs.
Most importantly, we learned about the very powerful automation tools that allow us to batch-import and batch-retarget animation files acquired from Mixamo.
In the next chapter, we will learn about DeepMotion, another online resource that allows us to create our own custom animations using just a video camera.