
4
Retargeting Animations
In the previous chapter, we were introduced to Blueprints and conducted some basic editing to the MetaHuman Blueprint and the Mannequin character Blueprint so that they shared some common settings.
In this chapter, you will be introduced to a new set of tools that we can use to retarget the animation files that come with the Mannequin onto our MetaHuman character: the IK Rig tool and the IK Retargeter tool.
So, in this chapter, we will cover the following topics:
- What is an IK Rig?
- Creating an IK Rig
- Creating the IK chains
- Creating an IK Retargeter
- Importing more animation data
Technical requirements
To complete this chapter, you will need the technical requirements detailed in Chapter 1, and the MetaHuman plus the Unreal Engine Mannequin that we imported into UE5 in Chapter 2.
What is an IK Rig?
Well, to answer that question, we actually have to ask two questions:
- What is a rig?
- What is IK?
Let’s answer them now.
What is a rig?
In 3D animation production, a rig is a simplified means of controlling a character’s movement, tailored for use by animators. Instead of the animator manipulating the character’s bones, a rig provides handles that the animator can quickly identify and select. Many 3D software applications come with rigs that are designed for people and animals. In animation studios, rigs are designed at varying levels of complexity depending on how complex the animation is. Ultimately, the purpose of a rig is to simplify the process of animation. In this chapter, we will take advantage of these simplified rigs for the purpose of applying animation data to them.
The MetaHuman comes with a built-in rig for character animation called an IK Rig. In fact, it comes with an IK Control Rig that allows animators to take full control of all the animation of a MetaHuman character. As you can see in Figure 4.1, a rig is a simplified way of manipulating bones:
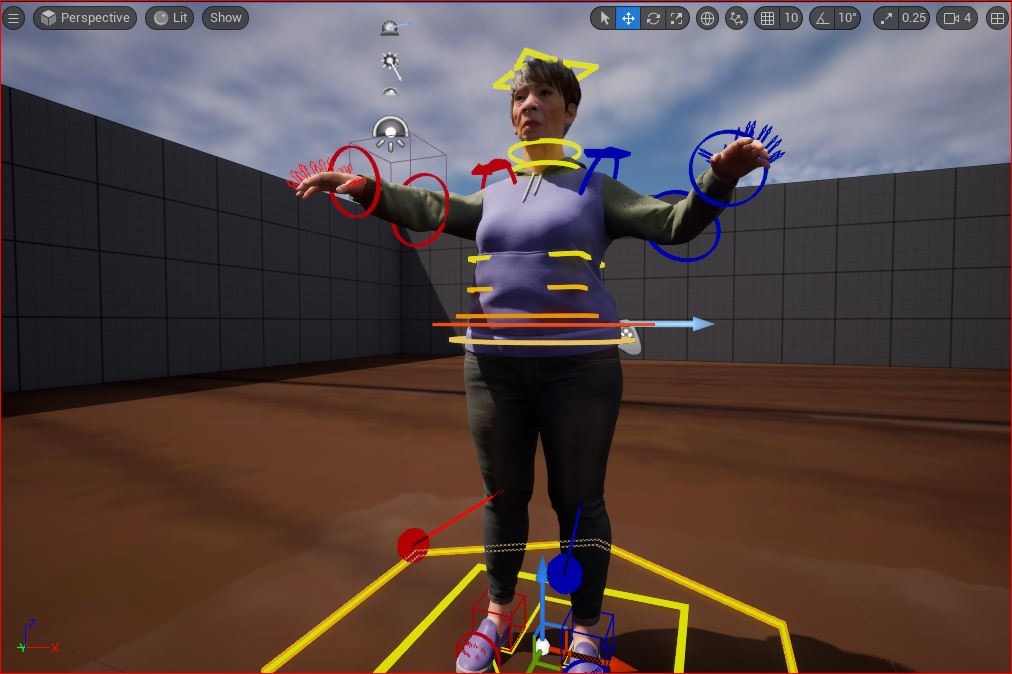
Figure 4.1: MetaHuman IK Control Rig
So, now that we understand what a rig is, let’s look at what IK means.
What is IK?
To answer this question, we need to understand that in character animation, we use bones. These bones have a distinctive relationship with one another in terms of how they move; if we want to phrase this in a slightly more technical way, these bones have a distinctive relationship in terms of how their kinetic relationship is defined. These bones exist within a hierarchy of bones, and how they move depends on whether the hierarchy has Forward Kinematics (FK) or Inverse Kinematics (IK).
When it comes to human bones, very few can move on all axes and no human bones have the freedom to move 360 degrees on any axis. However, unlike real human bones, computer-generated bones are very simple in their shape and can be displayed as simple lines, cylinders, spheres, pyramids, or capsules. Regardless of their shape, they all contain one or two pivot points that determine the point of rotation for the bone. In addition to the point of rotation, it is also possible for us to define what axis the bones rotate on and what axis they don’t. Let’s look at Figure 4.2, which demonstrates how bones are visualized in UE5. By selecting any bone, we are presented with a gizmo that allows us to edit the rotation of each bone; however, using this for animating is cumbersome, as it is difficult to make a selection or see what we are doing.

Figure 4.2: A Mannequin bone system in Unreal
Let’s think about our shoulder joints as an example. We know that we can swing our arms around in a particular direction, but we soon meet resistance when we try to move in other directions. That resistance in terms of joints is known as a constraint.
Now, see Figure 4.3 for an illustration of a shoulder joint as it appears on a MetaHuman; you can see that we don’t have to worry about rotational constraint:
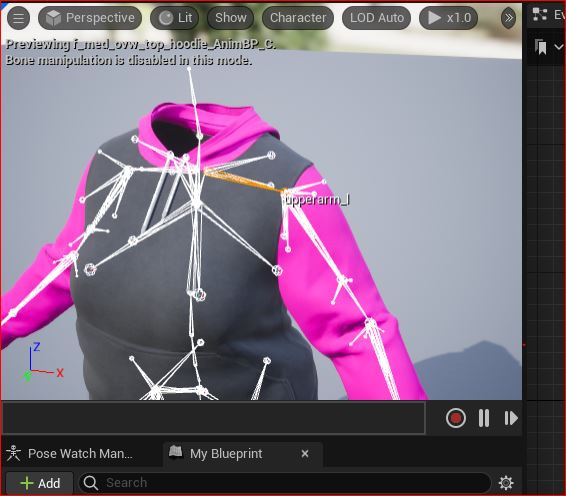
Figure 4.3: Shoulder joint
You’ll also note that it isn’t very clear which bone is selected, which demonstrates that working with bones directly isn’t very practical when it comes to animation.
Regardless, let’s get back to the point about what FK and IK actually are. In order to understand FK, first, we need to understand the simple relationship between parent and child (we use this analogy a lot in 3D graphics and robotics). A child will go wherever the parent goes, but the parent doesn’t have to go where the child goes.
FK
Let’s apply the parent-child relationship concept to joints, exploring FK by taking the example of the shoulder. Moving or rotating the hand joint has no effect on the shoulder joint. In fact, we would have to rotate the shoulder joint first, followed by the elbow joint, to affect the position of the hand to get the desired result. In other words, to define the position and rotation of the hand (the end effector), we must calculate the position and rotation of the shoulder and elbow first.
In Figure 4.4, I have demonstrated that by rotating Joint 01 (as seen on the left), I can then rotate Joint 02 (as seen on the right):

Figure 4.4: FK
Here, we are working out the position of the hand by applying rotations to Joint 01 (the parent) and Joint 02 (the child). This is called FK because we are solving the problem of motion by calculating the rotation of the parent first, so we solve this problem in the direction of parent to child.
IK
IK gets its name because it solves the problem of motion by calculating the rotation of the child first instead. Taking the example of the shoulder again, the IK solution can determine the rotation of the shoulder joint when the user or artist is affecting the position of the hand end effector (the child in the hierarchy). Therefore, it’s the opposite of FK, solving the problem of motion in the child-to-parent direction.
In Figure 4.5, I have demonstrated that I only need to move the hand, which, in turn, automatically works out the rotation of Joint 01 plus the rotation and subsequent position of Joint 02:
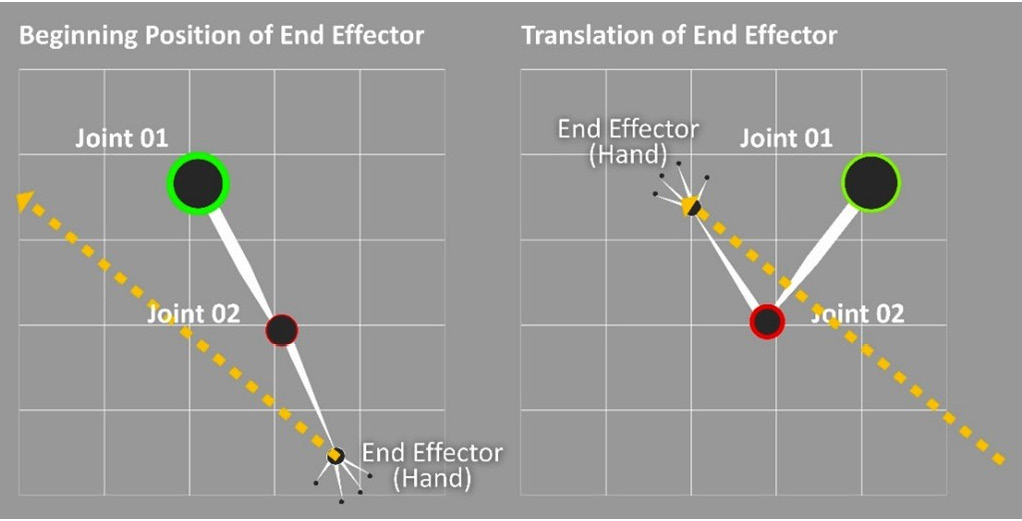
Figure 4.5: IK
In essence, IK is much more dynamic than FK and works out a lot of the problems for us. With IK, we can effectively move a hand of a character as if it were a real person’s hand, and all the rest of the bones will follow realistically.
Note
It is worth noting that switching between IK and FK solutions is common practice in animation. The use of IK is often used for the majority of work, as it adds a certain amount of automation to the workflow, whereas FK is put to use for subtle changes and fine-tuning.
You’ll be very pleased to know that you don’t require a full understanding of FK or IK to work with MetaHumans, particularly when it comes to working with motion capture data, but an understanding does demystify some of the jargon that you are presented with regularly in the process.
In the next section, let’s get started with creating our own IK Rigs.
Creating an IK Rig
You may be asking, why do we need to create an IK Rig if MetaHumans already have one? Considering that our goal is to retarget an animation designed for one character (as the source) and apply it to our MetaHuman character (as the target), we need to make sure that the rigs have the correct naming conventions. For example, we need to ensure the left arm of the source matches the left arm of the target; some rigs will refer to shoulder as clavicle, so we need to ensure the naming convention is the same for both rigs.
So, we are effectively going to create a new IK Rig that translates information from the source and to the target. This will become much more visually apparent as we progress with the chapter and deal with IK chains. The reason we are doing this is that the naming conventions for the source rig could be different from the target rig, so the IK Rig we are going to create for each is effectively just a simple set of instructions to make the translation easier. It also adds the extra benefit of keeping us from editing the original IK Rig of the character.
So, let’s create an IK rig for our source:
- If you remember from the last chapter, we acquired a character from Third Person Template. So, inside the Blueprint folder, then inside the Third Person Template folder, right-click anywhere within that folder and choose Animation.
- You’ll see a list of Animation tools to choose from. Choose IK Rig from the list, as you can see in Figure 4.6:
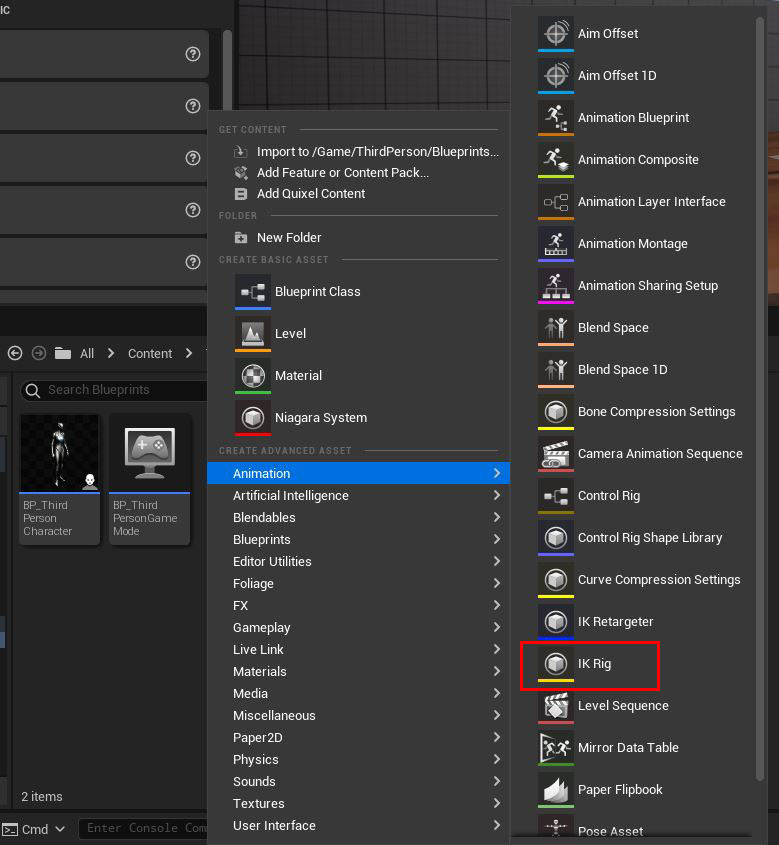
Figure 4.6: Choosing IK Rig from the Animation list
- Once you have selected IK Rig, it will ask you to pick a Skeletal Mesh option. At this point, we want to pick the skeleton related to our source character. For this, we want to choose SK_Mannequin, which you can see in Figure 4.7:
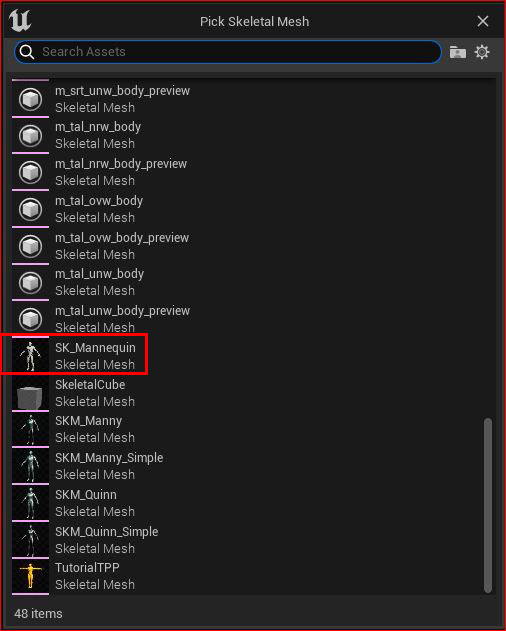
Figure 4.7: Choosing the source skeletal mesh
Once you’ve done that, it will create the IK Rig inside the same Blueprint folder you’ve been working from, as demonstrated in Figure 4.8. Make a note that I have clearly labeled this IK Rig SOURCE_Mannequin; this will help us when looking for it later and is also just good practice.
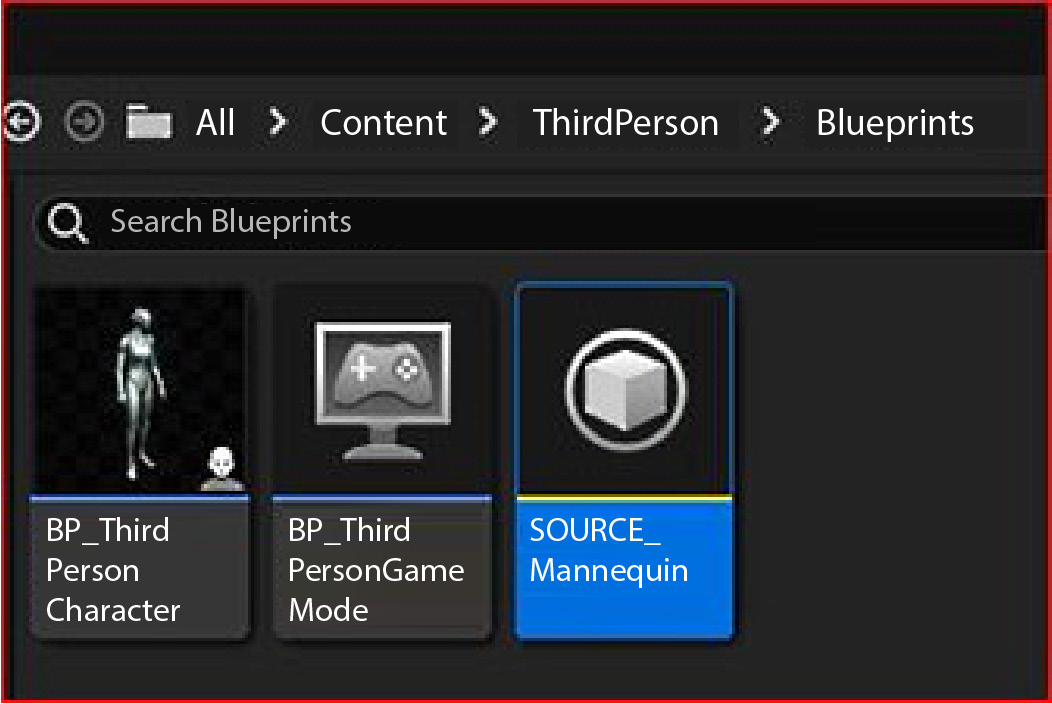
Figure 4.8: IK Rig inside the source folder
With the source IK Rig created, our next step is to create the target IK Rig.
- For this, we need to go to our MetaHuman’s folder and repeat the same steps that we just completed. So, right-click anywhere within the folder, choose Animation, and select IK Rig again:

Figure 4.9: Creating a target IK Rig
- Now, we need to choose a skeletal mesh for our target. In this case, I’m choosing the f_med_ovw_body mesh, which corresponds to Glenda being a female character of medium height and overweight (where f stands for female, med stands for medium, and ovw stands for overweight). It’s important to choose the correct one, as not doing so will cause issues later.
Note
As another example, you may have a character that is male, short, and underweight; in this case, the correct character mesh would be m_srt_unw_body.
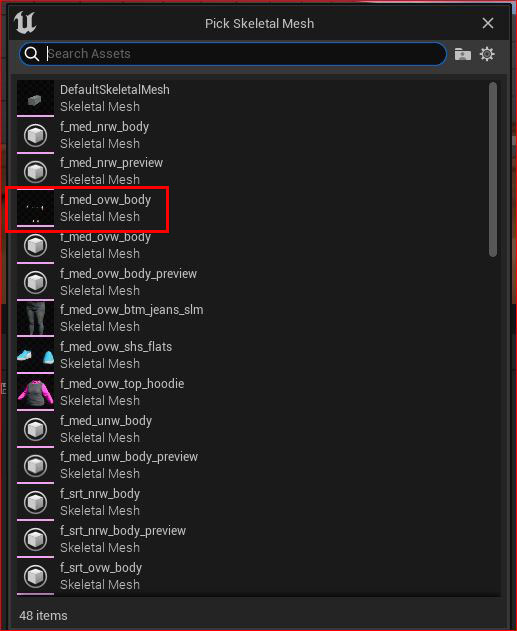
Figure 4.10: Picking the correct skeletal mesh for the target IK Rig
As before, once we’ve selected the skeletal mesh, we now have a new IK Rig in our character folder (mine is called Glenda). Take note again that I took the time to label this TARGET, as seen in Figure 4.11:
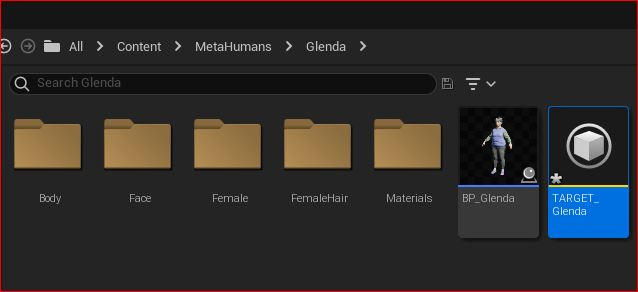
Figure 4.11: Target Rig created inside the character folder
Now, we will open both IK Rigs, and from here on, we will try to keep both rigs side by side. In Figure 4.12, I have arranged the two IK Rig windows, the source and target, respectively, so that the interfaces are as close as possible. I highly recommend that you do the same, as it will help you reduce the chances of making mistakes, but it also gives you a visual representation of exactly what is happening.

Figure 4.12: A side-by-side comparison of both the source and target IK Rigs
Splitting the screen is good practice, as it allows us to easily visualize how the source and target correspond to each other in relation to our changes. I have labeled key parts of the interface that you need to pay attention to:
- We have positioned the source IK Rig interface on the left-hand side of the screen and the target IK Rig interface on the right-hand side of the screen. This arrangement works as a visual aid to help us make comparisons quickly.
- The IK Retargeting tab is active. We need to ensure this tab is selected for both the source and target, as that is where we will be doing most of our editing.
- We have the option to click the +Add New Chain button because we will be simply adding IK chains and labeling them appropriately in both interfaces.
Under the IK Rig name in each IK Rig, on the left in each window, you’ll see that the skeletal hierarchy is written out as a list. You’ll also notice that the lists aren’t identical. For example, the source IK Rig has a skeleton with three spines, whereas the target IK Rig, which is more complex, has five spines.
You’ll also notice that both skeletons have a root at the very top of each of their hierarchies. For 3D characters, it is quite common for skeletons to have a root at the top of the hierarchy but in many cases, 3D characters use the pelvis as the top of the hierarchy. For Unreal and MetaHumans, we take the pelvis as the top of the hierarchy, so we’ll need to do a little editing.
To do this, see the following:
- Select pelvis, right-click on it, and locate the Set Retargeted Root option, as seen in Figure 4.13. Resting your cursor over this option, you’ll notice a prompt saying Set the Root Bone used for Retargeting. Usually ‘Pelvis’.:
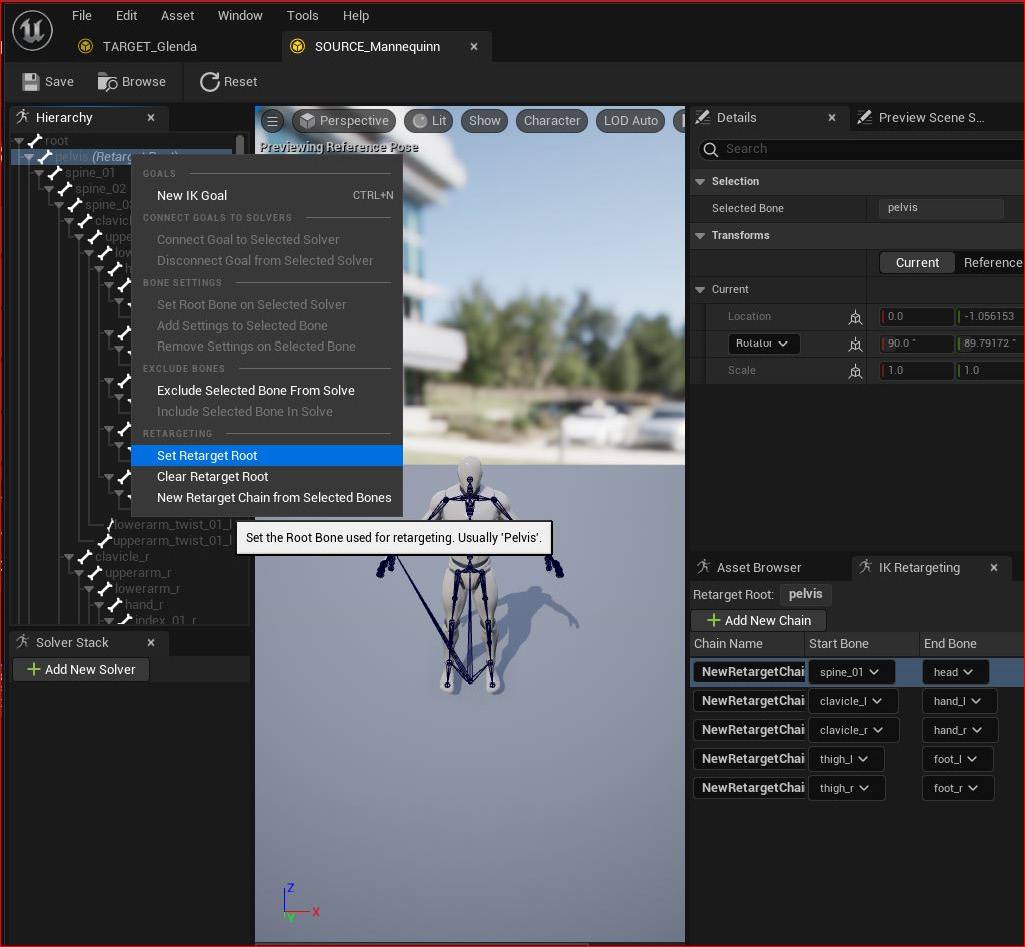
Figure 4.13: Setting the root on the source skeleton
From this, you’ll gather that, in most cases, the pelvis is set as the root, so in this case, I have selected pelvis as the root by clicking Set Retarget Root.
- Next, you’ll need to do the same for the target. In my case, it’s TARGET_Glenda. Again, as prompted by Engine, we are told that the root bone is usually the pelvis, so we’ll set the target to root to pelvis in both the source and target IK Rigs, as seen in Figure 4.14:
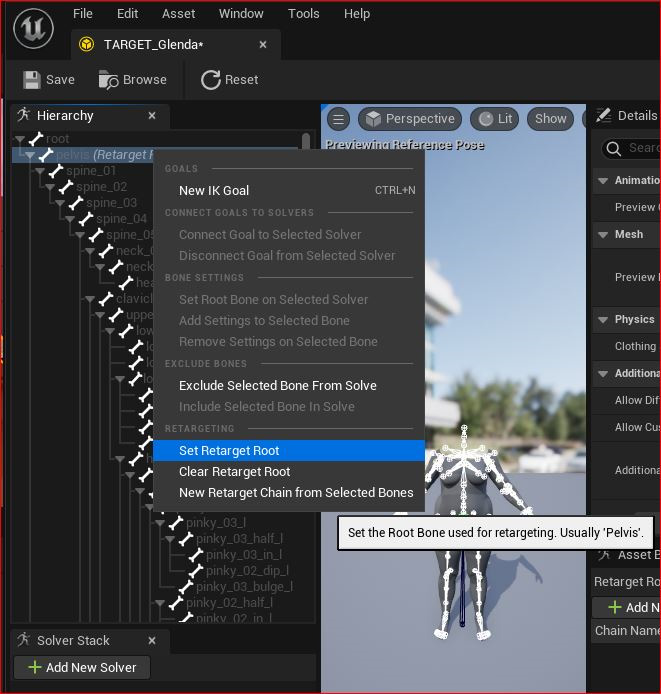
Figure 4.14: Choosing the pelvis as the root in the target IK Rig
Note
Some character rigs use a separate bone as root rather than the pelvis, so any issues with animation usually have to do with root being changed to either pelvis or root.
At this point, you’ve created two IK Rigs, one for the source and one for the target, and applied some very minor editing to both. Now, we’ll need to make sure that each limb in both the source and target corresponds to each other effectively. To do that, we need to take a look at IK chains.
Creating the IK chains
What are IK chains? Put simply, an IK chain is like any other chain, such as a bicycle chain, where each link in the chain has a relationship with the next. This applies to limbs in a body where each bone makes up a link in a chain. So, each limb, such as the shoulder down to the hand, makes up one IK chain.
All an IK Rig does is simplify each rig into the following five IK chains:
- Spine to head
- Left shoulder/clavicle to left hand
- Right shoulder/clavicle to right hand
- Left thigh to left foot
- Right thigh to right foot
Note
Ensure that you create each chain in the order that I have written them here and that the order applies to both the source and target skeletons.
To do this, let’s take a closer look at the IK Retargeting tab. In Figure 4.15, knowing that I just need five IK chains, I clicked on the +Add New Chain button five times:
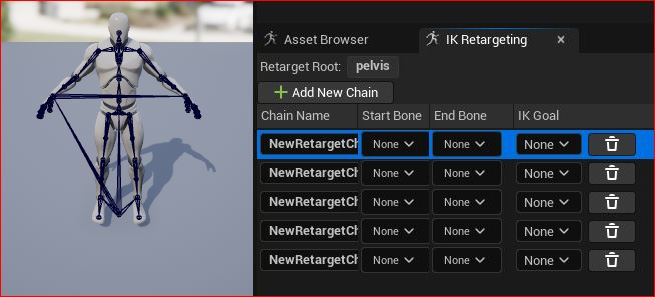
Figure 4.15: IK Retargeting tab for the source
By default, the start and end bones for each chain are set to None. To change this, click on None, and type Spine. This will activate a search through all the available bones; from the results, we can see that this skeleton has three available bones titled spine. Select spine_01.

Figure 4.16: Selecting the spine
Selecting spine_01 will make it the given Start Bone. Do the same for End Bone but this time, type Head to complete the chain.
With both IK Rigs displayed side by side, we get a visual guide for our first IK chain because when we select an IK chain, it turns bright green. To select a chain, click anywhere beside any one of the fields (that could be between the Start Bone and the End Bone fields or even just next to the trash can icon). You can see from Figure 4.17 that I have highlighted the first IK chain by clicking next to the End Bone field on each. This, in turn, highlights the chain in both viewports, which works as a great visual aid.
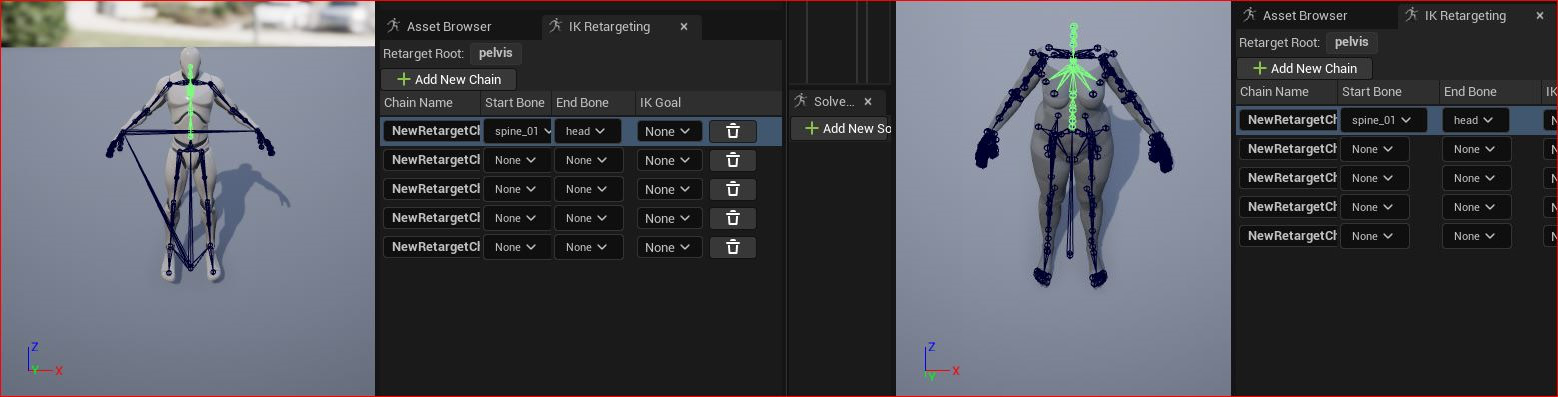
Figure 4.17: Visualizing the first IK chain
Now, we have an IK solution for both skeletons even though the skeletons are different.
Referring back to the list at the start of the section, let’s continue with the second IK chain. For the source IK Rig, choose Clavicle Left for Start Bone and Hand Left for End Bone. Then, do exactly the same for the target IK Rig.
By following the table and the previous instructions, you will be able to create the third, fourth, and fifth IK chains yourself, so that your source and target IK Rigs look similar to Figure 4.18. As you can see, I have selected the last IK chain, which is Left Leg. You can see in both Rigs that Start Bone is thigh_l and End Bone is foot_l and they are selected, and that this is represented in both viewports, with the relevant chain in each character highlighted in green:

Figure 4.18: Side-by-side visualization of IK chains from both the source and target Rigs
This precise matching between the source and target Rig is vital for the animation to be translated correctly. With that done, in the next section, we are going to create an IK Retargeter.
Creating an IK Retargeter
With the hard work out of the way, now it is time to create a tool that can make these two IK Rigs talk to each other. This is effectively what an IK Retargeter does, translating the animation from the IK chains of one character onto another. In this example, I have gone back to my Glenda folder to create the Retargeter. So, let’s go through the following steps:
- Just like when we were creating the IK Rig, right-click anywhere in your character’s Blueprint folder, choose Animation, and select IK Retargeter, just like in Figure 4.19:
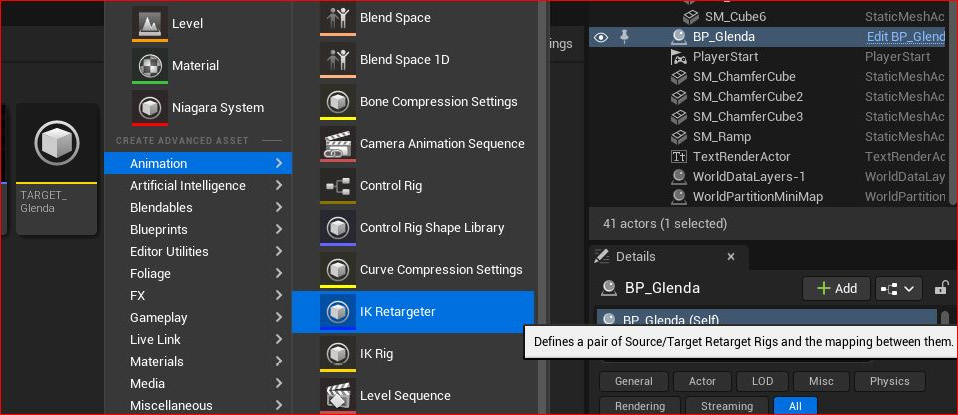
Figure 4.19: Creating the IK Retargeter
- When creating the IK Retargeter, you are prompted to pick the IK Rig from which you want to copy the animation. To make things easier for ourselves, we already labeled the IK Rig SOURCE_Mannequin earlier so that we could easily identify it as a source. You can see this available in the list in Figure 4.20:

Figure 4.20: Picking the source IK Rig
- Once picked, we will see another dialog box that shows us the source skeleton. Find the Target IKRig Asset option, which I have highlighted in red in Figure 4.21 (we will come to the option highlighted in green in a moment):

Figure 4.21: The IK Retargeter dialog box
The drop-down list beside it will show any available IK Rigs. The target IK Rig I want is aptly labeled TARGET_Glenda:
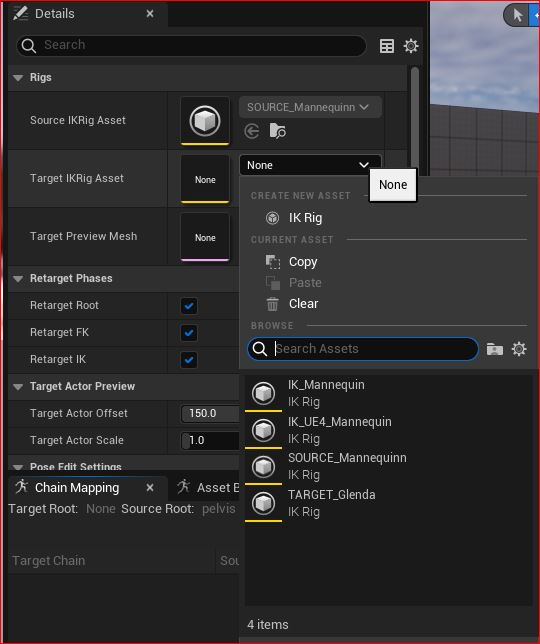
Figure 4.22: Selecting the target IK Rig within the IK Retargeter
When selecting Target IKRig Asset, you should see a MetaHuman mesh appear next to Mannequin. If you don’t see it, return to Figure 4.21, where I have highlighted the Target Preview Mesh selection box in green.
- Now, in Figure 4.23, you can see how the IK Retargeter gives you a viewport with both the Mannequin character and the MetaHuman character next to one another. In addition, note that you have two tabs at the bottom of the screen: Chain Mapping and AssetBrowser. Make sure you’re looking at the Chain Mapping tab and click on the Auto-Map Chains button.

Figure 4.23: Chain Mapping and Auto-Map options in the IK Retargeter
- Next, switch over to the AssetBrowser tab, where you will see the available animations. In my case, I have just one animation available titled Jog_Fwd (you may have more). Click on one and the viewport will update with the animation applied to your MetaHuman.

Figure 4.24: Exporting selected animations
- You can now export that animation so that it is retargeted to your MetaHuman. If you have more than one animation available, you can select them as well. To export, select the animation and click on Export Selected Animations. Here, you will see a dialog box asking you to select an export path. I suggest that you choose your MetaHumans folder to which to export the retargeted animations, as I have done in Figure 4.25:

Figure 4.25: Choosing a directory in which to save your retargeted animations
Note
When choosing the folder and pressing OK, the IK Retarger will create a new file using the animation name. In my case, it was Jog_Fwd. The file created will have the Retargeted suffix, which is a convenient way of differentiating the original animation from the retargeted animation files.
At this stage, you have seen your animation on your MetaHuman, but only in the IK Retargeter viewport. To get the animation in the scene, one way of doing this is to open up your character Blueprint (in my case, it is BP_Glenda).
- With the Blueprint open, you can now choose the retargeted animation in the Animation section under the Anim to Play drop-down menu, or you can just drag and drop your retargeted animation into the box beside it as per Figure 4.26:
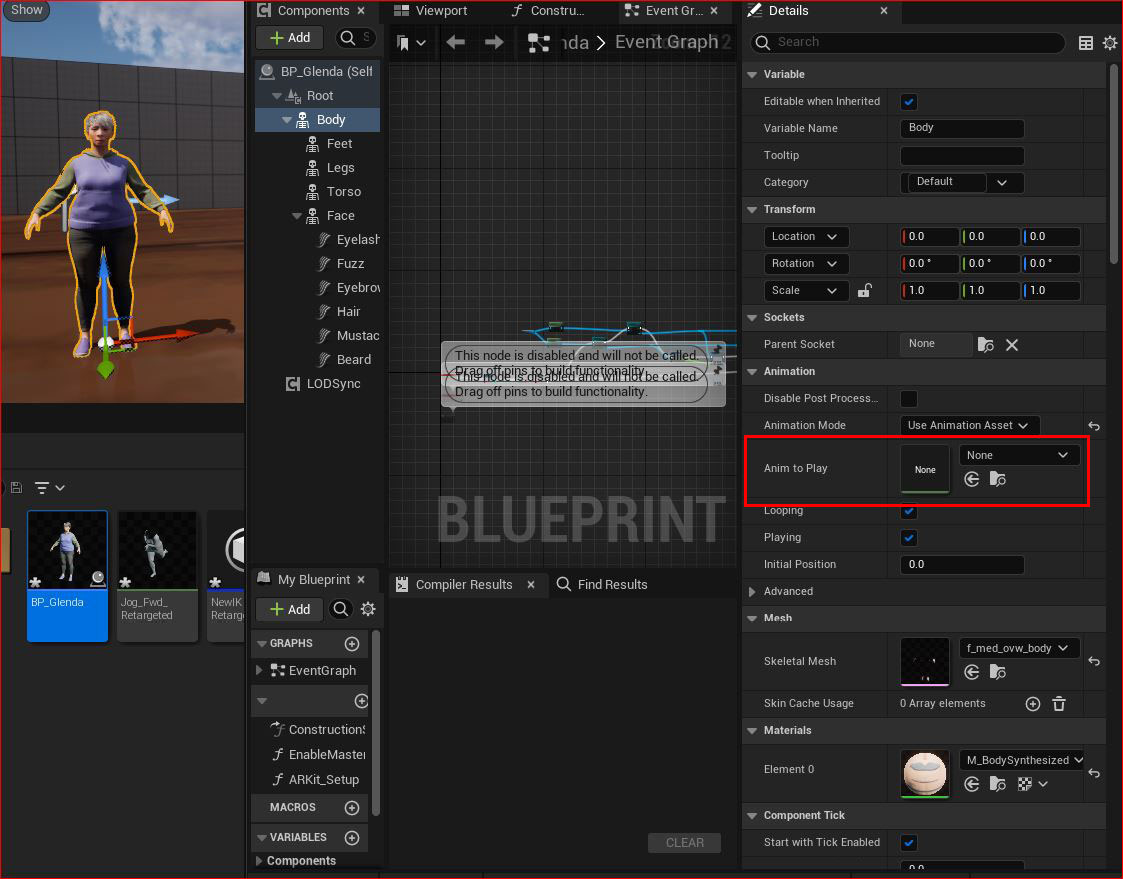
Figure 4.26: Applying the retargeted animation to the character Blueprint
- Similar to Figure 4.24, we can run a search to find the animation, and with the Retargeted suffix, we can confirm that we have selected the correct animation as per Figure 4.27:
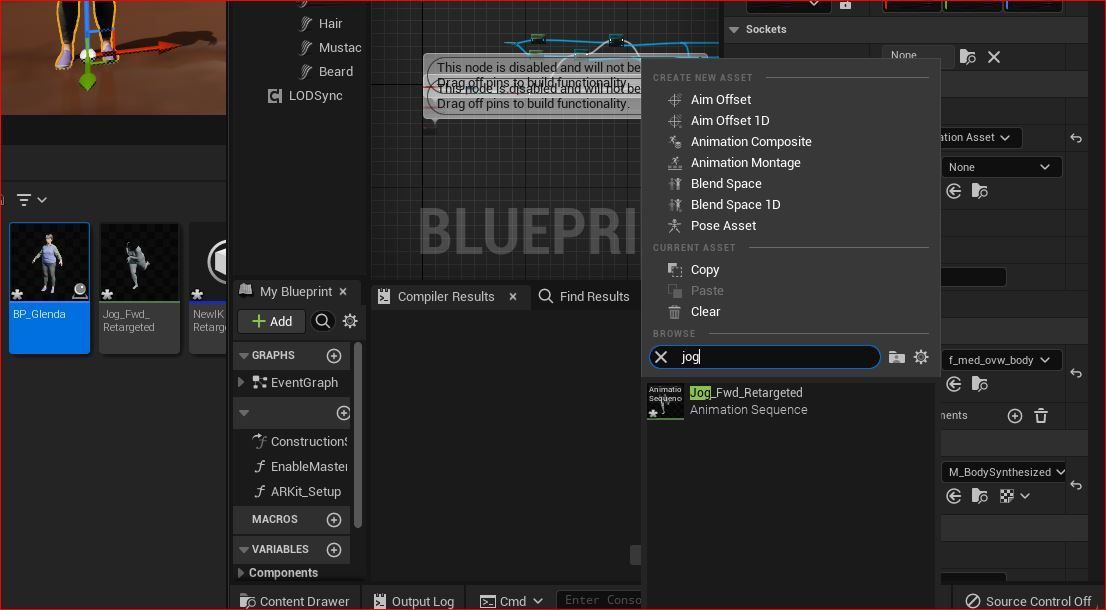
Figure 4.27: Using the search function to find the retargeted animation
- If you haven’t done so already, drag and drop your BP_Glenda file from your MetaHumans folder into Unreal Engine’s main viewport. Then, hit Play to simulate a game and see your animation play in the viewport.

Figure 4.28: Hitting play
We’ve gone through the steps to creating an IK Retargeter to make a source IK Rig talk to a target IK Rig, but we focused on just one animation. Let’s take a look at what to do when we have additional animation.
Importing more animation data
To see more animations at work, you can go to the Unreal Engine Marketplace and search for the Animation Starter Pack. This is a free animation pack that works with Unreal Engine version 5.0 and you can add it to your project if your project is still open.
So, why don’t we see how easy it is to retarget animation without the need to open the IK Retargeter using the Animation Starter Pack?
- With your project open, enter Epic Games and go to Marketplace.
- Under UE5, choose Animations. Then, under Filters, choose Max Price as Free.
This should bring up the Animation Starter Pack, and by clicking on it, you will see a page as per Figure 4.29:

Figure 4.29: Animation Starter Pack
- Click Add To Project to add the pack directly to your open project.
By doing this, an AnimationStarterPack folder will appear in your Project Content folder.
- Navigate there and right-click on one of the animation files, as per Figure 4.30. Select Retarget Animation Assets and you’ll see that your only option is to choose Duplicate and Retarget Animation Assets:
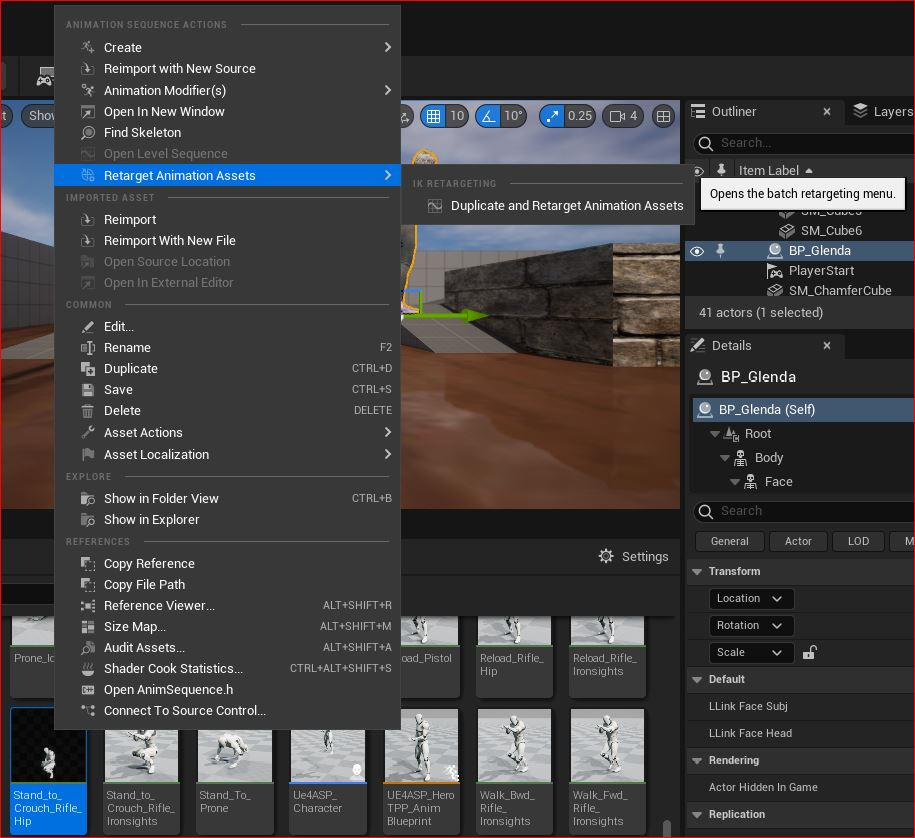
Figure 4.30: Right-click to retarget animation asset
Once selected, you will be brought to the dialog box illustrated in Figure 4.31:
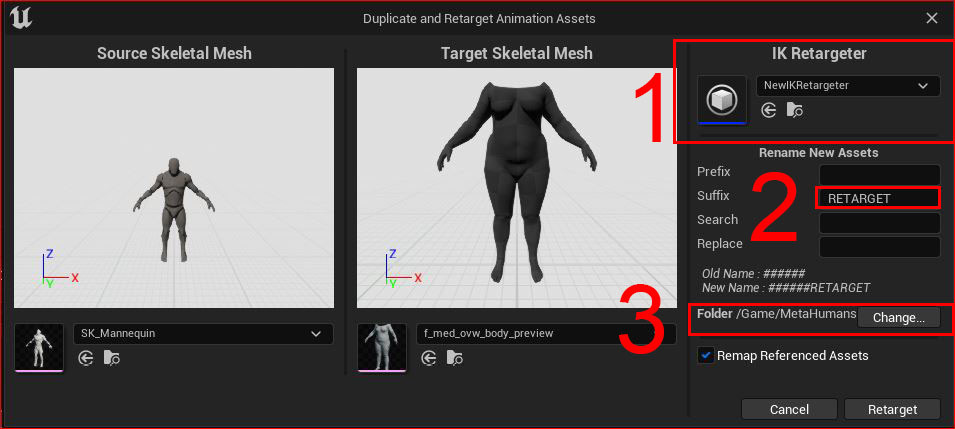
Figure 4.31: Duplicate and Retarget Animation Assets dialog box
There are three points to note regarding this figure:
- Under IK Retargeter, I chose NewIK Retargeter. Once you’ve selected the correct IK Retargeter, both viewports will instantly update; in my case, it will show SK_Mannequin as the source and f_med_ovw_body_preview as the target.
- I changed the Suffix option to RETARGET. This is just good housekeeping so that you can find it easily at a later stage.
- Choose what directory you want to save your new asset into and click on Retarget.
Note
While only for previewing, take note of the drop-down lists under each viewport in Figure 4.31. Here, you can preview the associated mesh of both the source and target skeletons.
Now, we’ve managed to import a new animation and added it to our character without having to use the IK Retargeter again.
Summary
In this chapter, we learned a little about IK and FK, and explored both the IK Rig and the IK Retargeter tools.
More importantly, we uncovered the principles of IK chains, visual aids, such as the highlight function for comparing the source and target IK chains, and the procedures that allow us to create effective and accurate IK chains that the IK Retargeter can use.
We also retargeted an animation effectively and applied it to our scene using the IK Retargeter and applied an alternative method of retargeting the animation assets.
In the next chapter, we will look at Mixamo so that we can use an extensive library of body animations and apply them to our MetaHuman characters. We will also look at using the IK Retargeter to retarget multiple animations in one go.