
9
Using Faceware for Facial Motion Capture
In the previous chapter, we used an iPhone to capture facial data via the Live Link Face App. While that is a great solution, it does have its limitations. One such limitation is how little control we had with regard to calibration; we were only able to calibrate to a neutral pose.
In this chapter, we’re going to look at a more professional solution that is used in both AAA games and film projects. Unlike the iPhone’s depth camera, we are looking at a video camera-based solution that provides us with a lot more calibration control: the solution is Faceware Studio.
Not only will we be taking advantage of the improved calibration when it comes to facial motion capture for our MetaHuman, we will also be looking at the additive tool in the Level Sequencer too.
So, in this chapter, we will cover the following topics:
- Installing Faceware Studio on a Windows PC
- Installing Unreal’s Faceware Plugin and the MetaHuman sample
- Setting up a webcam and the streaming function
- Enabling Live Link to receive Faceware data
- Editing the MetaHuman Blueprint
- Recording a session with a Take Recorder
- Importing a take into the Level Sequencer
- Baking and editing facial animation in Unreal
Technical requirements
In terms of computer power, you will need the technical requirements detailed in Chapter 1 and the MetaHuman plus the Unreal Engine Mannequin that we imported into UE5 in Chapter 2.
You will also need:
- A webcam and a well-lit room
- A stable internet connection as you will be downloading plugins
- Faceware Studio
Note
A word of warning: Faceware Studio is not a free solution; however, it is cheaper than a second-hand iPhone X. For individual users, there is an Indie pricing plan, which is €15 per month (at the time of writing). Alternatively, you can request a free trial.
Installing Faceware Studio on a Windows PC
To install Faceware Studio, head over to https://facewaretech.com/ and navigate to the Pricing page. There are two options for the Faceware Studio software that you could download, depending on your budget. The first is the Faceware Studio (Indie) version, which is currently priced at $179 annually; the second is the free trial version of Faceware Studio.
Let’s assume you do the latter – click Try Now under Faceware Studio, as per Figure 9.1.

Figure 9.1: Faceware pricing options
You’ll be invited to register for a Faceware account as per Figure 9.2:

Figure 9.2: Sign up for an account
Once you have an account set up, navigate to and click on Downloads at the top of the page. This will take you to a list of available downloads. From Figure 9.3, you can see that Faceware Studio is available (if you don’t see it, just scroll down the page). Here, you can click the Download button.

Figure 9.3: Downloading your 30-day trial
Once downloaded, open the installer.exe file and follow the simple onscreen instructions, then Faceware Studios will be installed!
In the next section, we are going to download and install the Faceware Live Link plugin, which allows Unreal to receive data from the Faceware application. We will also download a MetaHuman sample from Epic Games that is designed to work with Faceware.
Installing Unreal’s Faceware plugin and the MetaHuman sample
To install Unreal’s Faceware plugin, open up your project from Chapter 8 and then open up the Epic Games Launcher. Search for the Faceware Live Link and then click on Install to Engine, as shown in Figure 9.4:

Figure 9.4: Epic Games Launcher Faceware Live Link page
After the installation of the plugin has finished, scroll down on the Faceware plugin page until you see the link for the Sample MetaHuman Blueprint, as shown in Figure 9.5:

Figure 9.5: Sample MetaHuman Blueprint
Click on the Download Blueprint link. This will open a new browser, taking you away from Epic Launcher and you will see the following message:

Figure 9.6: CONTINUE TO EXTERNAL WEBSITE button
Click on CONTINUE TO EXTERNAL WEBSITE. At this stage, you will be asked where you want to download the Sample MetaHuman Blueprint to.

Figure: 9.7: Saving the Sample MetaHuman Blueprint
You can download it to a temporary location for the moment, or alternatively download it directly to your MetaHumans folder inside your project. If you don’t know where on your computer your project folder is, you can find it by jumping back into your Unreal project and going to the Content Browser. From there, right-click on the MetaHumans folder and choose Show in Explorer, as shown in Figure 9.8.

Figure 9.8: Locating your project folder
Clicking on Show in Explorer will open Windows Explorer so that we can see where our project files are independently of Unreal. Similar to what I have done in Figure 9.9, copy the file path of the MetaHumans folder location on your machine. Now we’re going to save the Sample Blueprint into the project’s MetaHumans folder we created in the previous chapter.

Figure 9.9: Copying the project location
Doing this will save the Blueprint into your project folder; however, it will be in a zipped file; you will need to extract it to the same folder. Once you do that, restart Unreal. During the restart, the MetaHuman Sample will update your project to ensure that MetaHumans will work with the Faceware plugin.
In the next section, we will move on over to the Faceware Studio software and use a webcam to track our face.
Setting up a webcam and the streaming function
The next step is to ensure that you have a working webcam or another camera with a working connection to your computer. If you have a camera that you’ve used in applications such as Zoom or Teams, it will also work with Faceware.
- So, boot up the Faceware Studio software. You should be greeted by an interface similar to what is shown in Figure 9.10:

Figure 9.10: The Faceware interface
To set up our webcam and the streaming function, we will need to explore the Realtime Setup panel and the Streaming panel.
Realtime Setup panel
On the left side of the screen is the REALTIME SETUP panel. Under Input Type, click the drop-down menu and select your webcam. As soon as you select a working webcam, you will get more options, as shown in Figure 9.11:
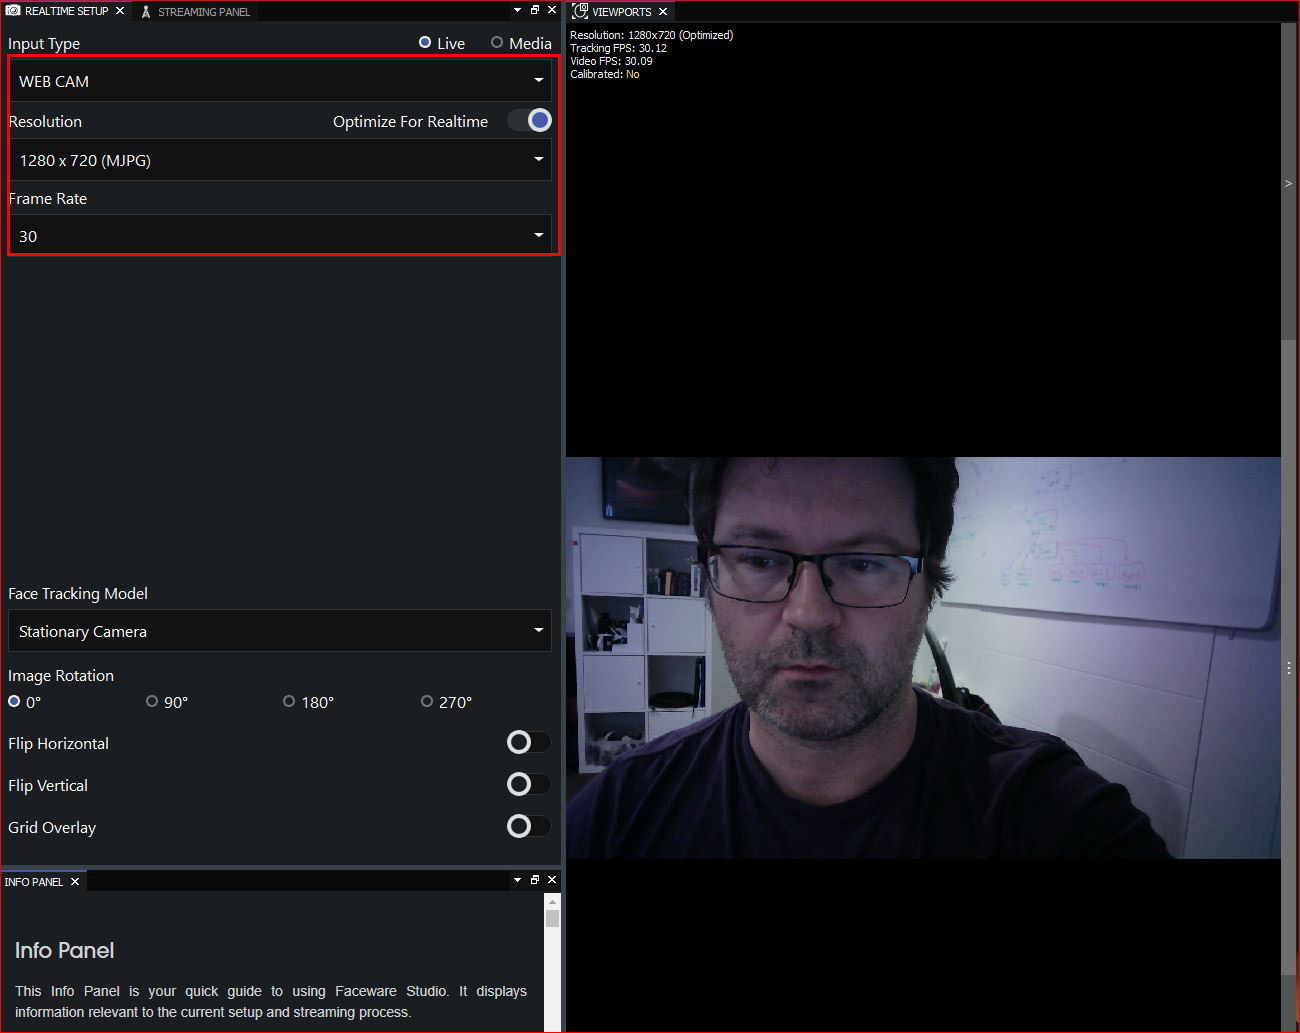
Figure 9.11: Realtime Setup panel
Let’s look at the options available:
Input Type
The Input Type panel allows you to choose what kind of video you want to use. As our goal is to stream live facial capture data into Unreal, we will pick Live. Should you wish to use pre-recorded footage located on your machine, you can select Media, but we won’t be exploring that option.
Resolution
Resolution can be as large as the video signal coming in. So, if your webcam and computer are capable of handling an ultra-high-definition webcam, Faceware won’t have any issues with it. In my case, my webcam had a resolution of 3840 X 2160. However, that high resolution gives no advantage and actually works against us due to the processing required for all that high-resolution data. I’ve reduced the resolution to a more practical 1280 X 720, as this resolution holds all the information required for a good track but isn’t as data heavy as my original option.
You are also given the option to choose either (MPG), which uses the Motion JPEG (MJPEG) compression/decompression codec algorithm, or (H264), which uses the H264 codec algorithm. Ultimately, choose whichever one works best for your machine in terms of frame rate, which I will explain in the next section.
Frame Rate
Frame rate is an important factor for accurate motion capture. You may remember from Chapter 5, Retargeting Animations with Mixamo, that motion capture was available to us at frame rates of 30 frames per second and above. Our goal is always to achieve a frame rate of 30 frames per second or above, which you can see I have done in Figure 9.11.
To further reduce processing time, you can switch on Optimize for Realtime, which will reduce the resolution and in turn increase the frame rate. If you look again at Figure 9.11, you can see a difference in resolution occurs in the top left of the viewport that features the webcam signal. I have also provided two examples of this signal information in Figure 9.12:

Figure 9.12: Resolution versus frame rate
You can see that the 3840x2160 resolution on the left gives us a video frame rate of just 14.38, which is bad, whereas the 1280x720 signal is giving us a video frame rate of 30.06, which is better (considering our target of 30 fps).
You may also notice that the Tracking FPS is generally the same as the Video FPS. If the Tracking FPS is lower, it means there’s something wrong with the software; possibly other applications are running, causing Faceware to be under-resourced. Try closing down any other applications that are running to help out with this.
Note
The difference between Tracking FPS and Video FPS is quite simple. Tracking FPS is how fast the software can correctly identify areas of the face and where they are in the picture, whereas Video FPS is simply how many frames the software is receiving from the webcam per second.
Face Tracking Model
Referring back to Figure 9.11, below Frame Rate, the next field is Face Tracking Model. The drop-down menu provides two options:
- Stationary Camera: Suitable for webcams where the camera is stationary, but the user’s head is moving.
- Professional Headcams: Suitable for professional solutions where the camera is fixed to a head rig and only captures facial expressions rather than head movements. Headcams aren’t capable of tracking neck movement, so if the user nods or shakes their head, the data isn’t recorded. In this scenario, a motion capture suit is relied upon to capture body motion, including head and neck movement. Typically, both body and facial captures are done simultaneously when professional headcams are being used as it produces a more natural result.
In our case, we are picking Stationary Camera.
Image Rotation
In cases where your camera is upside down or turned to the side, you can rotate the video signal in increments of 90 degrees to fix it. I don’t need this, so the Image Rotation option is set to 0 degrees.
Flip Horizontal and Flip Vertical
Again, if you are dealing with an upside-down camera or if you have a personal preference for a mirror image, you can choose to flip the image horizontally or vertically. I won’t be using these either.
Grid Overlay
This is a somewhat helpful tool to ensure your face is in the middle of the frame. I haven’t enabled this.
Now, before we go over to the Streaming panel, make sure that you have a video signal coming into Faceware, that your input is set to Live, and that your face is being tracked, with tracking markers moving in tandem with your face. You can see from my example in Figure 9.13 that I have orange tracking markers around my eyebrows, eyes, nose, and mouth:
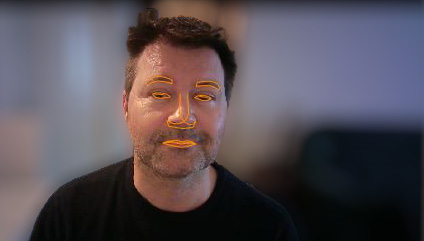
Figure 9.13: Tracking markers working
Once your face is being tracked, then you need to ensure that Faceware is able to send data out in the STREAMING panel.
Streaming panel
Switch over to the STREAMING panel, and you will see the following options shown in Figure 9.14:

Figure 9.14: The Streaming panel
Let’s take a look at each section of the panel.
Stream to Client
The first option in STREAM TO CLIENT is the STREAM TO CLIENT toggle button itself, which I have toggled to the right to turn it on. Effectively, the button is just an on-and-off switch. When it’s on, Faceware will stream live motion capture data to the client. The client in this instance is the Unreal Engine, which is enabled to receive the streaming data via Live Link.
Note that if you don’t have a live video signal, you won’t be able to enable STREAM TO CLIENT.
The second option is PORT – these ports are set up automatically when the Live Link plugin is installed. During the installation of Faceware, Faceware detects which ports are available for streaming to; however, do make note of the port number just in case. You should leave PORT as the default value; in my case, that is 802.
Now you are ready to start the face tracking. Get your face into a neutral pose, so no smiling or pouting, and click on the CALIBRATE NEUTRAL POSE button as per the bottom left of Figure 9.15:

.
Figure 9.15: Calibrating neutral pose
Be sure to look directly into the webcam when you do this and expect to hold that pose for about 5-10 seconds while Faceware recalibrates to your face. When it is done, it will automatically track your face. Take a look at Figure 9.16, where you can see that the CGI character is following the movement of my own head and facial expressions.

Figure 9.16: ANIMATION TUNING panel
You’ll also notice the ANIMATION TUNING panel on the right of the screen; you’ll see a lot of horizontal bars moving in response to your head moving. These are all the ARKit controls being animated as a result of the face tracking. We will go into this in further detail later. For now, let’s take a further look at the Realtime Setup features.
Control Schema
CONTROL SCHEMA refers to the naming conventions used for the streaming data from Faceware studio. Because we are utilizing ARKit, make sure you enable ARKIT. LEGACY and STANDARD are good, but they don’t have the fidelity of ARKit, which is used in the design of MetaHumans, and for this book, they are redundant.
Stream Face Groups
The STREAM FACE GROUPS feature allows us to remove certain parts of the face from streaming. If we were using a professional head cam that doesn’t record head rotation, I would suggest disabling the head from STREAM FACE GROUPS. In that scenario, we would be capturing the head rotation using a body motion capture solution.
In our example, let’s assume that we want to record the head rotation and all the facial movement. To do this, under STREAM FACE GROUPS, ensure to enable ALL. However, if you just wanted to capture one face group, for example, you just want to move eyebrows, you could just enable the EYEBROWS option.
At this point, we should be streaming, but let’s just look at one final part of the Faceware interface: the status bar.
Status bar
In Figure 9.17, you can see that the top toolbar is a color-coded tab list providing a way to troubleshoot and rectify issues quickly as they arise:

Figure 9.17: Top toolbar
They are in the order of left to right:
- VIDEO: This is a shortcut to the REALTIME SETUP panel, which we have just covered.
- TRACKING: This is a shortcut to the viewports, as seen in Figure 9.17, so that we can visualize how well the tracking is going. You can see in Figure 9.18 that not only is my head movement being tracked, but the tracker is even able to detect a wink through my glasses.

Figure 9.18: Viewports
- TUNING: This is a shortcut to the TUNING panel, where we will do most of the tweaking and fixing of issues. You can see that we have a lot of control over refining the brows, eyes, head, and mouth. As daunting as this may look, these controllers are relatively simple to use.
For example, if you look at the CGI head and its jaw doesn’t open as wide as your jaw in the webcam, you can increase the Jaw Open parameter to as much as 200% by dragging the blue slider to the right. I made similar adjustments in Figure 9.19 by dragging some of the mouth sliders to the right as much as 200%.

Figure 9.19: Tuning
If the jaw opens too much in the CGI character compared to your webcam video, then drag the slider to the left to decrease the amount. The same can be said for all of the parameters in the TUNING panel.
- EFFECTS: While not a common panel to use, EFFECTS does come in useful if you’ve found that you’re just not getting the desired result using TUNING alone. An example would be where the Mouth Smile Left is appearing just a little too high on the CGI face. To fix this, we can manually add an Offset with a negative value to counteract that, illustrated in Figure 9.20:

Figure 9.20: Effects
- STREAM: This is a shortcut to the STREAMING panel, which we also covered earlier.
Ideally, all of these buttons are green in the top menu. If they go between yellow and green, the settings are effective but not optimal. If they go into the red, then you’ll certainly need to make changes.
The most common circumstance that results in a red button is when we move our face out of the webcam’s range. The face tracking is generally very good but once we go out of frame, it can’t track and will immediately give us a red tracking button. The second most common red button instance is low frame rates, which in turn will result in a poor track.
Before we go into any more detail on any of these additional panels, especially TUNING, we must first go back to Unreal to make sure we are getting live facial capture data, and we will also need to jump into our MetaHumans Blueprint. The reason for this is that it is better to view how our MetaHuman is responding to the facial tracking and make our adjustments with that information rather than looking at the default head inside Faceware.
Enabling Live Link to receive Faceware data
Before we jump into the MetaHuman Blueprint, let’s just double-check to see that Live Link is receiving a signal.
To open up the Live Link plugin inside Unreal, go to Window, then Virtual Production, and choose Live Link, as per Figure 9.21:

Figure 9.21: Opening Live Link
In Figure 9.22, you can see that I’ve clicked on Faceware Live Link to select the incoming signal from Faceware. Make a note of the Port Number: it is the same port number I was able to detect in the Faceware STREAMING panel, as per Figure 9.14. If the Live Link port number is different to the Faceware port number, you can change it in either application to match.

Figure 9.22: Live Link Port Number
Now, with the STREAM TO CLIENT enabled in Faceware, we should have a good face track working. A good face track means we get no red warnings. It also means that we are receiving a live signal in Live Link, giving us a green button, as shown in Figure 9.22. Once we get that green button, we are good to start working with the MetaHuman Blueprint.
Editing the MetaHuman Blueprint
To start, we need to create a new Level Sequence because we’re going to add our MetaHuman Blueprint to the Level Sequencer:
- Just like in the last chapter, drag and drop the MetaHuman Blueprint from the Outliner and onto the Level Sequencer. Again, you’ll notice that a Metahuman_ControlRig and a Face_ControlBoard_CtrlRig have been created. Delete both of these as we don’t need them.
- Next, click on Face from the Blueprint in the Level Sequencer. In Figure 9.23, you’ll see how the Details panel has given me parameters for me to edit, namely the Animation Mode and Anim Class.

Figure 9.23: Selecting Face from the MetaHuman Blueprint
Ensure Animation Mode is set to Use Animation Blueprint and that Anim Class is set to ABP_Metahuman_Faceware_LiveLink Face.
- Now test your facial motion capture data by hitting the Play button at the top of the Unreal Engine interface. This will run a game simulation where you can see the facial animation come to life.
Make sure to hit Stop to stop the simulation. You need to do this before you can start the Take Recorder, which we use in the next section.
Recording a session with a Take Recorder
In the previous section, I mentioned running a simulation to test the facial motion capture data. That’s fine for just doing quick tests, but for animation production, we need to record the motion capture data, and to do that, Epic Games have created the Take Recorder. This will allows us to record mocap sessions and play them back from the Level Sequencer.
To use a Take Recorder instead, follow these steps:
- Go to Take Recorder tab and add the MetaHuman Blueprint. You can see in Figure 9.24 that I’ve done this by clicking the + Source option, and then From Actor.

Figure 9.24: Adding the MetaHuman Blueprint to the Take Recorder
- Still in the Take Recorder tab, add another asset by using the From LiveLink option, as per Figure 9.25. Here, we are going to add animationValues. The values referred to here are all the ARKit data values as they are being streamed from Faceware, such as rotation of the head, blinking of eyes, and opening of mouth.
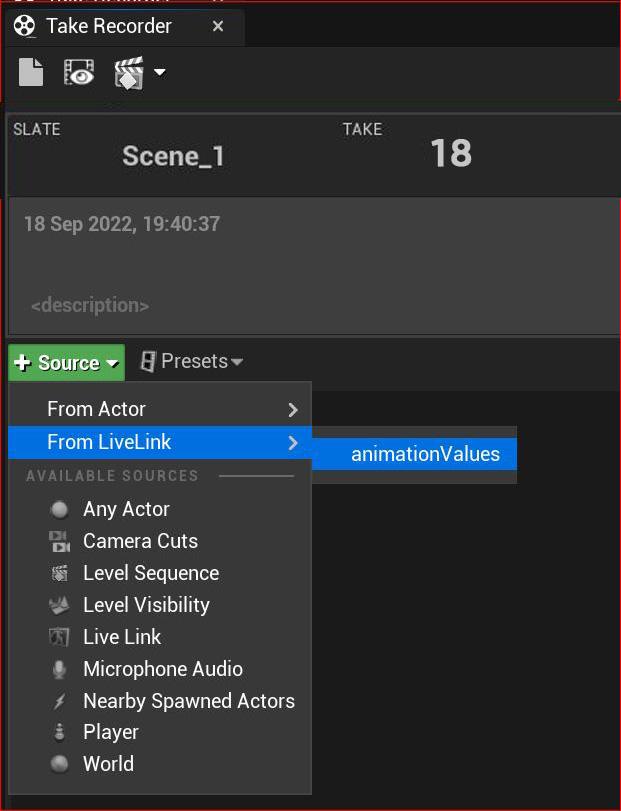
Figure 9.25: Adding animationValues to the Take Recorder
- Note the Take number. In my case, it’s Scene_1 Take 18. Whenever we want to play back a take, it is convenient to know in advance which take was the good take.
- Hit the Record button on the Take Recorder (yes, it’s the big red button!).
- Run the simulation again by pressing Play. Your animation is coming to life again as you stream from Faceware into Unreal.
- Hit Stop on the Take Recorder and note the new Take number.
- In order to play back the take we just captured, we first need to change the Animation Mode. Select Face to edit the Animation Mode. Then change the mode from Animation Blueprint to Use animation Asset, as per Figure 9.26:

Figure 9.26: Changing the Animation Mode to Use Animation Asset
We change the animation mode to Use an Asset when we want to play back a take and revert to Blueprint when we want to record a take.
In the next section, we will go back to the Level Sequencer in order to play back our facial motion capture recording.
Importing a take into the Level Sequencer
To play back our facial capture take, we need to add it to the Level Sequencer. To do this, follow these steps:
- Click on the + icon next to Face to add the animation. In the context menu, go to Animation and run a search for your most recent take. In my case, I am looking for take 19, as shown in Figure 9.27:

Figure 9.27: Adding the Animation Asset to the Face as a track
- Click on the desired track and it will automatically populate the Face track inside the Level Sequencer, as per Figure 9.28:
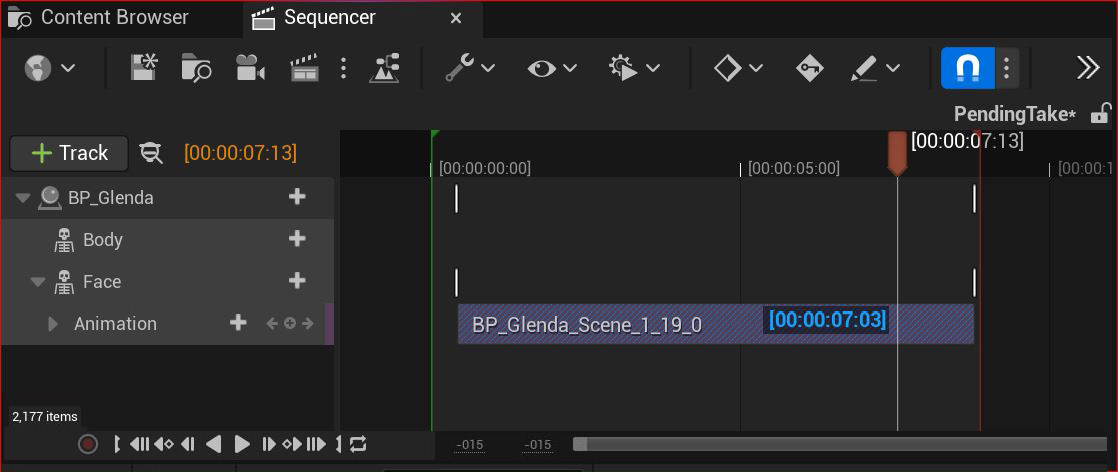
Figure 9.28: Adding the Take Recorder track to the Level Sequencer
- To play back the animation, click anywhere in the timeline where the playhead is and hit the spacebar.
Now we have added the Motion Capture data directly into the Level Sequencer. However, that is raw data and, in all likelihood, it will need a little editing. In the next section, we will look at some of the MetaHuman controls that we can take advantage of to further push the creative control of our characters.
Baking and editing facial animation in Unreal
Building on the previous chapter, where we added facial motion capture using the iPhone, we will apply the process of baking animation keyframes to the Faceware Studio Capture.
Similar to how we baked motion capture data onto a body control rig, we are going to do the same with the face rig and then create an additive section to make animation adjustments:
- With Face selected, right-click and choose Bake to Control Rig, followed by Face_ControlBoard_CtrlRig, as per Figure 9.29:

Figure 9.29: Baking the facial capture Animation Asset to the control rig
Once we’ve baked to the control rig, we should see the track looks similar to Figure 9.30:

Figure 9.30: The mocap data baked into the control rig
- For safety, we want to lock the baked track so that we don’t inadvertently edit it. Do this by right-clicking on the track and choosing Locked, as per Figure 9.31:
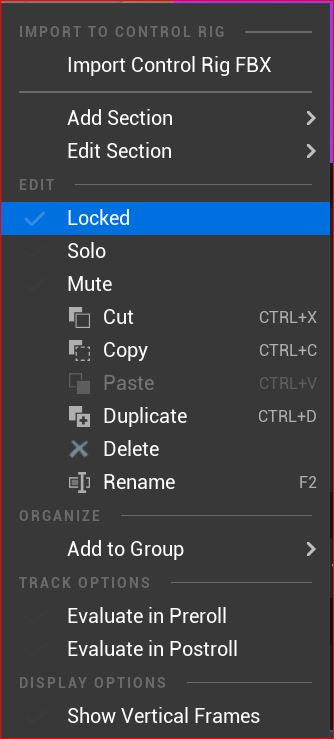
Figure 9.31: Locking the baked track
- With the control rig track locked, we can create an additive track for adding additional animation. It is effectively a duplicate track without any keyframes. To do this, click on + Section next to Face_CcontrolBoard_CtrlRig and choose Additive, as per Figure 9.32.

Figure 9.32: Creating an additive section
- Once you’ve created the additive track, the next step is to add keyframes to it. However, before doing that, you might want to double-check to see that the original motion capture track is locked. It will have a red border around it, as shown in Figure 9.33, if it is locked.

Figure 9.33: Locked track and new track
Also, take notice of the fact that there are no keyframes next to all of the controllers in the new additive track. This is exactly what we want.
Now let’s look at editing the face. During the Take Recorder session, and after I played back the mocap in the Level Sequencer, I noticed that on occasion, the right eye would blink out of time with or randomly on its own. This isn’t a physical effect of me writing this book but more than likely due to my wearing glasses during the recording.
To fine-tune this issue, you can run a search in the Sequencer for something simple, such as eye blink. This will come up with a list of the parameters related to this movement:
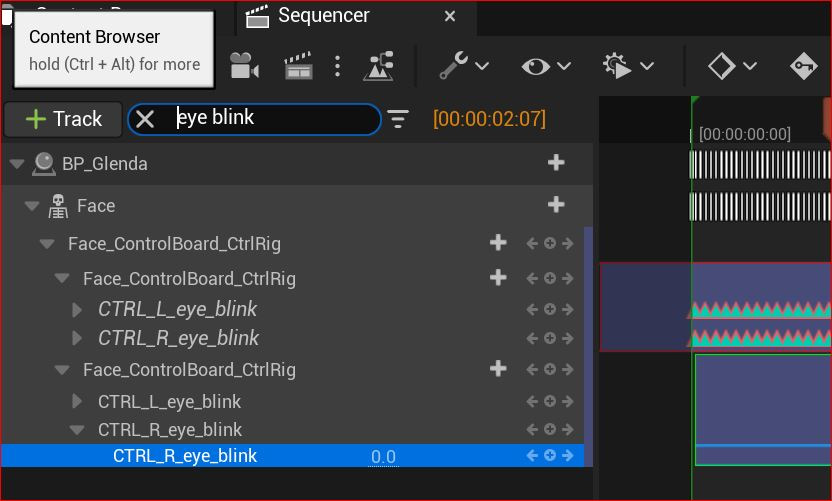
Figure 9.34: Picking a controller to edit
Using the Unreal MetaHuman controllers, I was able to set just a few keyframes to fix the eye issue. You can see from Figure 9.35 that I laid down the first keyframe at a point where the mocap was correct, the third keyframe where the mocap was correct again, and the second keyframe between them to correct the problem frames.

Figure 9.35: Making slight adjustments to Animation Controllers
If we only created the second keyframe, it would impact all the animation on the relevant track. We create the first and third keyframes to protect the animation outside the animation range of the first and third keyframes.
We are only touching the surface of editing motion capture data with the Level Sequencer. From the example I have given, I just used an additive section to fix a problem. It is a great function to know how to use, particularly when it comes to motion capture sessions. The reason is that you will know when a mocap session is good enough and whether it is cost effective to tweak the animation later or keep on going for a better take. In addition to just tweaking, you can use the techniques described in this section to make radical changes to your animation.
Summary
In this chapter, we have explored the Faceware Facial motion capture solution for MetaHumans in Unreal. Much of what we covered in this chapter was similar to the iPhone solution but with the bonus of being able to use a simple webcam, and we looked at how we can fine-tune our data before Unreal receives it.
On top of this, we had some time to revise what we have learned about the Take Recorder, and we learned how to bake our facial motion capture data into a control rig in a similar way to how we baked our body motion capture from DeepMotion. Finally, we uncovered some of the power of using the additive feature in conjunction with the MetaHumans’ many facial animation controllers to fix issues.
In the next chapter, we will build on this knowledge as we look at how to merge multiple takes inside the Level Sequencer and explore further ways to render videos.