
8
Using an iPhone for Facial Motion Capture
In the previous chapter, we took our body motion capture to the next level by learning how to make adjustments to the animation and render video using the Level Sequencer. The Level Sequencer plays an integral part when it comes to managing animation and we will use it again here as we explore facial motion capture.
In this chapter, we are specifically looking at facial motion capture for our MetaHuman, taking advantage of the iPhone depth camera and facial tracking features. MetaHumans come with dozens of intricate facial controls that respond to facial capture tools, giving you the power to create incredibly realistic facial performances including speech. This can capture your own performance or an actor’s performance to such a degree that even very subtle nuances are reflected, thus making the overall result incredibly realistic.
So, in this chapter, we will cover the following topics:
- Installing the Live Link Face app
- Installing Unreal Engine plugins (including Take Recorder)
- Connecting and configuring the Live Link app to Unreal Engine
- Configuring and testing the MetaHuman Blueprint
- Calibrating and capturing live data
Technical requirements
In terms of computer power, you will need the technical requirements detailed in Chapter 1 and the MetaHuman plus the Unreal Engine mannequin that we imported into UE5 in Chapter 2.
You will also need an iPhone and a stable Wi-Fi connection to install plugins.
Let’s look at that iPhone requirement a little more. You will need to have an iPhone X or newer, or an iPad Pro (3rd generation) or newer. This is because (unlike other phones, such as Android ones) they have a built-in depth camera, which is necessary for motion capture.
You will also need a long cable – approximately 2 meters – because it is best to have your iPhone on charge during motion capture sessions as the process is quite battery consuming.
Installing the Live Link Face app
The Live Link Face app is a free app that you can download onto your iPhone or iPad directly from the App Store. Its sole purpose is to utilize the iPhone’s built-in depth camera, along with facial recognition and pixel tracking technology, to produce data that works within ARKit. In addition to collecting facial motion capture data in real time, it also transmits the data via Internet Protocol (IP) to your desktop computer using a Wi-Fi connection; this data is then picked up by the Live Link utility in Unreal Engine, which we shall delve into later.
Figure 8.1 shows the Live Link Face app in the Apple App Store:

Figure 8.1: The Live Link Face app in the App Store
Once downloaded and installed, open the app to test that it is working. While looking at the display, you should immediately see your face. By default, the mesh overlay is enabled as seen in Figure 8.2, and you’ll see that the mesh very accurately tracks your face.

Figure 8.2: Opening up the Live Link Face app
As soon as our face is being tracked, we know the app is working. There is no need to do any more with the application for the time being. In the next section, we will install a number of Unreal Engine plugins, such as Live Link, which will allow us to receive the motion capture streaming data from the iPhone.
Installing Unreal Engine plugins (including Take Recorder)
As just mentioned, there are a number of plugins that you will need to have installed. The good news is that upon downloading and importing your first MetaHuman character, you will have inadvertently and automatically installed them without realizing it. However, you will need to make sure that the following plugins are enabled:
- Live Link
- Live Link Control Rig
- Live Link Curve Debug UI
- Apple ARKit
- Apple ARKit Face Support
- Take Recorder
To easily find the plugins, go to Edit, then Plugins, and we’ll start installing the required plugins.
Live Link, Live Link Control Rig, and Live Link Curve Debug UI
To find the Live Link plugins, search for Live Link as demonstrated in Figure 8.3. You can see that I have enabled the following plugins, which are indicated by the checkboxes and the blue ticks:

Figure 8.3: Enabling the Live Link plugins
Some of these plugins are essential for using the app and I will now briefly outline their importance.
Live Link
Live Link is the core plugin that allows third-party applications to stream animation data directly into Unreal Engine. Applications such as MotionBuilder and Maya permit users to make changes to these applications and see the results updated in the Unreal Engine viewport in real time. This functionality in the context of this book permits users to use other applications such as the Live Link iPhone app to stream data directly into Unreal Engine.
Live Link Control Rig
Live Link Control Rig allows the incoming data from a third-party application to communicate with the animation controllers of a character. For instance, a MetaHuman has a control rig that allows users to manually animate it. Live Link Control Rig harnesses the same control rig protocol.
Live Link Curve Debug UI
For the purpose of debugging and viewing the connection from a third-party animation data source into Unreal Engine, we will use the Live Link Curve Debug UI plugin.
Note
Live Link Curve Debug UI, while not essential, is a convenient interface for troubleshooting issues when it comes to advanced refinement; however, discussing it in detail is beyond the scope of this book as it looks at every single control point of the face.
ARKit and ARKit Face Support
Next, we need ARKit and ARKit Face Support. ARKit is an AR solution designed to work exclusively on an Apple iOS camera device. It ensures that Unreal is able to understand the incoming data. ARKit Face Support connects specifically to the face tracking solution via depth and RGB cameras on the iPhone.
So, in the Plugins tab, run a search, but this time for ARKit. You will see a list of the available ARKit plugins that you need to enable:
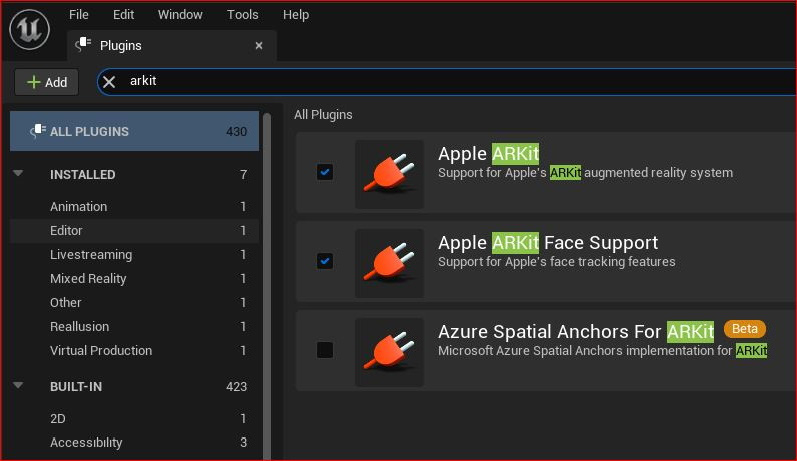
Figure 8.4: Enabling the Unreal Engine ARKit plugins
Take Recorder
We have one more plugin to enable, which is Take Recorder. Try to think of Take Recorder as a video camera. Effectively, it records the motion capture data received by Live Link and stores it for playback, which in turn is imported into the Level Sequencer. Just like a video camera, we can record multiple takes until we are happy that we have got the best one (or at the very least, as close as possible to the best!).
To enable Take Recorder, search for the plugin as per Figure 8.5:

Figure 8.5: Enabling the Unreal Engine Take Recorder plugin
Note
You may need to restart Unreal Engine if you have enabled any of these plugins for them to take effect.
With all of the necessary plugins enabled, we can now move on to the next section where we will configure the Live Link Face app so that it can send data into Unreal Engine.
Connecting and configuring the Live Link Face app to Unreal Engine
With the Live Link Face app installed on the iPhone and the Live Link plugin enabled in Unreal Engine, we now need to get them to talk to each other (figuratively speaking, of course). Our goal is to send motion capture data from the iPhone to the PC and/or the Live Link app to send this data into Unreal Engine.
To do this, we first need to configure the app by finding our computer’s IP address:
- Hit the Windows key and search for Command Prompt.
- In the Command Prompt, type ipconfig.
- You’ll see a list of all the IP configurations. On the top line you’ll see the IPv4 address, which should be similar to the following:
192.168.100.155
Make a note of that number, which will be unique to your machine.
- Next, open up the Live Link Face app.
- On the top left of the screen, you will see a cog icon, as illustrated in Figure 8.6:

Figure 8.6: Clicking on the settings icon
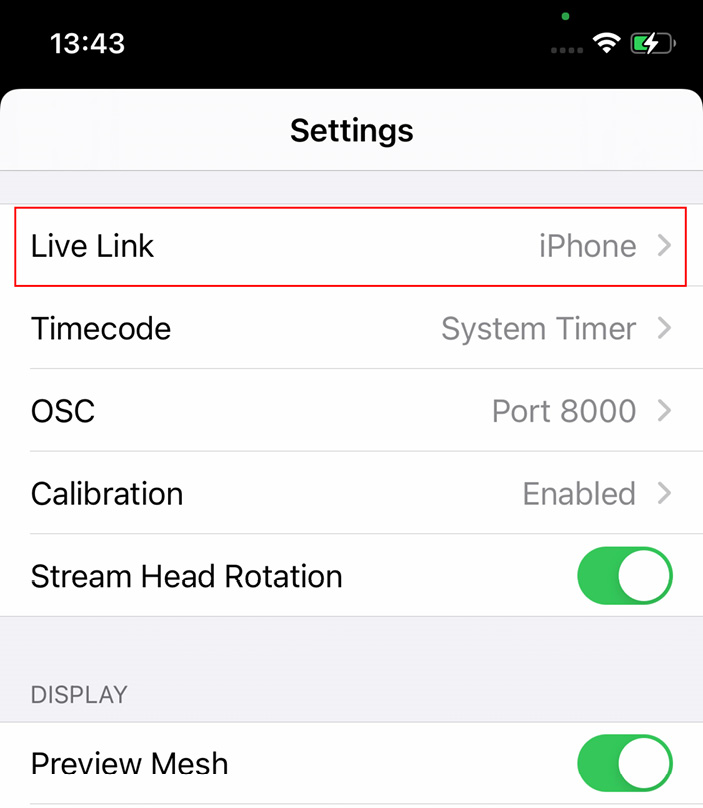
Figure 8.7: Clicking on Live Link iPhone
- Now click on Target and type in the IP address of your computer.

Figure 8.8: Clicking on the IP target
Once you have set your IP address in the app, you need to switch over to Unreal Engine again to see whether you are receiving a signal.
- In Unreal Engine, go to Window, then Virtual Production, and click on Live Link where you will be brought to the following Live Link interface:
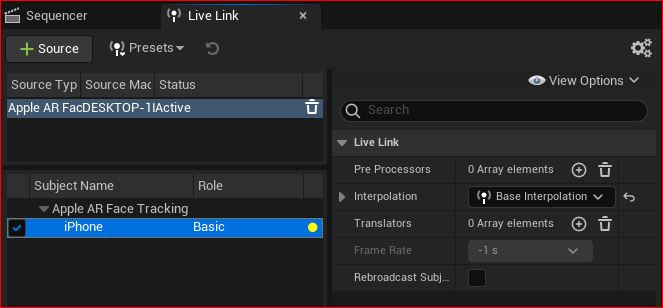
Figure 8.9: The Live Link interface
In Figure 8.9, you can see that Live Link has automatically picked up a signal. It recognizes that the type of signal is Apple AR Face Tracking and shows the name of the subject that the signal is coming from, in my case, iPhone. As it happens, iPhone is just the name that I gave to the phone after I purchased it. Whatever you have called your phone, that name will appear under the subject name.
Also in Figure 8.9, next to where it says iPhone, you’ll see that under Role it says Basic and to the right of that is a yellow dot. This dot indicates the status of the signal, which can be interpreted as follows:
- If the dot is red, it means there is no data coming in, which could be caused by improper configurations such as the Live Link Face app being closed or the phone being off
- The yellow dot indicates that both applications are pinging each other but no active ARKit data exists
- A green dot indicates that there is ARKit data coming into Unreal Engine from the Live Link Face app
Knowing that both apps are effectively speaking to each other means that we can go on to the next step and configure our MetaHuman to receive data.
Configuring and testing the MetaHuman Blueprint
We must now tell the MetaHuman Blueprint to receive data from Live Link. As it happens, this is very simple:
- Open up the MetaHumans Blueprint from within your Content folder.
- In the Components tab on the left-hand side, click on the top of the hierarchy where it says BP_ (your MetaHuman Name). In my case it is BP_Glenda. This will let you see the settings you need to edit in the Details panel, as per Figure 8.10:

Figure 8.10: Creating a Level Sequencer
- Go to the Llink Face Subject drop-down list and select the name of your phone. Again, in my case, it’s just called iPhone but your phone may have a more specific name.
- Also, tick the Llink Face Head option, which enables head movement data to be accepted by the Blueprint.

Figure 8.11: Enabling the Llink Face Head option
Next, click on Face within the Components tab. Then, in the Details panel, go to Animation, as seen in Figure 8.12:
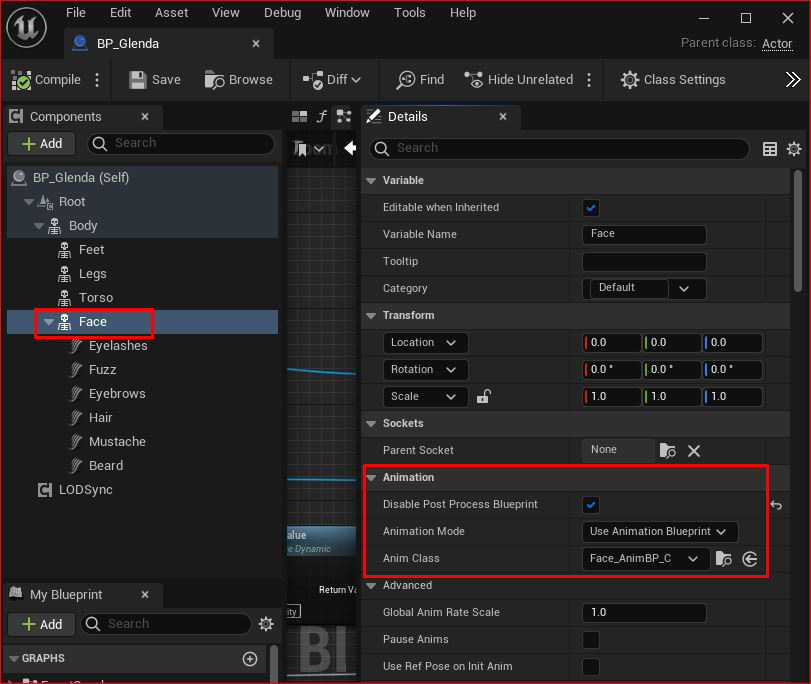
Figure 8.12: Changing Animation Mode and Anim Class
- Here, ensure that Disable Post Process Blueprint remains in its default ticked position. If the box isn’t ticked, please tick it.
- Then, change Animation Mode to Use Animation Blueprint and change Anim Class to Face_AnimpBP_C.
- Now, be sure to hit Compile and then save the Blueprint otherwise these changes won’t take effect.
With these changes made to the blueprint, it’s time to test the mocap data as it streams from the Live Link Face app and into your MetaHuman Blueprint. Before testing, make sure you go through the following checklist:
- The IP address is correct in the app
- Live Link is enabled and open
- The MetaHuman Blueprint is receiving the iPhone signal, next to LLink Face Subj in the Default parameter within the Details panel
- The MetaHuman Face Blueprint is set to Use Animation Blueprint for Mode and Face_AnimpBP_C for Anim Class as per Figure 8.12
If you have followed the checklist, the next thing you need to do is to run a simulation by hitting Alt + P. At this point, you should see a live facial capture of your character in the viewport.
If you have continued on from the previous chapter and have the Level Sequencer open, you will see the new facial animation on top of your character’s body as acquired through DeepMotion Animation 3D. Note that you can even play the body animation from the Level Sequencer while previewing the Live Facial capture simultaneously.
It won’t take long to realize that the iPhone motion capture result is not perfect. However, it is a very powerful and complex tool with plenty of scope to refine the data as it comes in and refine it again after the data has been recorded.
Note
If you are experiencing problems with the facial animation, such as the head rotation working and nothing else, there was a known bug that was fixed with an update of Quixel Bridge. If you are running Unreal Engine 5.0.3 or above, ensure that you have updated the Quixel Bridge plugin to version 5.0.0 or above. You will then need to re-download and re-import your character.
In the next section, we will look at calibrating the Live Link Face app to get us a better result.
Calibrating and capturing live data
To get a better result, the ARKit capturing process needs to acquire data that takes the performer’s characteristics into account. As you can see from Figure 8.13, the app has done a good job of capturing the performer’s facial proportions, clearly outlining the eyes, nose, mouth, and jaw. However, giving the app a baseline of information (such as a neutral pose) would really help to refine the overall outcome.

Figure 8.13: Calibrating the Live Link Face app
To understand how and why baselines and neutral poses work, let’s take a look at the eyebrows as an example using an arbitrary unit of measurement. If in the resting or neutral position the eyebrows are at 0 and a frown is at –10, and a surprised expression raises the eyebrows to +15, then knowing what the neutral pose is would give the app a better idea of where to determine the frown or surprised expressions to coincide with its tracking capability.
The calibration process in the Live Link Face app is incredibly simple as it relies only on a neutral expression. In Figure 8.13, I’ve highlighted the face icon on the right of the record button – click on the face icon, hit Recalibrate, and a short countdown will commence before taking a picture of your neutral pose for calibration.
Once calibrated, it’s time to prepare for capturing a facial performance. For this, there are three main considerations:
- System performance: We need to streamline as much as possible so that our systems and Unreal Engine are only concerned with getting as much data at the highest possible frame rate as possible. Therefore, processor-intensive tasks such as photorealistic lighting, high levels of lighting, and camera effects need to be scaled down. Also, ensure that no shaders are prepared in the background and that no other applications are running.
- Take Recorder: We’ll be using the Take Recorder plugin to record the facial motion capture, so you need to ensure it is enabled.
- The Level Sequencer: We’ll be using the Level Sequencer to import and play back the facial mocap and for refining any animation with it if need be.
I’ll guide you through the process of capturing the facial capture with your phone step by step:
- Ensure your phone is in a fixed position with plenty of light and that the front camera is looking directly at the performer.
- Ensure that Live Link is receiving the signal (remember that you want to see a green dot next to the name of your phone).
- Then, make sure that all rendering settings are turned to Low and complex scene actors are either hidden or removed from the scene. See Figure 8.14 as an example of a scaled-down viewport setting using the Unlit and Low settings:

Figure 8.14: Scalability set to Low and Unlit
- Open Take Recorder by going to Window, then Cinematics, and then Take Recorder.
- Then, add the character blueprint by clicking on the + Source button. Run a search for your character’s blueprint under From Actor and add your phone from the From LiveLink option, as per Figure 8.15.

Figure 8.15: Adding sources to Take Recorder
- When you’re ready, first run a simulation by hitting Alt + P and then hit the large red record button.
As soon as you run the simulation, the motion capture will begin, along with a 3-second countdown, similar to Figure 8.16:

Figure 8.16: The 3-second countdown
Immediately upon recording, the Blueprint track and the iPhone track will be written as a take and a reference of this will temporarily occupy the Level Sequencer to show which tracks are actively recording:

Figure 8.17: The tracks being recorded
When you are happy with your mocap session, hit the stop button on Take Recorder and stop your simulation by hitting Esc.
- Going back to the Level Sequencer, you can now take a look at your facial mocap. If you don’t have anything in your Level Sequencer, you will need to add your character Blueprint, click on + Track, then Actor to Sequence, and search for your character as per Figure 8.18:

Figure 8.18: Importing the character Blueprint into Level Sequencer
Note that in Figure 8.18, when you bring in your character, you also bring in a rig for both the face and another for the body. However, because we are driving the character with mocap, you need to delete these rigs.
- Once you’ve deleted the rigs from Level Sequencer, click on Face, then +Track, then Animation, and the most recent mocap session will be at the bottom of the list. In my case, I’m choosing the first take, BP_Glenda_Scene_1_01_0.

Figure 8.19: Adding an actor to the Level Sequencer
- Once you have selected a take, press the play button on the Level Sequencer to watch your motion capture play back in real time.
If you still have the character Blueprint from the previous chapter with the retargeted animation, you can import the body animation. In addition, if your performance requires speech, the Level Sequencer is capable of playing back audio if you wanted to test your performances inside Unreal Engine. This is useful when ensuring that the facial capture is in synchronization with the audio of the speech recorded.
Note
It is advised that you capture the body and face simultaneously because most performers lead with their heads and the head leads the body. Getting both the body and head in sync can only really be done properly when both elements are captured at the same time.
The iPhone solution can work simultaneously with DeepMotion Animate 3D. To do this, you need a facial capture rig to ensure that the iPhone’s depth camera is facing you at all times and that your hands are free. Ideally, the camera needs to be at a consistent distance at all times. Any movement of the camera separate from the head will be understood as a head movement and will lead to inaccurate data.
Companies such as MOCAP Design specialize in creating helmets that work with iPhones. You can see some of their iPhone and GoPro camera solutions at https://www.mocapdesign.com/m2-headcam.
This solution may be expensive to most so, alternatively, a DIY solution or 3D printed solution may be more cost-effective. Additionally, there are now solutions for live streamers to keep their phone cameras at a consistent distance. While not perfect, they are certainly better than holding a phone in one hand or on a tripod.
Summary
In this chapter, we have explored the iPhone’s facial motion capture solution for MetaHumans in Unreal Engine. We used the Live Link app, along with Live Link and ARKit plugins, to capture live data. Additionally, we got to use the Take Recorder plugin in conjunction with the Level Sequencer as a way to record and manage our mocap.
In the next chapter, we will continue our facial motion capture but on a much more professional level, using Faceware.