
10
Blending Animations and Advanced Rendering with the Level Sequencer
In the previous chapters, you’ve been equipped with a choice of facial motion capture methods, be it using an iPhone or a webcam with Faceware. You’ve also learned how to acquire custom body motion capture with DeepMotion. One common thread in all of this is the Level Sequencer.
In this chapter, we will come back to the Level Sequencer to manage our mocap animation data. You will learn how to manage both body motion capture and facial motion capture, fix timing issues, and merge takes.
In addition, we will look at some of the more advanced industry-standard rendering techniques and explore additional items that we can use with the Level Sequencer.
So, in this chapter, we will cover the following topics:
- Adding the MetaHuman Blueprint and body mocap data to the Level Sequencer
- Adding facial mocap data to the Level Sequencer
- Exploring advanced rendering features
Technical requirements
In terms of computer power, you will need the technical requirements detailed in Chapter 1 and the MetaHuman plus the Unreal Engine Mannequin that we imported into UE5 in Chapter 2.
If you have followed along with all of the chapters, you will also have Mixamo and DeepMotion data from Chapter 5 and Chapter 6, respectively. We will be using that data here.
Adding the MetaHuman Blueprint and body mocap data to the Level Sequencer
In this section, you will once again add your MetaHuman to the Level Sequencer so that you can apply both body capture data and facial capture data to it.
Adding the MetaHuman Blueprint
To start, first, create a new Level Sequencer by right-clicking anywhere within your content browser, finding Animation in the menu, and clicking Level Sequencer.
Once your new Level Sequencer has been created, click on +Track and add your MetaHuman Blueprint as per Figure 10.1 (if you don’t see it, use the search function and type in BP for Blueprint):

Figure 10.1: Adding the Blueprint to the Level Sequencer
As soon as you have your MetaHuman Blueprint in your Sequence, you’ll notice that both the Body and Face control rigs are present, which is standard when you add a MetaHuman Blueprint to a Level Sequencer:

Figure 10.2: The Body and Face control rigs
For the moment, we don’t need the control rigs because we’re just learning how to manage our animation data, which we will add in the very next section. So, delete both rigs highlighted in the Level Sequencer in Figure 10.2.
With the Level Sequencer still open, we are now ready to add our body mocap data.
Adding previously retargeted body mocap data
If you have followed along with all of the chapters, you will have created body motion capture files with Mixamo and DeepMotion
To add body animation, just click on +Track, then go to Animation, as shown in Figure 10.3:

Figure 10.3: Adding an animation
If you don’t see your animation in the list, use the search function. Remember, any track you are adding will have to have been retargeted, so you can always use the Retargeted suffix when running a search. That way, you’ll be able to see all the available mocap in your project.
In Figure 10.4, you can see that I’ve added a track. You can even see that it has the track title, which can confirm at a glance that you are using the correct mocap track:

Figure 10.4: An added track
You completed this step at the end of Chapter 8, but in the next section, we will look at ways to bring in additional mocap tracks for the body.
Adding additional body mocap data and merging mocap clips
There are two ways to bring in additional mocap tracks:
- Adding an animation track
- Adding animation to an existing track
Let’s take a look at them now.
Adding an animation track
To add an animation clip as a track in the Level Sequencer, click the + icon next to Body. This will create an additional animation track that you can reposition along the timeline and blend with the first track using the weight tool using keyframes.
In Figure 10.5, you can see that I now have two animation tracks:
- The first track is the Happy Dance file I created in DeepMotion and I have created two keyframes. The first keyframe has a Weight value (which is the value of influence over the character). By default, the Weight value is 1, which is equal to an influence of 100%; this means that the first animation track is the most prominent. For the second keyframe, I set the Weight value to 0, which is equal to 0%; this means that there is no happy dance. I know, it sounds depressing; however, all is not lost for Glenda, because I did the inverse for the new animation track.
- In the second animation track, which is the Macerena file taken from Mixamo, I keyframed the Weight value to start at 0% and transition to 100%, effectively blending the two dances using keyframes:

Figure 10.5: Adding another track
Adding animation to an existing track
Adding animation to an existing track doesn’t create an additional track but adds new animation to the same track. Rather than clicking on the +Track icon beside Body, click on +Animation under Body instead, as you can see in Figure 10.6:

Figure 10.6: Merging two animations into one track
In Figure 10.6, I’ve already added my animation. Notice how there is a transition between the two tracks where I’ve drawn the red square. Effectively, I have merged one animation track into another, indicated by a descending and ascending curve.
To merge a track in this way, you must go to the end of the first track in the Level Sequencer with your playhead. If your animation is 100 frames, be sure to go to a higher frame, such as 120; otherwise, you won’t be able to merge your animation to the track. Then, you must drag the second clip to the left so that it intersects with the first clip.
Note that it automatically blends from the first animation into the second animation on the same animation track. Effectively, this method has merged the two animations into one track. Take note of the number between the two animation (in the red box) clips that have merged. It reads as 0093. This indicates that the transition length from one animation to the next is 93 frames, which is approximately 3 seconds.
In the next section, we’ll take a look at a handy tip to help align animations.
Using the Show Skeleton feature for cleaner alignment
Sometimes, when we try to merge animations, we don’t get great results. For example, if the first animation is of the character walking and the second animation is of the character running, often, the character will appear to have jumped into a new position dramatically from one frame to the next.
To make such an adjustment, we need to add a Transform track to the body in the Level Sequencer. You can do this as per Figure 10.7:

Figure 10.7: Adding a transform track
This will create a new transform track in the Level Sequencer, allowing us to create keyframes in the Location parameter. Now, we can move the character around to fix any character position issues without impacting any of the overall animation properties. Any movement of the character that we apply will only set keyframes on the new transform track, so we won’t inadvertently lose any of the original motion capture data.
For example, imagine an animation of a character standing and waving an arm. If there is an issue with the mocap data where the body rises upwards randomly but we are happy that the character is waving, we can fix the random upward movement by adding keyframes to the Location parameter. We can do this without negatively impacting the waving motion of the arms.
However, it can be a little cumbersome to see the subtle adjustments when it comes to moving the character from A to B. To get around this visibility issue, Unreal has a function where we can see the MetaHuman skeleton. This allows us to focus on the exact position of our character without being confused by the mesh.
By right-clicking on the timeline, you will see the Show Skeleton option. Clicking on this will reveal a bright pink skeleton, which helps to make subtle adjustments, as shown in Figure 10.8:
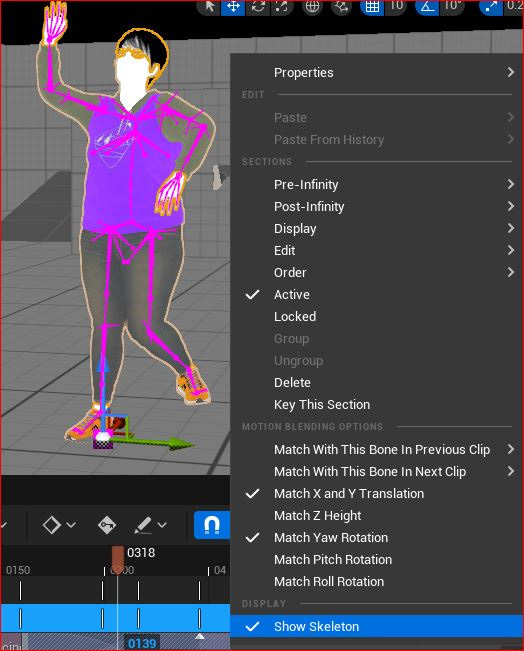
Figure 10.8: Show Skeleton
Note
When using the Show Skeleton function, both animations will be displayed with skeletons of different colors, which makes lining them up a little easier.
A common example of when to use the Transform track and the Show Skeleton functions is when you want to loop animation, such as a walk cycle.
However, if you have a character walking from position A to B, and you wish to loop the animation so that the character continues walking, we’ll come across an issue. The issue is that as soon as the character reaches position B, it will return to position A if we wish it to loop.
Using the Transform tracks, and placing keyframes on the locator, you can create a continual animation using a loop:
- Add a Transform track to your Animation track in the Level Sequencer.
- Go to the very end of the track and at the last frame, add keyframes for the locator positions – that is, X, Y, and Z. You can also do this by hitting the Enter key, providing you have the transform track selected in the Level Sequencer. We are doing this to secure the position of the animation so that it isn’t affected by the next step.
- Now, extend the track so that it repeats. On the first frame of the repeated section, add a new position so that the character occupies the same space that it did at the end of the original track. Most likely, you’ll just need to edit the X and Y axis positions slightly and possibly need to rotate the character on the Z axis if the character isn’t walking in a straight line. Each clip has the option of displaying its skeleton, so the slight editing of the X and Y positions is helped by showing the skeletons because you are essentially just lining up the skeletons of each track so that they occupy the same space.
Note
To further edit the character’s motion, you can always bake the animation to the control rig and add Additive Section for further editing.
Moving on from the convenient tool of visualizing your skeleton, there are other options for editing the animation clip. By right-clicking anywhere in the track and going to properties, you will see that you have more options when it comes to editing your clip:
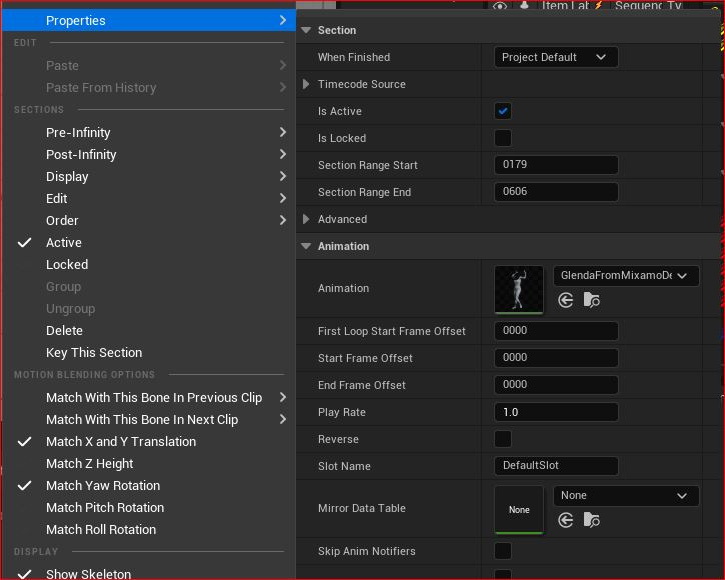
Figure 10.9: Further options
When it comes to merging animation, the most important thing is the frame rate. You may find that you are trying to blend two animations that have different speeds. The property function is a good way to tackle this problem by changing the frame rates so that they match. You can also experiment with different frame rates.
Now that we have looked at how to add mocap data related to the body, in the next section, we’ll cover the same principles of adding and merging animation tracks, but this time, we will focus on the face.
Adding facial mocap data to the Level Sequencer
To add and merge the face animation requires you to follow the the exact same steps as you did for the body, by either adding a whole new Faceware track or by adding the animation to the end of the existing animation track and moving the tracks. Let’s take a look in more detail.
Adding a recorded Faceware take
In this section, we are going to add the Faceware facial motion capture file to the Level Sequencer. If you are having trouble locating your Faceware facial capture file, which was recorded by Take Recorder in Chapter 8, just remember that Take Recorder added the _Scene suffix to the character Blueprint’s name. So, in my case, I just searched for BP+Glenda_Scene and all my takes were listed for me to choose from.
In Figure 10.10, you can see that I merged Take 6, BP_Glenda_scene_106_0, with Take 1, BP_Glenda_Scene_1_01_0:
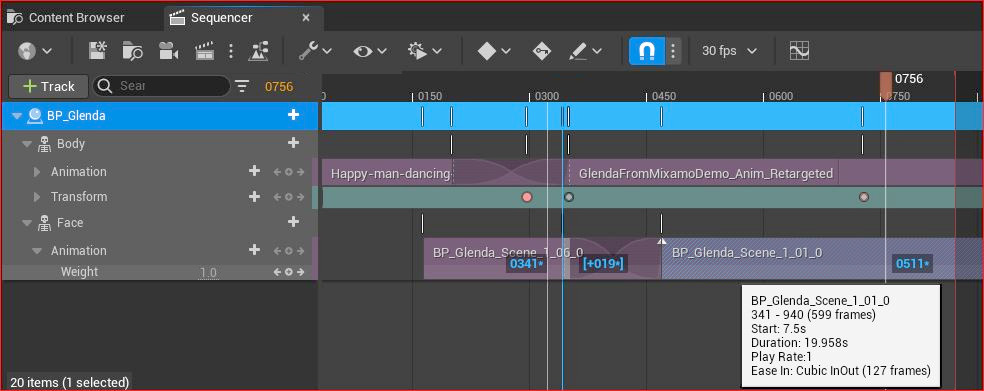
Figure 10.10: Adding Face animation to one animation track
I have selected BP_Glenda_Scene_1_01_0. You can see that the keyframes have appeared in blue, including 0341 and +19. Take note of the + icon – it means that I have moved the clip 19 frames to the right, so it will start 19 frames later.
Editing the facial mocap
The process for editing facial capture animation clips is practically identical to that of the body data, so we can use the same tools and follow the same steps from the previous section.
In addition, we can bake the track into keyframes in a control rig and add an Additive Section to tweak the animation, as we covered in Chapter 8. You can see from Figure 10.11 that I’ve taken the same steps of baking the control rig, which is indicated by the triangular keyframes:
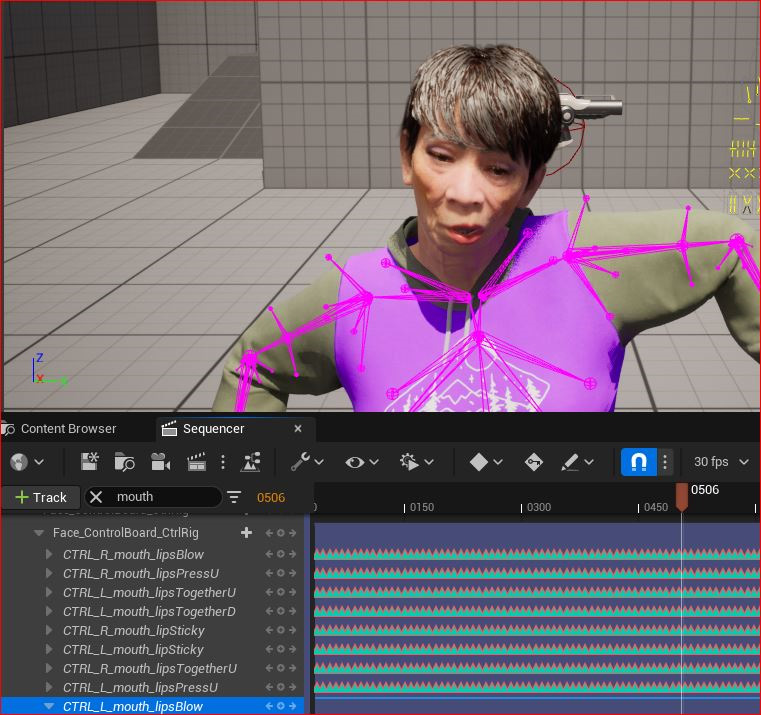
Figure 10.11: Baking the track to the control rig
A huge part of making the facial capture work with the body capture is timing. It may require just the easy step of sliding the facial mocap animation track to either the left or right; on the other hand, you may have to spend more time using the facial control rig, or even the body control rig, to make both animations match. The only way to get good at working with control rigs for the face is to experiment with them. A good practice would be to get as far as you can with the raw facial motion capture and then refine the animation using an Additive section with a control rig.
With some of the advanced animation features covered, it’s now time to delve into some advanced rendering.
Exploring advanced rendering features
I’ve said this before and I’ll say it again: Unreal Engine is a very powerful tool, and when it comes to rendering, it doesn’t disappoint. Unreal is capable of delivering outstanding results that are comparable to traditional path-tracing renderers such as Mental Ray, Arnold, V-Ray, and RenderMan. Unreal now supports path tracing, which is the foundation of how these other renderers work.
In the context of filmmaking, Unreal has real-time rendering capabilities that should be explored to unlock its full potential. The camera and lights have features that we find in 3D programs such as Maya, Houdini, and Blender that use path tracing renderers. It’s possible to export whole scenes from either of these applications with the camera and lighting settings intact and compatible with Unreal.
So, without further ado, let’s take a look at some of these great rendering features.
Adding and animating a camera
In Chapter 7, we used a method of creating a new camera directly from the Level Sequencer; however, in this chapter, we will create the camera without using the Level Sequencer.
In Figure 10.12, I went up to the Create Actor button to quickly add an actor to the scene. From there, I chose Cinematic, followed by Cine Camera Actor. This creates a camera in the viewport of my scene:
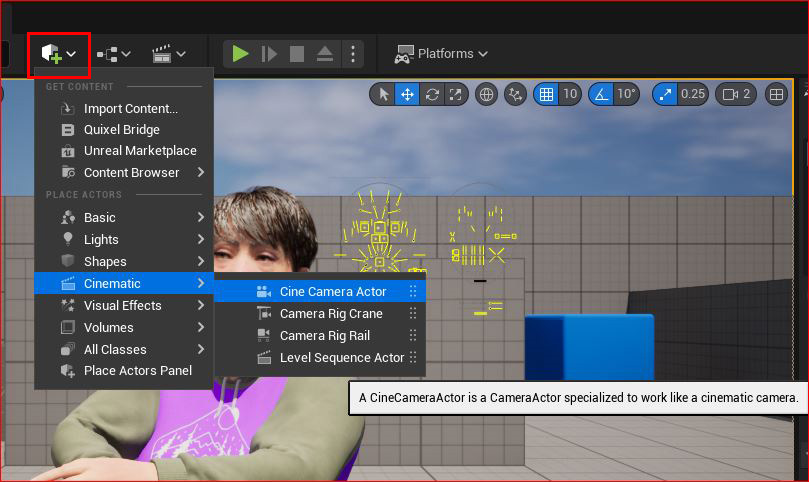
Figure 10.12: Quickly adding a camera to the scene
Next, go to the Level Sequencer and add the camera by clicking on the + Track button and choosing the camera you just created.
In Figure 10.13, the camera cut features the grid background, as does the viewport above. This allows us to preview any camera animation from the Level Sequencer directly in the viewport:

Figure 10.13: The camera cut being automatically created
Unlike the body and face of the MetaHuman Blueprints, the Cine Camera automatically generates a Transform function. This will allow you to change the location of the camera in the X, Y, and Z axes. You can also change the rotation of the camera in the X, Y, and Z axes, which change the Roll, Pitch, and Yaw, respectively.
As shown in Figure 10.14, you have keyframe attributes on the right-hand side. Typically, when animating the camera, you’ll need to adjust the Location setting and edit the Focus Distance setting to ensure your subject is in focus:

Figure 10.14: The camera transform
Rather than changing values in the Transform function within the Level Sequencer every time you want to set a keyframe in the Level Sequencer, you can always just pilot the camera inside the viewport, much like playing a first-person game using your keyboard and mouse.
Be sure to engage the autokey, as illustrated in Figure 10.15, which will create a keyframe every time you move the camera:

Figure 10.15: The Autokey function
In addition to just animating the camera position, you can also animate what the camera is focusing on. A very convenient tool for focus is the Debug Focus tool, illustrated in Figure 10.16. This tool gives us a clear visual indication of what is in focus. With the camera selected, tick the Draw Debug Focus Plane option; you’ll see a pink plane appear. Anything on that pink plane is going to be perfectly in focus:

Figure 10.16: Camera debug focus
You can control the focus and animate focus distance within the Level Sequencer but use the debug plane for precision focusing.
Now, with some of the more advanced camera features out of the way, it’s time to move on to lights.
Adding and animating light
For the most part, actors are added to the Level Sequencer with some attributes being animatable. It is possible to animate more attributes via the Level Sequencer, but we need to manually add them to the Level Sequencer.
Lights are also actors that we can animate. We can add a light to the Level Sequencer much the same as we added a camera earlier. By doing this, the only animatable attribute by default is the light intensity. But there are a lot of attributes for the light actor that we can add for animation purposes.
In Figure 10.17, you can see that by clicking on + Track next to the camera component in the Level Sequencer, I have access to nearly all of the attributes featured in the Detail panel for animating. Click on any of these attributes in the list for them to become an animatable component within the Level Sequencer:

Figure 10.17: Editing lights
Generally speaking, animating lights is rare, much the same as moving lights in a live-action shoot is rare, but not unusual – perhaps you want a flashing light from a police car or a lighthouse lamp spinning around, or you want to tweak a light’s intensity for when a character walks under it. I could spend a whole chapter on lighting in Unreal, if not a whole book on the subject, but we must move on to a very important feature, Post Process Volumes.
Using Post Process Volumes
Post Process Volume is an interesting tool as it gives us massive control of the final picture. Typically, Post Process Volume would surround your entire scene and is a volume in the sense that it is an area within your scene that is affected by input from an artist.
In essence, Post Process Volume is an effect and grading tool with much of the toolset aimed at the camera. For instance, we can control flares, blooms, and chromatic aberrations, which are all very specific lens characteristics, along with film grain, change exposure, white balancing, and so on. If you look at any settings inside a modern video camera or digital cinema camera, Post Process Volume pretty much has a matching feature. Epic Games have done incredible work giving artists real-world tools when it comes to their scene for real-time rendering.
In Figure 10.18, I have utilized some of these features:

Figure 10.18: Lens effects with Post Process Volumes
Let’s look at some of the features that I used:
- Lens Flare is obvious to see. If you’re not familiar with lens flares, they’re the light spots in the picture that cross over Glenda’s face – they react with the light source, which is a directional light behind Glenda. I’ve added a pink tint to the lens flare and increased the Bokeh size, which effectively increases the size of the lens flare.
- I have also added a Bloom effect, which gives us a realistic light glow from her hair. A bloom effect simulates filters used on real-world lenses such as pro mist filters, which soften highlights in the image.
- In addition, I’ve added Film Grain, Chromatic Aberration, and a Vignette, which are far too subtle to see here but are commonly used to enhance realism:
- Film Grain is used to simulate film stock or digital noise that is present in film or digital cameras
- Chromatic Aberration is a natural phenomenon found in photographic lenses where a very subtle rainbow effect appears, particularly from highlights in the image
- Vignettes are a common artifact of photographic lenses where the edges of the image are darker than the middle of the image
As the name suggests, Post Process Volume is a post-production tool. In terms of Unreal Engine, most of the difficult things such as lighting direction, shadow, skin shading, reflections, and so on are already set, but Post Process Volume adds an extra layer of effects over that. In a way, the Level Sequencer is like the camera and Post Process Volume is like Photoshop.
As a rule of thumb: it is best to get all of your lighting and camera work as close to the final look as possible, and rely on Post Process Volume for things you couldn’t achieve otherwise.
There are quite a lot of settings in Post Process Volume and unfortunately too many to cover in a book about MetaHumans. However, they will make your MetaHumans look amazing when it comes to rendering.
Note
If you would like to learn more about advanced lighting and rendering techniques, I recommend you take a look at the following video tutorial, which you can purchase from the Gnomon Workshop: https://www.thegnomonworkshop.com/tutorials/cinematic-lighting-in-unreal-engine-5.
This brings us to the next section, where we will take a close look at rendering out files from the Movie Render Queue for compositing and color grading.
Using the Movie Render Queue
When we are setting our renders from the Level Sequencer, we are given a choice of which render queue to use. To see what render queues are available to you, click on the three dots next to the clapper icon, as per Figure 10.19:
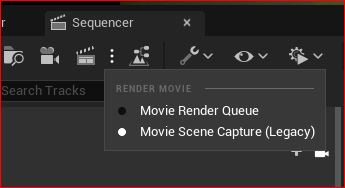
Figure 10.19: Movie Render Queue options
It is quite likely that you will only see Movie Scene Capture (Legacy), but this is somewhat dated and limited. The other option that you can see is Movie Render Queue; however, at the time of writing, it is still only in Beta, so isn’t enabled by default.
To enable it, you need to head over to the plugin section and search for Renderer. In Figure 10.20, you can see that I have already enabled both, which you should do too:

Figure 10.20: Enabling both Render Queue plugins
Now, when you click Movie Render Queue, as per Figure 10.21, you’ll see the following screen:

Figure 10.21: Movie Render Queue dialog box
The + Render button in green is for determining which sequence to render. Initializing the Movie Render Queue will assign the current Level Sequencer for rendering. However, should you have multiple Level Sequencers in your project, you can add them to the Render Queue using the + Render button. In this dialog box, you’ll see three columns:
- Job
- Settings
- Output
Let’s go through each of these columns.
Job
Job is the sequencer name that has been chosen for rendering. By default, it will be titled New Level Sequence. Keep in mind that parameters such as Range (how long the animation is) and Frame Rate are determined in the Level Sequencer.
Should you have more than one Level Sequencer in your project, they would be available under Job and you can select which Level Sequencer you want to render.
Settings
Settings refer to what render settings you want to apply to your sequence.
Ouput
The Output area displays the folder directory where your images or videos will be rendered, as set in the output setting.
There are quite a lot of options to choose from when it comes to rendering settings. Ultimately, if you are already committed to rendering a movie out of Unreal using a Level Sequencer, then you are not likely to be concerned with the real-time rendering capabilities of Unreal and are planning to do more work on the rendered sequence in post-production.
The file type, be it a movie file or an image sequence, is an important setting to consider. For example, should you plan to do additional post-production such as advanced color grading, then you should opt for an image sequence setting such as Open EXR that provides higher color fidelity. If you plan to just do a test render or commit a final render directly from Unreal, then a movie file such as a Quicktime Prores would suffice.
Let’s look at the default settings, as shown in Figure 10.22:
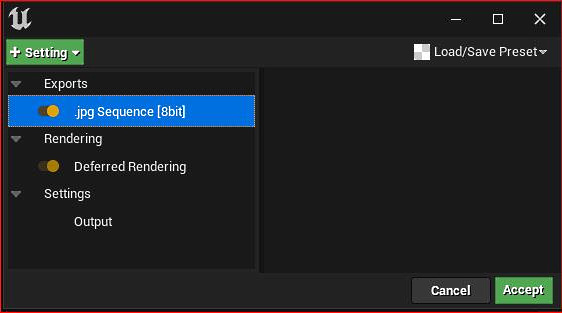
Figure 10.22: Default settings in Movie Render Queue
There are three types of default settings:
- Exports (jpg Sequence 8bit): Exports allows us to choose what file format options we want, from low-fidelity and compressed formats (such as JPGs, which are only 8-bit) to high-fidelity Open EXR, which are floating-point 16-bit.
- Rendering (Deferred Rendering): Deferred rendering is an optimized and default way of rendering a scene in Unreal. It renders in two passes. The primary pass includes calculations such as z depth and ambient occlusion. From the primary (base) pass, deductions can be made from the second pass regarding what needs to be calculated on a per-object basis in terms of shaders. This is to reduce processing time.
- Settings (Output): When you click on + Setting, you will see that there are more settings to choose from:

Figure 10.23: Available settings in Movie Render Queue
When rendering the Level Sequencer to a hard drive, we have various options to choose from to improve its quality:
- Settings: From this list, you can pick multiple options at once. For this book, I’m going to add Anti-Aliasing so that I can improve the quality of the motion blur.
- Exports: I’m going to replace .jpg sequence [8bit] with .exr Sequence [16bit]; this will significantly improve the quality of the render, particularly to refine the picture later in a video editing package. .exr Sequence [16bit] is exported in an Open EXR format – it gives us far greater ability to control what is over and under-exposed in the application, such as After Effects, Nuke, or DaVinci Resolve. Open EXR is the global visual effects standard for movies and television because it stores much more color information than other formats and also stores metadata.
- Rendering: Let’s look at some of the rendering options available:
- Deferred Rendering: The default rendering option, which uses multiple passes.
- Deferred Rendering (Reflections Only): This rendering option only renders out the reflections. This is handy if we want to control the intensity of reflections in a compositing application such as Nuke. Typically, you would choose this option as an addition to Deferred Rendering.
- Object IDs (Limited): Each object is given an object ID, which is represented by a unique color. When we have this option enabled, we will get an object ID video channel as part of the EXR file. When compositing in an application such as Nuke, we can then manipulate objects separately using the object ID by selecting the color associated with it. This is convenient if we want to change an object’s color in Nuke without having to make changes in Unreal.
You can see the settings I have selected in Figure 10.24:
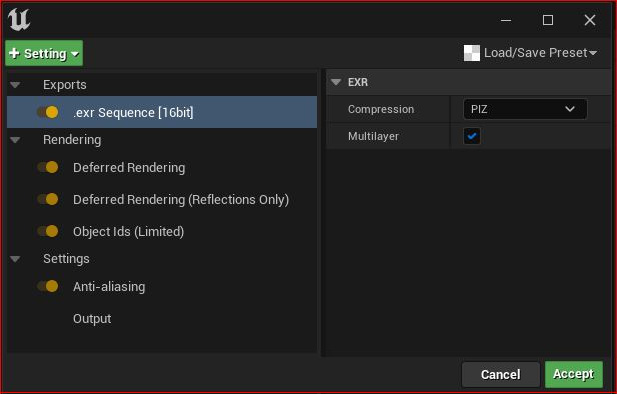
Figure 10.24: Settings selection
Note
The EXR file format is capable of storing multiple channels. Most image files store just three channels: Red, Green, and Blue, such as JPEG files. PNG files can store four channels: Red, Green, Blue, and an Alpha channel for transparency.
Output
Your default Output settings will match your Level Sequencer's default settings. However, the Output column is a means to override them, allowing you to control the final resolution and frame rate.
In Figure 10.24, I have used three render settings that will render out into one single EXR image sequence as separate channels, one channel for each of the following:
- Deferred Rendering
- Deferred Rendering (Reflections Only)
- Object ID (Limited)
You can see the result of that render in Figure 10.25. This figure represents the three extra channels that have been rendered and stored in the EXR file – the top left is Deferred Rendering, which appears normal, the top right is Reflections Only, and the bottom left is Object ID (in a compositing program, I can make further adjustments by manipulating these extra channels):

Figure 10.25: Example of rendering
The render settings in the new Movie Render Queue are very powerful and give the artist a little more control over the final images than that of a real-time render. This aligns with the results expected from traditional 3D animation productions, where compositors are given the same or more control over the 3D renders. As developments progress in Unreal, we expect that more and more 3D animation studios will adapt Unreal into their pipelines.
In the next section, we will look at some of the professional color standards that now ship with Unreal that allow MetaHumans to work within a professional studio environment.
ACES and color grading
As mentioned in the previous section, Open EXR is the professional industry standard file format used by visual effects and 3D animation studios for 3D rendering and compositing. One reason for this is that it can store a huge amount of pixel data, particularly color.
You might remember seeing .jpeg sequence [8 bit] as an option to render in. Well, that just doesn’t cut it in the professional world simply because it doesn’t represent even half of what the human eyes can see. An 8-bit image can only store 256 shades of red, green, and blue, respectively. In total, that amounts to just over 16 million colors versus the 280 trillion-plus colors in a 16-bit image.
If you take a look at Figure 10.26, where the widest area of color is represented by the ACES colorspace, you’ll see the significant difference when compared to sRGB. The JPEG format of 8-bit is only capable of working within a small colorspace such as sRGB. Therefore, utilizing the enormous data space of the EXR file format and the enormous colorspace of ACES, Unreal Engine is capable of incredibly photorealistic renders, which is why choosing Exr Sequence [16bit] is preferable:

Figure 10.26: ACES colorspace versus sRGB
Note
For further reading on the ACES colorspace, go to https://acescolorspace.com/.
In this section, we uncovered some pretty advanced color theory relating to the ACES colorspace versus sRGB and how this can help you improve your MetaHuman renders.
Summary
In this chapter, we got the opportunity to revise some key elements of bringing a MetaHuman to life by applying both body and face motion capture to the Level Sequencer. We looked at alternative ways to edit movement and fix common movement issues, such as fixing the position of a character when looping an animation. We also learned how to use Transform, Location, and Show Skeleton to help with creating longer animations using looped tracks.
After that, we covered cameras, lights, and Post-Process Volumes, reviewing some of the very powerful and professional rendering capabilities of Unreal Engine.
In the next and final chapter of this book, we will take a look at a new feature (at the time of writing) that allows us to use our likeness or someone else’s to fashion a MetaHuman around a real human!