
6
Adding Motion Capture with DeepMotion
In the previous chapter, we were introduced to the motion capture library of Mixamo and how to make the Mixamo animations work inside Unreal.
In this chapter, we are going to build on that knowledge and create our very own animation using another third-party online tool called DeepMotion, which includes a tool called Animate 3D that analyzes video of human performances and, in return, creates a motion capture file. We will learn how to use a video camera effectively to record a performance, then use DeepMotion’s Animate 3D feature to create your very own bespoke motion capture file, and then use it to animate your MetaHuman character in Unreal.
As much as stock motion libraries such as Mixamo are great, you will need to have your own bespoke animation to give you creative freedom. Even if a solution such as DeepMotion’s Animate 3D may not be as good as the results that you would get from expensive motion capture suits, it will be much better than the compromises you will make using library stock motion.
So, in this chapter, we will cover the following topics:
- Introducing DeepMotion
- Preparing our video footage
- Uploading our video clip to DeepMotion
- Exploring DeepMotion’s Animation Settings
- Downloading the DeepMotion Motion Capture File
- Importing the DeepMotion Motion Animation into Unreal
- Retargeting the DeepMotion Motion Capture
- Fixing position misalignment issues
Technical requirements
In terms of computer power, you will need the technical requirements detailed in Chapter 1, and the MetaHuman character plus the Unreal Engine Mannequin that we imported into UE5 in Chapter 2. Both of these will need to be saved in the same project in UE, and you will need to have UE running for this chapter.
You will also need a stable internet connection, as we will be uploading a MetaHuman preview mesh and a video file, and downloading numerous animation assets. You will need a video camera – a webcam, smartphone, or a professional video or digital cinecamera will all do, but note that there aren’t benefits for video with greater resolution than HD.
Introducing DeepMotion
Until recently, bespoke motion capture solutions required expensive equipment and expensive software; think about movies like Avatar, The Lord of the Rings, or Pirates of the Caribbean, where performers have to wear motion capture suits with either reflective balls or checker markers with infrared sensors. This technology was only viable for large studios that could make such an investment, and as a result, independent studios and freelance artists had to make do with just motion capture libraries, such as Mixamo, as we have already discussed.
Recently, this has changed as more and more affordable solutions have become available to artists. In my research for this book, I worked with a number of motion capture tools specifically with cost in mind. Because motion capture (mocap) suits and infrared sensors and all that fancy gear are just too expensive for most of us, I looked at DeepMotion’s Animate 3D.
DeepMotion’s Animation 3D is an example of a markerless mocap solution. This involves a process where a video of human performance is captured with a video camera with no special suit or markers required. The video file is analyzed by software that recognizes and tracks each body part. With machine learning aiding this process, the solution is able to utilize libraries or motion data to avoid errors. In addition, inverse kinematics is also utilized to further refine the process. This technology is constantly improving, and with machine learning being a key feature, the rate of progress is very fast indeed.
In the case of DeepMotion, the online tool allows us to upload a video of our performance and processes the motion capture for us to use in Unreal (or any other compatible platform). Though this process includes machine learning, fortunately for us, DeepMotion takes care of all that.
In the next section, we will dive into the nuts and bolts of how to record videos effectively.
Preparing our video footage
Before we go over to DeepMotion, there are some key factors we need to know with regard to recording our performances on video. Let’s look at them now:
- Camera quality and position: DeepMotion is capable of working with low-end cameras such as webcams or old smartphones, all the way up to high-end cinema cameras, so long as the picture is sharp and steady and has a reasonably high frame rate. Many lower-end cameras have a minimum frame rate of 30 fps, but you will get a better result on fast-moving actors if you use a higher frame rate.
Also, ideally, the camera should be stationary because the software works out the performer’s motion based on a fixed floor position. The ideal position of the camera is about 2 meters from the performer.
- High-contrast filming: As this markerless mocap solution is tracking pixels rather than sensors, we need to make it as easy as possible for the software to differentiate the background from the performer. This is why we need to have a high contrast between the two. If you plan to shoot against a dark background, such as a curtain, be sure to have your performer wear bright colors, and vice versa. Also, loose clothing can cause problems as, often, the clothing will be tracked; for example, if the performer is wearing very baggy sleeves, it’s difficult for the tracker to tell the difference between an arm and a sleeve.
- Keep head to toes in shot at all times: Although DeepMotion can do a good job at working out the motion of a character just from video of the waist up, as a rule of thumb, it is better to get more data than you need, so ensure that you capture head to toe shots of your performer as much as you can. Capturing the performer’s whole body is also important as, even if your performer’s feet or head go out of shot for a second, it can cause poor results throughout the rest of the motion-capturing process.
With that said, if your intention is to capture the full body performance, then video capturing the full body is a must.
- Calibration time: Make sure that you have your performer in shot for a few seconds before and after the performance, preferably in a T-shaped pose and facing the camera. This gives DeepMotion time to align its skeleton to the performer’s body before, rather than during, the performance.
- Occlusion: It is rare in video footage that we find performers not covering one part of their body with another. Typically, they have their arms in front of their body, but because DeepMotion can determine the skeleton’s spine position, in such a scenario, that type of occlusion isn’t a problem.
However, when the body goes in front of a limb, there can be issues. Taking hands as an example, if and when they go behind the body or the head, DeepMotion has to guess where the hands should be because it has no pixels to tell it where the hands are. It will either try to guess or apply no animation at all to those problem areas.
Also, occlusion can occur by objects that are between the performer and the camera, which can cause issues. For example, a tree branch or lamppost might momentarily get in the way but could inadvertently cause a lot more errors than expected.
Therefore, shooting with anything in the foreground obscuring your performers is not recommended.
- Performance speed: DeepMotion isn’t very good at detecting very fast motion in a clip. For example, for someone tap dancing or boxing, the software has a hard time keeping up with the rapid foot movement and, instead, gives a very poor result. A good rule of thumb is that if you see any motion blur in the video clip, it’s not likely to give you a good result. Be sure to play the clip in slow motion to properly analyze it.
- File size: If you work with professional video file formats, there is no benefit other than the ability to shoot at higher frame rates. Compressed or lossy video file formats such as MP4 will do the job, and keeping the file size down to around 200 MB is best. Larger file sizes take longer to upload and longer to get analyzed. While MOV files are accepted, I recommend you use MP4 files instead.
In this section, we have covered all the major factors that need to be considered when it comes to recording a video of your performer. Given the nature of video and how every scenario will be different, there will be a certain amount of trial and error, so don’t be disheartened if you don’t get great results at first. You can always refer back to this section to troubleshoot any issues you may be having.
Alternatively, if you don’t want to shoot anything yourself, you could go to a stock library and download a clip that matches the criteria mentioned earlier. For the purpose of this book, I have taken clips from motionarray.com.
In the next section, you will upload your clip to DeepMotion, assuming that you have shot something.
Uploading our video to DeepMotion
In this section, we will head over to the DeepMotion site, register, and upload our footage.
The first thing you need to do is go over to https://www.deepmotion.com/. From the landing page, click on the SIGN UP button and you’ll see the form shown in Figure 6.1. Fill this out to create a Freemium account (and note the features on the right):

Figure 6.1: Signing up with DeepMotion
Note
DeepMotion’s Freemium account will allow you to upload clips no more than 10 seconds long, no bigger in resolution than 1,080 pixels, and with a frame rate of no more than 30 fps. With the free user price plan, you get a maximum of 30 seconds of animation per month. Effectively, this is a trial service and you will have to pay for more usage, but there are various paid plans that have more features, such as allowing you to upload clips with higher frame rates.
Once you have filled in your details, click the Get Started button. This will either send a link to your email address or take you directly to the DeepMotion Portal page, as shown in Figure 6.2:

Figure 6.2: The DeepMotion Portal page
With the Freemium account, the only feature available to us is the Animate 3D feature (the other features are locked). When you click on the Animate 3D box, you’ll be taken to the Animate 3D welcome page, as per Figure 6.3:

Figure 6.3: The Animate 3D welcome page
Here, you’ll see how many credits you have: 1 credit is equal to 1 second of animation. The next box is titled Reruns, and this shows how many attempts you have to refine the capture process. Reruns allow you to make changes to your settings without using up any of your animation credits.
Now, click on the big yellow Create button and you’ll be greeted with the dashboard where you can place your footage, as shown in Figure 6.4:

Figure 6.4: The Animate 3D dashboard
At the top of Figure 6.4, you can see two thumbnails: 3D Animation and 3D Pose. Make sure to switch to 3D Animation.
Underneath, you have the option to either drag and drop your folder into DeepMotion or navigate through your folders to upload the file. They also provide a list of accepted file types: MP4, MOV, and AVI. If you have any other format, you will need to convert your files using an encoder such as Adobe Media Encoder, VLC Player, or QuickTime Pro.
Note
Unless there is any notable difference in quality from an original MOV file compared to an MP4 conversion, use MP4 as it will reduce the uploading and processing time.
Finally, you’ll see a reminder of how to get the best results for your videos (which I expanded upon earlier in the chapter), and I advise you to take a look at that to make sure you get the most out of your limited credit.
Once you are ready, upload your video via whichever method you prefer; now, you will be able to view the video setting.
Exploring DeepMotion’s animation settings
As soon as you have uploaded your video clip, you will be taken to the Animate 3D dashboard, as shown in Figure 6.5. If you want to use the same clip as me, I am using the clip of a dancing man, found here: https://motionarray.com/stock-video/happy-man-dancing-vertical-814129/.

Figure 6.5: Animate 3D dashboard
In Figure 6.5 you can see a thumbnail of the video clip, along with the clip’s filename, Happy-man-dancing-vertical-814129_1.mp4.The attributes of the clip are present on the right-hand side of the thumbnail, as follows:
- Duration: This allows you to keep an eye on how long the clip is. A clip that is longer than is permitted based on your pricing plan will give you an error; in this case, you will need to upload a shorter clip.
- File Size: If the file size is too big for your account setting, you will get an error. You will need to run the file through a compressor (such as Adobe Encoder) to reduce the file size, and then reupload it. If you get an error during the upload process, it is likely that you have breached the limit of one or more of these attributes based on your account setting.
- Resolution: Each account setting has a maximum resolution. You will get an error if the resolution is too big, and you will need to reduce the resolution using a converter. For example, a clip that is 4,096 x 3,112 will be too large for the Freemium account, so you will need to scale it down to 1,920 x 1,080 (using Adobe Encoder or similar).
- Frame Rate: If you have a Freemium account, using a higher frame rate, such as 200 fps, will produce an error. Typically, a webcam will produce a video with a frame rate of around 25 fps, so using a webcam can reduce the chance of this error.
In the bottom half of the interface shown in Figure 6.5, you’ll see two options: Animation Output and Video Output. For the purposes of this book, we are ignoring Video Output, so make sure that Animation Output is selected instead.
There are 10 features to use, but not all of them are either available or relevant based on your type of account and the complexity of the motion capture you want to achieve. The Animation Output parameters are as follows:
- FBX Output: This is the file type that you wish to use for your animation. Because we only want to use FBX animations in Unreal later, make sure the output is set to FBX. (We are only given other options if we want to create static poses, which are not relevant to this book.)
- Physics Filter: This enforces joint limits and attempts to remove collisions, such as hands drifting through the torso. If there are not any notable issues with the footage, I recommend you first attempt to process the animation with Physics Filter disabled, as it may produce a somewhat artificial result. Also, remember to take advantage of the Rerun option to experiment with Physics Filter if you don’t get a good result the first time.
- Foot Locking: This addresses a common problem in motion capture, which is to do with when a foot leaves the ground and then is returned. For motion capture with suits, this is less of an issue, but with video motion capture, it can be difficult to ascertain when a foot is in contact with the ground or not. Foot Locking comes with four options:
- Auto: This is the most common mode to use as it will automatically switch between locking the foot position to the ground or letting it move. For a character that is walking or dancing, this is the most likely mode to use because the character will inevitably be lifting and resting their feet on the ground intermittently.
Note
Only the Auto setting is available in the Freemium account.
- Never: In animations that involve swimming or continual falling, we know the character’s feet will never connect with the ground, so we use this mode to avoid an error.
- Always: Best used for situations when the character’s feet never leave the ground. It might seem a little obvious but when given the choice between Auto and Always, it is best to use Always when we know the character’s feet don’t leave the ground as the Auto mode could cause errors in this instance.
- Grounding: Effectively, this keeps the feet at ground level but doesn’t necessarily lock them to a fixed position. Auto works in a similar way but isn’t as effective in fast movement; if your character is moving their feet in a sliding motion, Grounding mode is the best choice.
- Default Pose: This refers to a skeleton calibration pose when saving the animation file. Ideally, the calibration pose of the source animation should match the calibration pose of the target character. In this dropdown, we have four options:
- A-Pose: One of the most common calibrations poses used and the same pose in which MetaHumans appear in the UE5 engine. This pose sets the arms at a 45-degree angle.
- I-Pose: This is an unlikely pose to use but one where the arms are straight down.
- T-Pose: Another standard pose and the default pose of an Unreal Engine Mannequin. The arms are straight out in this pose at a 90-degree angle from the body, thus providing a T shape.
- Sitting: Another unlikely pose, where the arms are similar to an A-Pose but the character is sitting down.
- Motion Smoothing: This option uses AI to determine how the character should move by looking at the trajectory of each joint, and then removes any jitter or noise from the animation, which comes from constant recalibration. While useful to get rid of unwanted jitter, it can introduce some artificial-looking movement; you can dial up and down the intensity of the smoothing to get the results you want.
Note
This feature is not available in the Freemium accounts.
- Root Joint at Origin: This is a particularly useful feature for Unreal Engine artists as it creates a bone at the origin, which is on the ground between both feet. This bone is linked to the hip to correspond to the root position of a character. It is recommended that you turn this feature on for motion capture intended for use with UE, so we’ll make sure to do that here.
- Face Tracking: At the time of writing, this tool is not a practical solution for the level of facial capture complexity that we will attain within the chapters of this book. Despite using ARKit technology, which is the underlying facial animation control technology for MetaHumans, the accuracy with DeepMotion is nowhere near as advanced as other solutions. We will look at much more accurate face tracking using both iPhone and webcam solutions in Chapters 8 and 9.
- Hand Tracking: This feature simply tracks hand movement but at a more advanced level, attempting to even track fingers. At the time of writing, this feature is only in beta. For Freemium users, it’s worth considering the extra cost to use this feature; unless you are seeing significant errors in the hand movement, such as hands moving in strange ways or penetrating other body parts, I suggest you leave this to the default setting (which is off).
- Speed Multiplier: This is an advanced feature for Premium users and is a great way of adding more accuracy to the motion capture by using videos with higher frame rates (in other words, slow motion). Speed Multiplier allows for a range of multiplication of 0-8. If your character moves at half speed (slow motion), adjusting the multiplier to 2.0 will give you the result of regular motion but with more accuracy. For the Professional and Studio plans, footage shot at up to 120 fps can be used. That footage would be very slow motion, which in turn captures a lot of very detailed and subtle motion. 120 fps is roughly 5 times slower than real-time, so you would use a Speed Multiplier of roughly 5 to get a real-time motion capture result and benefit from the increased accuracy.
Now, once you have gone through all of those Animation Output settings, you can click the Create button (this is at the bottom of Figure 6.5). Once clicked, you’ll see a confirmation dialog box, as per Figure 6.6:
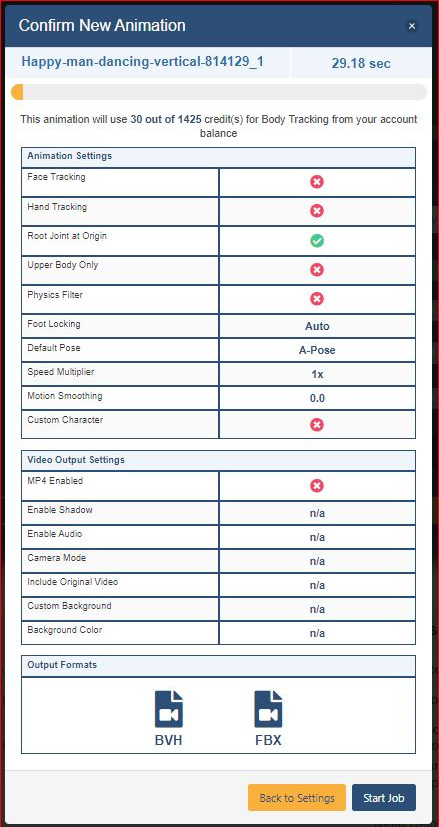
Figure 6.6: Confirm New Animation dialog box
You’ll see from the settings that I have enabled Root Joint at Origin, set Foot Locking to Auto, and then set Default Pose as A-Pose. Everything else was left to the default settings. I’m not interested in downloading any additional video, which is why the MPF Enabled option is disabled and everything else is marked n/a.
It is also worth noting at this point that we have the ability to rerun this process if we’re not happy with the outcome. With that said, it’s time to run it for the first time, so click on the Start Job button. You will be taken to the Starting job interface, as shown in Figure 6.7:

Figure 6.7: Starting job
The processing time varies depending on the file size and file length of your video clip. Also, if your video contains a lot of motion, expect a slower processing time.
Once processed, it’s time to see the results. In Figure 6.8, you can see the results of the clip I chose; of course, it’s impossible to see the results from this one single image, however, I was impressed with the results (after all, this motion capture is acquired from a single camera instead of an expensive motion capture suit and sensor array):

Figure 6.8: Motion capture result
From this screen, you will see an interactive 3D viewport where you can see the result from any angle and play the animation at various speeds.
On the right-hand side of the screen, you’ll see a short list of four-character types; similar to the MetaHuman preview mesh, we can preview various body types such as thin, large, male, and female, and choose them for downloading along with our animation. For the best results, select a body type that is the closest to your MetaHuman character. In my case, as Glenda is a little overweight, it would be better for me to choose the overweight character. Doing this would increase the arm distance from the body, which would help with any collisions between an arm and the torso (you might remember that feature called Arm Spacing in Mixamo; this works similarly to that).
Also note that you have two options at the bottom of the interface of Figure 6.8:
- Download: This allows us to download an FBX file with a skeleton mesh of our choosing. At this point, we can choose another mesh other than the preview mesh.
- Rerun: This is where we get another chance to refine the quality of the animation. For example, we may be happy with the overall animation, but it is a little jittery; this would be a good opportunity to apply a little Motion Smoothing. As another example, we may be unhappy with the feet not locking to the ground as much as they should; perhaps the Auto setting just wasn’t responsive to the fast movement, so we could go back and switch Auto to Grounding instead.
Needless to say, but I’ll say it anyway, Rerun is a very valid tool and it is unlikely that you will get the desired result the first time without having to tweak it. It is better to try and get as close as you can to the desired result using many reruns, rather than try to fix it in the Unreal Engine. By gaining enough experience with reruns, you’ll become more efficient at predicting which features should be used over practice and time.
In Figure 6.9, you can see the Rerun Animation dialog box:

Figure 6.9: Rerun Animation dialog box
The only difference between this Rerun Animation box and the Confirm New Animation box from Figure 6.6 is that it shows you the Current settings that gave you your last result and the New settings that you are about to contribute to your next job. This allows you to make a comparative study and, therefore, a more informed decision for the rerun.
Now, when you have gone through all of the settings and rerun your job until you are finally happy with the results, it is time to download your animation.
Downloading the DeepMotion motion capture file
To download the DeepMotion motion capture file, instead of clicking the Rerun option, simply click the Download button instead. This will bring up the Download Animations dialog box, as shown in Figure 6.10:

Figure 6.10: Download Animations
Before downloading the animation, the dialog box gives us the option to switch or confirm which body type we want to use: it gives you two adult females, two adult males, and a generic child to choose from. When you’re happy with the correct preview mesh, make sure you have selected the correct download file time, FBX, from the dropdown menu (the BVH and DMPE solutions won’t work for what we need to do in Unreal). Then, click on the yellow Download button and save your file somewhere in your project folder.
When you download your animation, you’ll see two FBX files and a folder, as per Figure 6.11:
:

Figure 6.11: Saved files from DeepMotion and naming conventions
The FBX file that has TPose at the end of the filename (Adult_Male_Alt(includeTPose) is given to the file that uses an actual T-pose at the beginning of the animation. The other file, Adult_Male_Alt, has no such T-pose at the beginning and, therefore, kicks in with the animation at the very first frame. Choosing one over the other isn’t critical as you can always remove the T-pose section from the animation, but the T-pose could become useful in instances where you need to align it for the purposes of retargeting. We will look at that at the end of this chapter.
Now that we have downloaded the relevant files, in this next section, we are going to import the DeepMotion motion capture file into Unreal so that we can retarget it to the MetaHuman IK Rig.
Importing the DeepMotion animation into Unreal
As mentioned at the very beginning of this chapter, we are building on what we have learned from the previous chapters, but don’t worry, we’ll use this section as a bit of a recap on how to import a character into Unreal.
The first thing you will need to do is to create a folder in your Unreal project called Deepmotion. Make sure that you are working in the project that you used in the previous chapter where you have both a source and target IK Rig for your Mixamo character and your MetaHuman character.
Once you’ve created the Deepmotion folder, right-click anywhere within the Content browser of your Deepmotion folder and look for your new DeepMotion FBX files. Choose the one that has the name TPose included. When you select it, you will then be greeted by the FBX Import Options dialog box, as shown in Figure 6.12:

Figure 6.12: FBX Import Options
There are two things to consider here:
- First, we don’t want to assign a skeleton to this import; we want to use one that is embedded in the file that we are about to import. So, under Mesh, leave Skeleton to its default position of None, and make sure the Skeletal Mesh option is selected so that it knows to choose the skeletal mesh from the file.
- Second, while it sounds obvious, make sure you tick the Import Animations option under Animations.
After those considerations, click on the blue Import All button. Don’t be alarmed by the error that mentions smoothing that pops up; you can dismiss that.
Now, when you look at your Deepmotion folder in your Content browser, you should see something similar to Figure 6.13:

Figure 6.13: Deepmotion Content folder
Much of what you see here should be familiar; from left to right, you will see the following:
- A material shader for the body
- A T-pose skeleton without animation
- The DeepMotion skeleton with animation
- The DeepMotion skeleton physics asset
- A T-pose skeleton without animation for editing
- A texture file used in the aforementioned material shader used for the body
In this section, we have successfully imported the Deepmotion file into the Unreal Engine. In the next section, we will use the DeepMotion animation with our character.
Retargeting the DeepMotion motion capture
As in previous chapters, you’ll need to create an IK Rig as the source. So, while in the Deepmotion folder, right-click anywhere and choose Animation, followed by IK Rig, as per Figure 6.14:
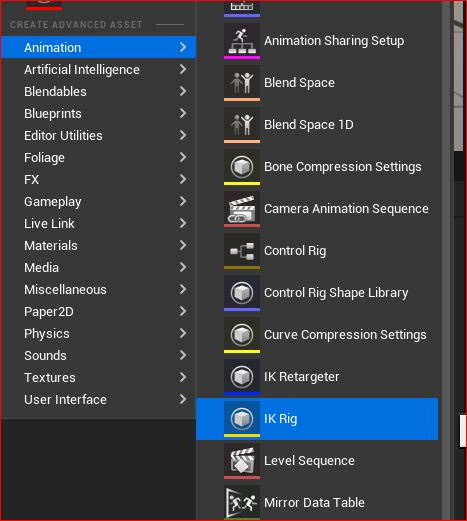
Figure 6.14: Creating an IK Rig
To avoid confusion, call this IK Rig Source_DM_Happy (this will help us later when we are looking for it).
Then, as we have also done before, follow the same process to create IK chains. Again, we will need to create six separate IK chains corresponding to the following:
- The root to the hip
- The spine and head
- The left arm
- The right arm
- The left leg
- The right leg
The only thing that is different, and you should expect this when importing motion capture from different sources, is the naming convention. The DeepMotion naming convention can be seen in Figure 6.15, where they use the JNS abbreviation for joints and start each appendage with the l_ or r_ prefix referring to either the left or the right:

Figure 6.15: IK chains
Notice that the order of these chains (starting from Root to hips_JNT and ending at r_upleg_JNT to r_foot_JNT) corresponds to my list of IK chains; having the same order in both the IK source and IK target reduces errors.
Now it’s time to create a new IK Retargeter, where we use our new IK Rig as the source. While still inside the Deepmotion folder, right-click anywhere in the Content browser, go to Animation, and select IK Retargeter, as shown in Figure 6.16:

Figure 6.16: Creating a new IK Retargeter
Once you have created a new IK Retargeter, double-click on it to open it and you’ll see a list of potential sources to choose from. You can see, in Figure 6.17, that I have a list of all the IK Rigs that are saved in my project folder:

Figure 6.17: Pick IK Rig To Copy Animation From
You’ll see that I have a source IK Rig titled SourceRigMixamo. As you practice with Unreal, you will soon end up with multiple source IK Rigs. You should still have a source IK Rig that you used from the previous chapter. This is why it’s important to label these IK Rigs appropriately so that you don’t inadvertently choose the wrong one.
You don’t want to use the Mixamo rig from the previous chapter, so select Source_DM_Happy as that is the rig from which we want to copy the animation. Then hit OK.
Note
If you choose the wrong IK Rig, you will need to delete this Retargeter and create a new one, hence why labeling the IK source rig is important.
Once you’ve created an IK Retargeter using the Source_DM_Happy rig, open it up by double-clicking on it. This will bring up the following interface:

Figure 6.18: Choosing the target in the IK Retargeter
Now, you want to choose the IK target to apply the DeepMotion motion capture to. You can see from Figure 6.19 that Source IKRig Asset is locked but Target IKRig Asset still has a drop-down list. Choose your MetaHuman target rig; in my case, it’s TARGET_meta.
It’s at this point that we also have the option to choose the appropriate Target Preview Mesh too. In my case, the target preview mesh is the Female Medium Overweight mesh, which is titled f_med_ovw_body_preview_mesh, as per Figure 6.19:
I

Figure 6.19: Target Preview Mesh
At the bottom of Figure 6.19, under the Asset Browser tab, you can see that the DeepMotion animation is now available for us to export. So, if you are happy with the animation, just click on the green Export Selected Animations button.
As a reminder, clicking on the Export Selected Animations button will create an animation file that will now work with your MetaHuman character. You will be given the option of where to save the animation to choose your Deepmotion folder.
Next, add your MetaHuman character to your scene by dragging and dropping it from your Content folder to your viewport. Then, ensure your MetaHuman blueprint is selected in Outliner.
After that, go to the Details panel, select Body, and under Animation Mode, choose Use Animation Asset. Run a search for your new retargeted animation file and click on it. In Figure 6.20, you can see that I picked the Happy Animation file from the drop-down list:

Figure 6.20: Applying the animation
With your file selected, run Play in your viewport and you’ll see your character come to life.
Now that you have successfully gone through the whole process of creating motion capture data from video and retargeted it to your MetaHuman character, we’ll take a look at troubleshooting a common problem in the next section.
Fixing position misalignment issues
It’s unlikely that your animation is going to perfectly match your video, and it’s just as unlikely that the retargeting process is going to be smooth sailing either. There’s always a slight mismatch between the source and target rigs. One of the most common problems is the arm positions, which mostly boils down to the T-pose and the A-pose.
As MetaHumans are set in an A-pose, and our DeepMotion rig was set to a T-Pose, this is where there’s a problem. In the event that you chose T-Pose in DeepMotion, there’s a handy little fix that saves you from having to go through the download and retargeting process again.
As you can see from Figure 6.21, showing the IK Retargeter interface, we can see the problem: the source DeepMotion character is in a T-Pose and the target MetaHuman character is in an A-Pose. In this scenario, because of the misalignment, the arms will not animate properly and will most likely intersect with the body:

Figure 6.21: IK Retargeter T-pose versus A-pose
The only option we have here is to change the pose of the target, which is the MetaHuman. To do this, click on the Edit Pose button at the top of the screen, as shown in Figure 6.22. This will allow you to rotate the joints of your MetaHuman character from within the IK Retargeter:

Figure 6.22: Edit Pose in the IK Retargeter
I strongly advise that you use rotational snapping, which is highlighted at the top-right of Figure 6.22. I found that the difference between the T-pose and the A-pose in terms of arm rotation was about 45 degrees. Currently, the snapping is set to increments of five degrees; however, you can change that to your liking.
The MetaHuman also has a slight rotation on the elbow joints that you will need to straighten to match that of the source; using the snapping tool allows you to get a much more uniform result. Be sure to change the angle from the front when you make corrections to the elbow joints so that you can see what you are doing.
When you are happy, click on the Edit Pose button again. This will allow you to press Play again, to view how well the animation is retargeted. You can keep going back to fine-tune these adjustments.
You may also find that you have exported the correct pose, but the animation is still causing slight issues, particularly with collision. In terms of DeepMotion, this could easily be attributed to the fact that you were using preset preview meshes as opposed to specific MetaHuman meshes. We will look at how to fix these issues in the next chapter.
Summary
In this section, we covered how we can create our own animation with as little as a single video camera. First, we looked at some of the major considerations when it comes to filming, what to avoid, and what steps we can take to bring even more accuracy.
Then we started using DeepMotion, exploring the various animation settings that it can offer us, including some artificial intelligence functionality. We looked at some best practices when it comes to these functions and the use of reruns before committing to the final animation.
Building on what we learned in the previous chapters, we once again retargeted our bespoke motion capture and applied it to our MetaHuman character, while looking a little more closely at A-poses versus T-poses. Finally, we covered an effective workaround for issues arising around those poses.
In the next chapter, we are going to look at the Level Sequencer and the Control Rig, and how to further refine our custom motion capture.