
3
Diving into the MetaHuman Blueprint
In the previous chapter, we exported a MetaHuman character using Quixel Bridge and the Quixel Bridge plugin inside UE5. We brought a number of assets into the engine – while most of the assets were images and meshes, the glue to hold them all together was the Blueprint.
In this chapter, you will be introduced to Blueprints, including what they are and what they are used for. Using Blueprints, you will learn the first steps required to prepare your MetaHuman for animation, repurposing motion capture data from another character that we will import into a project. We will then edit features within the skeletons of both our MetaHuman and the Unreal Engine Mannequin.
So, in this chapter, we will cover the following topics:
- What are Blueprints?
- Opening a Blueprint
- Importing and editing skeletons
Technical requirements
To complete this chapter, you will need the technical requirements detailed in Chapter 1 and the MetaHuman that we imported into UE5 in Chapter 2.
What are Blueprints?
So, what on earth is a Blueprint? If that’s what you’re thinking, I wouldn’t blame you.
Blueprints are effectively a visual representation of templates written in the C++ programming language. Epic Games could have easily just created a console within Unreal to let users write C++ code but because not everyone is familiar with the C++ programming language, they created an easy way for artists to edit the relevant code. In addition, for those familiar with C++, Blueprints are a very handy way of creating tools that are relatively easy for artists to use.
The good news is that you don’t really need to spend a huge amount of time using them when working on a MetaHuman character and animating it, but they are an integral part of the process and are being used by the engine in the background. It would be good practice for artists to get to grips with the fundamentals of Blueprints, as they are a fantastic way of reducing repetitive work; however, it must also be said that there are tasks that simply can’t be carried out without working with Blueprints.
In terms of functionality with the MetaHumans character, Blueprints essentially hold most of the information relating to the character in one place and we use the Blueprint to make changes to our character. The changes we will make relate to how the character is animated, and by the end of this chapter, you will be familiar with what areas of the Blueprint you will need to edit to animate your characters correctly.
You can look at a Blueprint as if it were a driver. Its function is to drive the mesh of your character using a skeleton. It does this by driving the bones, which in turn drive the skin. Because there is a cloth simulation at work, the skin drives the cloth. Because there is also a hair simulation at work, the skin drives the hair. All of this is driven by the Blueprint.
But where does the Blueprint get the initial instructions? Well, the answer is you. You tell the Blueprint what kind of instruction it will use to animate the character, and then you point to various animation modes for the Blueprint to use. There are just a couple of different types of animations that can be applied, listed here:
- Prerecorded data: This is simply a file that has motion data, usually one file for the face and another file for the body. We can get these files from plenty of resources. We can also use animation files that come with the third-person game template in UE5 or create our own files by recording our own motion capture data (we call these Takes).
- Live motion capture data: The Blueprint gives us the option of using live data that is coming from a piece of hardware, such as the following:
- An iPhone for facial motion capture.
- Software such as Faceware Studio, utilizing a video camera.
- Motion capture suits also provide us with live data via third-party software. Live data is information relating to the transformation and/or rotation of bones that is streamed in real-time into the engine.
- Animation Blueprints: These are primarily used for game logic, but they can use the same animation file types used in prerecorded data or saved when using live motion capture data that we would use in traditional 3D animation filmmaking.
Blueprints also allow for new data taken in from the user, such as a player in a game, and will engage a relevant animation file depending on what the player does. For example, if the player runs, the Blueprint will execute the run animation file, which drives the character to run. That file would usually be in the format of FBX or BVH. The files are referred to as assets.
So, let’s look at the Blueprint inside the engine.
Opening a Blueprint
Once you’ve successfully imported a MetaHuman character into UE5, you’ll see a few folders and a file starting with the BP_ prefix, as shown in Figure 3.1. The folder contains all the assets required to display your character.

Figure 3.1: The Blueprint inside the Content Browser
When you double-click on the Blueprint, this will open your character’s Blueprint. You will see that the screen is made up of six tabs, as shown in Figure 3.2:

Figure 3.2: The six panels of the character Blueprint
Let’s break down the tabs:
- Components: This is where we can select what part of the MetaHuman we wish to edit. We can also add additional components, such as meshes, cameras, and lights to our MetaHuman.
- My Blueprint: Here, we can see what functional elements are associated with our MetaHuman, such as the ARKit setup, which allows for facial motion capture to be directed to our character.
- Viewport: This gives us a view of our character without showing us the rest of the level. This comes in handy if we have brought a character into a busy scene and wish to inspect or edit our character without the distraction of a busy environment.
- Construction Script: A construction script allows the engine to read and write data to the Blueprint regardless of which level we are using. In the game world, this is useful, as the construction script can hold data such as character health. For the purposes of what we are using our MetaHumans for, we won’t need to make any changes to this.
- Event Graph: The event graph contains important information relating to events. An event can be a game starting or the result of pressing a particular key on the keyboard. In terms of MetaHumans, the event graph determines what LOD values the character should use. For example, if the camera moves far away from the character, that is an event that triggers the character to display an LOD value greater than 0.
- Details: This is where we do most of our editing. It is context-sensitive, so we will see different information depending on what we have clicked on in the Components tab. For instance, the body will give us different parameters to edit other than the face.
As we just mentioned, when it comes to editing our characters, we do so in the Details panel by editing various assets. Many of these assets are image files but many editors also allow you to further refine your character. In fact, in some instances, you are given even greater control over many aspects of your character. This additional control can bring even further realism to your character than you could have achieved with the MHC alone.
To see an example of how much extra editing power you have, click on Face within the Components tab and then double-click on one of the Eye materials options contained in the Details tab. Depending on which eye you chose, it would be labeled M_EyeRefractive_Inst_L.
Once you’ve opened the material editor for that eye, you can edit certain attributes that weren’t available to edit in MHC. For example, you can edit the cloudiness of the eye and ambient occlusion within the iris, which adds a lot of depth to the eye, as demonstrated in Figure 3.3:

Figure 3.3: Editing the eye material
Note
Adding further edits to your character using parameters exclusively available in Blueprints won’t affect your original design in MHC. You will always have a safe backup copy via Bridge.
Just as a reminder, the Blueprint acts like a driver and the character subfolders act like passengers. While you can access all these components directly through the character Blueprint, you can also gain access by diving into the individual subfolders; there may be occasions where you’d prefer to have multiple folders open at a time, so in many cases, it just comes down to personal preference.
Using the folder structure to navigate around the Blueprint
To show you how to navigate using folders, as seen in Figure 3.4, I have gone directly into the Hoodie folder and double-clicked on the Hoodie Material asset to change its color:

Figure 3.4: Further editing done directly within the folder structure
As you can see, there is even greater control of this particular asset than we would have gotten from just MHC alone; for example, using the color picker tool to change our MetaHuman’s hoodie. You may remember from Chapter 2, Creating Characters in the MetaHuman Interface, that we used the MHC color tools to make changes.
Navigating around the Blueprint without using folders
In Figure 3.5, you can see that the same edit is taking place, but we are using the character Blueprint to edit the same asset. Both methods are equally effective.

Figure 3.5: Editing a color inside the character Blueprint
You can see in Figure 3.5 that I followed the following steps:
- I chose Torso from the Components tab.
- I clicked on the Material element slot, which in turn opened Material Editor.
- I clicked on the current color, which opened Color Picker, allowing me to change the color.
While there are many additional editors within the Blueprints relating to the appearance of the characters, they are mostly for refining materials. For the most part, the results are subtle, but you can completely change color schemes.
As daunting as this all looks, rest assured that you will only really be editing a tiny section of the Blueprint. At the very least, you will just need to choose what kind of animation you want to drive for your character, and for repurposing animation from another character, we only need to edit skeletal details.
It makes sense to get up and running with some body animation first. UE5 comes with several starter packs to help us. One of the starter packs is a third-person game that comes with a Mannequin character that is rigged with a skeleton. It also comes with a few animations that we can use to test out our own character.
For the remainder of this chapter, we will look at Blueprints with the view to repurposing the animation from the starter game pack and applying it to our own character in the next chapter.
Importing and editing skeletons
In this section, we will add our Mannequin character to our project. Then, to be able to retarget animation from one character to another, the source and target characters both have to have skeletons. We will be looking at both of these skeletons in the following sections.
Adding the Mannequin character
To start, we want to use the skeleton of the Mannequin character that comes shipped with Unreal. To add it to your project, all you need to do is go to Content Browser, click on the +ADD button, and choose Add Feature or Content Pack…:
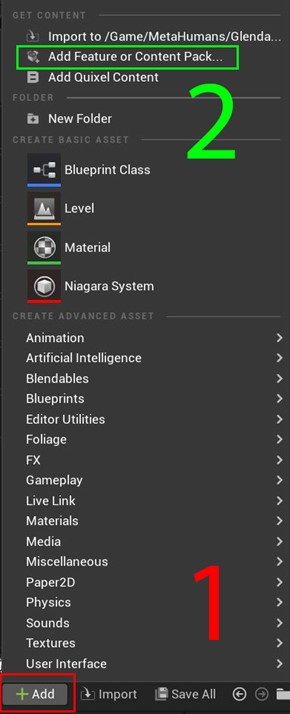
Figure 3.6: Adding a content pack
Once you’ve clicked on Add Feature or Content Pack…, you’ll see a pop-up window where you can choose Third Person from the Blueprint feature tab:

Figure 3.7: Add Content to the Project
The reason we choose Third Person is that it has a full character, including a mannequin, in the project, which we can repurpose. Then, click on Add to Project. This will load the project into your Content Browser.
You’ll notice that there are now two new folders in your Content Browser: Mannequin and Third PersonBP.
What we want to do at this stage is edit the Mannequin skeleton so that the structure, naming convention, and animation method are the same as for our MetaHuman. That way, we can repurpose the animation from Mannequin and apply it to our MetaHuman.
As mentioned earlier, there are two ways we can go about editing. We could go through Mannequin’s folder structure and search for the skeleton Blueprints, but we will play it safe and look for the main character Blueprint and navigate our way to the skeleton Blueprint from there.
Moving forward, here are the steps we need to take:
- Edit the Mannequin skeleton’s retargeting options.
- Edit the MetaHuman skeleton’s retargeting options.
So, let’s get started.
Editing the Mannequin skeleton's retargeting options
In this section, we are going to tell the skeleton of Unreal Engine’s Mannequin character and our MetaHuman character that we are only interested in their rotational data.
Once we’ve added the Third Person content pack into the project, we’ll see a new folder called ThirdPersonBP, so that’s a good start. You can see that in Figure 3.8:

Figure 3.8: The ThirdPerson Character Blueprint
In the ThirdPersonBP folder is another folder labeled Blueprints, and within that is ThirdPersonCharacter, which we need to edit. Double-click the Blueprint to open it.
In the Components tab, when clicking on Mesh (CharacterMesh0) as per Figure 3.9, you’ll notice the Details panel on the right change. Under Mesh, you’ll see Skeletal Mesh. Double-click on the little thumbnail for SK_Mannequinn:

Figure 3.9: Accessing the Skeletal Mesh editor tab
This will open an additional tab in the Blueprint that will contain two more tabs, as well as a viewport showing Mannequin and its skeleton, as shown in Figure 3.10:

Figure 3.10: Inside SK_Mannequinn
- Asset Details: Provides us with a lot of options should we want to edit the character for which we are repurposing animation. However, we are only interested in this character’s rig and the animations that are associated with it.
- Skeleton Tree: Where we want to do most of our editing. This shows us the relationship that each bone has with the others. Every bone is connected to root. If the root part moves or rotates, the rest of the bones in the hierarchy will move. Bones lowest in the hierarchy will have the least influence.
In Figure 3.10, in the Skeleton Tree tab, you can see that every bone is named, from root down to thumb. What we want to do is make sure that the retargeting option is set to the skeleton, but don’t worry, we don’t need to meticulously check through each bone. We can do this in four mouse clicks:
- Click on the cog.
- Select Show Retargeting Options.
- Right-click on pelvis.
- Then, left-click on Recursively Set Translation Retargeting Skeleton.
Let me walk you through those steps in more detail. So, click on the cog highlighted in Figure 3.11:
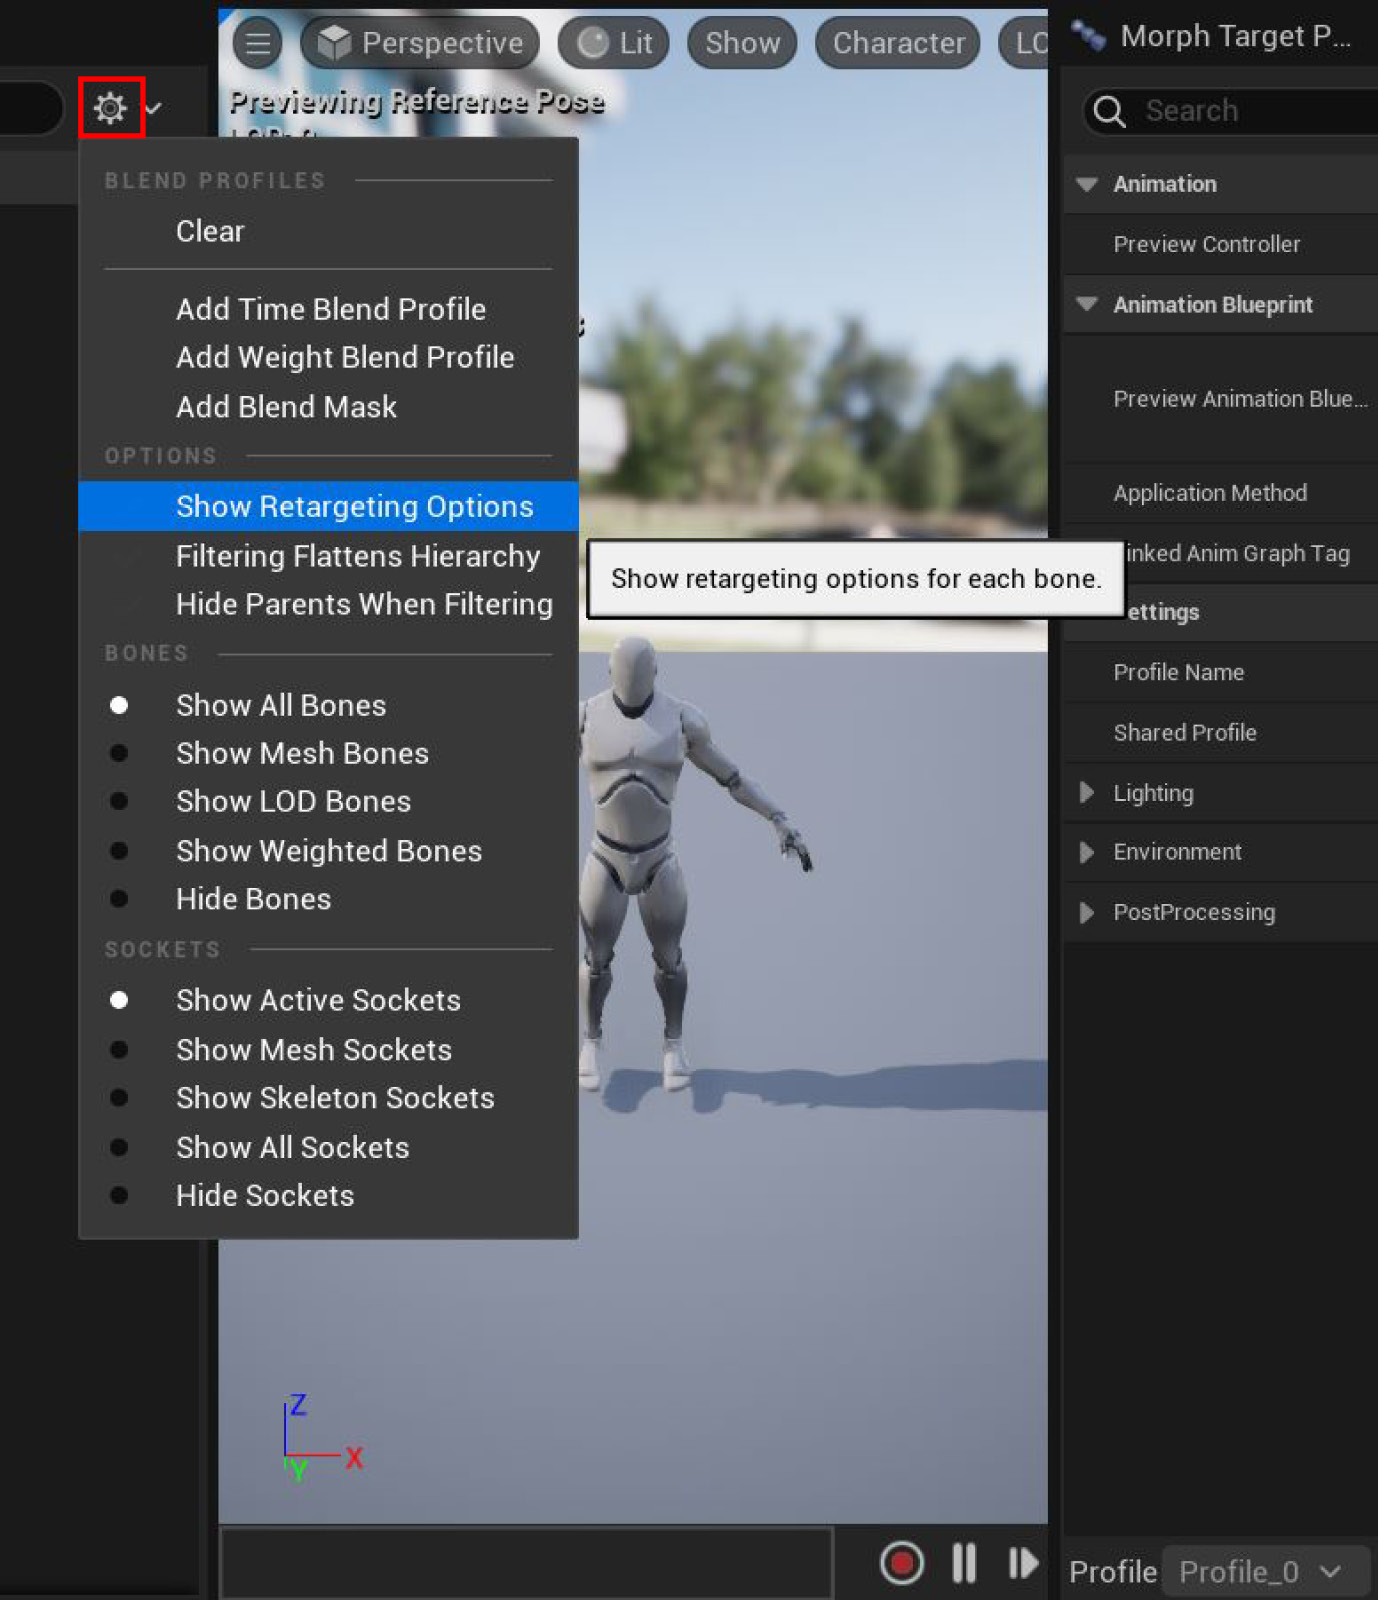
Figure 3.11: Show Retargeting Options
Under OPTIONS, click Show Retargeting Options. All we are doing is making sure that the hierarchy of the skeleton is being used effectively to drive the animation of each bone. Because all the bones are connected in a hierarchy, moving one bone can have a chain reaction effect on the whole body naturally. This is known as Inverse Kinematics (IK). In some animation data, every bone has animation, so the natural hierarchy of the skeleton isn’t very important. For IK animation, not all animation, such as rotation and transformation, for every bone is carried through; therefore, relying on an IK solution is important.
We are going to take advantage of the skeletal hierarchy in the next step because that is how the MetaHuman characters are designed. Because there is a bone hierarchy within this skeletal system, we can quickly change the nature of the bones’ translation by utilizing a handy retargeting option. In this case, we want to set Translation to Skeleton, starting with the pelvis bone.
Fortunately, there is a fast way to do this. Right-click pelvis and choose the Recursively Set Translation Retargeting Skeleton option, as shown in Figure 3.12:

Figure 3.12: Recursively Set Translation Retargeting to Skeleton
You’ve now set all of the bones from pelvis to skeleton in one click.
Note
Be sure to hit Save in the Blueprint tab when you have edited the retargeting options.
In addition to making sure our characters are both using skeletal animation, by doing things this way, we are only retargeting the rotational data. Put simply, this will allow us to retarget the rotation animation of each bone from this character and not the transformation data. If we copied over the transformation data from the original skeleton to the new skeleton, such as a MetaHumans skeleton, the bones would move disproportionately.
These issues are most notable when the new character has significant proportional differences from the original. For example, if the original skeleton was tall, then its bones would have very different transform data from that of a small character. Its bones would be longer than its smaller counterpart. While the rotation data would be fine, the transform data of the tall character would stretch the small character, as it would try to make the bones occupy the same locations in 3D space despite the rotational values being relatively correct.
In Figure 3.13, you can see the correct data transformation. That is to say that the three characters all share the same pose without any drastic stretching or deforming of the meshes. Had the transformational data been carried from character A to character B, character B would be stretched to the same height and character C would be squashed to the same height as character A.

Figure 3.13: Correct translation of motion data
If you find that you have successfully managed to get through all these steps and have animated your MetaHuman, chances are you haven’t followed these steps correctly. A common mistake is forgetting to save changes within the Blueprint.
The next step is to edit the retargeting options for the new skeleton, which is our MetaHumans character.
Editing the MetaHuman skeleton's retargeting options
To start editing the MetaHuman skeleton's retargeting options, in your character’s Blueprint, click on Body in the Components tab. Then, in the Details tab, double-click the thumbnail next to Skeletal Mesh under the Mesh section. Don’t worry if you don’t have an accurate thumbnail of your MetaHuman in the same way you did with Mannequin.

Figure 3.14: Editing the MetaHuman’s retargeting options
Once you double-click on the thumbnail, you’ll be greeted with the screen shown in Figure 3.15 (it’s an identical tab to the one you saw earlier in Figure 3.12 when you edited the Mannequin skeleton). You just need to follow the exact same steps as we did in the previous section. So, click on the cog and select Show Retargeting Options. Then right-click on pelvis, and select Recursively Set Translation Retargeting to Skeleton:

Figure 3.15: Recursively Set Translation Retargeting Skeleton in the MetaHuman Blueprint
After this, save the Blueprint. Now, we have edited both the Mannequin and MetaHuman skeletons, retargeting their options so the two can work together.
Summary
We’ve covered a lot of ground in this chapter. We’ve covered some key concepts regarding Blueprints in Unreal, what they are, and what they can be used for. We’ve done some basic editing of both Unreal’s Mannequin character and our own MetaHuman character so that they can effectively speak to each other by setting the translation targeting to Skeleton for both. We’ve also briefly discussed IK and how that solution works with our characters.
In the next chapter, we will jump back into Blueprints to retarget the animation from one character to the next and explore ways to fix any minor yet common problems. We will create IK Rigs for both the Mannequin character and our MetaHuman and use an IK Retargeter to export the animation data onto our character.