
Chapter 13
Asynchronous Programming
WHAT’S IN THIS CHAPTER?
- Why asynchronous programming is important
- Asynchronous patterns
- Foundations of the async and await keywords
- Creating and using asynchronous methods
- Error handling with asynchronous methods
WROX.COM CODE DOWNLOADS FOR THIS CHAPTER
The wrox.com code downloads for this chapter are found at http://www.wrox.com/remtitle.cgi?isbn=1118314425 on the Download Code tab. The code for this chapter is divided into the following major examples:
- Async Patterns
- Foundations
- Error Handling
WHY ASYNCHRONOUS PROGRAMMING IS IMPORTANT
The most important change of C# 5 is the advances provided with asynchronous programming. C# 5 adds only two new keywords: async and await. These two keywords are the main focus of this chapter.
With asynchronous programming a method is called that runs in the background (typically with the help of a thread or task), and the calling thread is not blocked.
In this chapter, you can read about different patterns on asynchronous programming such as the asynchronous pattern, the event-based asynchronous pattern, and the new task-based asynchronous pattern (TAP). TAP makes use of the async and await keywords. Comparing these patterns you can see the real advantage of the new style of asynchronous programming.
After discussing the different patterns, you will see the foundation of asynchronous programming by creating tasks and invoking asynchronous methods. You’ll learn about what’s behind the scenes with continuation tasks and the synchronization context.
Error handling needs some special emphasis; as with asynchronous tasks, some scenarios require some different handling with errors.
The last part of this chapter discusses how cancellation can be done. Background tasks can take a while and there might be a need to cancel the task while it is still running. How this can be done, you’ll also read in this chapter.
Chapter 21, “Threads, Tasks, and Synchronization,” covers other information about parallel programming.
Users find it annoying when an application does not immediately react to requests. With the mouse, we have become accustomed to experiencing a delay, as we’ve learned that behavior over several decades. With a touch UI, an application needs to immediately react to requests. Otherwise, the user tries to redo the action.
Because asynchronous programming was hard to achieve with older versions of the .NET Framework, it was not always done when it should have been. One of the applications that blocked the UI thread fairly often is Visual Studio 2010. With that version, opening a solution containing hundreds of projects meant you could take a long coffee break. With Visual Studio 2012, that’s no longer the case, as projects are loaded asynchronously in the background, with the selected project loaded first. This loading behavior is just one example of important changes built into Visual Studio 2012 related to asynchronous programming. Similarly, users of Visual Studio 2010 are likely familiar with the experience of a dialog not reacting. This is less likely to occur with Visual Studio 2012.
Many APIs with the .NET Framework offer both a synchronous and an asynchronous version. Because the synchronous version of the API was a lot easier to use, it was often used where it wasn’t appropriate. With the new Windows Runtime (WinRT), if an API call is expected to take longer than 40 milliseconds, only an asynchronous version is available. Now, with .NET 4.5 programming, asynchronously is as easy as programming in a synchronous manner, so there shouldn’t be any barrier to using the asynchronous APIs.
ASYNCHRONOUS PATTERNS
Before stepping into the new async and await keywords it is best to understand asynchronous patterns from the .NET Framework. Asynchronous features have been available since .NET 1.0, and many classes in the .NET Framework implement one or more such patterns. The asynchronous pattern is also available with the delegate type.
Because doing updates on the UI, both with Windows Forms, and WPF with the asynchronous pattern is quite complex, .NET 2.0 introduced the event-based asynchronous pattern. With this pattern, an event handler is invoked from the thread that owns the synchronization context, so updating UI code is easily handled with this pattern. Previously, this pattern was also known with the name asynchronous component pattern.
Now, with .NET 4.5, another new way to achieve asynchronous programming is introduced: the task-based asynchronous pattern (TAP). This pattern is based on the Task type that was new with .NET 4 and makes use of a compiler feature with the keywords async and await.
To understand the advantage of the async and await keywords, the first sample application makes use of Windows Presentation Foundation (WPF) and network programming to provide an overview of asynchronous programming. If you have no experience with WPF and network programming, don’t despair. You can still follow the essentials here and gain an understanding of how asynchronous programming can be done. The following examples demonstrate the differences between the asynchronous patterns. After looking at these, you’ll learn the basics of asynchronous programming with some simple console applications.
The sample application to show the differences between the asynchronous patterns is a WPF application that makes use of types in a class library. The application is used to find images on the web using services from Bing and Flickr. The user can enter a search term to find images, and the search term is sent to Bing and Flickr services with a simple HTTP request.
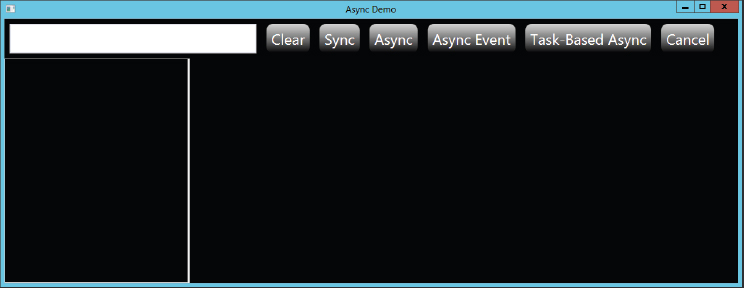
The UI design from the Visual Studio designer is shown in Figure 13-1. On top of the screen is a text input field followed by several buttons that start the search or clear the result list. The left side below the control area contains a ListBox for displaying all the images found. On the right side is an Image control to display the image that is selected within the ListBox control in a version with a higher resolution.
To understand the sample application we will start with the class library AsyncLib, which contains several helper classes. These classes are used by the WPF application.
The class SearchItemResult represents a single item from a result collection that is used to display the image together with a title and the source of the image. This class just defines simple properties: Title, Url, ThumbnailUrl, and Source. The property ThumbnailIUrl is used to reference a thumbnail image, the Url property contains a link to a larger-size image. Title contains some text to describe the image. The base class of SearchItemResult is BindableBase. This base class just implements a notification mechanism by implementing the interface INotifyPropertyChanged that is used by WPF to make updates with data binding (code file AsyncLib/SearchItemResult.cs):
namespace Wrox.ProCSharp.Async
{
  public class SearchItemResult : BindableBase
  {
    private string title;
    public string Title
    {
      get { return title; }
      set { SetProperty(ref title, value); }
    }

    private string url;
    public string Url
    {
      get { return url; }
      set { SetProperty(ref url, value); }
    }

    private string thumbnailUrl;
    public string ThumbnailUrl
    {
      get { return thumbnailUrl; }
      set { SetProperty(ref thumbnailUrl, value); }
    }

    private string source;
    public string Source
    {
      get { return source; }
      set { SetProperty(ref source, value); }
    }
  }
}
The class SearchInfo is another class used with data binding. The property SearchTerm contains the user input to search for images with that type. The List property returns a list of all found images represented with the SearchItemResult type (code file AsyncLib/SearchInfo.cs):
using System.Collections.ObjectModel;

namespace Wrox.ProCSharp.Async
{
  public class SearchInfo : BindableBase
  {
    public SearchInfo()
    {
      list = new ObservableCollection<SearchItemResult>();
      list.CollectionChanged += delegate { OnPropertyChanged("List"); };
    }

    private string searchTerm;
    public string SearchTerm
    {
      get { return searchTerm; }
      set { SetProperty(ref searchTerm, value); }
    }

    private ObservableCollection<SearchItemResult> list;
    public ObservableCollection<SearchItemResult> List
    {
      get
      {
        return list;
      }
    }
  }
}
In the XAML code, a TextBox is used to enter the search term. This control is bound to the SearchTerm property of the SearchInfo type. Several Button controls are used to activate an event handler, e.g., the Sync button invokes the OnSearchSync method (XAML file AsyncPatterns/MainWindow.xaml):
    <StackPanel Orientation="Horizontal" Grid.Row="0">
      <StackPanel.LayoutTransform>
        <ScaleTransform ScaleX="2" ScaleY="2" />
      </StackPanel.LayoutTransform>
      <TextBox Text="{Binding SearchTerm}" Width="200" Margin="4" />
      <Button Click="OnClear">Clear</Button>
      <Button Click="OnSearchSync">Sync</Button>
      <Button Click="OnSeachAsyncPattern">Async</Button>
      <Button Click="OnAsyncEventPattern">Async Event</Button>
      <Button Click="OnTaskBasedAsyncPattern">Task Based Async</Button>
    </StackPanel>
The second part of the XAML code contains a ListBox. To have a special representation for the items in the ListBox, an ItemTemplate is used. Every item is represented with two TextBlock controls and one Image control. The ListBox is bound to the List property of the SearchInfo class, and properties of the item controls are bound to properties of the SearchItemResult type:
    <Grid Grid.Row="1">
      <Grid.ColumnDefinitions>
        <ColumnDefinition Width="*" />
        <ColumnDefinition Width="3*" />
      </Grid.ColumnDefinitions>
      <ListBox Grid.IsSharedSizeScope="True" ItemsSource="{Binding List}"
          Grid.Column="0" IsSynchronizedWithCurrentItem="True"
          Background="Black">
        <ListBox.ItemTemplate>
          <DataTemplate>
            <Grid>
              <Grid.ColumnDefinitions>
                <ColumnDefinition SharedSizeGroup="ItemTemplateGroup" />
              </Grid.ColumnDefinitions>
              <StackPanel HorizontalAlignment="Stretch" Orientation="Vertical"
                  Background="{StaticResource linearBackgroundBrush}">
                <TextBlock Text="{Binding Source}" Foreground="White" />
                <TextBlock Text="{Binding Title}" Foreground="White" />
                <Image HorizontalAlignment="Center"
                    Source="{Binding ThumbnailUrl}" Width="100" />
              </StackPanel>
            </Grid>
          </DataTemplate>
        </ListBox.ItemTemplate>
      </ListBox>
      <GridSplitter Grid.Column="1" Width="3" HorizontalAlignment="Left" />
      <Image Grid.Column="1" Source="{Binding List/Url}" />
    </Grid>
Now let’s get into the BingRequest class. This class contains some information about how to make a request to the Bing service. The Url property of this class returns a URL string that can be used to make a request for images. The request is comprised of the search term, a number of images that should be requested (Count), and a number of images to skip (Offset). With Bing, authentication is needed. The user ID is defined with the AppId, and used with the Credentials property that returns a NetworkCredential object. To run the application, you need to register with Windows Azure Marketplace and sign up for the Bing Search API. At the time of this writing, up to 5000 transactions per month are free—this should be enough for running the sample application. Every search is one transaction. The link for the registration to the Bing Search API is https://datamarket.azure.com/dataset/bing/search. After registration you need to copy the application ID. After obtaining the application ID, add it to the BingRequest class.
After sending a request to Bing by using the created URL, Bing returns XML. The Parse method of the BingRequest class parses the XML and returns a collection of SearchItemResult objects (code file AsyncLib/BingRequest.cs):
using System.Collections.Generic;
using System.Linq;
using System.Net;
using System.Xml.Linq;

namespace Wrox.ProCSharp.Async
{
  public class BingRequest : IImageRequest
  {
    private const string AppId = "enter your Bing AppId here";

    public BingRequest()
    {
      Count = 50;
      Offset = 0;
    }
    private string searchTerm;
    public string SearchTerm
    {
      get { return searchTerm; }
      set { searchTerm = value; }
    }

    public ICredentials Credentials
    {
      get
      {
        return new NetworkCredentials(AppId, AppId);
      }
    }

    public string Url
    {
      get
      {
        return string.Format("https://api.datamarket.azure.com/" +
          "Data.ashx/Bing/Search/v1/Image?Query=%27{0}%27&" +
          "$top={1}&$skip={2}&$format=Atom",
          SearchTerm, Count, Offset);
      }
    }

    public int Count { get; set; }
    public int Offset { get; set; }

    public IEnumerable<SearchItemResult> Parse(string xml)
    {
      XElement respXml = XElement.Parse(xml);
      // XNamespace atom = XNamespace.Get("http://www.w3.org/2005/Atom");
      XNamespace d = XNamespace.Get(
        "http://schemas.microsoft.com/ado/2007/08/dataservices");
      XNamespace m = XNamespace.Get(
        "http://schemas.microsoft.com/ado/2007/08/dataservices/metadata");

      return (from item in respXml.Descendants(m + "properties")
              select new SearchItemResult
              {
                Title = new string(item.Element(d +
                  "Title").Value.Take(50).ToArray()),
                Url = item.Element(d + "MediaUrl").Value,
                ThumbnailUrl = item.Element(d + "Thumbnail").
                  Element(d + "MediaUrl").Value,
                Source = "Bing"
              }).ToList();
    }
  }
}
Both the BingRequest class and the FlickrRequest class implement the interface IImageRequest. This interface defines the properties SearchTerm and Url, and the method Parse, which enables easy iteration through both image service providers (code file AsyncLib/IImageRequest.cs):
using System;
using System.Collections.Generic;
using System.Net;

namespace Wrox.ProCSharp.Async
{
  public interface IImageRequest
  {
    string SearchTerm { get; set; }
    string Url { get; }

    IEnumerable<SearchItemResult> Parse(string xml);

    ICredentials Credentials { get; }
  }
}
The FlickrRequest class is very similar to BingRequest. It just creates a different URL to request an image with a search term, and has a different implementation of the Parse method, just as the returned XML from Flickr differs from the returned XML from Bing. As with Bing, to create an application ID for Flickr, you need to register with Flickr and request it: http://www.flickr.com/services/apps/create/apply/.
using System.Collections.Generic;
using System.Linq;
using System.Xml.Linq;

namespace Wrox.ProCSharp.Async
{
  public class FlickrRequest : IImageRequest
  {
    private const string AppId = "Enter your Flickr AppId here";

    public FlickrRequest()
    {
      Count = 50;
      Page = 1;
    }

    private string searchTerm;
    public string SearchTerm
    {
      get { return searchTerm; }
      set { searchTerm = value; }
    }

    public string Url
    {
      get
      {
        return string.Format("http://api.flickr.com/services/rest?" +
            "api_key={0}&method=flickr.photos.search&content_type=1&" +
            "text={1}&per_page={2}&page={3}", AppId, SearchTerm, Count, Page);
      }
    }

    public ICredentials Credentials
    {
      get { return null; }
    }

    public int Count { get; set; }
    public int Page { get; set; }

    public IEnumerable<SearchItemResult> Parse(string xml)
    {
      XElement respXml = XElement.Parse(xml);
      return (from item in respXml.Descendants("photo")
              select new SearchItemResult
              {
                Title = new string(item.Attribute("title").Value.
                    Take(50).ToArray()),
                Url = string.Format("http://farm{0}.staticflickr.com/" +
                    "{1}/{2}_{3}_z.jpg",
                  item.Attribute("farm").Value, item.Attribute("server").Value,
                  item.Attribute("id").Value, item.Attribute("secret").Value),
                ThumbnailUrl = string.Format("http://farm{0}." +
                    "staticflickr.com/{1}/{2}_{3}_t.jpg",
                    item.Attribute("farm").Value,
                    item.Attribute("server").Value,
                    item.Attribute("id").Value,
                    item.Attribute("secret").Value),
                Source = "Flickr"
              }).ToList();
    }
  }
}
Now you just need to connect the types from the library and the WPF application. In the constructor of the MainWindow class, an instance of SearchInfo is created, and the DataContext of the window is set to this instance. Now data binding can take place, shown earlier with the XAML code (code file AsyncPatterns/MainWindow.xaml.cs):
  public partial class MainWindow : Window
  {
    private SearchInfo searchInfo;

    public MainWindow()
    {
      InitializeComponent();
      searchInfo = new SearchInfo();
      this.DataContext = searchInfo;
    }
The MainWindow class also contains the helper method GetSearchRequests, which returns a collection of IImageRequest objects in the form of BingRequest and FlickrRequest types. In case you only registered with one of these services, you can change this code to return only the one with which you registered. Of course, you can also create IImageRequest types of other services, e.g., using Google or Yahoo. Then add these request types to the collection returned:
    private IEnumerable<IImageRequest> GetSearchRequests()
    {
      return new List<IImageRequest>
      {
        new BingRequest { SearchTerm = searchInfo.SearchTerm },
        new FlickrRequest { SearchTerm = searchInfo.SearchTerm}
      };
    }
Synchronous Call
Now that everything is set up, let’s start with a synchronous call to these services. The click handler of the Sync button, OnSearchSync, iterates through all search requests returned from GetSearchRequests and uses the Url property to make an HTTP request with the WebClient class. The method DownloadString blocks until the result is received. The resulting XML is assigned to the resp variable. The XML content is parsed with the help of the Parse method, which returns a collection of SearchItemResult objects. The items of these collections are then added to the list contained within searchInfo (code file AsyncPatterns/MainWindow.xaml.cs):
    private void OnSearchSync(object sender, RoutedEventArgs e)
    {
      foreach (var req in GetSearchRequests())
      {
        var client = new WebClient();
        client.Credentials = req.Credentials;
        string resp = client.DownloadString(req.Url);
        IEnumerable<SearchItemResult> images = req.Parse(resp);
        foreach (var image in images)
        {
          searchInfo.List.Add(image);
        }
      }
    }
Running the application (see Figure 13-2), the user interface is blocked until the method OnSearchSync is finished making network calls to Bing and Flickr, as well as parsing the results. The amount of time needed to complete these calls varies according to the speed of your network and the current workload of Bing and Flickr. Whatever it is, however, the wait is unpleasant to the user.

Therefore, make the call asynchronously instead.
Asynchronous Pattern
One way to make the call asynchronously is by using the asynchronous pattern. The asynchronous pattern defines a BeginXXX method and an EndXXX method. For example, if a synchronous method DownloadString is offered, the asynchronous variants would be BeginDownloadString and EndDownloadString. The BeginXXX method takes all input arguments of the synchronous method, and EndXXX takes the output arguments and return type to return the result. With the asynchronous pattern, the BeginXXX method also defines a parameter of AsyncCallback, which accepts a delegate that is invoked as soon as the asynchronous method is completed. The BeginXXX method returns IAsyncResult, which can be used for polling to verify whether the call is completed, and to wait for the end of the method.
The WebClient class doesn’t offer an implementation of the asynchronous pattern. Instead, the HttpWebRequest class could be used, which offers this pattern with the methods BeginGetResponse and EndGetResponse. This is not done in the following sample. Instead, a delegate is used. The delegate type defines an Invoke method to make a synchronous method call, and BeginInvoke and EndInvoke methods to use it with the asynchronous pattern. Here, the delegate downloadString of type Func<string, string> is declared to reference a method that has a string parameter and returns a string. The method that is referenced by the downloadString variable is implemented as a Lambda expression and invokes the synchronous method DownloadString of the WebClient type. The delegate is invoked asynchronously by calling the BeginInvoke method. This method uses a thread from the thread pool to make an asynchronous call.
The first parameter of the BeginInvoke method is the first generic string parameter of the Func delegate where the URL can be passed. The second parameter is of type AsyncCallback. AsyncCallback is a delegate that requires IAsyncResult as a parameter. The method referenced by this delegate is invoked as soon as the asynchronous method is completed. When that happens, downloadString.EndInvoke is invoked to retrieve the result, which is dealt with in the same manner as before to parse the XML content and get the collection of items. However, here it is not possible to directly go back to the UI, as the UI is bound to a single thread, and the callback method is running within a background thread. Therefore, it’s necessary to switch back to the UI thread by using the Dispatcher property from the window. The Invoke method of the Dispatcher requires a delegate as a parameter; that’s why the Action<SearchItemResult> delegate is specified, which adds an item to the collection bound to the UI (code file AsyncPatterns/MainWindow.xaml.cs):
    private void OnSeachAsyncPattern(object sender, RoutedEventArgs e)
    {
      Func<string, ICredentials, string> downloadString = (address, cred) =>
        {
          var client = new WebClient();
          client.Credentials = cred;
          return client.DownloadString(address);
        };

      Action<SearchItemResult> addItem = item => searchInfo.List.Add(item);

      foreach (var req in GetSearchRequests())
      {
        downloadString.BeginInvoke(req.Url, req.Credentials, ar =>
          {
            string resp = downloadString.EndInvoke(ar);
            IEnumerable<SearchItemResult> images = req.Parse(resp);
            foreach (var image in images)
            {
              this.Dispatcher.Invoke(addItem, image);
            }
          }, null);
      }
    }
An advantage of the asynchronous pattern is that it can be implemented easily just by using the functionality of delegates. The program now behaves as it should; the UI is no longer blocked. However, using the asynchronous pattern is difficult. Fortunately, .NET 2.0 introduced the event-based asynchronous pattern, which makes it easier to deal with UI updates. This pattern is discussed next.
Event-Based Asynchronous Pattern
The method OnAsyncEventPattern makes use of the event-based asynchronous pattern. This pattern is implemented by the WebClient class and thus it can be directly used.
This pattern defines a method with the suffix "Async". Therefore, for example, for the synchronous method DownloadString, the WebClient class offers the asynchronous variant DownloadStringAsync. Instead of defining a delegate that is invoked when the asynchronous method is completed, an event is defined. The DownloadStringCompleted event is invoked as soon as the asynchronous method DownloadStringAsync is completed. The method assigned to the event handler is implemented within a Lambda expression. The implementation is very similar to before, but now it is possible to directly access UI elements because the event handler is invoked from the thread that has the synchronization context, and this is the UI thread in the case of Windows Forms and WPF applications (code file AsyncPatterns/MainWindow.xaml.cs):
    private void OnAsyncEventPattern(object sender, RoutedEventArgs e)
    {
      foreach (var req in GetSearchRequests())
      {
        var client = new WebClient();
        client.Credentials = req.Credentials;
        client.DownloadStringCompleted += (sender1, e1) =>
          {
            string resp = e1.Result;
            IEnumerable<SearchItemResult> images = req.Parse(resp);
            foreach (var image in images)
            {
              searchInfo.List.Add(image);
            }
          };
        client.DownloadStringAsync(new Uri(req.Url));
      }
    }
An advantage of the event-based asynchronous pattern is that it is easy to use. Note, however, that it is not that easy to implement this pattern in a custom class. One way to use an existing implementation of this pattern to make synchronous methods asynchronous is with the BackgroundWorker class. BackgroundWorker implements the event-based asynchronous pattern.
This makes the code a lot simpler. However, the order is reversed compared to synchronous method calls. Before invoking the asynchronous method, you need to define what happens when the method call is completed. The following section plunges into the new world of asynchronous programming with the async and await keywords.
Task-Based Asynchronous Pattern
The WebClient class is updated with .NET 4.5 to offer the task-based asynchronous pattern (TAP) as well. This pattern defines a suffix Async method that returns a Task type. Because the WebClient class already offers a method with the Async suffix to implement the task-based asynchronous pattern, the new method has the name DownloadStringTaskAsync.
The method DownloadStringTaskAsync is declared to return Task<string>. You do not need to declare a variable of Task<string> to assign the result from DownloadStringTaskAsync; instead, a variable of type string can be declared, and the await keyword used. The await keyword unblocks the thread (in this case the UI thread) to do other tasks. As soon as the method DownloadStringTaskAsync completes its background processing, the UI thread can continue and get the result from the background task to the string variable resp. Also, the code following this line continues (code file AsyncPatterns/MainWindow.xaml.cs):
    private async void OnTaskBasedAsyncPattern(object sender,
        RoutedEventArgs e)
    {
      foreach (var req in GetSearchRequests())
      {
        var client = new WebClient();
        client.Credentials = req.Credentials;
        string resp = await client.DownloadStringTaskAsync(req.Url);

        IEnumerable<SearchItemResult> images = req.Parse(resp);
        foreach (var image in images)
        {
          searchInfo.List.Add(image);
        }
      }
}The code is much simpler now. There is no blocking, and no manually switching back to the UI thread, as this is done automatically; and the code has the same order as you’re used to with synchronous programming.
Next, the code is changed to use a different class from WebClient, one in which the task-based event pattern is more directly implemented and synchronous methods are not offered. This class, new with .NET 4.5, is HttpClient. Doing an asynchronous GET request is done with the GetAsync method. Then, to read the content another asynchronous method is needed. ReadAsStringAsync returns the content formatted in a string:
    private async void OnTaskBasedAsyncPattern(object sender,
        RoutedEventArgs e)
    {
      foreach (var req in GetSearchRequests())
      {
        var clientHandler = new HttpClientHandler
        {
          Credentials = req.Credentials
        };
        var client = new HttpClient(clientHandler);
        var response = await client.GetAsync(req.Url);
        string resp = await response.Content.ReadAsStringAsync();

        IEnumerable<SearchItemResult> images = req.Parse(resp);
        foreach (var image in images)
        {
          searchInfo.List.Add(image);
        }
      }
    }
Parsing of the XML string to could take a while. Because the parsing code is running in the UI thread, the UI thread cannot react to user requests at that time. To create a background task from synchronous functionality, Task.Run can be used. In the following example, Task.Run wraps the parsing of the XML string to return the SearchItemResult collection:
    private async void OnTaskBasedAsyncPattern(object sender,
        RoutedEventArgs e)
    {
      foreach (var req in GetSearchRequests())
      {
        var clientHandler = new HttpClientHandler
        {
          Credentials = req.Credentials
        };
        var client = new HttpClient(clientHandler);
        var response = await client.GetAsync(req.Url, cts.Token);
        string resp = await response.Content.ReadAsStringAsync();

        await Task.Run(() =>
        {
          IEnumerable<SearchItemResult> images = req.Parse(resp);
          foreach (var image in images)
          {
            searchInfo.List.Add(image);
          }
        }
      }
    }
Because the method passed to the Task.Run method is running in a background thread, here we have the same problem as before referencing some UI code. One solution would be to just do req.Parse within the Task.Run method, and do the foreach loop outside of the task to add the result to the list in the UI thread. WPF with .NET 4.5 offers a better solution, however, that enables filling collections that are bound to the UI from a background thread. This extension only requires enabling the collection for synchronization using BindingOperations.EnableCollectionSynchronization, as shown in the following code snippet:
  public partial class MainWindow : Window
  {
    private SearchInfo searchInfo;
    private object lockList = new object();

    public MainWindow()
    {
      InitializeComponent();
      searchInfo = new SearchInfo();
      this.DataContext = searchInfo;

      BindingOperations.EnableCollectionSynchronization(
          searchInfo.List, lockList);
    }
Having looked at the advantages of the async and await keywords, the next section examines the programming foundation behind these keywords.
FOUNDATION OF ASYNCHRONOUS PROGRAMMING
The async and await keywords are just a compiler feature. The compiler creates code by using the Task class. Instead of using the new keywords, you could get the same functionality with C# 4 and methods of the Task class; it’s just not as convenient.
This section gives information about what the compiler does with the async and await keywords, an easy way to create an asynchronous method, how you can invoke multiple asynchronous methods in parallel, and how you can change a class that just offers the asynchronous pattern to use the new keywords.
Creating Tasks
Let’s start with the synchronous method Greeting, which takes a while before returning a string (code file Foundations/Program.cs):
    static string Greeting(string name)
    {
      Thread.Sleep(3000);
      return string.Format("Hello, {0}", name);
    }
To make such a method asynchronously, the method GreetingAsync is defined. The task-based asynchronous pattern specifies that an asynchronous method is named with the Async suffix and returns a task. GreetingAsync is defined to have the same input parameters as the Greeting method but returns Task<string>. Task<string>, which defines a task that returns a string in the future. A simple way to return a task is by using the Task.Run method. The generic version Task.Run<string>() creates a task that returns a string:
    static Task<string> GreetingAsync(string name)
    {
      return Task.Run<string>(() =>
        {
          return Greeting(name);
        });
    }
Calling an Asynchronous Method
You can call this asynchronous method GreetingAsync by using the await keyword on the task that is returned. The await keyword requires the method to be declared with the async modifier. The code within this method does not continue before the GreetingAsync method is completed. However, the thread that started the CallerWithAsync method can be reused. This thread is not blocked:
    private async static void CallerWithAsync()
    {
      string result = await GreetingAsync("Stephanie");
      Console.WriteLine(result);
    }
Instead of passing the result from the asynchronous method to a variable, you can also use the await keyword directly within parameters. Here, the result from the GreetingAsync method is awaited like in the previously code snippet, but this time the result is directly passed to the Console.WriteLine method:
    private async static void CallerWithAsync2()
    {
      Console.WriteLine(await GreetingAsync("Stephanie"));
}In the next section you’ll see what’s driving this await keyword. Behind the scenes, continuation tasks are used.
Continuation with Tasks
GreetingAsync returns a Task<string> object. The Task object contains information about the task created, and allows waiting for its completion. The ContinueWith method of the Task class defines the code that should be invoked as soon as the task is finished. The delegate assigned to the ContinueWith method receives the completed task with its argument, which allows accessing the result from the task using the Result property:
    private static void CallerWithContinuationTask()
    {
      Task<string> t1 = GreetingAsync("Stephanie");
      t1.ContinueWith(t =>
        {
          string result = t.Result;
          Console.WriteLine(result);
        });
    }
The compiler converts the await keyword by putting all the code that follows within the block of a ContinueWith method.
Synchronization Context
If you verify the thread that is used within the methods you will find that in both methods, CallerWithAsync and CallerWithContinuationTask, different threads are used during the lifetime of the methods. One thread is used to invoke the method GreetingAsync, and another thread takes action after the await keyword or within the code block in the ContinueWith method.
With a console application usually this is not an issue. However, you have to ensure that at least one foreground thread is still running before all background tasks that should be completed are finished. The sample application invokes Console.ReadLine to keep the main thread running until the return key is pressed.
With applications that are bound to a specific thread for some actions (e.g., with WPF applications, UI elements can only be accessed from the UI thread), this is an issue.
Using the async and await keywords you don’t have to do any special actions to access the UI thread after an await completion. By default the generated code switches the thread to the thread that has the synchronization context. A WPF application sets a DispatcherSynchronizationContext, and a Windows Forms application sets a WindowsFormsSynchronizationContext. If the calling thread of the asynchronous method is assigned to the synchronization context, then with the continuous execution after the await, by default the same synchronization context is used. If the same synchronization context shouldn’t be used, you must invoke the Task method ConfigureAwait(continueOnCapturedContext: false). An example that illustrates this usefulness is a WPF application in which the code that follows the await is not using any UI elements. In this case, it is faster to avoid the switch to the synchronization context.
Using Multiple Asynchronous Methods
Within an asynchronous method you can call not only one but multiple asynchronous methods. How you code this depends on whether the results from one asynchronous method are needed by another.
Calling Asynchronous Methods Sequentially
The await keyword can be used to call every asynchronous method. In cases where one method is dependent on the result of another method, this is very useful. Here, the second call to GreetingAsync is completely independent of the result of the first call to GreetingAsync. Thus, the complete method MultipleAsyncMethods could return the result faster if await is not used with every single method, as shown in the following example:
    private async static void MultipleAsyncMethods()
    {
      string s1 = await GreetingAsync("Stephanie");
      string s2 = await GreetingAsync("Matthias");
      Console.WriteLine("Finished both methods.
 " +
          "Result 1: {0}
 Result 2: {1}", s1, s2);
    }
Using Combinators
If the asynchronous methods are not dependent on each other, it is a lot faster not to await on each separately, and instead assign the return of the asynchronous method to a Task variable. The GreetingAsync method returns Task<string>. Both these methods can now run in parallel. Combinators can help with this. A combinator accepts multiple parameters of the same type and returns a value of the same type. The passed parameters are “combined” to one. Task combinators accept multiple Task objects as parameter and return a Task.
The sample code invokes the Task.WhenAll combinator method that you can await to have both tasks finished:
    private async static void MultipleAsyncMethodsWithCombinators1()
    {
      Task<string> t1 = GreetingAsync("Stephanie");
      Task<string> t2 = GreetingAsync("Matthias");
      await Task.WhenAll(t1, t2);
      Console.WriteLine("Finished both methods.
 " +
          "Result 1: {0}
 Result 2: {1}", t1.Result, t2.Result);
    }
The Task class defines the WhenAll and WhenAny combinators. The Task returned from the WhenAll method is completed as soon as all tasks passed to the method are completed; the Task returned from the WhenAny method is completed as soon as one of the tasks passed to the method is completed.
The WhenAll method of the Task type defines several overloads. If all the tasks return the same type, an array of this type can be used for the result of the await. The GreetingAsync method returns a Task<string>, and awaiting for this method results in a string. Therefore, Task.WhenAll can be used to return a string array:
    private async static void MultipleAsyncMethodsWithCombinators2()
    {
      Task<string> t1 = GreetingAsync("Stephanie");
      Task<string> t2 = GreetingAsync("Matthias");
      string[] result =  await Task.WhenAll(t1, t2);
      Console.WriteLine("Finished both methods.
 " +
          "Result 1: {0}
 Result 2: {1}", result[0], result[1]);
    }
Converting the Asynchronous Pattern
Not all classes from the .NET Framework introduced the new asynchronous method style with .NET 4.5. There are still many classes just offering the asynchronous pattern with BeginXXX and EndXXX methods and not task-based asynchronous methods as you will see when working with different classes from the framework.
First, let’s create an asynchronous method from the previously-defined synchronous method Greeting with the help of a delegate. The Greeting method receives a string as parameter and returns a string, thus a variable of Func<string, string> delegate is used to reference this method. According to the asynchronous pattern, the BeginGreeting method receives a string parameter in addition to AsyncCallback and object parameters and returns IAsyncResult. The EndGreeting method returns the result from the Greeting method—a string—and receives an IAsyncResult parameter. With the implementation just the delegate is used to make the implementation asynchronously.
    private static Func<string, string> greetingInvoker = Greeting;

    static IAsyncResult BeginGreeting(string name, AsyncCallback callback,
      object state)
    {
      return greetingInvoker.BeginInvoke(name, callback, state);
    }

    static string EndGreeting(IAsyncResult ar)
    {
      return greetingInvoker.EndInvoke(ar);
    }
Now the BeginGreeting and EndGreeting methods are available, and these should be converted to use the async and await keywords to get the results. The TaskFactory class defines the FromAsync method that allows converting methods using the asynchronous pattern to the TAP.
With the sample code, the first generic parameter of the Task type, Task<string>, defines the return value from the method that is invoked. The generic parameter of the FromAsync method defines the input type of the method. In this case the input type is again of type string. With the parameters of the FromAsync method, the first two parameters are delegate types to pass the addresses of the BeginGreeting and EndGreeting methods. After these two parameters, the input parameters and the object state parameter follow. The object state is not used, so null is assigned to it. Because the FromAsync method returns a Task type, in the sample code Task<string>, an await can be used as shown:
    private static async void ConvertingAsyncPattern()
    {
      string s = await Task<string>.Factory.FromAsync<string>(
        BeginGreeting, EndGreeting, "Angela", null);
      Console.WriteLine(s);
    }
ERROR HANDLING
Chapter 16, “Errors and Exceptions,” provides detailed coverage of errors and exception handling. However, in the context of asynchronous methods, you should be aware of some special handling of errors.
Let’s start with a simple method that throws an exception after a delay (code file ErrorHandling/Program.cs):
    static async Task ThrowAfter(int ms, string message)
    {
      await Task.Delay(ms);
      throw new Exception(message);
    }
If you call the asynchronous method without awaiting it, you can put the asynchronous method within a try/catch block—and the exception will not be caught. That’s because the method DontHandle has already completed before the exception from ThrowAfter is thrown. You need to await the ThrowAfter method, as shown in the following example:
    private static void DontHandle()
    {
      try
      {
        ThrowAfter(200, "first");
        // exception is not caught because this method is finished
        // before the exception is thrown
      }
      catch (Exception ex)
      {
        Console.WriteLine(ex.Message);
      }
}Handling Exceptions with Asynchronous Methods
A good way to deal with exceptions from asynchronous methods is to use await and put a try/catch statement around it, as shown in the following code snippet. The HandleOneError method releases the thread after calling the ThrowAfter method asynchronously, but it keeps the Task referenced to continue as soon as the task is completed. When that happens (which in this case is when the exception is thrown after two seconds), the catch matches and the code within the catch block is invoked:
    private static async void HandleOneError()
    {
      try
      {
        await ThrowAfter(2000, "first");
      }
      catch (Exception ex)
      {
        Console.WriteLine("handled {0}", ex.Message);
      }
    }
Exceptions with Multiple Asynchronous Methods
What if two asynchronous methods are invoked that each throw exceptions? In the following example, first the ThrowAfter method is invoked, which throws an exception with the message first after two seconds. After this method is completed, the ThrowAfter method is invoked, throwing an exception after one second. Because the first call to ThrowAfter already throws an exception, the code within the try block does not continue to invoke the second method, instead landing within the catch block to deal with the first exception:
    private static async void StartTwoTasks()
    {
      try
      {
        await ThrowAfter(2000, "first");
        await ThrowAfter(1000, "second"); // the second call is not invoked
                                          // because the first method throws
                                          // an exception
      }
      catch (Exception ex)
      {
        Console.WriteLine("handled {0}", ex.Message);
      }
    }
Now let’s start the two calls to ThrowAfter in parallel. The first method throws an exception after two seconds, the second one after one second. With Task.WhenAll you wait until both tasks are completed, whether an exception is thrown or not. Therefore, after a wait of about two seconds, Task.WhenAll is completed, and the exception is caught with the catch statement. However, you will only see the exception information from the first task that is passed to the WhenAll method. It’s not the task that threw the exception first (which is the second task), but the first task in the list:
    private async static void StartTwoTasksParallel()
    {
      try
      {
        Task t1 = ThrowAfter(2000, "first");
        Task t2 = ThrowAfter(1000, "second");
        await Task.WhenAll(t1, t2);
      }
      catch (Exception ex)
      {
        // just display the exception information of the first task
        // that is awaited within WhenAll
        Console.WriteLine("handled {0}", ex.Message);
      }
    }
One way to get the exception information from all tasks is to declare the task variables t1 and t2 outside of the try block, so they can be accessed from within the catch block. Here you can check the status of the task to determine whether they are in a faulted state with the IsFaulted property. In case of an exception, the IsFaulted property returns true. The exception information itself can be accessed by using Exception.InnerException of the Task class. Another, and usually better, way to retrieve exception information from all tasks is demonstrated next.
Using AggregateException Information
To get the exception information from all failing tasks, the result from Task.WhenAll can be written to a Task variable. This task is then awaited until all tasks are completed. Otherwise the exception would still be missed. As described in the last section, with the catch statement just the exception of the first task can be retrieved. However, now you have access to the Exception property of the outer task. The Exception property is of type AggregateException. This exception type defines the property InnerExceptions (not only InnerException), which contains a list of all the exceptions from the awaited for. Now you can easily iterate through all the exceptions:
    private static async void ShowAggregatedException()
    {
      Task taskResult = null;
      try
      {
        Task t1 = ThrowAfter(2000, "first");
        Task t2 = ThrowAfter(1000, "second");
        await (taskResult = Task.WhenAll(t1, t2));
      }
      catch (Exception ex)
      {
        Console.WriteLine("handled {0}", ex.Message);
        foreach (var ex1 in taskResult.Exception.InnerExceptions)
        {
          Console.WriteLine("inner exception {0}", ex1.Message);
        }
      }
    }
CANCELLATION
With background tasks that can run longer in some scenarios, it is useful to cancel the tasks. For cancellation, .NET offers a standard mechanism that has been available since .NET 4. This mechanism can be used with the task-based asynchronous pattern.
The cancellation framework is based on cooperative behavior; it is not forceful. A long-running task needs to check itself if it is canceled, in which case it is the responsibility of the task to cleanup any open resources and finish its work.
Cancellation is based on the CancellationTokenSource class, which can be used to send cancel requests. Requests are sent to tasks that reference the CancellationToken that is associated with the CancellationTokenSource. The following section looks at an example by modifying the AsyncPatterns sample created earlier in this chapter to add support for cancellation.
Starting a Cancellation
First, a variable cts of type CancellationTokenSource is defined with the private field members of the class MainWindow. This member will be used to cancel tasks and pass tokens to the methods that should be cancelled (code file AsyncPatterns/MainWindow.xaml.cs):
  public partial class MainWindow : Window
  {
    private SearchInfo searchInfo;
    private object lockList = new object();
    private CancellationTokenSource cts;
For a new button that can be activated by the user to cancel the running task, the event handler method OnCancel is added. Within this method, the variable cts is used to cancel the tasks with the Cancel method:
    private void OnCancel(object sender, RoutedEventArgs e)
    {
      if (cts != null)
        cts.Cancel();
    }
The CancellationTokenSource also supports cancellation after a specified amount of time. The method CancelAfter enables passing a value, in milliseconds, after which a task should be cancelled.
Cancellation with Framework Features
Now let’s pass the CancellationToken to an asynchronous method. Several of the asynchronous methods in the framework support cancellation by offering an overload whereby a CancellationToken can be passed. One example is the GetAsync method of the HttpClient class. The overloaded GetAsync method accepts a CancellationToken in addition to the URI string. The token from the CancellationTokenSource can be retrieved by using the Token property.
The implementation of the GetAsync method periodically checks whether the operation should be cancelled. If so, it does a cleanup of resources before throwing the exception OperationCanceledException. This exception is caught with the catch handler in the following code snippet:
    private async void OnTaskBasedAsyncPattern(object sender,
        RoutedEventArgs e)
    {
      cts = new CancellationTokenSource();
      try
      {
        foreach (var req in GetSearchRequests())
        {
          var client = new HttpClient();
          var response = await client.GetAsync(req.Url, cts.Token);
          string resp = await response.Content.ReadAsStringAsync();

          //...
        }
      }
      catch (OperationCanceledException ex)
      {
        MessageBox.Show(ex.Message);
      }
    }
Cancellation with Custom Tasks
What about custom tasks that should be cancelled? The Run method of the Task class offers an overload to pass a CancellationToken as well. However, with custom tasks it is necessary to check whether cancellation is requested. In the following example, this is implemented within the foreach loop. The token can be checked by using the IsCancellationRequsted property. If you need to do some cleanup before throwing the exception, it is best to verify that cancellation is requested. If cleanup is not needed, an exception can be fired immediately after the check, which is done with the ThrowIfCancellationRequested method:
          await Task.Run(() =>
          {
            var images = req.Parse(resp);
            foreach (var image in images)
            {
              cts.Token.ThrowIfCancellationRequested();
              searchInfo.List.Add(image);
            }
          }, cts.Token);
Now the user can cancel long-running tasks.
SUMMARY
This chapter introduced the async and await keywords that are new with C# 5. Having looked at several examples, you’ve seen the advantages of the task-based asynchronous pattern compared to the asynchronous pattern and the event-based asynchronous pattern available with earlier editions of .NET.
You’ve also seen how easy it is to create asynchronous methods with the help of the Task class, and learned how to use the async and await keywords to wait for these methods without blocking threads. Finally, you looked at the error-handling aspect of asynchronous methods.
For more information on parallel programming, and details about threads and tasks, see Chapter 21.
The next chapter continues with core features of C# and .NET and gives detailed information on memory and resource management.