
Chapter 45
Windows Workflow Foundation
WHAT’S IN THIS CHAPTER?
- Learning the different types of workflows that you can create
- Exploring descriptions of some of the built-in activities
- Creating custom activities
- Getting an overview of a workflow
WROX.COM CODE DOWNLOADS FOR THIS CHAPTER
The wrox.com code downloads for this chapter are found at http://www.wrox.com/remtitle.cgi?isbn=1118314425 on the Download Code tab. The code for this chapter is divided into the following major examples:
- Hello World
- Parallel Execution
- Pick Demo
- Custom Activities
- Args and Vars
- Workflow Application
- Workflow as Services
- Dynamic Update
- Designer Hosting
A WORKFLOW OVERVIEW
This chapter presents an overview of the Windows Workflow Foundation 4.5 (referred to as WF and Workflow throughout the rest of this chapter), which provides a model to define and execute processes using a set of building blocks called activities. WF provides a Designer that, by default, is hosted within Visual Studio, which enables you to drag and drop activities from the toolbox onto the design surface to create a workflow template.
This template can then be executed in a number of different ways, as explained throughout the chapter. As a workflow executes, it may need to access the outside world, and there are a couple of methods typically used that enable you to do this. In addition, a workflow may need to save and restore its state, for example, when a long wait is needed.
A workflow is constructed from a number of activities, and these activities are executed at runtime. An activity might send an e-mail, update a row in a database, or execute a transaction on a back-end system. A number of built-in activities can be used for general-purpose work, and you can also create your own custom activities and plug these into the workflow as necessary.
With Visual Studio 2012, there are now effectively two versions of Workflow with different types — the 3.x version, which shipped with the .NET Framework 3 (namespace System.Workflow and its subnamespaces, which is also used by SharePoint 2010), and the 4.x version (namespace System.Activities and its subnamespaces), which ships since the .NET Framework 4. This chapter concentrates on the latest version of Workflow, and we’ll begin with the canonical example that everyone uses when faced with a new technology — Hello World.
HELLO WORLD
Visual Studio 2012 contains built-in support to create workflow projects for both the 3.x and 4.x versions of the frameworks. When you open the New Project dialog, you see a list of workflow project types, as shown in Figure 45-1.
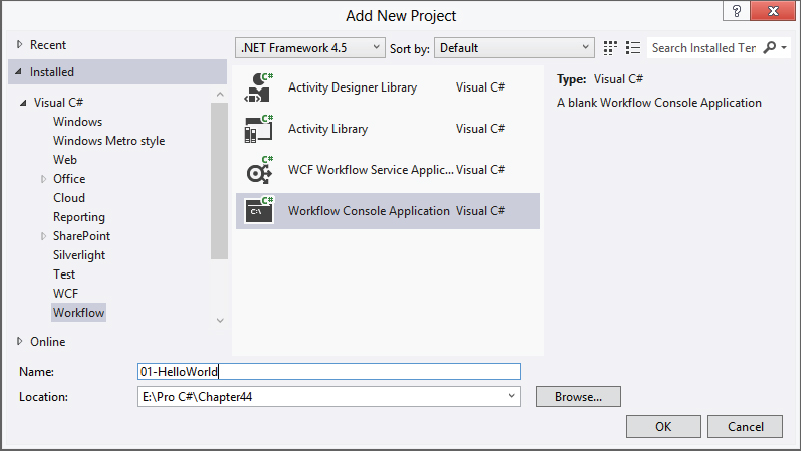
Ensure that you select .NET Framework 4 or 4.5 from the version combo box, and then choose Workflow Console Application from the available templates. This constructs a simple console application that includes a workflow template and also a main program, which executes this template.
Next, drag a WriteLine activity from the toolbox onto the design surface so that you have a workflow that looks like the one shown in Figure 45-2. The WriteLine activity is within the Primitives category of the toolbox.
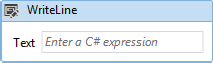
The WriteLine activity includes a Text property that you can set either on the design surface by simply entering text inline, or by displaying the property grid. Later in the section, “Custom Activities,” you see how to define your custom activities to use this same behavior.
The Text property is not just a simple string — it’s actually defined as an argument type that can use an expression as its source. Expressions are evaluated at runtime to yield a result, and it is this textual result that is used as the input to the WriteLine activity. To enter a simple text expression, you must use double quotation marks — so if you follow along with this in Visual Studio, type “Hello World” into the Text property. If you omit the quotation marks, you receive a compiler error because without quotation marks this is not a legal expression. The expression in 4.5 is a C# expression for C# projects — in version 4.0 the expression editor syntax was VB instead, which caused some confusion!
If you build and run the program, you see the output text on the console. When the program executes, an instance of the workflow is created in the Main method, which uses a static method of the WorkflowInvoker class to execute the instance. The code for this example is available in the Chapter45 solution in the 01-HelloWorld project.
The WorkflowInvoker class enables you to synchronously invoke a workflow. There are two other methods of workflow execution that execute workflows asynchronously, which you see later in the section “Workflow Application.” Synchronous execution was possible in Workflow 3.x but was somewhat more difficult to set up, and there was a lot more overhead.
The synchronous nature of WorkflowInvoker makes it ideal for running short-lived workflows in response to some UI action — you could use a workflow here to enable or disable some elements of the UI.
ACTIVITIES
Everything in a workflow is an activity, including the workflow itself. The term workflow is actually a synonym for a collection of activities; there is no actual Workflow class in version 4.x (there was in 3.x). An activity is just a class that ultimately derives from the abstract Activity class.
The class hierarchy is somewhat deeper than that defined for WF 3.x, and the main classes are defined in Figure 45-3.
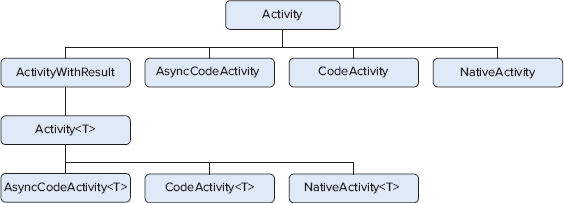
The Activity class is the root for all workflow activities, and typically you derive custom activities from the second tier. To create a simple activity like the WriteLine activity previously mentioned, you would derive from CodeActivity because this class has just enough functionality for your write line clone to function. Activities that execute and return some form of a result should derive from the ActivityWithResult class — you should use the generic Activity<TResult> class here because that provides a strongly typed Result property.
Deciding which base class to derive from can be the main battle when constructing custom activities, and you see examples in this chapter to assist with choosing the right base class.
For an activity to do something, it typically overrides the Execute method, which has a number of different signatures depending on the base class chosen. These signatures are shown in the following table.
| BASE CLASS | EXECUTE METHOD |
| AsyncCodeActivity | IAsyncResult BeginExecute(AsyncCodeActivityContext, AsyncCallback, object ) |
| void EndExecute(AsyncCodeActivityContext, IAsyncResult) | |
| CodeActivity | void Execute ( CodeActivityContext ) |
| NativeActivity | void Execute ( NativeActivityContext ) |
| AsyncCode Activity<TResult> | IAsyncResult BeginExecute(AsyncCodeActivityContext, AsyncCallback, object) |
| TResult EndExecute(AsyncCodeActivityContext, IAsyncResult) | |
| CodeActivity<TResult> | TResult Execute ( CodeActivityContext ) |
| NativeActivity<TResult> | void Execute ( NativeActivityContext ) |
Here you may notice that the parameters passed into the Execute methods differ in that there are type-specific execution context parameters used. In WF 3.x, there was a single class used (the ActivityExecutionContext); however, in WF 4.x you can use different contexts for different classes of activity.
The main difference is that the CodeActivityContext (and by derivation the AsyncCodeActivityContext) has a limited set of functionality compared with the NativeActivityContext. This means that activities deriving from CodeActivity and AsyncCodeActivity can do far less with their container. For example, the WriteLine activity presented earlier needs to write only to the console. Therefore, it doesn’t need access to its runtime environment. A more complex activity might need to schedule other child activities or communicate with other systems, in which case you must derive from NativeActivity to access the full runtime. You revisit this topic when you create your own custom activities.
Numerous standard activities are provided with WF, and the following sections provide examples of some of these together with scenarios in which you might use these activities. WF 4.x uses three main assemblies” System.Activities.dll, System.Activities.Core.Presentation.dll, and System.Activities.Presentation.dll.
If Activity
As its name implies, this activity acts like an If-Else statement in C#. When you drop an If onto the design surface, you see an activity, as shown in Figure 45-4. The If is a composite activity that contains two child activity placeholders, one for the Then part and one for the Else part.
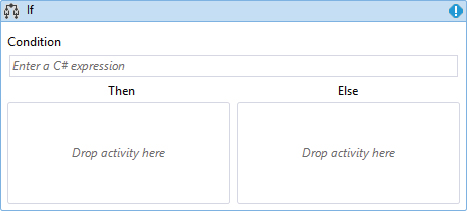
The If activity (refer to Figure 45-4) also includes a glyph indicating that there is a validation error with the activity; in this instance it is saying that the Condition property needs to be defined. This condition is evaluated when the activity is executed. If it returns True, the Then branch executes; otherwise the Else branch will be called.
The Condition property is an expression that evaluates to a Boolean value, so you can include any expression here that is valid.
An expression can reference any variables defined in the workflow and also access many static classes available in the .NET framework. So you could, for example, define an expression based on the Environment.Is64BitOperatingSystem value, if that were crucial to some part of your workflow. Naturally, you can define arguments that are passed into the workflow and that can then be evaluated by an expression inside an If activity. Arguments and variables are covered in the section, “Arguments and Variables.”
InvokeMethod Activity
This is one of the most useful activities in the box because it enables you to execute code that already exists and effectively wrap that code within the execution semantics of a workflow. It’s typical to have a lot of preexisting code, and this activity enables you to call that code directly from within a workflow.
There are two ways that you can use InvokeMethod to call code; which method you use depends on whether you want to call a static method or an instance method. If you call a static method, you need to define the TargetType and the MethodName parameters. However if you call an instance method, the TargetObject and MethodName properties are used. In this instance the TargetObject could be created inline, or it could be a variable defined somewhere within the workflow. The example code in the 02-ParallelExecution sample shows both modes to use the InvokeMethod activity.
If you need to pass arguments to the method you’re invoking, you can define these using the Parameters collection. The order of the parameters in the collection must match the order of the parameters to the method. In addition, there is a Result property set to the return value of the function call. You can bind this to a variable within the workflow to use the value as appropriate.
Parallel Activity
The Parallel activity is rather poorly named because, at first sight, you might think that on a multiprocessor machine this activity would schedule its children in true parallel; however, that isn’t the case apart from some special circumstances.
After you drop a Parallel activity onto the design surface, you can then drop in other subordinate activities, as shown in Figure 45-5.

These child activities can be singular activities, as in Figure 45-5, or they can form a composite activity, such as a Sequence or another Parallel activity.
At runtime, the Parallel activity schedules each immediate child for execution. The underlying runtime execution engine then schedules these children in a first in, first out (FIFO) manner, thereby providing the illusion of parallel execution; however, they run only on a single thread.
To include true parallel execution, the activities you drop into the Parallel activity must be derived from the AsyncCodeActivity class. The sample code in 02_ParallelExecution includes an example that shows how to asynchronously process code within two branches of a Parallel activity. Figure 45-6 shows the use of two InvokeMethod activities within a Parallel activity.
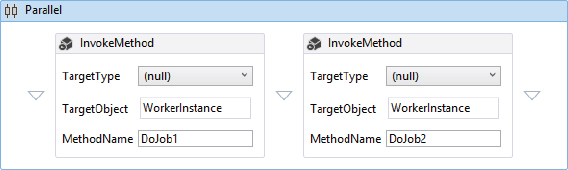
The InvokeMethod activities used here call two simple methods, DoJob1 and DoJob2, which sleep for 2 and 3 seconds, respectively. To run these methods asynchronously, there is one final change needed. The InvokeMethod activity has a Boolean RunAsynchronously property that defaults to False. Setting this in the UI to True then calls the target method asynchronously, thereby enabling the Parellel activity to execute more than one activity at the same time. With a uniprocessor machine, two threads can execute, giving the illusion of simultaneous execution; however, on a multiprocessor machine, these threads may be scheduled on different cores, thereby providing true parallel execution. If you create your own activities, it is worthwhile creating these as asynchronous activities because then the end user can get the benefits of true parallel execution.
Delay Activity
Business processes often need to wait for a period before completing. Consider using a workflow for expense approval. Your workflow might send an e-mail to your immediate manager asking him to approve your expense claim. The workflow then enters a waiting state in which it waits for approval (or horror of horrors, rejection). But it would also be nice to define a timeout so that if no response is returned within, say, one day, the expense claim is then routed to the next manager up the chain of command.
The Delay activity can form part of this scenario. (The other part is the Pick activity defined in the next section.) Its job is to wait for a predefined time before continuing execution of the workflow.
The Delay activity contains a Duration property, which can be set to a discrete TimeSpan value, but because it is defined as an expression, this value could be linked to a variable within the workflow or computed from some other values as required.
When a workflow is executed, it enters an Idle state, in which it runs a Delay activity. Workflows that are idle are candidates for persistence — this is where the workflow instance data is stored within a persistent medium (such as an SQL Server database), and the workflow can then be unloaded from memory. This conserves system resources because only running workflows need to be in memory at any given time. Any workflows delayed will be persisted to disk.
Pick Activity
A common programming construct is to wait for one of a set of possible events — one example of this is the WaitAny method of the WaitHandle class in the System.Threading namespace. The Pick activity is the way to do this in a workflow because it can define any number of branches, and each branch can wait for a trigger action to occur before running. After a trigger has been fired, the other activities within that branch execute.
As a concrete example, consider the expense claims procedure outlined in the previous section. Here, you have a Pick activity with three branches: one to deal with accepted claims, one to deal with rejected claims, and a third to deal with a timeout.
The example is available in the 03_PickDemo code in the download. This contains a sample workflow consisting of a Pick activity and three branches. When it is run, you are prompted to accept or reject the claim. If 10 seconds or more elapses, it closes this prompt and runs the delay branch instead.
In the example, the DisplayPrompt activity is used as the first activity in the workflow. This calls a method defined on an interface that would prompt the manager for approval or rejection. Because this functionality is defined as an interface, the prompt could be an e-mail, an IM message, or any other manner of notifying your manager that an expense claim needs to be processed. The workflow then executes the Pick, which awaits input from this external interface (either an approval or a rejection) and also waits on a delay.
When the pick executes, it effectively queues a wait on the first activity in each branch, and when one event is triggered, this cancels all other waiting events and then processes the rest of the branch where the event was raised. So, in the instance in which the expense report is approved, the WaitForAccept activity completes, and then the next action is to write out a confirmation message. If, however, your manager rejects the claim, the WaitForReject activity completes, and in the example this then outputs a rejection message.
Lastly, if neither the WaitForAccept nor WaitForReject activities completes, the WaitForTimeout ultimately completes after its delay expires, and the expense report could then be routed to another manager — potentially looking up that person in Active Directory. In the example, a dialog displays to the user when the DisplayPrompt activity executes, so if the delay executes, you also need to close the dialog, which is the purpose of the activity named ClosePrompt in Figure 45-7.

Some concepts used in that example have not been covered yet — such as how to write custom activities or waiting on external events; however, these topics are covered in the section, “Custom Activities.”
CUSTOM ACTIVITIES
So far, you have used activities defined within the System.Activities namespace. In this section, you learn how to create custom activities and extend these activities to provide a good user experience at both design time and runtime.
To begin, you create a DebugWrite activity that can be used to output a line of text to the console in debug builds. Although this is a trivial example, it will be expanded to show the full gamut of options available for custom activities using this example. When creating custom activities, you can simply construct a class within a workflow project; however, it is preferable to construct your custom activities inside a separate assembly because then your activities will be reusable. For this reason, you should create a simple class library project to construct your custom activities within. The code for this example is available in the 04_CustomActivities project.
A simple activity, such as the DebugWrite activity, will be derived directly from the CodeActivity base class. The following code shows a constructed activity class and defines a Message property that displays when the activity executes (code file 04_CustomActivities/Activities/DebugWrite.cs):
using System;
using System.Activities;
using System.Diagnostics;
namespace Activities
{
public class DebugWrite : CodeActivity
{
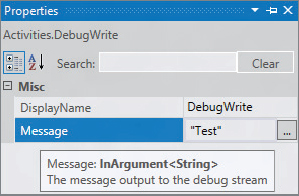
[Description("The message output to the debug stream")]
public InArgument<string> Message { get; set; }
protected override void Execute(CodeActivityContext context)
{
Debug.WriteLine(Message.Get(context));
}
}
}When a CodeActivity is scheduled for execution, its Execute method is called — this is where the activity actually needs to do something.
In the example, you defined the Message property, which looks like a regular .NET property; however, its usage inside the Execute method may be unfamiliar. One of the many changes made in WF 4 is where state data is stored. Within WF 3.x, it was common to use standard .NET properties and store activity data within the activity. The problem with that method was that this storage was effectively opaque to the workflow runtime engine. so to persist a workflow, you need to perform binary persistence on all constructed activities to faithfully restore their data.
With WF 4, all data is stored outside of the individual activities — so the model here is that to get the value of an argument, you ask the context for the value, and to set the value of an argument, you provide the new value to the context. In this way the workflow engine can track changes to state as the workflow executes and potentially store only the changes between persistence points rather than the entire workflow data.
The [Description] attribute defined on the Message property is used within the property grid in Visual Studio to provide extra information about the property, as shown in Figure 45-8.
As it stands, the activity is perfectly usable; however, several areas should be addressed to make this more user-friendly. As you have seen with activities such as the Pick earlier in the chapter, an activity may have some mandatory properties that, when not defined, produce an error glyph on the design surface. To get the same behavior from your activity, you need to extend the code.
Activity Validation
When an activity is placed on the design surface, the Designer looks in two places for validation information. The simplest form of validation is to add a [RequiredArgument] attribute to the argument property. If the argument is not defined, the exclamation mark glyph is shown to the right of the activity name, as in Figure 45-9.
If you hover over the glyph, a tooltip displays that states Value for a Required Activity Argument “Message” Was Not Supplied. This is a compilation error, so you need to define a value for this argument before you can execute your application.
In the case where multiple properties may be related, you can override the CacheMetadata method to add on some extra validation code. This method is called prior to the activity being executed; within it you can check that mandatory arguments are defined and optionally add extra metadata to the passed argument. You can also add extra validation errors (or warnings) by calling one of the AddValidationError overrides on the CodeActivityMetadata object passed to the CacheMetadata method.
Now that you have completed the activity validation, the next thing to do is to change the rendering behavior of the activity because the current Designer experience is provided for you, and it could be made more interesting.
Designers
When an activity is rendered onscreen, it is typical to associate a designer with the activity. The job of the designer is to provide the onscreen representation of that activity, and in WF this representation is done in XAML. If you haven’t used XAML before to create user interfaces, look at Chapter 35, “Core WPF,” before continuing.
The design-time experience for an activity is typically created in a separate assembly from the activity because this design experience is unnecessary at runtime. Visual Studio includes an Activity Designer Library project type that is an ideal starting point because when you create a project using this template, you’re provided with a default activity designer that you can then alter as appropriate.
Within the XAML for your designer, you can provide anything you want — including animations. Less is usually more for user interfaces, so look at the preexisting activities to understand what is appropriate.
First, create a simple designer and associate this with the DebugWrite activity. The code that follows (code file 04_CustomActivities/Activities.Design/DebugWriteDesigner.xaml) shows the template created for you when you add an activity designer to your project (or when you construct a new activity designer library project):
<sap:ActivityDesigner x:Class="Activities.<Presentation.DebugWriteDesigner"
    xmlns="http://schemas.microsoft.com/winfx/2006/xaml/presentation"
    xmlns:x="http://schemas.microsoft.com/winfx/2006/xaml"
    xmlns:sap="clr-namespace:System.Activities.Presentation;
               assembly=System.Activities.Presentation"
    xmlns:sapv="clr-namespace:System.Activities.Presentation.View;
                assembly=System.Activities.Presentation">
  <Grid>
  </Grid>
</sap:ActivityDesigner>
The XAML created simply constructs a grid and also includes some imported namespaces, which may be needed by your activity. Obviously, there is little content within the template, so to begin add in a label and a text box that can define the message.
<Grid>
  <Grid.ColumnDefinitions>
    <ColumnDefinition Width="Auto"/>
    <ColumnDefinition Width="*"/>
  </Grid.ColumnDefinitions>
  <TextBlock Text="Message" Margin="0,0,5,0"/>
  <TextBox Text="{Binding Path=ModelItem.Message, Mode=TwoWay}"
    Grid.Column="1"/>
</Grid>
The XAML here constructs a binding between the Message property of the activity and the text box. Within the designer XAML, you can always reference the activity being designed by using the ModelItem reference.
To associate the designer previously defined with the DebugWrite activity, you also need to alter the activity and add on a Designer attribute. (You can also implement the IRegisterMetadata interface, which isn’t covered further in this chapter.)
[Designer("Activities.Presentation.DebugWriteDesigner, Activities.Presentation")]
public class DebugWrite : CodeActivity
{
    ...
}
Here, you used the [Designer] attribute to define the link between the designer and the activity. It’s good practice to use the string version of this attribute because that ensures that there is no reference to the design assembly within the activity assembly.
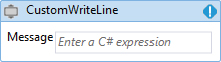
Now when you use an instance of the DebugWrite activity within Visual Studio, you see something like Figure 45-10.
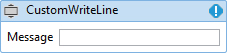
The problem with this, however, is the Message property. It’s not showing the value defined within the property grid, and if you try to set a value by typing it into the text box, you receive an exception. The reason is that you’re trying to bind a simple text value to an InArgument<string> type, and to do that, you need to use another couple built-in classes that come with WF: the ExpressionTextBox and the ArgumentToExpressionConverter. The full XAML for the designer is now as follows. You can see the lines that have been added or modified in boldface.
<sap:ActivityDesigner x:Class="Activities.Presentation.DebugWriteDesigner"
  xmlns="http://schemas.microsoft.com/winfx/2006/xaml/presentation"
  xmlns:x="http://schemas.microsoft.com/winfx/2006/xaml"
  xmlns:sap="clr-namespace:System.Activities.Presentation;
      assembly=System.Activities.Presentation"
  xmlns:sapv="clr-namespace:System.Activities.Presentation.View;
      assembly=System.Activities.Presentation"
  xmlns:sadc="clr-namespace:System.Activities.Presentation.Converters;
      assembly=System.Activities.Presentation">
  <sap:ActivityDesigner.Resources>
    <sadc:ArgumentToExpressionConverter x:Key="argConverter"/>
  </sap:ActivityDesigner.Resources>
  <Grid>
    <Grid.ColumnDefinitions>
      <ColumnDefinition Width="Auto"/>
      <ColumnDefinition Width="*"/>
    </Grid.ColumnDefinitions>
    <TextBlock Text="Message" Margin="0,0,5,0" />
    <sapv:ExpressionTextBox Grid.Column="1"
      Expression="{Binding Path=ModelItem.Message, Mode=TwoWay,
                   Converter={StaticResource argConverter},
                   ConverterParameter=In}"
                   OwnerActivity="{Binding ModelItem}"/>
  </Grid>
</sap:ActivityDesigner>
You included a new namespace in the file: the System.Activities.Presentation.View. This includes the converter used to convert between an expression onscreen and the Message property of the activity. This is the ArgumentToExpressionConverter, which has been added to the resources of the XAML file.
Then replace the standard TextBox control with an ExpressionTextBox. This control enables the user to enter expressions and simple text, so the DebugWrite activity could include an expression combining many values from the running workflow, rather than just a simple text string. With those changes in place, the activity behaves more like the built-in activities.
If you upgrade a solution from .NET 4 to .NET 4.5, you might be surprised to see Enter a VB Expression in any expression text boxes that you have in your activities for existing workflows, and Enter a C# Expression in any new workflows you create. WF 4.5 has an attribute defined in the XAML that if absent shows the VB expression prompt. If you look at the XAML for a new workflow, you can see the following directive.
sap:2010:ExpressionActivityEditor.ExpressionActivityEditor="C#"If this is omitted, the VB expression displays. Needless to say, working out this foible of WF 4.5 cost me a lot of time!
Custom Composite Activities
A common requirement with activities is to create a composite activity — that is, an activity that contains other child activities. You have already seen examples, such as the Pick activity and the Parallel activity. The execution of a composite activity is entirely up to the programmer — you could, for example, have a random activity that schedules only one of its children, or an activity that bypasses some children based on the current day of the week. The simplest execution pattern would be to execute all children, but as the developer you can decide how child activities are executed and also when your activity is complete.
This example creates a “retry” activity. It is quite common to try an operation, and if it fails, retry it a number of times before having it fail. The pseudo-code for this activity is as follows:
int iterationCount = 0;
bool looping = true;
while ( looping )
{
  try
  {
    // Execute the activity here
    looping = false;
  }
  catch (Exception ex)
  {
    iterationCount += 1;
    if ( iterationCount >= maxRetries )
      rethrow;
  }
}
You need to replicate the preceding code as an activity and insert the activity you want to execute where the comment is placed. You might consider doing this all within the Execute method of a custom activity. However, there is another way: You can code the whole lot using other activities. Create a custom activity that contains a “hole” into which the end user can place the activity that will be retried, and then a maximum retry count property. The code that follows shows how to do this (code file 04_CustomActivities/Activities/Retry.cs):
  public class Retry : Activity
  {
    public Activity Body { get; set; }
    [RequiredArgument]
    public InArgument<int> NumberOfRetries { get; set; }
    public Retry()
    {
      Variable<int> iterationCount =
        new Variable<int> ( "iterationCount", 0 );
      Variable<bool> looping = new Variable<bool> ( "looping", true );
      this.Implementation = () =>
      {
        return new While
        {
          Variables = { iterationCount, looping },
          Condition = new VariableValue<bool> { Variable = looping },
          Body = new TryCatch
          {
            Try = new Sequence
            {
              Activities =
              {
                this.Body,
                new Assign
                {
                  To = new OutArgument<bool> ( looping ),
                  Value = new InArgument<bool> { Expression = false }
                }
              }
            },
            Catches =
            {
              new Catch<Exception>
              {
                Action = new ActivityAction<Exception>
                {
                  Handler = new Sequence
                  {
                    Activities =
                    {
                      new Assign
                      {
                        To = new OutArgument<int>(iterationCount),
                        Value = new InArgument<int>
                          (ctx => iterationCount.Get(ctx) + 1)
                      },
                      new If
                      {
                        Condition = new InArgument<bool>
                          (env=>iterationCount.Get(env) >=
                            NumberOfRetries.Get(env)),
                        Then = new Rethrow()
                      }
                    }
                  }
                }
              }
            }
          }
        };
      };
    }
  }
Phew!
First, you defined a Body property of type Activity, which is the activity executed within the retry loop. Then define the RetryCount property, which is used to define the number of times the operation will be tried.
This custom activity derives directly from the Activity class and provides the implementation as a function. When a workflow is executed that contains this activity, it effectively executes the function, which provides a runtime execution path similar to the pseudo-code defined earlier. Within the constructor, create the local variables used by the activity and then construct a set of activities that matches the pseudo-code. The code for this example is also available in the 04_CustomActivities solution.
From the preceding code, you can infer that you can create workflows without XAML — there is no design experience (that is, you can’t drag and drop activities to generate code). However, if code is what you prefer, there’s no reason not to use it instead of XAML.
Now that you have the custom composite activity, you also need to define a designer. What’s needed here is an activity that has a placeholder into which you can drop another activity. If you look at other standard activities, there are several that exhibit a similar behavior, such as the If and Pick activities. Ideally, you would like the activity to work in a similar manner to the built-in activities, so it’s time to look at their implementations.
If you use Reflector to poke around inside the workflow libraries, you’ll find a distinct lack of any designer XAML. This is because it’s been compiled into the assemblies as a set of resources. You can use Reflector to look at these resources, and the current version (v7.5) includes the capability to decompile BAML resources so that you can read them.
In Reflector, load up the System.Activities.Presentation assembly, and then navigate to the Resources node in the treeview and open out System.Activites.Presentation.g.resources. This presents you with a list of all the BAML resources in the currently loaded assemblies, and you can then look at an appropriate sample to see some sample XAML.
The author used this method to learn about the XAML that was used for the built-in activities, which helped to construct the example for the Retry activity shown in Figure 45-11.

The key to this activity is the WorkflowItemPresenter class, which is used in the XAML to define the placeholder for the child activity. This is defined as follows:
<sap:WorkflowItemPresenter IsDefaultContainer="True"
     AllowedItemType="{x:Type sa:Activity}"
     HintText="Drop an activity here" MinWidth="100" MinHeight="60"
     Item="{Binding Path=ModelItem.Body, Mode=TwoWay}"
     Grid.Column="1" Grid.Row="1" Margin="2">
This control is bound to the Body property of the Retry activity, and the HintText defines the help text shown when no child activity has been added to the control. The XAML also includes some styles used to show the expanded or contracted version of the designer — this ensures that the activity works the same way as the built-in activities. All the code and XAML for this example is available in the 04_CustomActivities solution.
WORKFLOWS
Up to this point, the chapter has concentrated on activities but has not discussed workflows. A workflow is simply a list of activities, and indeed a workflow is just another type of activity. Using this model simplifies the runtime engine because the engine needs to know how to execute one type of object — that being anything derived from the Activity class.
You’ve already seen the WorkflowInvoker class, which can execute a workflow synchronously, but as mentioned at the time this is only one of the ways that a workflow can be executed. There are three different options for executing workflows, and each has different capabilities. Before getting into the other methods to execute workflows, you must delve into arguments and variables.
Arguments and Variables
A workflow can be considered a program, and one of the facets of any programming language is the capability to create variables and pass arguments into and out of that program. Naturally, WF supports both constructs, and this section shows you how you can define both arguments and variables.
To begin, assume that the workflow processes an insurance policy, so a likely argument to pass to the workflow would be the policy ID. To define an argument to a workflow, you need to go into the Designer and click the Arguments button on the bottom left. This brings up a list of arguments defined for the workflow, as shown in Figure 45-12, and here you can also add your own.

To define an argument, you need to specify the Name, Direction (which can be In, Out, or InOut) and the data type for that argument. You can optionally specify a default value, which will be used if the argument is not provided.
The direction of the argument is used to define whether the argument is expected as an input to the workflow, as an output from the workflow, or in the case of the InOut direction, as both an input and output.
The first section of this chapter described using the WorkflowInvoker class to execute a workflow. You can use several overrides of the Invoke method to pass arguments into the workflow. They are passed as a dictionary of name/value pairs, where the name must match the argument’s name exactly — this match is case-sensitive. The following code passes a PolicyId value into a workflow (code file 05_ArgsAndVars/Program.cs):
Dictionary<string, object> parms = new Dictionary<string, object>();
parms.Add("PolicyId", 123);
WorkflowInvoker.Invoke(new PolicyFlow(), parms);
This then invokes the workflow and passes the PolicyId from the dictionary to the named parameter. If you supply a name in the dictionary for which an argument does not exist, then an ArgumentException will be thrown. Conversely, if you don’t supply the value for an In argument, no exception is thrown. This is the wrong way around — you would expect an argument exception to be thrown for any In arguments that were not defined and would prefer no exception to be thrown if you passed in too many arguments.
When a workflow completes, you may want to retrieve output arguments. To do this, there is a specific override of the WorkflowInvoker.Invoke method that returns a dictionary. This dictionary contains just the Out or InOut arguments.
Within the workflow, you may then want to define variables. This wasn’t easy to do in XAML workflows in WF 3.x; however, in WF 4 this has been addressed, and you can easily define parameters in the XAML.
As in any programming language, workflow variables have the notion of scope. You can define “globally” scoped variables by defining them on the root activity of the workflow. These variables are available by all activities within the workflow, and their lifetime is tied to that of the workflow.
You can also define variables on individual activities, and in this case these variables are only available to the activity that the variable is defined on and also children of that activity. After an activity has completed, its variables go out of scope and are no longer accessible.
WorkflowApplication
Although WorkflowInvoker is a useful class for synchronous execution of workflows, you might need to have long-running workflows that may persist to a database and need to be rehydrated at some point in the future. If that’s the case then you might want to use the WorkflowApplication class.
The WorkflowApplication class is similar to the WorkflowRuntime class that existed in Workflow 3 in that it enables you to run a workflow and also respond to events that occur on that workflow instance. Probably the simplest program you can write to use the WorkflowApplication class is shown here:
WorkflowApplication app = new WorkflowApplication(new Workflow1());
ManualResetEvent finished = new ManualResetEvent(false);
app.Completed = (completedArgs) => { finished.Set(); };
app.Run();
finished.WaitOne();
This constructs a workflow application instance and then hooks up to the Completed delegate of that instance to set a manual reset event. The Run method is called to start the workflow execution, and lastly the code waits for the event to be triggered.
This shows one of the main differences between WorkflowExecutor and WorkflowApplication — the latter is asynchronous. When you call Run, the system uses a thread pool thread to execute the workflow rather than the calling thread. Thus, you need some form of synchronization to ensure that the application hosting the workflow doesn’t exit before the workflow completes.
A typical long-running workflow may have many periods when it is dormant — the execution behavior for most workflows can best be described as periods of episodic execution. There is typically some work done at the start of the workflow; then it waits on some input or a delay. After this input has been received, it processes up to the next wait state.
So, when a workflow is dormant, it would be ideal to unload it from memory and only reload it when an event triggers the workflow to continue. To do this, you need to add an InstanceStore object to the WorkflowApplication and also make some other minor alterations to the preceding code. There is one implementation of the abstract InstanceStore class in the framework — the SqlWorkflowInstanceStore. To use this class, you first need a database, and the scripts for this can be found by default in the C:WindowsMicrosoft.NETFramework64v4.0.30319SQLen directory. Note that the version number is subject to change.
You can find a number of SQL files in this directory, but the two you need are: SqlWorkflowInstanceStoreSchema.sql and SqlWorkflowInstanceStoreLogic.sql. You can run these against an existing database or create an entirely new database as appropriate, and you can use a full SQL server installation or an SQL Express installation.
After you have a database, you need to make some alterations to the hosting code. First, you need to construct an instance of the SqlWorkflowInstanceStore and then add this to the workflow application (code file 06_WorkflowApplication/Program.cs)
SqlWorkflowInstanceStore store = new SqlWorkflowInstanceStore
  (ConfigurationManager.ConnectionStrings["db"].ConnectionString);
AutoResetEvent finished = new AutoResetEvent(false);
WorkflowApplication app = new WorkflowApplication(new Workflow1());
app.Completed = (e) => { finished.Set(); };
app.PersistableIdle = (e) => { return PersistableIdleAction.Unload; };
app.InstanceStore = store;
app.Run();
finished.WaitOne();
The bold lines are those added to the previous example. You can also notice that the addition of an event handler to the PersistableIdle delegate on the workflow application. When a workflow executes, it runs as many activities as it can, until there is no more work to do. At that point, it transitions to an Idle state, and an idle workflow is a candidate for persistence. The PersistableIdle delegate determines what should happen to an idle workflow. The default is to do nothing; however, you can also specify PersistableIdleAction.Persist, which can take a copy of the workflow and store that in the database but still leave the workflow in memory, or you can specify PersistableIdleAction.Unload, which persists and then unloads the workflow.
You can also request persistence of a workflow by using the Persist activity, and indeed as a custom activity writer, you can also request persistence if you have derived from NativeActivity by calling the RequestPersist method of the NativeActivityContext.
You now have a problem — you have the ability to unload a workflow from memory and store it in the persistence store, but as yet you haven’t described how to retrieve it from the store and get it to execute again.
Bookmarks
The traditional use of a bookmark is to mark a page in a book, so you can resume reading from the same point. In the context of a workflow, a bookmark specifies a place in which you would like to resume running that workflow, and bookmarks are typically used when you’re waiting for external input.
For example, you might write an application that deals with insurance quotes. An end user might go online to produce a quotation, and as you can imagine, there would be a workflow associated with that quotation. The quotation might be valid for only 30 days, so you would like to invalidate the quote after that point. Similarly, you might request proof of a no-claims discount and cancel the policy if that proof didn’t arrive within a specified time. This workflow then has a number of periods of execution, and other times when it is dormant and could be unloaded from memory. Before being unloaded, however, you must define a point in the workflow where processing can be resumed, and this is where bookmarks are used.
To define a bookmark, you need a custom activity that derives from NativeActivity (code file 06_Workflow Application/CustomActivities/Task.cs). You can then create a bookmark within the Execute method, and when the bookmark has been resumed, your code continues. The example activity defines a simplistic Task activity that creates a bookmark, and on resumption at the point of that bookmark, the activity completes.
  public class Task : NativeActivity<Boolean>
  {
    [RequiredArgument]
    public InArgument<string> TaskName { get; set; }
    protected override bool CanInduceIdle
    {
      get { return true; }
    }
    protected override void Execute(NativeActivityContext context)
    {
      context.CreateBookmark(TaskName.Get(context),
        new BookmarkCallback(OnTaskComplete));
    }
    private void OnTaskComplete(NativeActivityContext context,
        Bookmark bookmark, object state)
    {
      bool taskOK = Convert.ToBoolean(state);
      this.Result.Set(context, taskOK);
    }
  }
The call to CreateBookmark passes the name of the bookmark and also a callback function. This callback executes when the bookmark resumes. The callback is passed an arbitrary object, which in this case is a Boolean because you decided that each task should report success or failure, and you can then use this to decide on the next steps in the workflow. There’s nothing to stop you from passing any object into the workflow — it could be a complex type with many fields.
So that’s the activity written; you now need to alter the hosting code to resume at the point of the bookmarks. But there’s another problem. How does the hosting code know that a workflow has created a bookmark? If it’s the host’s responsibility to resume from the bookmark, it needs to know that one exists.
The Task you created needs to do some more work — telling the outside world that a task has been created. In a production system, this would typically result in an entry being stored in a queue table, and this queue would be presented to the call center staff as a job list.
Communicating with the host is the subject of the next section.
Extensions
An extension is simply a class or interface added to the runtime context of a workflow application. In WF 3.x these were called Services; however, that clashed with WCF Services, so these have been renamed extensions in WF 4.
You typically define an interface for your extensions and then provide a runtime implementation of this interface. Your activities simply call the interface, and this allows the implementation to change as necessary. A good example of an extension is something that sends an e-mail. You could create a SendEmail activity that calls the extension within its Execute method, and then you can define an SMTP-based e-mail extension or an Exchange-based outlook extension to actually send the e-mail at runtime. Your activity wouldn’t need to be changed to use any e-mail provider — you can just plug in a new one by altering the application configuration file.
For the task sample, you need an extension that will be notified when the Task activity is about to wait at its bookmark. This could write the name of the bookmark and other pertinent information into a database so that a task queue could then be presented to the user. Use the following interface to define this extension (code file 06_WorkflowApplication/SharedInterfaces/ITaskExtension.cs):
public interface ITaskExtension
{
    void ExecuteTask(string taskName);
}
The task activity can then be updated to notify the task extension that it’s executing by modifying the Execute method as follows (code file 06_WorkflowApplication/CustomActivities/Task.cs):
protected override void Execute(NativeActivityContext context)
{
    context.CreateBookmark(TaskName.Get(context),
        new BookmarkCallback(OnTaskComplete));
    context.GetExtension<ITaskExtension>().
        ExecuteTask(TaskName.Get(context));
}
The context object passed to the Execute method is queried for the ITaskExtension interface and then the code calls the ExecuteTask method. The WorkflowApplication maintains a collection of extensions, so you can create a class that implements this extension interface, which can then be used to maintain the list of tasks. You could then construct and execute a new workflow, and each task would then notify the extension when it was executed. Some other process might look at the task list and present this to the end user.
To keep things simple in the sample code, you created just one workflow instance. This instance contains a Task activity followed by an If, which outputs a message according to whether the user accepts or rejects the task.
Putting It All Together
Now you can run, persist, and unload a workflow, and also deliver events into that workflow via bookmarks; the last part reloads the workflow. When using WorkflowApplication, you can call Load and pass through the unique ID of the workflow. Every workflow has a unique ID that can be retrieved from the WorkflowApplication object by calling the Id property. So, in pseudo-code, the workflow-hosting application is as follows (code file 06_WorkflowApplication/Program.cs):
WorkflowApplication app = BuildApplication();
Guid id = app.Id;
app.Run();
// Wait for a while until a task is created, then reload the workflow
app = BuildApplication();
app.Load(id);
app.ResumeBookmark()
The sample code provided is more complex than the preceding because it also includes an implementation of the ITaskExtension interface, but the code follows the earlier pattern. You may notice two calls to the BuildApplication method. This is one used in the code to construct a WorkflowApplication instance and to set up all required properties, such as the InstanceStore and the delegates for Completed and PersistableIdle. After the first call, execute the Run method. This begins execution of a new instance of the workflow.
The second time the application is loaded is after a persistence point, so by that point the workflow has been unloaded; hence, the application instance is also essentially dead. Then construct a new WorkflowApplication instance, but instead of calling Run, call the Load method, which uses the persistence provider to load up an existing instance from the database. This instance is then resumed by calling the ResumeBookmark function.
If you run the example, you see a prompt onscreen. Although that prompt is there, the workflow is persisted and unloaded, and you can check this by running SQL Server Management Studio and executing the command, as shown in Figure 45-13.
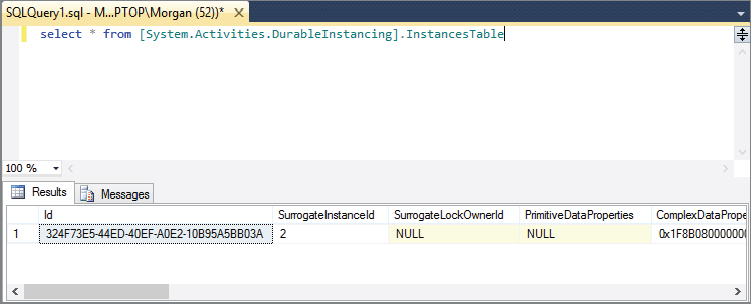
Workflow instances are stored within the InstancesTable of the System.Activities.DurableInstancing schema. The entry shown in Figure 45-13 is the persisted instance of the workflow running on the author’s machine.
When you continue the workflow will eventually complete, and at that point the workflow will be deleted from the instances table because there’s an option on the instance store exposed as the InstanceCompletionAction, which by default is set to be DeleteAll. This ensures that any data stored in the database for a given workflow instance will be deleted after that workflow completes. This is a sensible default because after a workflow completes, you would normally not expect any data to hang around. You can change this option when you define the instance store by setting the instance completion action to DeleteNothing.
If you now continue running the test application and then retry the SQL command from Figure 45-13, the workflow instance has been deleted.
Hosting WCF Workflows
As previously mentioned there were three ways to host workflows — the last is to use the WorkflowServiceHost class, which exposes a workflow through WCF. One of the major areas that Workflow is destined to be used for is as the backend to WCF services. If you think about what a typical WCF service does, it’s usually a bunch of related methods typically called in some sort of order. The main problem here is that you could call these methods in any order, and usually you need to define the ordering so that, for example, the order details are not uploaded before the order.
With Workflow you can easily expose WCF services that also have a notion of method ordering. The main classes you use here are the Receive and the Send activities. In the code for this example (which is available in the 07_WorkflowsAsServices solution), the scenario used is an estate agent (a Realtor if you’re in the US) who wants to upload information about a property to a website.
You can host workflows using WCF in two ways: either explicitly in your code by constructing an instance of WorkflowServiceHost (much like the regular WCF ServiceHost class). But you can also construct a service as a .xamlx file in which case the workflow will most likely be exposed using IIS or WAS. This option is used in the sample, but it’s worth knowing that you can do this all manually if you need to.
This example also showcases two new features of WF 4.5, the first is that you use a State Machine workflow, and the second is that the implementation of this workflow uses a WCF service contract that has been defined in a contract-first manner. The State Machine workflow type was missing in .NET 4 but has made a welcome return in the latest version of the framework, and it’s a good fit for the example you write here. Figure 45-14 shows an overview of the state-machine that you create in this sample.
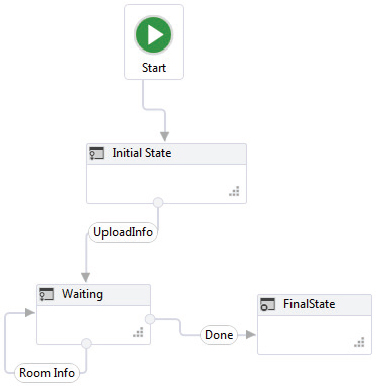
With a state-machine you have a start state, any number of intermediate states, and an optional end state. In addition to the states, there are also transitions, which await an event (typically an activity receiving some input) and then transition the state-machine to another state.
The state-machine works by waiting for a transition activity to complete. This then moves the state-machine into a new state. On entry to a state, you can call an activity, and on exit from a state, you can also execute an activity. The state-machine then waits for one of the transitions to complete and moves into the new state.
In the previous diagram the first state is marked as “Initial State”. That has just one transition that waits for a message to come in over WCF. After this message has been received, the state-machine then moves to the “Waiting” state, which has two transitions. These map to the two operations that are then available on the WCF interface; either the user can send up details of a room, or they can indicate that the data upload is complete. The WCF service used in this example is modeled as follows (code file 07_WorkflowsAsServices/SharedInterfaces/IPropertyInformation.cs):
[ServiceContract(Namespace="http://www.morganskinner.com")]
public interface IPropertyInformation
{
    [OperationContract()]
    Guid UploadPropertyInformation(string ownerName, string address, float price);

    [OperationContract(IsOneWay=true)]
    void UploadRoomInformation(Guid propertyId, string roomName, float width,
      float length);

    [OperationContract(IsOneWay = true)]
    void DetailsComplete(Guid propertyId);
}
The UploadPropertyInformation call is the start of the state machine. This effectively creates a new workflow instance, transitions the state machine to the “Waiting” state and then awaits either a call to UploadRoomInformation or DetailsComplete.
To use an existing WCF service contract in WF, you need to display the context menu for a Workflow project and select the Import Service Contract item from the menu. This constructs activities for each operation in the service contract. If you want to see these activities, click the Show All Files toolbar button, and expand the ServiceContracts item for the current project in Visual Studio. This shows the service contract name (in the example, IPropertyInformation), and then show the activities that were automatically generated, as shown in Figure 45-15.

This shows that three activities have been created from the service contract, and these are subsequently used in the workflow to implement the service contract.
Correlation
The other important topic to understand with WCF workflows is how to make a call from the client and that call can find the right workflow instance on the server. If you look at the WCF service interface, you need to make a call to the server to initiate an upload using the UploadPropertyInformation operation.
This operation returns a unique ID, and this ID is passed back on the subsequent calls to UploadRoomInformation and DetailsComplete. To do this, Workflow has the concept of Correlation, which, simply put, enables you to use an arbitrary piece of information (or indeed, pieces of information) to route a call to the correct workflow instance. In the first call you return this ID, and as long as you use the same ID on the next call to the workflow, that is enough to find the correct workflow instance to route that message to.
To have correlation work you need two things: a CorrelationHandle and a correlation initializer. The handle is simply a variable that you defined with a suitable scope (that is, outside of all activities that need it). The correlation initializer defines what item(s) are used either in the incoming or outgoing messages to uniquely identify one workflow instance from another.
In the example there is a CorrelationHandle defined as a variable on the root activity in the workflow. Then in the UploadInfo transition, there is a Receive/Send pair. The Receive has its CanCreateInstance property set to True, which tells Workflow that when the client calls the server, it is this operation that is permitted to be first in the chain of execution of a workflow. The Receive activity can read any data from the parameters passed to the service call (and store these away for later in the workflow if appropriate).
The Send activity used here sets up the correlation to the unique ID created within the workflow. In this case it uses an XPath expression, as shown in Figure 45-16, to extract the Guid sent back to the user as the return value of the UploadPropertyInformation method.

Now that you have effectively associated the workflow instance with this ID, you can use correlation again to allow subsequent calls to one of the other methods on the service contract, and these can find the right workflow instance as correlation is used here again, in this case to extract a value from the parameters passed to the operation(s) that process data on the server side. This is powerful; in Workflow 3.x you could use only the inbuilt Workflow Instance ID; however, in 4.x you can choose any unique parts of the data to allow a client call to find the right workflow instance.
Similarly, you can correlate on different data during the life of the workflow. So, you might return a Guid from the first call but then return a unique integer key from subsequent method invocations.
Calling Workflow Services
With a Workflow hosted as a .xamlx file, you need some way to call that workflow. This is the same as calling any standard WCF service in that you need to add a reference to that service. In this case the service is not addressed by a URL that ends in a .svc file, but instead it’s a URL that ends with the .xamlx workflow definition.
The client can then interact with the service by making WCF calls. The only difference here is that a Workflow won’t accept any call on that WCF interface at all times. The operation(s) that are valid at any specific time are dependent on the state of the workflow. When you initially call the workflow, you use the UploadPropertyInformation call, which due to the receiver of that call having its CanCreateInstance property set to true allows a new workflow instance to be created.
Then you can call either of the other methods on the interface because these are what the workflow instance is now awaiting.
The code download for this example includes a proxy class similar to that created with an add service reference. The author tends to create these in code because the process is more intuitive than using add service reference and also better to support a large development team, where a service interface can often change. Using the method here that change needs to be made only in one place, rather than regenerating multiple service references in multiple projects.
The code then creates an instance of this proxy class as follows:
PropertyInformationClient client = new PropertyInformationClient("state");This uses an endpoint defined within the app.config:
<endpoint address="http://localhost:1353/StateService.xamlx"
          binding="basicHttpBinding"
          contract="SharedInterfaces.IPropertyInformation"
          name="state"/>
Here as you can see the address of the service ends with .xamlx, which indicates that the service is a Workflow rather than a standard WCF service.
Workflow Versioning
Because a workflow can be persisted and potentially run for a long time, you need a way to change a workflow. For example, consider a workflow that deals with insurance renewals. An instance of this workflow might run for every new policy taken out, and 10 months from the time the policy was taken out it might reactivate to then send out a renewal quotation, and, depending on the response from the customer, send out a reminder or two.
Now say that you implement a new customer contact mechanism that enables you to send text messages to inform customers of their renewal. What would you do with all the workflows already in the database?
Before WF 4.5 there were only two options and neither was particularly palatable. The first option was to ignore the change for any existing workflows and implement the change only in new workflow instances. The other was to cancel all existing instances and restart them. Neither of these options are what you would ideally like to do, and WF 4.5 adds a couple of new capabilities that can help in this area.
Dynamic Update
The Dynamic Update feature enables a persisted workflow instance to be changed to apply some new functionality to that workflow. There are several steps to undertake to update a workflow, which can be broken into two phases.
The first phase prepares to update your persisted workflows. Here you use the new DynamicUpdateServices class by calling the PrepareForUpdate method as shown in the following code. Then you alter the workflow as appropriate, such as adding new activities. The example has a new WriteLine activity and adds this to the end of the current workflow. After all changes have been made, you can then call the CreateUpdateMap method, which returns an instance of the DynamicUpdateMap class, which is used when loading existing instances to update them to the new workflow definition (code file 08_DynamicUpdate/Program.cs):
Activity workflowDefinition = GetInitialWorkflow();
DynamicUpdateServices.PrepareForUpdate(workflowDefinition);

// Now update the workflow - add in a new activity
Sequence seq = workflowDefinition as Sequence;
seq.Activities.Add(new WriteLine { Text = "Second version of workflow" });

// And then after all the changes, create the map
return DynamicUpdateServices.CreateUpdateMap(workflowDefinition);
You can use an update map repeatedly to update workflow instances, which is why the author mentions there are two phases, the second being loading up existing workflows and upgrading them. The following snippet shows how you could load an existing workflow instance and use the upgrade map previously created to update that instance.
SqlWorkflowInstanceStore store = new SqlWorkflowInstanceStore(
  ConfigurationManager.ConnectionStrings["db"].ConnectionString);
WorkflowApplicationInstance instance = WorkflowApplication.GetInstance(id, store);
WorkflowApplication app = new WorkflowApplication(GetUpdatedWorkflow());
app.Load(instance, map);
app.Unload();
Here the GetUpdatedWorkflow method loads the new workflow definition, and the existing instance data is loaded into this new workflow definition using the map object to indicate how to move persistence data between the existing and new activities. As the workflow persistence data contains only the data and not the workflow definition, upgrading is merely an act to move persistence information between nodes in the workflow.
After a workflow has been upgraded, it must run against the new workflow definition. And to simplify the task to know what version a workflow is within the database, there is the new WorkflowIdentity class, which can be attached to a WorkflowApplication when the application is created. This information forms part of the persistence information of a workflow and can be accessed using the DefinitionIdentity property of the WorkflowApplicationInstance class. You could use this to iterate through all workflows in the persistence store to find which have been upgraded and which need to be altered.
Side-by-Side Workflows
When hosting workflows using the WorkflowApplication class, you can now include a WorkflowIdentity object, which allows you to associate version information with a workflow definition so that when that workflow is persisted to the database, the version information is also persisted. Then, when reading persisted workflow instances back from the database, you can find workflows of a given version so that you can map the runtime workflow definition in the persisted state of the workflow in the database.
To load and resume any workflow instance, the WorkflowApplication that hosts that workflow must have been initialized with the specific workflow definition used to create the workflow place. By reading the version information prior to resuming the workflow, you can use this to map to a specific workflow definition.
In addition, this versioning support has also been extended to workflows hosted using the WorkflowServiceHost class. When hosting versioned workflows with WorkflowServiceHost, you need to specify version information in the DefinitionIdentity property of the workflow service.
These additions make workflow a much better option than it was previously, especially for business processes that might span weeks or months. Over the longer term it is much more likely that changes will need to be made. Although making those changes is a nontrivial matter, at least you now have the option.
Hosting the Designer
Often people save the best until last. Keeping with that tradition, that’s what is done in this chapter. The Workflow Designer used within Visual Studio can also be hosted within your own application, allowing your end users to create their own workflows without a copy of Visual Studio in sight. This is the best feature of WF 4 by far. Traditional application extension mechanisms always require some form of developer — either to write an extension DLL and plug it into the system somewhere, or by writing macros or scripts. Windows Workflow enables end users to customize an application simply by dragging and dropping activities onto a design surface.
Rehosting the designer in Workflow 3.x was not for the faint-hearted; however, in WF 4 it became almost trivial. The Designer is a WPF control, so you can use a WPF project as the main application. The code for this example is available in the 09_DesignerRehosting project.
The first thing you need to do is to include the workflow assemblies, and then you need to define the main window XAML. Use the Model-View-ViewModel (MVVM) pattern when constructing WPF user interfaces because it simplifies the coding and also ensures that you can drape different XAML over the same view model if necessary. The XAML for the main window is as follows (code file 09_DesignerRehosting/MainWindow.xaml):
<Window x:Class="HostApp.MainWindow"
        xmlns="http://schemas.microsoft.com/winfx/2006/xaml/presentation"
        xmlns:x="http://schemas.microsoft.com/winfx/2006/xaml"
        Title="MainWindow">
  <Grid>
    <Grid.RowDefinitions>
      <RowDefinition Height="Auto"/>
      <RowDefinition Height="*"/>
    </Grid.RowDefinitions>
    <Menu IsMainMenu="True">
      <MenuItem Header="_File">
        <MenuItem Header="_New" Command="{Binding New}"/>
        <MenuItem Header="_Open" Command="{Binding Open}"/>
        <MenuItem Header="_Save" Command="{Binding Save}"/>
        <Separator/>
        <MenuItem Header="_Exit" Command="{Binding Exit}"/>
      </MenuItem>
      <MenuItem Header="Workflow">
        <MenuItem Header="_Run" Command="{Binding Run}"/>
      </MenuItem>
    </Menu>
    <Grid Grid.Row="1">
      <Grid.ColumnDefinitions>
        <ColumnDefinition Width="*"/>
        <ColumnDefinition Width="4*"/>
        <ColumnDefinition Width="*"/>
      </Grid.ColumnDefinitions>
      <ContentControl Content="{Binding Toolbox}" />
      <ContentControl Content="{Binding DesignerView}"
        Grid.Column="1"/>
      <ContentControl Content="{Binding PropertyInspectorView}"
        Grid.Column="2"/>
    </Grid>
  </Grid>
</Window>
It is a simple layout with a main menu and then a grid that defines placeholders for the toolbox, designer, and property grid. You can notice that everything is bound including the commands.
The ViewModel created consists of properties for each of the main UI elements: the Toolbox, Designer, and Property Grid. In addition to these properties, there are also properties for each command, such as New, Save, and Exit (code file 09_DesignerRehosting/ViewModel.cs):
public class ViewModel : BaseViewModel
{
    public ViewModel()
    {
        // Ensure all designers are registered for inbuilt activities
        new DesignerMetadata().Register();
    }
    public void InitializeViewModel(Activity root)
    {
        _designer = new WorkflowDesigner();
        _designer.Load(root);
        this.OnPropertyChanged("DesignerView");
        this.OnPropertyChanged("PropertyInspectorView");
    }
    public UIElement DesignerView
    {
        get { return _designer.View; }
    }
    public UIElement ProperttInspectorView
    {
        get { return _designer.PropertyInspectorView; }
    }
    private WorkflowDesigner _designer;
}
To begin, the ViewModel class derives from BaseViewModel. This base class is one that you use every time you construct a view model because it provides an implementation of INotifyPropertyChanged. It comes from a set of snippets written by Josh Twist and is available on www.thejoyofcode.com.
The constructor ensures that the metadata for all the built-in activities is registered. Without this call, none of the type specific designers show up on the user interface. Within the InitializeViewModel method, you then construct an instance of the Workflow Designer and load an activity into it. The WorkflowDesigner class is curious in that, after you load one workflow into it, you cannot load another. So here you re-create this class whenever a new workflow is created.
The last thing that the InitializeViewModel method does is to call the property change notification function to indicate to the user interface that both the DesignerView and PropertyInspectorView are updated. As the UI is bound to these properties, they will be requeried and will load the new values from the new Workflow Designer instance.
The next part of the user interface that needs to be created is the toolbox. In Workflow 3.x you had to construct this control yourself; however, in WF 4 there is a ToolboxControl, which is trivially easy to use (code file 09_DesignerRehosting/ViewModel.cs):
    public UIElement Toolbox
    {
      get
      {
        if (null == _toolbox)
        {
          _toolbox = new ToolboxControl();
          ToolboxCategory cat = new ToolboxCategory
            ("Standard Activities");
          cat.Add(new ToolboxItemWrapper(typeof(Sequence),
            "Sequence"));
          cat.Add(new ToolboxItemWrapper(typeof(Assign), "Assign"));
          _toolbox.Categories.Add(cat);
          ToolboxCategory custom = new ToolboxCategory("Custom Activities");
          custom.Add(new ToolboxItemWrapper(typeof(Message), "MessageBox"));
          _toolbox.Categories.Add(custom);
        }
        return _toolbox;
      }
    }
Here, you construct the toolbox control and then add two toolbox items to the first category and one toolbox item to a second category. The ToolboxItemWrapper class is used to simplify the code needed to add a given activity to the toolbox.
With that code in place, you have a functioning application — well almost. All you need to do now is wire up the ViewModel with the XAML. This is done in the constructor for the main window.
    public MainWindow()
    {
      InitializeComponent();
      ViewModel vm = new ViewModel();
      vm.InitializeViewModel(new Sequence());
      this.DataContext = vm;
    }
Here, you construct the view model, and, by default, add in a Sequence activity so that something displays onscreen when the application runs.
The only part missing now is some commands. We use a DelegateCommand class to write ICommand-based commands for WPF because then you can find the code in the view model is easy to understand. The commands are fairly trivial to implement because is evident by the New command shown here:
    public ICommand New
    {
      get
      {
        return new DelegateCommand(unused =>
        {
          InitializeViewModel(new Sequence());
        });
      }
    }
This command is bound to the New menu item, so when that is clicked, the delegate is executed, and in this instance that simply calls the InitializeViewModel method with a new Sequence activity. Because this method also raises the property change notification for the designer and the property grid, these are updated, too.
The Open command is a little more involved but not much:
    public ICommand Open
    {
      get
      {
        return new DelegateCommand(unused =>
        {
          OpenFileDialog ofn = new OpenFileDialog();
          ofn.Title = "Open Workflow";
          ofn.Filter = "Workflows (*.xaml)|*.xaml";
          ofn.CheckFileExists = true;
          ofn.CheckPathExists = true;
          if (true == ofn.ShowDialog())
            InitializeViewModel(ofn.FileName);
        });
      }
    }
Here, you use another override of InitializeViewModel, which in this instance takes a filename rather than an activity. You’ve not seen this code, but it is available in the code download. This command displays an OpenFileDialog, and when one is chosen, it loads the workflow into the Designer. There is a corresponding Save command, which calls the WorkflowDesigner.Save method to store the workflow XAML on disk. If you run the application now, you see a window that looks like that in Figure 45-17.

The last section of code in the view model is the Run command. It wouldn’t be much good designing workflows without executing them, so you can include this facility in the view model as well. It’s fairly trivial — the Designer includes a Text property, which is the XAML representation of the activities within the workflow. All you need to do is convert this into an Activity and then execute that using the WorkflowInvoker class.
    public ICommand Run
    {
      get
      {
        return new DelegateCommand(unused =>
        {
          Activity root = _designer.Context.Services.
            GetService<ModelService>().Root.
            GetCurrentValue() as Activity;
          WorkflowInvoker.Invoke(root);
        },
        unused => { return !HasErrors; }
        );
      }
    }

    public bool HasErrors
    {
      get { return (0 != _errorCount); }
    }

    public void ShowValidationErrors(IList<ValidationErrorInfo> errors)
    {
      _errorCount = errors.Count;
      OnPropertyChanged("HasErrors");
    }
    private int _errorCount;
The author butchered the preceding code to fit it into the space on the page because the first line of the delegate command that retrieves the root activity from the designer is long, to say the least. All you then need to do is use the WorkflowInvoker.Invoke method to execute the workflow.
The command infrastructure within WPF includes a way to disable commands if they cannot be accessed, and that’s the second Lambda function on the DelegateCommand. This function returns the value of HasErrors, a Boolean property that has been added to the view model. This property indicates whether any validation errors have been found within the workflow because the view model implements the IValidationErrorService, which is notified whenever the valid state of the workflow changes.
You could extend the sample to expose this list of validation errors on the user interface as necessary — and you probably want to add in some more activities to the toolbox because you won’t get far with just three activities.
SUMMARY
Windows Workflow offers a radical change in the way that you construct applications. You can now surface complex parts of an application as activities and permit users to alter the processing of the system simply by dragging and dropping activities into a workflow.
You can apply workflow to almost all applications — from the simplest command-line tool to the most complex system containing many hundreds of modules. Before you might have needed a developer to write an extension module for a system, but now you can provide a simple and extensible customization mechanism that almost anyone can use. As an application vendor, you would have provided the custom activities that interacted with your system, and you would also have provided the code in the application that called the workflows, but you can now leave it up to your customers to define what they want to happen when an event occurs in the application.
WF 3.x has now been largely superseded by WF 4, and if you plan to use workflow for the first time, start with this version and bypass Workflow 3.x entirely.