
Chapter 47
Message Queuing
WHAT’S IN THIS CHAPTER?
- Message Queuing architecture
- Using Message Queuing administrative tools
- Creating Message Queues programmatically
- Sending and receiving messages
- Course order sample application
- Using Message Queuing with WCF
WROX.COM CODE DOWNLOADS FOR THIS CHAPTER
You can find the wrox.com code downloads for this chapter http://www.wrox.com/remtitle.cgi?isbn=1118314425 on the Download Code tab.
- Working with Queues
- Create Message Queue
- Find Queues
- Open Queues
- Send Messages
- Receive Messages
- Course Order Sample
- Sender
- Receiver
- WCF Course Order Sample
- Sender
- Receiver
OVERVIEW
System.Messaging is a namespace that includes classes for reading and writing messages with the Message Queuing facility of the Windows operating system. You can use messaging in a disconnected scenario in which the client and server don’t need to run at the same time.
This chapter gives you information about the architecture and usage scenarios of Message Queuing, and then you dive into the classes from the System.Messaging namespace to create queues, and send and receive messages. You see how to deal with getting answers from the server with acknowledgment and response queues, and also how to use message queuing with a WCF message queuing binding.
Before diving into programming Message Queuing, this section discusses the basic concepts of messaging and compares it to synchronous and asynchronous programming. With synchronous programming, when a method is invoked, the caller must wait until the method completes. With asynchronous programming, the calling thread starts the method that runs concurrently. Asynchronous programming can be done with delegates, class libraries that already support asynchronous methods (for example, web service proxies, System.Net, and System.IO classes), or by using custom threads and tasks (see Chapter 21, “Tasks, Threads, and Synchronization”). With both synchronous and asynchronous programming, the client and the server must run at the same time.
Although Message Queuing operates asynchronously, because the client (sender) does not wait for the server (receiver) to read the data sent to it, there is a crucial difference between Message Queuing and asynchronous programming: Message Queuing can be done in a disconnected environment. At the time data is sent, the receiver can be offline. Later, when the receiver goes online, it receives the data without intervention from the sending application.
You can compare connected and disconnected programming with talking to someone on the phone and sending an e-mail. When talking to someone on the phone, both participants must be connected at the same time; the communication is synchronous. With an e-mail, the sender isn’t sure when the e-mail will be dealt with. People using this technology work in a disconnected mode. Of course the e-mail may never be dealt with — it may be ignored. That’s in the nature of disconnected communication. To avoid this problem, you can ask for a reply to confirm that the e-mail has been read. If the answer doesn’t arrive within a time limit, you may be required to deal with this “exception.” This is also possible with Message Queuing.
You can think of Message Queuing as e-mail for application-to-application communication, instead of person-to-person communication. Message Queuing offers a lot of features not available with mailing services, such as guaranteed delivery, transactions, confirmations, express mode using memory, and so on. As you see in the next section, Message Queuing has a lot of features useful for communication between applications.
With Message Queuing, you can send, receive, and route messages in a connected or disconnected environment. Figure 47-1 shows a simple way to use messages. The sender sends messages to the message queue, and the receiver receives messages from the queue.

When to Use Message Queuing
One case in which Message Queuing is useful is when the client application is often disconnected from the network, for example, when a salesperson visits a customer onsite. The salesperson can enter order data directly at the customer’s site. The application sends a message for each order to the message queue located on the client’s system (see Figure 47-2). As soon as the salesperson is back in the office, the order is automatically transferred from the message queue of the client system to the message queue of the target system, where the message is processed.
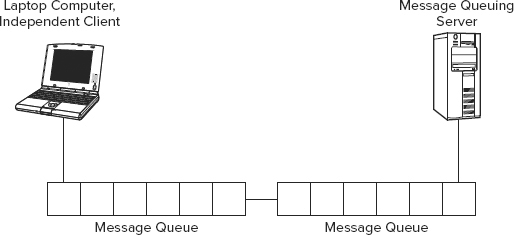
In addition to using a laptop, the salesperson could use a smaller device where Message Queuing is available.
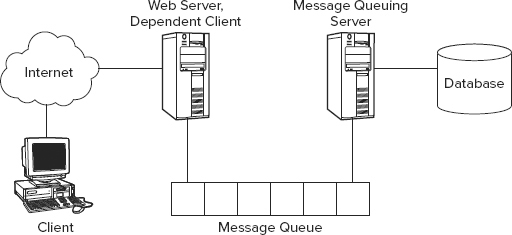
Message Queuing can also be useful in a connected environment. Imagine an e-commerce site (see Figure 47-3) where the server is fully loaded with order transactions at certain times, for example, early evening and weekends, but the load is low at nighttime. A solution would be to buy a faster server or to add additional servers to the system so that the peaks can be handled. But there’s a cheaper solution: Flatten the peak loads by moving transactions from the times with higher loads to the times with lower loads. In this scheme, orders are sent to the message queue, and the receiving side reads the orders at the rates that are useful for the database system. The load of the system is now flattened over time so that the server dealing with the transactions can be less expensive than an upgrade of the database server(s).
Message Queuing Features
Message Queuing is part of the Windows 8 operating system. The main features of this service follow:
- Messages can be sent in a disconnected environment. It is not necessary for the sending and receiving applications to run at the same time.
- With express mode, messages can be sent quickly. Express-mode messages are just stored in memory.
- For a recoverable mechanism, messages can be sent using guaranteed delivery. Recoverable messages are stored within files and are delivered even in cases when the server reboots.
- Message queues can be secured with access-control lists to define which users can send or receive messages from a queue. Messages can also be encrypted to avoid network sniffers reading them. Messages can be sent with priorities so that high-priority items are handled faster.
- Message Queuing 3.0 supports sending multicast messages.
- Message Queuing 4.0 supports poison messages. A poison message is one that isn’t getting resolved. You can define a poison queue where unresolved messages are moved. For example, if the job after reading the message from the normal queue were to insert it into the database, but the message did not get into the database and thus this job failed, it would get sent to the poison queue. It is someone’s job to handle the poison queue — and that person should deal with the message in a way that resolves it.
- Message Queuing 5.0 supports more secure authentication algorithms and can handle a larger number of queues. (Message Queuing 4.0 had performance problems with several thousand queues.)
The remainder of this chapter discusses how to use these features.
MESSAGE QUEUING PRODUCTS
Message Queuing 5.0 is part of Windows since Windows 7 and Windows Server 2008 R2. Windows 2000 was delivered with Message Queuing 2.0, which didn’t have support for the HTTP protocol and multicast messages. Message Queuing 3.0 is part of Windows XP and Windows Server 2003. Message Queuing 4.0 is part of Windows Vista and Windows Server 2008.
When you use the link Turn Windows Features On or Off in Configuring Programs and Features of Windows 8, there is a separate section for Message Queuing options. With this section, you can select these components:
- Microsoft Message Queue (MSMQ) Server Core: Required for base functionality with Message Queuing.
- Active Directory Domain Services Integration: Message queue names are written to the Active Directory. With this option, you can find queues with the Active Directory integration and secure queues with Windows users and groups.
- MSMQ HTTP Support: Enables you to send and receive messages using the HTTP protocol.
- Triggers: Applications can be instantiated on the arrival of a new message.
- Multicast Support: A message can be sent to a group of servers.
- MSMQ DCOM Proxy: A system can connect to a remote server by using the DCOM API.
When Message Queuing is installed, the Message Queuing service (see Figure 47-4) must be started. This service reads and writes messages and communicates with other Message Queuing servers to route messages across the network.

MESSAGE QUEUING ARCHITECTURE
With Message Queuing, messages are written to and read from a message queue. Messages and message queues have several attributes that must be further elaborated.
Messages
A message is sent to a message queue. The message includes a body containing the data that is sent and a label that is the title of the message. Any information can be put into the body of the message. With .NET, several formatters convert data to be put into the body. In addition to the label and the body, the message includes more information about the sender, timeout configuration, transaction ID, or priority.
Message queues have several types of messages:
A normal message is sent by an application.
An acknowledgment message reports the status of a normal message. Acknowledgment messages are sent to administration queues to report success or failure when sending normal messages.
Response messages are sent by receiving applications when the original sender requires some special answer.
A report message is generated by the Message Queuing system. Test messages and route-tracking messages belong to this category.
A message can have a priority that defines the order in which the messages will be read from the queue. The messages are sorted in the queue according to their priority, so the next message read in the queue is the one with the highest priority.
Messages have two delivery modes: express and recoverable. Express messages are delivered quickly because memory is used only for the message store. Recoverable messages are stored in files at every step along the route until the message is delivered. This way, delivery of the message is ensured, even with a computer reboot or network failure.
Transactional messages are a special version of recoverable messages. With transactional messaging, it is guaranteed that messages arrive only once and in the same order that they were sent. Priorities cannot be used with transactional messages.
Message Queue
A message queue is a storage bin for messages. You can find messages stored on disk in the <windir>system32msmqstorage directory.
Public or private queues are usually used for sending messages, but other queue types also exist:
A public queue is published in the Active Directory. Information about these queues is replicated across Active Directory domains. You can use browse and search features to get information about these queues. A public queue can be accessed without knowing the name of the computer where it is placed. You can also move such a queue from one system to another without the client knowing it. You cannot create public queues in a Workgroup environment because the Active Directory is needed.
Private queues are not published in the Active Directory. You can only access these queues when the full pathname to the queue is known. You can use private queues in a Workgroup environment.
Journal queues keep copies of messages after they have been received or sent. Enabling journaling for a public or private queue automatically creates a journal queue. With journal queues, two different queue types are possible: source journaling and target journaling. Source journaling is turned on with the properties of a message; journal messages are stored with the source system. Target journaling is turned on with the properties of a queue; these messages are stored in the journal queue of the target system.
Dead-letter queues store messages if a message doesn’t arrive at the target system before a specific timeout is reached. Contrary to synchronous programming where errors are immediately detected, errors must be dealt with differently using Message Queuing. The dead-letter queue can be checked for messages that didn’t arrive.
Administration queues contain acknowledgments for messages sent. The sender can specify an administration queue from which it receives notification of whether the message was sent successfully.
A response queue is used if more than a simple acknowledgment is needed as an answer from the receiving side. The receiving application can send response messages back to the original sender.
A report queue is used for test messages. You can create report queues by changing the type (or category) of a public or private queue to the predefined ID {55EE8F33-CCE9–11CF-B108–0020AFD61CE9}. Report queues are useful as a testing tool to track messages on their route.
System queues are private and are used by the Message Queuing system. These queues are used for administrative messages, storing of notification messages, and to guarantee the correct order of transactional messages.
MESSAGE QUEUING ADMINISTRATIVE TOOLS
Before looking at how to deal with Message Queuing programmatically, this section looks at the administrative tools that are part of the Windows operating system to create and manage queues and messages.
Creating Message Queues
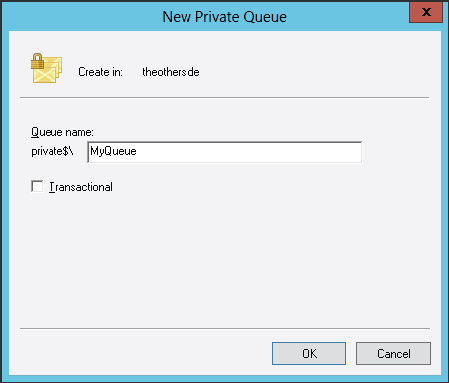
Message queues can be created with the Computer Management MMC snap-in. In the tree view pane, Message Queuing is located below the Services and Applications entry. By selecting Private Queues or Public Queues, new queues can be created from the Action menu (see Figure 47-5). Public queues are available only if Message Queuing is configured in Active Directory mode.
Message Queue Properties
After a queue is created, you can modify the queue’s properties with the Computer Management snap-in by selecting the queue in the tree pane and selecting the Action Properties menu (see Figure 47-6).
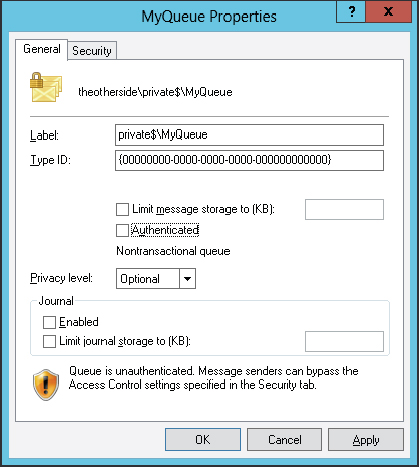
You can configure several options:
- The label is the name of the queue that can search for the queue.
- The type ID, which is by default, set to {00000000–0000–0000–0000–000000000000} to map multiple queues to a single category or type. Report queues use a specific type ID, as discussed earlier. A type ID is a universal unique ID (UUID) or GUID.
NOTE Custom type identifiers can be created with the uuidgen.exe or guidgen.exe utilities. uuidgen.exe is a command-line utility that can create unique IDs, and guidgen.exe is a graphical version that creates UUIDs.
- The maximum size of all messages of a queue can be limited to avoid filling up the disk.
- When checked, the Authenticated option enables only authenticated users to write and read messages to and from the queue.
- With the Privacy Level option, the content of the message can be encrypted. The possible values to set are None, Optional, or Body. None means that no encrypted messages are accepted; Body accepts only encrypted messages; and the default Optional value accepts both.
- Target journaling can be configured with the Journal settings. With this option, copies of the messages received are stored in the journal. The maximum size of disk space occupied can be configured for the journal messages of a queue. When the maximum size is reached, target journaling ceases.
- With the configuration option Multicast, you can define a multicast IP address for the queue. The same multicast IP address can be used with different nodes in the network so that a message sent to a single address is received with multiple queues.
PROGRAMMING MESSAGE QUEUING
Now that you understand the architecture of Message Queuing, you can look into the programming. In the next sections, you see how to create and control queues, and how to send and receive messages.
You also build a small course order application that consists of a sending and a receiving part.
Creating a Message Queue
You’ve already seen how to create message queues with the Computer Management utility. Message queues can be created programmatically with the Create method of the MessageQueue class.
With the Create method, the path of the new queue must be passed. The path consists of the host name where the queue is located and the name of the queue. In the following example, the queue MyNewPublicQueue is created on the local host. To create a private queue, the pathname must include Private$; for example, Private$MyNewPrivateQueue.
After the Create method is invoked, properties of the queue can be changed. For example, using the Label property, the label of the queue is set to Demo Queue. The sample program writes the path of the queue and the format name to the console. The format name is automatically created with a UUID that can access the queue without the name of the server (code file WorkingWithQueues/CreateMessageQueue/Program.cs):
using System;
using System.Messaging;

namespace Wrox.ProCSharp.Messaging
{
  class Program
  {
    static void Main()
    {
      using (var queue = MessageQueue.Create(@".MyNewPublicQueue"))
      {
        queue.Label = "Demo Queue";
        Console.WriteLine("Queue created:");
        Console.WriteLine("Path: {0}", queue.Path);
        Console.WriteLine("FormatName: {0}", queue.FormatName);
      }
    }
  }
}Finding a Queue
You can use the pathname and the format name to identify queues. To find queues, you must differentiate between public and private queues. Public queues are published in the Active Directory. For these queues, it is not necessary to know the system where they are located. You can find private queues only if you know the name of the system where the queue is located.
You can find public queues in the Active Directory domain by searching for the queue’s label, category, or format name. You can also get all queues on a machine. The class MessageQueue has static methods to search for queues: GetPublicQueuesByLabel, GetPublicQueuesByCategory, and GetPublicQueuesByMachine. The method GetPublicQueues returns an array of all public queues in the domain (code file WorkingWithQueues/FindQueues/Program.cs):
using System;
using System.Messaging;

namespace Wrox.ProCSharp.Messaging
{
  class Program
  {
    static void Main()
    {
      foreach (var queue in MessageQueue.GetPublicQueues())
      {
        Console.WriteLine(queue.Path);
      }
    }
  }
}
The method GetPublicQueues is overloaded. One version enables passing an instance of the MessageQueueCriteria class. With this class, you can search for queues created or modified before or after a certain time, and you can also look for a category, label, or machine name.
You can search for private queues with the static method GetPrivateQueuesByMachine. This method returns all private queues from a specific system.
Opening Known Queues
If the name of the queue is known, it is not necessary to search for it. Queues can be opened by using the path or format name. They both can be set in the constructor of the MessageQueue class.
Pathname
The path specifies the machine name and the queue name to open the queue. This code example opens the queue MyPublicQueue on the local host. To be sure that the queue exists, you use the static method MessageQueue.Exists (code file WorkingWithQueues/OpenQueue/Program.cs):
using System;
using System.Messaging;

namespace Wrox.ProCSharp.Messaging
{
  class Program
  {
    static void Main()
    {
      if (MessageQueue.Exists(@".MyPublicQueue"))
      {
        var queue = new MessageQueue(@".MyPublicQueue");
        //...

      }
      else
      {
        Console.WriteLine("Queue .MyPublicQueue not existing");
      }
    }
  }
}
Depending on the queue type, different identifiers are required when queues are opened. The following table shows the syntax of the queue name for specific types.
| QUEUE TYPE | SYNTAX |
| Public queue | MachineNameQueueName |
| Private queue | MachineNamePrivate$QueueName |
| Journal queue | MachineNameQueueNameJournal$ |
| Machine journal queue | MachineNameJournal$ |
| Machine dead-letter queue | MachineNameDeadLetter$ |
| Machine transactional dead-letter queue | MachineNameXactDeadLetter$ |
When you use the pathname to open public queues, it is necessary to pass the machine name. If the machine name is not known, the format name can be used instead. The pathname for private queues can be used only on the local system. The format name must be used to access private queues remotely.
Format Name
Instead of the pathname, you can use the format name to open a queue. The format name is used for searching the queue in the Active Directory to get the host where the queue is located. In a disconnected environment where the queue cannot be reached at the time the message is sent, you must use the format name:
            var queue = new MessageQueue(
                @"FormatName:PUBLIC=09816AFF-3608-4c5d-B892-69754BA151FF");
The format name has some different uses. You can use it to open private queues and to specify a protocol that should be used:
- To access a private queue, the string that must be passed to the constructor is FormatName:PRIVATE=MachineGUIDQueueNumber. The queue number for private queues is generated when the queue is created. You can see the queue numbers in the <windows>System32msmqstoragelqs directory.
- With FormatName:DIRECT=Protocol:MachineAddressQueueName, you can specify the protocol that should be used to send the message. The HTTP protocol is supported since Message Queuing 3.0.
- FormatName:DIRECT=OS:MachineNameQueueName is another way to specify a queue using the format name. This way you don’t need to specify the protocol but still can use the machine name with the format name.
Sending a Message
You can use the Send method of the MessageQueue class to send a message to the queue. The object passed as an argument of the Send method is serialized to the associated queue. The Send method is overloaded so that a label and a MessageQueueTransaction object can be passed. Transactional behavior of Message Queuing is discussed in the section “Transactional Queues.”
The code example first checks if the queue exists. If it doesn’t exist, a queue is created. Then the queue is opened and the message Sample Message is sent to the queue using the Send method.
The pathname specifies a dot (just like a period) for the server name, which is the local system. Pathnames to private queues work only locally (code file WorkingWithQueues/SendMessage/Program.cs):
using System;
using System.Messaging;

namespace Wrox.ProCSharp.Messaging
{
  class Program
  {
    static void Main()
    {
      try
      {
        if (!MessageQueue.Exists(@".Private$MyPrivateQueue"))
        {
          MessageQueue.Create(@".Private$MyPrivateQueue");
        }
        var queue = new MessageQueue(@".Private$MyPrivateQueue");

        queue.Send("Sample Message", "Label");
      }
      catch (MessageQueueException ex)
      {
        Console.WriteLine(ex.Message);
      }
    }
  }
}
Figure 47-7 shows the Computer Management admin tool where you can see the message that arrived in the queue.
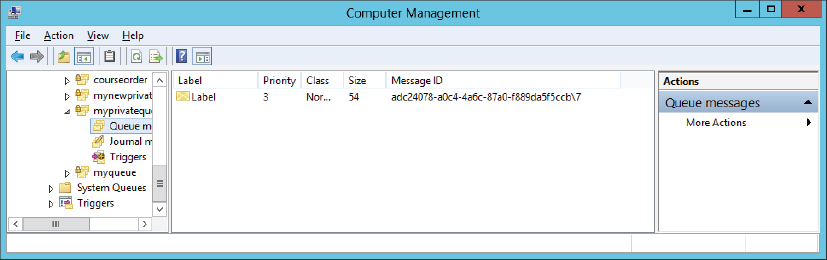
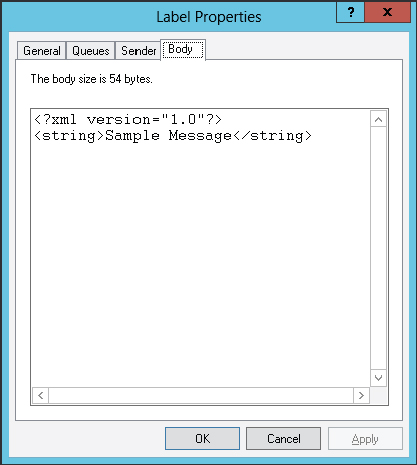
By opening the message and selecting the Body tab (see Figure 47-8) of the dialog box, you can see that the message was formatted using XML. Determining how the message is formatted is the function of the formatter that’s associated with the message queue.
Message Formatter
The format in which messages are transferred to the queue depends on the formatter. The MessageQueue class has a Formatter property through which a formatter can be assigned. The default formatter, XmlMessageFormatter, formats the message in XML syntax as shown in the previous example.
A message formatter implements the interface IMessageFormatter. Three message formatters are available with the namespace System.Messaging:
- The XmlMessageFormatter is the default formatter. It serializes objects using XML. See Chapter 34, “Manipulating XML,” for more on XML formatting.
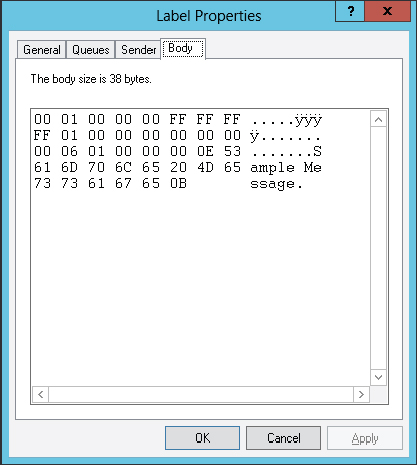
- With the BinaryMessageFormatter, messages are serialized in a binary format. These messages are shorter than the messages formatted using XML.
- The ActiveXMessageFormatter is a binary formatter so that messages can be read or written with COM objects. Using this formatter, you can write a message to the queue with a .NET class and to read the message from the queue with a COM object or vice versa.
The sample message shown in Figure 47-8 with XML is formatted with the BinaryMessageFormatter in Figure 47-9.
Sending Complex Messages
Instead of passing strings, you can pass objects to the Send method of the MessageQueue class. The type of the class must fulfill some specific requirements, but they depend on the formatter.
For the binary formatter, the class must be serializable with the [Serializable] attribute. With the .NET runtime serialization, all fields are serialized. (This includes private fields.) Custom serialization can be defined by implementing the interface ISerializable. You can read more about the .NET runtime serialization in Chapter 24, “Manipulating Files and the Registry.”
XML serialization takes place with the XML formatter. With XML serialization, all public fields and properties are serialized. The XML serialization can be influenced by using attributes from the System.Xml.Serialization namespace. You can read more about XML serialization in Chapter 34.
Receiving Messages
To read messages, again, you can use the MessageQueue class. With the Receive method, a single message is read and removed from the queue. If messages are sent with different priorities, the message with the highest priority is read. Reading messages with the same priority may mean that the first message sent is not the first message read because the order of messages across the network is not guaranteed. For a guaranteed order, you should use transactional message queues.
In the following example, a message is read from the private queue MyPrivateQueue. Previously, a simple string was passed to the message. When you read a message using the XmlMessageFormatter, you must pass the types of the objects that are read to the constructor of the formatter. In the example, the type System.String is passed to the argument array of the XmlMessageFormatter constructor. This constructor enables either a String array that contains the types as strings to be passed or a Type array.
The message is read with the Receive method, and then the message body is written to the console (code file WorkingWithQueues/SendMessage/Program.cs):
using System;
using System.Messaging;

namespace Wrox.ProCSharp.Messaging
{
  class Program
  {
    static void Main()
    {
      var queue = new MessageQueue(@".Private$MyPrivateQueue");
      queue.Formatter = new XmlMessageFormatter(
          new string[] {"System.String"});

      Message message = queue.Receive();
      Console.WriteLine(message.Body);
    }
  }
}
The Receive message behaves synchronously and waits until a message is in the queue if there is none.
Enumerating Messages
Instead of reading message by message with the Receive method, you can use an enumerator to walk through all messages. The MessageQueue class implements the interface IEnumerable and thus can be used with a foreach statement. Here, the messages are not removed from the queue, but you get just a peek at the messages to get their content:
         var queue = new MessageQueue(@".Private$MyPrivateQueue");
         queue.Formatter = new XmlMessageFormatter(
               new string[] {"System.String"});

         foreach (Message message in queue)
         {
            Console.WriteLine(message.Body);
         }
Instead of using the IEnumerable interface, you can use the class MessageEnumerator. MessageEnumerator implements the interface IEnumerator but has some more features. With the IEnumerable interface, the messages are not removed from the queue. The method RemoveCurrent of the MessageEnumerator removes the message from the current cursor position of the enumerator.
In the example, the MessageQueue method GetMessageEnumeratoraccesses the MessageEnumerator. The MoveNext method takes a peek message by message with the MessageEnumerator. The MoveNext method is overloaded to allow a time span as an argument. This is one of the big advantages when using this enumerator. Here, the thread can wait until a message arrives in the queue, but only for the specified time span. The Current property, which is defined by the IEnumerator interface, returns a reference to a message:
         var queue = new MessageQueue(@".Private$MyPrivateQueue");
         queue.Formatter = new XmlMessageFormatter(
               new string[] {"System.String"});

         using (MessageEnumerator messages = queue.GetMessageEnumerator())
         {
            while (messages.MoveNext(TimeSpan.FromMinutes(30)))
            {
               Message message = messages.Current;
               Console.WriteLine(message.Body);
            }
         }
Asynchronous Read
The Receive method of the MessageQueue class waits until a message from the queue can be read. To avoid blocking the thread, you can specify a timeout in an overloaded version of the Receive method. To read the message from the queue after the timeout, you must invoke Receiveagain. Instead of polling for messages, the asynchronous method BeginReceive can be called. Before starting the asynchronous read with BeginReceive, you should set the event ReceiveCompleted. The ReceiveCompleted event requires a ReceiveCompletedEventHandler delegate that references the method invoked when a message arrives in the queue and can be read. In the example, the method MessageArrived passes to the ReceivedCompletedEventHandler delegate (code file WorkingWithQueues/ReceiveMessageAsync/Program.cs):
         var queue = new MessageQueue(@".Private$MyPrivateQueue");
         queue.Formatter = new XmlMessageFormatter(
               new string[] {"System.String"});

         queue.ReceiveCompleted += MessageArrived;
         queue.BeginReceive();
         // thread does not wait
The handler method MessageArrived requires two parameters. The first parameter is the origin of the event, the MessageQueue. The second parameter is of type ReceiveCompletedEventArgs that contains the message and the asynchronous result. In the example, the method EndReceive from the queue is invoked to get the result of the asynchronous method, the message:
    public static void MessageArrived(object source, ReceiveCompletedEventArgs e)
    {
      MessageQueue queue = (MessageQueue)source;
      Message message = queue.EndReceive(e.AsyncResult);
      Console.WriteLine(message.Body);
    }
If the message should not be removed from the queue, the BeginPeek and EndPeek methods can be used with asynchronous I/O.
COURSE ORDER APPLICATION
To demonstrate the use of Message Queuing, in this section you create a sample solution to order courses. The sample solution is made up of three assemblies:
- A component library (CourseOrder) that includes entity classes for the messages sent and received in the queue
- A WPF application (CourseOrderSender) that sends messages to the message queue
- A WPF application (CourseOrderReceiver) that receives messages from the message queue
Course Order Class Library
Both the sending and the receiving application need the order information. For this reason, the entity classes are put into a separate assembly. The CourseOrder assembly includes three entity classes: CourseOrder, Course, and Customer and a base class BindableBase. With the sample application, not all properties are implemented as they would be in a real application, but just enough properties to show the concept.
In the file BindableBase.cs, the class BindableBase is defined. This class implements the interface INotifyPropertyChanged and offers the method SetProperty that can be called from derived classes within a property setter (code file CourseOrderApplication/CourseOrder/BindableBase.cs).
using System.Collections.Generic;
using System.ComponentModel;
using System.Runtime.CompilerServices;

namespace Wrox.ProCSharp.Messaging
{
  public abstract class BindableBase : INotifyPropertyChanged
  {
    protected void SetProperty<T>(ref T prop, T value,
        [CallerMemberName] string callerName = "")
    {
      if (!EqualityComparer<T>.Default.Equals(prop, value))
      {
        prop = value;
        OnPropertyChanged(callerName);
      }
    }

    protected virtual void OnPropertyChanged(string propertyName)
    {
      PropertyChangedEventHandler propertyChanged = PropertyChanged;
      if (propertyChanged != null)
      {
        propertyChanged(this, new PropertyChangedEventArgs(propertyName));
      }
    }

    public event PropertyChangedEventHandler PropertyChanged;
  }
}
In the file Course.cs, the class Course is defined. This class has just one property for the title of the course (code file CourseOrderApplication/CourseOrder/Course.cs):
   public class Course : BindableBase
   {
     private string title;
     public string Title
     {
       get { return title; }
       set
       {
         SetProperty(ref title, value);
       }
     }
   }
The file Customer.cs includes the class Customer, which includes properties for the company and contact names (code file CourseOrderApplication/CourseOrder/Customer.cs):
  public class Customer : BindableBase
  {
    private string company;
    public string Company
    {
      get { return company; }
      set
      {
        SetProperty(ref company, value);
      }
    }

    private string contact;
    public string Contact
    {
      get { return contact; }
      set
      {
        SetProperty(contact, value);
      }
    }
  }
The class CourseOrder in the file CourseOrder.cs maps a customer and a course inside an order and defines whether the order is high priority. This class also defines the name of the queue that is set to a format name of a public queue. The format name is used to send the message, even if the queue cannot be reached currently. You can get the format name by using the Computer Management snap-in to read the ID of the message queue. If you don’t have access to an Active Directory to create a public queue, you can easily change the code to use a private queue (code file CourseOrderApplication/CourseOrder/CourseOrder.cs):
  public class CourseOrder : BindableBase
  {
    public const string CourseOrderQueueName =
        "FormatName:Public=D99CE5F3–4282–4a97–93EE-E9558B15EB13";

    private Customer customer;
    public Customer Customer
    {
      get { return customer; }
      set
      {
        SetProperty(ref customer, value);
      }
    }

    private Course course;
    public Course Course
    {
      get { return course; }
      set
      {
        SetProperty(ref course, value);
      }
    }
  }
Course Order Message Sender
The second part of the solution is a Windows application called CourseOrderSender. With this application, course orders are sent to the message queue. The assemblies System.Messaging and CourseOrder must be referenced.
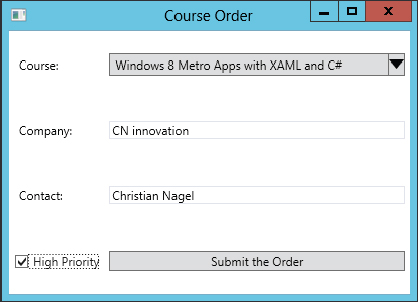
The user interface of this application is shown in Figure 47-10. A combo box enables selecting an available course, and some text box controls enable entering some text by the user before submitting the order.

The XAML code makes use of WPF data binding as shown in the code snippet. The ComboBox is bound to the property Courses that returns a list of available courses (code file CourseOrderApplication/CourseOrderSender/CourseOrderWindow.xaml).
    <CheckBox Grid.Row="3" Grid.Column="0"
        IsChecked="{Binding MessageConfiguration.HighPriority,
            Mode=OneWayToSource}">
      High Priority</CheckBox>
    <ComboBox ItemsSource="{Binding Courses}" Grid.Row="0" Grid.Column="1"
      SelectedItem="{Binding CourseOrder.Course.Title, Mode=OneWayToSource}" />
    <TextBox Text="{Binding CourseOrder.Customer.Company}" Grid.Row="1"
      Grid.Column="1" />
    <TextBox Text="{Binding CourseOrder.Customer.Contact}" Grid.Row="2"
      Grid.Column="1" />
    <Button Click="buttonSubmit_Click" Grid.Row="3" Grid.Column="1">
      Submit the Order</Button>
The properties bound from the code-behind file are shown in the following code snippet. The Courses property just returns a string collection that contains available courses. The CourseOrder property of type CourseOrder receives the input data from the user. The CourseOrder class was shown earlier creating the course order class library (code file CourseOrderApplication/CourseOrderSender/CourseOrderWindow.xaml.xs):
  public partial class CourseOrderWindow : Window
  {
    private readonly ObservableCollection<string> courseList =
        new ObservableCollection<string>();
    private readonly CourseOrder courseOrder = new CourseOrder();
    private readonly MessageConfiguration messageConfiguration =
        new MessageConfiguration();

    public CourseOrderWindow()
    {
      InitializeComponent();
      FillCourses();
      this.DataContext = this;
    }

    public IEnumerable<string> Courses
    {
      get
      {
        return courseList;
      }
    }

    private void FillCourses()
    {
      courseList.Add("Parallel .NET Programming");
      courseList.Add("Data Access with the ADO.NET Entity Framework");
      courseList.Add("Distributed Solutions with WCF");
      courseList.Add("Windows 8 Metro Apps with XAML and C#");
    }

    public CourseOrder CourseOrder
    {
      get
      {
        return courseOrder;
      }
    }
    public MessageConfiguration MessageConfiguration
    {
      get
      {
        return messageConfiguration;
      }
    }
When the Submit the Order button is clicked, the handler method buttonSubmit_Click is invoked. With this method, a MessageQueue instance is created to open a message queue with a format name. With the Send method, the courseOrder object is passed to write the message to the queue (code file CourseOrder Application/CourseOrderSender/CourseOrderWindow.xaml.cs):
    private void buttonSubmit_Click(object sender, RoutedEventArgs e)
    {
      try
      {
        using (var queue = new MessageQueue(CourseOrder.CourseOrderQueueName))
        {
          queue.Send(courseOrder, String.Format("Course Order {{{0}}}",
              courseOrder.Customer.Company));
        }

        MessageBox.Show("Course Order submitted", "Course Order",
            MessageBoxButton.OK, MessageBoxImage.Information);
      }
      catch (MessageQueueException ex)
      {
        MessageBox.Show(ex.Message, "Course Order Error",
            MessageBoxButton.OK, MessageBoxImage.Error);
      }
    }
Sending Priority and Recoverable Messages
Messages can be prioritized by setting the Priority property of the Message class. If messages are specially configured, a Message object must be created where the body of the message is passed in the constructor.
In the example, the priority is set to MessagePriority.High or MessagePriority.Normal depending on the selection of the user that manifests with the MessageConfiguration.HighPriority property that is bound to a check box setting. MessagePriority is an enumeration that enables you to set values from Lowest (0) to Highest (7). The default value, Normal, has a priority value of 3.
To make the message recoverable, the property Recoverable is set to true:
    private void buttonSubmit_Click(object sender, RoutedEventArgs e)
    {
      try
      {
        using (var queue = new MessageQueue(CourseOrder.CourseOrderQueueName))
        using (var message = new Message(courseOrder)
          {
            Recoverable = true,
            Priority = MessageConfiguration.HighPriority == true ?
                MessagePriority.High : MessagePriority.Normal
          })
        {
          queue.Send(message, String.Format("Course Order {{{0}}}",
              courseOrder.Customer.Company));
        }

        MessageBox.Show("Course Order submitted", "Course Order",
            MessageBoxButton.OK, MessageBoxImage.Information);
      }
      catch (MessageQueueException ex)
      {
        MessageBox.Show(ex.Message, "Course Order Error",
            MessageBoxButton.OK, MessageBoxImage.Error);
      }
    }
By running the application, you can add course orders to the message queue (see Figure 47-11).
Course Order Message Receiver
The design view of the Course Order receiving application that reads messages from the queue is shown in Figure 47-12. This application displays labels of every order in the listOrders list box. When an order is selected, the content of the order displays with the controls on the right side of the application.
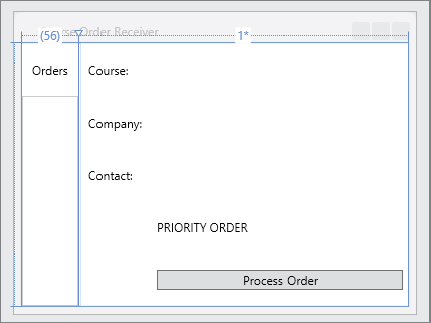
As with the previous WPF application, the receiving application makes use of data binding as well. Here, the ListBox is bound to the OrdersList property that returns a list of all orders. A Grid that contains the controls for the selected order from the list box is bound to the property SelectedCourseInfo. The property SelectedCourseInfo is of type CourseOrderInfo. This class is created for defining the information needed by the child controls of this grid. CourseOrderInfo implements the properties Course, Company, Contact. . . (code file CourseOrderApplication/CourseOrderReceiver/CourseOrderReceiverWindow.xaml):
    <Grid Grid.Column="0">
      <Grid.RowDefinitions>
        <RowDefinition Height="*" />
        <RowDefinition Height="4*" />
      </Grid.RowDefinitions>
      <Label Grid.Row="0" Content="Orders"/>
      <ListBox x:Name="listOrders" Grid.Row="1" ItemsSource="{Binding OrdersList}"
          SelectionChanged="listOrders_SelectionChanged" />
    </Grid>
    <GridSplitter Grid.Column="1" HorizontalAlignment="Left" Width="3" />
    <Grid Grid.Column="1" IsEnabled="True"
        DataContext="{Binding SelectedCourseInfo}" >
      <Grid.RowDefinitions>
        <RowDefinition />
        <RowDefinition />
        <RowDefinition />
        <RowDefinition />
        <RowDefinition />
      </Grid.RowDefinitions>
      <Grid.ColumnDefinitions>
        <ColumnDefinition Width="Auto" />
        <ColumnDefinition Width="*" />
      </Grid.ColumnDefinitions>
      <Label Grid.Row="0" Grid.Column="0" Content="Course:"/>
      <Label Grid.Row="1" Grid.Column="0" Content="Company:"/>
      <Label Grid.Row="2" Grid.Column="0" Content="Contact:"/>
      <TextBlock Text="{Binding Course}" Grid.Row="0" Grid.Column="1" />
      <TextBlock Text="{Binding Company}" Grid.Row="1" Grid.Column="1" />
      <TextBlock Text="{Binding Contact}" Grid.Row="2" Grid.Column="1" />
      <TextBlock Grid.Row="3" Grid.Column="1" Text="PRIORITY ORDER"
          Visibility="{Binding HighPriority}"/>
      <Button Grid.Row="4" Grid.Column="1" Content="Process Order"
          IsEnabled="{Binding EnableProcessing}"
          Click="buttonProcessOrder_Click"/>
The code for the class CourseOrderInfo is shown in the next code snippet. This class derives from the base class BindableBase shown earlier for an implementation of the interface INotifyPropertyChanged and defines all the properties needed for data binding from XAML (code file CourseOrderApplication/CourseOrderReceiver/CourseOrderInfo.cs):
using System.Windows;

namespace Wrox.ProCSharp.Messaging
{
  public class CourseOrderInfo : BindableBase
  {
    public CourseOrderInfo()
    {
      Clear();
    }

    private MessageInfo messageInfo;
    public MessageInfo MessageInfo
    {
      get { return messageInfo; }
      set
      {
        SetProperty(ref messageInfo, value);
      }
    }

    private string course;
    public string Course
    {
      get { return course; }
      set
      {
        SetProperty(ref course, value);
      }
    }

    private string company;
    public string Company
    {
      get { return company; }
      set
      {
        SetProperty(ref company, value);
      }
    }

    private string contact;
    public string Contact
    {
      get { return contact; }
      set
      {
        SetProperty(ref contact, value);
      }
    }

    private bool enableProcessing;
    public bool EnableProcessing
    {
      get
      {
        return enableProcessing;
      }
      set
      {
        SetProperty(ref enableProcessing, value);
      }
    }

    private Visibility highPriority;
    public Visibility HighPriority
    {
      get
      {
        return highPriority;
      }
      set
      {
        SetProperty(ref highPriority, value);
      }
    }

    public void Clear()
    {
      Course = string.Empty;
      Company = string.Empty;
      Contact = string.Empty;
      EnableProcessing = false;
      HighPriority = Visibility.Hidden;
    }
  }
}
In the constructor of the Window class CourseOrderReceiverWindow, the MessageQueue object is created that references the same queue that was used with the sending application. For reading messages, the XmlMessageFormatter with the types that are read is associated with the queue using the Formatter property.
To display the available messages in the list, a new task is created that peeks at messages in the background. The task’s main method is PeekMessages (code file CourseOrderApplication/CourseOrderReceiver/CourseOrderReceiverWindow.xaml.cs):
using System;
using System.Collections.ObjectModel;
using System.Messaging;
using System.Threading.Tasks;
using System.Windows;
using System.Windows.Controls;
using System.Windows.Data;
using System.Windows.Threading;

namespace Wrox.ProCSharp.Messaging
{
  public partial class CourseOrderReceiverWindow : Window
  {
    private MessageQueue ordersQueue;
    private ObservableCollection<MessageInfo> ordersList =
        new ObservableCollection<MessageInfo>();
    private object syncOrdersList = new object();

    public ObservableCollection<MessageInfo> OrdersList
    {
      get
      {
        return ordersList;
      }
    }

    protected override void OnClosed(EventArgs e)
    {
      base.OnClosed(e);
      if (ordersQueue != null)
        ordersQueue.Dispose();
    }

    public CourseOrderReceiverWindow()
    {
      InitializeComponent();
      this.DataContext = this;
      BindingOperations.EnableCollectionSynchronization(ordersList,
          syncOrdersList);

      ordersQueue = new MessageQueue(CourseOrder.CourseOrderQueueName);

      ordersQueue.Formatter = new XmlMessageFormatter(
        new Type[]
          {
            typeof(CourseOrder),
            typeof(Customer),
            typeof(Course)
          });

      // start the task that fills the ListBox with orders
      Task.Factory.StartNew(PeekMessages);
}The task’s main method, PeekMessages, uses the enumerator of the message queue to display all messages. Within the while loop, the messagesEnumerator checks to see if there is a new message in the queue. If there is no message in the queue, the task waits 3 hours for the next message to arrive before it exits.
    private void PeekMessages()
    {
      try
      {
        using (MessageEnumerator messagesEnumerator =
            ordersQueue.GetMessageEnumerator2())
        {
          while (messagesEnumerator.MoveNext(TimeSpan.FromHours(3)))
          {
            var messageInfo = new MessageInfo
            {
              Id = messagesEnumerator.Current.Id,
              Label = messagesEnumerator.Current.Label
            };

            ordersList.Add(messageInfo);
          }
        }
        MessageBox.Show("No orders in the last 3 hours. Exiting thread",
              "Course Order Receiver", MessageBoxButton.OK,
              MessageBoxImage.Information);
      }
      catch (MessageQueueException ex)
      {
        MessageBox.Show(ex.Message, "Error", MessageBoxButton.OK,
            MessageBoxImage.Error);
      }
    }
The ListBox control contains elements of the MessageInfo class. This class is used to display the labels of the messages in the list box but to keep the ID of the message hidden. The ID of the message can be used to read the message at a later time (code file CourseOrderApplication/CourseOrderReceiver/MessageInfo.cs):
      private class MessageInfo
      {
         public string Label { get; set; }
         public string Id { get; set; }

         public override string ToString()
         {
            return Label;
         }
      }
The ListBox control has the SelectedIndexChanged event associated with the method listOrders_SelectionChanged. This method gets the LabelIdMapping object from the current selection and uses the ID to peek at the message once more with the PeekById method. Then the content of the message displays in the TextBox control. Because by default the priority of the message is not read, the property MessageReadPropertyFilter must be set to receive the Priority (code file CourseOrderApplication/CourseOrderReceiver/CourseOrderReceiverWindow.xaml.cs):
    private void listOrders_SelectionChanged(object sender,
        SelectionChangedEventArgs e)
    {
      var messageInfo = (sender as ListBox).SelectedItem as MessageInfo;
      if (messageInfo == null)
        return;

      ordersQueue.MessageReadPropertyFilter.Priority = true;
      Message message = ordersQueue.PeekById(messageInfo.Id);

      var order = message.Body as CourseOrder;
      if (order != null)
      {
        selectedCourseInfo.MessageInfo = messageInfo;
        selectedCourseInfo.Course = order.Course.Title;
        selectedCourseInfo.Company = order.Customer.Company;
        selectedCourseInfo.Contact = order.Customer.Contact;
        selectedCourseInfo.EnableProcessing = true;

        if (message.Priority > MessagePriority.Normal)
        {
          selectedCourseInfo.HighPriority = Visibility.Visible;
        }
        else
        {
          selectedCourseInfo.HighPriority = Visibility.Hidden;
        }
      }
      else
      {
        MessageBox.Show("The selected item is not a course order",
              "Course Order Receiver", MessageBoxButton.OK,
              MessageBoxImage.Warning);
      }
    }
When the Process Order button is clicked, the handler method OnProcessOrder is invoked. Here again, the currently selected message from the list box is referenced, and the message is removed from the queue by calling the method ReceiveById:
    private void buttonProcessOrder_Click(object sender, RoutedEventArgs e)
    {
      Message message = ordersQueue.ReceiveById(
          SelectedCourseInfo.MessageInfo.Id);

      ordersList.Remove(SelectedCourseInfo.MessageInfo);

      listOrders.SelectedIndex = -1;
      selectedCourseInfo.Clear();

      MessageBox.Show("Course order processed", "Course Order Receiver",
            MessageBoxButton.OK, MessageBoxImage.Information);
    }
Figure 47-13 shows the running receiving application that lists four orders in the queue, and one order is currently selected.

RECEIVING RESULTS
With the current version of the sample application, the sending application never knows if the message is ever dealt with. To get results from the receiver, you can use acknowledgment queues or response queues.
Acknowledgment Queues
With an acknowledgment queue, the sending application can get information about the status of the message. With acknowledgments, you can define if you would like to receive an answer, if everything went okay, or if something went wrong. For example, acknowledgments can be sent when the message reaches the destination queue or when the message is read, or if it didn’t reach the destination queue or was not read before a timeout elapsed.
In the example, the AdministrationQueue of the Message class is set to the CourseOrderAck queue, which must be created similar to a normal queue. This queue is just used the other way around: The original sender receives acknowledgments. The AcknowledgeType property is set to AcknowledgeTypes.FullReceive to get an acknowledgment when the message is read:
         var message = new Message(order);

         message.AdministrationQueue = new MessageQueue(@".CourseOrderAck");
         message.AcknowledgeType = AcknowledgeTypes.FullReceive;

         queue.Send(message, String.Format("Course Order {{0}}",
               order.Customer.Company);

         string id = message.Id;
The correlation ID determines what acknowledgment message belongs to which message sent. Every message sent has an ID, and the acknowledgment message sent in response to that message holds the ID of the originating message as its correlation ID. The messages from the acknowledgment queue can be read using MessageQueue.ReceiveByCorrelationId to receive the associated acknowledgment.
Instead of using acknowledgments, the dead-letter queue can be used for messages that didn’t arrive at their destination. With the UseDeadLetterQueue property of the Message class set to true, the message is copied to the dead-letter queue if it didn’t arrive at the target queue before the timeout was reached.
Timeouts can be set with the Message properties TimeToReachQueue and TimeToBeReceived.
Response Queues
If more information than an acknowledgment is needed from the receiving application, a response queue can be used. A response queue is like a normal queue, but the original sender uses the queue as a receiver, and the original receiver uses the response queue as a sender.
The sender must assign the response queue with the ResponseQueue property of the Message class. The sample code here shows how the receiver uses the response queue to return a response message. With the response message responseMessage, the property CorrelationId is set to the ID of the original message. This way the client application knows to which message the answer belongs. This is similar to acknowledgment queues. The response message is sent with the Send method of the MessageQueue object that is returned from the ResponseQueue property:
      public void ReceiveMessage(Message message)
      {
         var responseMessage = new Message("response")
         {
           CorrelationId = message.Id
         }

         message.ResponseQueue.Send(responseMessage);
      }
TRANSACTIONAL QUEUES
With recoverable messages, it is not guaranteed that the messages arrives in order and just once. Failures on the network can cause messages to arrive multiple times; this happens also if both the sender and receiver have multiple network protocols installed that are used by Message Queuing.
Transactional queues can be used when these guarantees are required:
- Messages arrive in the same order they have been sent.
- Messages arrive only once.
With transactional queues, a single transaction doesn’t span the sending and receiving of messages. The nature of Message Queuing is that the time between send and receive can be quite long. In contrast, transactions should be short. With Message Queuing, the first transaction is used to send the message into the queue, the second transaction forwards the message on the network, and the third transaction is used to receive the messages.
The next example shows how to create a transactional message queue and how to send messages using a transaction.
A transactional message queue is created by passing true with the second parameter of the MessageQueue.Create method.
If you want to write multiple messages to a queue within a single transaction, you must instantiate a MessageQueueTransaction object and invoke the Begin method. When you finish sending all messages that belong to the transaction, the Commit method of the MessageQueueTransaction object must be called. To cancel a transaction (and have no messages written to the queue), the Abort method must be called, as you can see within the catch block:
using System;
using System.Messaging;

namespace Wrox.ProCSharp.Messaging
{
  class Program
  {
    static void Main()
    {
      if (!MessageQueue.Exists(@".MyTransactionalQueue"))
      {
        MessageQueue.Create(@".MyTransactionalQueue", true);
      }

      var queue = new MessageQueue(@".MyTransactionalQueue");
      var transaction = new MessageQueueTransaction();

      try
      {
        transaction.Begin();
        queue.Send("a", transaction);
        queue.Send("b", transaction);
        queue.Send("c", transaction);
        transaction.Commit();
      }
      catch
      {
        transaction.Abort();
      }
    }
  }
}
MESSAGE QUEUING WITH WCF
Chapter 43, “Windows Communication Foundation,” covers the architecture and core features of WCF. With WCF, you can configure a Message Queuing binding that makes use of the Windows Message Queuing architecture. With this, WCF offers an abstraction layer to Message Queuing. Figure 47-14 explains the architecture using a simple picture. The client application invokes a method of a WCF proxy to send a message to the queue. The message is created by the proxy. For the client developer, there’s no need to know that a message is sent to the queue. The client developer just invokes a method of the proxy. The proxy abstracts deals with the classes from the System.Messaging namespace and sends a message to the queue. The MSMQ listener channel on the service side reads messages from the queue, converts them to method calls, and invokes the method calls with the service.

Next, the Course Ordering application converts to make use of Message Queuing from a WCF viewpoint. With this solution, the three earlier projects are modified, and one more assembly is added that includes the contract of the WCF service:
- The component library (CourseOrder) includes entity classes for the messages that are sent across the wire. These entity classes are modified to fulfill the data contract for serialization with WCF.
- A new library is added (CourseOrderService) that defines the contract offered by the service.
- The WPF sender application (CourseOrderSender) is modified to not send messages but instead invoke methods of a WCF proxy.
- The WPF receiving application (CourseOrderReceiver) is modified to make use of the WCF service that implements the contract.
Entity Classes with a Data Contract
In the library CourseOrder, the classes Course, Customer, and CourseOrder are modified to apply the data contract with the attributes [DataContract] and [DataMember]. For using these attributes, you must reference the assembly System.Runtime.Serialization and import the namespace System.Runtime.Serialization (code file CourseOrderApplicationWCF/CourseOrder/Course.cs):
using System.Runtime.Serialization;

namespace Wrox.ProCSharp.Messaging
{
  [DataContract]
  public class Course
  {
    [DataMember]
    public string Title { get; set; }
  }
}
The Customer class requires the data contract attributes as well (code file CourseOrderApplicationWCF/CourseOrder/Customer.cs):
  [DataContract]
  public class Customer
  {
    [DataMember]
    public string Company { get; set; }

    [DataMember]
    public string Contact { get; set; }
  }
With the class CourseOrder, not only the data contract attributes are added, but an override of the ToString method as well to have a default string representation of these objects (code file CourseOrderApplicationWCF/CourseOrder/CourseOrder.cs):
  [DataContract]
  public class CourseOrder
  {
    [DataMember]
    public Customer Customer { get; set; }

    [DataMember]
    public Course Course { get; set; }

    public override string ToString()
    {
      return String.Format("Course Order {{{0}}}", Customer.Company);
    }
  }
WCF Service Contract
To offer the service with a WCF service contract, add a WCF service library with the name CourseOrderServiceContract. The contract is defined by the interface ICourseOrderService. This contract needs the attribute [ServiceContract]. If you want to restrict using this interface only with message queues, you can apply the [DeliveryRequirements] attribute and assign the property QueuedDeliveryRequirements. Possible values of the enumeration QueuedDeliveryRequirementsMode are Required, Allowed, and NotAllowed. The method AddCourseOrder is offered by the service. Methods used by Message Queuing can have only input parameters. Because the sender and receiver can run independent of each other, the sender cannot expect an immediate result. With the attribute [OperationContract], the IsOneWay property is set. The caller of this operation does not wait for an answer from the service (code file CourseOrderApplicationWCF/CourseOrderServiceContract/ICourseOrderService.cs):
using System.ServiceModel;

namespace Wrox.ProCSharp.Messaging
{
  [ServiceContract]
  [DeliveryRequirements(
      QueuedDeliveryRequirements=QueuedDeliveryRequirementsMode.Required)]
  public interface ICourseOrderService
  {
    [OperationContract(IsOneWay = true)]
    void AddCourseOrder(CourseOrder courseOrder);
  }
}WCF Message Receiver Application
The WPF application CourseOrderReceiver is now modified to implement the WCF service and receive the messages. References to the assembly System.ServiceModel and the WCF contract assembly CourseOrderServiceContract are required.
The class CourseOrderService implements the interface ICourseOrderService. With the implementation, the event CourseOrderAdded is fired. The WPF application registers to this event to receive CourseOrder objects.
Because WPF controls are bound to a single thread, the property UseSynchronizationContext is set with the [ServiceBehavior] attribute. This is a feature of the WCF runtime to pass the method call invocation to the thread defined by the synchronization context of the WPF application (code file CourseOrderApplicationWCF/CourseOrderReceiver/CourseOrderService.cs):
using System.ServiceModel;

namespace Wrox.ProCSharp.Messaging
{
  [ServiceBehavior(UseSynchronizationContext=true)]

  public class CourseOrderService: ICourseOrderService
  {
    public static event EventHandler<CourseOrderEventArgs>
        CourseOrderAdded;

    public void AddCourseOrder(CourseOrder courseOrder)
    {
      var courseOrderAdded = CourseOrderAdded;
      if (courseOrderAdded != null)
      {
        courseOrderAdded(this, new CourseOrderEventArgs(courseOrder));
      }
    }
  }

  public class CourseOrderEventArgs : EventArgs
  {
    public CourseOrderEventArgs(CourseOrder courseOrder)
    {
      this.CourseOrder = courseOrder;
    }
    public CourseOrder CourseOrder { get; private set; }
  }
}With the constructor of the class CourseReceiverWindow, a ServiceHost object is instantiated and opened to start the listener. The binding of the listener is done in the application configuration file.
In the constructor, the event CourseOrderAdded of the CourseOrderService is subscribed. Because the only thing that happens here is adding the received CourseOrder object to a collection, a simple Lambda expression is used.
The collection class used here is ObservableCollection<T> from the namespace System.Collections.ObjectModel. This collection class implements the interface INotifyCollectionChanged, and thus the WPF controls bound to the collection are informed about dynamic changes to the list (code file CourseOrderApplicationWCF/CourseOrderReceiver/CourseOrderReceiverWindow.xaml.cs):
using System;
using System.Collections.ObjectModel;
using System.ServiceModel;
using System.Windows;

namespace Wrox.ProCSharp.Messaging
{
  public partial class CourseOrderReceiverWindow : Window
  {
    private ObservableCollection<CourseOrder> courseOrders =
        new ObservableCollection<CourseOrder>();

    public CourseOrderReceiverWindow()
    {
      InitializeComponent();
      this.DataContext = courseOrders;
      CourseOrderService.CourseOrderAdded += (sender, e) =>
        {
          courseOrders.Add(e.CourseOrder);
          buttonProcessOrder.IsEnabled = true;
        };

      var host = new ServiceHost(typeof(CourseOrderService));
      try
      {
        host.Open();
      }
      catch (Exception ex)
      {
        Console.WriteLine(ex.Message);
      }
    }
The data binding of the WPF elements in the XAML code is now changed to use the new collection. The ListBox is bound to the data context, and the single-item controls are bound to properties of the current item of the data context (code file CourseOrderApplicationWCF/CourseOrderReceiver/CourseOrderReceiverWindow.xaml):
      <ListBox x:Name="listOrders" Grid.Row="1" ItemsSource="{Binding}"
          IsSynchronizedWithCurrentItem="True" />
      <!-- ... -->

      <TextBlock Text="{Binding Course.Title}" Grid.Row="0" Grid.Column="1" />
      <TextBlock Text="{Binding Customer.Company}" Grid.Row="1" Grid.Column="1" />
      <TextBlock Text="{Binding Customer.Contact}" Grid.Row="2" Grid.Column="1" />
The application configuration file defines the netMsmqBinding. For reliable messaging, transactional queues are required. To receive and send messages to nontransactional queues, the exactlyOnce property must be set to false (config file CourseOrderApplicationWCF/CourseOrderReceiver/app.config):
<?xml version="1.0"?>
<configuration>
  <startup>
    <supportedRuntime version="v4.0" sku=".NETFramework,Version=v4.5"/>
  </startup>
  <system.serviceModel>
    <bindings>
      <netMsmqBinding>
        <binding name="NonTransactionalQueueBinding" exactlyOnce="false">
          <security mode="None" />
        </binding>
      </netMsmqBinding>
    </bindings>
    <services>
      <service name="Wrox.ProCSharp.Messaging.CourseOrderService">
        <endpoint address="net.msmq://localhost/private/courseorder"
          binding="netMsmqBinding"
          bindingConfiguration="NonTransactionalQueueBinding"
          name="OrderQueueEP"
          contract="Wrox.ProCSharp.Messaging.ICourseOrderService" />
      </service>
    </services>
  </system.serviceModel>
</configuration>
The Click event handler of the buttonProcessOrder button removes the selected course order from the collection class (code file CourseOrderApplicationWCF/CourseOrderReceiver/CourseOrderReceiverWindow.xaml.cs):
    private void buttonProcessOrder_Click(object sender, RoutedEventArgs e)
    {
      var courseOrder = listOrders.SelectedItem as CourseOrder;
      courseOrders.Remove(courseOrder);
      listOrders.SelectedIndex = -1;
      buttonProcessOrder.IsEnabled = false;

      MessageBox.Show("Course order processed", "Course Order Receiver",
            MessageBoxButton.OK, MessageBoxImage.Information);

    }
WCF Message Sender Application
The sending application is modified to make use of a WCF proxy class. For the contract of the service, the assembly CourseOrderServiceContract is referenced, and the assembly System.ServiceModel is required for use of the WCF classes.
In the Click event handler of the buttonSubmit control, the ChannelFactory class returns a proxy. The proxy sends a message to the queue by invoking the method AddCourseOrder (code file CourseOrderApplicationWCF/CourseOrderSender/CourseOrderWindow.xaml.cs):
    private void buttonSubmit_Click(object sender, RoutedEventArgs e)
    {
      try
      {
        var factory = new ChannelFactory<ICourseOrderService>("queueEndpoint");
        ICourseOrderService proxy = factory.CreateChannel();
        proxy.AddCourseOrder(CourseOrder);
        factory.Close();

        MessageBox.Show("Course Order submitted", "Course Order",
              MessageBoxButton.OK, MessageBoxImage.Information);
      }
      catch (MessageQueueException ex)
      {
        MessageBox.Show(ex.Message, "Course Order Error",
              MessageBoxButton.OK, MessageBoxImage.Error);
      }
    }
The application configuration file defines the client part of the WCF connection. Again, the netMsmqBinding is used (config file CourseOrderApplicationWCF/CourseOrderSender/app.config):
<?xml version="1.0"?>
<configuration>
  <startup>
    <supportedRuntime version="v4.0" sku=".NETFramework,Version=v4.5"/>
  </startup>
  <system.serviceModel>
    <bindings>
      <netMsmqBinding>
        <binding name="nonTransactionalQueueBinding" exactlyOnce="false">
          <security mode="None" />
        </binding>
      </netMsmqBinding>
    </bindings>
    <client>
      <endpoint address="net.msmq://localhost/private/courseorder"
        binding="netMsmqBinding"
        bindingConfiguration="nonTransactionalQueueBinding"
        contract="Wrox.ProCSharp.Messaging.ICourseOrderService"
        name="queueEndpoint"
        kind="" endpointConfiguration="" />
    </client>
  </system.serviceModel>
</configuration>
When you start the application now, it works in a similar way as before. There is no longer a need to use classes of the System.Messaging namespace to send and receive messages. Instead, you write the application in a similar way as using TCP or HTTP channels with WCF.
However, to create message queues and to purge messages, you still need the MessageQueue class. WCF is only an abstraction to send and receive messages.
MESSAGE QUEUE INSTALLATION
Message queues can be created with the MessageQueue.Create method. However, the user running an application usually doesn’t have the administrative privileges required to create message queues.
Usually, message queues are created with an installation program, using the class MessageQueueInstaller. If an installer class is part of an application, the command-line utility installutil.exe (or a Windows Installation Package) invokes the Install method of the installer.
Visual Studio has special support for using the MessageQueueInstaller with Windows Forms applications. If a MessageQueue component is dropped from the toolbox onto the form, the smart tag of the component enables you to add an installer with the menu entry Add Installer. The MessageQueueInstaller object can be configured with the properties editor to define transactional queues, journal queues, the type of the formatter, the base priority, and so on.
SUMMARY
In this chapter, you’ve seen how to use Message Queuing. Message Queuing is an important technology that offers not only asynchronous but also disconnected communication. The sender and receiver can run at different times, which makes Message Queuing an option for smart clients and also useful to distribute the load on the server over time.
The most important classes with Message Queuing are Message and MessageQueue. The MessageQueue class enables sending, receiving, and peeking at messages, and the Message class defines the content that is sent.
WCF offers an abstraction to Message Queuing. You can use the concepts offered by WCF to send messages by calling methods of a proxy and to receive messages by implementing a service.