
Chapter 31
Windows Runtime
WHAT’S IN THIS CHAPTER?
- Windows Runtime overview
- Understanding Language projection
- Using Windows Runtime components
- Handling the life cycle of applications
- Storing application settings
- Defining and using capabilities
WROX.COM CODE DOWNLOADS FOR THIS CHAPTER
The wrox.com code downloads for this chapter are found at http://www.wrox.com/remtitle.cgi?isbn=1118314425 on the Download Code tab. The code for this chapter is divided into the following major examples:
- Language Projections
- Lifecycle Management
- App Settings
- Capabilities
OVERVIEW
Starting with Windows 8, Microsoft offers a new runtime for writing Windows applications with the new style: the Windows Runtime (WinRT). It contains classes with properties, methods, and events, and it uses delegates — so it looks like .NET but it’s a native library. This chapter explains the core fundamentals of the Windows Runtime, demonstrating how it differs from .NET and how you can integrate the two to begin writing Windows 8 applications.
The Windows Runtime is easily accessible from C#, C++, and JavaScript. Although .NET has previously enabled other languages to use the framework, it required the languages to adapt. If you are familiar with JScript.NET, then you know that this is a JavaScript language for programming with .NET. In this case, JavaScript code can be used to directly access methods and properties from .NET classes.
Conversely, the Windows Runtime adapts to different languages, enabling developers to work within an environment with which they are familiar, whether it is C#, JavaScript, or C++. Using the Windows Runtime from .NET languages like C# and Visual Basic, the Windows Runtime looks like .NET. Using it from C++, it contains methods that conform to the methods of the C++ Standard Library. Using the Windows Runtime from JavaScript, the methods have names and cases shared with JavaScript libraries.
The Windows Runtime primarily is a replacement for the Windows API. The .NET Framework is in large part a wrapper to the Windows API. It provides managed classes that can be used from C# to access operating system features. The Windows Runtime is a native API. It’s just as easy to use as the .NET Framework classes. The .NET Framework is independent of the operating system. You can use .NET 4.5 on Windows Vista, Windows 7, and Windows 8. It is bound to a specific version of the operating system.
The first version of the Windows Runtime is available only with Windows 8. The next version is expected to be available with Windows 9, and this future version is not expected to run on Windows 8. This is very similar to the Windows API. You can also expect compatibility with future versions. Applications written with the Windows Runtime for Windows 8 will run on Windows 9 as well. This is not to be expected in the other direction. If applications are written using Windows 9, it can invoke methods that are not available with Windows 8, and thus the the application will not run on Windows 8.
Comparing .NET and Windows Runtime
With C# Windows 8 applications you can use both the Windows Runtime as well as the .NET Framework. However, not all classes and namespaces are available from the .NET Framework, and sometimes only some methods of classes are available. The Windows Runtime is a sandboxed API that wraps new UI classes and parts of the Windows API.
Namespaces unavailable with the .NET subset for Windows 8 apps are replaced by a corresponding WinRT namespace, as shown in the following table:
| .NET NAMESPACE | WINRT NAMESPACE |
| System.Net.Sockets | Windows.Networking.Sockets |
| System.Net.WebClient | Windows.Networking.BackgroundTransfer and System.Net.HttpClient |
| System.Resources | Windows.ApplicationModel.Resources |
| System.Security.IsolatedStorage | Windows.Storage |
| System.Windows | Windows.UI.Xaml |
Namespaces
The best way to see what’s offered by the Windows Runtime is to look at the namespaces. The classes from the Windows Runtime are grouped within namespaces, similarly to the .NET Framework. Whereas the .NET Framework starts with the System namespace, the Windows Runtime starts with the Windows namespace. In addition, whereas a part of the .NET Framework is a public standard and can be implemented for other platforms (see Mono at http://www.go-mono.org), the Windows Runtime is meant for use only with Windows.
Some of the major namespaces are shown in Figure 31-1. An explanation is given in the following table:
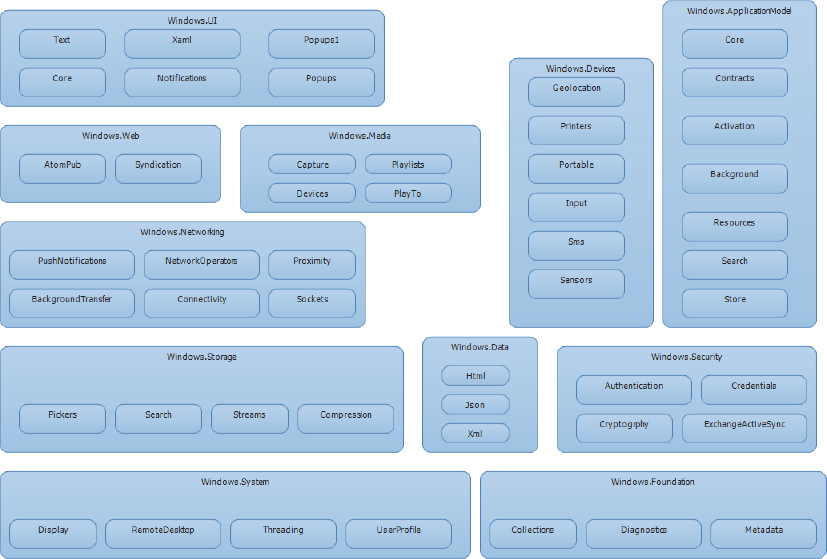
| WINDOWS RUNTIME NAMESPACE | DESCRIPTION |
| Windows.System | The Windows.System namespace and it subnamespaces contain a Launcher class for launching applications, classes with information about a remote desktop, a ThreadPool and ThreadPoolTimer for working with background tasks, and more. |
| Windows.Foundation | The Windows.Foundation namespace contains subnamespaces for collections, diagnostics, and metadata. |
| Windows.ApplicationModel | Windows.ApplicationModel has subnamespaces to manage licensing with the store, to open the search with the Charms bar, to share data with other apps, to work with contacts, and to create background tasks. |
| Windows.Globalization | Windows.Globalization defines calendars, regions, languages, date, and number formats. |
| Windows.Graphics | Windows.Graphics is for images and printing. |
| Windows.Media | Windows.Media enables accessing audio and video, using the camera, and making use of the PlayTo standard to play videos to other devices. |
| Windows.Data | Windows.Data contains classes for XML, HTML, and JSON. |
| Windows.Devices | Windows.Devices enables interacting with devices and sensors, e.g., using Accelerometer, Compass, Gyrometer, Inclinometer, LightSensor, OrientationSensor, sending SMS, and using geo-location (of course, only if the device supports these options). |
| Windows.Storage | For reading and writing files, the Windows.Storage namespace contains classes such as StorageFile and StorageFolder, but also streams and file pickers, and classes for compression and decompression with the algorithms Mszip, Lzms, Xpress, and XpressHuff. |
| Windows.Security | This namespace contains subnamespaces for security with authentication, credentials, and cryptography. |
| Windows.Networking | Windows.Networking is for client socket programming. There’s also a way to start a background transfer that continues when the application goes out of scope for the user. |
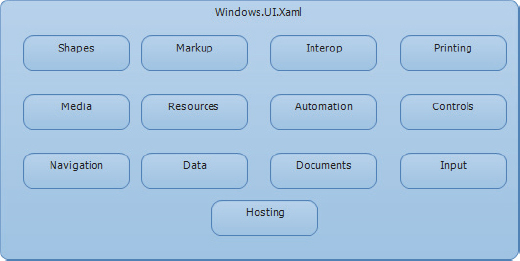
For XAML there’s the subnamespace Windows.UI.Xaml, which contains several other namespaces, as shown in Figure 31-2. Here you find shapes (Shapes namespace); XAML documents (Documents); data binding (Data); bitmaps, brushes, paths, transformations (Media); touch, mouse, and keyboard input (Input); a XAML reader (Markup); printing of XAML elements (Printing); and more.
Clearly, the namespaces for the Windows Runtime offer a lot of possibilities. Of course, the .NET Framework is huge compared to the Windows Runtime, but the latter is primarily meant for Windows 8 apps; therefore, some parts of the .NET Framework are not required.
You can use a subset of the .NET Framework together with the Windows Runtime, although some categories of classes are not offered for Windows 8 apps. For example, server-side code is not required for Windows 8 apps. There’s no ASP.NET and no hosting part of WCF. The client-side part for WCF is available with Windows 8 apps. Doing communication with a WCF service running on a server is possible with WCF client classes.
Other categories where classes are not available in the subset are removing duplicates, and doing some clean ups. Classes that are available with the Windows Runtime are not duplicated with the .NET Framework for Window 8 apps. The Windows Runtime already contains an XmlDocument class that deals with the DOM of XML in the namespace Windows.Data.Xml.Dom, so there’s no need for another one in the namespace System.Xml. Clean ups are done with obsolete and unsafe APIs. These are not available anymore, and also classes that directly access the Windows API are missing. That’s the role of the Windows Runtime.
Metadata
Accessing metadata information is possible in the same way with .NET applications as it is with the Windows Runtime. The metadata format is the same. The metadata information defined for .NET is specified by an ECMA standard (ECMA 335), and the same standard has been used with the Windows Runtime.
You can use ildasm to read the metadata of the Windows Runtime libraries with the file extension .winmd. You can find the metadata information for the Windows Runtime in the directory <windows>system32WinMetadata. There you will find the files that can be opened using ildasm to read metadata information. However, it’s easier to use the Visual Studio Object Browser (see Figure 31-3), which makes use of the metadata information as well.
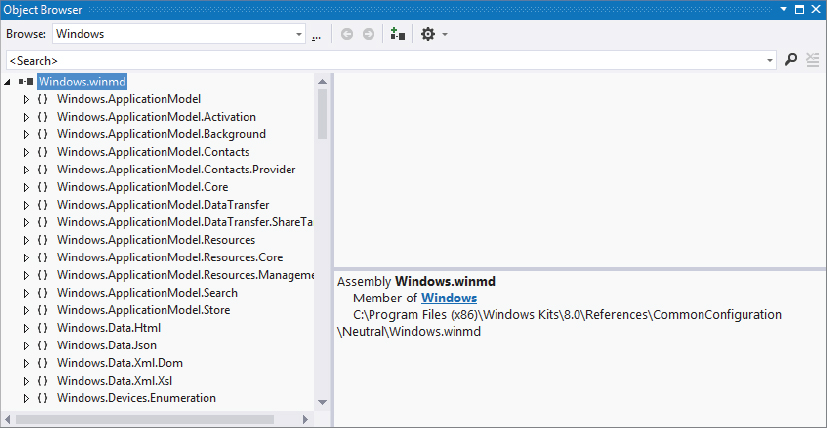
Using the Object Browser it’s easy to look at the classes from the Windows Runtime by selecting Windows as the browsing scope, and the subset of .NET classes available by selecting .NET for Windows 8 apps as the browsing scope. Windows uses the Windows.winmd file from the directory <Program Files (x86)>Windows Kits8.0ReferencesCommonConfigurationNeutral, and the .NET subset can be found at <Program Files (x86)>Reference AssembliesMicrosoftFramework.NETCorev4.5. These files contain only metadata information that defines what is available.
Language Projections
The metadata information is used to create different projections that vary according to the programming language. The Windows Runtime looks different when using it from C++, C#, and JavaScript. This section creates two sample Windows 8 apps to demonstrate the differences between JavaScript and C#. The applications contain a button and an image. Clicking the button starts a file picker that enables the user to select an image, which is then displayed.
The first application built uses JavaScript. To begin, select the JavaScript Windows Store Blank App template. The generated HTML file, default.html, is modified to contain button and img elements as shown in the following code snippet (code file ProjectionWithJavaScript/default.html):
  <button id="selectImageButton">Select an Image</button>
  <p />
  <img alt="Some Image" src="Images/logo.png" id="image1" />
The JavaScript file, default.js, is also created from the Visual Studio template. This file contains an event handler that is added to the onactivated event of the app. As the name suggests, this event handler is invoked when the application is activated. You just add functionality after the call to setPromise. Promise objects (one is returned from setPromise) and the then and done functions are the JavaScript variants of asynchronous programming. With C#, the async and await keywords are used instead. The WinJS.UI.processAll function processes all elements of the page and manages binding. This example focuses on the code that happens after that — the done function invokes the function that is passed as a parameter as soon as processing is completed. With the implementation of this function, a click event handler is added to the selectImageButton. The function that is passed to the addEventListener function is invoked as soon as the button is clicked.
Now we are getting into the Windows Runtime code. A FileOpenPicker from the namespace Windows.Storage.Pickers is instantiated. This picker requests a file from the user. To specify a preferred directory, the suggestedStartLocation is set to Windows.Storage.Pickers.PickerLocationId.picturesLibrary. Then file extensions are added to the file type filter list. fileTypeFilter is a property from the FileOpenPicker. This property returns an IVector<string> collection; and with JavaScript, to add items to the collection the append function is invoked. Calling the function pickSingleFileAsync the user is asked for a file to open. As soon as the result is retrieved, the then function defines what should be done next. The file argument is used to create a BLOB object that is assigned to the src attribute of the image element, enabling the selected image file to be shown in the UI. The following code shows how to accomplish all this (code file ProjectionWithJavaScript/js/default.js):
(function () {
  "use strict";

  var app = WinJS.Application;
  var activation = Windows.ApplicationModel.Activation;
  WinJS.strictProcessing();

  app.onactivated = function (args) {
    if (args.detail.kind === activation.ActivationKind.launch) {
      if (args.detail.previousExecutionState !==
        activation.ApplicationExecutionState.terminated) {
        // TODO: This application has been newly launched. Initialize
        // your application here.

      } else {
        // TODO: This application has been reactivated from suspension.
        // Restore application state here.
      }

      args.setPromise(WinJS.UI.processAll().done(function () {
        document.getElementById("selectImageButton").addEventListener(
          "click", function () {
          var picker = new Windows.Storage.Pickers.FileOpenPicker();
          picker.suggestedStartLocation =
            Windows.Storage.Pickers.PickerLocationId.picturesLibrary;
          picker.fileTypeFilter.append(".jpg");
          picker.fileTypeFilter.append(".png");
          picker.pickSingleFileAsync().then(function (file) {
            if (file) {
              var imageBlob = URL.createObjectURL(file);
              document.getElementById("image1").src = imageBlob;
            }
            else {

            }
          });
        });
      }));
    }
  };
Now, let’s do the same with XAML and C#. This project makes use of the Windows Store Blank App (XAML) template. As before, a Button element and an Image element are created, but this time XAML code is used instead of HTML (code file ProjectionWithCSharp/MainPage.xaml):
  <Grid Background="{StaticResource ApplicationPageBackgroundThemeBrush}">
    <Grid.RowDefinitions>
      <RowDefinition Height="Auto" />
      <RowDefinition Height="*" />
    </Grid.RowDefinitions>
    <Button Grid.Row="0" Click="OnOpenImage">Select an Image</Button>
    <Image Grid.Row="1" x:Name="image1" />
  </Grid>
It’s after the OnOpenImage handler method is assigned to the Click event of the button that things get interesting. Similar to before, a FileOpenPicker object is created. However, immediately after that, in the next line, an interesting difference can be seen. SuggestedStartLocation is of the type of the PickerLocationId enumeration. The enumeration values are written with uppercase notation as you’re used to with C#. The FileTypeFilter does not return IVector<string>, but instead IList<string>. With this the Add method is invoked to pass a few file extensions. Working with JavaScript, it’s more common to use an append function instead of the Add method. Using the await keyword, you can wait until the StorageFile is returned. Finally, a BitmapImage object is assigned to the XAML Image element. The BitmapImage itself receives a random access stream to load the image (code file ProjectionWithCSharp/MainPage.xaml.cs):
        private async void OnOpenImage(object sender, RoutedEventArgs e)
        {
          var picker = new FileOpenPicker();
          picker.SuggestedStartLocation = PickerLocationId.PicturesLibrary;
          picker.FileTypeFilter.Add(".jpg");
          picker.FileTypeFilter.Add(".png");
          StorageFile file = await picker.PickSingleFileAsync();

          BitmapImage image = new BitmapImage();
          image.SetSource(await file.OpenReadAsync());

          image1.Source = image;
        }
The same classes have been used with these two examples, but the methods look different depending on the programming language used. With .NET, the convention is to use PascalCase with types, methods, properties, and events. With JavaScript, the convention is to use PascalCase for the types, camelCase with methods and properties, and lowercase with events. This conversion for the languages is handled by language projection, which changes not only uppercase and lowercase, but also data types and method names. More details about this are provided in subsequent sections.
Windows Runtime Types
This section looks at the Windows Runtime types, including how they are categorized and how they compare to .NET types. An important aspect of the types defined by the Windows Runtime is their interaction with various languages. For example, when passing a .NET string to a Windows Runtime method, it shouldn’t necessary to create a new string with every method call just because there are two different technologies. Passing data here is known as marshalling, which is discussed in more detail in Chapter 23, “Interop”. Understanding the Windows Runtime types is important not only when using classes and methods from the runtime, but also when creating types with C# that should be used from other languages, such as C++ and JavaScript.
Let’s look at categories of Windows Runtime types:
- Strings — With the Windows Runtime, strings are defined as handles, HSTRING. A handle is a reference to a string that just references the first character of the string The HSTRING is added to the buffer of the .NET String type to address the rest of the string inside. With .NET, strings are immutable and cannot be changed. WinRT always assumes that the string buffer is immutable and null-terminated which is the case with .NET strings. A .NET String type simply maps to HSTRING.
- Basic data types — These types, such as Int16, Int32, Int64, Single, and Double, map directly to .NET representatives. The WinRT DateTime maps to a .NET DateTimeOffset.
- Arrays — Simple arrays such as Int32[] can be used for basic collections.
- Enums — These map easily to the C# enum. It’s also possible to use flag and non-flag enums.
- Structs — These are available with WinRT as well, but they are different from .NET struct types. A struct can contain only basic data types and strings. Whereas a .NET struct can implement interfaces, this is not possible with WinRT; a struct is just a simple data holder.
- Interfaces — These are the heart of the Windows Runtime. Chapter 23 discusses COM interfaces such as IUnknown. The classes offered by the Windows Runtime are COM objects, the new generation. In addition to IUnknown, they also implement the interface IInspectible. Unlike IUnknown, IInspectible provides information about the implemented interfaces and the name of a class.
- Generic interfaces — The Windows Runtime supports these as well. IIterable<T> enables you to enumerate a collection, and IVector<T> represents a random-access collection of elements. These interfaces map to IEnumerable<T> and IList<T>, respectively.
- Runtime classes — This includes classes such as Windows.Storage.StorageFile. Runtime classes implement interfaces; for example, StorageFile implements IStorageFile, IStorageFileItem, IRandomAccessStreamReference, IInputStreamReference, and IStorageItemProperties (in addition to IUnknown and IInspectible). With .NET applications you typically work only with the runtime classes, not with the interfaces directly.
WINDOWS RUNTIME COMPONENTS
Although you have seen that there are differences between the Windows Runtime and .NET in terms of types, many of them map easily. For example, the HSTRING directly maps to a String. The differences are extremely important if you create Windows Runtime components with .NET. Visual Studio offers a Windows Runtime Component template with the application templates. Using this, you can create a component that is available for other languages using the Windows Runtime, such as C++ and JavaScript. This differs from the Portable class library whereby you can create classes that are available with other .NET variants, such as applications using the full .NET Framework, Silverlight, or Windows Runtime with C#.
When creating Windows Runtime components, the public classes offered must be sealed. Only sealed types are supported — with the exception of UI components, for which sealing is not that strict. The following sections take a closer look at both the automatic mappings and the sometimes not so automatic mappings.
Collections
The Windows Runtime defines collection interfaces that automatically map to .NET collection interfaces as shown in the following table:
| WINDOWS RUNTIME | .NET |
| IIterable<T> | IEnumerable<T> |
| IIterator<T> | IEnumerator<T> |
| IVector<T> | IList<T> |
| IVectorView<T> | IReadOnlyList<T> |
| IMap<K, V> | IDictionary<K, V> |
| IMapView<K, V> | IReadOnlyDictionary<K, V> |
When creating a Windows Runtime component, you need to return an interface, such as IList<string> shown in the following code snippet. Returning List<string> directly is not possible. IList<string> automatically maps to IVector<T>. Similarly, you can use IList<T> as a parameter with methods.
    public IList<string> GetStringList()
    {
      return new List<string> { "one", "two" };
    }
Streams
Streams differ from collections. The foundation for working with Windows Runtime streams are, of course, interfaces. The Windows.Storage.Streams namespace also offers concrete stream classes such as FileInputStream, FileOutputStream, and RandomAccessStream, and reader and writer classes using streams such as DataReader and DataWriter. All these classes are based on the interfaces. .NET doesn’t use interfaces for streams. Public signatures of Windows Runtime components always require interfaces for streams such as IInputStream, IOutputStream, and IRandomAccessStream. Mapping these interfaces to .NET types and vice versa is done with extension methods defined within the WindowsRuntimeStreamExtensions class. As shown in the following code snippet, AsStreamForRead creates a Stream object from an IInputStream:
    public void StreamSample(IInputStream inputStream)
    {
      var reader = new StreamReader(inputStream.AsStreamForRead());
      //...
    }
Other extension methods defined are AsStreamForWrite to create a Stream object from an IOutputStream and AsStream to create a Stream from an IRandomAccessStream. To create a Windows Runtime stream from a .NET stream, the method AsInputStream can be used to create an IInputStream from a Stream, and AsOutputStream can be used to create an IOuputStream from a Stream.
The following code shows one example using only Windows Runtime classes. First, a StorageFolder object is created that references the local folder to which the application is allowed to write. ApplicationData.Current returns the current instance of the ApplicationData class, which defines properties for local, roaming, and temporary folders to read and write data. The content of the roaming folder is copied to the different systems into which the user logs in to. The roaming folder has size limitations (quotas). At the time of this writing the size is limited to 100 kB per application. With the sample code, in the local folder a new file is created. The method CreateFileAsync returns a StorageFile object. StorageFile is a Windows Runtime object and thus returns an object implementing the IRandomAccessStream interface on calling OpenAsync. The IRandomAccessStream can be passed to the constructor of the Windows Runtime DataWriter class, which is used to write a string to the file:
          StorageFolder folder = ApplicationData.Current.LocalFolder;
          StorageFile file = await folder.CreateFileAsync("demo1.txt");
          IRandomAccessStream stream = await file.OpenAsync(FileAccessMode.ReadWrite);
          using (var writer = new DataWriter(stream))
          {
            writer.WriteString("Hello, WinRT");
            await writer.FlushAsync();
          }
The preceding example is purely Windows Runtime code. Now let’s look at a mixed variant with the Windows Runtime and .NET. As before, the StorageFolder is created. With the StorageFolder, the extension method OpenStreamForWriteAsync is used. OpenStreamForWriteAsync is an extension method defined with the WindowsRuntimeStorageExtensions class that returns a .NET Stream object. This enables all the .NET classes using streams to write to the file, such as the StreamWriter class. WindowsRuntimeStorageExtension is defined in the .NET assembly System.Runtime.WindowsRuntime in the namespace System.IO:
          StorageFolder folder = ApplicationData.Current.LocalFolder;
          Stream stream = await folder.OpenStreamForWriteAsync("demo2.text",
              CreationCollisionOption.ReplaceExisting);
          using (var writer = new StreamWriter(stream))
          {
            await writer.WriteLineAsync("Hello, .NET");
            await writer.FlushAsync();
          }
With streams, byte[] often comes into play as well. For a byte[], Windows Runtime defines the interface IBuffer. With byte arrays, there’s a similar mix-and-match just like streams. With the Create method of the WindowsRuntimeBuffer class (namespace System.Runtime.InteropServices.WindowsRuntime), an object implementing IBuffer is returned from a byte[]. The WindowsRuntimeBufferExtensions class offers methods to get IBuffer from byte[] (AsBuffer method), to copy byte[] to IBuffer or vice versa (CopyTo), and to create a byte[] from IBuffer (ToArray).
Delegates and Events
Programming delegates and events looks very similar from .NET and the Windows Runtime, but behind the scenes the implementation is different. Windows Runtime events can only be of a Windows Runtime delegate type (or a type that matches a Windows Runtime delegate type). An event cannot be of type EventHandler, but using the type EventHandler<object> is OK.
For the Windows Runtime implementation of events, the WindowsRuntimeMarshal class is used. This class offers the methods AddEventHandler and RemoveEventHandler to add or remove handlers from events.
Async
For async operations with .NET, Task objects are used. An async method that does not have a return value returns Task, and an async method with a return value returns Task<T>. Async methods with the Windows Runtime are based on the interfaces IAsyncAction and IAsyncOperation<T>.
Async Windows Runtime methods can be used in the same way as async .NET methods, with the keywords async and await. The following code snippet makes use of the Windows Runtime XmlDocument class from the namespace Windows.Data.Xml.Dom. The method LoadFromUriAsync returns IAsyncOperation<XmlDocument>. This can be used in the same way as a method that returns Task<XmlDocument>:
    private async Task<string> XmlDemo()
    {
      Uri uri = new Uri("http://www.cninnovation.com/downloads/Racers.xml");
      XmlDocument doc = await XmlDocument.LoadFromUriAsync(uri);
      return doc.GetXml();
    }

    private async void OnXml(object sender, RoutedEventArgs e)
    {
      text1.Text = await XmlDemo();
    }
If you create a Windows Runtime component, a public async method cannot return Task. Such a method needs to be written as shown in the following two code snippets. If the method does not return a value, it needs to return IAsyncAction. A Task is converted to IAsyncAction with the extension method AsAsyncAction. The extension methods for tasks are defined in the WindowsRuntimeSystemExtensions class.
    public IAsyncAction TaskSample()
    {
      return Task.Run(async () =>
        {
          await Task.Delay(3000);
        }).AsAsyncAction();
    }
With an async method that returns a value, IAsyncOperation<T> needs to be returned. The extension method AsAsyncOperation converts a Task<T> to IAsyncOperation<T>:
    public IAsyncOperation<int> TaskWithReturn(int x, int y)
    {
      return Task<int>.Run<int>(async () =>
        {
          await Task.Delay(3000);
          return x + y;
        }).AsAsyncOperation();
    }
WINDOWS 8 APPS
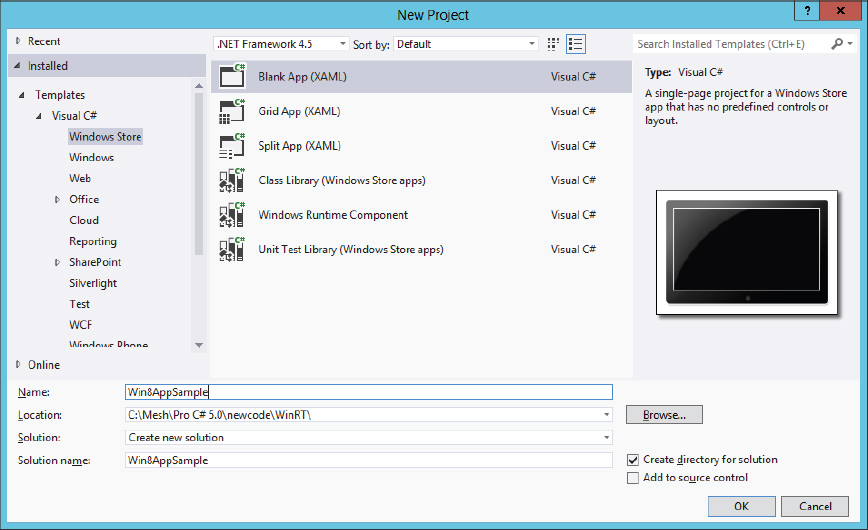
Visual Studio offers several templates for creating Windows 8 apps, as shown in Figure 31-4. The Blank App template is the most rudimentary, containing just a single empty page. The Grid App template contains three pages that display grouped grid information, and the Split App template contains two pages to navigate with an item list. A Class Library template is a .NET library that you can reuse with different Windows 8 projects created with C# or Visual Basic. A Windows Runtime Component Library template creates a library that can be reused with various Windows 8 projects from other languages, such as C++ and JavaScript. The Windows Runtime Component Library template restricts you to define public signatures of methods that must match to the Windows Runtime types as explained in the previous section.
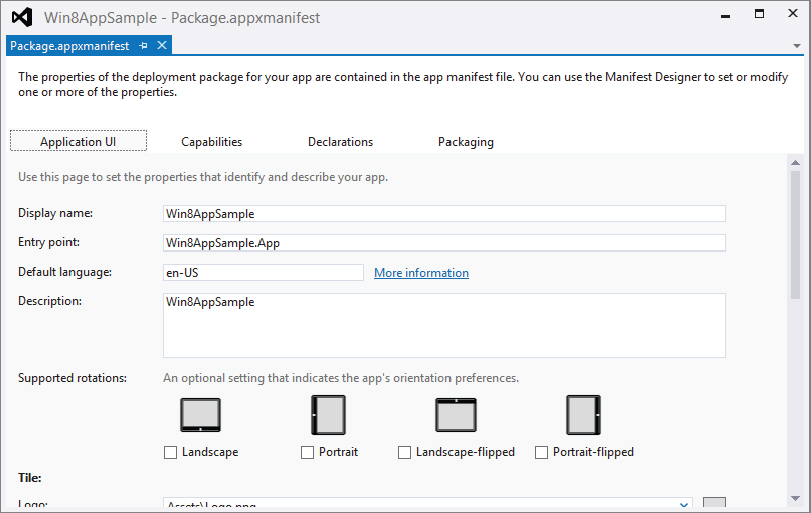
For the sample application, the Blank App template is used. With a Windows Store project, in addition to the usual project settings, there’s also a configuration for the deployment package. The deployment package can be configured by clicking the file Package.appxmanifest in Solution Explorer. Clicking this file opens the Manifest Designer, shown in Figure 31-5. Using this designer you can configure application settings such as which images are used for the logo, names, rotation information, and colors. The second tab, Capabilities, enables you to define which capabilities are included with the application, and what it needs permissions to access (e.g., directories such as the documents library or the music library, and devices such as the microphone or webcam). The Declarations tab defines what the application needs to access (e.g., camera settings, registering a file type association, availability as a share target). The Packaging tab enables you to define the application logo, a certificate and version number, and other options that describe your deployed app.
The Manifest Designer creates an XML file like the one shown here containing all the configured values:
<?xml version="1.0" encoding="utf-8"?>
<Package xmlns="http://schemas.microsoft.com/appx/2010/manifest">
  <Identity Name="920e63ef-9344-4925-a408-86f056314f31" Publisher="CN=Christian"
    Version="1.0.0.0" />
  <Properties>
    <DisplayName>Win8AppSample</DisplayName>
    <PublisherDisplayName>CN innovation</PublisherDisplayName>
    <Logo>AssetsStoreLogo.png</Logo>
  </Properties>
  <Prerequisites>
    <OSMinVersion>6.2.1</OSMinVersion>
    <OSMaxVersionTested>6.2.1</OSMaxVersionTested>
  </Prerequisites>
  <Resources>
    <Resource Language="x-generate" />
  </Resources>
  <Applications>
    <Application Id="App" Executable="$targetnametoken$.exe"
      EntryPoint="Win8AppSample.App">
      <VisualElements DisplayName="Win8AppSample" Logo="AssetsLogo.png"
        SmallLogo="AssetsSmallLogo.png" Description="Win8AppSample"
        ForegroundText="light" BackgroundColor="#464646">
        <DefaultTile ShowName="allLogos" />
        <SplashScreen Image="AssetsSplashScreen.png" />
      </VisualElements>
    </Application>
  </Applications>
  <Capabilities>
    <Capability Name="internetClient" />
  </Capabilities>
</Package>
Building the project with Visual Studio and starting it automatically deploys it on the system. You can also create an app package for deployment in the Windows Store or for the sideloading of business applications.
THE LIFE CYCLE OF APPLICATIONS
The life cycle of desktop applications is different from the life cycle of Windows 8 apps. With desktop applications, the user is in control of starting and stopping the application. Sometimes the Task Manager is needed to kill a hanging application, but usually the user decides how many applications should run concurrently. For example, it wouldn’t be unusual to keep multiple instances of Visual Studio, Outlook, several Internet Explorer windows, and some tools open at the same time. On the contrary, other users start and end one application before opening the next. This is completely different to the new way Windows 8 apps work.
With Windows 8 apps, the user typically does not stop the application. The usual way to start an application is by clicking on its tile. Of course, this is very similar to desktop applications. The big differences are just following. When the user starts an application it is in running mode. As soon as another application is started and the previous application is no longer visible, it changes to suspended mode. In suspended mode, battery consumption is reduced if applicable. The application stays in memory but is no longer allowed to consume CPU, disk, or network resources. All threads are suspended. Before the application moves to the suspended mode, the application gets a chance to react. Here, the application should save the state.
When the user switches back to the first application it is instantly resumed from suspend (as it is still stored in memory) and brought to the foreground. The mode is now running again. Switching from suspended to running usually requires no action on behalf of the application, as all application data is still in memory; therefore, the application only needs reactivation.
In case memory resources are low, Windows can terminate suspended applications. To terminate applications the process is killed. No information is sent to the application, so it cannot react to this event. That’s why an application should act on the suspended event and save its state there. Upon termination it is too late.
Application Execution States
States of the application are defined with the ApplicationExecutionState enumeration. This enumeration defines the states NotRunning, Running, Suspended, Terminated, and ClosedByUser. The application needs to be aware of and store its state, as users returning to the application expect to continue where they left it previously.
With the OnLaunched method in the App class, you can get the previous execution state of the application with the PreviousExecutionState property of the LauchActivatedEventArgs argument. The previous execution state is NotRunning if the application is being started for the first time after installing it, or after a reboot, or when the user stopped the process from the Task Manager. The application is in the Running state if it was already running when the user activated it from a second tile or it’s activated by one of the activation contracts. The PreviousExecutionState property returns Suspended when the application was suspended previously. Usually there’s no need to do anything special in that case.
The sample application to demonstrate the life cycle of Windows 8 apps (LifecycleSample) is started with the Blank App template. After creation of the project, a new Basic Page named MainPage is added to replace the originally created MainPage from the project. The Visual Studio item template Basic Page adds several files to the Common directory. One of these files is SuspensionManager.cs, which contains the class SuspensionManager. This class greatly assists with state management.
To demonstrate navigation state, the application contains the basic pages Page1 and Page2 in addition to the MainPage. Each of these pages contains a button for navigation. The button of the MainPage has a Click event handler that navigates to Page2, as shown in the following code snippet (file MainPage.xaml.cs):
    private void OnGotoPage2(object sender, RoutedEventArgs e)
    {
      Frame.Navigate(typeof(Page2));
    }
The other handlers are similar. The goal is to enable users to return to the page they had open in case the application was terminated in between.
Suspension Manager
The SuspensionManager class (code file LifecycleSample/Common/SuspensionManager.cs) contains a SaveAsync method that saves both frame navigation state and session state. For navigation state, the method sets it with all registered frames in the method SaveFrameNavigationState. In the following example, the frame state is added to the session state to save them together. Session state first is written to a MemoryStream with the help of the DataContractSerializer, and afterward is written to the XML file _sessionState.xml:
    private static Dictionary<string, object> _sessionState =
      new Dictionary<string, object>();
    private static List<Type> _knownTypes = new List<Type>();
    private const string sessionStateFilename = "_sessionState.xml";

    public static async Task SaveAsync()
    {
      // Save the navigation state for all registered frames
      foreach (var weakFrameReference in _registeredFrames)
      {
        Frame frame;
        if (weakFrameReference.TryGetTarget(out frame))
        {
          SaveFrameNavigationState(frame);
        }
      }

      // Serialize the session state synchronously to avoid asynchronous access
      // to shared state
      MemoryStream sessionData = new MemoryStream();
      DataContractSerializer serializer =
        new DataContractSerializer(typeof(Dictionary<string, object>), _knownTypes);
      serializer.WriteObject(sessionData, _sessionState);

      // Get an output stream for the SessionState file and write the
      // state asynchronously
      StorageFile file = await ApplicationData.Current.LocalFolder.CreateFileAsync(
        sessionStateFilename, CreationCollisionOption.ReplaceExisting);
      using (Stream fileStream = await file.OpenStreamForWriteAsync())
      {
        sessionData.Seek(0, SeekOrigin.Begin);
        await sessionData.CopyToAsync(fileStream);
        await fileStream.FlushAsync();
      }
    }

    private static void SaveFrameNavigationState(Frame frame)
    {
      var frameState = SessionStateForFrame(frame);
      frameState["Navigation"] = frame.GetNavigationState();
    }
For a restore of the data, the method RestoreAsync is available. This method opens a StorageFile and reads data using the DataContractSerializer:
   public static async Task RestoreAsync()
    {
      _sessionState = new Dictionary<String, Object>();

      // Get the input stream for the SessionState file
      StorageFile file = await ApplicationData.Current.LocalFolder.GetFileAsync(
        sessionStateFilename);
      using (IInputStream inStream = await file.OpenSequentialReadAsync())
      {
        // Deserialize the Session State
        DataContractSerializer serializer = new DataContractSerializer(
          typeof(Dictionary<string, object>), _knownTypes);
        _sessionState = (Dictionary<string, object>)serializer.ReadObject(
          inStream.AsStreamForRead());
      }

      // Restore any registered frames to their saved state
      foreach (var weakFrameReference in _registeredFrames)
      {
        Frame frame;
        if (weakFrameReference.TryGetTarget(out frame))
        {
          frame.ClearValue(FrameSessionStateProperty);
          RestoreFrameNavigationState(frame);
        }
      }
    }
In the next section you’ll add some code to make use of the SuspensionManager to save the navigation state.
Navigation State
To save state on suspending of the application, the Suspending event of the App class is set the OnSuspending event handler. The event is fired when the application moves into suspended mode. With the argument SuspendingEventArgs, the SuspendingOperation object can be accessed with the SuspendingOperation property. The GetDeferral property enables suspension of the application to be delayed, giving it some time to finish before it is suspended. GetDeferral returns a SuspendingDeferral that is used to inform the runtime of completion of the suspending state by invoking the Complete method. The maximum amount of time that can be used is defined by the Deadline property of SuspendingOperation. This property provides information about the time remaining before the application is suspended. After getting the SuspendingDeferral, the SaveAsync method of the SuspensionManager is invoked to save the application state:
    private async void OnSuspending(object sender, SuspendingEventArgs e)
    {
      var deferral = e.SuspendingOperation.GetDeferral();
      await SuspensionManager.SaveAsync();
      deferral.Complete();
    }
To remember navigation information, the frame needs to be registered with the SuspensionManager. The OnLaunched method of the Application class is overridden, and after the Frame object is created it is registered with the SuspensionManager class. This way, the frame navigation information is saved on suspension, and the variable is filled when its state is restored. If the application was launched again after it was terminated previously (which is checked with the PreviousExecutionState property), the RestoreAsync method of the SuspensionManager is invoked to retrieve the navigation data from the frame. Before navigation to the MainPage, the Content property of the frame is checked to confirm that it is not null. If that’s the case, the content is already filled from the restore. If a restore was not done, then navigation to the MainPage is initiated (code file LifecycleSample/App.xaml.cs):
    protected async override void OnLaunched(LaunchActivatedEventArgs args)
    {
      // Do not repeat app initialization when already running, just ensure that
      // the window is active
      if (args.PreviousExecutionState == ApplicationExecutionState.Running)
      {
        Window.Current.Activate();
        return;
      }

      var rootFrame = new Frame();

      SuspensionManager.RegisterFrame(rootFrame, "AppFrame");

      if (args.PreviousExecutionState == ApplicationExecutionState.Terminated)
      {
        await SuspensionManager.RestoreAsync();
      }

      // Create a Frame to act navigation context and navigate to the first page
      if (rootFrame.Content == null)
      {
        if (!rootFrame.Navigate(typeof(MainPage)))
        {
          throw new Exception("Failed to create initial page");
        }
      }
Testing Suspension
Now you can start the application, navigate to another page, and then open other applications to wait until the application is terminated. With the Task Manager, you can see the suspended applications with the More details view if the Status Values option is set to “Show suspended status.” This is not an easy way to test suspension (because it can take a long time before the termination happens), however, and it would be nice to debug the different states.
Using the debugger, everything works differently. If the application would be suspended as soon as it doesn’t have a focus, it would be suspended every time a breakpoint is reached. That’s why suspension is disabled while running under the debugger. So the normal suspension mechanism doesn’t apply. However, it’s easy to simulate. If you open the Debug Location toolbar, there are three buttons for Suspend, Resume, and Suspend And Shutdown. If you select Suspend And Shutdown, and then start the application again, it continues from the previous state of ApplicationExecutionState.Terminated, and thus opens the page the user opened previously.
Page State
Any data that was input by the user should be restored as well. For this demonstration, on page 2 an input field is created. The data representation of this input field is a simple Page2Data class with a Data property, as shown in the following code snippet (code file LifecycleSample/DataModel/Page2Data.cs):
  public class Page2Data : BindableBase
  {
    private string data;
    public string Data
    {
      get { return data; }
      set { SetProperty(ref data, value); }
    }
  }
The data is bound to a TextBox element (file Page2.xaml):
    <StackPanel Grid.Row="1" DataContext="{Binding Page2Data}">
      <TextBox Text="{Binding Data, Mode=TwoWay}" />
      <Button Content="Goto Page 3" Click="OnGotoPage3" />
    </StackPanel>
In the Page2 class, a variable of the Page2Data is defined to bind it to the UI element:
  public sealed partial class Page2 : LayoutAwarePage
  {
    private Page2Data data;
Assigning the variable data to bind it to the UI can be done within the LoadState method. The LoadState method is overridden from the base class LayoutAwarePage, which invokes the LoadState method within the OnNavigatedTo method. With the implementation, the pageState is used to verify whether the dictionary already contains the key for the data specific to Page2. If so, the value is accessed and assigned to the data variable. If the data is not yet there, a new Page2Data object is created:
    protected override void LoadState(Object navigationParameter,
      Dictionary<String, Object> pageState)
    {
      if (pageState != null && pageState.ContainsKey("Page2"))
      {
        data = pageState["Page2"] as Page2Data;
      }
      else
      {
        data = new Page2Data() { Data = "initital data" };
      }
      this.DefaultViewModel["Page2Data"] = data;
    }
On leaving the page, the method SaveState is invoked. As before, SaveState is invoked by the base class LayoutAwarePage. This time it’s invoked only from within the OnNavigatedFrom method, the method that is invoked on navigating away from the page. The implementation just needs to add the page state:
    protected override void SaveState(Dictionary<String, Object> pageState)
    {
      pageState.Add("Page2", data);
    }
Run the application once more to test suspension and termination. The state of the input field will be set to the value from the previous session.
APPLICATION SETTINGS
Windows 8 application settings should not be handled by adding controls directly to a page and allowing the user to change their values. Instead, Windows 8 has a predefined area for application settings. These settings can be opened from the Charms bar. You can open the Charms bar with touch by swiping from right, or with the mouse by moving it to the top-right corner. In the Charms bar, selecting the Settings command (see Figure 31-6) opens the settings specific to the application.

All you need to do with the application to register with the settings is add a command handler to the CommandsRequested event with the SettingsPane class, as shown in the following code snippet (code file MainPage.xaml.cs):
    protected override void LoadState(Object navigationParameter,
      Dictionary<String, Object> pageState)
    {
      SettingsPane.GetForCurrentView().CommandsRequested +=
        MainPage_CommandsRequested;
    }
The SettingsPane class also offers a static Show method that enables opening the settings directly controlled by the application. Opening the Settings pane is a good option if the application needs some initial configuration when the user starts it for the first time.
The command handler MainPage_CommandsRequests is invoked as soon as the user opens the settings. The handler just needs to add commands to the SettingsPaneCommandRequest object. This object is accessed with the Request property of the SettingsPaneCommandsRequestEventArgs argument. ApplicationCommands returns an IList of SettingsCommand that enables adding commands, including defining an ID, a label that is shown in the UI, and an event handler. The event handler is invoked when the user clicks the command. The following code creates two commands and adds these to the Settings pane:
   void MainPage_CommandsRequested(SettingsPane sender,
     SettingsPaneCommandsRequestedEventArgs args)
    {
      SettingsCommand command1 = new SettingsCommand("command1", "Command 1",
        new UICommandInvokedHandler(Command1));
      args.Request.ApplicationCommands.Add(command1);
      SettingsCommand command2 = new SettingsCommand("command2", "Command 2",
        new UICommandInvokedHandler(Command2));
      args.Request.ApplicationCommands.Add(command2);
    }
When the user clicks Settings, the commands shown in Figure 31-7 are displayed. In addition to these commands, the Permissions command is available with all Windows 8 apps. This command displays all permissions requested by the application with respect to its capabilities.

Clicking on a command invokes the event handler of the application, enabling you to react to and adjust settings as needed.
If more information is needed from the user, a pop-up window can be shown in the event handler. The following code snippet shows the XAML code to define some input controls (code file SettingsDemo/SampleSettingsPane.xaml) within a user control:
<UserControl
    x:Class="SettingsDemo.SampleSettingsPane"
    xmlns="http://schemas.microsoft.com/winfx/2006/xaml/presentation"
    xmlns:x="http://schemas.microsoft.com/winfx/2006/xaml"
    xmlns:local="using:SettingsDemo"
    xmlns:d="http://schemas.microsoft.com/expression/blend/2008"
    xmlns:mc="http://schemas.openxmlformats.org/markup-    compatibility/2006"
    mc:Ignorable="d"
    d:DesignHeight="300"
    d:DesignWidth="400">
  <Grid>
    <Grid.RowDefinitions>
      <RowDefinition Height="Auto" />
      <RowDefinition Height="Auto" />
      <RowDefinition Height="*" />
    </Grid.RowDefinitions>
    <Grid.ColumnDefinitions>
      <ColumnDefinition />
      <ColumnDefinition />
    </Grid.ColumnDefinitions>
    <TextBlock Text="Text1" Grid.Row="0" Grid.Column="0" />
    <TextBlock Text="Text2" Grid.Row="1" Grid.Column="0" />
    <TextBox Text="{Binding Text1}" Grid.Row="0" Grid.Column="1" />
    <TextBox Text="{Binding Text2}" Grid.Row="1" Grid.Column="1" />
  </Grid>
</UserControl>
The pop-up window is opened from the Command2 event handler. The Child property is set to the instantiated user control SampleSettingsPane. Setting the property IsLightDismissedEnabled enables dismissing the pop-up by clicking on any position outside of the pop-up window. By default, the pop-up window is displayed in the top-left position. To change this to a top-right position with the Charms bar, the Canvas.LeftProperty and Canvas.TopProperty is set with the pop-up (code file SettingsDemo/MainPage.xaml.cs):
    void Command2(IUICommand command)
    {
      Window.Current.Activated += Window_Activated;
      SampleSettingsPane myPane = new SampleSettingsPane();
      myPane.Width = this.settingsWidth;
      myPane.Height = this.windowBounds.Height;
      settingsPopup = new Popup();
      settingsPopup.Closed += SettingsPopup_Closed;
      settingsPopup.Child = myPane;
      settingsPopup.IsLightDismissEnabled = true;
      settingsPopup.SetValue(Canvas.LeftProperty, windowBounds.Width - settingsWidth);
      settingsPopup.SetValue(Canvas.TopProperty, 0);

      settingsPopup.IsOpen = true;

    }

    void SettingsPopup_Closed(object sender, object e)
    {
      Window.Current.Activated -= Window_Activated;
    }

    private void Window_Activated(object sender, WindowActivatedEventArgs e)
    {
      if (e.WindowActivationState == CoreWindowActivationState.Deactivated)
      {
        settingsPopup.IsOpen = false;
      }
    }

    void MainPage_SizeChanged(object sender, SizeChangedEventArgs e)
    {
      windowBounds = Window.Current.Bounds;
    }
WEBCAM CAPABILITIES
A Windows 8 application that needs sensors or devices such as a microphone or a webcam needs to have permissions from the user to use these. The sample application that demonstrates how this can be done invokes the webcam on startup to take a picture, and shows the picture within an Image control of the UI.
The application for using the webcam is created from the Blank App (XAML) template. Not a lot of changes are required. In the XAML code, only an Image control is added, with the name image1. In the code-behind file MainWindow.xaml.cs, the OnNavigatedTo method is implemented to use the CameraCaptureUI to capture an image. CameraCaptureUI is defined in the namespace Windows.Media.Capture and enables capturing pictures and videos. You can change photo and video settings with the properties PhotoSettings and VideoSettings, and the photo or video is captured by invoking the method CaptureFileAsync. The sample application captures a photo by using the default settings. Camera settings are not changed, and the mode with CaptureFileAsync is set to CameraCaptureUIMode.Photo. If the user does not click Cancel and captures a video, a temporary file is created that is returned from the method and referenced from the StorageFile variable file. The StorageFile is used to create a BitmapImage, and the BitmapImage is assigned to the UI Image control to display:
protected async override void OnNavigatedTo(NavigationEventArgs e)
{
var cam = new CameraCaptureUI();
StorageFile file = await cam.CaptureFileAsync(CameraCaptureUIMode.Photo);
if (file != null)
{
var image = new BitmapImage(new Uri(file.Path));
image1.Source = image;
}
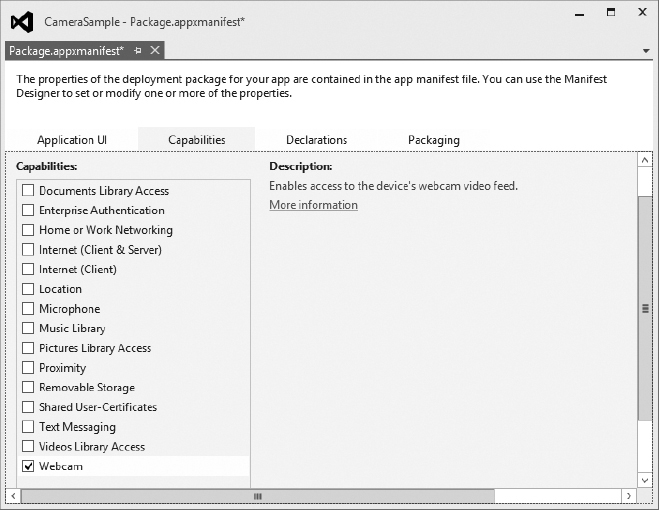
}By default, the application doesn’t have permission to use the camera. To change this, you must enable the webcam capability in the package manifest, as shown in Figure 31-8.
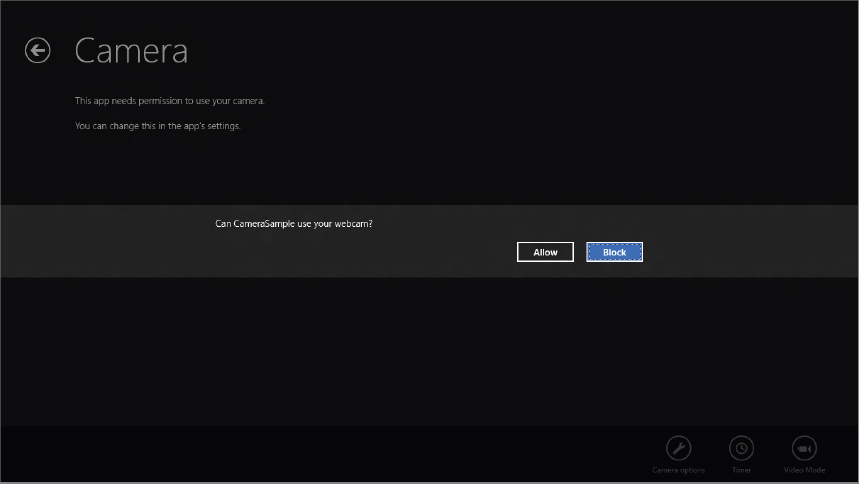
When running the application for the first time, the user is asked to allow permissions to use the camera (see Figure 31-9). If the application doesn’t obtain permission, it cannot use the Webcam API.
With permission, the user can take a picture to which the application can have access. The application can display the picture in the image control, as shown in Figure 31-10.

After allowing permissions for an application, the user can later deny them with the application settings discussed earlier.
SUMMARY
In this chapter, you’ve seen the core features of the Windows Runtime and how it differs from .NET applications. Language projection enables an application to use the Windows Runtime in a way that’s compatible with the programming language used. With language projection you’ve seen how the native API can be used easily writing .NET code.
You saw how interfaces are used with Windows Runtime components, how the interfaces map automatically to .NET interfaces (collections), and when it is necessary to work with different types and convert these by using extension methods.
With the Windows Runtime you’ve been introduced to core concepts on writing Windows 8 apps, including their life cycle and application settings, as well as defining and using capabilities.
For more information on writing Windows 8 applications, see Chapter 38, which covers the user interface aspects of writing these applications with XAML, including features such as the App bar. Having covered the core functionality of .NET and now the Windows Runtime, the next chapter begins our look at data access. Regarding Windows 8 apps, you cannot use ADO.NET directly from these apps, but ADO.NET is important with services — and of course Windows 8 apps communicate with services. The next chapter is also important for Windows 8 desktop applications.