
Chapter 42
ASP.NET Dynamic Data
WHAT’S IN THIS CHAPTER?
- Creating Dynamic Data Web Applications
- Customizing Scaffolding
- Customizing Templates
- Configuring Routing for Dynamic Data
WROX.COM CODE DOWNLOADS FOR THIS CHAPTER
You can find the wrox.com code downloads for this chapter at http://www.wrox.com/remtitle.cgi?isbn=1118314425 on the Download Code tab. The code for this chapter is contains this major examples covering all aspects of the chapter:
- Dynamic Data Sample
OVERVIEW
In the previous three chapters, you learned about how to use ASP.NET to create web applications and how to add advanced functionality to streamline those. In this chapter, you look at a framework that includes best-practice techniques to make data-driven web applications easy to create.
ASP.NET Dynamic Data enables you to build a website from preexisting data that you have in a database. The wizards that Visual Studio supplies make it possible to generate dynamic data websites quickly, which you can then customize to get the look and feel you want. Advanced template capabilities are included in dynamic data websites so that you can get up and running quickly. Dynamic data isn’t suitable for all types of websites, but for many types — including e-commerce sites and data manipulation sites — it provides a perfect starting point for development.
If you think about data-driven websites (which these days includes most websites), you probably realize that a lot of their functionality is very similar. Such a website is likely to include one or more of the following concepts:
- Render HTML shaped dynamically based on data in an underlying data source (such as a database table or individual database row).
- Include pages in a site map that map directly or indirectly to entries in a data source (such as a database table).
- Have a structure that relates directly or indirectly to the structure of the underlying data source. (A section of the site may map to a database table, such as About or Products.)
- Allow modification to the underlying data source that will be reflected on pages.
If you want to build a data-driven site, you would probably use fairly standardized code to achieve the previous concepts. You might bind ASP.NET elements such as tables of data directly to a database table, or you might include an intermediate layer of data objects to represent data in the database and bind to those. You have seen a lot of the code you would use for that in earlier chapters.
However, because this situation is so common, there is an alternative. You could instead use a framework that provides a lot of the code for you to save a lot of tedious coding. ASP.NET Dynamic Data is just such a framework, and makes creating a data-driven website much easier. In addition to giving you the code previously outlined (referred to in dynamic data web applications as scaffolding), dynamic data web applications provide a lot of additional functionality, as you see shortly.
In this section, you can see how to create a dynamic data application and look at some of the features that it offers.
CREATING DYNAMIC DATA WEB APPLICATIONS
The best way to get a taste of what dynamic data websites have to offer is to build one in Visual Studio, which is a surprisingly simple thing to do.
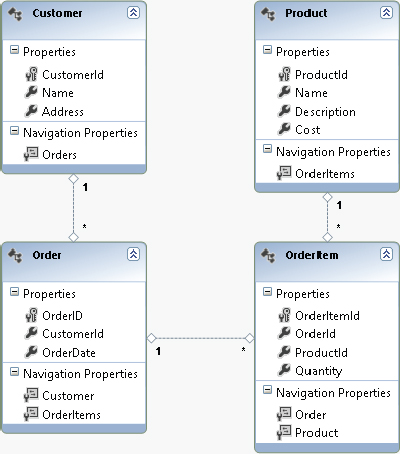
To create a dynamic data website you need to have some source data. You can use whatever data you like, but if you want you can use the sample data that is included in the downloadable code for this chapter. This data is a SQL Server database with the database named MagicShop. Figure 42-1 shows the tables included in this database.

The MagicShop database represents a simple structure that you can use in an e-commerce website. The types of and relationships between data can illustrate how dynamic data sites work.
When you create a dynamic data site through the File ⇒ New Project ⇒ Web menu item, you can notice that there is one template available for dynamic data: ASP.NET Dynamic Data Entities Web Application.
After you create a web application, the next thing to do is to add a data source. This means adding a new item to your project, ADO.NET Entity Model template. Before you do that, you may also want to add a local copy of your database to the App_Data directory of your website or use a SQL connection to the SQL Server database.
If you use the MagicShop.mdf database as a test, then — after adding the database to the App_Data directory — add an entity model called MagicShop.edmx, and in the Add New Item Wizard, use the default settings and add entities for all tables in the database as shown in Figure 42-2.
Configuring Scaffolding
There is one more step to perform before the initial build of your dynamic data website is complete. You must configure your data model for scaffolding in the Global.asax file for the website. Apart from differences in explanatory comments, this file is identical in both site template types. If you inspect the file, you can see that scaffolding for the website is configured through a model, which is defined at the application level as follows (code file Global.asax.cs):
    private static MetaModel s_defaultModel = new MetaModel();
    public static MetaModel DefaultModel
    {
      get
      {
        return s_defaultModel;
      }
    }
The Global.asax file accesses this model in the RegisterRoutes() method, called in the Application_Start() handler. This method also configures dynamic data routing in the website, which you look at later in the section “Configuring Routing.” The method contains the following commented-out line of code:
        //DefaultModel.RegisterContext(typeof(YourDataContextType),
        //   new ContextConfiguration() { ScaffoldAllTables = false });
Configuring the model simply requires you to uncomment this code and supply the appropriate data context type for your data model. You can also change the ScaffoldAllTables property to true initially to instruct the model to provide scaffolding for all available tables. Later, you may want to revert this change because you probably want a finer degree of control over exactly what scaffolding is created (including what data is visible in the site, what is editable, and so on), as you see in the section Controlling Scaffolding.
For the ADO.NET Entities version of this site, the code is as follows:
        DefaultModel.RegisterContext(typeof(MagicShopEntities),
            new ContextConfiguration() { ScaffoldAllTables = true });
Exploring the Result
At this point, everything is in place to test the default dynamic data websites. The end result is identical regardless of which template you use. If you look at Default.aspx in a browser, the display appears, as shown in Figure 42-3.
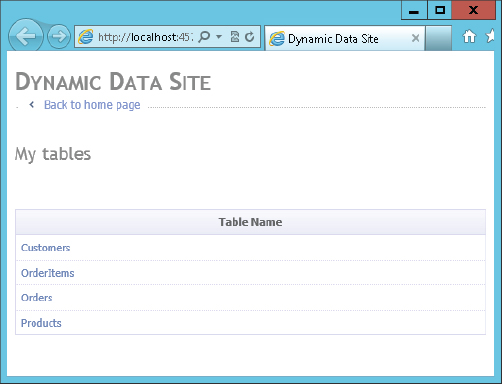
This page shows a list of links to each of the tables in the database along with some additional information, defined in the Default.aspx page as follows:
<%@ Page Language="C#" MasterPageFile="~/Site.master" CodeBehind="Default.aspx.cs"
         Inherits="DynamicDataSample._Default" %>

<asp:Content ID="headContent" ContentPlaceHolderID="head" Runat="Server">
</asp:Content>

<asp:Content ID="Content1" ContentPlaceHolderID="ContentPlaceHolder1"
  Runat="Server">
  <asp:ScriptManagerProxy ID="ScriptManagerProxy1" runat="server" />

  <h2 class="DDSubHeader">My tables</h2>

  <br /><br />

  <asp:GridView ID="Menu1" runat="server" AutoGenerateColumns="false"
    CssClass="DDGridView" RowStyle-CssClass="td" HeaderStyle-CssClass="th"
    CellPadding="6">
    <Columns>
      <asp:TemplateField HeaderText="Table Name" SortExpression="TableName">
        <ItemTemplate>
          <asp:DynamicHyperLink ID="HyperLink1" runat="server">
            <%# Eval("DisplayName") %>
          </asp:DynamicHyperLink>
        </ItemTemplate>
      </asp:TemplateField>
    </Columns>
  </asp:GridView>
</asp:Content>
A lot of the display code is contained in the master page and the CSS file for the website, which won’t be listed here to save space. The important section of the preceding code is the GridView control, which contains a DynamicHyperLink control that renders the link to a table. Data is bound to the GridView control from code-behind as follows (code file Default.aspx.cs):
    protected void Page_Load(object sender, EventArgs e)
    {
      System.Collections.IList visibleTables =
          Global.DefaultModel.VisibleTables;
      if (visibleTables.Count == 0)
      {
        throw new InvalidOperationException(
          "There are no accessible tables. Make sure that at least one data"
          + " model is registered in Global.asax and scaffolding is enabled"
          + " or implement custom pages.");
      }
      Menu1.DataSource = visibleTables;
      Menu1.DataBind();
    }
This extracts the list of visible tables from the model (in this case, all the tables because scaffolding is provided for all of them as discussed earlier), each of which is described by a MetaTable object. The DynamicHyperLink controls intelligently render links to pages for the tables based on properties of these objects. For example, the link for the Customers table is as follows:
http://localhost:45724/Customers/List.aspxObviously, the website has no such page defined; instead, routing is used as described in the first part of this chapter to generate content for this link. If you click the link, you see a listing page for the Customers table, as shown in Figure 42-4.
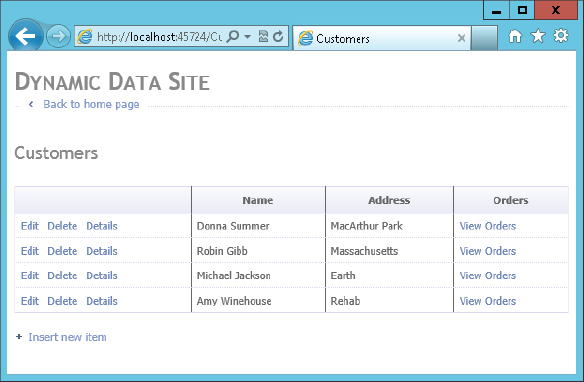
This page is generated from templates, which are stored in the code for the site and are discussed in the next section. You can use the links on this page to inspect, edit, insert, and delete records, as well as to traverse associations between tables. The View Orders link for each customer displays any orders for that particular customer — on a page that includes a drop-down list of customers that you can use to view orders for different customers if you want to.
If you click Edit for a customer, you see an edit customer view, as shown in Figure 42-5.
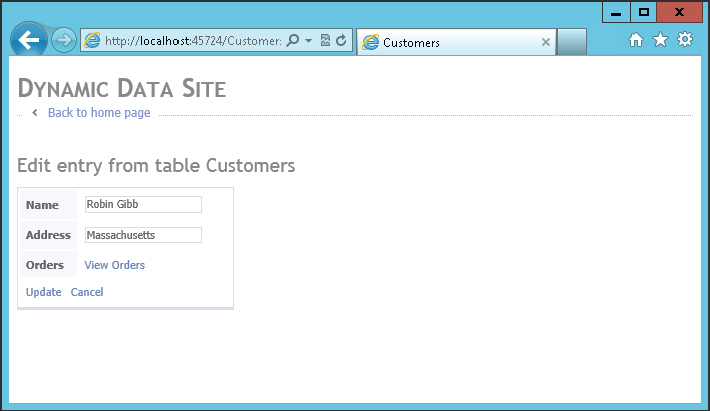
The template system used by a dynamic data website enables you to customize what is shown for each column in a table according to what data type it is. Or you can make further customizations that are unique to columns that you specify; you do have a lot of flexibility here.
What you have seen in this section is that even with the default settings, dynamic data can get you up and running quickly. Now, you may think that this ease of use comes at a cost, namely flexibility. This is not the case. Using some simple techniques, you can completely customize how dynamic data websites work, as you see in the next section.
CUSTOMIZING DYNAMIC DATA WEBSITES
There are a number of ways in which you can customize dynamic data websites to get exactly the effect you want. These range from simply modifying the HTML and CSS for the templates to customizing the way in which data is rendered though code and attribute modifications. In this section, you look at a few of these, starting with how to customize scaffolding — which, among other things, can affect the visibility of primary key values as noted in the previous section.
Controlling Scaffolding
In the sample dynamic data web application you have seen so far in this chapter, scaffolding was configured automatically for all tables (and all columns of those tables). This was achieved by setting the ScaffoldAllTables property of the ContextConfiguration for the sites to true, as shown in this code (code file Global.asax.cs):
If the value is changed to false, then the default behavior is not to provide any scaffolding for any tables or columns. To instruct the dynamic data framework to scaffold a table or column, you must provide metadata in your data model. This metadata is then read by the dynamic data runtime, and scaffolding is generated for you. Metadata can also provide information for other things — such as validation logic — as you see shortly.
Metadata is added using attributes. The attributes can be applied to types and properties to influence the UI. With designer-generated types, you can add attributes to the class. Because the designer-generated class is created as a partial class, another partial part of the class can be created to apply the attribute. However, you cannot add attributes to the designer-generated properties. If these would be done, all the modifications would be lost if the designer-generated code is regenerated. There’s a solution — another way to do this. To add metadata to properties of an entity, a separate metadata class can be created that defines the same properties as the entity type, and the attributes can be applied there.
To supply metadata for a table, you must do two things:
- Create a metadata class definition for each table you want to supply metadata for, with members that map to columns.
- Associate the metadata classes with the data model table classes.
All data model items, the generated code items, are defined as partial class definitions. In the sample code, for example, there is a class called Customer (contained in the MagicShopModel.Designer.cs file) that is used for rows in the Customers table. To supply metadata for Customers rows, you might create a class called CustomerMetadata. After you have done that, you can supply a second partial class definition for Customer and use the MetadataType attribute to link the classes together.
In the .NET Framework, metadata is supported through data annotations. As such it should come as no surprise that the MetadataType attribute, along with other metadata attributes, is found in the System.ComponentModel.DataAnnotations namespace. The MetadataType attribute uses a Type parameter to specify the metadata type. The two attributes that control scaffolding are ScaffoldTable and ScaffoldColumn. Both of these attributes have a Boolean parameter to specify whether scaffolding will be generated for a table or column.
The following code shows an example of how this is achieved (code file Customer.cs):
using System.ComponentModel.DataAnnotations;

  //...

  [MetadataType(typeof(CustomerMetadata))]
  public partial class Customer { }
And here is the metadata definition (code file CustomerMetadata.cs)
using System.ComponentModel.DataAnnotations;

  //...

  [ScaffoldTable(true)]
  public class CustomerMetadata
  {
    [ScaffoldColumn(false)]
    public string Address { get; set; }
  }
Here, the ScaffoldTable attribute specifies that scaffolding will be generated for the Customer table, and the ScaffoldColumn attribute is used to ensure that the Address column will have no scaffolding. Note that columns are represented by object type properties, regardless of the type. You just have to ensure that the name of the property matches the name of the column.
The code shown here can be used with the example web applications introduced in the previous section to hide the addresses of customers.
You can apply other scaffolding configurations. When you set Scaffolding to false with the ConfigurationContext, then only the entity types that have the ScaffoldTable attribute applied are shown.
With the metadata type it can not only be configured if the table or columns should be used for scaffolding, but it is also possible to apply other annotations such as StringLength, as discussed in the next section.
Customizing Templates
As mentioned earlier in the chapter, dynamic data is generated through a system of templates. There are page templates used for laying out controls within different types of list and details pages, and field templates for displaying different data types in display, edit, and foreign key selection modes.
All the project templates are located in the DynamicData subfolder of a dynamic data website, which has the nested subfolders described in the following table.
| DIRECTORY | DESCRIPTION |
| Content | This folder contains images used in other templates as well as the template for pagination (which is applied automatically when lists of data are long). |
| CustomPages | Use this directory if you want to supply custom pages. |
| EntityTemplates | This directory contains user control templates used for displaying a single row of data on a page, in either view, edit, or insert mode. The base class for templates in this category is EntityTemplateUserControl. |
| FieldTemplates | This directory contains user control templates used to display individual column data. Field templates derive from FieldTemplateUserControl. |
| Filters | This directory contains user control templates used to display filters for foreign key relationships. In the default code, these are drop-down lists. For example, the list page for orders includes a filter to display only those orders associated with a particular user. The base class for filters is QueryableFilterUserControl. |
| PageTemplates | This directory contains the main templates used to display single or multiple rows of data in various modes of operation. The body of these pages uses the user control templates from the other directories to build its content. Page templates are complete pages and thus derive from the base class Page. |
It is worth digging into these templates and their code-behind to see how everything fits together. For example, text columns display using two field templates in the FieldTemplates directory. The first of these, Text.ascx, is as follows (code file DynamicData/FieldTemplates/Text.ascx):
<asp:Literal runat="server" ID="Literal1" Text="<%# FieldValueString %>" />This code is self-explanatory; it simply outputs the text value of a column in a Literal control. The code-behind (code file DynamicData/FieldTemplates/Text.ascx.cs) derives from the base class FieldTemplateUserControl and overrides the FieldValueString and DataControl properties. The FieldValueString property reduces the length of the string defined in the base class if the string is used within a list control. The DataControl property returns the Literal control defined with the ASPX code.
using System.Web.DynamicData;
using System.Web.UI;

namespace DynamicDataSample
{
  public partial class TextField : FieldTemplateUserControl
  {
    private const int MAX_DISPLAYLENGTH_IN_LIST = 25;

    public override string FieldValueString
    {
      get
      {
        string value = base.FieldValueString;
        if (ContainerType == ContainerType.List)
        {
          if (value != null && value.Length > MAX_DISPLAYLENGTH_IN_LIST)
          {
            value = value.Substring(0, MAX_DISPLAYLENGTH_IN_LIST - 3) + "...";
          }
        }
        return value;
      }
    }

    public override Control DataControl
    {
      get
      {
        return Literal1;
      }
    }
  }
}
If, though, the column is in an editable mode, Text_Edit.ascx is used instead. For the edit mode always _Edit is added to the control filename and the base type (code file DynamicData/FieldTemplates/Text/Edit.ascx):
<asp:TextBox ID="TextBox1" runat="server" Text='<%# FieldValueEditString %>'
  CssClass="DDTextBox"></asp:TextBox>

<asp:RequiredFieldValidator runat="server" ID="RequiredFieldValidator1"
  CssClass="DDControl" ControlToValidate="TextBox1" Display="Dynamic"
  Enabled="false" />
<asp:RegularExpressionValidator runat="server" ID="RegularExpressionValidator1"
  CssClass="DDControl" ControlToValidate="TextBox1" Display="Dynamic"
  Enabled="false" />
<asp:DynamicValidator runat="server" ID="DynamicValidator1" CssClass="DDControl"
  ControlToValidate="TextBox1" Display="Dynamic" />
A TextBox control is used here to render the control so that it is editable, and a combination of the three validation controls is used to provide validation functionality if required. Exactly how these validation controls work is determined by the data model and its associated metadata. Non-nullable columns, for example, result in the RequiredFieldValidator being active. The DynamicValidator control is used with metadata attributes, for example, StringLength, which you can use to set the maximum permitted length of a string.
The code from the code-behind file Text_Edit.ascx.cs is shown here.
using System;
using System.Collections.Specialized;
using System.Web.DynamicData;
using System.Web.UI;

namespace DynamicDataSample
{
  public partial class Text_EditField : FieldTemplateUserControl
  {
    protected void Page_Load(object sender, EventArgs e)
    {
      if (Column.MaxLength < 20)
      {
        TextBox1.Columns = Column.MaxLength;
      }
      TextBox1.ToolTip = Column.Description;

      SetUpValidator(RequiredFieldValidator1);
      SetUpValidator(RegularExpressionValidator1);
      SetUpValidator(DynamicValidator1);
    }

    protected override void OnDataBinding(EventArgs e)
    {
      base.OnDataBinding(e);
      if (Column.MaxLength > 0)
      {
        TextBox1.MaxLength = Math.Max(FieldValueEditString.Length,
          Column.MaxLength);
      }
    }

    protected override void ExtractValues(IOrderedDictionary dictionary)
    {
      dictionary[Column.Name] = ConvertEditedValue(TextBox1.Text);
    }

    public override Control DataControl
    {
      get
      {
        return TextBox1;
      }
    }
  }
}
Now consider some examples for customizing templates and changing the template to use. Showing all orders, the OrderDate displays a date and time, as shown in Figure 42-6. However, just the date is set. With the table headings, the OrderDate and OrderItems titles should be changed to Order Date and Order Items.
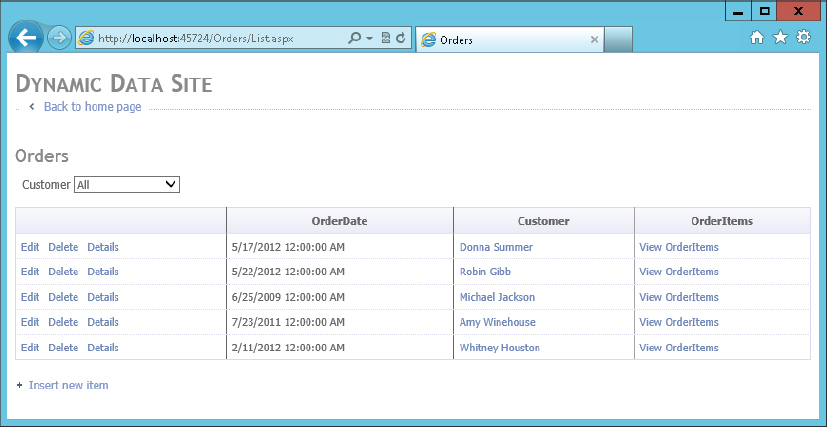
These requirements can be easily fulfilled by using metadata with the OrderMetadata class. Similar to mapping the CustomerMetadata to the Customer type as was done in the controlling scaffolding section, the mapping between Order and OrderMetadata is done in a similar way. With the following code snippet (code file OrderMetadata.cs), the OrderMetadata type now has some annotations to the OrderDate and OrderItems properties. With both of these properties, the DisplayName attribute is applied. This attribute is used when showing the titles. With OrderDate the additional annotation to define a DataType is applied. The DataType attribute changes the type to DataType.Date to show only the date both with display and edit modes (code file OrderMetadata.cs):
using System;
using System.ComponentModel;
using System.ComponentModel.DataAnnotations;
using System.Data.Objects.DataClasses;

namespace DynamicDataSample
{
  [ScaffoldTable(true)]
  public class OrderMetadata
  {
    [DisplayName("Order Date")]
    [DataType(DataType.Date)]
    public DateTime OrderDate { get; set; }

    [DisplayName("Order Items")]
    public EntityCollection<OrderItem> OrderItems { get; set; }
  }
}
DataType is an enumeration that defines Duration, EmailAddress, PhoneNumber, PostalCode, Url, and many other definitions to allow for different template selections.
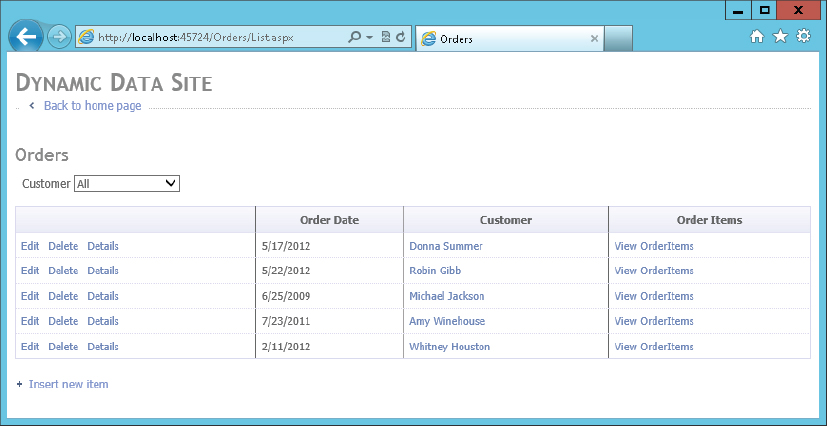
Running the application again, the title and order date changes, as shown in Figure 42-7.
If the format of the date should be represented differently, for example, with a long date format, it’s easy to create a custom field template. Although a template for the Date type (as defined by the DataType attribute) doesn’t exist with the project as it was created, it’s easy to do this just by naming the file Date.ascx within the FieldTemplates folder.
The following code snippet (code file Date.ascx) just contains a Literal control:
<%@ Control Language="C#" AutoEventWireup="true" CodeBehind="Date.ascx.cs"
  Inherits="DynamicDataSample.DynamicData.FieldTemplates.DateField" %>
<asp:Literal runat="server" ID="Literal1" Text="<%# FieldValueString %>" />
With the code-behind (code file Date.ascx.cs) the FieldValueString property is overridden to return a long date format string:
using System;
using System.Web.DynamicData;
using System.Web.UI;

namespace DynamicDataSample.DynamicData.FieldTemplates
{
  public partial class DateField : FieldTemplateUserControl
  {
    public override string FieldValueString
    {
      get
      {
        if (FieldValue == null) return null;

        DateTime date = (DateTime)FieldValue;
        return date.ToLongDateString();
      }
    }
    public override Control DataControl
    {
      get
      {
        return Literal1;
      }
    }
  }
}
Running the application once more, the custom template is selected based on its name that maps to the type.
For a single data type, multiple templates should be used; the UIHint attribute can be used to specify a template with a different name.
Configuring Routing
One of the most important concepts to grasp when dealing with dynamic data sites is that pages are generated according to actions. An action is a way to define what a page should do in response to, for example, the user clicking a particular link. There are four page actions defined for you by default: List, Details, Edit, and Insert.
Each of the page templates defined for a dynamic data site (which are also known as views) can function differently according to what action is currently performed. The routing configuration for the website associates actions with views, and each route can optionally be constrained by the tables that it should apply to. For example, you might create a new view intended for listing customers. That view might function differently from the default List.aspx view. To create the new view, you must configure routing so that the correct view will be used.
The default routing for a dynamic data website is configured in Global.asax as follows:
      routes.Add(new DynamicDataRoute("{table}/{action}.aspx")
      {
        Constraints = new RouteValueDictionary(
          new { action = "List|Details|Edit|Insert" }),
        Model = DefaultModel
      });
This uses the routing framework described earlier in the chapter; although, here routes use the DynamicDataRoute type. This class derives from Route and provides specialized functionality for dealing with actions, views, and tables.
You can notice in this code that this route includes the name of a table and the name of an action — where the value of the action is constrained to the four predefined page action types. To take the example of using a different view for listing customers, you might add the following route (before the existing one, or that one would take precedence):
      routes.Add(new DynamicDataRoute("Customers/List.aspx")
      {
        Table = "Customers",
        Action = PageAction.List,
        ViewName = "ListCustomers",
        Model = DefaultModel
      });
This route associates the /Customers/List.aspx URL with the view ListCustomers.aspx, so for this code to work, you must supply a file of this name in the PageTemplates directory. You can also see that the Table and Action properties are specified here because they are not available in the URL any more. The way the dynamic data routing works is that {table} and {action} routing parameters are used to populate the Table and Action properties, and in this URL these parameters are not present.
You can build up as complex a system of routing as you want in this manner, providing specialized pages for tables and actions as you see fit. You can also make use of the ListDetails.aspx view, which is a master-detail view of data that enables row selection and inline editing. To use this view, you can supply alternative routes, or simply uncomment the following routes that the dynamic data site template provides (code file Global.asax.cs):
      routes.Add(new DynamicDataRoute("{table}/ListDetails.aspx")
      {
        Action = PageAction.List,
        ViewName = "ListDetails",
        Model = DefaultModel
      });

      routes.Add(new DynamicDataRoute("{table}/ListDetails.aspx")
      {
        Action = PageAction.Details,
        ViewName = "ListDetails",
        Model = DefaultModel
      });
These routes can cause the ListDetails.aspx view to be used whenever the List or Details page actions are used. The Edit and Insert page actions are then not required because (as mentioned earlier) editing capabilities are provided inline. An example of this is shown in Figure 42-8.

SUMMARY
In this chapter, you saw how to create dynamic data websites that provide seamless integration of your data with a powerful frontend ASP.NET UI. This technology provides so much code for you by default that at times it feels like your websites write themselves. You saw how to customize scaffolding, templates, and routing to make sites work just the way you want.
Having the framework like ASP.NET Dynamic Data in place can drastically reduce the work you must do to access data, while leaving you free to concentrate on the rest of your website.
In the next chapter, you look at Windows Communication Foundation, which enables you to make remote calls across application boundaries in a flexible, secure way. This underpins a lot of web development, because you often want to pull in data from disparate sources for your web applications rather than including in-place databases as you have been doing in this chapter.