
Chapter 14
Memory Management and Pointers
WHAT’S IN THIS CHAPTER?
- Allocating space on the stack and heap at runtime
- Garbage collection
- Releasing unmanaged resources using destructors and the System.IDisposable interface
- The syntax for using pointers in C#
- Using pointers to implement high-performance stack-based arrays
WROX.COM CODE DOWNLOADS FOR THIS CHAPTER
The wrox.com code downloads for this chapter are found at http://www.wrox.com/remtitle.cgi?isbn=1118314425 on the Download Code tab. The code for this chapter is divided into the following major examples:
- PointerPlayground
- PointerPlayground2
- QuickArray
MEMORY MANAGEMENT
This chapter presents various aspects of memory management and memory access. Although the runtime removes much of the responsibility for memory management from the programmer, it is useful to understand how memory management works, and important to know how to work with unmanaged resources efficiently.
A good understanding of memory management and knowledge of the pointer capabilities provided by C# will better enable you to integrate C# code with legacy code and perform efficient memory manipulation in performance-critical systems.
MEMORY MANAGEMENT UNDER THE HOOD
One of the advantages of C# programming is that the programmer does not need to worry about detailed memory management; the garbage collector deals with the problem of memory clean up on your behalf. As a result, you get something that approximates the efficiency of languages such as C++ without the complexity of having to handle memory management yourself as you do in C++. However, although you do not have to manage memory manually, it still pays to understand what is going on behind the scenes. Understanding how your program manages memory under the covers will help you increase the speed and performance of your applications. This section looks at what happens in the computer’s memory when you allocate variables.
Value Data Types
Windows uses a system known as virtual addressing, in which the mapping from the memory address seen by your program to the actual location in hardware memory is entirely managed by Windows. As a result, each process on a 32-bit processor sees 4GB of available memory, regardless of how much hardware memory you actually have in your computer (on 64-bit processors this number is greater). This memory contains everything that is part of the program, including the executable code, any DLLs loaded by the code, and the contents of all variables used when the program runs. This 4GB of memory is known as the virtual address space or virtual memory. For convenience, this chapter uses the shorthand memory.
Each memory location in the available 4GB is numbered starting from zero. To access a value stored at a particular location in memory, you need to supply the number that represents that memory location. In any compiled high-level language, including C#, Visual Basic, C++, and Java, the compiler converts human-readable variable names into memory addresses that the processor understands.
Somewhere inside a processor’s virtual memory is an area known as the stack. The stack stores value data types that are not members of objects. In addition, when you call a method, the stack is used to hold a copy of any parameters passed to the method. To understand how the stack works, you need to understand the importance of variable scope in C#. If variable a goes into scope before variable b, then b will always go out of scope first. Consider the following code:
{
   int a;
   // do something
   {
      int b;
      // do something else
   }
}
First, a is declared. Then, inside the inner code block, b is declared. Then the inner code block terminates and b goes out of scope, then a goes out of scope. Therefore, the lifetime of b is entirely contained within the lifetime of a. The idea that you always deallocate variables in the reverse order of how you allocate them is crucial to the way the stack works.
Note that b is in a different block from code (defined by a different nesting of curly braces). For this reason, it is contained within a different scope. This is termed as block scope or structure scope.
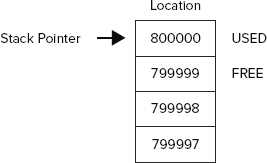
You do not know exactly where in the address space the stack is — you don’t need to know for C# development. A stack pointer (a variable maintained by the operating system) identifies the next free location on the stack. When your program first starts running, the stack pointer will point to just past the end of the block of memory that is reserved for the stack. The stack fills downward, from high memory addresses to low addresses. As data is put on the stack, the stack pointer is adjusted accordingly, so it always points to just past the next free location. This is illustrated in Figure 14-1, which shows a stack pointer with a value of 800000 (0xC3500 in hex); the next free location is the address 799999.
The following code tells the compiler that you need space in memory to store an integer and a double, and these memory locations are referred to as nRacingCars and engineSize. The line that declares each variable indicates the point at which you start requiring access to this variable. The closing curly brace of the block in which the variables are declared identifies the point at which both variables go out of scope:
{
   int nRacingCars = 10;
   double engineSize = 3000.0;
   // do calculations;
}
Assuming that you use the stack shown in Figure 14-1, when the variable nRacingCars comes into scope and is assigned the value 10, the value 10 is placed in locations 799996 through 799999, the 4 bytes just below the location pointed to by the stack pointer (4 bytes because that’s how much memory is needed to store an int.) To accommodate this, 4 is subtracted from the value of the stack pointer, so it now points to the location 799996, just after the new first free location (799995).
The next line of code declares the variable engineSize (a double) and initializes it to the value 3000.0. A double occupies eight bytes, so the value 3000.0 is placed in locations 799988 through 799995 on the stack, and the stack pointer is decremented by eight, so that it again points to the location just after the next free location on the stack.
When engineSize goes out of scope, the runtime knows that it is no longer needed. Because of the way variable lifetimes are always nested, you can guarantee that whatever happened while engineSize was in scope, the stack pointer is now pointing to the location where engineSize is stored. To remove engineSize from the stack, the stack pointer is incremented by eight and it now points to the location immediately after the end of engineSize. At this point in the code, you are at the closing curly brace, so nRacingCars also goes out of scope. The stack pointer is incremented by 4. When another variable comes into scope after engineSize and nRacingCars have been removed from the stack, it overwrites the memory descending from location 799999, where nRacingCars was stored.
If the compiler hits a line such as int i, j, then the order of variables coming into scope looks indeterminate. Both variables are declared at the same time and go out of scope at the same time. In this situation, it does not matter in what order the two variables are removed from memory. The compiler internally always ensures that the one that was put in memory first is removed last, thus preserving the rule that prohibits crossover of variable lifetimes.
Reference Data Types
Although the stack provides very high performance, it is not flexible enough to be used for all variables. The requirement that the lifetime of a variable must be nested is too restrictive for many purposes. Often, you need to use a method to allocate memory for storing data and keeping that data available long after that method has exited. This possibility exists whenever storage space is requested with the new operator — as is the case for all reference types. That is where the managed heap comes in.
If you have done any C++ coding that required low-level memory management, you are familiar with the heap. The managed heap is not quite the same as the heap C++ uses, however; the managed heap works under the control of the garbage collector and provides significant benefits compared to traditional heaps.
The managed heap (or heap for short) is just another area of memory from the processor’s available 4GB. The following code demonstrates how the heap works and how memory is allocated for reference data types:
void DoWork()
{
   Customer arabel;
   arabel = new Customer();
   Customer otherCustomer2 = new EnhancedCustomer();
}
This code assumes the existence of two classes, Customer and EnhancedCustomer. The EnhancedCustomer class extends the Customer class.
First, you declare a Customer reference called arabel. The space for this is allocated on the stack, but remember that this is only a reference, not an actual Customer object. The arabel reference occupies 4 bytes, enough space to hold the address at which a Customer object will be stored. (You need 4 bytes to represent a memory address as an integer value between 0 and 4GB.)
The next line,
arabel = new Customer();does several things. First, it allocates memory on the heap to store a Customer object (a real object, not just an address). Then it sets the value of the variable arabel to the address of the memory it has allocated to the new Customer object. (It also calls the appropriate Customer constructor to initialize the fields in the class instance, but we won’t worry about that here.)
The Customer instance is not placed on the stack — it is placed on the heap. In this example, you don’t know precisely how many bytes a Customer object occupies, but assume for the sake of argument that it is 32. These 32 bytes contain the instance fields of Customer as well as some information that .NET uses to identify and manage its class instances.
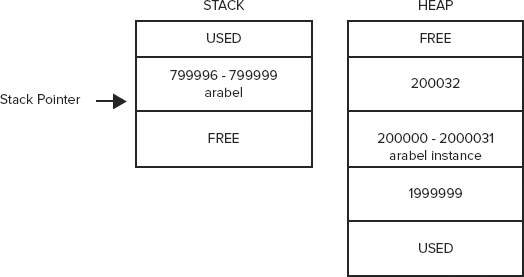
To find a storage location on the heap for the new Customer object, the .NET runtime looks through the heap and grabs the first adjacent, unused block of 32 bytes. Again for the sake of argument, assume that this happens to be at address 200000, and that the arabel reference occupied locations 799996 through 799999 on the stack. This means that before instantiating the arabel object, the memory content will look similar to Figure 14-2.

After allocating the new Customer object, the content of memory will look like Figure 14-3. Note that unlike the stack, memory in the heap is allocated upward, so the free space can be found above the used space.
The next line of code both declares a Customer reference and instantiates a Customer object. In this instance, space on the stack for the otherCustomer2 reference is allocated and space for the mrJones object is allocated on the heap in a single line of code:
Customer otherCustomer2 = new EnhancedCustomer();This line allocates 4 bytes on the stack to hold the otherCustomer2 reference, stored at locations 799992 through 799995. The otherCustomer2 object is allocated space on the heap starting at location 200032.
It is clear from the example that the process of setting up a reference variable is more complex than that for setting up a value variable, and there is a performance overhead. In fact, the process is somewhat oversimplified here, because the .NET runtime needs to maintain information about the state of the heap, and this information needs to be updated whenever new data is added to the heap. Despite this overhead, you now have a mechanism for allocating variables that is not constrained by the limitations of the stack. By assigning the value of one reference variable to another of the same type, you have two variables that reference the same object in memory. When a reference variable goes out of scope, it is removed from the stack as described in the previous section, but the data for a referenced object is still sitting on the heap. The data remains on the heap until either the program terminates or the garbage collector removes it, which happens only when it is no longer referenced by any variables.
That is the power of reference data types, and you will see this feature used extensively in C# code. It means that you have a high degree of control over the lifetime of your data, because it is guaranteed to exist in the heap as long as you are maintaining some reference to it.
Garbage Collection
The previous discussion and diagrams show the managed heap working very much like the stack, to the extent that successive objects are placed next to each other in memory. This means that you can determine where to place the next object by using a heap pointer that indicates the next free memory location, which is adjusted as you add more objects to the heap. However, things are complicated by the fact that the lives of the heap-based objects are not coupled to the scope of the individual stack-based variables that reference them.
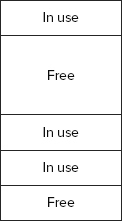
When the garbage collector runs, it removes all those objects from the heap that are no longer referenced. Immediately after doing this, the heap will have objects scattered on it, mixed up with memory that has just been freed (see Figure 14-4).
If the managed heap stayed like this, allocating space for new objects would be an awkward process, with the runtime having to search through the heap for a block of memory big enough to store each new object. However, the garbage collector does not leave the heap in this state. As soon as the garbage collector has freed up all the objects it can, it compacts the heap by moving all the remaining objects to form one continuous block of memory. This means that the heap can continue working just like the stack, as far as locating where to store new objects. Of course, when the objects are moved about, all the references to those objects need to be updated with the correct new addresses, but the garbage collector handles that too.
This action of compacting by the garbage collector is where the managed heap works very differently from old, unmanaged heaps. With the managed heap, it is just a question of reading the value of the heap pointer, rather than iterating through a linked list of addresses to find somewhere to put the new data. For this reason, instantiating an object under .NET is much faster. Interestingly, accessing objects tends to be faster too, because the objects are compacted toward the same area of memory on the heap, resulting in less page swapping. Microsoft believes that these performance gains more than compensate for the performance penalty you get whenever the garbage collector needs to do some work to compact the heap and change all those references to objects it has moved.
When the garbage collector runs, it actually hurts the performance of your application as it is impossible for your application to continue running while the garbage collector finishes its tasks. Because of this, it’s best to let the runtime decide when to do garbage collection and not try to optimize it yourself.
When objects are created, they are placed within the managed heap. The first section of the heap is called the generation 0 section, or gen 0. As your new objects are created, they are moved into this section of the heap. Therefore, this is where the youngest objects reside.
Your objects remain there until the first collection of objects occurs through the garbage collection process. The objects that remain alive after this cleansing are compacted and then moved to the next section or generational part of the heap — the generation 1, or gen 1, section.
At this point, the generation 0 section is empty, and all new objects are again placed in this section. Older objects that survived the GC (garbage collection) process are found further down in the generation 1 section. This movement of aged items actually occurs one more time. The next collection process that occurs is then repeated. This means that the items that survived the GC process from the generation 1 section are moved to the generation 2 section, and the gen 0 items go to gen 1, again leaving gen 0 open for new objects.
This process greatly improves the performance of your application. Typically, your youngest objects are the ones that can be collected, and a large number of younger-related objects might be reclaimed as well. If these objects reside next to each other in the heap, then the garbage collection process will be faster. In addition, because related objects are residing next to each other, program execution will be faster all around.
Another performance-related aspect of garbage collection in .NET is how the framework deals with larger objects that are added to the heap. Under the covers of .NET, larger objects have their own managed heap, referred to as the Large Object Heap. When objects greater than 85,000 bytes are utilized, they go to this special heap rather than the main heap. Your .NET application doesn’t know the difference, as this is all managed for you. Because compressing large items in the heap is expensive, it isn’t done for the objects residing in the Large Object Heap.
FREEING UNMANAGED RESOURCES
The presence of the garbage collector means that you usually do not need to worry about objects you no longer need; you simply allow all references to those objects to go out of scope and let the garbage collector free memory as required. However, the garbage collector does not know how to free unmanaged resources (such as file handles, network connections, and database connections). When managed classes encapsulate direct or indirect references to unmanaged resources, you need to make special provisions to ensure that the unmanaged resources are released when an instance of the class is garbage collected.
When defining a class, you can use two mechanisms to automate the freeing of unmanaged resources. These mechanisms are often implemented together because each provides a slightly different approach:
- Declare a destructor (or finalizer) as a member of your class.
- Implement the System.IDisposable interface in your class.
The following sections discuss each of these mechanisms in turn, and then look at how to implement them together for best results.
Destructors
You have seen that constructors enable you to specify actions that must take place whenever an instance of a class is created. Conversely, destructors are called before an object is destroyed by the garbage collector. Given this behavior, a destructor would initially seem like a great place to put code to free unmanaged resources and perform a general clean up. Unfortunately, things are not so straightforward.
The syntax for a destructor will be familiar to C++ developers. It looks like a method, with the same name as the containing class, but prefixed with a tilde (~). It has no return type, and takes no parameters or access modifiers. Here is an example:
class MyClass
{
   ~MyClass()
   {
      // destructor implementation
   }
}
When the C# compiler compiles a destructor, it implicitly translates the destructor code to the equivalent of a Finalize method, which ensures that the Finalize method of the parent class is executed. The following example shows the C# code equivalent to the Intermediate Language (IL) that the compiler would generate for the ~MyClass destructor:
protected override void Finalize()
{
   try
   {
      // destructor implementation
   }
   finally
   {
      base.Finalize();
   }
}
As shown, the code implemented in the ~MyClass destructor is wrapped in a try block contained in the Finalize method. A call to the parent’s Finalize method is ensured by placing the call in a finally block. You can read about try and finally blocks in Chapter 16, “Errors and Exceptions.”
Experienced C++ developers make extensive use of destructors, sometimes not only to clean up resources but also to provide debugging information or perform other tasks. C# destructors are used far less than their C++ equivalents. The problem with C# destructors as compared to their C++ counterparts is that they are nondeterministic. When a C++ object is destroyed, its destructor runs immediately. However, because of the way the garbage collector works when using C#, there is no way to know when an object’s destructor will actually execute. Hence, you cannot place any code in the destructor that relies on being run at a certain time, and you should not rely on the destructor being called for different class instances in any particular order. When your object is holding scarce and critical resources that need to be freed as soon as possible, you do not want to wait for garbage collection.
Another problem with C# destructors is that the implementation of a destructor delays the final removal of an object from memory. Objects that do not have a destructor are removed from memory in one pass of the garbage collector, but objects that have destructors require two passes to be destroyed: The first pass calls the destructor without removing the object, and the second pass actually deletes the object. In addition, the runtime uses a single thread to execute the Finalize methods of all objects. If you use destructors frequently, and use them to execute lengthy clean-up tasks, the impact on performance can be noticeable.
The IDisposable Interface
In C#, the recommended alternative to using a destructor is using the System.IDisposable interface. The IDisposable interface defines a pattern (with language-level support) that provides a deterministic mechanism for freeing unmanaged resources and avoids the garbage collector–related problems inherent with destructors. The IDisposable interface declares a single method named Dispose, which takes no parameters and returns void. Here is an implementation for MyClass:
class MyClass: IDisposable
{
   public void Dispose()
   {
      // implementation
   }
}
The implementation of Dispose should explicitly free all unmanaged resources used directly by an object and call Dispose on any encapsulated objects that also implement the IDisposable interface. In this way, the Dispose method provides precise control over when unmanaged resources are freed.
Suppose that you have a class named ResourceGobbler, which relies on the use of some external resource and implements IDisposable. If you want to instantiate an instance of this class, use it, and then dispose of it, you could do so like this:
ResourceGobbler theInstance = new ResourceGobbler();

// do your processing

theInstance.Dispose();
Unfortunately, this code fails to free the resources consumed by theInstance if an exception occurs during processing, so you should write the code as follows using a try block (as covered in detail in Chapter 16):
ResourceGobbler theInstance = null;

try
{
   theInstance = new ResourceGobbler();

   // do your processing
}
finally
{
   if (theInstance != null)
   {
      theInstance.Dispose();
   }
}
This version ensures that Dispose is always called on theInstance and that any resources consumed by it are always freed, even if an exception occurs during processing. However, if you always had to repeat such a construct, it would result in confusing code. C# offers a syntax that you can use to guarantee that Dispose is automatically called against an object that implements IDisposable when its reference goes out of scope. The syntax to do this involves the using keyword — though now in a very different context, which has nothing to do with namespaces. The following code generates IL code equivalent to the try block just shown:
using (ResourceGobbler theInstance = new ResourceGobbler())
{
   // do your processing
}
The using statement, followed in brackets by a reference variable declaration and instantiation, causes that variable to be scoped to the accompanying statement block. In addition, when that variable goes out of scope, its Dispose method will be called automatically, even if an exception occurs. However, if you are already using try blocks to catch other exceptions, it is cleaner and avoids additional code indentation if you avoid the using statement and simply call Dispose in the finally clause of the existing try block.
Implementing IDisposable and a Destructor
The previous sections discussed two alternatives for freeing unmanaged resources used by the classes you create:
- The execution of a destructor is enforced by the runtime but is nondeterministic and places an unacceptable overhead on the runtime because of the way garbage collection works.
- The IDisposable interface provides a mechanism that enables users of a class to control when resources are freed but requires discipline to ensure that Dispose is called.
In general, the best approach is to implement both mechanisms to gain the benefits of both while overcoming their limitations. You implement IDisposable on the assumption that most programmers will call Dispose correctly, but implement a destructor as a safety mechanism in case Dispose is not called. Here is an example of a dual implementation:
using System;

public class ResourceHolder: IDisposable
{

   private bool isDisposed = false;

   public void Dispose()
   {
      Dispose(true);
      GC.SuppressFinalize(this);
   }

   protected virtual void Dispose(bool disposing)
   {
      if (!isDisposed)
      {
         if (disposing)
         {
            // Cleanup managed objects by calling their
            // Dispose() methods.
         }
         // Cleanup unmanaged objects
      }
      isDisposed = true;
   }

   ~ResourceHolder()
   {
      Dispose (false);
   }

   public void SomeMethod()
   {
      // Ensure object not already disposed before execution of any method
      if(isDisposed)
      {
         throw new ObjectDisposedException("ResourceHolder");
      }

      // method implementation...
   }
}
You can see from this code that there is a second protected overload of Dispose that takes one bool parameter — and this is the method that does all the cleaning up. Dispose(bool) is called by both the destructor and by IDisposable.Dispose. The point of this approach is to ensure that all clean-up code is in one place.
The parameter passed to Dispose(bool) indicates whether Dispose(bool) has been invoked by the destructor or by IDisposable.Dispose — Dispose(bool) should not be invoked from anywhere else in your code. The idea is this:
- If a consumer calls IDisposable.Dispose, that consumer is indicating that all managed and unmanaged resources associated with that object should be cleaned up.
- If a destructor has been invoked, all resources still need to be cleaned up. However, in this case, you know that the destructor must have been called by the garbage collector and you should not attempt to access other managed objects because you can no longer be certain of their state. In this situation, the best you can do is clean up the known unmanaged resources and hope that any referenced managed objects also have destructors that will perform their own cleaning up.
The isDisposed member variable indicates whether the object has already been disposed of and ensures that you do not try to dispose of member variables more than once. It also allows you to test whether an object has been disposed of before executing any instance methods, as shown in SomeMethod. This simplistic approach is not thread-safe and depends on the caller ensuring that only one thread is calling the method concurrently. Requiring a consumer to enforce synchronization is a reasonable assumption and one that is used repeatedly throughout the .NET class libraries (in the Collection classes, for example). Threading and synchronization are discussed in Chapter 21, “Threads, Tasks, and Synchronization.”
Finally, IDisposable.Dispose contains a call to the method System.GC.SuppressFinalize. GC is the class that represents the garbage collector, and the SuppressFinalize method tells the garbage collector that a class no longer needs to have its destructor called. Because your implementation of Dispose has already done all the clean up required, there’s nothing left for the destructor to do. Calling SuppressFinalize means that the garbage collector will treat that object as if it doesn’t have a destructor at all.
UNSAFE CODE
As you have just seen, C# is very good at hiding much of the basic memory management from the developer, thanks to the garbage collector and the use of references. However, sometimes you will want direct access to memory. For example, you might want to access a function in an external (non-.NET) DLL that requires a pointer to be passed as a parameter (as many Windows API functions do), or possibly for performance reasons. This section examines the C# facilities that provide direct access to the content of memory.
Accessing Memory Directly with Pointers
Although we are introducing pointers as if they were a new topic, in reality pointers are not new at all. You have been using references freely in your code, and a reference is simply a type-safe pointer. You have already seen how variables that represent objects and arrays actually store the memory address of where the corresponding data (the referent) is stored. A pointer is simply a variable that stores the address of something else in the same way as a reference. The difference is that C# does not allow you direct access to the address contained in a reference variable. With a reference, the variable is treated syntactically as if it stores the actual content of the referent.
C# references are designed to make the language simpler to use and to prevent you from inadvertently doing something that corrupts the contents of memory. With a pointer, however, the actual memory address is available to you. This gives you a lot of power to perform new kinds of operations. For example, you can add 4 bytes to the address in order to examine or even modify whatever data happens to be stored 4 bytes further in memory.
There are two main reasons for using pointers:
- Backward compatibility — Despite all the facilities provided by the .NET runtime, it is still possible to call native Windows API functions, and for some operations this may be the only way to accomplish your task. These API functions are generally written in C and often require pointers as parameters. However, in many cases it is possible to write the DllImport declaration in a way that avoids use of pointers — for example, by using the System.IntPtr class.
- Performance — On those occasions when speed is of the utmost importance, pointers can provide a route to optimized performance. If you know what you are doing, you can ensure that data is accessed or manipulated in the most efficient way. However, be aware that more often than not, there are other areas of your code where you can likely make the necessary performance improvements without resorting to using pointers. Try using a code profiler to look for the bottlenecks in your code — one is included with Visual Studio.
Low-level memory access has a price. The syntax for using pointers is more complex than that for reference types, and pointers are unquestionably more difficult to use correctly. You need good programming skills and an excellent ability to think carefully and logically about what your code is doing to use pointers successfully. Otherwise, it is very easy to introduce subtle, difficult-to-find bugs into your program when using pointers. For example, it is easy to overwrite other variables, cause stack overflows, access areas of memory that don’t store any variables, or even overwrite information about your code that is needed by the .NET runtime, thereby crashing your program.
In addition, if you use pointers your code must be granted a high level of trust by the runtime’s code access security mechanism or it will not be allowed to execute. Under the default code access security policy, this is only possible if your code is running on the local machine. If your code must be run from a remote location, such as the Internet, users must grant your code additional permissions for it to work. Unless the users trust you and your code, they are unlikely to grant these permissions. Code access security is discussed in more detail in Chapter 22, “Security.”
Despite these issues, pointers remain a very powerful and flexible tool in the writing of efficient code.
Writing Unsafe Code with the unsafe Keyword
As a result of the risks associated with pointers, C# allows the use of pointers only in blocks of code that you have specifically marked for this purpose. The keyword to do this is unsafe. You can mark an individual method as being unsafe like this:
unsafe int GetSomeNumber()
{
   // code that can use pointers
}
Any method can be marked as unsafe, regardless of what other modifiers have been applied to it (for example, static methods or virtual methods). In the case of methods, the unsafe modifier applies to the method’s parameters, allowing you to use pointers as parameters. You can also mark an entire class or struct as unsafe, which means that all its members are assumed unsafe:
unsafe class MyClass
{
   // any method in this class can now use pointers
}
Similarly, you can mark a member as unsafe:
class MyClass
{
   unsafe int* pX;   // declaration of a pointer field in a class
}
Or you can mark a block of code within a method as unsafe:
void MyMethod()
{
   // code that doesn't use pointers
   unsafe
   {
      // unsafe code that uses pointers here
   }
   // more 'safe' code that doesn't use pointers
}
Note, however, that you cannot mark a local variable by itself as unsafe:
int MyMethod()
{
   unsafe int *pX;   // WRONG
}
If you want to use an unsafe local variable, you need to declare and use it inside a method or block that is unsafe. There is one more step before you can use pointers. The C# compiler rejects unsafe code unless you tell it that your code includes unsafe blocks. The flag to do this is unsafe. Hence, to compile a file named MySource.cs that contains unsafe blocks (assuming no other compiler options), the command is
csc /unsafe MySource.csor
csc -unsafe MySource.cs
Pointer Syntax
After you have marked a block of code as unsafe, you can declare a pointer using the following syntax:
int* pWidth, pHeight;
double* pResult;
byte*[] pFlags;
This code declares four variables: pWidth and pHeight are pointers to integers, pResult is a pointer to a double, and pFlags is an array of pointers to bytes. It is common practice to use the prefix p in front of names of pointer variables to indicate that they are pointers. When used in a variable declaration, the symbol * indicates that you are declaring a pointer (that is, something that stores the address of a variable of the specified type).
When you have declared variables of pointer types, you can use them in the same way as normal variables, but first you need to learn two more operators:
- & means take the address of, and converts a value data type to a pointer — for example int to *int. This operator is known as the address operator.
- * means get the content of this address, and converts a pointer to a value data type — for example, *float to float. This operator is known as the indirection operator (or the dereference operator).
You can see from these definitions that & and * have opposite effects.
The following code shows examples of how to use these operators:
int x = 10;
int* pX, pY;
pX = &x;
pY = pX;
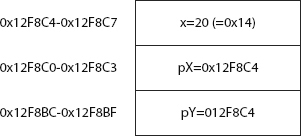
*pY = 20;You start by declaring an integer, x, with the value 10 followed by two pointers to integers, pX and pY. You then set pX to point to x (that is, you set the content of pX to the address of x). Then you assign the value of pX to pY, so that pY also points to x. Finally, in the statement *pY = 20, you assign the value 20 as the contents of the location pointed to by pY — in effect changing x to 20 because pY happens to point to x. Note that there is no particular connection between the variables pY and x. It is just that at the present time, pY happens to point to the memory location at which x is held.
To get a better understanding of what is going on, consider that the integer x is stored at memory locations 0x12F8C4 through 0x12F8C7 (1243332 to 1243335 in decimal) on the stack (there are four locations because an int occupies 4 bytes). Because the stack allocates memory downward, this means that the variables pX will be stored at locations 0x12F8C0 to 0x12F8C3, and pY will end up at locations 0x12F8BC to 0x12F8BF. Note that pX and pY also occupy 4 bytes each. That is not because an int occupies 4 bytes, but because on a 32-bit processor you need 4 bytes to store an address. With these addresses, after executing the previous code, the stack will look like Figure 14-5.
You can declare a pointer to any value type (that is, any of the predefined types uint, int, byte, and so on, or to a struct). However, it is not possible to declare a pointer to a class or an array; this is because doing so could cause problems for the garbage collector. To work properly, the garbage collector needs to know exactly what class instances have been created on the heap, and where they are; but if your code started manipulating classes using pointers, you could very easily corrupt the information on the heap concerning classes that the .NET runtime maintains for the garbage collector. In this context, any data type that the garbage collector can access is known as a managed type. Pointers can only be declared as unmanaged types because the garbage collector cannot deal with them.
Casting Pointers to Integer Types
Because a pointer really stores an integer that represents an address, you won’t be surprised to know that the address in any pointer can be converted to or from any integer type. Pointer-to-integer-type conversions must be explicit. Implicit conversions are not available for such conversions. For example, it is perfectly legitimate to write the following:
int x = 10;
int* pX, pY;
pX = &x;
pY = pX;
*pY = 20;
uint y = (uint)pX;
int* pD = (int*)y;
The address held in the pointer pX is cast to a uint and stored in the variable y. You have then cast y back to an int* and stored it in the new variable pD. Hence, now pD also points to the value of x.
The primary reason for casting a pointer value to an integer type is to display it. The Console.Write and Console.WriteLine methods do not have any overloads that can take pointers, but they will accept and display pointer values that have been cast to integer types:
Console.WriteLine("Address is " + pX);   // wrong -- will give a
                                         // compilation error
Console.WriteLine("Address is " + (uint)pX);   // OK
You can cast a pointer to any of the integer types. However, because an address occupies 4 bytes on 32-bit systems, casting a pointer to anything other than a uint, long, or ulong is almost certain to lead to overflow errors. (An int causes problems because its range is from roughly −2 billion to 2 billion, whereas an address runs from zero to about 4 billion.) When C# is released for 64-bit processors, an address will occupy 8 bytes. Hence, on such systems, casting a pointer to anything other than ulong is likely to lead to overflow errors.
It is also important to be aware that the checked keyword does not apply to conversions involving pointers. For such conversions, exceptions will not be raised when overflows occur, even in a checked context. The .NET runtime assumes that if you are using pointers, you know what you are doing and are not worried about possible overflows.
Casting Between Pointer Types
You can also explicitly convert between pointers pointing to different types. For example, the following is perfectly legal code:
byte aByte = 8;
byte* pByte= &aByte;
double* pDouble = (double*)pByte;
However, if you try something like this, be careful. In this example, if you look at the double value pointed to by pDouble, you will actually be looking up some memory that contains a byte (aByte), combined with some other memory, and treating it as if this area of memory contained a double, which will not give you a meaningful value. However, you might want to convert between types to implement the equivalent of a C union, or you might want to cast pointers from other types into pointers to sbyte to examine individual bytes of memory.
void Pointers
If you want to maintain a pointer but not specify to what type of data it points, you can declare it as a pointer to a void:
int* pointerToInt;
void* pointerToVoid;
pointerToVoid = (void*)pointerToInt;
The main use of this is if you need to call an API function that requires void* parameters. Within the C# language, there isn’t a great deal that you can do using void pointers. In particular, the compiler will flag an error if you attempt to dereference a void pointer using the * operator.
Pointer Arithmetic
It is possible to add or subtract integers to and from pointers. However, the compiler is quite clever about how it arranges this. For example, suppose that you have a pointer to an int and you try to add 1 to its value. The compiler will assume that you actually mean you want to look at the memory location following the int, and hence it will increase the value by 4 bytes — the size of an int. If it is a pointer to a double, adding 1 will actually increase the value of the pointer by 8 bytes, the size of a double. Only if the pointer points to a byte or sbyte (1 byte each), will adding 1 to the value of the pointer actually change its value by 1.
You can use the operators +, -, +=, -=, ++, and -- with pointers, with the variable on the right side of these operators being a long or ulong.
For example, assume the following definitions:
uint u = 3;
byte b = 8;
double d = 10.0;
uint* pUint= &u;        // size of a uint is 4
byte* pByte = &b;       // size of a byte is 1
double* pDouble = &d;   // size of a double is 8
Next, assume the addresses to which these pointers point are as follows:
- pUint: 1243332
- pByte: 1243328
- pDouble: 1243320
Then execute this code:
++pUint;              // adds (1*4) = 4 bytes to pUint
pByte -= 3;           // subtracts (3*1) = 3 bytes from pByte
double* pDouble2 = pDouble + 4; // pDouble2 = pDouble + 32 bytes (4*8 bytes)
The pointers now contain this:
- pUint: 1243336
- pByte: 1243325
- pDouble2: 1243352
You can also subtract one pointer from another pointer, if both pointers point to the same data type. In this case, the result is a long whose value is given by the difference between the pointer values divided by the size of the type that they represent:
double* pD1 = (double*)1243324;   // note that it is perfectly valid to
                                  // initialize a pointer like this.
double* pD2 = (double*)1243300;
long L = pD1-pD2;                 // gives the result 3 (=24/sizeof(double))
The sizeof Operator
This section has been referring to the size of various data types. If you need to use the size of a type in your code, you can use the sizeof operator, which takes the name of a data type as a parameter and returns the number of bytes occupied by that type, as shown in this example:
int x = sizeof(double);This will set x to the value 8.
The advantage of using sizeof is that you don’t have to hard-code data type sizes in your code, making your code more portable. For the predefined data types, sizeof returns the following values:
sizeof(sbyte) = 1;  sizeof(byte) = 1;
sizeof(short) = 2;  sizeof(ushort) = 2;
sizeof(int) = 4;    sizeof(uint) = 4;
sizeof(long) = 8;   sizeof(ulong) = 8;
sizeof(char) = 2;   sizeof(float) = 4;
sizeof(double) = 8; sizeof(bool) = 1;
You can also use sizeof for structs that you define yourself, although in that case, the result depends on what fields are in the struct. You cannot use sizeof for classes.
Pointers to Structs: The Pointer Member Access Operator
Pointers to structs work in exactly the same way as pointers to the predefined value types. There is, however, one condition — the struct must not contain any reference types. This is due to the restriction mentioned earlier that pointers cannot point to any reference types. To avoid this, the compiler will flag an error if you create a pointer to any struct that contains any reference types.
Suppose that you had a struct defined like this:
struct MyStruct
{
   public long X;
   public float F;
}
You could define a pointer to it as follows:
MyStruct* pStruct;Then you could initialize it like this:
MyStruct Struct = new MyStruct();
pStruct = &Struct;
It is also possible to access member values of a struct through the pointer:
(*pStruct).X = 4;
(*pStruct).F = 3.4f;
However, this syntax is a bit complex. For this reason, C# defines another operator that enables you to access members of structs through pointers using a simpler syntax. It is known as the pointer member access operator, and the symbol is a dash followed by a greater-than sign, so it looks like an arrow: ->.
Using the pointer member access operator, the previous code can be rewritten like this:
pStruct->X = 4;
pStruct->F = 3.4f;
You can also directly set up pointers of the appropriate type to point to fields within a struct:
long* pL = &(Struct.X);
float* pF = &(Struct.F);
or
long* pL = &(pStruct->X);
float* pF = &(pStruct->F);
Pointers to Class Members
As indicated earlier, it is not possible to create pointers to classes. That is because the garbage collector does not maintain any information about pointers, only about references, so creating pointers to classes could cause garbage collection to not work properly.
However, most classes do contain value type members, and you might want to create pointers to them. This is possible but requires a special syntax. For example, suppose that you rewrite the struct from the previous example as a class:
class MyClass
{
   public long X;
   public float F;
}
Then you might want to create pointers to its fields, X and F, in the same way as you did earlier. Unfortunately, doing so will produce a compilation error:
MyClass myObject = new MyClass();
long* pL = &(myObject.X);   // wrong -- compilation error
float* pF = &(myObject.F);  // wrong -- compilation error
Although X and F are unmanaged types, they are embedded in an object, which sits on the heap. During garbage collection, the garbage collector might move MyObject to a new location, which would leave pL and pF pointing to the wrong memory addresses. Because of this, the compiler will not let you assign addresses of members of managed types to pointers in this manner.
The solution is to use the fixed keyword, which tells the garbage collector that there may be pointers referencing members of certain objects, so those objects must not be moved. The syntax for using fixed looks like this if you just want to declare one pointer:
MyClass myObject = new MyClass();
fixed (long* pObject = &(myObject.X))
{
   // do something
}
You define and initialize the pointer variable in the brackets following the keyword fixed. This pointer variable (pObject in the example) is scoped to the fixed block identified by the curly braces. As a result, the garbage collector knows not to move the myObject object while the code inside the fixed block is executing.
If you want to declare more than one pointer, you can place multiple fixed statements before the same code block:
MyClass myObject = new MyClass();
fixed (long* pX = &(myObject.X))
fixed (float* pF = &(myObject.F))
{
   // do something
}
You can nest entire fixed blocks if you want to fix several pointers for different periods:
MyClass myObject = new MyClass();
fixed (long* pX = &(myObject.X))
{
   // do something with pX
   fixed (float* pF = &(myObject.F))
   {
      // do something else with pF
   }
}
You can also initialize several variables within the same fixed block, if they are of the same type:
MyClass myObject = new MyClass();
MyClass myObject2 = new MyClass();
fixed (long* pX = &(myObject.X), pX2 = &(myObject2.X))
{
   // etc.
}
In all these cases, it is immaterial whether the various pointers you are declaring point to fields in the same or different objects or to static fields not associated with any class instance.
Pointer Example: PointerPlayground
This section presents an example that uses pointers. The following code is an example named PointerPlayground. It does some simple pointer manipulation and displays the results, enabling you to see what is happening in memory and where variables are stored:
using System;

namespace PointerPlayground
{
   class MainEntryPoint
   {
      static unsafe void Main()
      {
         int x=10;
         short y = -1;
         byte y2 = 4;
         double z = 1.5;
         int* pX = &x;
         short* pY = &y;
         double* pZ = &z;

         Console.WriteLine(
           "Address of x is 0x{0:X}, size is {1}, value is {2}",
           (uint)&x, sizeof(int), x);
         Console.WriteLine(
           "Address of y is 0x{0:X}, size is {1}, value is {2}",
           (uint)&y, sizeof(short), y);
         Console.WriteLine(
           "Address of y2 is 0x{0:X}, size is {1}, value is {2}",
           (uint)&y2, sizeof(byte), y2);
         Console.WriteLine(
           "Address of z is 0x{0:X}, size is {1}, value is {2}",
           (uint)&z, sizeof(double), z);
         Console.WriteLine(
           "Address of pX=&x is 0x{0:X}, size is {1}, value is 0x{2:X}",
           (uint)&pX, sizeof(int*), (uint)pX);
         Console.WriteLine(
           "Address of pY=&y is 0x{0:X}, size is {1}, value is 0x{2:X}",
           (uint)&pY, sizeof(short*), (uint)pY);
         Console.WriteLine(
           "Address of pZ=&z is 0x{0:X}, size is {1}, value is 0x{2:X}",
           (uint)&pZ, sizeof(double*), (uint)pZ);

         *pX = 20;
         Console.WriteLine("After setting *pX, x = {0}", x);
         Console.WriteLine("*pX = {0}", *pX);

         pZ = (double*)pX;
         Console.WriteLine("x treated as a double = {0}", *pZ);

         Console.ReadLine();
      }
   }
}
This code declares four value variables:
- An int x
- A short y
- A byte y2
- A double z
It also declares pointers to three of these values: pX, pY, and pZ.
Next, you display the value of these variables as well as their size and address. Note that in taking the address of pX, pY, and pZ, you are effectively looking at a pointer to a pointer — an address of an address of a value. Also, in accordance with the usual practice when displaying addresses, you have used the {0:X} format specifier in the Console.WriteLine commands to ensure that memory addresses are displayed in hexadecimal format.
Finally, you use the pointer pX to change the value of x to 20 and do some pointer casting to see what happens if you try to treat the content of x as if it were a double.
Compiling and running this code results in the following output. This screen output demonstrates the effects of attempting to compile both with and without the /unsafe flag:
csc PointerPlayground.cs
Microsoft (R) Visual C# Compiler version 4.0.30319.17379
for Microsoft(R) .NET Framework 4.5
Copyright (C) Microsoft Corporation. All rights reserved.

PointerPlayground.cs(7,26): error CS0227: Unsafe code may only appear if
        compiling with /unsafe

csc /unsafe PointerPlayground.cs
Microsoft (R) Visual C# Compiler version 4.0.30319.17379
for Microsoft(R) .NET Framework 4.5
Copyright (C) Microsoft Corporation. All rights reserved.

PointerPlayground
Address of x is 0x12F4B0, size is 4, value is 10
Address of y is 0x12F4AC, size is 2, value is -1
Address of y2 is 0x12F4A8, size is 1, value is 4
Address of z is 0x12F4A0, size is 8, value is 1.5
Address of pX=&x is 0x12F49C, size is 4, value is 0x12F4B0
Address of pY=&y is 0x12F498, size is 4, value is 0x12F4AC
Address of pZ=&z is 0x12F494, size is 4, value is 0x12F4A0
After setting *pX, x = 20
*pX = 20
x treated as a double = 2.86965129997082E-308
Checking through these results confirms the description of how the stack operates presented in the “Memory Management Under the Hood” section earlier in this chapter. It allocates successive variables moving downward in memory. Notice how it also confirms that blocks of memory on the stack are always allocated in multiples of 4 bytes. For example, y is a short (of size 2), and has the (decimal) address 1242284, indicating that the memory locations reserved for it are locations 1242284 through 1242287. If the .NET runtime had been strictly packing up variables next to each other, Y would have occupied just two locations, 1242284 and 1242285.
The next example illustrates pointer arithmetic, as well as pointers to structs and class members. This example is named PointerPlayground2. To start, you define a struct named CurrencyStruct, which represents a currency value as dollars and cents. You also define an equivalent class named CurrencyClass:
internal struct CurrencyStruct
{
   public long Dollars;
   public byte Cents;

   public override string ToString()
   {
      return "$" + Dollars + "." + Cents;
   }
}

internal class CurrencyClass
{
   public long Dollars;
   public byte Cents;

   public override string ToString()
   {
      return "$" + Dollars + "." + Cents;
   }
}
Now that you have your struct and class defined, you can apply some pointers to them. Following is the code for the new example. Because the code is fairly long, we will go through it in detail. You start by displaying the size of CurrencyStruct, creating a couple of CurrencyStruct instances and creating some CurrencyStruct pointers. You use the pAmount pointer to initialize the members of the amount1 CurrencyStruct and then display the addresses of your variables:
public static unsafe void Main()
{
   Console.WriteLine(
      "Size of CurrencyStruct struct is " + sizeof(CurrencyStruct));
   CurrencyStruct amount1, amount2;
   CurrencyStruct* pAmount = &amount1;
   long* pDollars = &(pAmount->Dollars);
   byte* pCents = &(pAmount->Cents);

   Console.WriteLine("Address of amount1 is 0x{0:X}", (uint)&amount1);
   Console.WriteLine("Address of amount2 is 0x{0:X}", (uint)&amount2);
   Console.WriteLine("Address of pAmount is 0x{0:X}", (uint)&pAmount);
   Console.WriteLine("Address of pDollars is 0x{0:X}", (uint)&pDollars);
   Console.WriteLine("Address of pCents is 0x{0:X}", (uint)&pCents);
   pAmount->Dollars = 20;
   *pCents = 50;
   Console.WriteLine("amount1 contains " + amount1);
Now you do some pointer manipulation that relies on your knowledge of how the stack works. Due to the order in which the variables were declared, you know that amount2 will be stored at an address immediately below amount1. The sizeof(CurrencyStruct) operator returns 16 (as demonstrated in the screen output coming up), so CurrencyStruct occupies a multiple of 4 bytes. Therefore, after you decrement your currency pointer, it points to amount2:
   --pAmount;   // this should get it to point to amount2
   Console.WriteLine("amount2 has address 0x{0:X} and contains {1}",
      (uint)pAmount, *pAmount);
Notice that when you call Console.WriteLine, you display the contents of amount2, but you haven’t yet initialized it. What is displayed will be random garbage — whatever happened to be stored at that location in memory before execution of the example. There is an important point here: Normally, the C# compiler would prevent you from using an uninitialized variable, but when you start using pointers, it is very easy to circumvent many of the usual compilation checks. In this case, you have done so because the compiler has no way of knowing that you are actually displaying the contents of amount2. Only you know that, because your knowledge of the stack means that you can tell what the effect of decrementing pAmount will be. Once you start doing pointer arithmetic, you will find that you can access all sorts of variables and memory locations that the compiler would usually stop you from accessing, hence the description of pointer arithmetic as unsafe.
Next, you do some pointer arithmetic on your pCents pointer. pCents currently points to amount1.Cents, but the aim here is to get it to point to amount2.Cents, again using pointer operations instead of directly telling the compiler that’s what you want to do. To do this, you need to decrement the address pCents contains by sizeof(Currency):
   // do some clever casting to get pCents to point to cents
   // inside amount2
   CurrencyStruct* pTempCurrency = (CurrencyStruct*)pCents;
   pCents = (byte*) ( --pTempCurrency );
   Console.WriteLine("Address of pCents is now 0x{0:X}", (uint)&pCents);
Finally, you use the fixed keyword to create some pointers that point to the fields in a class instance and use these pointers to set the value of this instance. Notice that this is also the first time that you have been able to look at the address of an item stored on the heap, rather than the stack:
   Console.WriteLine("
Now with classes");
   // now try it out with classes
   CurrencyClass amount3 = new CurrencyClass();

   fixed(long* pDollars2 = &(amount3.Dollars))
   fixed(byte* pCents2 = &(amount3.Cents))
   {
      Console.WriteLine(
         "amount3.Dollars has address 0x{0:X}", (uint)pDollars2);
      Console.WriteLine(
         "amount3.Cents has address 0x{0:X}", (uint) pCents2);
      *pDollars2 = -100;
      Console.WriteLine("amount3 contains " + amount3);
   }
Compiling and running this code gives output similar to this:
csc /unsafe PointerPlayground2.cs
Microsoft (R) Visual C# 2010 Compiler version 4.0.21006.1
Copyright (C) Microsoft Corporation. All rights reserved.

PointerPlayground2
Size of CurrencyStruct struct is 16
Address of amount1 is 0x12F4A4
Address of amount2 is 0x12F494
Address of pAmount is 0x12F490
Address of pDollars is 0x12F48C
Address of pCents is 0x12F488
amount1 contains $20.50
amount2 has address 0x12F494 and contains $0.0
Address of pCents is now 0x12F488

Now with classes
amount3.Dollars has address 0xA64414
amount3.Cents has address 0xA6441C
amount3 contains $-100.0
Notice in this output the uninitialized value of amount2 that is displayed, and notice that the size of the CurrencyStruct struct is 16 — somewhat larger than you would expect given the size of its fields (a long and a byte should total 9 bytes).
Using Pointers to Optimize Performance
Until now, all the examples have been designed to demonstrate the various things that you can do with pointers. We have played around with memory in a way that is probably interesting only to people who like to know what’s happening under the hood, but that doesn’t really help you write better code. Now you’re going to apply your understanding of pointers and see an example of how judicious use of pointers has a significant performance benefit.
Creating Stack-Based Arrays
This section explores one of the main areas in which pointers can be useful: creating high-performance, low-overhead arrays on the stack. As discussed in Chapter 2, C# includes rich support for handling arrays. Although C# makes it very easy to use both 1-dimensional and rectangular or jagged multidimensional arrays, it suffers from the disadvantage that these arrays are actually objects; they are instances of System.Array. This means that the arrays are stored on the heap, with all the overhead that this involves. There may be occasions when you need to create a short-lived, high-performance array and don’t want the overhead of reference objects. You can do this by using pointers, although as you see in this section, this is easy only for 1-dimensional arrays.
To create a high-performance array, you need to use a new keyword: stackalloc. The stackalloc command instructs the .NET runtime to allocate an amount of memory on the stack. When you call stackalloc, you need to supply it with two pieces of information:
- The type of data you want to store
- The number of these data items you need to store
For example, to allocate enough memory to store 10 decimal data items, you can write the following:
decimal* pDecimals = stackalloc decimal[10];This command simply allocates the stack memory; it does not attempt to initialize the memory to any default value. This is fine for the purpose of this example because you are creating a high-performance array, and initializing values unnecessarily would hurt performance.
Similarly, to store 20 double data items, you write this:
double* pDoubles = stackalloc double[20];Although this line of code specifies the number of variables to store as a constant, this can equally be a quantity evaluated at runtime. Therefore, you can write the previous example like this:
int size;
size = 20;   // or some other value calculated at runtime
double* pDoubles = stackalloc double[size];
You can see from these code snippets that the syntax of stackalloc is slightly unusual. It is followed immediately by the name of the data type you want to store (which must be a value type) and then by the number of items you need space for, in square brackets. The number of bytes allocated will be this number multiplied by sizeof(data type). The use of square brackets in the preceding code sample suggests an array, which is not too surprising. If you have allocated space for 20 doubles, then what you have is an array of 20 doubles. The simplest type of array that you can have is a block of memory that stores one element after another (see Figure 14-6).
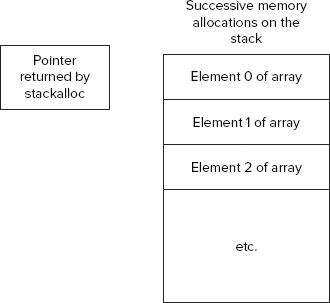
This diagram also shows the pointer returned by stackalloc, which is always a pointer to the allocated data type that points to the top of the newly allocated memory block. To use the memory block, you simply dereference the returned pointer. For example, to allocate space for 20 doubles and then set the first element (element 0 of the array) to the value 3.0, write this:
double* pDoubles = stackalloc double[20];
*pDoubles = 3.0;
To access the next element of the array, you use pointer arithmetic. As described earlier, if you add 1 to a pointer, its value will be increased by the size of whatever data type it points to. In this case, that’s just enough to take you to the next free memory location in the block that you have allocated. Therefore, you can set the second element of the array (element number 1) to the value 8.4:
double* pDoubles = stackalloc double [20];
*pDoubles = 3.0;
*(pDoubles+1) = 8.4;
By the same reasoning, you can access the element with index X of the array with the expression *(pDoubles+X).
Effectively, you have a means by which you can access elements of your array, but for general-purpose use, this syntax is too complex. Fortunately, C# defines an alternative syntax using square brackets. C# gives a very precise meaning to square brackets when they are applied to pointers; if the variable p is any pointer type and X is an integer, then the expression p[X] is always interpreted by the compiler as meaning *(p+X). This is true for all pointers, not only those initialized using stackalloc. With this shorthand notation, you now have a very convenient syntax for accessing your array. In fact, it means that you have exactly the same syntax for accessing 1-dimensional, stack-based arrays as you do for accessing heap-based arrays that are represented by the System.Array class:
double* pDoubles = stackalloc double [20];
pDoubles[0] = 3.0;   // pDoubles[0] is the same as *pDoubles
pDoubles[1] = 8.4; // pDoubles[1] is the same as *(pDoubles+1)Although your high-performance array can be accessed in the same way as a normal C# array, a word of caution is in order. The following code in C# raises an exception:
double[] myDoubleArray = new double [20];
myDoubleArray[50] = 3.0;
The exception occurs because you are trying to access an array using an index that is out of bounds; the index is 50, whereas the maximum allowed value is 19. However, if you declare the equivalent array using stackalloc, there is no object wrapped around the array that can perform bounds checking. Hence, the following code will not raise an exception:
double* pDoubles = stackalloc double [20];
pDoubles[50] = 3.0;
In this code, you allocate enough memory to hold 20 doubles. Then you set sizeof(double) memory locations, starting at the location given by the start of this memory + 50*sizeof(double) to hold the double value 3.0. Unfortunately, that memory location is way outside the area of memory that you have allocated for the doubles. There is no knowing what data might be stored at that address. At best, you may have used some currently unused memory, but it is equally possible that you may have just overwritten some locations in the stack that were being used to store other variables or even the return address from the method currently being executed. Again, you see that the high performance to be gained from pointers comes at a cost; you need to be certain you know what you are doing, or you will get some very strange runtime bugs.
QuickArray Example
Our discussion of pointers ends with a stackalloc example called QuickArray. In this example, the program simply asks users how many elements they want to be allocated for an array. The code then uses stackalloc to allocate an array of longs that size. The elements of this array are populated with the squares of the integers starting with 0 and the results are displayed on the console:
using System;

namespace QuickArray
{
    internal class Program
    {
        private static unsafe void Main()
        {
            Console.Write("How big an array do you want?
> ");
            string userInput = Console.ReadLine();
            uint size = uint.Parse(userInput);

            long* pArray = stackalloc long[(int) size];
            for (int i = 0; i < size; i++)
            {
                pArray[i] = i*i;
            }

            for (int i = 0; i < size; i++)
            {
               Console.WriteLine("Element {0} = {1}", i, *(pArray + i));
            }

            Console.ReadLine();
        }
    }
}
Here is the output from the QuickArray example:
How big an array do you want?
> 15
Element 0 = 0
Element 1 = 1
Element 2 = 4
Element 3 = 9
Element 4 = 16
Element 5 = 25
Element 6 = 36
Element 7 = 49
Element 8 = 64
Element 9 = 81
Element 10 = 100
Element 11 = 121
Element 12 = 144
Element 13 = 169
Element 14 = 196
_
SUMMARY
Remember that in order to become a truly proficient C# programmer, you must have a solid understanding of how memory allocation and garbage collection work. This chapter described how the CLR manages and allocates memory on the heap and the stack. It also illustrated how to write classes that free unmanaged resources correctly, and how to use pointers in C#. These are both advanced topics that are poorly understood and often implemented incorrectly by novice programmers.
This chapter should be treated as a companion to what you learn from Chapter 16 on error handling and from Chapter 21 about dealing with threading. The next chapter of this book looks at reflection in C#.