
Chapter 19
Assemblies
WHAT’S IN THIS CHAPTER?
- An overview of assemblies
- Creating assemblies
- Using application domains
- Sharing assemblies
- Versioning
- Sharing assemblies between different technologies
WROX.COM CODE DOWNLOADS FOR THIS CHAPTER
The wrox.com code downloads for this chapter are found at http://www.wrox.com/remtitle.cgi?isbn=1118314425 on the Download Code tab. The code for this chapter is divided into the following major examples:
- Application Domains
- Dynamic Assembly
- Shared Demo
WHAT ARE ASSEMBLIES?
An assembly is the .NET term for a deployment and configuration unit. This chapter discusses exactly what assemblies are, how they can be applied, and why they are such a useful feature.
You will learn how to create assemblies dynamically, how to load assemblies into application domains, and how to share assemblies between different applications. The chapter also covers versioning, which is an important aspect of sharing assemblies.
Assemblies are the deployment units of .NET applications, which consist of one or more assemblies. .NET executables, with the usual extension .EXE or .DLL, are known by the term assembly. What’s the difference between an assembly and a native DLL or EXE? Although they both have the same file extension, .NET assemblies include metadata that describes all the types that are defined in the assembly, with information about its members — methods, properties, events, and fields.
The metadata of .NET assemblies also provides information about the files that belong to the assembly, version information, and the exact information about assemblies that are used. .NET assemblies are the answer to the DLL hell we’ve seen previously with native DLLs.
Assemblies are self-describing installation units, consisting of one or more files. One assembly could be a single DLL or EXE that includes metadata, or it can consist of different files — for example, resource files, modules, and an EXE.
Assemblies can be private or shared. With simple .NET applications, using only private assemblies is the best way to work. No special management, registration, versioning, and so on is needed with private assemblies. The only application that could have version problems with private assemblies is your own application. Other applications are not influenced because they have their own copies of the assemblies. The private components you use within your application are installed at the same time as the application itself. Private assemblies are located in the same directory as the application or subdirectories thereof. This way, you shouldn’t have any versioning problems with the application. No other application will ever overwrite your private assemblies. Of course, it is still a good idea to use version numbers for private assemblies, too. This helps a lot with code changes (as you can detect on your own: these assemblies have a different version, there must be some changes), but it’s not a requirement of .NET.
With shared assemblies, several applications can use the same assembly and have a dependency on it. Shared assemblies reduce the need for disk and memory space. With shared assemblies, many rules must be fulfilled — a shared assembly must have a version number and a unique name, and usually it’s installed in the global assembly cache (GAC). The GAC enables you to share different versions of the same assembly on a system.
Assembly Features
The features of an assembly can be summarized as follows:
- Assemblies are self-describing. It’s no longer necessary to pay attention to registry keys for apartments, to get the type library from some other place, and so on. Assemblies include metadata that describes the assembly. The metadata includes the types exported from the assembly and a manifest; the next section describes the function of a manifest.
- Version dependencies are recorded inside an assembly manifest. Storing the version of any referenced assemblies in the manifest makes it possible to easily find deployment faults because of wrong versions available. The version of the referenced assembly that will be used can be configured by the developer and the system administrator. Later in this chapter, you’ll learn which version policies are available and how they work.
- Assemblies can be loaded side by side. Beginning with Windows 2000, a side-by-side feature enables different versions of the same DLL to be used on a system. Did you ever check the directory <windows>winsxs? .NET allows different versions of the same assembly to be used inside a single process! How is this useful? If assembly A references version 1 of the shared assembly Shared, and assembly B uses version 2 of the shared assembly Shared, and you are using both assembly A and B, you need both versions of the shared assembly Shared in your application — and with .NET both versions are loaded and used. The .NET 4 runtime even allows multiple CLR versions (2 and 4) inside one process. This enables, for example, loading plugins with different CLR requirements. While there’s no direct .NET way to communicate between objects in different CLR versions inside one process, you can use other techniques, such as COM.
- Application isolation is ensured by using application domains. With application domains, a number of applications can run independently inside a single process. Faults in one application running in one application domain cannot directly affect other applications inside the same process running in another application domain.
- Installation can be as easy as copying the files that belong to an assembly. An xcopy can be enough. This feature is named ClickOnce deployment. However, in some cases ClickOnce deployment cannot be applied, and a normal Windows installation is required. Deployment of applications is discussed in Chapter 18, “Deployment.”
Assembly Structure
An assembly consists of assembly metadata describing the complete assembly, type metadata describing the exported types and methods, MSIL code, and resources. All these parts can be inside of one file or spread across several files.
In the first example (see Figure 19-1), the assembly metadata, type metadata, MSIL code, and resources are all in one file — Component.dll. The assembly consists of a single file.

The second example shows a single assembly spread across three files (see Figure 19-2). Component.dll has assembly metadata, type metadata, and MSIL code, but no resources. The assembly uses a picture from picture.jpeg that is not embedded inside Component.dll but referenced from within the assembly metadata. The assembly metadata also references a module called util.netmodule, which itself includes only type metadata and MSIL code for a class. A module has no assembly metadata; thus, the module itself has no version information, nor can it be installed separately. All three files in this example make up a single assembly; the assembly is the installation unit. It would also be possible to put the manifest in a different file.

Assembly Manifests
An important part of an assembly is a manifest, which is part of the metadata. It describes the assembly with all the information that’s needed to reference it and lists all its dependencies. The parts of the manifest are as follows:
- Identity — Name, version, culture, and public key.
- A list of files — Files belonging to this assembly. A single assembly must have at least one file but may contain a number of files.
- A list of referenced assemblies — All assemblies used from the assembly are documented inside the manifest. This reference information includes the version number and the public key, which is used to uniquely identify assemblies. The public key is discussed later in this chapter.
- A set of permission requests — These are the permissions needed to run this assembly. You can find more information about permissions in Chapter 22, “Security.”
- Exported types — These are included if they are defined within a module and the module is referenced from the assembly; otherwise, they are not part of the manifest. A module is a unit of reuse. The type description is stored as metadata inside the assembly. You can get the structures and classes with the properties and methods from the metadata. This replaces the type library that was used with COM to describe the types. For the use of COM clients, it’s easy to generate a type library from the manifest. The reflection mechanism uses the information about the exported types for late binding to classes. See Chapter 15, “Reflection,” for more information about reflection.
Namespaces, Assemblies, and Components
You might be a little bit confused by the meanings of namespaces, types, assemblies, and components. How does a namespace fit into the assembly concept? The namespace is completely independent of an assembly. You can have different namespaces in a single assembly, but the same namespace can be spread across assemblies. The namespace is just an extension of the type name — it belongs to the name of the type.
For example, the assemblies mscorlib and system contain the namespace System.Threading among many other namespaces. Although the assemblies contain the same namespaces, you will not find the same class names.
Private and Shared Assemblies
Assemblies can be private or shared. A private assembly is found either in the same directory as the application or within one of its subdirectories. With a private assembly, it’s not necessary to think about naming conflicts with other classes or versioning problems. The assemblies that are referenced during the build process are copied to the application directory. Private assemblies are the usual way to build assemblies, especially when applications and components are built within the same company.
When using shared assemblies, you have to be aware of some rules. The assembly must be unique; therefore, it must also have a unique name, called a strong name. Part of the strong name is a mandatory version number. Shared assemblies are mostly used when a vendor other than the application vendor builds the component, or when a large application is split into subprojects. Also, some technologies, such as .NET Enterprise Services, require shared assemblies in specific scenarios.
Satellite Assemblies
A satellite assembly is an assembly that contains only resources. This is extremely useful for localization. Because an assembly has a culture associated with it, the resource manager looks for satellite assemblies containing the resources of a specific culture.
Viewing Assemblies
You can view assemblies by using the command-line utility ildasm, the MSIL disassembler. You can open an assembly by starting ildasm from the command line with the assembly as an argument or by selecting File ⇒ Open from the menu.
Figure 19-3 shows ildasm opening the example that you will build a little later in the chapter, SharedDemo.dll. Note the manifest and the SharedDemo type in the Wrox.ProCSharp.Assemblies namespace. When you open the manifest, you can see the version number and the assembly attributes, as well as the referenced assemblies and their versions. You can see the MSIL code by opening the methods of the class.

Creating Assemblies
Now that you know what assemblies are, it is time to build some. Of course, you have already built assemblies in previous chapters, because a .NET executable counts as an assembly. This section looks at special options for building assemblies.
Creating Modules and Assemblies
All C# project types in Visual Studio create an assembly. Whether you choose a DLL or EXE project type, an assembly is always created. With the command-line C# compiler, csc, it’s also possible to create modules. A module is a DLL without assembly attributes (so it’s not an assembly, but it can be added to assemblies later). The command:
csc /target:module hello.cscreates a module hello.netmodule. You can view this module using ildasm.
A module also has a manifest, but there is no .assembly entry inside the manifest (except for the external assemblies that are referenced) because a module has no assembly attributes. It’s not possible to configure versions or permissions with modules; that can be done only at the assembly scope. You can find references to assemblies in the manifest of the module. With the /addmodule option of csc, it’s possible to add modules to existing assemblies.
To compare modules to assemblies, create a simple class A and compile it by using the following command:
csc /target:module A.csThe compiler generates the file A.netmodule, which doesn’t include assembly information (as you can see using ildasm to look at the manifest information). The manifest of the module shows the referenced assembly mscorlib and the .module entry (see Figure 19-4).

Next, create an assembly B, which includes the module A.netmodule. It’s not necessary to have a source file to generate this assembly. The command to build the assembly is as follows:
csc /target:library /addmodule:A.netmodule /out:B.dllLooking at the assembly using ildasm, you can find only a manifest. In the manifest, the assembly mscorlib is referenced. Next, you see the assembly section with a hash algorithm and the version. The number of the algorithm defines the type of the algorithm used to create the hash code of the assembly. When creating an assembly programmatically, it is possible to select the algorithm. Part of the manifest is a list of all modules belonging to the assembly. Figure 19-5 shows .file A.netmodule, which belongs to the assembly. Classes exported from modules are part of the assembly manifest; classes exported from the assembly itself are not.

Modules enable the faster startup of assemblies because not all types are inside a single file. The modules are loaded only when needed. Another reason to use modules is if you want to create an assembly with more than one programming language. One module could be written using Visual Basic, another module could be written using C#, and these two modules could be included in a single assembly.
Assembly Attributes
When creating a Visual Studio project, the source file AssemblyInfo.cs is generated automatically. It is located below Properties in Solution Explorer. You can use the normal source code editor to configure the assembly attributes in this file. This is the file generated from the project template:
using System.Reflection;
using System.Runtime.CompilerServices;
using System.Runtime.InteropServices;
//
// General Information about an assembly is controlled through the following
// set of attributes. Change these attribute values to modify the information
// associated with an assembly.
[assembly: AssemblyTitle("ClassLibrary1")]
[assembly: AssemblyDescription("")]
[assembly: AssemblyConfiguration("")]
[assembly: AssemblyCompany("CN innovation")]
[assembly: AssemblyProduct("ClassLibrary1")]
[assembly: AssemblyCopyright("Copyright @ CN innovation 2012")]
[assembly: AssemblyTrademark("")]
[assembly: AssemblyCulture("")]

// Setting ComVisible to false makes the types in this assembly not visible
// to COM components.  If you need to access a type in this assembly from
// COM, set the ComVisible attribute to true on that type.
[assembly: ComVisible(false)]

// The following GUID is for the ID of the typelib if this project is exposed
// to COM
[assembly: Guid("21649c19-6609-4607-8fc0-d75f1f27a8ff")]

//
// Version information for an assembly consists of the following four
// values:
//
//      Major Version
//      Minor Version
//      Build Number
//      Revision
//
// You can specify all the values or you can default the Build and Revision
// Numbers by using the '*' as shown below:
// [assembly: AssemblyVersion("1.0.*")]
[assembly: AssemblyVersion("1.0.0.0")]
[assembly: AssemblyFileVersion("1.0.0.0")]
This file is used for configuration of the assembly manifest. The compiler reads the assembly attributes to inject the specific information into the manifest.
The assembly: prefix with the attribute marks an assembly-level attribute. Assembly-level attributes are, in contrast to the other attributes, not attached to a specific language element. The arguments that can be used for the assembly attribute are classes of the namespaces System.Reflection, System.Runtime.CompilerServices, and System.Runtime.InteropServices.
The following table describes the assembly attributes defined within the System.Reflection namespace.
| ASSEMBLY ATTRIBUTE | DESCRIPTION |
| AssemblyCompany | Specifies the company name. |
| AssemblyConfiguration | Specifies build information such as retail or debugging information. |
| AssemblyCopyright and AssemblyTrademark | Holds the copyright and trademark information. |
| AssemblyDefaultAlias | Can be used if the assembly name is not easily readable (such as a GUID when the assembly name is created dynamically). With this attribute an alias name can be specified. |
| AssemblyDescription | Describes the assembly or the product. Looking at the properties of the executable file, this value shows up as Comments. |
| AssemblyProduct | Specifies the name of the product where the assembly belongs. |
| AssemblyTitle | Used to give the assembly a friendly name. The friendly name can include spaces. With the file properties you can see this value as Description. |
| AssemblyCulture | Defines the culture of the assembly. This attribute is important for satellite assemblies. |
| AssemblyInformationalVersion | This attribute isn’t used for version checking when assemblies are referenced; it is for information only. It is very useful to specify the version of an application that uses multiple assemblies. Opening the properties of the executable you can see this value as the Product Version. |
| AssemblyVersion | Provides the version number of the assembly. Versioning is discussed later in this chapter. |
| AssemblyFileVersion | Defines the version of the file. The value shows up with the Windows file properties dialog, but it doesn’t have any influence on .NET behavior. |
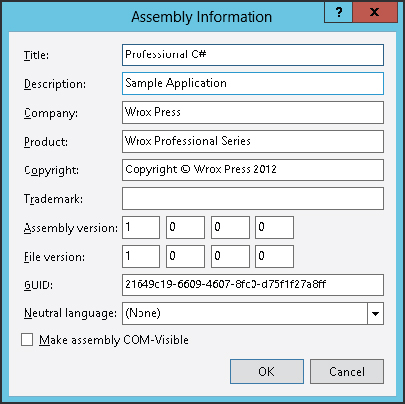
Here's an example of how these attributes might be configured:
[assembly: AssemblyTitle("Professional C#")]
[assembly: AssemblyDescription("Sample Application")]
[assembly: AssemblyConfiguration("Retail version")]
[assembly: AssemblyCompany("Wrox Press")]
[assembly: AssemblyProduct("Wrox Professional Series")]
[assembly: AssemblyCopyright("Copyright (C) Wrox Press 2012")]
[assembly: AssemblyTrademark("Wrox is a registered trademark of " +
     "John Wiley & Sons, Inc.")]
[assembly: AssemblyCulture("")]

[assembly: AssemblyVersion("1.0.0.0")]
[assembly: AssemblyFileVersion("1.0.0.0")]
With Visual Studio 2012, you can configure these attributes with the project properties, select the tab Application, and click the button Assembly Information, as shown in Figure 19-6.
Creating and Loading Assemblies Dynamically
During development, you add a reference to an assembly so that it is included with the assembly references, and the types of the assembly are available to the compiler. During runtime, the referenced assembly is loaded as soon as a type of the assembly is instantiated or a method of the type is used. Instead of using this automatic behavior, you can also load assemblies programmatically. To load assemblies programmatically, you can use the class Assembly with the static method Load(). This method is overloaded, meaning you can pass the name of the assembly using AssemblyName, the name of the assembly, or a byte array.
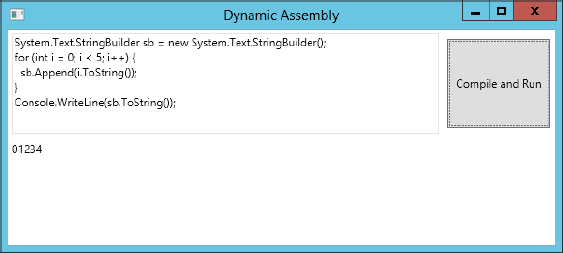
It is also possible to create an assembly on the fly, as shown in the next example. Here, C# code is entered in a text box, a new assembly is dynamically created by starting the C# compiler, and the compiled code is invoked.
To compile C# code dynamically, you can use the class CSharpCodeProvider from the namespace Microsoft.CSharp. Using this class, you can compile code and generate assemblies from a DOM tree, from a file, and from source code.
The UI of the application is created by using WPF. You can see the design view of the UI in Figure 19-7. The window is made up of a TextBox to enter C# code, a Button, and a TextBlock WPF control that spans all columns of the last row to display the result.

To dynamically compile and run C# code, the class CodeDriver defines the method CompileAndRun(). This method compiles the code from the text box and starts the generated method (code file DynamicAssembly/CodeDriver.cs):
using System;
using System.CodeDom.Compiler;
using System.IO;
using System.Reflection;
using System.Text;
using Microsoft.CSharp;

namespace Wrox.ProCSharp.Assemblies
{
  public class CodeDriver
  {
    private string prefix =
        "using System;" +
        "public static class Driver" +
        "{" +
        "   public static void Run()" +
        "   {";

    private string postfix =
        "   }" +
        "}";


    public string CompileAndRun(string input, out bool hasError)
    {
      hasError = false;
      string returnData = null;

      CompilerResults results = null;
      using (var provider = new CSharpCodeProvider())
      {
        var options = new CompilerParameters();
        options.GenerateInMemory = true;

        var sb = new StringBuilder();
        sb.Append(prefix);
        sb.Append(input);
        sb.Append(postfix);

        results = provider.CompileAssemblyFromSource(options, sb.ToString());
      }

      if (results.Errors.HasErrors)
      {
        hasError = true;
        var errorMessage = new StringBuilder();
        foreach (CompilerError error in results.Errors)
        {
          errorMessage.AppendFormat("{0} {1}", error.Line,
              error.ErrorText);
        }
        returnData = errorMessage.ToString();
      }
      else
      {
        TextWriter temp = Console.Out;
        var writer = new StringWriter();
        Console.SetOut(writer);
        Type driverType = results.CompiledAssembly.GetType("Driver");

        driverType.InvokeMember("Run", BindingFlags.InvokeMethod |
            BindingFlags.Static | BindingFlags.Public, null, null, null);
        Console.SetOut(temp);

        returnData = writer.ToString();
      }

      return returnData;
    }
  }
}
The method CompileAndRun() requires a string input parameter in which one or multiple lines of C# code can be passed. Because every method that is called must be included in a method and a class, the variables prefix and postfix define the structure of the dynamically created class Driver and the method Run() that surround the code from the parameter. Using a StringBuilder, the prefix, postfix, and the code from the input variable are merged to create a complete class that can be compiled. Using this resultant string, the code is compiled with the CSharpCodeProvider class. The method CompileAssemblyFromSource() dynamically creates an assembly. Because this assembly is needed only in memory, the compiler parameter option GenerateInMemory is set.
If the source code that was passed contains some errors, these will appear in the Errors collection of CompilerResults. The errors are returned with the return data, and the variable hasError is set to true.
If the source code compiles successfully, the Run() method of the new Driver class is invoked. Invocation of this method is done using reflection. From the newly compiled assembly that can be accessed using CompilerResults.CompiledType, the new class Driver is referenced by the driverType variable. Then the InvokeMember() method of the Type class is used to invoke the method Run(). Because this method is defined as a public static method, the BindingFlags must be set accordingly. To see a result of the program that is written to the console, the console is redirected to a StringWriter to finally return the complete output of the program with the returnData variable.
The Click event of the WPF button is connected to the Compile_Click() method where the CodeDriver class is instantiated, and the CompileAndRun() method is invoked. The input is taken from the TextBox named textCode, and the result is written to the TextBlock textOutput (code file DynamicAssembly/DynamicAssemblyWindow.xaml.cs):
      private void Compile_Click(object sender, RoutedEventArgs e)
      {
        textOutput.Background = Brushes.White;
        var driver = new CodeDriver();
        bool isError;
        textOutput.Text = driver.CompileAndRun(textCode.Text, out isError);
        if (isError)
        {
          textOutput.Background = Brushes.Red;
        }
      }
Now you can start the application; enter C# code in the TextBox as shown in Figure 19-8, and compile and run the code.
The program as written so far has the disadvantage that every time you click the Compile and Run button, a new assembly is created and loaded, so the program always needs more and more memory. You cannot unload an assembly from the application. To unload assemblies, application domains are needed.
APPLICATION DOMAINS
Before .NET, processes were used as isolation boundaries, with each process having its private virtual memory, an application running in one process could not write to the memory of another application and thereby crash the other application. The process was used as an isolation and security boundary between applications. With the .NET architecture, you have a new boundary for applications: application domains. With managed IL code, the runtime can ensure that access to the memory of another application inside a single process can’t happen. Multiple applications can run in a single process within multiple application domains (see Figure 19-9).

An assembly is loaded into an application domain. In Figure 19-9, you can see process 4711 with two application domains. In application domain A, objects one and two are instantiated, object one in assembly one, and object two in assembly two. The second application domain in process 4711 has an instance of object one. To minimize memory consumption, the code of assemblies is loaded only once into an application domain. Instance and static members are not shared among application domains. It’s not possible to directly access objects within another application domain; a proxy is needed instead. Therefore, in Figure 19-9, the object one in application domain B cannot directly access the objects one or two in application domain A without a proxy.
The AppDomain class is used to create and terminate application domains, load and unload assemblies and types, and enumerate assemblies and threads in a domain. In this section, you program a small example to see application domains in action.
First, create a C# console application called AssemblyA. In the Main() method, add a Console.WriteLine() so that you can see when this method is called. In addition, add the class Demo with a constructor with two int values as arguments, which will be used to create instances with the AppDomain class. The AssemblyA.exe assembly will be loaded from the second application that will be created (code file AssemblyA/Program.cs):
using System;

namespace Wrox.ProCSharp.Assemblies
{
  public class Demo
  {
    public Demo(int val1, int val2)
    {
      Console.WriteLine("Constructor with the values {0}, {1} in domain " +
          "{2} called", val1, val2, AppDomain.CurrentDomain.FriendlyName);
    }
  }

  class Program
  {
    static void Main()
    {
      Console.WriteLine("Main in domain {0} called",
          AppDomain.CurrentDomain.FriendlyName);
    }
  }
}
Running the application produces this output:
Main in domain AssemblyA.exe called.The second project you create is again a C# console application: DomainTest. First, display the name of the current domain using the property FriendlyName of the AppDomain class. With the CreateDomain() method, a new application domain with the friendly name New AppDomain is created. Next, load the assembly AssemblyA into the new domain and call the Main() method by calling ExecuteAssembly() (code file DomainTest/Program.cs):
using System;
using System.Reflection;

namespace Wrox.ProCSharp.Assemblies
{
  class Program
  {
    static void Main()
    {
      AppDomain currentDomain = AppDomain.CurrentDomain;
      Console.WriteLine(currentDomain.FriendlyName);
      AppDomain secondDomain = AppDomain.CreateDomain("New AppDomain");
      secondDomain.ExecuteAssembly("AssemblyA.exe");
    }
  }
}
Before starting the program DomainTest.exe, reference the assembly AssemblyA.exe with the DomainTest project. Referencing the assembly with Visual Studio 2012 copies the assembly to the project directory so that the assembly can be found. If the assembly cannot be found, a System.IO.FileNotFoundException exception is thrown.
When DomainTest.exe is run, you get the following console output. DomainTest.exe is the friendly name of the first application domain. The second line is the output of the newly loaded assembly in the New AppDomain. With a process viewer, you will not see the process AssemblyA.exe executing because no new process is created. AssemblyA is loaded into the process DomainTest.exe.
DomainTest.exe
Main in domain New AppDomain called
Instead of calling the Main() method in the newly loaded assembly, you can also create a new instance. In the following example, replace the ExecuteAssembly() method with a CreateInstance(). The first argument is the name of the assembly, AssemblyA. The second argument defines the type that should be instantiated: Wrox.ProCSharp.Assemblies.AppDomains.Demo. The third argument, true, means that case is ignored. System.Reflection.BindingFlags.CreateInstance is a binding flag enumeration value to specify that the constructor should be called:
      AppDomain secondDomain = AppDomain.CreateDomain("New AppDomain");
      // secondDomain.ExecuteAssembly("AssemblyA.exe");
      secondDomain.CreateInstance("AssemblyA",
          "Wrox.ProCSharp.Assemblies.Demo", true,
          BindingFlags.CreateInstance, null, new object[] {7, 3},
          null, null);
The results of a successful run of the application are as follows:
DomainTest.exe
Constructor with the values 7, 3 in domain New AppDomain called
Now you have seen how to create and call application domains. In runtime hosts, application domains are created automatically. Most application types just have the default application domain. ASP.NET creates an application domain for each web application that runs on a web server. Internet Explorer creates application domains in which managed controls will run. For applications, it can be useful to create application domains if you want to unload an assembly. You can unload assemblies only by terminating an application domain.
With this knowledge about application domains, it is now possible to change the WPF program created earlier. The new class CodeDriverInAppDomain creates a new application domain using AppDomain.CreateDomain. Inside this new application domain, the class CodeDriver is instantiated using CreateInstanceAndUnwrap(). Using the CodeDriver instance, the CompileAndRun() method is invoked before the new application domain is unloaded again:
using System;
using System.Runtime.Remoting;

namespace Wrox.ProCSharp.Assemblies
{
  public class CodeDriverInAppDomain
  {
    public string CompileAndRun(string code, out bool hasError)
    {
      AppDomain codeDomain = AppDomain.CreateDomain("CodeDriver");

      CodeDriver codeDriver = (CodeDriver)
          codeDomain.CreateInstanceAndUnwrap("DynamicAssembly",
              "Wrox.ProCSharp.Assemblies.CodeDriver");

      string result = codeDriver.CompileAndRun(code, out hasError);

      AppDomain.Unload(codeDomain);

      return result;
    }
  }
}To access the class CodeDriver from a different application domain, the class CodeDriver must derive from the base class MarshalByRefObject. Only classes that derive from this base type can be accessed across another application domain. In the main application domain, a proxy is instantiated to invoke the methods of this class across an inter-application domain channel (code file DynamicAssembly/CodeDriver.cs):
using System;
using System.CodeDom.Compiler;
using System.IO;
using System.Reflection;
using System.Text;
using Microsoft.CSharp;

namespace Wrox.ProCSharp.Assemblies
{
  public class CodeDriver: MarshalByRefObject
  {
The Compile_Click() event handler can now be changed to use the CodeDriverInAppDomain class instead of the CodeDriver class (code file DynamicAssembly/DynamicAssemblyWindow.xaml.cs):
    private void Compile_Click(object sender, RoutedEventArgs e)
    {
      var driver = new CodeDriverInAppDomain();
      bool isError;
      textOutput.Text = driver.CompileAndRun(textCode.Text, out isError);
      if (isError)
      {
        textOutput.Background = Brushes.Red;
      }
    }
Now you can click the Compile and Run button of the application any number of times and the generated assembly is always unloaded.
SHARED ASSEMBLIES
Assemblies can be isolated for use by a single application — not sharing an assembly is the default. When using shared assemblies, specific requirements must be followed. This section explores everything that’s needed for sharing assemblies. Strong names are required to uniquely identify a shared assembly. You can create a strong name by signing the assembly. This section also explains the process of delayed signing. Shared assemblies are typically installed into the global assembly cache (GAC). You will read about how to use the GAC in this section.
Strong Names
A shared assembly name must be globally unique, and it must be possible to protect the name. At no time can any other person create an assembly using the same name.
COM solved the first requirement by using a globally unique identifier (GUID). The second issue, however, still existed because anyone could steal the GUID and create a different object with the same identifier. Both issues are solved with strong names of .NET assemblies.
A strong name consists of the following:
- The name of the assembly itself.
- A version number enables the use of different versions of the same assembly at the same time. Different versions can also work side by side and can be loaded concurrently inside the same process.
- A public key guarantees that the strong name is unique. It also guarantees that a referenced assembly cannot be replaced from a different source.
- A culture (cultures are discussed in Chapter 28).
A strong name is a simple text name accompanied by a version number, a public key, and a culture. You wouldn’t create a new public key with every assembly; you’d have one in your company, so the key uniquely identifies your company’s assemblies.
However, this key cannot be used as a trust key. Assemblies can carry Authenticode signatures to build a trust. The key for the Authenticode signature can be a different one from the key used for the strong name.
To uniquely identify the assemblies in your companies, a useful namespace hierarchy should be used to name your classes. Here is a simple example showing how to organize namespaces: Wrox Press could use the major namespace Wrox for its classes and namespaces. In the hierarchy below the namespace, the namespaces must be organized so that all classes are unique. Every chapter of this book uses a different namespace of the form Wrox.ProCSharp.<Chapter>; this chapter uses Wrox.ProCSharp.Assemblies. Therefore, if there is a class Hello in two different chapters, there’s no conflict because of different namespaces. Utility classes that are used across different books can go into the namespace Wrox.Utilities.
A company name commonly used as the first part of the namespace is not necessarily unique, so something else must be used to build a strong name. For this the public key is used. Because of the public/private key principle in strong names, no one without access to your private key can destructively create an assembly that could be unintentionally called by the client.
Integrity Using Strong Names
A public/private key pair must be used to create a shared component. The compiler writes the public key to the manifest, creates a hash of all files that belong to the assembly, and signs the hash with the private key, which is not stored within the assembly. It is then guaranteed that no one can change your assembly. The signature can be verified with the public key.
During development, the client assembly must reference the shared assembly. The compiler writes the public key of the referenced assembly to the manifest of the client assembly. To reduce storage, it is not the public key that is written to the manifest of the client assembly, but a public key token. The public key token consists of the last eight bytes of a hash of the public key and is unique.
At runtime, during loading of the shared assembly (or at install time if the client is installed using the native image generator), the hash of the shared component assembly can be verified by using the public key stored inside the client assembly. Only the owner of the private key can change the shared component assembly. There is no way a component Math that was created by vendor A and referenced from a client can be replaced by a component from a hacker. Only the owner of the private key can replace the shared component with a new version. Integrity is guaranteed insofar as the shared assembly comes from the expected publisher.
Figure 19-10 shows a shared component with a public key referenced by a client assembly that has a public key token of the shared assembly inside the manifest.

Global Assembly Cache
The global assembly cache (GAC) is, as the name implies, a cache for globally available assemblies. Most shared assemblies are installed inside this cache; otherwise, a shared directory (also on a server) can be used.
The GAC is located in the directory <windows>Microsoft.NETassembly. Inside this directory, you can find multiple GACxxx directories. The GACxxx directories contain shared assemblies. GAC_MSIL contains the assemblies with pure .NET code; GAC_32 contains the assemblies that are specific to a 32-bit platform. On a 64-bit system, you can also find the directory GAC_64 with assemblies specific for 64 bit platforms.
In the directory <windows>assemblyNativeImages_<runtime version>, you can find the assemblies compiled to native code. If you go deeper in the directory structure, you will find directory names that are similar to the assembly names, and below that a version directory and the assemblies themselves. This enables installation of different versions of the same assembly.
gacutil.exe is a utility to install, uninstall, and list assemblies using the command line. The following list explains some of the gacutil options:
- gacutil /l — Lists all assemblies from the assembly cache.
- gacutil /i mydll — Installs the shared assembly mydll into the assembly cache. With the option /f you can force the installation to the GAC even if the assembly is already installed. This is useful if you changed the assembly but didn’t change the version number.
- gacutil /u mydll — Uninstalls the assembly mydll.
Creating a Shared Assembly
In the next example, you create a shared assembly and a client that uses it. Creating shared assemblies is not much different from creating private assemblies. Create a simple Visual C# class library project with the name SharedDemo. Change the namespace to Wrox.ProCSharp.Assemblies and the class name to SharedDemo. Enter the following code. In the constructor of the class, all lines of a file are read into an array. The name of the file is passed as an argument to the constructor. The method GetQuoteOfTheDay() just returns a random string of the array (code file SharedDemo/SharedDemo.cs).
using System;
using System.IO;

namespace Wrox.ProCSharp.Assemblies
{
  public class SharedDemo
  {
    private string[] quotes;
    private Random random;

    public SharedDemo(string filename)
    {
      quotes = File.ReadAllLines(filename);
      random = new Random();
    }

    public string GetQuoteOfTheDay()
    {
      int index = random.Next(1, quotes.Length);
      return quotes[index];
    }
  }
}
Creating a Strong Name
A strong name is needed to share this assembly. You can create such a name with the strong name tool (sn):
sn -k mykey.snkThe strong name utility generates and writes a public/private key pair, and writes this pair to a file; here the file is mykey.snk.
With Visual Studio 2012, you can sign the assembly with the project properties by selecting the Signing tab, as shown in Figure 19-11. You can also create keys with this tool. However, you should not create a key file for every project. Just a few keys for the complete company can be used instead. It is useful to create different keys depending on security requirements (see Chapter 22).

Setting the signing option with Visual Studio adds the /keyfile option to the compiler setting. Visual Studio also allows you to create a keyfile that is secured with a password. As shown in the figure, such a file has the file extension .pfx.
After rebuilding, the public key can be found inside the manifest. You can verify this using ildasm, as shown in Figure 19-12.

Installing the Shared Assembly
With a public key in the assembly, you can now install it in the global assembly cache using the global assembly cache tool, gacutil, with the /i option. The /f option forces you to write the assembly to the GAC, even if it is already there:
gacutil /i SharedDemo.dll /fThen you can use the Global Assembly Cache Viewer or gacutil /l SharedDemo to check the version of the shared assembly to see if it is successfully installed.
Using the Shared Assembly
To use the shared assembly, create a C# console application called Client. Change the name of the namespace to Wrox.ProCSharp.Assemblies. The shared assembly can be referenced in the same way as a private assembly: by selecting Project ⇒ Add Reference from the menu.
Add the file quotes.txt to the project items, and set the property Copy to Output Directory to Copy if newer.
Here’s the code for the client application (code file Client/Program.cs):
using System;
namespace Wrox.ProCSharp.Assemblies
{
  class Program
  {
    static void Main()
    {
      var quotes = new SharedDemo("Quotes.txt");
      for (int i=0; i < 3; i++)
      {
        Console.WriteLine(quotes.GetQuoteOfTheDay());
        Console.WriteLine();
      }
    }
  }
}
Looking at the manifest in the client assembly using ildasm (see Figure 19-13), you can see the reference to the shared assembly SharedDemo: .assembly extern SharedDemo. Part of this referenced information is the version number, discussed next, and the token of the public key.
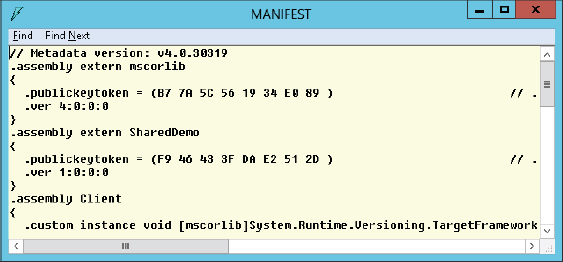
The token of the public key can also be seen within the shared assembly using the strong name utility: sn –T shows the token of the public key in the assembly, and sn –Tp shows the token and the public key. Note the use of the uppercase T!
The result of your program with a sample quotes file is shown here:
"We don't like their sound. And guitar music is on the way out."
 — Decca Recording, Co., in rejecting the Beatles, 1962

"The ordinary 'horseless carriage' is at present a luxury for the wealthy; and
although its price will probably fall in the future, it will never come into as
common use as the bicycle." — The Literary Digest, 1889

"Landing and moving around the moon offers so many serious problems for human
beings that it may take science another 200 years to lick them", Lord Kelvin
(1824–1907)
Delayed Signing of Assemblies
The private key of a company should be safely stored. Most companies don’t give all developers access to the private key; only a few security people have it. That’s why the signature of an assembly can be added at a later date, such as before distribution. When the assembly attribute AssemblyDelaySign is set to true, no signature is stored in the assembly, but enough free space is reserved so that it can be added later. Without using a key, you cannot test the assembly and install it in the GAC; however, you can use a temporary key for testing purposes, later replacing this key with the real company key.
The following steps are required to delay signing of assemblies:
sn -k mykey.snksn -p mykey.snk mykeypub.snksn -Vr SharedDemo.dllsn -R MyAssembly.dll mykey.snkReferences
Assemblies in the GAC can have references associated with them. These references are responsible for the fact that a cached assembly cannot be deleted if it is still needed by an application. For example, if a shared assembly is installed by a Microsoft installer package (.msi file), it can only be deleted by uninstalling the application, not by deleting it directly from the GAC. Trying to delete the assembly from the GAC results in the following error message:
"Assembly <name> could not be uninstalled because it is required by other applications."You can set a reference to the assembly by using the gacutil utility with the option /r. The option /r requires a reference type, a reference ID, and a description. The type of the reference can be one of three options: UNINSTALL_KEY, FILEPATH, or OPAQUE. UNINSTALL_KEY is used by MSI when a registry key is defined that is also needed for the uninstallation. A directory can be specified with FILEPATH. A useful directory would be the root directory of the application. The OPAQUE reference type enables you to set any type of reference.
The command line:
gacutil /i shareddemo.dll /r FILEPATH c:ProCSharpAssembliesClient "Shared Demo"installs the assembly shareddemo in the GAC with a reference to the directory of the client application. Another installation of the same assembly is possible with a different path, or an OPAQUE ID, such as in this command line:
gacutil /i shareddemo.dll /r OPAQUE 4711 "Opaque installation"Now, the assembly is in the GAC only once, but it has two references. To delete the assembly from the GAC, both references must be removed:
gacutil /u shareddemo /r OPAQUE 4711 "Opaque installation"
gacutil /u shareddemo /r FILEPATH c:ProCSharpAssembliesClient "Shared Demo"Native Image Generator
With the native image generator, Ngen.exe, you can compile the IL code to native code at installation time. This way, the program can start faster because the compilation during runtime is no longer necessary. Comparing precompiled assemblies to assemblies for which the JIT compiler needs to run is not different from a performance perspective after the IL code is compiled. The biggest improvement you get with the native image generator is that the application starts faster because there’s no need to run JIT. Also, during runtime JIT is not needed as the IL code is already compiled. If your application is not using a lot of CPU time, you might not see a big improvement here. Reducing the startup time of the application might be enough reason to use the native image generator. If you do create a native image from the executable, you should also create native images from all the DLLs that are loaded by the executable. Otherwise, the JIT compiler still needs to run.
The ngen utility installs the native image in the native image cache. The physical directory of the native image cache is <windows>assemblyNativeImages<RuntimeVersion>.
With ngen install myassembly, you can compile the MSIL code to native code and install it into the native image cache. This should be done from an installation program if you would like to put the assembly in the native image cache.
With ngen, you can also display all assemblies from the native image cache with the option display. If you add an assembly name to the display option, you get information about all assemblies that are dependent on the assembly; and after the long list, you can see all versions of this assembly installed:
C:>ngen display System.Core
Microsoft (R) CLR Native Image Generator - Version 4.0.30319.17626
Copyright (c) Microsoft Corporation.  All rights reserved.

NGEN Roots that depend on "System.Core":

C:Program Files (x86)Common FilesMicrosoft SharedVSTAPipeline.v10.0
AddInViewsMicrosoft.VisualStudio.Tools.Applications.Runtime.v10.0.dll
C:Program Files (x86)Common FilesMicrosoft SharedVSTAPipeline.v10.0
HostSideAdaptersMicrosoft.VisualStudio.Tools.Office.Excel.HostAdapter.v10.0.
dll
C:Program Files (x86)Common FilesMicrosoft SharedVSTAPipeline.v10.0
HostSideAdaptersMicrosoft.VisualStudio.Tools.Office.HostAdapter.v10.0.dll
c:Program Files (x86)Microsoft ExpressionBlend 4
Microsoft.Windows.Design.Extensibility
Microsoft.Windows.Design.Extensibility.dll
...

Native Images:

System.AddIn, Version=3.5.0.0, Culture=neutral, PublicKeyToken=b77a5c561934e089
System.AddIn, Version=4.0.0.0, Culture=neutral, PublicKeyToken=b77a5c561934e089
In case the security of the system changes, it is not sure if the precompiled native image has the security requirements it needs for running the application. This is why the native images become invalid with a system configuration change. With the command ngen update, all native images are rebuilt to include the new configurations.
Installing .NET 4.5 also installs the Native Runtime Optimization Service, which can be used to defer compilation of native images and regenerate native images that have been invalidated.
The command ngen install myassembly /queue can be used by an installation program to defer compilation of myassembly to a native image using the Native Image Service. ngen update /queue regenerates all native images that have been invalidated. With the ngen queue options pause, continue, and status, you can control the service and get status information.
CONFIGURING .NET APPLICATIONS
Previous to COM, application configuration typically was using INI files. In the following application generation, the registry was the major place for configuration. All COM components are configured in the registry. The first version of Internet Information Server (IIS) had its complete configuration in the registry as well. The registry has its advantage on a centralized place for all configuration. One disadvantage was the open API where applications put configuration values to places in the registry that wasn’t meant to. Also, xcopy deployment is not possible with registry configuration. IIS later changed to a custom binary configuration format that is only accessible via IIS Admin APIs. Nowadays, IIS uses XML files for its configuration. XML configuration files are also the preferred place to store configuration values for .NET applications. Configuration files can simply be copied. The configuration files use XML syntax to specify startup and runtime settings for applications.
This section explores the following:
- What you can configure using the XML base configuration files
- How you can redirect a strongly named referenced assembly to a different version
- How you can specify the directory of assemblies to find private assemblies in subdirectories and shared assemblies in common directories or on a server
Configuration Categories
The configuration can be grouped into the following categories:
- Startup settings — Enable you to specify the version of the required runtime. It’s possible that different versions of the runtime could be installed on the same system. The version of the runtime can be specified with the <startup> element.
- Runtime settings — Enable you to specify how garbage collection is performed by the runtime and how the binding to assemblies works. You can also specify the version policy and the code base with these settings. You take a more detailed look into the runtime settings later in this chapter.
- WCF settings — Used to configure applications using WCF. You deal with these configurations in Chapter 43, “Windows Communication Foundation.”
- Security settings — Covered in Chapter 22, configuration for cryptography and permissions is handled here.
These settings can be provided in three types of configuration files:
- Application configuration files — Include specific settings for an application, such as binding information to assemblies, configuration for remote objects, and so on. Such a configuration file is placed into the same directory as the executable; it has the same name as the executable with a .config extension. ASP.NET configuration files are named web.config.
- Machine configuration files — Used for system-wide configurations. You can also specify assembly binding and remoting configurations here. During a binding process, the machine configuration file is consulted before the application configuration file. The application configuration can override settings from the machine configuration. The application configuration file should be the preferred place for application-specific settings so that the machine configuration file remains smaller and more manageable. Machine configuration files are located at %runtime_install_path%configMachine.config.
- Publisher policy files — Can be used by a component creator to specify that a shared assembly is compatible with older versions. If a new assembly version just fixes a bug of a shared component, it is not necessary to put application configuration files in every application directory that uses this component; the publisher can mark it as compatible by adding a publisher policy file instead. If the component doesn’t work with all applications, it is possible to override the publisher policy setting in an application configuration file. In contrast to the other configuration files, publisher policy files are stored in the GAC.
To understand how these configuration files are used, recall that how a client finds an assembly (also called binding) depends on whether the assembly is private or shared. Private assemblies must be in the directory of the application or a subdirectory thereof. A process called probing is used to find such an assembly. If the assembly doesn’t have a strong name, the version number is not used with probing.
Shared assemblies can be installed in the GAC or placed in a directory, on a network share, or on a website. You specify such a directory with the configuration of the codeBase shortly. The public key, version, and culture are all important aspects when binding to a shared assembly. The reference of the required assembly is recorded in the manifest of the client assembly, including the name, the version, and the public key token. All configuration files are checked to apply the correct version policy. The GAC and code bases specified in the configuration files are checked, followed by the application directories, and probing rules are then applied.
Binding to Assemblies
You’ve already seen how to install a shared assembly to the GAC. Instead of doing that, you can configure a specific shared directory by using configuration files. This feature can be used if you want to make the shared components available on a server. Another possible scenario is when you want to share an assembly between your applications but you don’t want to make it publicly available in the GAC, so you put it into a shared directory instead.
There are two ways to find the correct directory for an assembly: the codeBase element in an XML configuration file, or through probing. The codeBase configuration is available only for shared assemblies, and probing is done for private assemblies.
<codeBase>
The <codeBase> element can be configured with an application configuration file. The following application configuration file redirects the search for the assembly SharedDemo to load it from the network:
<?xml version="1.0" encoding="utf-8" ?>
<configuration>
  <runtime>
    <assemblyBinding xmlns="urn:schemas-microsoft-com:asm.v1">
      <dependentAssembly>
        <assemblyIdentity name="SharedDemo" culture="neutral"
              publicKeyToken="f946433fdae2512d" />
        <codeBase version="1.0.0.0"
              href="http://www.christiannagel.com/WroxUtils/SharedDemo.dll" />
      </dependentAssembly>
    </assemblyBinding>
  </runtime>
</configuration>
The <codeBase> element has the attributes version and href. With version, the original referenced version of the assembly must be specified. With href, you can define the directory from which the assembly should be loaded. In the preceding example, a path using the HTTP protocol is used. A directory on a local system or a share is specified by using href="file://C:/WroxUtils/SharedDemo.dll".
<probing>
When the <codeBase> is not configured and the assembly is not stored in the GAC, the runtime tries to find an assembly through probing. The .NET runtime tries to find assemblies with either a .dll or an .exe file extension in the application directory or in one of its subdirectories that has the same name as the assembly searched for. If the assembly is not found here, the search continues. You can configure search directories with the <probing> element in the <runtime> section of application configuration files. This XML configuration can also be done easily by selecting the properties of the application with the .NET Framework Configuration tool. You can configure the directories where the probing should occur by using the search path in the .NET Framework configuration.
The XML file produced has the following entries:
<?xml version="1.0" encoding="utf-8" ?>
<configuration>
  <runtime>
    <assemblyBinding xmlns="urn:schemas-microsoft-com:asm.v1">
      <probing privatePath="bin;utils;" />
    </assemblyBinding>
  </runtime>
</configuration>
The <probing> element has just a single required attribute: privatePath. This application configuration file tells the runtime that assemblies should be searched for in the base directory of the application, followed by the bin and util directories. Both directories are subdirectories of the application base directory. It’s not possible to reference a private assembly outside the application base directory or a subdirectory thereof. An assembly outside of the application base directory must have a shared name and can be referenced using the <codeBase> element, as shown earlier.
VERSIONING
For private assemblies, versioning is not important because the referenced assemblies are copied with the client. The client uses the assembly it has in its private directories. This is different for shared assemblies, however. This section looks at the traditional problems that can occur with sharing.
With shared components, more than one client application can use the same component. The new version can break existing clients when updating a shared component with a newer version. You can’t stop shipping new versions because new features will be requested and introduced with new versions of existing components. You can try to program carefully for backward compatibility, but that’s not always possible.
A solution to this dilemma could be an architecture that allows installation of different versions of shared components, with clients using the version that they referenced during the build process. This solves a lot of problems but not all of them. What happens if you detect a bug in a component that’s referenced from the client? You would like to update this component and ensure that the client uses the new version instead of the version that was referenced during the build process.
Therefore, depending on the type in the fix of the new version, you sometimes want to use a newer version, and you also want to use the older referenced version. The .NET architecture enables both scenarios. In .NET, the original referenced assembly is used by default. You can redirect the reference to a different version by using configuration files. Versioning plays a key role in the binding architecture — how the client gets the right assembly where the components reside.
Version Numbers
Assemblies have a four-part version number — for example, 1.1.400.3300. The parts are <Major>,<Minor>,<Build>,<Revision>. How these numbers are used depends on your application configuration.
With Visual Studio 2012, you can define the version number of the assembly with the assembly information in the project settings. The project settings write the assembly attribute [AssemblyVersion] to the file AssemblyInfo.cs:
[assembly: AssemblyVersion("1.0.0.0")]Instead of defining all four version numbers, you can also place an asterisk in the third or fourth place:
[assembly: AssemblyVersion("1.0.*")]With this setting, the first two numbers specify the major and minor version, and the asterisk (*) means that the build and revision numbers are auto-generated. The build number is the number of days since January 1, 2000, and the revision is the number of seconds since midnight divided by two. Though the automatic versioning might help during development time, before shipping it is a good practice to define a specific version number.
This version is stored in the .assembly section of the manifest.
Referencing the assembly in the client application stores the version of the referenced assembly in the manifest of the client application.
Getting the Version Programmatically
To enable checking the version of the assembly that is used from the client application, add the read-only property FullName to the SharedDemo class created earlier to return the strong name of the assembly. For easy use of the Assembly class, you have to import the System.Reflection namespace (code file SharedDemo/SharedDemo.cs):
public string FullName
{
   get
   {
      return Assembly.GetExecutingAssembly().FullName;
   }
}
The FullName property of the Assembly class holds the name of the class, the version, the locality, and the public key token, as shown in the following output, when calling FullName in your client application.
In the client application, just add a call to FullName in the Main() method after creating the shared component (code file Client/Program.cs):
static void Main()
{
   var quotes = new SharedDemo("Quotes.txt");
   Console.WriteLine(quotes.FullName);
Be sure to register the new version of the shared assembly SharedDemo again in the GAC, using gacutil. If the referenced version cannot be found, you will get a System.IO.FileLoadException, because the binding to the correct assembly failed.
With a successful run, you can see the full name of the referenced assembly:
SharedDemo, Version=1.0.0.0, Culture=neutral, PublicKeyToken= f946433fdae2512dThis client program can now be used to test different configurations of this shared component.
Binding to Assembly Versions
With a configuration file, you can specify that the binding should happen to a different version of a shared assembly. Assume that you create a new version of the shared assembly SharedDemo with major and minor versions 1.1. Maybe you don’t want to rebuild the client but just want the new version of the assembly to be used with the existing client instead. This is useful in cases where either a bug is fixed with the shared assembly or you just want to get rid of the old version because the new version is compatible.
By running gacutil.exe, you can see that the versions 1.0.0.0 and 1.0.3300.0 are installed for the SharedDemo assembly:
> gacutil -l SharedDemo

Microsoft (R) .NET Global Assembly Cache Utility.  Version 4.0.30319.17626
Copyright (c) Microsoft Corporation.  All rights reserved.

The Global Assembly Cache contains the following assemblies:
  SharedDemo, Version=1.0.0.0, Culture=neutral,
  PublicKeyToken=f946433fdae2512d, processorArchitecture=x86
  SharedDemo, Version=1.0.3300.0, Culture=neutral,
  PublicKeyToken=f946433fdae2512d, processorArchitecture=x86

Number of items = 2
Figure 19-14 shows the manifest of the client application for which the client references version 1.0.0.0 of the assembly SharedDemo.

Now, again, an application configuration file is needed. As before, the assembly that is redirected needs to be specified with the <assemblyIdentity> element. This element identifies the assembly using the name, culture, and public key token. For a redirect to a different version, the <bindingRedirect> element is used. The oldVersion attribute specifies what version of the assembly should be redirected to a new version. With oldVersion you can specify a range like the one shown, with all assemblies from version 1.0.0.0 to 1.0.3300.0 to be redirected. The new version is specified with the newVersion attribute (configuration file Client/App.config):
<?xml version="1.0" encoding="utf-8" ?>
<configuration>
  <runtime>
    <assemblyBinding xmlns="urn:schemas-microsoft-com:asm.v1">
      <dependentAssembly>
        <assemblyIdentity name="SharedDemo" culture="neutral"
                          publicKeyToken="f946433fdae2512d" />
        <bindingRedirect oldVersion="1.0.0.0–1.0.3300.0"
                         newVersion="1.0.3300.0" />
      </dependentAssembly>
    </assemblyBinding>
  </runtime>
</configuration>
Publisher Policy Files
Using assemblies shared from the GAC enables you to use publisher policies to override versioning issues. Assume that you have an assembly used by some applications. What can be done if a critical bug is found in the shared assembly? You have seen that it is not necessary to rebuild all the applications that use this shared assembly, because you can use configuration files to redirect to the new version of this shared assembly. Maybe you don’t know all the applications that use this shared assembly, but you want to get the bug fix to all of them. In that case, you can create publisher policy files to redirect all applications to the new version of the shared assembly.
To set up publisher policies, you have to do the following:
- Create a publisher policy file.
- Create a publisher policy assembly.
- Add the publisher policy assembly to the GAC.
Creating a Publisher Policy File
A publisher policy file is an XML file that redirects an existing version or version range to a new version. The syntax used here is the same as that used for application configuration files, so you can use the file you created earlier to redirect the old versions 1.0.0.0 through 1.0.3300.0 to the new version 1.0.3300.0. Rename the previously created file to mypolicy.config to use it as a publisher policy file.
Creating a Publisher Policy Assembly
To associate the publisher policy file with the shared assembly, it is necessary to create a publisher policy assembly and place it in the GAC. The tool you can use to create such a file is the assembly linker, al. The option /linkresource adds the publisher policy file to the generated assembly. The name of the generated assembly must start with policy, followed by the major and minor version number of the assembly that should be redirected, and the filename of the shared assembly. In this case the publisher policy assembly must be named policy.1.0.SharedDemo.dll to redirect the assemblies SharedDemo with the major version 1 and minor version 0. The key that must be added to this publisher key with the option /keyfile is the same key that was used to sign the shared assembly SharedDemo to guarantee that the version redirection is from the same publisher:
al /linkresource:mypolicy.config /out:policy.1.0.SharedDemo.dll
/keyfile:..mykey.snk
Adding the Publisher Policy Assembly to the GAC
The publisher policy assembly can now be added to the GAC with the utility gacutil:
gacutil -i policy.1.0.SharedDemo.dllDo not forget the -f option if the same policy file was already published. Then remove the application configuration file that was placed in the directory of the client application and start the client application. Although the client assembly references 1.0.0.0, you use the new version 1.0.3300.0 of the shared assembly because of the publisher policy.
Overriding Publisher Policies
With a publisher policy, the publisher of the shared assembly guarantees that a new version of the assembly is compatible with the old version. As you know from changes to traditional DLLs, such guarantees don’t always hold. Maybe all applications except one are working with the new shared assembly. To fix the one application that has a problem with the new release, the publisher policy can be overridden by using an application configuration file.
You can disable the publisher policy by adding the XML element <publisherPolicy> with the attribute apply="no" (configuration file Client/App.config):
<?xml version="1.0" encoding="utf-8" ?>
<configuration>
  <runtime>
    <assemblyBinding xmlns="urn:schemas-microsoft-com:asm.v1">
      <dependentAssembly>
        <assemblyIdentity name="SharedDemo" culture="neutral"
                          publicKeyToken="f946433fdae2512d" />
        <publisherPolicy apply="no" />
      </dependentAssembly>
    </assemblyBinding>
  </runtime>
</configuration>
By disabling the publisher policy, you can configure different version redirection in the application configuration file.
Runtime Version
Installing and using multiple versions is not only possible with assemblies but also with the .NET runtime (CLR). The versions 1.0, 1.1, 2.0, and 4.0 (and later versions) of the CLR can be installed on the same operating system side by side. Visual Studio 2012 targets applications running on CLR 2.0 with .NET 2.0, 3.0, and 3.5, and CLR 4.0 with .NET 4 and 4.5.
If the application is built with CLR 2.0, it might run without changes on a system where only CLR version 4.0 is installed. The reverse is not true: If the application is built with CLR 4.0, it cannot run on a system on which only CLR 2.0 is installed.
In an application configuration file, not only can you redirect versions of referenced assemblies, you can also define the required version of the runtime. You can specify the version that’s required for the application in an application configuration file. The element <supportedRuntime> marks the runtime versions that are supported by the application. The order of <supportedRuntime> elements defines the preference if multiple runtime versions are available on the system. The following configuration prefers the .NET 4 runtime and supports 2.0. Remember that in order for this to be possible, the application must be built with the target framework .NET 2.0, 3.0 or 3.5.
<?xml version="1.0"?>
<configuration>
  <startup>
    <supportedRuntime version="v4.0" />
    <supportedRuntime version="v2.0.50727" />
  </startup>
</configuration>
Optionally, the SKUs can be defined with the sku attribute. The SKU defines the .NET Framework version, e.g., 4.0 with SP1, or the client profile. The following snippet requires the full version of .NET 4.5:
<supportedRuntime version="v4.0" sku=".NET Framework,Version=4.5" />To specify the client profile of .NET 4.0 with SP2, this string is specified:
.NET Framework,Version=4.02,Profile=ClientAll the possible SKUs can be found in the registry key HKLMSOFTWAREMicrosoft.NETFrameworkv4.0.30319SKUs.
SHARING ASSEMBLIES BETWEEN DIFFERENT TECHNOLOGIES
Sharing assemblies is not limited to different .NET applications; you can also share code or assemblies between different technologies — for example, between .NET and Windows 8 Metro applications. This section describes the different options available, including their advantages and disadvantages. Your requirements will determine which option is most appropriate for your environment.
Sharing Source Code
The first option is not really a variant of sharing assemblies; instead, source code is shared. To share source code between different technologies, you can use C# preprocessor directives and define conditional compilation symbols, as shown in the following code snippet. Here, the method PlatformString returns a string, which varies according to whether the symbol SILVERLIGHT or NETFX_CORE or neither of these symbols is defined:
      public string PlatformString()
      {
#if SILVERLIGHT
        return "Silverlight";
#elif NETFX_CORE
        return "Windows 8 Metro";
#else
        return "Default";
#endif
      }
You can define the code with these platform dependencies within a normal .NET library. With other libraries, such as a Windows Metro-style class library or a Silverlight 5 class library, symbols are defined as shown in Figure 19-15, which in this case uses a Windows Metro-style class library.

With other projects, existing items can be added with the option Add as Link from Solution Explorer. This way, the source code only exists once, and can be edited from all projects where the link was added. Depending on the project in which the file is opened for editing, the Visual Studio editor highlights the code from the part of the current active #if block. In Figure 19-16, three different projects have the same file, Demo.cs, linked. The links have a different symbol within Solution Explorer.

When sharing source code, every project type can take full advantage of all its features. However, it’s necessary to define different code segments to handle the differences. For that, preprocessor directives can be used to deal with different method implementations, or different methods, or even different implementations of complete types.
Portable Class Library
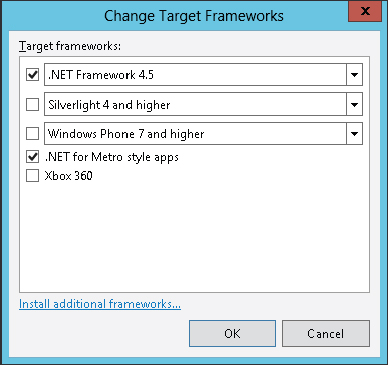
Sharing the binary assembly instead of the source code can be done with the portable class library. Visual Studio 2012 provides a new template for creating portable class libraries. With this library you can configure multiple target frameworks, as shown in Figure 19-17. Here, the target frameworks .NET 4.5 and .NET for Metro-style apps are selected. This enables all references, classes, and methods to be used with all the selected frameworks.
If all the frameworks are selected, of course, the classes that can be used are very limited. The available classes and class members are displayed within the Object Browser, as shown in Figure 19-18.
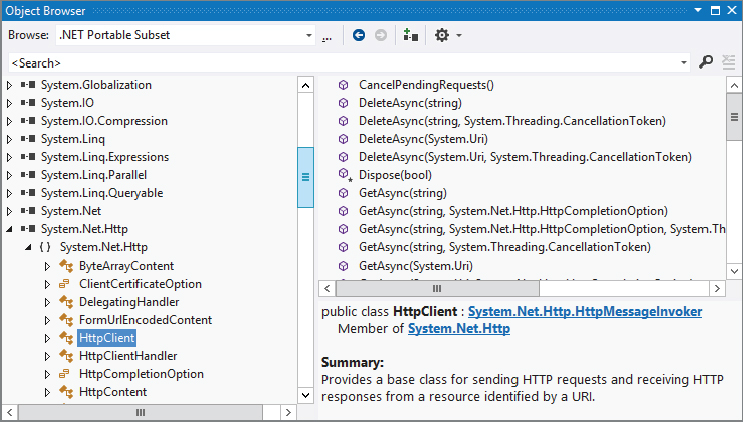
For example, using .NET Framework 4.5 and .NET for Metro-style apps, a subset of MEF and WCF, is available. Classes from WPF, Windows Forms, ASP.NET, and ADO.NET are not available. It’s possible to create a view model within the portable library to be used with the MVVM pattern. With the portable library, the view model classes cannot use libraries that reference ADO.NET. Of course, it’s a common scenario to use a database from a Windows application. To do this you can use some server-side code that accesses the database and use a communication protocol to access the service.
SUMMARY
Assemblies are the installation unit for the .NET platform. Microsoft learned from problems with previous architectures (like COM) and did a complete redesign to avoid them. This chapter discussed the main features of assemblies: that they are self-describing, and require no type library or registry information.
Because version dependencies are exactly recorded with assemblies, the old DLL hell no longer exists, and development, deployment, and administration have become a lot easier.
You learned the differences between private and shared assemblies and saw how shared assemblies can be created. With private assemblies, you don’t have to pay attention to uniqueness and versioning issues because these assemblies are copied and only used by a single application. Sharing assemblies requires the use of a key for uniqueness and to define the version. You also looked at the GAC, which can be used as an intelligent store for shared assemblies.
You can have faster application startup by using the native image generator. With this, the JIT compiler does not need to run because the native code is created during installation.
You looked at all the aspects of assembly versioning, including overriding the policy to use a version of an assembly different from the one that was used during development; this is achieved using publisher policies and application configuration files. You learned how probing works with private assemblies.
The chapter also discussed loading assemblies dynamically and creating assemblies during runtime. If you want more information on this, read about the plugin model of .NET 4 in Chapter 30, “Managed Extensibility Framework.”
The next chapter is on diagnostics, to find failures with applications not only during development but also on a production system.