
In November 2009, at the Microsoft PDC in Los Angeles, Microsoft announced Project Huron, a project that allows database synchronization capabilities in the cloud. If you've been following the hype and reading keeping up with the blog posts regarding Huron, Microsoft has been billing it and associated database sync functionality as "friction free," meaning easy to set up and maintain. Microsoft's goal with Huron was to eliminate many of the emblematic complexities and idiosyncrasies that are associated with data sharing between databases, such as scalability and configuration. Along with these goals, Microsoft also wanted to include user-friendly tools that allow administrators to easily configure and synchronize their data.
In June 2010, at the start of Tech-Ed in New Orleans, Microsoft announced the public preview availability of the Data Sync Service for SQL Azure, part of the Huron project. This is Microsoft's solution to allow users to easily and efficiently share data between databases without regard to database locations and connectivity. Sharing data is only the beginning: Microsoft also has visions of including data collaboration, providing users and developers the ability to use and work on data regardless of the data's location.
This chapter focuses entirely on the capabilities and features of the SQL Azure Data Sync Service. It begins with a brief overview and then shows you how to get started by setting up and configuring the Data Sync Service. You then work through several examples of using the SQL Azure Data Sync Service in different scenarios and situations. You also see some patterns and best practices along the way to help ensure a solid understanding of the Data Sync Service.
The SQL Azure Data Sync Service is a bidirectional synchronization between two or more databases. On the surface, it's as simple as that; but even behind the scenes, it doesn't get much more complicated. With zero lines of code, you can quickly and easily configure your SQL Azure database to be synchronized with other SQL Azure databases in any of the Microsoft Azure data centers.
Why is the ability to sync data between SQL Azure databases important? That's a fair question to ask. Let's explore a couple of answers.
First, you may be a fan of SQL Server replication, but it isn't the easiest to set up and configure. Granted, transactional replication gives you real-time updates, but setting up and maintaining transactional replication isn't a cake walk.
Second, although the SQL Azure Data Sync Service doesn't give you real-time updates, it does allow you to extend your data to the location closest to your users without a lot of headaches. The Data Sync Service lets you move data changes between databases seamlessly, ensuring that the appropriate changes are proliferated to all the other databases in the current data center as well as other databases in other data centers that you've defined in your configuration to be part of your synchronization.
The SQL Azure Data Sync Service is part of Windows Azure and runs in Windows Azure, so it can take advantage of the web and worker roles. A key component of the SQL Azure Data Sync Service is its use of the Microsoft Sync Framework, a synchronization platform provided in the .NET Framework. The great thing is that all this synchronization functionality is provided for you, hosted in the South Central US data center; there is no application you need to run or installation you need to perform.
Every SQL Azure synchronization environment includes a single database hub and has one or more database members, as shown in Figure 11-1. Setting up synchronization includes creating and defining a synchronization group in which you specify the hub database and then assign the database members to that hub.

Let's talk about the initial synchronization for a minute, because it's helpful to understand the process and changes that take place. When the initial sync takes place, it's a two-step process:
This may seem simple, but let's discuss what happens during these two steps. First, you don't have to generate the target (member) database schemas yourself. During the first step, the Data Sync Service does that for you (for the tables you specify to sync). As part of this process, foreign key constraints are not copied. This is because a full schema synchronization capability hasn't been built into the Data Sync Service as of yet.
Because foreign keys aren't copied, you may be wondering what happens in the scenario where data is entered at the member that could potentially break synchronization back to the hub. The answer is that you can control the order in which data is applied, and this helps make certain the changes that are applied don't affect any foreign key constraints. During the initial sync, changes are made to both the hub and member databases to effectively track data changes. You see this behavior in the example later in this chapter.
The next step in the process is the data synchronization that takes place after all the member databases are provisioned. Provisioning of the members takes place during the initial sync. Data synchronization is as simple as copying the data from hub to member in the order specified in the configuration. Because there are no foreign keys on the member databases, there is no particular order in which the tables need to be synchronized. However, it's a good practice to add the tables in an order that indicates the order in which the changes will be applied when a data sync occurs. This helps you ensure that the changes are applied in a way that doesn't affect any foreign key constraints.
Now that you're familiar with the foundation of how the Data Sync Service works, let's dive in and configure a new sync for the SQL Azure Data Sync Service to sync two databases. This example synchs the TechBio database (the hub database). For this, you need to create a member database, which you do by going into the SQL Azure portal and creating a second database called TechBio2 (see Figure 11-2).

You can now begin configuring your SQL Azure data synch, which you walk though over the next few pages.
SQL Azure Data Sync is part of the SQL Azure Labs, which is currently in developer review. To begin, open your browser and go to the following URL: https://datasync.sqlazurelabs.com/SADataSync.aspx. You're taken to a Terms of Service page, and your first step is to agree to the terms. Like other Azure portals, the SQL Azure Data Labs is based on your Live ID, so you will need to sign in with your Live ID if you have one or create one if you do not have a Live ID. Any time you access the SQL Azure Data Labs, you will be asked to sign in if you are not already signed in.
After you agree to the terms of service, you're taken to the Windows Azure Platform SQL Azure Labs home page. On this page, select the SQL Azure Data Sync link at left, to display the Sync Group Management page shown in Figure 11-3.
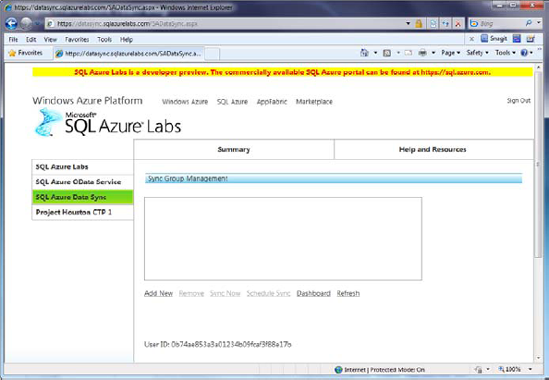
The SQL Azure Data Sync page is where you create and configure data synchronization by first creating a sync group. A sync group is where you define the databases (hub and associated members) that you want to synchronize and the data to be shared between these databases. You can have multiple sync groups, with each sync group having a single hub and multiple members.
To create a new sync group, follow these steps:
Click the Add New link below the Sync Group list. Doing so starts a simple multistep wizard to walk you through defining your sync group.
The first step of the wizard asks you to provide a name for the sync group you're creating. Sync group names must be unique and should be informative enough that you can look at the name and know what you're syncing. The text box appears to accept an endless number of characters; but the text box shown in Figure 11-4 displays only around 70, so keep the name short but descriptive. For this example, enter the name
TechBioSync, as shown in Figure 11-4, and click the Next link.The next step of the wizard asks you to provide Member Information, which means the server name and database(s) that will be your hub and members. You see a Server Name drop-down and a Database drop-down, as well as an Add HUB link and a Register New Server link. Initially, both drop-downs have no values, because you haven't defined any servers. Click the Register New Server link; doing so displays the three text boxes shown in Figure 11-5. Enter your server name, username, and password for your SQL Azure server, and click Next.

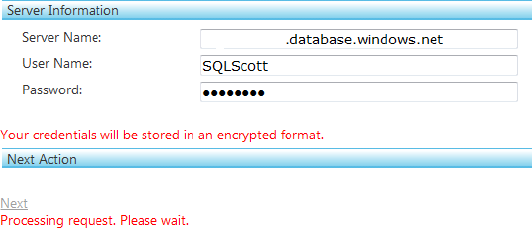
It's important to notice that the Server Information section informs you that your credentials will be stored in an encrypted format. This is because the information is kept and stored for the next time you run this wizard. Subsequent runs through the wizard will automatically display the server name and associated databases, as shown in a moment in Figure 11-6.
The credentials are also stored to support the scheduled sync. The SQL Azure Data Sync Service launches the sync process and as such needs access to the SQL Azure databases to complete the sync.
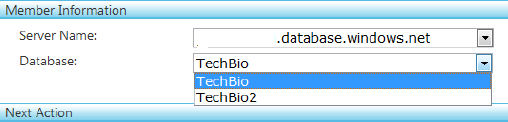
Clicking Next in the Server Information section of the wizard takes you back to the Member Information section with the server selected and the associated databases listed in the Database drop-down.
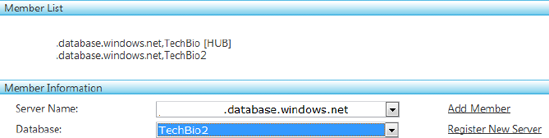
Your next action is to select which database will be the hub. In this example, it's the TechBio database. Select TechBio from the Database drop-down, as shown in Figure 11-6, and click the Add HUB link.
As you add hub and member databases, they're displayed in the Member List section along with their role in the sync group. For example, Figure 11-7 shows the TechBio database listed as the hub.
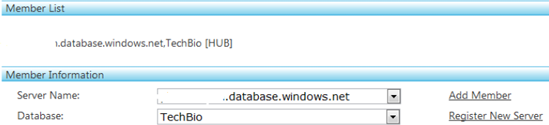
You next need to add one or more member databases. Notice that because you've added the hub, the Add HUB link has changed to Add Member. Select the TechBio2 database from the Database drop-down, and click Add Member. The Member List section now displays the hub and associated member database, as shown in Figure 11-8.
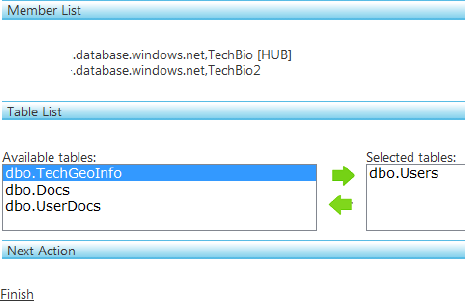
After you've selected your hub and member databases, click Next. You're shown a list of available tables from the hub database. Select the tables that you want to synchronize with the selected member databases, and click the right-pointing green arrow to move them to the "Selected tables" list. For this example, select the Users table and move it to the "Selected tables" list, as shown in Figure 11-9. Then, click the Finish link.
Note
The order in which you add the tables indicates the order in which changes are applied, thus affecting how foreign key constraints are evaluated.
Be aware that the SQL Azure Data Sync Service doesn't sync schema changes, except for the initial synchronization. For example, if you add a column to or remove a column from a table, that information isn't synchronized. The question then becomes, how do you sync schema changes? Right now, there is no way to sync schema changes unless you reprovision the database for sync, which basically means dropping the member database tables and re-creating them.
Congratulations—you've successfully created and configured your first SQL Azure data synch! You should see a Sync Group Management window similar to that in Figure 11-10.
Note
You've configured the sync group, but the initial synchronization hasn't yet taken place. You see how to initiate that first synchronization shortly, in the section "Manually Synchronizing."

The SQL Azure Data Sync Service gives you the ability to manually sync at any time as well as schedule data synchronizations. Let's first run your sync manually so you can see the fruits of your labors. (Not that you're impatient, but developers hate waiting.)
Before you sync manually, let's look at the member database you created earlier. Open SQL Server Management Studio, and connect to your SQL Azure instance (be sure to connect to the master database so you see all the databases in Object Explorer). Expand the Tables node for the TechBio2 database. It should have no tables, as shown in Figure 11-11.

Back on the Sync Group Management page, select your newly created sync group, and click Sync Now. The SQL Azure Data Sync page (see Figure 11-12) displays the time the sync is scheduled, the sync group, the status of the sync, and a link to the sync job log. Notice that the scheduled time is the second you clicked the Sync Now link (displayed in UTC time). Also notice that the status is Scheduled—the synchronization is currently running, but it hasn't completed yet.

In this example the synchronization is simple, so by the time you're finished reading this, you can press F5 to read the page. The Status changes to Completed, as shown in Figure 11-13. If you refresh quickly enough, you see the status with a value of Processing.
One of the great things about the Data Sync page in Figure 11-13 is that below the list of scheduled sync jobs is the Sync Job Log. By clicking the ViewLog link for a given sync job, you can view the log information for the selected sync job in the Sync Job Log section. Information from the log provides great detail pertaining to the synchronization process, including the total changes and how long those changes took. For example, the following log shows a sync like the one you just executed. It shows that there were no sync changes from member to hub, that there were a total of 105 total changes from hub to member, and that the sync took a mere 2 seconds:
Retrieving DbSyncScopeDescription from Hub Checking to see if Scope 71793881-3437-4861-870a-af5eaebe7197 exists in endpointplqfubbqom.database.windows.net,TechBio2 Scope doesnt exist. Provisioning server. Synchronizing Endpoint plqfubbqom.database.windows.net,TechBio2 ==> HUB. Conflict Endpointwins Total Changes Transferred = 0, Total Changes Failed = 0. Sync time (in seconds): 2.4. Synchronizing HUB ==> Endpoint plqfubbqom.database.windows.net,TechBio2. Conflict HUB wins Total Changes Transfered = 105, Total Changes Failed = 0. Sync time (in seconds): 2.0.
Earlier, this chapter mentioned that the SQL Azure Data Sync Service makes changes to the databases, so let's look at those. Back in SQL Server Management Studio, expand the Tables nodes of both the TechBio database and the TechBio2 database. Notice that the SQL Azure Data Sync created four new tables in both databases, and it also created the Users table in the TechBio2 database, shown in Figure 11-14.
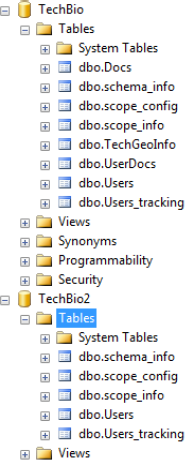
Let's take a quick look at the four system synchronization tables the SQL Azure Data Sync created:
schema_info. Tracks member schema information.
scope_config / scope_info. Used by the Sync Framework to determine what tables, filters, and so on are being synchronized. Each database that is participating in a sync includes these tables and includes at least one scope (if they're being synchronized).
Users_tracking. Tracks changes to the Users table.
Each relationship has its own scope—thus the need for the scope tables. For example, the hub-to-Member1 relationship has a scope, and the hub-to-Member2 relationship has its own, different scope. Just like sync groups, these scopes define the data to be shared among members; multiple scopes make up a sync group. Scopes aren't exposed in order to simplify management of the Data Sync Service.
In this example, four tables were created, but keep in mind that a tracking table is created for each table included in the sync. For example, had you included the Docs and UserDocs tables in the sync, you would also see Docs_tracking and UserDocs_tracking tables. Each tracking table is responsible for storing the changes for its respective table.
Also added, but not shown in Figure 11-14, are triggers. A trigger is added to each base table that updates the tracking table when a change occurs. Some stored procedures are also added to each database; the Data Sync Service uses them to efficiently get and apply changes.
Let's move on. Just for validation, query the Users table in the TechBio2 database, and look at the data. Yep, it's all there. You should see data similar to that shown in Figure 11-15.

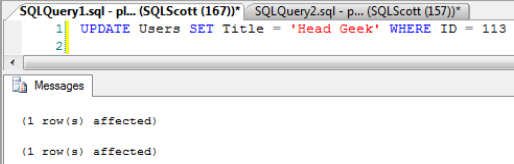
Let's go back the other way and make a change to the Users table in TechBio2 (the member database) and resync. In Figure 11-16, you can see a query that updates the Title column.
Go back to the Sync Group Management page, and click the Sync Now link. When the sync finishes, click the job log for the latest sync and view the details. You can see in the log that there was no sync from hub to member, but a single change was transferred from member to hub. Here are the detailed log entries:
Retrieving DbSyncScopeDescription from Hub Checking to see if Scope 7e2d9af0-aea3-48db-96a9-deed2c0c2c14 exists in endpointplqfubbqom.database.windows.net,TechBio2
Synchronizing Endpoint plqfubbqom.database.windows.net,TechBio2 ==> HUB. ConflictEndpoint wins Total Changes Transferred = 1, Total Changes Failed = 0. Sync time (in seconds): 1.8. Synchronizing HUB ==> Endpoint plqfubbqom.database.windows.net, TechBio2. Conflict HUB wins Total Changes Transfered = 0, Total Changes Failed = 0. Sync time (in seconds): 1.7.
Looking back at Figure 11-16, you see that the UPDATE statement generated two "1 row(s) affected" updates. Where did the second update come from? It came from the trigger on the base table. When you updated the Users table, the Users_tracking table was also updated such that when a data sync takes place, the data sync knows there is a change on the member side.
Let's talk about scheduling a data sync. Go to the SQL Azure Data Sync home page, select your sync group, and then click the Schedule Sync link. A schedule recurrence pattern is displayed, giving you the option to choose the frequency of the sync recurrence: None, Hourly, Daily, Weekly, and Monthly. If None is selected, data synchronization occurs manually. Select any of the other options to display additional options for running the data sync. For example, in Figure 11-17, the Weekly option is selected, and additional options are displayed that let you select days of the week and what time to run the data synchronization.

Defining a schedule for a data sync doesn't display the schedule on the Sync Group list page, but rest assured that the scheduled is indeed saved and runs when scheduled. Let's wrap up this chapter with a discussion of synching on-premises and SQL Azure databases.
You read earlier that the SQL Azure Data Sync Service only works between SQL Azure databases. However, Microsoft has released a Community Technology Preview (CTP) of a tool called Microsoft Sync Framework Power Pack for SQL Azure. This tool lets you synchronize your local database with an Azure database.
You can download the Power Pack by going to www.microsoft.com/downloads and searching for "Sync Framework Power Pack". The download page includes a Microsoft Word document that walks you through the Power Pack's features, functionality, and components. Download the Power Pack and also that Word file with the documentation. Be sure to read the documentation!
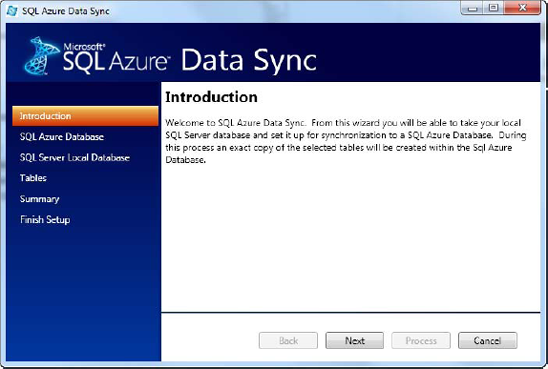
After the tool is downloaded, you can install it by double-clicking the .msi setup file. The install is simple and takes only a few minutes. When it's finished, a new SQL Azure Data Sync item appears on your Start menu. Click it to open the SQL Azure Data Sync wizard, shown in Figure 11-18.
Note
This tool requires the Microsoft Sync Framework 2.0 SDK. Even though you may be able to start the tool and walk though the wizard, synchronization will fail if you don't have the Microsoft Sync Framework 2.0 SDK installed.
The SQL Azure Data Sync Wizard walks you through several steps to connect to your SQL Azure database and a local SQL Server instance, and select the local tables you want to synchronize. Your progress through the wizard is displayed at left.
This tool is smart. First, the destination database doesn't need to exist in SQL Azure—the tool creates it for you. Second, if any of your local tables don't have a primary key, the sync doesn't happen.
One of the components included in the Power Pack is a Visual Studio plug-in that adds a new template called SqlAzureDataSyncClient. This template allows developers to write applications that provide offline synchronization. If you're using VS 2010, the template doesn't appear in the list of available templates until you copy the AddSqlAzureDataSyncCacheTemplate.zip file found on your C drive at
Users[Username]My DocumentsVisual Studio 2008TemplatesItemTemplatesVisual C#
to the following, new destination:
Users[Username]My DocumentsVisual Studio 2010TemplatesItemTemplatesVisual C#
Restart Visual Studio, and the template shows up in the list of templates when you add a new item to your Visual Studio project, as shown in Figure 11-19.

Selecting the SQLAzureDataSyncClient template starts a wizard similar to the one shown in Figure 11-18, which walks you through creating an offline data cache in SQL Compact. When the wizard is completed, a SQL Compact database is created, and code is generated that allows for offline synchronization to sync changes on demand. The code generated is a set of classes that provides the synchronization capability.
One of the things we see when training and consulting is that many companies use the SQL Azure Data Sync Service as a solution for database backup and restore functionality. This may seem like a viable solution, but it isn't the right solution, especially in light of the topics discussed in Chapter 6 regarding new backup capabilities. The Data Sync Service wasn't meant as a backup solution—it's meant to share data with one or more databases in or outside of a data center. It's designed to synchronize data between multiple data sources (the hub and one or more members).
With the SQL Azure Data Sync and the Sync Framework Power Pack still in CTP as of this writing, best practices are still being defined. However, when you approach your design of synchronization, ask yourself the following questions:
When will you use the .NET Sync Framework or SQL Server Integration Services (SSIS) over the SQL Azure Data Sync?
What design options do you need to consider, such as scheduling a sync, or the type of data to sync?
What type of design will create more or fewer issues? For example, should you use GUIDs versus INTs for record identifiers?
How can you use data synchronization in a data warehouse environment? For example, with geographically placed data centers, it may be beneficial to sync region-specific data.
The answers to these questions will certainly change between now and release to public, and even past release as SQL Azure Data Sync is put to use. They will also differ depending on the environment. These questions are meant to give you some guidance about what to consider when you're looking at using SQL Azure Data Sync in your environment.
Although the SQL Azure Data Sync Service is yet to be officially released, this chapter provided a detailed walkthrough of the functionality you can expect to see when it's released. You learned how to set up a sync, and the different options you have for syncing your data. You also now have several items to think about as you plan your synchronization.
In Chapter 12 we discuss SQL Azure performance tuning, discussing topics such as Sharding which are aimed at ensuring that your Azure experience is a successful.