
Technical authors typically write books because they're excited about the technology about which they're writing and want to share their excitement with the readers. As the authors work through the chapters, they get to illustrate the exciting ways in which to use the technology and apply it in real-world scenarios. Occasionally, they get to work on a chapter where the technology is so cool that they don't look forward to the chapter ending.
This is one of those chapters. It's about OData, a platform-independent protocol for querying and updating data. Using OData, you can get at your data even from a mobile phone.
How cool is it to hook up a Windows Mobile 7 phone using OData to a SQL Azure database to view your data, with almost the greatest of ease? Very cool. By the time you get to the end of this chapter, we hope you agree.
You may be wondering what OData is, and how it and Windows Mobile relates to SQL Azure. This chapter answers those questions, among others, by discussing the OData protocol, what it is and why it exists, and how it relates to SQL Azure. You also learn how to use OData to query your SQL Azure database and then build applications (such as a Windows Mobile phone application) in which to display data from your Azure database via OData.
Services are a critical and fundamental part of application development today, and even more so in the applications of tomorrow. This is why technologies such as WCF Data Services and OData are covered in this book, with OData covered specifically in this chapter as it relates to SQL Azure. OData continues to be a widely accepted protocol used in many applications and environments that use web technologies such as HTTP. Let's dive in to OData.
OData stands for Open Data protocol. It's a REST-based web protocol for querying and updating data completely independent of the platform or source. OData accomplishes this by utilizing and enhancing existing web technologies such as HTTP, JavaScript Object Notation (JSON), and the Atom Publishing Protocol (AtomPub). Through OData, you can gain access to a multitude of different applications and services from a variety of sources including relational databases, file systems, and even content-management systems.
The OData protocol came about from experiences implementing AtomPub clients and servers in an assortment of products over the past few years. OData relies on URIs for resource identification, which provides consistent interoperation with the Web, committing to an HTTP-based and uniform interface for interacting with the different sources. OData is committed to the fundamental web principles; this gives OData its great ability to integrate and interoperate with a plethora of services, clients, tools, and servers.
It doesn't matter if you have a basic set of reference data or are architecting an enterprise-size web application: OData facilitates the exposure of your data and associated logic as OData feeds, thus making the data available to be consumed by any OData-aware consumers such as business intelligence tools and products as well as developer tools and libraries.
An OData producer is a service or application that exposes its data using the OData protocol. For example, you can deduce that because this book—and, specifically, this chapter—pertains to SQL Azure and OData, SQL Azure can expose data as OData. But so can SQL Server Reporting Services and SharePoint 2010, among other applications. Later in this chapter, you walk through how to expose an OData service on your SQL Azure database.
Many public (or live) OData services have been made available, which anyone can consume in an application. For example, Stack Overflow, NerdDinner, and even Netflix have partnered with Microsoft to create an OData API. You can view a complete list of such OData producers, or services, at www.odata.org/producers.
Note
Let's take a quick look at Netflix's OData service. Open your web browser, and navigate to http://OData.netflix.com/Catalog. The examples in this chapter used Internet Explorer 7.0 or greater. Using Firefox or Chrome might yield different results.
In the browser, you see a list of the categories by which you can browse or search for a movie offered by Netflix, as shown in Figure 7-1. Now, if you didn't skip reading Chapter 6, you probably look at Figure 7-1 and think, "This looks a lot like WCF Data Services." That is correct, because, as stated earlier, OData facilitates the exposure of your data and associated logic as OData feeds, making it much easier via a standardized method to consume data regardless of the source or consuming application.
Thus, in Figure 7-1 you can see the categories via which you can search Netflix movie catalog. For example, you can see the different endpoints of the API through which to find a movie, such as Titles, People, Languages, and Genres.
As you learned in Chapter 6, you can begin navigating through the vast Netflix catalog by entering your query as a URI. For example, let's look at all the different genres offered by Netflix. The URI is http://OData.netflix.com/Catalog/Genres
You're given a list of genres, each of which is in an <entry> element with the name of the genre in the <Name> element in the feed, shown in Figure 7-2.

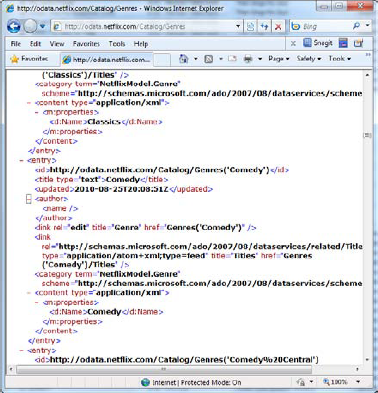
Figure 7-2 shows the Comedy genre. Additional information lets you know what you need to add to the URI to drill down into more detail. For example, look at the <id> element. If you copy the value of that element into your browser, you see the detailed information for that genre.
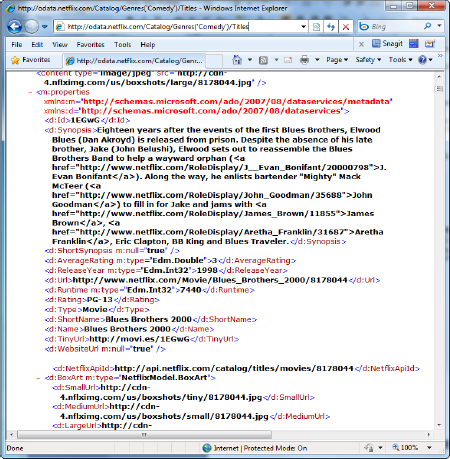
Continuing the Comedy example, let's return all the titles in the Comedy genre. To do that, you need to append the /Titles filter to the end of the URI:
http://OData.netflix.com/Catalog/Genres('Comedy')/TitlesThe Netflix OData service returns all the information for the movies in the Comedy genre. Figure 7-3 shows one of the movies returned from the service, displayed in the browser.
At this point you're just scratching the surface—you can go much further. Although this chapter isn't intended to be a complete OData tutorial, here are some basic examples of queries you can execute:
To count how many movies Netflix has in its Comedy genre, the URI is
http://netflix.cloudapp.net/Catalog/Genres('Comedy')/Titles/$count?$filter=Type%20eq%20'Movie'.Your browser displays a number, and as of this writing, it's 4642.
To list all the comedies made in the 1980s, the URI is
http://OData.netflix.com/Catalog/Genres('Comedy')/Titles?$filter=ReleaseYear%20le%201989%20and%20ReleaseYear%20ge%201980.To see all the movies Brad Pitt has acted in, the URI is
http://OData.netflix.com/Catalog/People?$filter=Name%20eq%20'Brad%20Pitt'&$expand=TitlesActedIn.
The key to knowing what to add to the URL to apply additional filters is in the information returned by the service. For example, let's modify the previous example as follows:
http://OData.netflix.com/Catalog/People?$filter=Name%20eq%20'Brad%20Pitt'
On the resulting page, several <link> elements tell you what additional filters you can apply to your URI:
<link rel="http://schemas.microsoft.com/ado/2007/08/dataservices/related/Awards"...
<link rel="http://schemas.microsoft.com/ado/2007/08/dataservices/related/TitlesActedIn"...
<link rel="http://schemas.microsoft.com/ado/2007/08/dataservices/related/TitlesDirected"...
These links let you know the information by which you can filter the data.
An OData consumer is an application that consumes data exposed via the OData protocol. An application that consumes OData can range from a simple web browser (as you've just seen) to an enterprise custom application. The follow is a list of the consumers that support the OData protocol:
Browsers. Most modern browsers allow you to browse OData services and Atom-based feeds.
OData Explorer. A Silverlight application that allows you to browse OData services.
Excel 2010. Via PowerPivot for Excel 2010. This is a plug-in to Excel that has OData support.
LINQPad. A tool for building interactive OData queries.
Client libraries. Programming libraries such as .NET, PHP, Java, and Windows Phone 7 that make it easy to consume OData services.
Sesame (an OData browser). A browser built by Fabrice Marguerie specifically for browsing OData.
OData Helper for webMatrix. Along with ASP.NET, let's you retrieve and update data from any service that exposes its data via the OData protocol.
There are several more supported client libraries. You can find a complete list of consumers at www.odata.org/consumers.
OK, enough about OData. If you want to learn more, the OData home page is www.OData.org/home.
You should spend some time reading up on OData and start playing with some of the services provided by the listed producers. When people began getting into web services and WCF services, there was an obvious learning curve involved in understanding and implementing these technologies. Not so much with OData—it has the great benefit of using existing technologies to build on, so understanding and implementing OData is much faster and simpler.
When you first look at OData and its interoperation with SQL Azure, you may think you're in for a lengthy process and a ton of reading. Wrong. Enabling OData is simple and takes no time at all. This section spends a couple of pages walking you through the process of enabling OData on your SQL Azure database.
Up until now, you've done most of your work through the SQL Azure Portal at http://sql.azure.com. But as you read about enabling OData and other topics such as SQL Azure Sync Services in Chapter 11, you use Microsoft SQL Azure Labs at http://sqlazurelabs.com. SQL Azure Labs, as the front page says, is a place where you can access early previews of Azure products and enhancements to SQL Azure. So, this is where you begin your venture into several topics such as OData and Azure Sync Services.
Browse to SQL Azure Labs. Then, follow these steps:
On the home page, you see a list at left of things Microsoft is working on. Click the SQL Azure OData Services tab, which first asks you to log in using a Windows Live account.
When you've logged in, you're presented with the window shown in Figure 7-4: a summary of OData and, more important the first step of configuring your SQL Azure OData Service. The Create a New Server link on the right takes you to the SQL Azure home page where you can sign up for an Azure account, and so on. Because you've already done that, you skip that link. In the Connection Information section, enter your complete server name plus your username and password, and then click Connect.
Note
One of the tabs you see in Figure 7-4 is Project Houston, which is discussed in Appendix A.
After your information is validated, a Database Information section appears on the page. Select the database on which you want to enable OData, and select the Enable OData check box. At this point you may think you're done, but not quite. When you click the Enable OData check box, a User Mapping section appears on the page, as shown in Figure 7-5.


As the User Mapping section explains, you can map specific users to the Access Control Service (ACS) keys or allow anonymous access to your SQL Azure database via OData through a single SQL Azure account. Now that we have our data exposed via a REST interface it is through the User Mapping that we control access to our SQL Azure data.
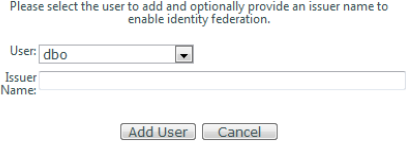
The Anonymous Access User drop-down defaults to No Anonymous Access, but you can also choose to map and connect via dbo, as shown in Figure 7-6. This chapter talks about anonymous access shortly. Selecting the dbo option allows you to connect using the database dbo account, basically as administrator. In a moment you learn the correct way to connect to the OData service.

Notice also that this section provides a URI link that you can use to browse your SQL Azure data in a web browser. How nice is that? Highlight it and copy and paste it into something like Notepad; you use that link in several places later in the chapter, and having it handy will make things much easier. Also in this section is a link to add a user to your list (discussed shortly).
For the sake of this example, select dbo. You have now OData-enabled your SQL Azure database. Before you proceed, let's spend a few minutes discussing in more detail anonymous access and the ACS and how it applies to SQL Azure.
Anonymous access means that authentication isn't needed between the HTTP client and SQL Azure OData Service. Keep in mind, however, that there is no such thing as anonymous access to SQL Azure. If you want to allow anonymous access, you must specify a SQL Azure user that the SQL Azure OData Service can use to access SQL Azure. Figure 7-7 shows how you do that.
The SQL Azure OData Service access has the same restriction as the SQL Azure user. Therefore, if the SQL Azure user being used in SQL Azure OData Service anonymous access has read-only permissions to the SQL Azure database, SQL Azure OData Service can only read the data in the database.
Depending on the requirements of the application, you may consider creating a read-only user for your SQL Azure database. The syntax to do that is as follows:
EXEC sp_addrolemember 'db_datareader', usernameLet's talk a moment about ACS and how that applies to SQL Azure.
ACS is part of the Windows Azure AppFabric. It's a hosted service that provides federated authentication and rules-driven, claims-based authorization for REST based web services, allowing these web services to rely on ACS for simple username/password scenarios.
In the Community Technology Preview (CTP) of SQL Azure OData Service, it's necessary for you to sign up for the AppFabric and create a service namespace to be used with the SQL Azure OData Service. This allows a single user to access SQL Azure OData Service through the Windows Azure AppFabric Access Control. This user must have the same user id as the database user.
Now that you know a little about security regarding SQL Azure OData, you need to be familiar with a few best practices surrounding SQL Azure OData Service:
Always create a new SQL Azure user instead of allowing anonymous access to SQL Azure OData Service.
Never use your SQL Azure Administrator username to access SQL Azure OData Service.
Don't allow the SQL Azure user that is used by SQL Azure OData Service to have write access to SQL Azure OData Service through anonymous access.
The problem you run into by not creating a new user is that you then allow anyone to read from and write to your database. You also have no way to control how much data or what type of data they write.
But with all of that said, because SQL Azure OData is currently in CTP, it's easier to test with anonymous access than with a read-only SQL Azure user. But when out of CTP, you should build your client to use anything other than anonymous access. The browser doesn't support simple web token authentication natively, and this is required for SQL Azure OData Service via ACS. Thus, in production, don't use anonymous access.
It's time to view the fruits of your labors (not that it was a lot of hard work). You first briefly view your data in the browser, just as you did the Netflix data, to prove that you can indeed consume the data via OData. You then use a third-party app to view the data in a more pleasant-looking format. Then, you build your own little application to consume the data.
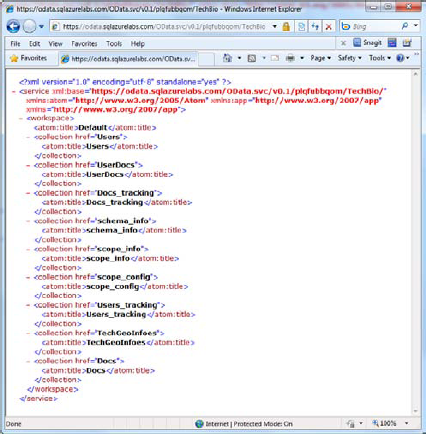
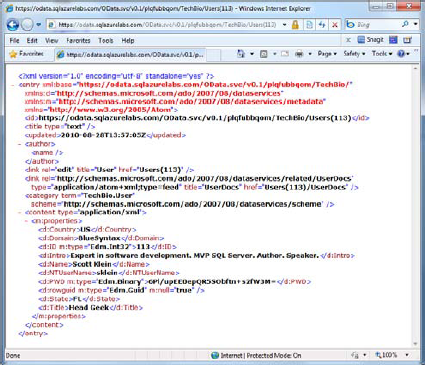
Open your browser, and type in the following URL. Be sure to enter the appropriate server name for your SQL Azure database: https://odata.sqlazurelabs.com/OData.svc/v0.1/servername/TechBio. By now, what you see in Figure 7-8 should look familiar. These are the same REST-based results you saw earlier in this chapter as well as in Chapter 6, except that in this example you're looking at the list of tables, or entities, that the SQL Azure OData service is providing from the TechBio database. Listed are the Users and Docs tables, as well as several other tables that pertain to SQL Azure Data Sync Service (discussed in Chapter 11).
As in previous example, you can navigate into the different entities to look at specific data. For example, in Figure 7-9 the URL is modified slightly to look at a specific user in the Users table.
The key is that in this example, your SQL Azure database is your OData producer, and your browser is the OData consumer. Those two alone allow you to easily navigate through the data, applying different filters
You should now have a good understanding of OData. But let's take a quick look at one of the OData consumers listed earlier, to give you an idea of the possibilities you have to consume an OData feed.
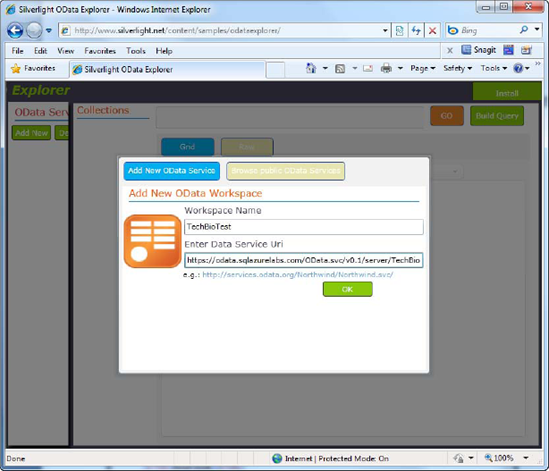
Earlier, the chapter listed several existing OData consumers that you can use today to view data exposed via your SQL Azure OData-enabled database. This section takes a quick look at one of them: the web-based Silverlight OData Explorer. In your browser, navigate to the following URL: www.silverlight.net/content/samples/ODataexplorer/.
When the page first loads, you're presented with what you see in Figure 7-10: a dialog asking you to name your workspace and provide the URI to your OData service. The workspace name can be any name, such as TechBioTest. After you've entered this information, click OK.
The OData Explorer lists your OData service namespace at left, along with the list of collections it found. As you click the individual collections, the data is displayed in a grid, as shown in Figure 7-11.

This page also allows you to edit the data of each record via an Edit link on each row in the grid (if the SQL Azure user selected in the User Mapping section in Figure 7-5 is write-enabled). You can also view related data via links on each row (determined by examining relationships). You can navigate to specific data via the text box at the top of the form (just as you did in the browser examples), or you can build your own query via the Build Query button.
This section doesn't explore all the functionality of the application, but it does show what can be done to view data exposed via an OData service. Frankly, this is a nice application, and it should give you an idea of what you can do.
If you have some time, look at the other OData consumers. But just as important, let's move on to the next section, in which you build your own OData consumers.
The rest of this chapter focuses on building two applications that consume the OData service that you just enabled on your SQL Azure database. The first one is very simple, to whet your appetite and show you the basics. The second is the cool one. (But don't skip the first one!)
For this first example, create a Windows Forms Application project. The name of the project and language don't matter. When your project is created, follow these steps:
Drop a list box and a button on the form.
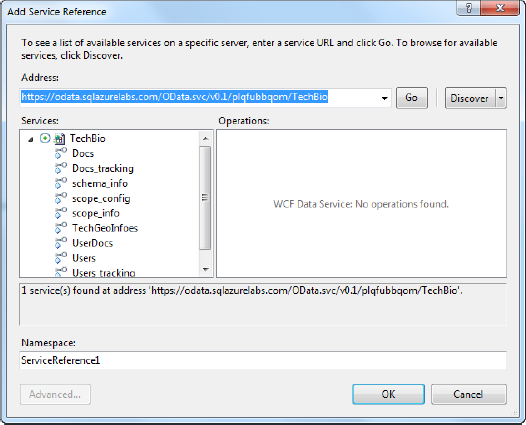
In Solution Explorer, right-click the References node, and select Add Service Reference from the context menu.
When the Add Service Reference dialog appears, you need the URI you copied from Figure 7-6. Paste it into the Address field, and click the Go button. After several seconds the available services and associated endpoints appear in the Services section of the form, as shown in Figure 7-12.
Leave the Namespace name as is, and click OK. A new Service Reference node appears in Solution Explorer, which lists the service you just added.
In the code behind the form, add the following
usingstatements:using System.Data.Services; using System.Data.Services.Client;
In the declaration section, add the following two lines of code. The first line declares your context variable, which references the newly added service; the second line defines the URI that accesses the OData service:
private ServiceReference1.TechBio context;
private const string svcUri = "https://OData.sqlazurelabs.com/OData.svc/v0.1/servername/TechBio";
In the button's click event, add the following code:
context = new ServiceReference1.TechBio(new Uri(svcUri));

var userQuery = from u in context.Users
                select u;

foreach (var u in userQuery)
{
    listBox1.Items.Add(u.Name);
}
Run the application. When the form displays, click the button. After a few seconds, the list box populates with usernames, as shown in Figure 7-13.

Very simple, but a good foundation to build on. This example gives you an idea of how you can consume on OData service via a .NET application. But you're probably tired of waiting, so let's move on to the really cool example: the Windows Phone application.
Let's build something cool (not that you haven't done that prior to this point). In this example, you create a new application that consumes the same OData service that you consumed in the last example, but this time you use a Windows Phone 7 application to consume the service.
For this example, you need to download and install a couple of things. First is the OData Client Library for Windows Phone 7 Series CTP, which is available at www.microsoft.com/downloads/details.aspx?FamilyID=b251b247-70ca-4887-bab6-dccdec192f8d&displaylang=en. The install extracts several files to a directory that you specify.
The second item to download is the Windows Phone Developer Tools, which installs the Visual Studio Windows Phone application templates and associated components that provide integrated Visual Studio design and testing of Windows Phone 7 phone applications. The Windows Phone Developer Tools is available at http://developer.windowsphone.com/windows-phone-7/. To download the tools, click the Download the Developer Tools! link.
When the installs are finished, follow these steps:
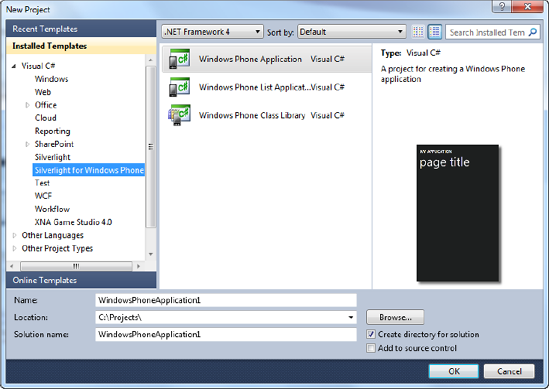
Start a new instance of Visual Studio 2010, and create a new project. In the New Project dialog, select the Silverlight for Windows Phone template (which was installed as part of the Windows Phone Developer Tools), and then select Windows Phone Application, as shown in Figure 7-14. The project name isn't important, but feel free to give it a meaningful name such as WP7ODataApp.
Before you can start coding and consuming the OData service, you need to do a couple of things. First, the OData Client Library installation extracted a file called
System.Data.Services.Client.dll. In Solution Explorer, right-click the References node, and select Add Reference. In the Add Reference dialog, browse to the directory where you extracted the DLL file, and add that file to your references.Next, you need to create a service proxy class that your OData service will use. Open a command prompt, and navigate to the following folder:
C:WindowsMicrosoft.NetFrameworkv4.0.30319.Enter the following command:
datasvcutil.exe /uri:https://odata.sqlazurelabs.com/OData.svc/v0.1/
servernameTechBio /out:C:
directoryDataSvcUtil is a command-line tool provided by WCF Data Services that consumes an OData feed and generates the client data service class or classes that are needed to access a data service in a .NET client application. In this above, where you see bolded and italicized text, be sure to enter your SQL Azure server and the directory in which you want to save the proxy class.
Press the Enter key to generate the proxy class. Figure 7-15 shows the results.

If no errors are generated, you're set to go. The next step is to include this file in your project:
Right-click the project name in Solution Explorer, and select Add →Existing Item from the context menu. Navigate to the directory where you create the proxy class, and add the proxy class to your project.
Add a new class to the project. This class will be used to create the connection to the OData service, define and execute the query against the OData service, and load the Docs collection that will bind to the UI. For this example, name the new class
TechBioModel.
When you've added all the components discussed, your Solution Explorer should look like Figure 7-16. You're ready to start adding some code.

Open the
TechBioModelclass, and add the following namespaces. These namespaces provide additional functionality needed to query your OData source and work with collections. For example, theSystem.Collections.ObjectModelnamespace contain classes that can be used as collections in the object model of a reusable library. TheSystem.Data.Services.Clientnamespace represents the Silverlight client library that your application uses to access the data service:using System.Linq; using System.ComponentModel; using System.Collections.Generic; using System.Diagnostics; using System.Text; using System.Windows.Data; using TechBioModel; using System.Data.Services.Client; using System.Collections.ObjectModel;
Add the following code to the
TechBioModelclass. This class calls out to your OData service. First, you initialize a newTechBioobject (the object you created via the DataSvcUtil and added to your project) using the URI to your OData service. Then, you execute a LINQ query and populate your DocsDataServiceCollectionwhich is used to bind to the list box on the phone's user interface. In this example, the query asks for all the document data from the Docs table (Entity) where the AuthorID is 113:public MainViewModel() {LoadData(); } void LoadData() { TechBio context = new TechBio(new Uri("https://odata.sqlazurelabs.com/OData.svc/v0.1/plqfubbqom/TechBio")); var qry = from u in context.Docs where u.AuthorId == 113 select u; var dsQry = (DataServiceQuery<Doc>)qry; dsQry.BeginExecute(r => { try { var result = dsQry.EndExecute(r); if (result != null) { Deployment.Current.Dispatcher.BeginInvoke(() => { Docs.Load(result); }); } } catch (Exception ex) { MessageBox.Show(ex.Message.ToString()); } }, null); } DataServiceCollection<Doc> _docs = new DataServiceCollection<Doc>(); public DataServiceCollection<Doc> Docs { get { return _docs; } private set { _docs = value; } }
You're probably wondering why you use the Dispatcher for this call. You do so because the call isn't guaranteed to be on the UI thread. You need to use the Dispatcher to marshal the call to the UI thread.
In
App.xaml.cs, add the following code to theAppclass:private static TechBioModel viewModel = null; public static TechBioModel ViewModel { get { if (viewModel == null) viewModel = new TechBioModel(); return viewModel; } }Right-click
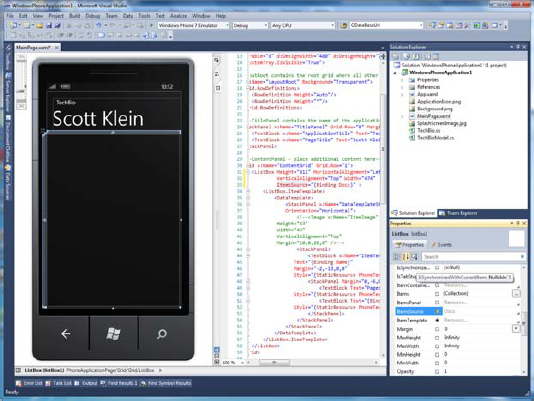
MainPage.xamlin Solution Explorer, and select View Code. Add the following code below theMainPageconstructor:protected override void OnNavigatedTo(System.Windows.Navigation.NavigationEventArgs e) { base.OnNavigatedTo(e); if (DataContext == null) DataContext = App.ViewModel; }Set the
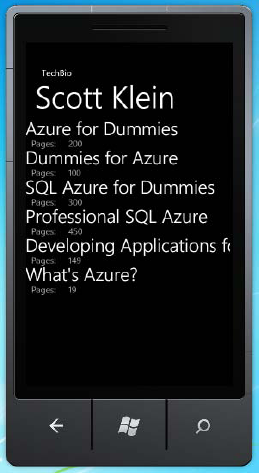
ItemSourceproperty of the list box on the phone UI as shown in Figure 7-17. This binds the list box to the DocsDataServiceCollectionso that when the collection is populated, the list box displays the data.Press F5 to run the project. The Windows Mobile 7 Phone emulator appears, and initially it has a blank screen. But if you look in the status bar at lower-left in Visual Studio, you see that Visual Studio is connecting to the Windows Phone 7 emulator and then deploying the application to the phone. After several seconds, you should see the phone populate with the list of books for Scott Klein, as shown in Figure 7-18.
Now that you've completed this example, you should agree that this is really cool. Getting data on your mobile device has never been easier.
This chapter discussed several topics surrounding OData and SQL Azure. OData is an open protocol for sharing data, providing a way to increase the shared value of data and enabling applications to use a broader set of data. By enabling SQL Azure to expose its data via the OData protocol, myriads of applications can take advantage by consuming that data easily and efficiently.
You saw several examples of OData consumers and producers and then walked through how to OData-enable your SQL Azure database. You then worked on a couple of examples of how to consume the data, specifically via a Windows Phone 7 application, to illustrate how a data consumer can interoperate with a data producer that is far more powerful than before.
In Chapter 8 we discuss how to use SQL Azure with SQL Server Reporting Services (SSRS) to provide reporting capabilities when your data is in SQL Azure.