
When companies talk about their research into or experiences with the Azure technology—specifically the SQL side of Azure—two of their most frequent concerns (aside from security) are migrating local databases and data into the cloud, and backup strategies. Until Azure came around, databases were housed locally (and they still are): they're contained within the walls of the company or in a data center. Moving to the Azure platform, and SQL Azure, means moving and storing all or a portion of your data into the cloud.
Chapter 4 talked at length about security concerns, considerations, and best practices regarding storing your precious data in the cloud. Moving data into the cloud is a decision that you shouldn't and can't take lightly. But after you make the decision to utilize SQL Azure, the question becomes, how do you get your data into the cloud? As nice as it would be if moving your local database into SQL Azure was seamless, it isn't as cut-and-dried as you may think. You do you have several options available, all of which are viable; but you must consider things beyond just moving the data, such as costs from data transfers.
After your data is in the cloud, further questions arise regarding the backup strategies that are common with local databases. In SQL Azure, gone are the concepts of backup devices and backing up and restoring databases. As shocking as this may sound, remember that Microsoft is managing the hardware behind the scenes. For now, there are no such things as drives, devices, and so on.
In this chapter we will discuss the different migration tools, strategies and concepts for moving your database and data into the cloud and examples which illustrate how these tools are used. We'll then discuss a recently added feature to SQL Azure which allows the backup, or "copy" of a SQL Azure database.
So you want to move one or more of your applications and their databases to the cloud. It's a noble idea. More than likely, you're in the same category as countless others who are looking into moving applications into the cloud: you don't want to start from scratch. You'd rather migrate an existing application to the cloud, but you aren't sure about the steps necessary to do so, or the technologies available to help in the process. This section discusses three tools from Microsoft and come with SQL Server:
Generate and Publish Scripts Wizard
SQL Server Integration Services
Bcp utility
In addition to these three tools, we will also briefly mention a free utility found on CodePlex called the SQL Azure Migration Wizard which provides a wizard-driven interface to walk you through migrating your database and data to SQL Azure.
The examples in this chapter use SQL Server 2008 R2 Community Technology Preview (CTP), which at the time of this writing is available from Microsoft's MSDN site. These examples also work with SQL Server 2008, although some the screens may be a bit different.
You may wonder why the SQL Server Import and Export Wizard isn't listed here. The answer is that the SQL Server Import and Export Wizard isn't supported for SQL Azure yet. Microsoft is working on it. No timeframe has been given as to when the Import/Export Wizard will support SQL Azure, but support is definitely in the works.
The database you use in these examples is TechBio, which you can download from the Apress web site for this book. This sample database is a mini version of the TechBio database that is behind the TechBio application found in the download for this book.
The Generate and Publish Scripts Wizard is used to create T-SQL scripts for SQL Server databases and/or related objects within the selected database. You have probably used this wizard, so this section doesn't walk through it step by step; instead, the section briefly highlights a few steps in the wizard and points out the options necessary to effectively work with SQL Azure.
SQL Server 2008 R2 comes with the ability to script an on-premises database for the SQL Azure environment. Because many haven't moved to SQL Server 2008 R2, the examples in this section use the version prior to R2, which is the original release of SQL Server 2008.
One of the differences between SQL Server 2008 R2 and SQL Server 2008 (pertaining to object scripting) is a setting in the Advanced Scripting Options dialog as you go through the wizard. This dialog includes two properties you can set regarding the version of SQL Server for which you're scripting database objects: Script for Server Version and "Script for the database engine type." The Script for Server Version option lists the version of SQL Server that the Generate and Publish Scripts wizard supports, which ranges from SQL Server 2000 to SQL Server 2008 R2.
The "Script for the database engine type" property has two options you can choose from: "Stand-alone instance" and "SQL Azure database." The "SQL Azure database" option only works with the SQL Server 2008 R2 Server version. For example, if you set the Script for Server version to SQL Server 2008 (non R2) and then set the "Script for the database engine type" property to "SQL Azure database," the Script for Server version property value automatically changes to SQL Server 2008 R2.
The Generate and Publish Scripts Wizard does a really nice job of appropriately scripting objects for SQL Azure. The wizard checks for unsupported syntax and data types, and checks for primary keys on each table. Thus, the following example sets SQL for Server Version to SQL Server 2008 (non R2) for several reasons. First, many people aren't using SQL Server 2008 R2 and therefore don't have the option to script for SQL Azure. Second, this exercise shows you what steps are needed to get a script ready to run in SQL Azure.
To start the Generate and Publish Scripts Wizard in SQL Server Management Studio (SSMS), open Object Explorer and expand the Databases node. Select a database, right-click it, and then select Generate Scripts from the context menu.
On the wizard's Introduction page for SQL Server 2008 R2, you're informed that you must follow four steps to complete this wizard:
The following sections work through these steps.
To select your target database objects, follow these steps:
On the Introduction page of the Generate and Publish Scripts Wizard, click Next.
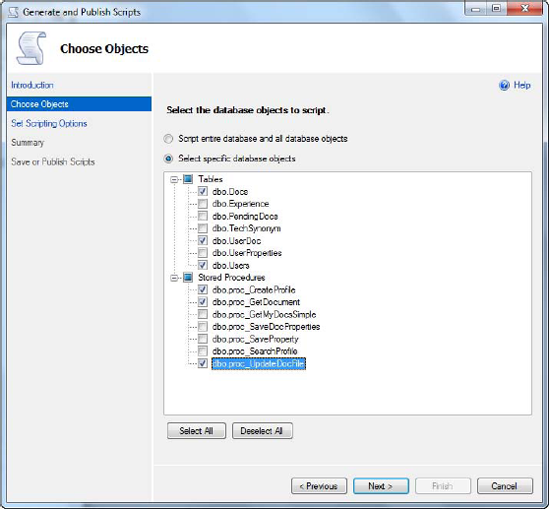
On the Choose Objects page (see Figure 5-1), select the "Select specific database objects" option, because for the purposes of this example, you simply want to select a few objects to migrate.
In the list of objects in Figure 5-1, expand the Tables and Stored Procedures nodes, and select the following objects:
Tables: Docs, UserDoc, and Users
Stored procedures: proc_CreateProfile, proc_GetDocument, and proc_UpdateDocFile
Click Next on the Choose Objects page.
On the Set Scripting Objects page, select the "Save to new query window" option shown in Figure 5-2, and then click the Advanced button.
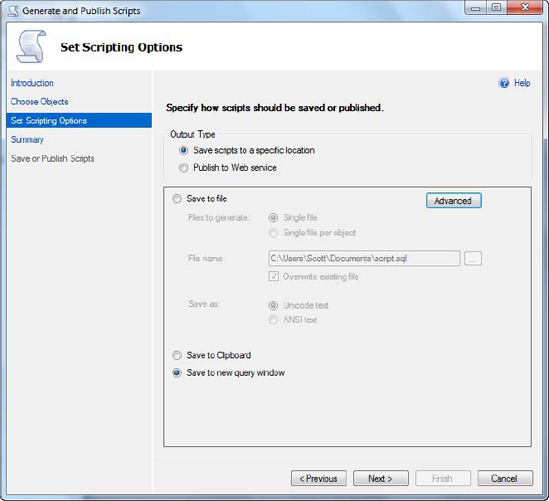
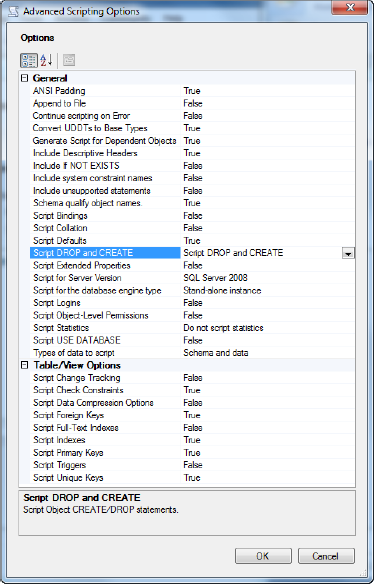
Clicking the Advanced button brings up the Advanced Scripting Options dialog shown in Figure 5-3. Follow these steps:
In the Advanced Scripting Options dialog, set the following options:
Convert UDDTs to Base Types = True
Script Extended Properties = False
Script Logins = False
Script USE DATABASE = False
Types of data to script = Schema and data
You can also set the Script DROP and CREATE option to Script DROP and CREATE, as shown in Figure 5-3, but that option isn't required for SQL Azure.
Click OK in the Advanced Scripting Options dialog, and then click Next in the Generate Scripts wizard.
Complete the wizard with these steps:
On the wizard's Summary page, review your selections, and then click Next. The T-SQL script is generated, and you're taken to the Save or Publish Scripts page (see Figure 5-4).
Click Finish. At this point your script is finished and is displayed in a query window in SSMS.

Open the file you created, and let's take a quick look at the generated T-SQL. The following snippet from what you see shows the creation of three tables and three stored procedures, and a few INSERT statements that add rows of data to some of the tables. Except for the things you told the script-generation wizard to ignore, the following T-SQL looks like all other object creation T-SQL you typically deal with on a daily basis:
/****** Object:  Table [dbo].[Users]    Script Date: 03/31/2010 23:39:20 ******/
SET ANSI_NULLS ON
GO
SET QUOTED_IDENTIFIER ON
GO
SET ANSI_PADDING ON
GO
CREATE TABLE [dbo].[Users](
        [ID] [int] IDENTITY(1,1) NOT NULL,
     [Name] [nvarchar](50) NULL,
     [NTUserName] [nvarchar](128) NULL,
     [Domain] [nvarchar](50) NOT NULL,
     [Intro] [nvarchar](100) NULL,
     [Title] [nvarchar](50) NOT NULL,
     [State] [nvarchar](10) NOT NULL,
     [Country] [nvarchar](100) NULL,
     [PWD] [varbinary](100) NULL,
     [rowguid] [uniqueidentifier] DEFAULT NEWSEQUENTIALID()
PRIMARY KEY CLUSTERED
(
     [ID] ASC
)WITH (PAD_INDEX  = OFF, STATISTICS_NORECOMPUTE  = OFF,
IGNORE_DUP_KEY = OFF, ALLOW_ROW_LOCKS  = ON,
ALLOW_PAGE_LOCKS  = ON) ON [PRIMARY]
) ON [PRIMARY]
GO
SET ANSI_PADDING OFF
GO

SET IDENTITY_INSERT [dbo].[Users] ON
INSERT [dbo].[Users] ([ID], [Name], [NTUserName], [Domain], [Intro], [Title],
    [State], [Country], [PWD])
VALUES (1, N'Herve Roggero', N'hroggero', N'PYNLOGIC',
N'Enterprise and Azure Architect; Speaker. Expert knowledge in C#. Prev. mgmt exp.',
N'Azure Architect', N'FL', N'US',
0xE8F97FBA9104D1EA5047948E6DFB67FACD9F5B73)

INSERT [dbo].[Users] ([ID], [Name], [NTUserName], [Domain], [Intro], [Title],
    [State], [Country], [PWD])
VALUES (2, N'Jim Mullis', N'jmullis', N'PYNLOGIC',
N'Expert in software development. C++; Oracle; SQL Server DBA', N'', N'FL', N'US', 0xE8F97FBA9104D1EA5047948E6DFB67FACD9F5B73)

INSERT [dbo].[Users] ([ID], [Name], [NTUserName], [Domain], [Intro], [Title],
[State], [Country], [PWD])
VALUES (3, N'Scott Klein', N'sklein', N'',
N'Expert in software development. MVP SQL Server. Author. Speaker.',
N'Architect', N'FL', N'US', 0xE8F97FBA9104D1EA5047948E6DFB67FACD9F5B73)
SET IDENTITY_INSERT [dbo].[Users] OFF
/****** Object: StoredProcedure [dbo].[proc_CreateProfile]
Script Date: 03/31/2010 23:39:21 ******/
SET ANSI_NULLS ON
GO
SET QUOTED_IDENTIFIER ON
GO
CREATE PROCEDURE [dbo].[proc_CreateProfile]
@uid [nvarchar](50),
@pwd [nvarchar](50),
@name [nvarchar](50),
@title [nvarchar](50),
@country [nvarchar](50),
@state [nvarchar](20),
@rowguid uniqueidentifier
WITH RECOMPILE, ENCRYPTION
AS
DECLARE @password varbinary(100)
SET @password = HASHBYTES('sha1', @pwd)
-- Make sure the UID is not already taken...
IF (Exists(SELECT TOP 1 * FROM Users WHERE NTUserName = @uid))
BEGIN
RAISERROR(N'0x001 - User ID already in use', 16, 1)
END
ELSE
BEGIN
INSERT INTO Users
(Name, NTUserName, Domain, Intro, Title, State, Country, PWD, rowguid)
VALUES
(@name, @uid, '', '', @title, @state, @country, @password, @rowguid)
END
GONotice that the script enables several options, such as ANSI_NULL and ANSI_PADDING. Then, the script creates the Users table. This table has an IDENTITY column as well as a rowguid column that uses the uniqueidentifier database. The rowguid column also has a default on it, which uses the NEWSEQUENTIALID() function to automatically generate new GUIDs. This table is created on the PRIMARY file group, followed by the setting of several table options via the WITH clause.
Further down in the script, several stored procedures are created, one of which is shown in the preceding code snippet. proc_CreateProfile is a standard stored procedure that accepts several input parameters and uses the WITH option to specify procedure options: in this case, RECOMPILE (to indicate that the database engine doesn't need to cache a plan for this procedure and to compile the procedure at runtime) and ENCRYPTION (indicating that SQL Server converts the text of this stored procedure to an obfuscated format).
Because you selected to script for SQL Server 2008, the script includes some syntax and statements that aren't supported in SQL Azure. Figure 5-5 shows some of the errors you see if you try to run the script as generated.

Another problem is that SQL Azure doesn't support heap tables. A heap table is one without a clustered index. SQL Azure currently supports only clustered tables.
You need to make some changes for your script to run under SQL Azure. Here's what to do:
Delete all instances of
SET ANSI_NULLS ON.Delete all instances of
ON [PRIMARY].Delete all instance of
PAD_INDEX = OFFas well asALLOW_ROW_LOCKS = ONandALLOW_PAGE_LOCKS = ON.In the Users table, modify the rowguid column, changing
DEFAULT NEWSEQUENTIALID()toNULL.In the stored procedure, remove the
ENCRYPTIONclause.Add a clustered index to any heap tables.
Appendix B discusses the need for these changes in detail. For now, here's a quick explanation:
ON [PRIMARY ]isn't needed because, as you learned in Chapters 1 and 2, SQL Azure hides all hardware-specific access and information. There is no concept ofPRIMARYor file groups because disk space is handled by Microsoft, so this option isn't required.According to SQL Server Books Online (BOL) you can remove the entire
WITHclause that contains the table options. However, the only table options you really need to remove are those listed in step 3 (PAD_INDEX, ALLOW_ROW_LOCKS, andALLOW_PAGE_LOCKS).The
NEWSEQUENTIALID()function isn't supported in SQL Azure because there is no CLR support in SQL Azure, and thus all CLR-based types aren't supported. TheNEWSEQUENTIALID()return value is one of those types. Also, theENCRYPTIONoption isn't supported because SQL Azure as a whole doesn't yet support encryption.SQL Azure doesn't support heap tables. Thus, you need to change any heap table into a clustered table by adding a clustered index. (Interestingly, if you execute one statement at a time, you can, in fact, create a heap table. However, any inserts into that table fail.)
A word about the final item in the list. The syntax for defining a clustered index looks like this:
CREATE TABLE [dbo].[UserDocs]
(
    [UserID] [int] NOT NULL,
    [DocID] [int] NOT NULL
PRIMARY KEY CLUSTERED
(
    [UserID], [DocID] ASC
)
)
One of the things the SQL Azure documentation suggests, and which is listed earlier, is to set the Convert UDDTs to Base Types property to True. This is because user-defined types aren't supported in SQL Azure.
After you make the changes just described to your SQL script, it should look like the following:
/****** Object:  Table [dbo].[Users]    Script Date: 03/31/2010 23:39:20 ******/
SET QUOTED_IDENTIFIER ON
GO
SET ANSI_PADDING ON
GO
CREATE TABLE [dbo].[Users](
     [ID] [int] IDENTITY(1,1) NOT NULL,
     [Name] [nvarchar](50) NULL,
     [NTUserName] [nvarchar](128) NULL,
     [Domain] [nvarchar](50) NOT NULL,
     [Intro] [nvarchar](100) NULL,
     [Title] [nvarchar](50) NOT NULL,
     [State] [nvarchar](10) NOT NULL,
     [Country] [nvarchar](100) NULL,
     [PWD] [varbinary](100) NULL,
     [rowguid] [uniqueidentifier] NULL
PRIMARY KEY CLUSTERED
(
     [ID] ASC
)WITH (STATISTICS_NORECOMPUTE  = OFF, IGNORE_DUP_KEY = OFF)
)
GO
SET ANSI_PADDING OFF
GO

SET IDENTITY_INSERT [dbo].[Users] ON
INSERT [dbo].[Users] ([ID], [Name], [NTUserName], [Domain], [Intro], [Title],
    [State], [Country], [PWD])
VALUES (1, N'Herve Roggero', N'hroggero', N'PYNLOGIC',
N'Enterprise and Azure Architect; Speaker. Expert knowledge in C#. Prev. mgmt exp.',
N'Azure Architect', N'FL', N'US',
0xE8F97FBA9104D1EA5047948E6DFB67FACD9F5B73)
INSERT [dbo].[Users] ([ID], [Name], [NTUserName], [Domain], [Intro], [Title],
[State], [Country], [PWD])
VALUES (2, N'Jim Mullis', N'jmullis', N'PYNLOGIC',
N'Expert in software development. C++; Oracle; SQL Server DBA', N'', N'FL', N'US', 0xE8F97FBA9104D1EA5047948E6DFB67FACD9F5B73)
INSERT [dbo].[Users] ([ID], [Name], [NTUserName], [Domain], [Intro], [Title],
[State], [Country], [PWD])
VALUES (3, N'Scott Klein', N'sklein', N'',
N'Expert in software development. MVP SQL Server. Author. Speaker.',
N'Architect', N'FL', N'US', 0xE8F97FBA9104D1EA5047948E6DFB67FACD9F5B73)
SET IDENTITY_INSERT [dbo].[Users] OFF
/****** Object: StoredProcedure [dbo].[proc_CreateProfile]
Script Date: 03/31/2010 23:39:21 ******/
SET QUOTED_IDENTIFIER ON
GO
CREATE PROCEDURE [dbo].[proc_CreateProfile]
@uid [nvarchar](50),
@pwd [nvarchar](50),
@name [nvarchar](50),
@title [nvarchar](50),
@country [nvarchar](50),
@state [nvarchar](20),
@rowguid uniqueidentifier
WITH RECOMPILE
AS
DECLARE @password varbinary(100)
SET @password = HASHBYTES('sha1', @pwd)
-- Make sure the UID is not already taken...
IF (Exists(SELECT TOP 1 * FROM Users WHERE NTUserName = @uid))
BEGIN
RAISERROR(N'0x001 - User ID already in use', 16, 1)
END
ELSE
BEGIN
INSERT INTO Users
(Name, NTUserName, Domain, Intro, Title, State, Country, PWD, rowguid)
VALUES
(@name, @uid, '', '', @title, @state, @country, @password, @rowguid)
END
GO
Now that you've made the necessary corrections, you're ready to create your objects in a SQL Azure database.You don't have a SQL Azure database to run the script against, so let's create one now:
Connect to your SQL Azure instance (refer to Chapter 2 for reference if needed), making sure you're connecting to the master database.
Open a new query window, and use the syntax discussed in Chapter 2 to create your SQL Azure database. Name it TechBio, because this is the name the examples use throughout this chapter.
Click over to the generated script. This query window is currently connected to your local SQL instance, so you need to change it to your SQL Azure instance and the database you just created. Right-click anywhere in the script, and select Connection → Change Connection from the context menu.
In the Connect to Database Engine dialog, enter the information for your SQL Azure instance, and enter the name of the database you just created on the Connection Properties tab.
Click Connect.
You now have your script, a database, and a connection to that database. Click the Execute button. Your script should run and create the tables, procedures, and data in your SQL Azure Database.
The SQL Server Generate and Publish Script wizard is a great way to start understanding the required changes that need to be made when migrating to SQL Azure. With this foundation, let's discuss one of the other options, SQL Server Integration Services.
SQL Server Integration Services (SSIS) is a data-integration and workflow-solutions platform, providing ETL (Extract, Transformation, Load) solutions for data warehousing as well as extractions and transformations. With its graphical tools and wizards, developers often find that SSIS is a quick solution for moving data between a source and destination. As such, it's a great choice for migrating data between a local database and a SQL Azure database. Notice, however, that the previous sentence says data. When you're using SSIS, the database and tables must already exist in SQL Azure.
Note
Volumes of information (books, articles, online help, and so on) are available about SSIS. This section isn't intended to be an SSIS primer. If you're unfamiliar with SSIS, this section provides enough information to give you a foundation and get you started.
If you're familiar at any level with SSIS, you're probably wondering why it has the limitation of only moving data. Several SSIS tasks can provide the functionality of moving objects as well data, such as the Transfer SQL Server Objects task. When asked about this task, Microsoft replied that SSIS relies on SMO (SQL Server Management Objects) for this task, and SMO doesn't currently support SQL Azure. In addition, some of the SSIS connection managers use SMO and therefore are limited when dealing with objects. Thus, the current solution is to create databases and tables using straight SQL and then use SSIS to do the actual data transfer. The following section illustrates how to use SSIS move migrate your data from on-premise SQL to SQL Azure.
To create your project, follow these steps:
Fire up Business Intelligence Development Studio (BIDS) by choosing Programs → Microsoft SQL Server 2008 → Business Intelligence Development Studio.
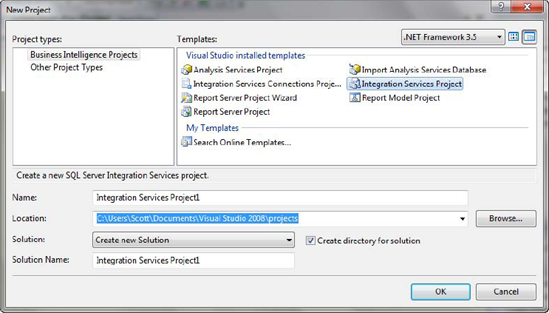
When BIDS opens and the New Project dialog displays, select Business Intelligence Projects from the list of project types, and then select Integration Services Project, as shown in Figure 5-6. Click OK.
You now see an SSIS package designer surface. This surface has several tabs along the top: Control Flow, Data Flow, Event Handlers, and Package Explorer, shown in Figure 5-7. This example uses the Control Flow and Data Flow tabs.
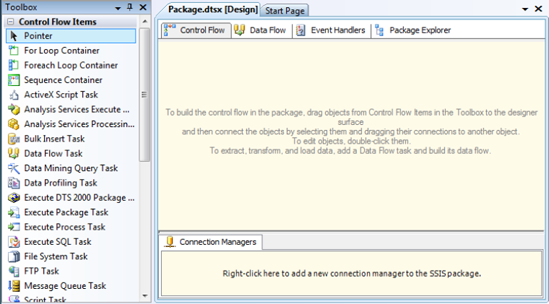
In Visual Studio, select View → Toolbox. The Toolbox contains a plethora of what are called tasks, which are control and data-flow elements that define units of work that are contained and preformed within a package. You use a few of these tasks to migrate the data from your local database to your SQL Azure database.
Let's clear any data that exists in the SQL Azure database so you can start with a clean slate. In SSMS, open a new query connecting to the TechBio database, and delete the data from the UserDocs, Users, and Docs tables by executing the following DELETE statements:
DELETE FROM UserDocs
DELETE FROM Docs
DELETE FROM Users
All three of those tables should now contain no data, as shown in Figure 5-8.

Let's start building an SSIS package to migrate your data. Follow these steps:
In the SSIS package designer, select the Control Flow tab, and drag an Execute SQL task and three data flow tasks from the Toolbox onto the Control Flow designer.
Right-click Execute SQL task, and select Edit from the context menu. The Execute SQL Task Editor opens.
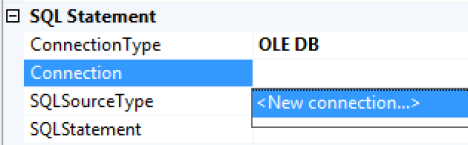
Change the task name to Clear Data, leave the Connection Type as OLE DB, and leave the SQLSourceType as Direct Input.
In the Connection property, select <New connection>, as shown in Figure 5-9. The Connection Manager dialog opens (see Figure 5-10).
In the Connection Manager dialog, enter the server name of your SQL Azure server, select Use SQL Authentication, and enter your SQL Azure username and password. The username must be in the format username@server where username is your Administrator username or a valid SQL Azure username and server is the first part of the server name (the piece prior to .database.windows.net).
In the "Select or enter a database name" field, the OLE DB provider doesn't return a list of databases. No big deal: type in the name TechBio.
Click the Test Connection button. If you've entered everything correctly and your firewall is set up, your test connection succeeds.
Click OK in the Connection Manager dialog.
Back in the Execute SQL Task Editor, click the ellipsis button in the SQLStatement property to display a small Enter SQL Query dialog in which to enter one or more T-SQL statements. Enter the following
DELETEstatements, which clear out the data from the previous example. (This isn't critical, but it gives you a clean slate to start with.)DELETE FROM UserDocs DELETE FROM Users DELETE FROM Docs
Click OK in the Enter SQL Query dialog. The Execute SQL Task Editor dialog should look like Figure 5-11. Click OK.
Back on the Control Flow tab in the SSIS package designer, make sure the Clear Data task is highlighted. Notice the green arrow coming from the bottom of the Clear Data task: click anywhere on this green arrow, and drag it to the first data flow task. Doing so creates a connection from the Clear Data task to the first data flow task, signifying the flow of execution. You can see an example of this in Figure 5-14.When the Clear Data task has completed executing, the first data flow task will then execute.
Let's add logic to the first data flow task. Double-click the linked data flow task (or right-click and select Edit). Doing so takes you to the Data Flow tab.
Drag an OLE DB Source task and an OLE DB Destination task to the Data Flow designer surface. This is where the actions of pulling data from the source database (the local DB) and copying it to the destination database (SQL Azure) take place.
Right-click the OLE DB Source task, and click Edit. Doing so opens the OLE DB Source Editor, where you define a connection to your local database, such as the connection shown in Figure 5-10. You already have a connection to the SQL Azure database, but you need to create a connection to your local database that your tasks use to copy the data.
On the OLE DB Source Editor task, you see the connection to the SQL Azure database. Click the New button to open the Configure OLE DB Connection Manager dialog. Click New again to open the Connection Manager dialog you saw in Figure 5-10.
In this dialog, enter the information to connect to your local copy of the TechBio database.
Test the connection, and then click OK in the Connection Manager dialog.
Click OK in the Configure OLE DB Connection Manager dialog.
Back in the OLE DB Source Editor, click the Table/View drop-down, select the Docs table, and then click OK.
As you did for the control flow task, drag the green arrow from the OLE DB Source task to the OLE DB Destination task.
Double-click the OLE DB Source task to edit the task properties, which is where the data is going: the SQL Azure database. Because you've already created a connection to the SQL Azure database, you can use that connection. In the OLE DB Destination Editor, select the SQL Azure connection, and then select the Docs table from the drop-down list of tables. Oops—you get the error shown in Figure 5-12.


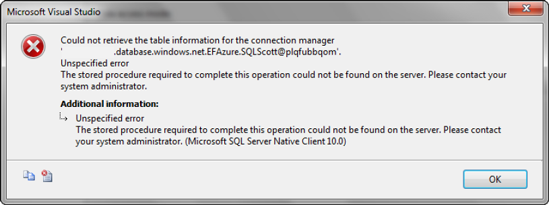
This is interesting, because you didn't get this error when configuring the Execute SQL task. The difference is that the two Connection Manager dialogs don't operate quite the same way. The Connection Manager dialog for the Execute SQL task let you type in the table name, whereas the Connection Manager dialog for the OLE DB Destination task required you to select from the list. But when you expanded the list, you received the error shown in Figure 5-12.
The fix is to use an ADO.NET destination instead of the OLE DB destination. To do this, continue as follows:
Delete the OLE DB Destination task, and drag an ADO.NET Destination task onto the surface.
Connect to the two tasks, and then double-click the ADO.NET Destination task to configure it.
In the ADO.NET Destination Editor dialog, click the New button to configure a new ADO.NET connection.
Walk through the same steps as in the previous two connection configurations. This time, you're able to type the database name in the Connection Manager dialog.
Click OK in the all the dialogs until you're back to the ADO.NET Destination Editor.
Before you click OK in this dialog, click Mappings at left, as shown in Figure 5-13. Doing so ensures that the source table columns are appropriately mapped to the destination table columns. Click OK in the ADO.NET Destination Editor
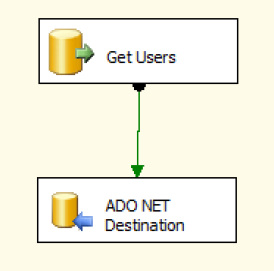
If you're new to SSIS, congratulations: you've just configured your first SSIS data flow. Your data flow should look like Figure 5-14—not very exciting, but useful nonetheless. If you aren't new to SSIS, you still deserve congratulations, because you've successfully configured a data flow to migrate data to the cloud.

Put down the root beer, though, because you aren't quite done. Continue with these steps:
Go back to the Control Flow tab, and connect the first data flow task to the second data flow task, and connect the second and third data flow tasks.
Double-click the second data flow task, and do the same thing you did for the first data flow beginning in step 12. You don't need to re-create the connections, but in the Source and Destination Editors for the second data flow, select the Users table.
Repeat the process for the third data flow task, this time selecting the UserDocs table.
When you're finished, your control flow task should look like Figure 5-15. The tasks aren't green (yet), but the flow should be similar.
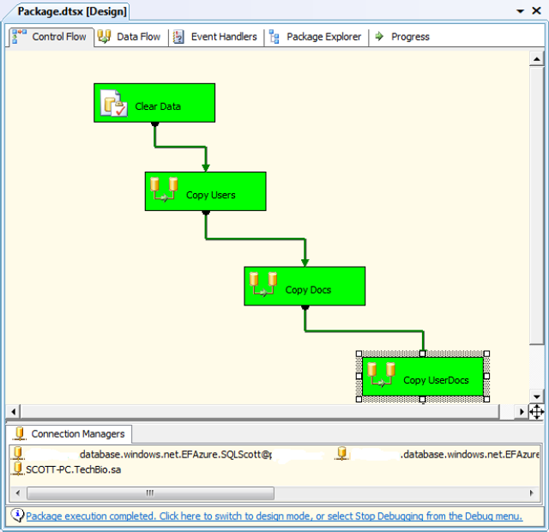
You're now ready to test your SSIS package. In Visual Studio, click the green arrow on the toolbar to begin package execution. Execution starts at the Clear Data task—which, as you recall, deletes all the data from the UserDocs, Users, and Docs tables. Execution next goes to the first data flow, which queries data from the local Docs table (source) and copies it to the TechBio database in the Docs table in SQL Azure (destination). Execution then goes the second and third data flow tasks.
When execution is complete, all the tasks are green, as shown in Figure 5-15, letting you know that they executed successfully. Any tasks that are yellow are currently executing. Red tasks are bad: that means an error occurred during the execution of the task, regardless of whether the task was in the control flow or data flow, and execution stops.
If your tasks are all green, you can go back to your root beer. Otherwise, the best place to start debugging is the Output window. All output, including errors, is written to this window. You can find errors easily by looking for any line that starts with Error: toward the end of the list.
Errors you receive may be SSIS specific or SQL Azure specific. For example, did you define your connections correctly? Microsoft makes testing connections very simple, and this doesn't mean the Test Connection button. The Source Editors dialog—regardless if whether it's an OLE DB or ADO.NET Editor—includes a Preview button that provides a small preview of your data, up to 200 rows. This ensures that at least your source connection works correctly.
When you have everything working and executing smoothly, in Visual Studio click the blue square button on the toolbar to stop execution. Go back to SSMS, and query the three tables in your SQL Azure instance to verify that data indeed copied successfully. As shown in Figure 5-16, you should see roughly 100 rows in the Users table, two rows in the Docs table, and two rows in the UserDocs table.

This example was simple; the source and destination tables were mirrors of each other, including column names and data types. This made data migration easy. However, in some cases the source and destination tables differ in column names and data types. There are tasks that help with this, such as the Derived Column, Data Conversion, and Lookup tasks. If you're using these tasks and are getting errors, start by looking at these tasks to make sure they aren't the source of data-truncation or data-conversion errors.
Again, this section isn't intended to be an SSIS primer. Great books about SSIS are available that focus on beginner topics all the way to advanced topics. Brian Knight is a SQL Server MVP who has written numerous books on SSIS; his books are highly recommended if you're looking for SSIS information and instruction.So far we have talked about SSIS and the SQL Server Generate and Publish Scripts wizard which both offer viable options for migrating your data, but with little differences. For example, SSIS doesn't migrate schema while the Scripts wizard does. Let's talk about the third tool, Bcp, which also provides a method for migrating data to SQL Azure.
The bcp utility provides bulk copying of data between instances of Microsoft SQL Server. This utility is installed with SQL Server and requires no knowledge or understanding of T-SQL syntax. If you aren't familiar with the bcp utility, don't confuse or associate its functionality with that of the Import/Export Wizard in SQL Server. Although the bcp documentation refers to what bcp does as a "bulk copy," be aware that you can't bcp data from a source into a destination with a single statement. You must first bcp the data out of the source; then, you can bcp the data in to the destination.
Note
The bcp utility is very flexible and powerful, and you can apply a lot of options to it. This section doesn't go into the entire range of bcp options or dive deep into the many uses of the utility. You can find that information in the SQL Server Books Online or on the Microsoft MSDN web site at http://msdn.microsoft.com/en-us/library/ms162802.aspx.
This section describe show to use the bcp utility to export data from a local database and import the data into your SQL Azure database. It also discusses some things you should watch out for when using the bcp utility for SQL Azure.
The bcp utility has no GUI; it's a command prompt–driven utility. But don't let that intimidate you, especially given what you're using it for. It's very flexible and can seem a bit overwhelming, but it's quite simple. The basic syntax for the bcp utility is as follows:
bcp table direction filename -servername -username -passwordwhere:
tableis the source or destination table based on the direction parameter.directionisinorout, depending on whether you're copying data into the database or out of the database.filenameis the filename you're copying data to or from.servernameis the name of the server you're copying data to or from.usernameis the username used to connect to either the local or SQL Azure database.passwordis the password associated with the username.
Let's get started by exporting the data from your source database.
Begin by copying data out of your local SQL instance. Open a command prompt, and type the command shown in Figure 5-17. Enter your own values for the server name, the target directory, and the username and password for your local server. (The password is blanked out in Figure 5-17.)
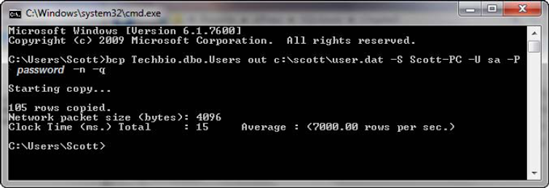
Notice that in this example you're using the out keyword for the direction parameter. That's because you're copying data out of SQL Server.
The -n parameter performs the bulk-copy operation using the native database data types of the data. The -q parameter executes the SET QUOTED_IDENTIFIERS ON statement in the connection between the bcp utility and your SQL Server instance.
After you type in the command, press the Enter key to execute the bcp utility. In mere milliseconds, 105 rows are exported and copied to the user.dat file. Now, do the same for the Docs and UserDocs tables.
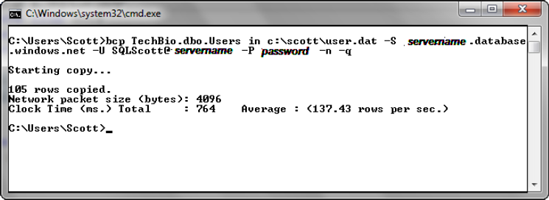
The next step is to copy the data into the cloud—specifically, to your SQL Azure TechBio database. The syntax for copying into a database is very similar to the syntax for copying data out. You use the in keyword and specify the server name and credentials for your SQL Azure database, as shown in Figure 5-18.

After you type in the command, press Enter to execute the bcp utility. Only one row is copied over, and then an error is generated, stating that an unexpected end-of-file (EOF) was encountered. This error isn't specific to SQL Azure; the bcp utility has issues with columns of the uniqueidentifier data type. You can find posts and blogs all over the Internet about this problem.
The solution is to execute the following T-SQL against the Users table in your SQL Azure database:
alter table users
drop column rowguid
The cool thing is that you don't need to re-export the data. You can re-execute the bcp import command. Do that, as shown in Figure 5-19, and all 105 rows are imported. Then, use the same syntax to import the Docs and UserDocs data.
Don't forget to put the rowguid column back on the Users table. You can do this by using the same syntax as before:
ALTER TABLE Users
ADD rowguid uniqeidentifier
Next, let's make this a little simpler and put the export and import together, so you aren't running the statements one at a time.
You can put the export and import processes together into a single file to make them easier to use. To do so, open Notepad, and type in the following, replacing the italicized information with the appropriate information for your environment:
bcp Techbio.dbo.Users outc:scottuser.dat -S Scott-PC -U sa -PPassword-n -q bcp Techbio.dbo.Docs out c:scottdocs.dat -S Scott-PC -U sa -P Password -n -q bcp Techbio.dbo.UserDocs out c:scottuserdoc.dat -S Scott-PC -U sa -P Password -n -q bcp Techbio.dbo.Users in c:scottuser.dat -S servername.database.windows.net -U SQLScott@ servername -P #ackThis -n -q bcp Techbio.dbo.docs in c:scottdocs.dat -S servername.database.windows.net -U SQLScott@ servername -P #ackThis -n -q bcp Techbio.dbo.userdocs in c:scottuserdoc.dat -S servername.database.windows.net -U SQLScott@ servername -P #ackThis -n -q Save the file as AzureBCP.cmd, and navigate to its location. Double-click the file to execute it. A command window appears, showing the results of the bcp commands that export and import the data.
As stated earlier, SQL Server BOL is full of information about how to use the bcp utility. This section is a brief introductory look at how to use this utility to move data from your local SQL Server instance to SQL Azure. The bcp utility is bulk-copy method of moving data. It lacks SSIS's ability to convert data from one data type to another, and SSIS's workflow components. But if all you're interested in is moving data from one table to a similar destination table, bcp is your best friend.
Your data is in the cloud, but it really doesn't stop there. Much of the functionality that DBAs have at their fingertips when dealing with local data stores doesn't exist in the cloud yet. The operative word in that sentence is yet. At the time of this writing, SU4 was recently released, and it supports Database Copy functionality.
Database Copy enables you to copy your database to make a new database on the same SQL Azure server. Alternative, you can copy to a different SQL Azure server in the same subregion or data center. This functionality is much needed, but at the same time it has some shortcomings; some can be worked around, but others will require future service updates.
The Database Copy feature allows you to create a single copy of a source database. You do so by adding a new argument to the CREATE DATABASE statement: AS COPY OF. As a refresher, the syntax for CREATE DATABASE is as follows:
CREATE DATABASE MyDatabase (MAXSIZE= 10 GB, EDITION= 'Business')
To create a copy of a source database, the syntax now becomes
CREATE DATABASE MyDatabase AS COPY OF [source_server_name].source_database_name]
Thus, if you want to create a copy of your TechBio database, the syntax is
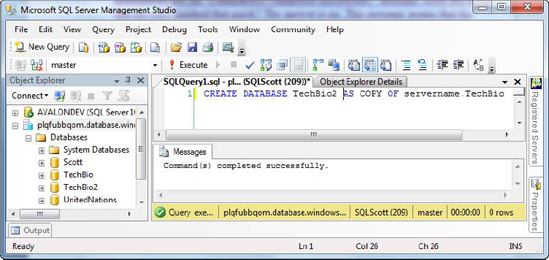
CREATE DATABASE TechBio2 AS COPY OF servername.TechBioFigure 5-20 shows the execution of the previous statement. The interesting thing to note is the message in the Messages window. When you execute the CREATE DATABASE statement with the AS COPY OF argument, you immediately get the "Command(s) completed successfully" message. Does this mean the copy finished that quickly? No. This message means the copy has started. You can also see in Figure 5-20 that the TechBio2 database is already listed in the list of databases; however, that doesn't mean the database copy has completed.
The question then becomes, how do you know the copy is finished? The answer is that Microsoft created a new data management view (DMV) to return the details of the database copy operation. This DMV is called sys.dm_database_copies, and it returns a great deal of information about the status of the database copy, such as when the database copy process started and completed, the percentage of bytes that have been copied, error codes, and more. In addition, Microsoft modified the state and state_desc columns in the sys.databases table to provide detailed information on the status of the new database.
Figure 5-21 was generated by deleting the TechBio2 database and creating it again. This time, a statement looks at the sys.dm_database_copies DMV and checks the status of the copy. You can see the statement highlighted in Figure 5-21. You can also see results in the figure from the query against the DMV. The TechBio database was tiny to begin with, so the copy takes only a few seconds, if that.

You can schedule a database copy via an on-premises SQL Agent job and an SSIS package (as discussed earlier in this chapter). The job can be scheduled like a normal on-premises SQL job, as long as the connection information for the Execute SQL task points to the SQL Azure database.
Although this may not be the most favorable solution, it's certainly an option, and it does provide the scheduling capabilities you're looking for. The key for this solution is to first delete the copy database before you re-create it.
The Database Copy functionality lets you create an instant backup of your database, but it doesn't provide a way to create a backup history. In other words, you can't append to the backup and create multiple days' worth of backups. You do have several options, however.
If all you care about is backing up the current day's data, you can delete the current backup copy and re-copy the database. This is a viable option and doesn't require a lot of maintenance.
If, on the other hand, you want a backup history, doing so is a bit more tricky. Many, if not most, companies like to keep a week's worth of backups. These companies back up their databases each night and keep seven days' worth of backups so they have the option to restore past the previous night's backup. To do this with the Database Copy functionality, you must create seven copies of the source database—you have seven backup copy databases.
This strategy works, but keep in mind that you're billed for those additional seven databases. The key here is that if you're using SQL Azure, a look at your backup plan is critical.
What does Microsoft have coming in future Service Updates? The company is working very hard on adding and improving SQL Azure backup and restore functionality. Microsoft wants to hear from you—your feedback is important. Talks of database cloning and continuous backups have surfaced; keep your fingers crossed that this functionality and more will appear in the near future.
In this chapter we discussed the several different migration options when migrating your database schema and associated data to SQL Azure. From our discussion we learned that there are pros and cons to each; for example the SQL Server script generation wizard will script the schema as well as the data, but SSIS and the Bcp utility does not. We also learned that if you use SQL Server 2008 R2 you have the option for scripting for SQL Azure which scripts the objects ready for execution in the SQL Azure environment.
We also discussed the SQL Azure Copy feature, which allows you to make a copy of your SQL Azure database for backup purposes.
With your database in SQL Azure, we can now focus on how to program applications for SQL Azure, which we will discuss in Chapter 6.