
The chapters previous to this one have laid the foundation for the rest of the book. You've seen an overview of SQL Azure, learned about cloud computing design options, and walked through setting up your Azure account. You've read about SQL Azure security, including security compliance and encryption topics; and you spent the last chapter learning about data migration (how to get your data into the cloud) and backup strategies—the types of things a DBA likes to hear.
Starting with this chapter, the rest of the book focuses on developing with Azure. This chapter looks at using various Microsoft technologies to program against SQL Azure, including ODBC, ADO.NET, LINQ, and others. This chapter also discusses development considerations as you start to design and build new applications to work with SQL Azure or consider moving existing applications to SQL Azure.
You should begin getting the picture that SQL Azure really isn't that much different than your local SQL instances. The last chapter talked at length about some of the T-SQL differences in SQL Azure but also said that Microsoft is continually adding features and functionality; so, the differences gap closes at a very rapid pace (which has made writing this book a fun challenge, but that's another story). The key to developing applications isn't pointing your application to your cloud version of the database, but rather your approach to developing the application and design considerations for accessing your cloud database. Moving a database to the cloud and pointing your application to that instance can have disastrous results, such as degraded application performance and unwanted (and undesired) monetary costs.
This chapter first focuses on application design approaches to get the most from SQL Azure application development. The rest of the chapter discusses various technologies for accessing your SQL Azure database, showing you how to use those technologies to connect to and retrieve data. You learn the right place to use each of the technologies, because there are many technologies to choose from. The end of this chapter provides a simple, best-practice discussion of testing locally before deploying remotely to ensure a successful SQL Azure application deployment.
As stated earlier, you could use the information from Chapter 5 to push your entire database to SQL Azure. But is that the right thing to do?
Chapter 2 discussed at length the design aspects of architecting and publishing applications for the cloud, including topics such as storage, high availability, security, and performance. Each of those aspects is important (especially performance) and should be discussed when you're considering moving applications to the cloud. In addition to security, performance is one of the primary items of concern that companies have about cloud computing. One of the last things a company wants to do is decide to take a critical application and move it to the cloud, only to find that it doesn't perform as well as the on-premises version of the app.
Don't get the idea that moving an on-premises application to the cloud automatically results in security issues and a loss of performance—that isn't the case. With planning and the right approach, you can achieve a very successful application deployment into the cloud. The purpose of this discussion, and of Chapter 2, is to get you to think and plan before you deploy, so you take the right approach. The question is, what is that right approach?
This discussion is really about two things. First, when deciding to move an application to the cloud, do you move the entire application (meaning, database and app) or just a portion? Second, regardless of whether you move all or a portion of the database, do you also move the application, or do you keep the application on-premises? Let's not forget that using SQL Azure doesn't mean you automatically have to move your application to the Azure platform. You can move your database to the cloud and still host your application on-premises. As with everything, you have options. Let's discuss the different ways of hosting your SQL Azure application.
On-premise means your application is hosted locally and not in Azure, but your database is in SQL Azure. Your application code uses client libraries to access one or more SQL Azure databases. Some companies are reluctant to put business logic or application-specific logic outside of their corporate data center, and the on-premise option provides the ability to house the data in the cloud while keeping the application logic local.
Although this is a viable option, limitations are associated with it. For example, only the following client libraries are supported:
.NET Framework 3.5 SP1 Data Provider for SQL Server (System.Data.SqlClient) or later
Entity Framework 3.5 SP1 or later
SQL Server 2008 R2 Native Client ODBC driver
SQL Server 2008 Native Client Driver (supported, but has less functionality)
SQL Server 2008 Driver for PHP version 1.1 or later
If your application uses OLE DB, you have to change your application so use one of the client libraries listed here.
The biggest consideration related to keeping your application on-premise is the cost. Any time you move data between SQL Azure and your on-premise application, there is an associated cost (currently, $0.10 in and $0.15 out per GB, or more if your selected geolocation is Asia). If you're using Azure Storage, there is also the cost of using that storage (currently, $0.15 per GB stored per month). Again, this is per GB, so the cost is low. An example of an expensive pattern is synchronizing large amounts of data multiple times per day. But keep in mind that synching even a 50GB database costs only $5.
These costs and limitations shouldn't deter you from using an on-premise solution for your application. However, let's look at what an Azure-hosted solution provides.
Azure-hosted means that your application code is hosted in Windows Azure and your database is in SQL Azure. Your application can still use the same client libraries to access the database or databases in SQL Azure. Most companies right now are taking existing ASP.NET applications and publishing them to Windows Azure and accessing SQL Azure. However, you aren't limited to just web apps: you can use a Windows desktop app or Silverlight app that uses the Entity Framework and the WCF (Windows Communication Foundation) Data Services client to access SQL Azure as well. Again, you have plenty of options.
The benefit of using an Azure-hosted solution is the ability to minimize network latency of requests to the SQL Azure database. Just as important is the fact that you're cutting the costs of data movement between SQL Azure and the application. As long as your Windows Azure and SQL Azure are in the same subregion, bandwidth usage between SQL Azure and Windows Azure is free.
By putting both your application and database in Azure, you also get the benefit of more efficient transactions between your app and the database, because doing so minimizes the network latency between your application and the database.
But you incur the compute cost, which is currently $0.12 per hour. Compute hours is the time your application is deployed to Windows Azure. Even if your application isn't in a running state, you're being billed. Billing is per hour, and partial hours are billed as full hours. When developing and testing your application, you should remove the compute instances that aren't being used. Thus, the key here is to test locally before deploying remotely.
The decision to move your application to the cloud versus keeping it local is entirely up to you and shouldn't be determined solely by what you read in the last two sections. The decision isn't that cut-and-dried. You need to look at several other factors, such as costs, data traffic, and bandwidth, and then base your decision of the analysis of this information. For example, it may not be a sound decision for a small company with little web traffic to host an application in Azure, due to the compute costs. However, that same company can keep its database in Azure while keeping the application on-premise because the data-transfer costs are minimal, yet gain the benefits of SQL Azure (failover, and so on).
In many companies, the initial goal isn't an all-or-nothing approach. The companies spend some time looking at their databases and applications, decide what functionality makes sense to put in the cloud, and test functionality on that. They test for performance foremost, to ensure that when deployed to Azure in production, performance is in the same ballpark. The thought is to keep the important things up front to ensure a successful Azure deployment. Roll your application out in pieces, if necessary, and test locally prior to deployment.
Whether you deploy all or part of your database and application is for you to decide. Chapter 2 discussed the issue at length, and this chapter doesn't rehash it except to say that before you make a decision, you should look at all the facts.
Developing applications that work with SQL Azure isn't rocket science, but it requires knowing what to expect and what functionality you have to work with. You read earlier that not all client libraries work with SQL Azure and saw the libraries that are supported. Chapter 5 also spent some time discussing what T-SQL functionality exists in SQL Azure. Even as this book is being written, the list of supported features changes as Microsoft continues to add functionality. This chapter now focuses on a client application's perspective.
This section looks at using several technologies to connect to and query a SQL Azure database, including ADO.NET, ODBC, and WCF Data Services. You read at length earlier about taking the right approach to move to the Azure platform. You must consider many things, including the following:
SQL Azure is only available via TCP port 1433.
SQL Azure doesn't currently support OLE DB.
SQL Azure only supports SQL Server authentication. Windows Authentication isn't supported.
When connecting to SQL Azure, you must specify the target database in the connection string. Otherwise, you're connecting to the master database.
Distributed transactions (transactions that affect multiple resources, such as tables, or different databases via sharding) aren't supported in SQL Azure.
You must ensure that your SQL Azure firewall is configured to accept connections.
You must determine whether any embedded (in-line) T-SQL in your application is supported by SQL Azure.
You must use the login name format
<login>@<server>when connecting to SQL Azure, because some tools implement Tabular Data Stream (TDS) differently.
Most of the items in this list are self-explanatory, but let's talk about a couple of them. First, it's highly recommended that you read Appendix B, which discusses the T-SQL syntax that is and isn't supported. Also, if you have any inline or embedded T-SQL code, you need to go through your app and make sure the T-SQL meets the requirements listed in Appendix B. It also may behoove you look at the online help for supported T-SQL syntax, because of the gap between when this book is finished and when it's published (Microsoft may make some T-SQL changes in that time).
Second, although distributed transactions aren't supported, Chapter 10 discusses a technique called sharding that you can use to improve performance dramatically. Sharding is the concept of horizontally partitioning your data among several databases based on criteria (such as geolocation) and then using a technology such as the ADO.NET Task Parallel Library (TPL) to add parallelism and concurrency to your application.
Third, think carefully about OLE DB. SQL Azure currently doesn't support connecting via OLE DB, but supporting OLE DB is on Microsoft's radar. However, as you learned in Chapter 3, you can connect using OLE DB using SSIS. It isn't recommended, though, that you try to work in OLE DB—wait until it's fully supported.
Let's get to some coding. The next few sections show you how to connect to SQL Azure using different libraries such as ADO.NET, ODBC, the sqlcmd utility, and WCF Data Services to query SQL Azure.
Microsoft makes it very easy to connect an application to SQL Azure by providing the necessary connection strings for both ADO.NET and ODBC, as shown in Figure 6-1. You can find the connection information on the SQL Azure Server Administration page by selecting a database and clicking the Connection Strings button.

Let's first look at how to connect to an Azure database using ADO.NET. Fire up an instance of Visual Studio 2010, and create a new Windows Forms application. Then, follow these steps:
Place a button on Form1, and double-click the new button to view its click event.
Before you place any code in the click event, let's add a method to get a connection string. To demonstrate connecting to SQL Azure versus a local database, let's first connect to a local copy of the database. Then, you can change to connect to Azure. Below the click event, add a new method called
GetConStringthat returns the connection string for your local instance of SQL Server. Here's the code to write:string GetConString() { return "Server=server;Database=TechBio;User ID=sa;Password=password;"; }Go back to the button's click event, and add the following code. This code calls the
GetConStringmethod you previously added, returns the connection string, establishes and opens a connection to the local database, and then closes the connection:private void button1_Click(object sender, EventArgs e) { string connStr = GetConString(); using (SqlConnection conn = new SqlConnection(connStr)) { try { conn.Open(); MessageBox.Show("Connection made."); } catch (SqlException ex) { MessageBox.Show(ex.Message.ToString()); } finally { conn.Close(); } } }Run the application, and click the button on the form. You should get a message box that says "Connection Made."
Now, let's change this simple application to connect to SQL Azure. Instead of returning the connection string to your local database, you want to return the ADO.NET connection string. Continue as follows:
On your SQL Azure Server Administration page, select the database you want to connect to.
Click the Connection Strings button, and click the Copy to Clipboard link for the ADO.NET connection string.
Back in your Visual Studio project, replace the local connection string in the
GetConStringmethod with the SQL Azure ADO.NET connection string, as shown in the following code. Be sure to enter your correct password into the connection string:string GetConString() { return "Server=tcp:servername.database.windows.net;Database=TechBio; UserID=SQLScott@servername;Password=password; Trusted_Connection=False;Encrypt=True;"; }Before you run the application, make sure your Azure firewall settings are up to date (via the SQL Azure Server Administration page). Then, run the application, and click the button on the form. If everything is configured correctly, you should get a message box that says "Connection Made."
Granted, this is a very simple example, but it illustrates how easy it is to take an existing application and point it to SQL Azure. The caveat is what your application contains. As mentioned earlier, if you have any inline T-SQL, you at a minimum need to ensure that your inline T-SQL is supported by SQL Azure. The likelihood is that it is, but it's always safest to check and test.
Even though you've connected to SQL Azure, does that affect your data-access code? The next two sections discuss using a data reader and a dataset when connecting to SQL Azure.
As you become more and more familiar with SQL Azure, you'll find that you don't need to make a lot of changes to your application code except possibly any inline T-SQL. The beauty of all this is that you're using a proven and trusted data-access technology, ADO.NET. Thus, nothing really changes. Let's modify the application and click event code to illustrate this. Follow these steps:
Add a new list box to the form.
In the click event, add the code in bold in the following snippet. This new code uses the
SqlDataReaderclass to execute a simpleSELECTcommand against the SQL Azure database and then iterate over theSqlDataReaderto populate the list box:private void button1_Click(object sender, EventArgs e) { string connStr = GetConString(); using (SqlConnection conn = new SqlConnection(connStr)) {SqlCommand cmd = new SqlCommand("SELECT Name FROM Users", conn);conn.Open();SqlDataReader rdr = cmd.ExecuteReader();try{while (rdr.Read()){listBox1.Items.Add(rdr[0].ToString());}rdr.Close();} catch (SqlException ex) { MessageBox.Show(ex.Message.ToString()); } } }Run the application, and click the button on the form. Within a few seconds, the list box populates with names from the Users table.
The key is that you can replace the connection string with your local connection string, and it still works. This is because you're using ADO.NET to handle the connection, and it doesn't care where the database is. Next, let's take this example one step further and look at how you use datasets.
In the last example, you found that there is no difference in using a SqlDataReader when querying a SQL Azure database. This example uses the SqlCommand class and the SqlDataAdapter to query SQL Azure and populate a dataset. Here are the steps:
In the button's click event, replace the existing code with the following:
using (SqlConnection conn = new SqlConnection(connStr))
{
    try
    {
        using (SqlCommand cmd = new SqlCommand())
        {
            conn.Open();
            SqlDataAdapter da = new SqlDataAdapter();
            cmd.CommandText = "SELECT Name FROM Users";
            cmd.Connection = conn;
            cmd.CommandType = CommandType.Text;
            da.SelectCommand = cmd;
            DataSet ds = new DataSet("Users");
            da.Fill(ds);
            listBox1.DataSource = ds.Tables[0];
            listBox1.DisplayMember = "Name";
        }
    }
    catch (SqlException ex)
    {
        MessageBox.Show(ex.Message.ToString());
    }
}
This code creates a new connection using the same connection information as the previous example, and then creates a new SqlCommand instance. The connection, text, and type of the SqlCommand are set and then executed using the instantiated SqlDataAdapter. A new dataset is created and filled from the SqlDataAdapter, which is then applied to the datasource property of the list box.
Run the application, and click the button on the form. Again, the list box is populated with the names from the Users table in the SQL Azure database. Again, you could change the connection string to point to your local database and the code would work fine.
So, when would code like this not work? Suppose your application had code such as the following, which creates a table without a clustered index:
using (SqlConnection conn = new SqlConnection(connStr))
{
    try
    {
        using (SqlCommand cmd = new SqlCommand())
        {
            conn.Open();
            SqlDataAdapter da = new SqlDataAdapter();
            cmd.CommandText = "CREATE TABLE TestTable(ID int, Name varchar(20))";
            cmd.Connection = conn;
            cmd.ExecuteNonQuery();
            cmd.CommandText = "INSERT INTO TestTable (ID, Name)
    VALUES (1, 'Scott'), (2, 'Herve')";
            int val = cmd.ExecuteNonQuery();
        }
    }
    catch (SqlException ex)
    {
        MessageBox.Show(ex.Message.ToString());
    }
}
Although this code is certainly valid and runs successfully against your local SQL Server instance, it doesn't work when executing against your SQL Azure database. Why? Go ahead and replace the code in the button's click event with this code, and run the application. The error you get in the message box states that SQL Azure tables without a clustered index aren't supported. If you step through the code, you find out that the table is indeed created, but the error comes from trying to insert data into the table. You need to go through your application and look for these sorts of things, to ensure that the application will run successfully against SQL Azure.
We have discussed connecting with ADO.NET and the different options we have with ADO.NET, so let's move on to the other connection option, ODBC.
There is nothing earth-shattering or truly groundbreaking here, but let's walk though an example to see how ODBC connections work and illustrate that your ODBC classes still work as you're used to. Follow these steps:
Do this the proper way and create an enumeration to handle the type of connection you're using.
Modify the
GetConStringmethod as shown in the following snippet to take a parameter. The parameter lets you specify the connection type so you can return the correct type of connection string (either ADO.NET or ODBC). Be sure to use your correct password and server name with the correct server. If the value ofADO_NETis passed into this method, the ADO.NET connection string is returned; otherwise the ODBC connection string is returned:enum ConnType { ADO_NET = 1, ODBC = 2 } string GetConString(ConnType connType) { if (connType == ConnType.ADO_NET) return "Server=tcp:servername.database.windows.net;Database=TechBio; User ID=SQLScott@servername;Password=password; Trusted_Connection=False;Encrypt=True;"; else return "Driver={SQL Server Native Client 10.0};Server=tcp:servername.database.windows.net; Database=TechBio;Uid=SQLScott@servername;Pwd=password;Encrypt=yes;"; }Place a second button on the form, along with a DataGridView. In its click event, add the following code. This code is just like the code from the ADO.NET example, but it uses the
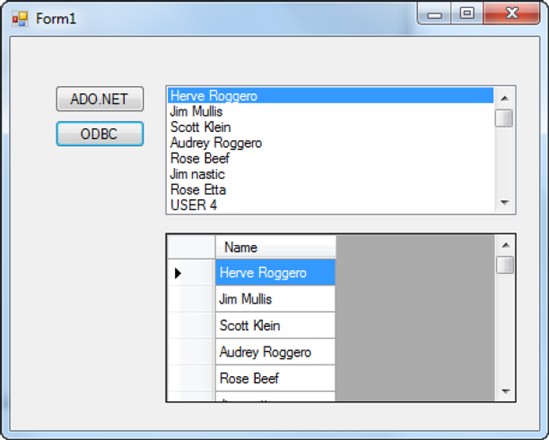
Odbcdata classes versus theSqldata classes. For clarity, change the Text property of this new button to "ODBC" so you know the difference between this button and the first button. Notice in the code that the value "ODBC" is passed in theGetConStringmethod, returning the ODBC connection string:string connStr = GetConString(ConnType.ODBC); using (OdbcConnection conn = new OdbcConnection(connStr)) { try { conn.Open(); OdbcDataAdapter da = new OdbcDataAdapter(); OdbcCommand cmd = new OdbcCommand("SELECT Name FROM Users", conn); cmd.CommandType = CommandType.Text; da.SelectCommand = cmd; DataSet ds = new DataSet("Users"); da.Fill(ds); listBox1.DataSource = ds.Tables[0]; dataGridView1.DataSource = ds.Tables[0]; listBox1.DisplayMember = "Name"; } catch (OdbcException ex) { MessageBox.Show(ex.Message.ToString());} }
Run the project, and click the ODBC button. As in the previous example, the list box populates with the names from the Users table. The grid also populates with the same set of names (see Figure 6-2).
From these examples, you can see that connecting to and querying SQL Azure is no different from connecting to a local instance of SQL Server. The end of this chapter discusses some guidelines and best practices to help you prepare for your move to SQL Azure.
So far we have discussed connecting with ADO.NET and ODBC along with the different options we have with each, so let's continue the discussion and talk about using the SqlCmd utility.
If you've worked with SQL Server for any length of time, chances are you've worked with the sqlcmd utility. This utility lets you enter and execute T-SQL statements and other objects via a command prompt. You can also use the sqlcmd utility via the Query Editor in sqlcmd mode, in a Windows script file, or via a SQL Server Agent job.
This section discusses how to use the sqlcmd utility to connect to a SQL Azure database and execute queries against that database. This section assumes that you have some familiarity with sqlcmd. This utility has many options, or parameters, but this section only discusses those necessary to connect to SQL Azure.
Note
SQL Azure doesn't support the -z or -Z option for changing user passwords. You need to use ALTER LOGIN after connecting to the master database in order to change a password.
To use the sqlcmd utility, you first open a command prompt. At the command prompt, you need to provide the options and values necessary to connect to the SQL Azure database. As a minimum, the command syntax is the following:
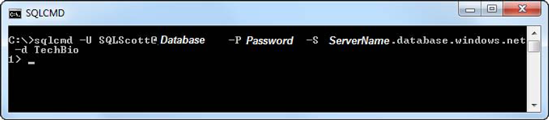
sqlcmd -U login -P password -S server -d database
The parameters are nearly self-explanatory, but here they are, just in case:
-Uis the user login ID.-Pis the user-specified password. Passwords are case sensitive.-Sspecifies the instance of SQL Server to which to connect.
Optionally, you can provide a database name via the -d parameter. Thus, the sqlcmd syntax looks something like the following:
Sqlcmd -U providerlogin@Server -P ProviderPassword -S ProviderServer -d database
Let's put this syntax to use. Follow these steps:
At the command prompt, use the sqlcmd syntax and type in your connection information, as shown in Figure 6-3. (In the figure, the server name and password are hidden.) Press Enter.
When the sqlcmd utility connects, you're presented with the sqlcmd prompt
1>, at which point you can begin typing in and executing T-SQL commands. The command to execute any T-SQL statement isGO. For example, in Figure 6-4, the followingSELECTstatement is entered and executed:SELECT Name FROM Users
Press the Enter key on line
1>to create a new line. Pressing Enter executes theSELECTquery. TypeGOon line2>and press Enter, to execute all statements since the lastGOstatement (see Figure 6-4). Figure 6-5 shows the results of the sqlcmd query entered. As you can see, executing a query isn't difficult.


Let's work through another example in which you create a table and add data. Here are the steps:
After the previous query is finished, you're back at the
1>prompt. Type in the statement shown in Figure 6-6.Press Enter, type
GOon line2>, and press Enter again, to execute theCREATEstatement.When the T-SQL command that you execute is the type that doesn't return data, the sqlcmd utility doesn't give you back a message but takes you to the
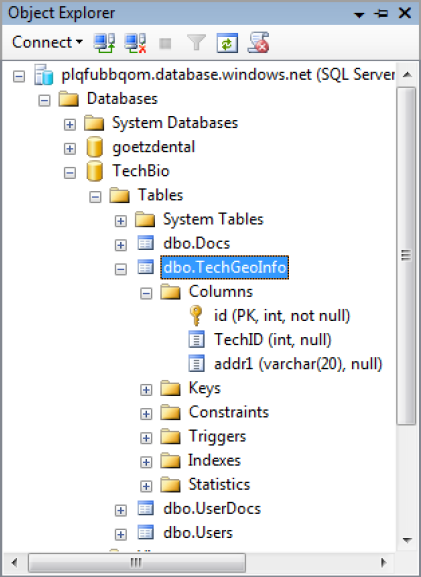
1>prompt. However, you can verify that a statement executed successfully by going into SQL Server Management Studio (SSMS), connecting to your SQL Azure instance, and expanding the Tables node of your chosen database. Figure 6-7 shows the results from doing that—you can see that the table was indeed created.
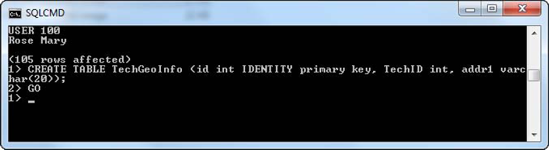
The table you created is called TechGeoInfo, and it has three columns: an ID column that is the primary key (clustered index), a TechID column, and an address column. The table is simple, but it's good enough to demonstrate functionality.
Note
You know from earlier in the chapter that the id column must be a primary key clustered index, or you won't be able to add data to the table.
Add some data to the table by going back to the command window and typing in the
INSERTstatements shown in Figure 6-8. The great thing about the sqlcmd utility is that you can enter in as many commands as you want and not execute them until you typeGO. Here you use twoINSERTstatements that add two records the table you created in the previous step.Type
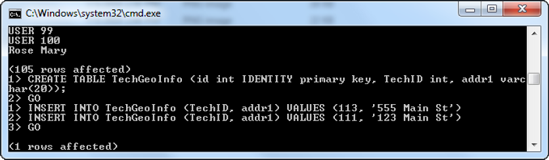
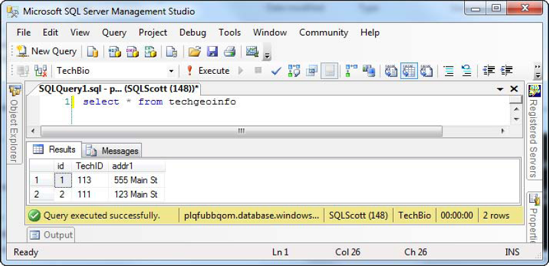
GOon line3>, and press Enter. Although the sqlcmd utility tells you1 rows affected, you can query this new table in SSMS and see the two new rows that were added, as shown in Figure 6-9.
As you can see, using the sqlcmd utility is straightforward. Just remember that it doesn't work with SQL Azure if you're trying to use heap tables. All tables must have a primary key. Also, as mentioned earlier, the -z and -Z parameters don't work.
This section has discussed the different mechanisms for connecting and querying SQL Azure, including examples for ADO.NET, ODBC, and SqlCmd. You can see that it quite similar to the way you currently connect to and query an on-premise database. However, with an overall industry push to an SOA architecture, let's take the discussion to the next level and discuss using services, specifically WCF Data Services, to connect to our Azure database.
WCF Data Services, formerly known as ADO.NET Data Services, enables the creation and consumption of OData services. OData, the Open Data Protocol, is a new data-sharing standard that allows for greater sharing of data between different systems. Before it was called WCF Data Services, ADO.NET Data Services was one of the very first Microsoft technologies to support OData with Visual Studio 2008 SP1. Microsoft has broadened its support of OData in products such as SQL Server 2008 R2, Windows Azure Storage, and others. This section discusses how to use WCF Data Services to connect to and query your SQL Azure database.
First you need to create a data service. Follow these steps:
Create a new ASP.NET web application, and call it WCFDataServiceWebApp. (You can host data services a number of different environments but this example uses a web app.)
The next step in creating a data service on top of a relational database is to define a model used to drive your data service tier. The best way to do that is to use the ADO.NET Entity Framework, which allows you to expose your entity model as a data service. And to do that, you need to add a new item to your web project. Right-click the web project, and select New Item. In the Add New Item dialog, select Data from the Categories list, and then select ADO.NET Entity Data Model from the Templates list. Give the model the name
TechBioModel.edmx, and click OK.In the first step of the Data Model Wizard, select the Generate From Database option, and click Next.
The next step is Choose Your Data Connection. Click the New Connection button, and create a connection to your SQL Azure database. Save the entity connection settings as
TechBioEntities, and then click Next.The next step of the wizard is the Choose Your Database Objects page. Select all the tables. Note the option that is new to ADO.NET Entity Framework version 4.0, which pluralizes or singularizes generated objects names. If you leave this option checked, it comes into play later. Leave it checked, and click Finish.
The Entity Framework looks at all the tables you selected and creates a conceptual model on top of the storage schema that you can soon expose as a data service. In Visual Studio, you should see the Entity Framework Model Designer with a graphical representation of the tables, called entities, and their relationships. Close the Model Designer—you don't need it for this example.
What you need to do now is create the data service on top of your data model. In Solution Explorer right-click the web application and select Add, then select New Item. In the Add New Item dialog, select the Web category, then scroll down the list of templates and select the WCF Data Service template. Enter a name of TechBioDataService the click Add, as shown in Figure 6-10.

When the ADO.NET Data Service is added to your project, the associated .cs file will automatically be displayed in the IDE. As you can see the ADO.NET Data Service template has generated for you the beginnings of your data service.
Now you need to wire up your data service to your data model so that the service knows where to get its data. You know where to do this because as you can see in the code it tells you where to enter that information. Thus, change the line:
public class TechBioDataService : DataService< /* TODO: put your data source
class name here */ >
To:
public class TechBioDataService : DataService< TechBioEntities >
Wiring up your data service to the model is as simple as that. Believe it or not, you're ready to test your service. However, let's finish what you need to do on this page. By default, the WCF Data Service is secured. The WCF Data Service needs to be told explicitly which data you want to see. The instructions in the code tell you this, as you can see in code in the InitializeService method. Some examples are even provided in the comments to help you out.
For your example, you don't want to restrict anything so you really want to unlock all the entities and explicitly define access rights to the entity sets. You do this by adding the code below to the InitializeService method. The code below sets the access rule for the specified entities to All, providing authorization to read, write, delete, and update data for the specified entity set:
// This method is called only once to initialize service-wide policies.
public static void InitializeService(DataServiceConfiguration config)
{
    // TODO: set rules to indicate which entity sets and service operations are visible, updatable, etc.
    // Examples:
    config.SetEntitySetAccessRule("Docs", EntitySetRights.All);
    config.SetEntitySetAccessRule("UserDocs", EntitySetRights.All);
    config.SetEntitySetAccessRule("Users", EntitySetRights.All);
    config.SetEntitySetAccessRule("TechGeoInfo", EntitySetRights.All);
    config.DataServiceBehavior.MaxProtocolVersion = DataServiceProtocolVersion.V2;
}
If you don't feel like specifying each entity one by one, you can optionally specify all the entities with a single line, as follows:
config.SetEntitySetAccessRule("*", EntitySetRights.All);The above line assumes that you want to specify the same rights to all the entities. Not recommended, but will do for this example. In a production environment you want to more specific with what rights you specify for each entity.
There are other EntitySetRights options, such as AllRead, AllWrite, None, ReadSingle, and WriteAppend. You won't cover them all here but you can read about them here:
http://msdn.microsoft.com/en-us/library/system.data.services.entitysetrights.aspx
So far, you've created your Web application, added your data model, and added your WCF Data Service. Right now your Solution Explorer should look like Figure 6-11.

The next step is to add the client application. In Solution Explorer right click the solution and select Add->New Project. In the Add New Project Dialog, select the Cloud project types then select Windows Azure Cloud Service, providing a name of TechBioSite, as shown in Figure 6-12.

Click OK on the Add New Project dialog.
Next, in the New Cloud Service Project dialog, select ASP.NET Web Role to add it to the Cloud Service Solution pane, leaving the default name of WebRole1, then click OK.
Next, right click the Web Role project in Solution Explorer and select Add Service Reference from the context menu. This will bring up the Add Service Reference dialog shown in Figure 6-13.
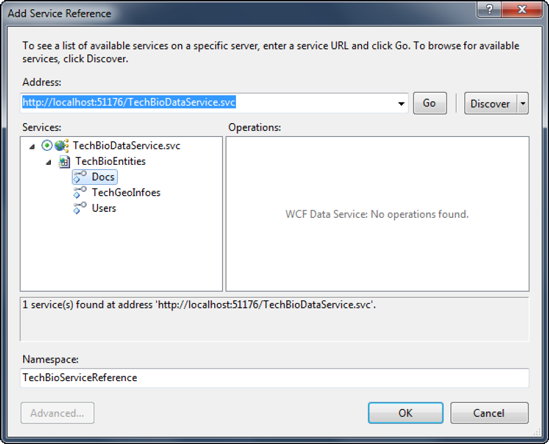
In the Add Service Reference click the Discover button, which will interrogate your solution for existing services and display them in the Services list. As you can see from Figure 6-12, the discovery function did in fact find your TechBioDataServices service in your Web application project. The discovery also provides your local URI for the service as well as the Entities that are exposed by the service. Give the service a namespace name of TechBioServiceReference and click OK.
At this point your Solution Explorer will have your TechBioSite Cloud Service project, your WCFDataServiceWebApp project and your web role. You should see those items as they're shown in Figure 6-14.

You're almost done. You need a user interface in which to display the data you query via the data service, so open up the Default.aspx in the Azure Web Role project and select the Source tab. Replace the code that you see with the following code which defines a list box, label, and combo box:
<%@ Page Title="Home Page" Language="C#" AutoEventWireup="true"
    CodeBehind="Default.aspx.cs" Inherits="WebRole1._Default" %>

<html xmlns="http://www.w3.org/1999/xhtml">
<head runat="server">
    <title></title>
</head>
<body>
    <form id="form1" runat="server">
        <div>
            <asp:ListBox ID="docsList" runat="server"
OnSelectedIndexChanged="docsList_SelectedIndexChanged"
AutoPostBack="true">
</asp:ListBox>
<br />
<br />
<asp:Label ID="infoLabel" runat="server"></asp:Label>
<br />
<br />
<asp:DropDownList ID="authorList" runat="server">
</asp:DropDownList>
</div>
</form>
</body>
</html>The last thing you need to do is add the events that are defined in the code above, specifically the docsList_SelectedIndexChanged event. Click the Design tab for the Default.aspx page and double click the list box, which will create the docsList_SelectedIndexChanged event. However, before you put code in this event, you need to put some code in the Page_Load event as well as define a few variables. First, add the following using statements:
using System.Data.Services.Client;
using WebRole1.TechBioServiceReference;
Next, add the following declarations. These define the DataServiceContext and URI to the data service. You can get the URL from the Add Service Reference box shown in Figure 6-13:
private TechBioEntities context;
private Uri svcUri = new Uri("http://localhost:51176/TechBioDataService.svc");
Next, add the following code to the Page_Load event. This instantiates the data service context, and loads the list box with available documents and the combo box with available users:
context = new TechBioEntities(svcUri);

DataServiceQuery<Doc> docs = context.Docs;
DataServiceQuery<User> users = context.Users;

foreach (Doc d in docs)
{
    docsList.Items.Add(new ListItem(d.Name, d.ID.ToString()));
}

foreach (User u in users)
{
    authorList.Items.Add(new ListItem(u.Name, u.ID.ToString()));
}
Finally, add the following code to the docsList_SelectedIndexChanged event. This code queries the docs table to get the document information for the selected doc and displays the associated document description and price in the label, then selects the author (userid) for the selected document. By the way, the query you see below is LINQ to Entities, a LINQ (Language-Integrated Query) query that enables developers to write queries using LINQ syntax against an Entity Framework conceptual model:
var docInfo = (from d in context.Docs
                where d.ID == Convert.ToInt32(docsList.SelectedItem.Value)
                select d).FirstOrDefault();
infoLabel.Text = string.Concat("Desc: ", docInfo.Descr, " ", "Price: ", docInfo.PurchasePrice.ToString());
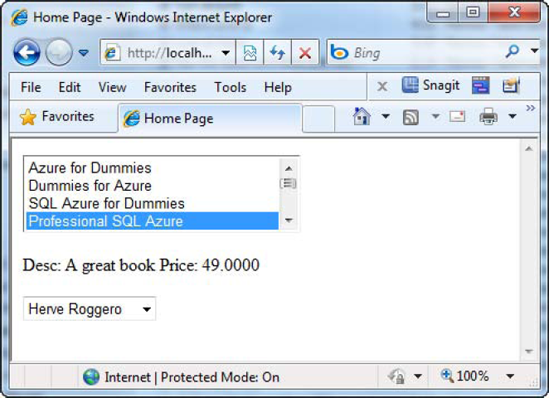
authorList.SelectedIndex = docInfo.AuthorId;You're ready to run your application! Make sure that the Web Role project is the startup project by right clicking the Web Role project and selecting Set as Startup Project from the context menu. Go ahead and press F5 to build and run the project. When the web page in Figure 6-15 comes up, the list box will be populated with the list of documents from the Docs table. Scroll through the list and select a document which will then populate the label with the appropriate description and price, as well as select the associated author in the combo box.
Congratulations, you've successfully built a WCF Data Service that connects to, and queries, a SQL Azure database. While this was a fairly simple example, it should be enough to provide you with a solid foundation on which to start building and architecting data services for the cloud.
Before you finish this chapter, let's talk a few more minutes about the WCF Data Service you built and how you can use that to navigate through records. Record navigation is one of the things that really gets me excited about WCF Data Services. Let's dive right in.
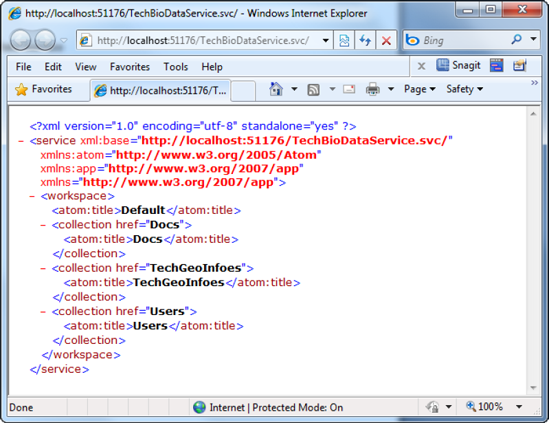
If your project is still running, stop the project and open the Solution Explorer and navigate to the data service. For simplicity, you'll do this right from the solution. Right mouse click the data service and select View in Browser. The service will fire up and what you see is a REST (Representational State Transfer) based service on top of your relational database, a mere XML representation of the service and the entities exposed via the service, shown in Figure 6-16. You see the entities listed because you set the entity set rights to ALL. If you were to go back to the code a few pages back where you set the entity set rights, and comment those lines out, you would not see the entities listed (Docs, TechGeoInfoes, and Users).
The question though, is how do you view the data that you really want to see. The answer is simple. Specify an entity at the end of your URI, and you'll see data for that entity. For example, specify the following URI to see data on the Users entity:
http://localhost:51176/TechBioDataService.svc/UsersTake care to get the case correct. Entity names are case sensitive. Specify users instead of Users, and you'll get a "The webpage cannot be found" error message.
Tip
Take time out now to mistype an entity name and see the resulting message. That way you'll more readily recognize the problem when you make same mistake inadvertently. Sooner or later, you all make that mistake.
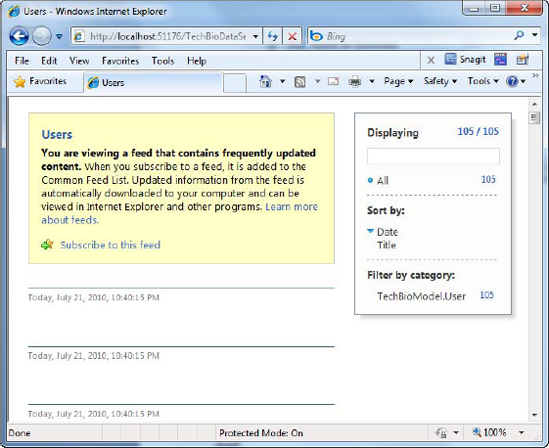
At this point you either get an XML representation of the data in the Users table, or the web page shown in Figure 6-17. If it's the latter, then you need to go turn off the feed reading view in Internet Explorer IE. That is because IE thinks that the data coming back is the type you would get in an RSS feed. You can see in the message that the browser thinks you're trying to view an RSS feed.
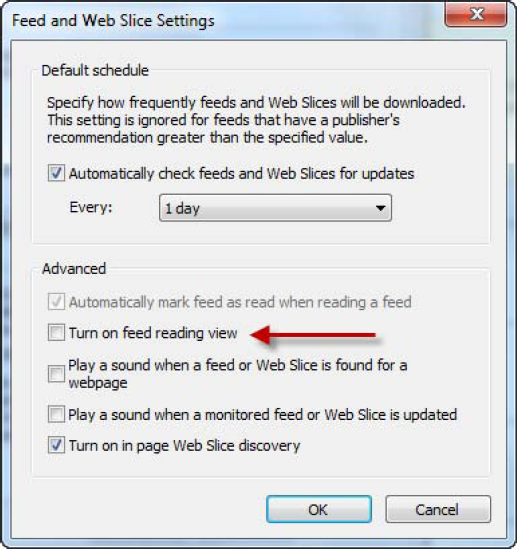
To fix the RSS feed issue you need to turn off this feature in Internet Explorer. With IE open, from the Tools menu select Options which open the Internet Options dialog. This dialog has a number of tabs along the top which you might be familiar with. Select the Content tab and on that tab click the Settings button under Feeds and Web Slices.
Clicking the Settings button will display the Settings dialog, and on this dialog you need to uncheck the Turn on feed reading view checkbox, shown in Figure 6-18. Click OK on this dialog and the Internet Options dialog.
Back on your web page, press F5 to refresh the page. What you should get back now is a collection of Users, shown in Figure 6-19, by querying the underlying database for the Users.
However, you aren't done yet because there is still so much more you can do here. For example, the page you're currently looking at displays all the Users, but what if you want to return a specific user?
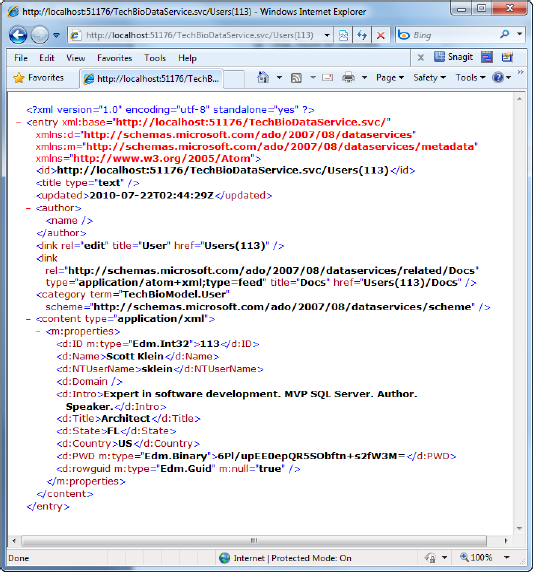
Looking at the data you can see that the each record contains the id of the specific row, and you can use that to your advantage by including that in your URI. For this example let's use ID 113. Modify the URI by appending the number 113 to the end of the URI enclosed in parenthesis, as shown in Figure 6-20.
By loading the URI which includes the id of a specific record, I can now drill down further and return just the record I am looking for. This is just like applying a WHERE clause to a T-SQL query, in this case WHERE ID = 113. In this case I have queried the underlying store for a specific user by passing the appropriate ID in the URI.
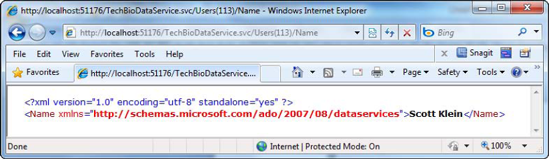
Additionally I can return a specific field by adding the field I want to the URI, such as:
http://localhost:51176/TechBioDataService.svc/Users(113)/Name
Specifying the specific field along with the id will return just the field you request. In the code snipped above, the value in the Name column for User ID 113 is returned, as shown in Figure 6-21.
You can also use this same methodology to navigate between tables. For example, you could do the following to return documents for a specific User ID:
http://localhost:51176/TechBioDataService.svc/Users(113)/Docs

While this information isn't critical to connect to SQL Azure it's good information to have so you know how REST services work and can benefit from its functionality in your application. While this chapter did not go deep into the Entity Framework or REST technology, there are plenty of good books by APress or information on MSDN about this technology. I highly recommend that you explore these technologies further to enhance your SQL Azure applications.
To wrap up this chapter, let's spend a few minutes talking about some things you should consider when developing applications for the cloud. You spend a large portion of this chapter discussing how to connect to SQL Azure, but even before you start coding the very first thing you should consider is your connection. First and foremost, secure your connection string from injection attacks and man-in-the-middle attacks. The .NET Framework provides a simple class in which to create and manage the contents of connection strings used by the SqlConnection class. This class is called the SqlConnectionStringBuilder class.
The following example illustrates how to use this class. I first define four static variables to hold the username, password, database name and server:
private static string userName = "SQLScott@server"; private static string userPassword =password; private static string dataSource = "tcp:server.database.windows.net"; private static string dbName = "TechBio";
I then modify my GetConString method to use the SqlConnectionStringBuilder class to dynamically build my connection string:
string GetConString(int connType)
{
    if (connType == 1)
        SqlConnectionStringBuilder connstr = new SqlConnectionStringBuilder();
        connstr.DataSource = dataSource;
        connstr.InitialCatalog = dbName;
        connstr.Encrypt = true;
        connstr.TrustServerCertificate = false;
        connstr.UserID = userName;
        connstr.Password = userPassword;
        return connstr.ToString();
...
}
Thus, consider the following when connecting to a SQL Azure database.
Use the SqlConnectionStringBuilder class to avoid injection attacks.
Encrypt your connection. Set the Encrypt parameter to True and the TrustServerCertificate to False to ensure a properly encrypted connection to avoid any man-in-the-middle attacks.
Use MARS (Multiple Active Results Sets) whenever possible to lessen the trips to the database.
Lastly, let's discuss some connection constraints. You discussed these previously briefly but in bears repeating them because you're discussing SQL Azure connections. The idea is that Azure is handling the connections, and because multiple resources will more than likely using the same server as you, the last thing Microsoft want is for you to hog all the resources and bring the server to its knees. Thus, your connection can, and probably will, be closed automatically if your connection meets any of the following criteria:
Long running queries and Long running single transactions - If your query takes a long time to execute (right now the time is set at 30 seconds) then Azure will kill your connection. Equally, if you have a single transaction
Idle Connections - Play nice with others and close your connections. Don't leave them hanging open.
Excessive resource usage - This should go without saying. Because you share the resources with others, don't hog all the resources. Again, play nice.
Failover because of server failures - This one is obvious. If the server fails, so will your connection. But when your application reconnects, you'll automatically connect to one of the failover databases.
You have control over the first three items, you don't have control over the last item. Items one and three you referenced at the beginning of the chapter. The bottom line is to test locally before deploying remotely. This is a must, an absolute must. Spend some time looking at your queries and their execution plans to ensure they will execute efficiently and timely. Don't deploy to the cloud until you're satisfied that your database will play nice with the others.
We began the chapter with a discussion surrounding the different factors for deploying your application, such as keeping your application on-premise or hosting your application in Azure. We also covered application deployment from the database side, providing some ideas and concepts around things to consider when moving your database to the cloud, such as considering how much of your data to move.
We then discussed the different methods different programming approaches for connecting to and querying a SQL Azure database, providing examples for each method including ADO.NET and ODBC.
Lastly, we discussed accessing your SQL Azure database through WCF Data Services. With the strong emphasis on SOA architecture not only from Microsoft, the discussion on WCF Data Services provided a solid foundation for providing a services layer for your SQL Azure database. This information provides a great introduction into the next chapter, which discusses OData, a standardized method for querying and updating data over the web.