
The first two chapters of this book have provided an introductory look at cloud-based computing and how similar a cloud database is to a regular database. Although there are many similarities, you've also seen some of the differences between a cloud database and a local database. Chapter 6 discusses many more of these differences in greater detail.
Chapter 2 also took an in-depth look at the design patterns and factors that companies must take into account when considering moving to a cloud computing architecture. Deciding to move to a cloud computing solution isn't cut and dried; you must consider many options when designing cloud solutions. The rest of the book, including this chapter, builds on the information from Chapter 2.
Before you get started with the Azure platform, you must first register for an Azure account. After the account is created, you have access to all of Azure's features and functionality. This chapter shows you the account options, walks you through creating an Azure account, and then introduces you to options and T-SQL syntax statements you can use to create, modify, and delete important types of objects in SQL Azure, such as databases, users, and stored procedures. You also spend a few pages looking at how to connect to a SQL Azure database from different environments.
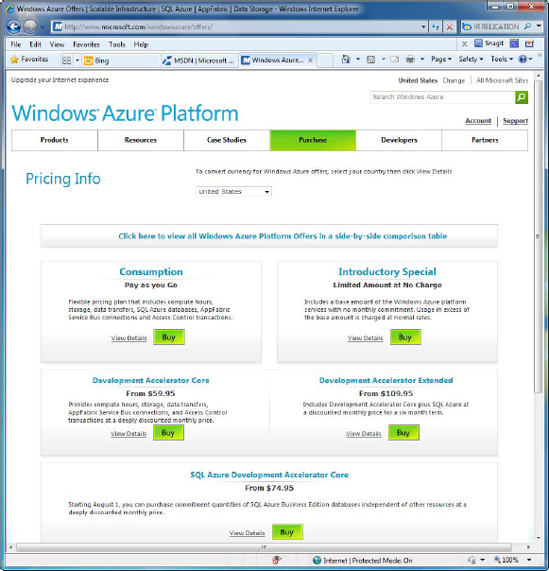
Creating an Azure account is simple, but it takes quite a few steps because of the amount of information required. To begin setting up your Azure account, open your browser and go to www.microsoft.com/windowsazure/offers. This URL takes you to the Windows Azure Platform Offers page, shown in Figure 3-1. This page lists several packages based on your usage (transactions, connections, and so on) and storage. You can see detailed information about each package by clicking the View Details button in the comparison table on the page.
It's highly recommend that you select the Introductory Special package to begin working with Azure. With this package, you get the following at no charge:
25 hours of small compute instance, 500MB of storage, and 10,000 storage transactions on Windows Azure
1 Web Edition database on SQL Azure
100,000 access control transactions and 2 service bus connections on AppFabric
500MB in and 500MB out for data transfer (per region)
Note
The Introductory Special offer, per the details of the offer, ends on October 31, 2010. Standard rates will apply after that date. It's unknown at the time of this writing whether a free or "lite" version will continue to be offered. Standard rates are based on storage, computer, AppFabric transactions, and data transfers. You can find information regarding the exact standard rates by clicking the Details button for any of the offers.
To sign up for an Azure account, you must have a Windows Live ID. Clicking the Buy button prompts you to sign in with that ID. After you've signed in, creating your account is a four-step process:
Creating Your Profile. This step asks you to enter your contact and business information and then select the location that will use the Azure service so it can determine the services available as well as calculate tax.
Billing Information. After the introductory special ends, you begin to be billed for using Azure services. This step asks you to enter your billing information, including payment options and payment information.
Service Activation. This step lets you to create a meaningful subscription name and define a service administrator (the individual who is responsible for setting up and managing your service). The service administrator is created/assigned by the account owner (the individual defined in the main contact profile).
Confirmation. In this step, you provide additional information regarding the activation of your Azure service.
The Confirmation page tells you that an e-mail has been sent to your Windows Live ID e-mail address. This e-mail contains a link to the Microsoft Online Services Customer Portal, with the following instructions:
Click the link, and log in with your Windows Live ID.
In the Customer Portal, open the Subscriptions page, and locate your subscription.
In the Actions list for your subscription, select Activate Now, and then click the Go button.
At this point, your service is activated and ready to go.
Now you're getting to the meat of Azure. After reading all the information in the last two chapters, and working through setup and activation in this chapter, the time has come to start getting your hands dirty. From here on out, it's hands-on.
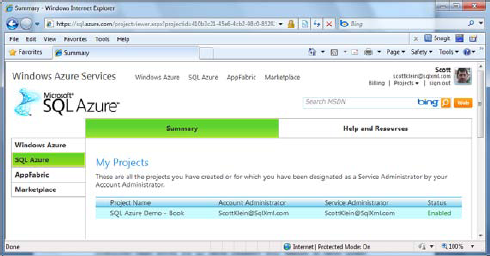
To access your SQL Azure Portal projects, go to https://sql.azure.com/. Your browser displays the SQL Azure Summary page, which shows all your SQL Azure projects. The page lists each project's name (which you created during the activation process) and the account and service administrators, as shown in Figure 3-2.
The projects listed on the Summary page are those you've created or those you've been given access to via the account administrator. At this point, you can't do much; but you'll fix that in the following sections as you walk you through administering your SQL Azure server.
Administering your SQL Azure projects is easy. Go ahead and click the project you created in the Summary window. You're prompted to enter a username and password. (You see how this information is used in a moment.) After you enter your username and password, you're presented with the SQL Azure Server Administration portal, shown in Figure 3-3.
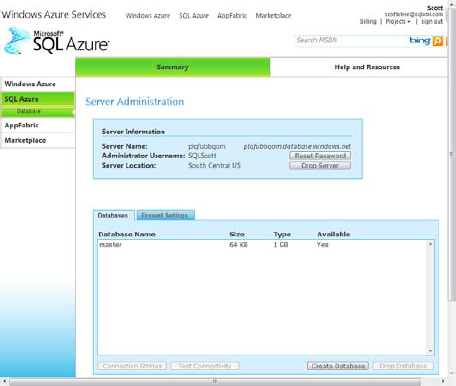
The Server Administration portal displays three categories of information that are vital to administering, connecting to, and working with SQL Azure. You see information about your server, including its name and location. You also have two tabs: one showing your firewall settings and the other listing your databases.
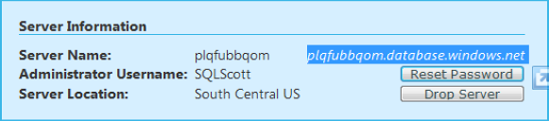
The Server Information box is at the top of the Summary tab. Figure 3-3 shows that box in context, and Figure 3-4 focuses in so you can read the details.
The Server Information box displays the following:
Server Name. The fully qualified domain name (FQDN) of your logical database server—a physical machine name that resolves to an IP address at the Microsoft data center. This is not the database server name. When a connection is made to this IP address, your connection is routed to the physical database server based on your login name and the database (master, for example).
Administrator Username. The name you entered in the pop-up dialog when you clicked the project name in Figure 3-2. Whenever you connect to SQL Azure, for example through SQL Server Management Studio, this is the username you use, along with the associated password.
Server Location. The geo location where your Azure server resides. As of this writing, there are seven locations: Anywhere Asia, Anywhere Europe, Anywhere US, North Central US, North Europe, South Central US, and Southeast Asia.
Microsoft recommends that when creating your logical servers, you should put them in the same geo location. If you don't, you incur data charges. For example, if you put your Windows Azure web application in the North Central US location and your SQL Azure database in the South Central US location, you incur data-transfer and other transactional charges. If your application and database are located in the same geo location, you don't incur these charges. Another reason to put your application and database in the same geo location is performance. However, spreading your services across geo locations helps with redundancy.
A quick note about the Drop Server button in the Server Information box: dropping a SQL Azure server deletes all databases associated with the server and removes the server from your account. When you drop a server, you're informed that dropping the server can't be undone and asked whether you want to continue. If you choose to continue, no databases can be recovered, and you must start the server-creation process all over again, including creating a new administrator and selecting the location.
Because your databases are located in places you physically can't get to or control, Microsoft has implemented a mechanism to help protect your data. This protection mechanism is the SQL Azure firewall, which prevents restricted access to all your databases until you physically specify which computers have permission. Access to your SQL Azure databases is based on the originating IP address that makes a request.
To grant access to your SQL Azure databases, you specify a range of acceptable IP addresses in the Server Administration portal on the Firewall Settings tab, shown in Figure 3-5. IP address ranges are defined by rules that allow you to specify multiple firewall setting entries. For example, you can define an IP address range for your home as well as one for your office. If you attend a conference, you can define an additional rule and IP address that let you connect from that specific location. Also notice the "Allow Microsoft Services access to this server" check box on the Firewall Settings tab; it allows internal communication between Windows Azure services and SQL Azure databases.

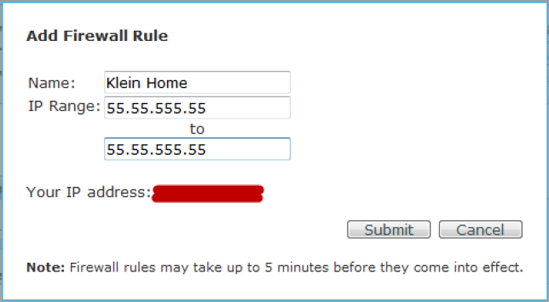
To add a firewall rule, click the Add Rule button on the Firewall Settings tab to display the Add Firewall Rule dialog, shown in Figure 3-6. You're asked to specify the rule name and the IP address range. Firewall rule names must be unique, and there is no limit to the number of rules you can have.
Entering the IP Range is simple because the dialog tells you what your IP address is. Figure 3-6 uses the same value for the range's start and ending values to indicate that only the single specified address should be allowed to access the database. You can enter a range of IP address if you want multiple computers to access SQL Azure.
After you've entered your firewall rule information, click the Submit button. Your new rule is added to the Firewall Settings tab, as shown in Figure 3-7. As the note in Figure 3-6 states, it may be up to 5 minutes before your rule takes effect and you can connect to SQL Azure (although I have never had it take more than 1 minute to take affect). After that, you can edit and delete the rule.

The Databases tab is first in the Server Administration portal, but the chapter discussed the Firewall Settings tab before it because even though you can create databases, you can't connect to them without defining a firewall rule and an IP address range. Now that you've defined your firewall rules, let's create a database and connect to it.
The Databases tab makes it very easy to create and manage SQL Azure databases. Click the Create Database button on the Databases tab to bring up the dialog shown in Figure 3-8. This dialog asks you to enter the name of the database, the database edition (Web or Business), and the database's maximum size. Web database editions are available in 1 GB and 5 GB; the Business edition provides sizes ranging from 10 GB to 50 GB, in increments of 10.

Note
You're free to pick any database size. But if you use more space than you select, you're charged for the next biggest size. For example, if you initially select a 20 GB database, and after a few months your data grows to 22GB, you then begin to be charged for the 30 GB maximum size.
After you've entered the database name, edition, and maximum size, click the Create button. Your database is now be listed on the Databases tab, along with the database's current size, type (or maximum size), and availability. (See Figure 3-9.)
From the SQL Azure Server Administration portal and the Databases tab, you can also drop existing databases and test connectivity to databases. To test connectivity, select a database from the list, and click the Test Connectivity button. Doing so opens the Database Connectivity Test dialog, which asks you to specify your username and password to connect to the selected database. Enter the appropriate username and password, and click Connect. If the connection is successful, the dialog lets you know, as shown in figure 3-10.


At this point, you've created a database and walked through how to create and manage your databases. Let's move on to how to connect to your databases through SQL Server Management Studio (SSMS) and how to create databases and users via T-SQL.
Now that you've defined your firewall rules and settings, you can create and access SQL Azure databases. Let's do that now.
This section provides a quick and high-level overview of using T-SQL syntax to create databases and users. Chapter 6 goes into an in-depth discussion of the full T-SQL syntax available in SQL Azure to create database objects, such as stored procedures and tables, as well as programming in SQL Azure.
You've walked through how to create and manage databases using the SQL Azure Portal, but now let's use SQL Server Management Studio (SSMS) to create and manage a database. This book uses SQL Server 2008 R2 throughout for the examples. As explained in Chapter 1, you can also use SQL Server 2008, but you must connect via a query window.
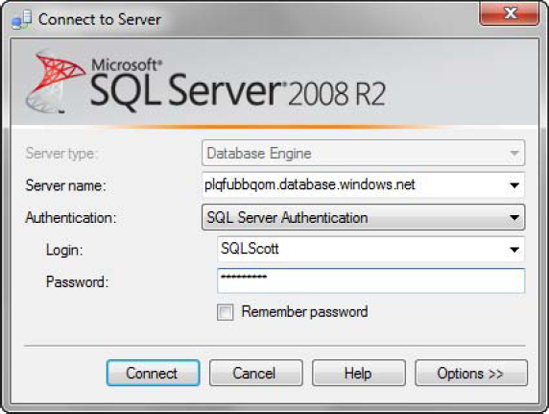
Fire up SQL Server 2008 R2, and enter the FQDN of the database server name in the "Server name" box when the Connect to Server dialog appears (see Figure 3-11). Enter the administrator login name and password, and click Connect. You're now connected to SQL Azure.
At this juncture, the only database available to you is the master database, unless you've created databases via the SQL Azure Portal. Let's spend a few minutes discussing how to create databases and other objects using T-SQL. Some of this information was covered briefly in Chapter 1, but this section reviews it as a primer for upcoming chapters.
When you create databases in a non-Azure environment, you have to know and specify a lot in the CREATE statement. For example, you must provide the path and physical object names of the database and log files, as well as the database size and optionally the maximum size and file growth. A CREATE DATABASE statement in a non-Azure environment might look like the following:
CREATE DATABASE [MyDatabase] ON  PRIMARY
( NAME = N'MyDatabase', FILENAME = N'C:Program FilesMicrosoft SQL
ServerMSSQL10.MSSQLSERVERMSSQLDATAMyDatabase.mdf' , SIZE = 32768KB , MAXSIZE =
UNLIMITED, FILEGROWTH = 1024KB )
LOG ON
( NAME = N'MyDatabase_log', FILENAME = N'C:Program FilesMicrosoft SQL
ServerMSSQL10.MSSQLSERVERMSSQLDATAMyDatabase_log.ldf' , SIZE = 92864KB , MAXSIZE = 2048GB
, FILEGROWTH = 10%)
GO
As you've learned in the past few chapters, with Azure you don't have to worry about hardware and where objects are located and how hardware is provisioned, which makes statements such CREATE DATABASE much simpler. In Chapter 1, you learned that you must connect to the master database first; then, all you need to do is issue the following statement:
CREATE DATABASE MyDatabase
You can optionally supply two parameters with the CREATE DATABASE statement: MAXSIZE, which specifies the maximum size of the database; and EDITION, which specifies the edition of the database (Web or Business). Here's an example:
CREATE DATABASE MyDatabase (MAXSIZE= 10 GB, EDITION= 'Business')
In the current release of SQL Azure, two database sizes are available for the Web edition: 1GB and 5GB. For the Business edition, available sizes range from 10GB to 50GB, in increments of 10GB. If MAXSIZE is set to a value of 1GB or 5GB and EDITION isn't specified, the database edition is automatically set to Web. If MAXSIZE is set to a value between 10BG and 50GB and EDITION isn't specified, the database edition is automatically set to Business. If neither MAXSIZE nor EDITION is specified, a Web database of 1GB is created.
SQL Azure doesn't support additional arguments that you're used to using when working with SQL in a local environment. For example, SQL Azure doesn't support parameters that relate to working with physical files, such as filespec and filegroup. You also can't attach or detach a database. Other unsupported arguments are covered in depth in Appendix B.
Now that you've created a database, you need to grant access to other users. This section discusses creating logins and users, and allowing others to access the SQL Azure environment. Creating logins and users is similar to doing so locally; but as you found out when creating databases, there are T-SQL limitations.
When granting access to another user, you must first create the login for that user. Then, you create the user based on that login. A login is used for authentication; a user account is used for database access and permission validation.
When creating logins and users, you must be connected to the master database. You then can use the CREATE LOGIN command as follows:
CREATE LOGINloginnameWITH PASSWORD = 'password'
You must use the WITH PASSWORD option and specify a password. Several options you may be used to from using SQL Server locally aren't support in SQL Azure, such as DEFAULT_DATABASE and DEFAULT_LANGUAGE. Chapter 6 discusses the CREATE LOGIN command in more detail.
Now that you've created a login, let's create a user based on it. This is also simple. The syntax is nearly equivalent to the local syntax:
CREATE USER usernameThis syntax works if there is a login with the same name. For example, the following is valid:
CREATE LOGIN myuser WITH PASSWORD = 'T3stPwd001'
CREATE USER myuser
However, the following fails:
CREATE LOGIN myuser WITH PASSWORD = 'T3stPwd001'
CREATE USER myotheruser
You must use the FROM LOGIN clause when creating a user whose username differs from that of the login name:
CREATE USERusernameFROM LOGINloginname
Thus, the correct syntax is the following:
CREATE LOGIN myuser WITH PASSWORD = 'T3stPwd001'
CREATE USER myotheruser FROM LOGIN myuser
Note
SQL Azure doesn't support GUEST accounts. When you create a user, it must be based on an existing login.
OK, enough about creating databases, users, and logins. Chapter 6 talks more about SQL Azure–specific T-SQL syntax when it discusses programming with SQL Azure in detail. Let's wrap up this chapter with a simple example of how to connect an application to a SQL Azure database.
You have to hand it to Microsoft for going above and beyond in some areas of Azure. The fact that it provides you with connection strings to use in your applications is just plain cool. If you flip back to Figure 3-3, notice the button labeled, appropriately enough, Connection Strings. As soon as you select a database in the list, the Connection Strings button becomes enabled. Clicking it brings up the dialog shown in Figure 3-12, which provides you with two connections strings (one .NET and the other ODBC) to use in your applications to connect to the selected SQL Azure database.

This section uses the ADO.NET connection string to create an ADO.NET 4.0 Entity Framework application. You also use Visual Studio 2010, which at the time of this writing is a release candidate and available to everyone, and which should be available by the time this book is in your hands.
Before you start building your application, you need a database with data in it. Based on what you've learned in this chapter, create a new SQL Azure database named EFAzure. Next, open the SQL file for this chapter called CreateContactTable.sql, and run that script against the EFAzure database. The script creates a single table called Contact and inserts about a dozen contact records.
The examples in the following two sections illustrate connecting to a SQL Azure database and querying the database for contact records. The first example uses the ADO.NET connection string shown in Figure 3-12, and the second uses the ADO.NET 4.0 Entity Framework. You have many options to connect to a SQL Azure database, and this chapter shows you simple examples; later chapters show more detailed examples.
In this first example, you build a simple Windows Forms application and use ADO.NET to query the EFAzure SQL Azure database. Follow these steps:
Open Visual Studio 2010, and create a new Windows Forms Application project.
Open Form1 in design mode, and place a button and a ListBox on the form.
Double-click the button to view its
Clickevent, and enter the following code. Copy the ADO.NET connection string for your database from the dialog shown in Figure 3-12, and use it to replace the bolded section shown in the code:using (SqlConnection conn = new SqlConnection("Server=tcp:servername.database.windows.net;Database=EFAzure;User ID=userid;Password=mypassword;Trusted_Connection=False;Encrypt=True;")) { try { SqlCommand cmd = new SqlCommand(@"SELECT FirstName, LastName FROM Contact ORDER BY LastName", conn); cmd.Connection.Open(); SqlDataReader rdr = cmd.ExecuteReader(); while (rdr.Read()){ listBox1.Items.Add(String.Format("{0} {1}", rdr[0], rdr[1])); } } catch (Exception ex) { MessageBox.Show(ex.Message.ToString()); } }
When the code is in place, run the application. When Form1 appears, click the button; doing so should quickly display in the list box the first name and last name of the contacts from the Contact table. As you can see, the code is the same as if you were querying a local SQL Server database, except for the connection string.
This example uses the ADO.NET Entity Framework and lets it handle your connection. Follow these steps:
Fire up Visual Studio 2010, and create a new Windows Forms Application project. For this simple example, you can use whatever project name you like.
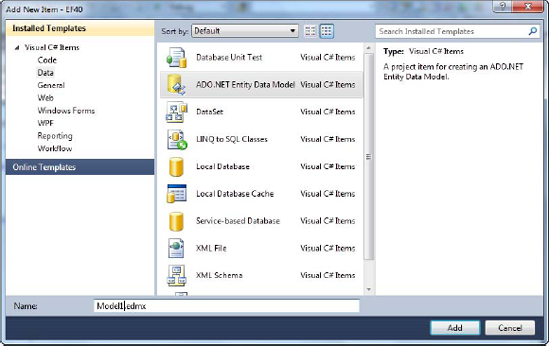
Right-click the project in the Solution Explorer window, and select Add → New Item from the context menu. Doing so brings up the Add New Item dialog.
Select the ADO.NET Entity Data Model data template, as shown in Figure 3-13.
Accept the default name of Model1 and click the Add button, which starts the Entity Data Model Wizard.
The first page of wizard is the Choose Model Contents page, which lets you create a conceptual model of your database by reverse-engineering an existing database. Or, you can start with an empty model and build your conceptual model by hand first. For this example, select the Generate From Database option, and click Next.
Note
This section doesn't go deep into the ADO.NET Entity Framework. For more information about the Entity Framework, see Pro ADO.NET 4.0 Entity Framework by Scott Klein (Apress, 2010).
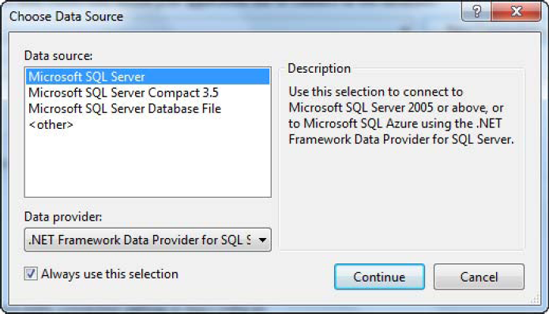
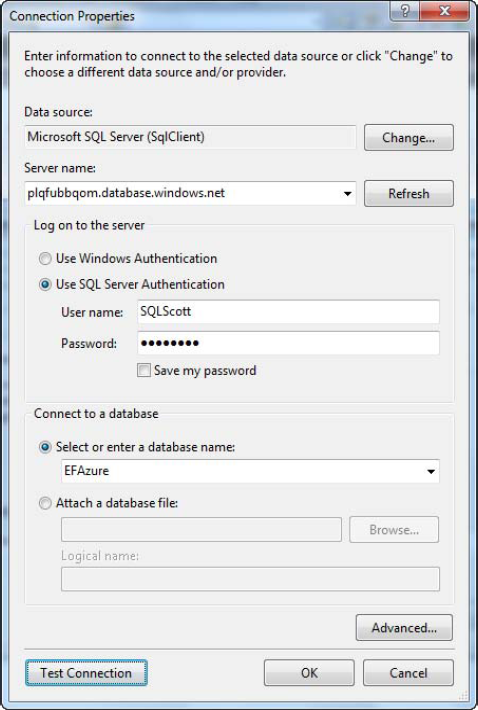
Next is the Choose Your Data Connection page. You need to create a connection to your new EFAzure database, so click the New Connection button. Doing so brings up the Connection Properties dialog, which you've probably seen before; it lets you define a connection that your application uses to connect to the specified database.
In the Connection Properties dialog, click the Change button to open the Choose Data Source dialog shown in Figure 3-14.
Select Microsoft SQL Server from the list of data sources, and click Continue to return to the Connection Properties dialog.
Enter the server name and the administrator username and password, and select the EFAzure database (see Figure 3-15). The server name is the logical name of the server (FQDN); you can get that piece of information from the SQL Azure Portal in the Server Information section, shown earlier in Figure 3-4.
To ensure that your connection works, click the Test Connection button. If you entered everything correctly and the firewall settings are correct, you get a message stating that the test connection succeeded.
Click OK in the Connection Properties dialog. Doing so takes you back to the Entity Data Model Wizard's Choose Your Data Connection page.
Your connection has been defined, and you're ready to proceed. You may need to select whether to include the sensitive data in the connection string or to exclude it. For the sake of this example, select the include option (see Figure 3-16). Keep the other default settings, and click Next.
The next step of the Entity Data Model Wizard allows you to select the objects from your database that you want to include in your conceptual model (see Figure 3-17). You see nodes for Views and Stored Procedures; but because you didn't create any, you can't select anything. Select the Contact table, and click Finish.
The Entity Data Model Wizard creates your conceptual model and displays it in the Visual Studio IDE. You won't work with this directly, so close it. You do need the form, so open it in Design view and place a ListBox on it, leaving the default name listbox1.
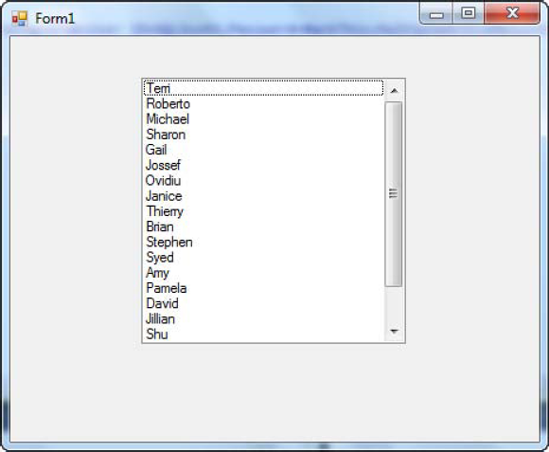
Double-click the form (not the ListBox) to display the code-behind and create the form's
Loadevent. You want to do something very simple: load the contacts from the Contact table into the list box when the form loads. (In normal circumstances, this wouldn't be a good idea; but because the table contains only a few contacts, and this example is demonstrating the functionality of querying an Azure database, you can let it slide.) In theLoadevent, enter the following code:using (EFAzureEntities context = new EFAzureEntities()) { var query = from con in context.Contacts select con; foreach (var cont in query) {listBox1.Items.Add(cont.FirstName); } }


Again, this book isn't focused on the Entity Framework, but here's a quick explanation of what this code does (you use the Entity Framework in a couple more places in this book). The first line creates an instance of the EFAzureEntities class. This class lets you work with database objects in terms of .NET object-oriented objects. You then use the Language Integrated Query (LINQ) language technology (in this case, LINQ to Entities) to query the Contact table and fill the list box with the first names of all the contacts, as shown in Figure 3-18.
And there you have it; you've successfully queried the cloud. Yes, this is a simple example, but its purpose is to illustrate how easy it is to connect to SQL Azure, create and populate a database, and create an application that queries the database.
This chapter walked through a brief introduction to creating and configuring you Azure account. You learned how to maintain and administer your SQL Azure Portal, from creating databases to maintaining security via the built-in firewall settings that allow you to specify who can connect to those databases. You also saw how to create databases of different editions and sizes, as well as how to create databases through T-SQL statements.
You then created a simple application that connected to your SQL Azure database and returned data to a form. With this foundation, you can move on to more detailed and advanced topics such as security, which is discussed next.