 Using OpenStack Dashboard for user management
by Tony Campbell, Egle Sigler, Cody Bunch, Kevin Jackson, Sunil Sarat, Alok Shrivas
OpenStack: Building a Cloud Environment
Using OpenStack Dashboard for user management
by Tony Campbell, Egle Sigler, Cody Bunch, Kevin Jackson, Sunil Sarat, Alok Shrivas
OpenStack: Building a Cloud Environment
- OpenStack: Building a Cloud Environment
- Table of Contents
- OpenStack: Building a Cloud Environment
- OpenStack: Building a Cloud Environment
- Credits
- Preface
- 1. Module 1
- 1. An Introduction to OpenStack
- 2. Authentication and Authorization Using Keystone
- Identity concepts in Keystone
- Architecture and subsystems
- Installing common components
- Installing Keystone
- Verifying the installation
- Troubleshooting the installation and configuration
- Summary
- 3. Storing and Retrieving Data and Images using Glance, Cinder, and Swift
- Introducing storage services
- Working with Glance
- Working with Cinder
- Working with Swift
- Troubleshooting steps
- Summary
- 4. Building Your Cloud Fabric Controller Using Nova
- 5. Technology-Agnostic Network Abstraction Using Neutron
- The software-defined network paradigm
- Neutron
- Installing Neutron
- Troubleshooting Neutron
- Summary
- 6. Building Your Portal in the Cloud
- 7. Your OpenStack Cloud in Action
- 8. Taking Your Cloud to the Next Level
- Working with Heat
- Ceilometer
- Installing Ceilometer
- Installing Ceilometer on the compute node
- Installing Ceilometer on the storage node
- Testing the installation
- Billing and usage reporting
- Summary
- 9. Looking Ahead
- A. New Releases
- 2. Module 2
- 1. Keystone – OpenStack Identity Service
- Introduction
- Installing the OpenStack Identity Service
- Configuring OpenStack Identity for SSL communication
- Creating tenants in Keystone
- Configuring roles in Keystone
- Adding users to Keystone
- Defining service endpoints
- Creating the service tenant and service users
- Configuring OpenStack Identity for LDAP Integration
- 2. Glance – OpenStack Image Service
- Introduction
- Installing OpenStack Image Service
- Configuring OpenStack Image Service with OpenStack Identity Service
- Configuring OpenStack Image Service with OpenStack Object Storage
- Managing images with OpenStack Image Service
- Registering a remotely stored image
- Sharing images among tenants
- Viewing shared images
- Using image metadata
- Migrating a VMware image
- Creating an OpenStack image
- 3. Neutron – OpenStack Networking
- Introduction
- Installing Neutron and Open vSwitch on a dedicated network node
- Configuring Neutron and Open vSwitch
- Installing and configuring the Neutron API service
- Creating a tenant Neutron network
- Deleting a Neutron network
- Creating an external floating IP Neutron network
- Using Neutron networks for different purposes
- Configuring Distributed Virtual Routers
- Using Distributed Virtual Routers
- 4. Nova – OpenStack Compute
- Introduction
- Installing OpenStack Compute controller services
- Installing OpenStack Compute packages
- Configuring database services
- Configuring OpenStack Compute
- Configuring OpenStack Compute with OpenStack Identity Service
- Stopping and starting nova services
- Installation of command-line tools on Ubuntu
- Using the command-line tools with HTTPS
- Checking OpenStack Compute services
- Using OpenStack Compute
- Managing security groups
- Creating and managing key pairs
- Launching our first cloud instance
- Fixing a broken instance deployment
- Terminating your instances
- Using live migration
- Working with nova-schedulers
- Creating flavors
- Defining host aggregates
- Launching instances in specific Availability Zones
- Launching instances on specific Compute hosts
- Removing Nova nodes from a cluster
- 5. Swift – OpenStack Object Storage
- Introduction
- Configuring Swift services and users in Keystone
- Installing OpenStack Object Storage services – proxy server
- Configuring OpenStack Object Storage – proxy server
- Installing OpenStack Object Storage services – storage nodes
- Configuring physical storage for use with Swift
- Configuring Object Storage replication
- Configuring OpenStack Object Storage – storage services
- Making the Object Storage rings
- Stopping and starting OpenStack Object Storage
- Setting up SSL access
- 6. Using OpenStack Object Storage
- 7. Administering OpenStack Object Storage
- 8. Cinder – OpenStack Block Storage
- 9. More OpenStack
- Introduction
- Using cloud-init to run post-installation commands
- Using cloud-config to run the post-installation configuration
- Installing OpenStack Telemetry
- Using OpenStack Telemetry to interrogate usage statistics
- Installing Neutron LBaaS
- Using Neutron LBaaS
- Configuring Neutron FWaaS
- Using Neutron FWaaS
- Installing the Heat OpenStack Orchestration service
- Using Heat to spin up instances
- 10. Using the OpenStack Dashboard
- Introduction
- Installing OpenStack Dashboard
- Using OpenStack Dashboard for key management
- Using OpenStack Dashboard to manage Neutron networks
- Using OpenStack Dashboard for security group management
- Using OpenStack Dashboard to launch instances
- Using OpenStack Dashboard to terminate instances
- Using OpenStack Dashboard to connect to instances using a VNC
- Using OpenStack Dashboard to add new tenants – projects
- Using OpenStack Dashboard for user management
- Using OpenStack Dashboard with LBaaS
- Using OpenStack Dashboard with OpenStack Orchestration
- 11. Production OpenStack
- Introduction
- Installing the MariaDB Galera cluster
- Configuring HA Proxy for the MariaDB Galera cluster
- Configuring HA Proxy for high availability
- Installing and configuring Pacemaker with Corosync
- Configuring OpenStack services with Pacemaker and Corosync
- Bonding network interfaces for redundancy
- Automating OpenStack installations using Ansible – host configuration
- Automating OpenStack installations using Ansible – Playbook configuration
- Automating OpenStack installations using Ansible – running Playbooks
- 1. Keystone – OpenStack Identity Service
- 3. Module 3
- 1. The Troubleshooting Toolkit
- 2. Troubleshooting OpenStack Identity
- 3. Troubleshooting the OpenStack Image Service
- 4. Troubleshooting OpenStack Networking
- 5. Troubleshooting OpenStack Compute
- 6. Troubleshooting OpenStack Block Storage
- 7. Troubleshooting OpenStack Object Storage
- 8. Troubleshooting the OpenStack the Orchestration Service
- 9. Troubleshooting the OpenStack Telemetry Service
- 10. OpenStack Performance, Availability, and Reliability
- A. Bibliography
- Index
OpenStack Dashboard gives us the ability to administer users through the web interface. This allows an administrator to easily create and edit users within an OpenStack environment. To manage users, you must log in using an account that is a member of the admin role.
Load a web browser, point it to our OpenStack Dashboard address at http://192.168.100.200/, and log in as a user, such as the admin user created in the Adding users to Keystone recipe of Chapter 1, Keystone – OpenStack Identity Service, with the password openstack.
User management under OpenStack Dashboard is achieved by carrying out the steps discussed in the following sections.
To add users, perform the following steps:
- Under the Identity panel, click on the Users option to bring up a list of users set up on the system:

- To create a new user, click on the Create User button.
- We will be presented with a form that asks for user name details. Enter the user name, e-mail, and the password for that user. In the example shown in the following screenshot, we create a user named
test, setopenstackas the password, and assign that user to thehorizontenant with the role of admin:
- We are returned to the screen listing the users of our OpenStack environment with a message stating that our user creation was successful.
To delete users, perform the following steps:
- Under the Identity panel, click on the Users option to bring up a list of users on the system.
- We will be presented with a list of users in our OpenStack environment. To delete a user, click on the appropriate Edit button, which will present a drop-down list with the Delete User option:

- Clicking on the Delete User option will bring up a confirmation dialog box. Confirm by clicking on the Delete User button to remove the user from the system:

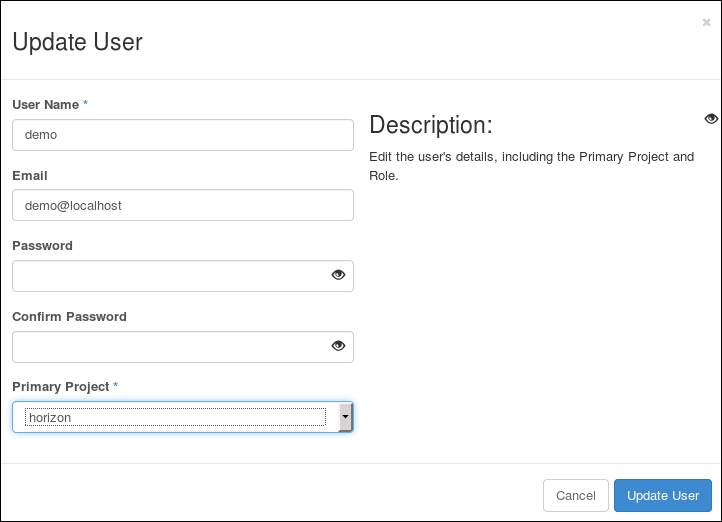
To update user details and passwords, perform the following steps:
- Under the Identity panel, click on the Users option to bring up a list of users on the system.
- To change a user's password, e-mail address, or primary project (tenant), click on the Edit button for that user.
- This brings up a dialog box asking for the relevant information. When the information has been set as we want it to be, click on the Update User button:
To add users to tenants, perform the following steps:
- Under the Identity panel, click on the Projects option to bring up a list of tenants on the system:

- Click on the appropriate Modify Users option to bring up a list of users associated with a tenant as well as a list of users, which we can add to that tenant:

- To add a new user to the list, simply click on the + (plus sign) button next to that user.
- To change the role of the user within that tenant, select the drop-down arrow next to the username and select a new role:

- After clicking on the Save button at the bottom of the dialog box, we see a message saying that our tenant has been updated. This user can now launch instances in different tenants when they log on.
To remove users from tenants, perform the following steps:
- Under the Identity panel, click on the Projects option to bring up a list of tenants on the system.
- To remove a user from a tenant, for example,
horizon, click on the appropriate Modify Users button:
- After clicking on the Modify Users button, you will get a modal window with a list of all users as well as project members, which we can remove from that tenant:

- To remove a user from this tenant, click on the - (minus sign) button next to that particular user under project members.
- After clicking on the Save button at the bottom of the dialog box, we see a message saying that our tenant has been updated.
OpenStack Dashboard is a feature-rich interface that complements the command-line options available to us when managing our cloud environment. The interface has been designed so that the functions available are as intuitive as possible to the administrator. This means that we can easily create users, modify their membership within tenants, update passwords, and remove them from the system altogether.
-
No Comment