
Glance is the code name for the OpenStack image service. This service is responsible for the functionality that allows users to discover virtual machine images, register new images, and retrieve existing images. Glance provides a RESTful API, which also powers the command-line interface and the image functionality in the Horizon Dashboard.
In this chapter, we will systematically walk you through the troubleshooting layers, which are as follows:
- Glance services
- The Glance database
- The Glance authentication
- The Glance API
- The Glance command-line client
- Glance logging and configuration
- Common errors
Glance is made up of several components. There is an API service and a registry service included in Glance. Each of these services need to be running for Glance to work properly. Glance also requires a database such as MySQL or Postgres. Finally, Glance supports several storage backends, where images are physically stored. The backend you use is configurable in glance-api.conf.
When troubleshooting Glance, one of the first things to check is whether or not the service is running. A quick way to confirm this is by running some simple Glance commands from the command line:
glance image-list
When Glance operates properly, this command should return a list of images in your Glance repository, similar to the following output:

This command may also return an empty list if your Glance repository is empty. You may receive an error when you run this command that is similar to the following error:
This error typically occurs when you haven't passed all the necessary attributes to the glance image-list command. The common way to solve this problem is by creating an openrc file that contains the attributes that are required by the command-line client. A sample openrc file would look like this:

Once you adjust the preceding lines to include your specific details, you would save that content to a file named openrc. To leverage these settings, simply source the openrc file:
source openrc
Once the openrc file has been sourced, you should be able to run commands such as glance image-list without the need to provide the required attributes on the command line. When you run the Glance image-list command and you see an error similar to the following one, you should confirm that the Glance service is running:

There are a few ways in which you can verify that Glance is running. You can check for the Glance processes by running this command:
ps –aux | grep glance-
When Glance is running successfully, you will see a process for the glance-api and glance-registry. The output will look similar to the following output:

If you find that the glance-api and glance-registry processes are not running, you can use the glance-control tool to start them. To start all the Glance services, simply run this command:
glance-control all start
This command will start the Glance API and the Glance Registry.
Once you have confirmed that the Glance service has started properly, you should verify that the database is configured and operating properly. Begin by confirming that your database engine is running. You can check whether mysql is running by executing the following command:
service mysql status
mysql start/running, process 15628
If this command does not return a message indicating that the process is running, you will need to troubleshoot your database server to get it working properly. How to troubleshoot your database engine is outside the scope of this book, but there are many great resources out there that can help.
Next, you should confirm that you can connect to the database server. For example, to confirm that you can connect to MySQL, use a command similar to the following one:
mysql -u db_user -p -h my.db.server glance
Be sure to replace db_user with a valid username for your database and replace my_db_server with the hostname or IP address of your database. The last argument to this command is the database name, which in this case is glance. If you are successfully connected to MySQL, you will see an output similar to what is displayed here:

If you are unsuccessful when trying to connect to the database manually, be sure to verify the username and password of the database user you are utilizing. Once the credentials are confirmed, you should also check whether the user has appropriate privileges to access this database. With MySQL, you can leverage the show grants statement:

The database user for the glance database in our case is named glance. We have ensured that our glance user has all the privileges on the database, which is also named glance.
In addition to having your database engine up and running, we need to confirm that the glance database exists. In MySQL, when you run the show databases command, glance should be in the list:

If the glance database does not appear in the database list, then you simply need to create an empty database named glance. After confirming that the glance database exists, you also need to ensure that it is properly initialized. An initialized Glance database will have several tables created. You can confirm this in MySQL by running the show tables command in the database named glance:

When you run this command, if it returns an empty list, you need to initialize your glance database. This can be achieved by running the following command:
glance-manage db_sync
This command will output several logging messages to the terminal, as it executes the database initialization. Upon completion, you should be able to run the show tables command again and see a list of tables similar to the preceding list.
Finally, you should confirm that the database connection string is configured properly in the glance-api.conf file located in the 127.0.0.1/glance directory. You can quickly view the current configuration for this connection string by running the following command:
less /etc/glance/glance-api.conf | grep ^connection
The result of this command will be similar to the following output:
connection = mysql://glance_db_user:glance_db_pass@
After this, confirm the database username and password used in the connection string. If you haven't already, follow the steps at the beginning of this section to connect to your database, using the same username and password indicated in your glance-api configuration file.
Glance requires Keystone for its authentication. For Glance to work properly, Keystone needs to be configured and run properly. For details on troubleshooting Keystone, refer to the previous chapter in this book. To confirm that Glance and Keystone are successfully working together, follow these steps.
Make sure Keystone is running. You can confirm this by running the following command:
ps -aux | grep keystone
This command should return an output similar to the following:

If you do not see any Keystone processes running, refer to the previous chapter in this book for Keystone troubleshooting tips.
By convention, most OpenStack deployments will have users created for each service. In this case, it would be a Glance service user named glance. Confirm that this user exists by running the following command:
openstack user list
Running this command will return a list of users in Keystone. An example of the output is given in the following code:

Make sure that there is a user named glance. Secondly, this user should belong to a project/tenant named service by convention. You can confirm that the service project exists by running the following command:
openstack project list
This command will list the projects (tenants) configured in our Keystone installation:

In the output of this command, you should see a project named service, as demonstrated in the preceding code. The next step is to confirm that the glance user is assigned to this project. The next command will accomplish this:
openstack user show glance
The preceding user show command will display details for the glance user:

In the preceding project_id field, we are looking for a project ID that matches the ID of our service project displayed in the OpenStack project list command we ran earlier. In our example, the project ID we are looking for is 7d9cdf4b5204066b3909a3dfcb3c1d6. The output tells us that our glance user is indeed a part of the service project.
Next, we need to confirm that the glance user has the correct roles in Keystone. The following command can help us with this:
openstack user role list --project service glance
This command will list the roles for the glance user in the context of the service project:

When examining the output of this command, we want to confirm that the glance user has the admin role in the service project.
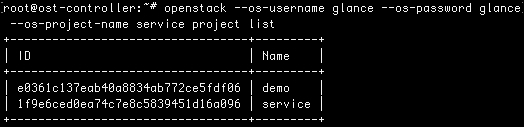
Finally, let's confirm the password for the glance user. A quick way to confirm the password is using the OpenStack command-line client, authenticating as the glance user. To achieve this, we will run a command similar to the following one:
openstack --os-username glance --os-password glance --os-project-name service project list
The preceding command is really just the OpenStack project list command with a few arguments passed in on the command line. The arguments passed in will override the values we have in our openrc file. This allows us to test different users, which are stated as follows:
--os-username: This indicates the username of the user we want to use. For this test, the username isglance.--os-password: This is the value we are targeting with this test. We want to make sure that the password is set and working as expected. For my test, I'm expecting the password to also beglance.--os-project-name: Finally, we need to pass in the project name so that Keystone knows which project to authenticate. Our user may have different roles under different projects. In our example, we are testing theglanceuser under theserviceproject.
If the password for the glance user is indeed glance, as I expect, this command will return a list of projects in Keystone:
This error tells me that the password is probably not glance, as I anticipated:
The request you have made requires authentication. (HTTP 401) (Request-ID: req-707fd197-ae15-4698-ac04-1de4c92acfe9)
At this point, I can try a few more password possibilities or I can reset the password. To reset the glance user's password, you can use a command like the following one:
openstack user set --password-prompt glance
When you run the preceding command, you will be prompted to enter a new password for the glance user and then asked to type that password a second time to confirm. After you reset the password, you can test it using the same technique we described earlier.
The final step is to confirm that our credentials are set properly in the glance configuration files. In both the /etc/glance/glance-api.conf and the /etc/glance/glance-registry.conf file, there should be a keystone_authtoken stanza. Under that stanza, if auth_plugin = password, make sure that the values of the username and password field match the values you have set in Keystone:
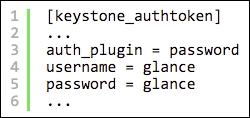
In the preceding example, our username is set to glance and our password is set to glance. Replace these values with the username and password you have configured for your installation.
At this stage, we should confirm that the service catalog contains the correct endpoints for the Glance service:
openstack endpoint show glance
When you run the endpoint show command as demonstrated in the preceding line of code, you will see details for the glance endpoint in the service catalog. An example of a typical output is included in the following code snippet:

Confirm that the values of the adminurl, internalurl, and publicurl are correct. If any of these values are incorrect, you have the following three options to correct the issue:
- You can use the
openstack endpoint deletecommand to remove the current endpoints, followed by theopenstack endpoint createcommand. - If you are using the default SQL driver for your service catalog, you can make the edits to the endpoints directly in the SQL database. Use caution when executing this option.
- If you are using the templated driver for your service catalog, you simply need to update your endpoint template file.
You can confirm that Glance is running as expected by testing the Glance API. This will also allow you to confirm that Glance and Keystone are correctly configured to work together. To begin, you can request an Auth Token using the Keystone API and your glance service user. If you have any trouble with getting Keystone to run successfully, refer to Chapter 2, Troubleshooting OpenStack Identity. The following CURL request will generate an auth token for the glance service user:
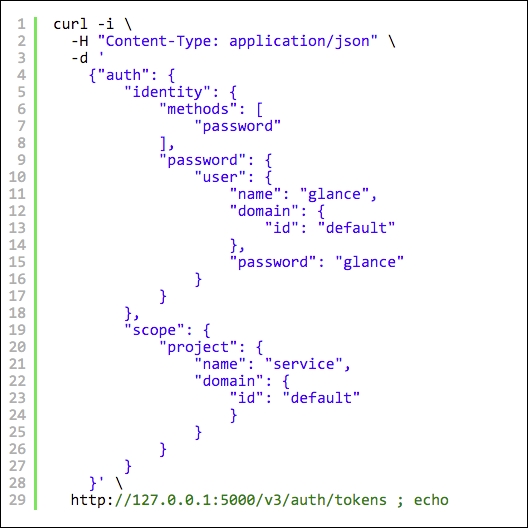
Make sure to modify the preceding cURL call with your glance user's password and the correct IP address or URL for your keystone installation. In the preceding example, I used glance as the password for the glance service user and localhost in the URL for my Keystone endpoint.
This Curl command will return a scoped token from Keystone. The headers returned in response will be similar to the following output:

The Auth Token is contained in the header name X-Subject-Token. We will use this Auth Token when we query the Glance API to confirm that it is working properly. To test the Glance API, we send a request to list the images in Glance:

This API request will return a response that is similar to the following one:

Now that we have confirmed that the API is working, we will check the command-line interface client and ensure its proper operation. We can begin by listing the images currently registered in Glance. To do this, we will leverage the openstack image list command:
openstack image list
Note
When using command-line clients, we recommend that you leverage an openrc file that contains environment variables representing the required fields of the CLI client. Refer to the Chapter 2, Troubleshooting OpenStack Identity, for more information.
On executing this command, you should see a list of images currently registered in Glance, as demonstrated in the following code:

If you do not see an output similar to the preceding one, then there are a few things we need to check. First, if you receive any errors when running this command, carefully go over this section again and confirm that everything is set up as expected. Next, run the command again, but use the --debug switch for additional debugging output on the terminal:
openstack --debug image list
The preceding command should print out several lines of useful information on the terminal.
A few errors that you may come across in this situation include the following:
- Service Unavailable (HTTP 503): This could mean that your password for the glance service user is incorrect. Use the methods discussed in this section to troubleshoot that issue.
- Unable to establish connection to http://glanceserver:9292/v2/images: This could be an indication that your Glance API service is not running. Again, you can use the information we covered earlier to help you troubleshoot.
If running the OpenStack image list command does not return an error, but simply returns a blank output, this probably means that you do not have any images in your Glance installation yet.
It's also helpful to have a known working image that you can use for troubleshooting. We can install a Cirros image for this purpose. You can use the following command to download a copy of the Cirros image:
wget http://download.cirros-cloud.net/0.3.4/cirros-0.3.4-x86_64-disk.img
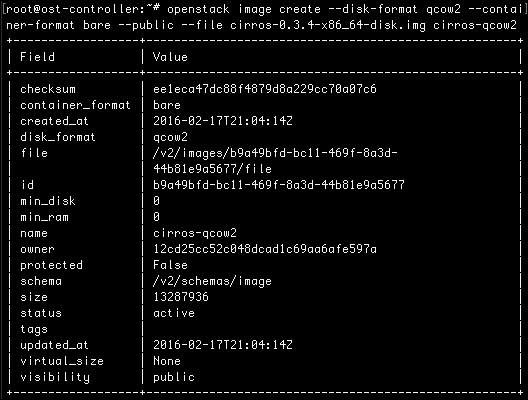
Once you've downloaded the image, you can load it into Glance using the Glance command-line client:
openstack image create --disk-format qcow2 --container-format bare --public --file cirros-0.3.4-x86_64-disk.img cirros-qcow2
Running this command will return an output similar to this:
You can confirm that the image has been successfully loaded by executing the openstack image list command again. Once you have confirmed that the image list command is working, try a few other openstack image commands for extra assurance.