
The OpenStack Dashboard has the ability to view, create, and edit Load Balancers, add Virtual IPs (VIPs), and add nodes behind a Load Balancer. Dashboard also provides a user interface for creating HA Proxy server Load Balance services for our instances. We do this first by creating load balancing pools and then adding running instances to those pools.
In this section, we will use two instances running Apache that were created in the previous chapter. We will create an HTTP Load Balance pool, create a VIP, and configure instances to be part of the pool. The result will be the ability to use the HTTP Load Balancer pool address to send traffic to two instances running Apache.
Load a web browser, point it to our OpenStack Dashboard address at http://192.168.100.200/, and log in as an admin user, such as the admin user created in the Adding users to Keystone recipe of Chapter 1, Keystone – OpenStack Identity Service, with the password openstack.
First we will create an HTTP Load Balance pool.
To create a Load Balancer pool for a logged in user, carry out the following steps:
- To manage Load Balancers within our OpenStack Dashboard, select the Load Balancers tab:

- This will show available Load Balancer pools. Since we currently do not have any created, click on the Add Pool button in the top-right corner to add a pool.
- After clicking on the Add Pool button, we are presented with a modal window. Fill out the details to add a new pool:

- Set name, description, and provider in the modal window. We name our pool
web-pooland give an appropriate description. We choose to go with a default provider since we are creating an HA Proxy. - Select a subnet for the pool by clicking on the drop-down menu. All of our instances are attached to the private network, so we select
10.200.0.0/24. - We select the HTTP protocol, but HTTPS and TCP are also available. This selection will depend on what kind of applications you are running.
- Select your preferred routing algorithm; we choose the ROUND_ROBIN balancing method. Other options are LEAST_CONNECTIONS, and SOURCE_IP.
- We leave the Admin State set to UP.
- Click on the Add button to create a new pool. You should see the new pool created in the pool list:

To add instances to the Load Balancer, follow these steps:
- After adding a pool, you should still be on the Load Balancer page. Click on the Members tab. You should see a list of active members, if you have any, or an empty list:

- On the Members tab, click on the Add Member button. This will present you with the following menu:
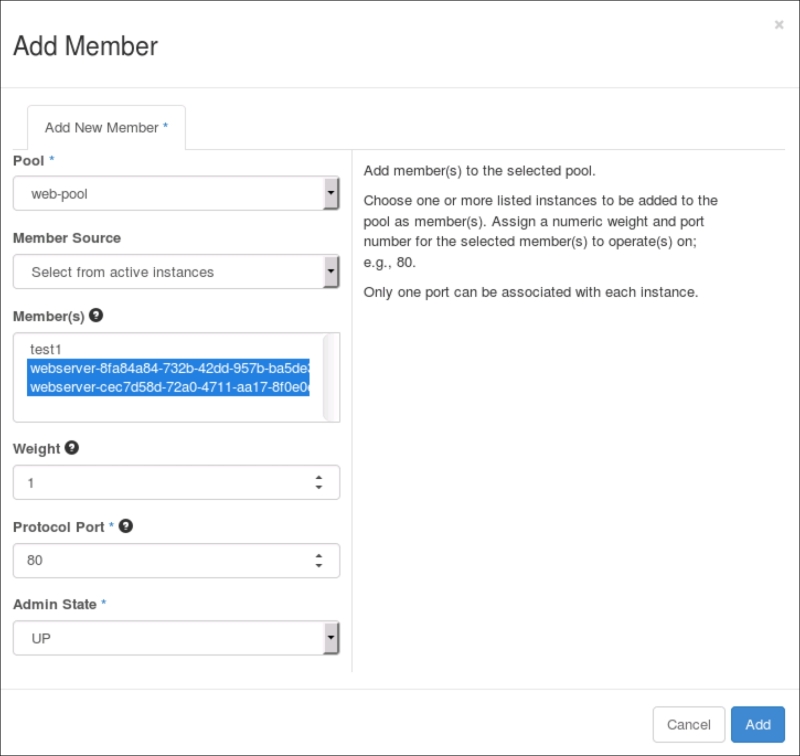
- We select the pool we just created, web-pool, and specify members or instances that will be part of this pool. If you do not have any instances running with Apache installed, refer to the Using cloud-config to run the post-installation configuration recipe in Chapter 9, More OpenStack, for creating instances with running Apache.
- Select weights for the members of the pool. In our case, both members of the pool will have equal weights, so we assign the weight as 1.
- The selected protocol port will be used to access all members of the pool and, since we are using HTTP, we set the port to 80. We set Admin State to UP.
- Click on the Add button to add members to the pool.
- Now the member list should contain two newly added nodes:

Creating a VIP on the external network will allow access to the Load Balance pool and the instances behind it. To create the VIP, carry out the following steps:
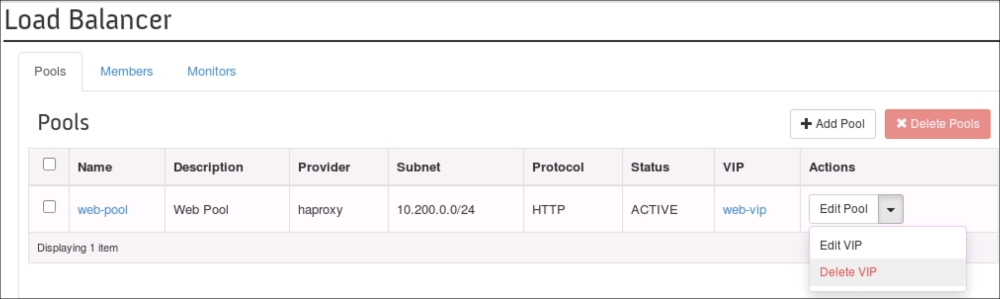
- From the Load Balancer page, select the Pools tab and click on the drop-down arrow next to the Edit Pool button. This will give you a drop-down menu with an option to add a VIP:

- Click on the Add VIP option. This will present you with the modal window for creating a new VIP:

- We enter a custom name and description for our VIP.
- For VIP Subnet, we pick external subnet
192.168.100.0/24, followed by an available IP in that subnet. We choose192.168.100.12. - Enter 80 for Protocol Port, followed by selecting HTTP for Protocol.
- Set -1 for Connection Limit if you do not wish to have a maximum number of connections for this VIP.
- Click on the Add button to create the VIP. This will create a new VIP and show the current pool list:

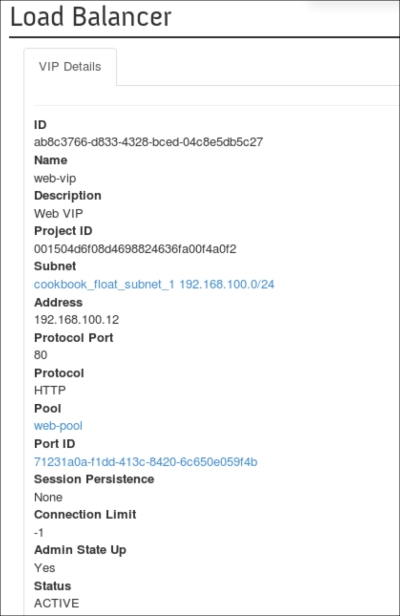
- Now, when we click on web-pool, we will see the following details:

- Click on the web-vip link in the details to view the VIP details:
- You can test this Load Balancer by entering the VIP's IP in a browser. If you selected ROUND_ROBIN for your routing algorithm, each time you refresh your browser it should hit a different node.
To delete the Load Balancer, we will first need to delete the attached VIP and then delete the pool.
- From the Load Balancer page, check the Pools tab and click on the drop-down arrow next to the Edit Pool button. This will give you a drop-down menu with an option to delete a VIP:
- Selecting the Delete VIP drop-down option will give you a warning and ask you to confirm the deletion of the VIP. Click on the Delete VIP button to confirm:

- After deleting the VIP, now we can delete the pool. From the Load Balancer page's Pools tab, click on the drop-down arrow next to the appropriate Edit Pool button:

- Select the Delete Pool option from the drop-down list to delete the pool. You will get asked to confirm the deletion. If you are ready to delete the Load Balance pool, click on the Delete Pool button:

We created a Load Balance pool and added two instances with Apache to it. We also created a virtual IP to be used on the external network and assigned it to our pool. To do this, we executed the following steps:
- Create a pool from the Load Balancer page's Pools tab.
- Select the subnet to which all the nodes are attached when creating the pool.
- Add members to the pool.
- Create a VIP for the pool.
Both the pool and VIP can be edited after being created. Additional members can also be added to the pool at a later time.