
To perform a DNS amplification attack, follow the given steps:
- In order to understand how DNS amplification works, one can use a basic DNS query utility such as host, dig, or nslookup:
- By performing a request for all record types associated with a well-established domain, you will notice that some return a fairly sizable response:

- In the example provided, a request for all record types associated with the yahoo.com domain returns a response that includes seven A records, three AAAA records, five NS records, and three MX records. A DNS amplification attack's effectiveness is directly correlated to the size of the response. We will now attempt to perform the same action using packets built in Scapy.
- To send our DNS query request, we must first build the layers of this request. The first layer that we will need to construct is the IP layer:

- To build the IP layer of our request, we should assign the IP object to the variable i. By calling the display() function, we can identify the attribute configurations for the object. By default, both the sending and receiving addresses are set to the loopback address of 127.0.0.1. These values can be modified by changing the destination address by setting i.dst equal to the string value of the address of the nameserver to be queried.
- By calling the display() function again, we can see that not only has the destination address been updated, but Scapy will also automatically update the source IP address to the address associated with the default interface.
- Now that we have constructed the IP layer of the request, we should proceed to the next layer. As DNS is handled over UDP, the next layer to construct is the UDP layer:

- To build the UDP layer of our request, we will use the same technique as we did for the IP layer. In the example provided, the UDP object was assigned to the u variable. As discussed earlier, the default configurations can be identified by calling the display() function.
- Here, we can see that the default values for both the source and destination ports are listed as domain. As you might likely suspect, this is to indicate the DNS service associated with the port 53. DNS is a common service that can often be discovered on networked systems. To confirm this, one can call the value directly by referencing the variable name and attribute.
- Now that the IP and UDP layers have been constructed, we need to build the DNS layer:
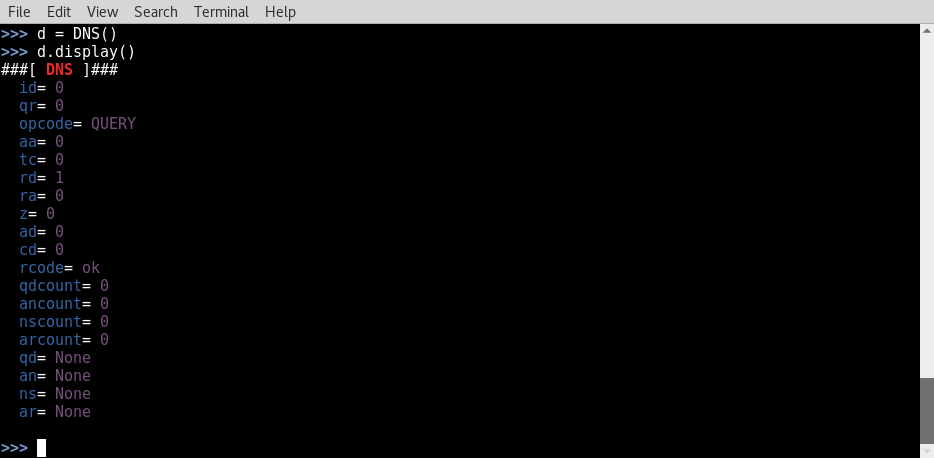
- To build the DNS layer of our request, we will use the same technique as we did for both the IP and UDP layers. In the example provided, the DNS object was assigned to the d variable. As discussed earlier, the default configurations can be identified by calling the display() function. Here, we can see that there are several values that need to be modified:

- The recursion-desired bit needs to be activated; this can be done by setting the rd value equal to 1. Also, a value of 0x0001 needs to be supplied for qdcount; this can be done by supplying an integer value of 1. By calling the display() function again, we can verify that the configuration adjustments have been made.
- Now that the IP, UDP, and DNS layers have been constructed, we need to build a DNS question record to assign to the qd value:

- To build the DNS question record, we will use the same technique as we did for the IP, UDP, and DNS layers. In the example provided, the DNS question record was assigned to the q variable. As discussed earlier, the default configurations can be identified by calling the display() function. Here, we can see that there are several values that need to be modified:

- The qname value needs to be set to the domain that is being queried. Also, qtype needs to be set to ALL by passing an integer value of 255. By calling the display() function again, we can verify that the configuration adjustments have been made.
- Now that the question record has been configured, the question record object should be assigned as the DNS qd value:

- We can verify that the question record has been assigned to the DNS qd value by calling the display() function. Now that the IP, UDP, and DNS layers have been constructed and the appropriate question record has been assigned to the DNS layer, we can construct the request by stacking these layers:

- The IP, UDP, and DNS layers can be stacked by separating the variables with a forward slash. These layers can then be set equal to a new variable that will represent the entire request. The display() function can then be called to view the configurations for the request.
- Prior to sending this request, we should view it in the same display format as we will view the response. By doing this, we can get a better visual understanding of the amplification that occurs between the request and response. This can be done by calling the variable directly:

- Once the request has been built, it can be passed to the send (send()) and receive (recv()) functions so that we can analyze the response. We will not assign this to a variable, but instead, we will call the function directly so that the response can be viewed in the same format:

- The response confirms that we have successfully built the desired request, and we have solicited a sizable payload that includes seven A records, three AAAA record, five NS records, and three MX records for the yahoo.com domain.
- This exercise makes it clear that the response to this request is significantly larger than the request itself. To make this an effective amplification attack, it needs to be redirected to our target by spoofing the source IP address:

- After redefining the source IP address value to the string equivalent of the IP address of the target system, we can confirm that the value has been adjusted using the display() function. We can then rebuild our request with the change. To verify that we are then able to redirect the DNS query response to this spoofed host, we can start a TCP dump on the host using the tcpdump command, as shown in the following screenshot:
- In the example provided, the tcpdump configurations will capture all traffic that crosses the eth0 interface from a source address of 192.168.68.2 (the address of the queried DNS server). Then, we can send our requests using the send() function:

- After sending the requests, we should refer back to the tcpdump content to verify that the response to the DNS queries was returned to the victim server:

- This entire process of performing DNS amplification can actually be performed with a single one-liner command in Scapy. This command uses all of the same values that we discussed in the previous exercise. The count value can then be modified to define the number of payload responses that you want to be sent to the victim server:
