
Chapter 10. Function Decorators: Wrapping Functions

When it comes to augmenting your code, Chapter 9’s context management protocol is not the only game in town.
Python also lets you use function decorators, a technique whereby you can add code to an existing function without having to change any of the existing function’s code. If you think this sounds like some sort of black art, don’t despair: it’s nothing of the sort. However, as coding techniques go, creating a function decorator is often considered to be on the harder side by many Python programmers, and thus is not used as often as it should be. In this chapter, our plan is to show you that, despite being an advanced technique, creating and using your own decorators is not that hard.
Your Webapp Is Working Well, But...
You’ve shown the latest version of your webapp to a colleague, and they’re impressed by what you’ve done. However, they pose an interesting question: is it wise to let any web user view the log page?
The point they’re making is that anybody who is aware of the /viewlog URL can use it to view the logged data whether they have your permission or not. In fact, at the moment, every one of your webapp’s URLs are public, so any web user can access any of them.
Depending on what you’re trying to do with your webapp, this may or may not be an issue. However, it is common for websites to require users to authenticate before certain content is made available to them. It’s probably a good idea to be prudent when it comes to providing access to the /viewlog URL. The question is: how do you restrict access to certain pages in your webapp?
Only authenticated users gain access
You typically need to provide an ID and password when you access a website that serves restricted content. If your ID/password combination match, access is granted, as you’ve been authenticated. Once you’re authenticated, the system knows to let you access the restricted content. Maintaining this state (whether authenticated or not) seems like it might be as simple as setting a switch to True (access allowed; you are logged in) or False (access forbidden; you are not logged in).

It’s a bit more complicated than that.
There’s a twist here (due to the way the Web works) which makes this idea a tad more complicated than it at first appears. Let’s explore what this complication is first (and see how to deal with it) before solving our restricted access issue.
The Web Is Stateless
In its most basic form, a web server appears incredibly silly: each and every request that a web server processes is treated as an independent request, having nothing whatsoever to do with what came before, nor what comes after.
This means that sending three quick requests to a web server from your computer appears as three independent individual requests. This is in spite of the fact that the three requests originated from the same web browser running on the same computer, which is using the same unchanging IP address (which the web server sees as part of the request).
As stated at the top of the page: it’s as if the web server is being silly. Even though we assume the three requests sent from our computer are related, the web server doesn’t see things this way: every web request is independent of what came before it, as well as what comes after.

HTTP is to blame...
The reason web servers behave in this way is due to the protocol that underpins the Web, and which is used by both the web server and your web browser: HTTP (the HyperText Transfer Protocol).
HTTP dictates that web servers must work as described above, and the reason for this has to do with performance: if the amount of work a web server needs to do is minimized, it’s possible to scale web servers to handle many, many requests. Higher performance is achieved at the expense of requiring the web server to maintain information on how a series of requests may be related. This information—known as state in HTTP (and not related to OOP in any way)—is of no interest to the web server, as every request is treated as an independent entity. In a way, the web server is optimized to respond quickly, but forget fast, and is said to operate in a stateless manner.
Which is all well and good until such time as your webapp needs to remember something.

If only the Web were that simple.
When your code is running as part of a web server, its behavior can differ from when you run it on your computer. Let’s explore this issue in more detail.
Your Web Server (Not Your Computer) Runs Your Code
When Flask runs your webapp on your computer, it keeps your code in memory at all times. With this in mind, recall these two lines from the bottom of your webapp’s code, which we initially discussed at the end of Chapter 5:

This if statement checks to see whether the interpreter is executing the code directly or whether the code is being imported (by the interpreter or by something like PythonAnywhere). When Flask executes on your computer, your webapp’s code runs directly, resulting in this app.run line executing. However, when a web server is configured to execute your code your webapp’s code is imported, and the app.run line does not run.
Why? Because the web server runs your webapp code as it sees fit. This can involve the web server importing your webapp’s code, then calling its functions as needed, keeping your webapp’s code in memory at all times. Or the web server may decide to load/unload your webapp code as needed, the assumption being that, during periods of inactivity, the web server will only load and run the code it needs. It’s this second mode of operation—where the web server loads your code as and when it needs it—that can lead to problems with storing your webapp’s state in variables. For instance, consider what would happen if you were to add this line of code to your webapp:

The idea here is that other parts of your webapp can refer to the variable logged_in in order to determine whether a user is authenticated. Additionally, your code can change this variable’s value as needed (based on, say, a successful login). As the logged_in variable is global in nature, all of your webapp’s code can access and set its value. This seems like a reasonable approach, but has two problems.
Firstly, your web server can unload your webapp’s running code at any time (and without warning), so any values associated with global variables are likely lost, and are going to be reset to their starting value when your code is next imported. If a previously loaded function sets logged_in to True, your reimported code helpfully resets logged_in to False, and confusion reigns...

Secondly, as it stands, there’s only a single copy of the global logged_in variable in your running code, which is fine if all you ever plan to have is a single user of your webapp (good luck with that). If you have two or more users each accessing and/or changing the value of logged_in, not only will confusion reign, but frustration will make a guest appearance, too. As a general rule of thumb, storing your webapp’s state in a global variable is a bad idea.
Don’t store your webapp’s state in global variables.
It’s Time for a Bit of a Session
As a result of what we learned on the last page, we need two things:
A way to store variables without resorting to using globals
A way to keep one webapp user’s data from interferring with another’s
Most webapp development frameworks (including Flask) provide for both of these requirements using a single technology: the session.
Think of a session as a layer of state spread on top of the stateless Web.
By adding a small piece of identification data to your browser (a cookie), and linking this to a small piece of identification data on the web server (the session ID), Flask uses its session technology to keep everything straight. Not only can you store state in your webapp that persists over time, but each user of your webapp gets their own copy of the state. Confusion and frustration are no more.
To demonstrate how Flask’s session mechanism works, let’s take a look at a very small webapp that is saved to a file called quick_session.py. Take a moment to read the code first, paying particular attention to the highlighted parts. We’ll discuss what’s going on after you’ve had a chance to read this code:


Flask’s Session Technology Adds State
In order to use Flask’s session technology, you first have to import session from the flask module, which the quick_session.py webapp you just saw does on its very first line. Think of session as a global Python dictionary within which you store your webapp’s state (albeit a dictionary with some added superpowers):

Even though your webapp is still running on the stateless Web, this single import gives your webapp the ability to remember state.
Flask ensures that any data stored in session exists for the entire time your webapp runs (no matter how many times your web server loads and reloads your webapp code). Additionally, any data stored in session is keyed by a unique browser cookie, which ensures your session data is kept away from that of every other user of your webapp.
Find out more about Flask sessions here: http://flask.pocoo.org/docs/0.11/api/#sessions
Just how Flask does all of this is not important: the fact that it does is. To enable all this extra goodness, you need to seed Flask’s cookie generation technology with a “secret key,” which is used by Flask to encrypt your cookie, protecting it from any prying eyes. Here’s how quick_session.py does this:

Flask’s documentation suggests picking a secret key that is hard to guess, but any stringed value works here. Flask uses the string to encrypt your cookie prior to transmitting it to your browser.
Once session is imported and the secret key set, you can use session in your code as you would any other Python dictionary. Within quick_session.py, the /setuser URL (and its associated setuser function) assigns a user-supplied value to the user key in session, then returns the value to your browser:

Now that we’ve set some session data, let’s look at the code that accesses it.
Dictionary Lookup Retrieves State
Now that a value is associated with the user key in session, it’s not hard to access the data associated with user when you need it.
The second URL in the quick_session.py webapp, /getuser, is associated with the getuser function. When invoked, this function accesses the value associated with the user key and returns it to the waiting web browser as part of the stringed message. The getuser function is shown below, together with this webapp’s dunder name equals dunder main test (first discussed near the end of Chapter 5):

Time for a Test Drive?
It’s nearly time to take the quick_session.py webapp for a spin. However, before we do, let’s think a bit about what it is we want to test.
For starters, we want to check that the webapp is storing and retrieving the session data provided to it. On top of that, we want to ensure that more than one user can interact with the webapp without stepping on any other user’s toes: the session data from one user shouldn’t impact the data of any other.
To perform these tests, we’re going to simulate multiple users by running multiple browsers. Although the browsers are all running on one computer, as far as the web server is concerned, they are all independent, individual connections: the Web is stateless, after all. If we were to repeat these tests on three physically different computers on three different networks, the results would be the same, as all web servers see each request in isolation, no matter where the request originates. Recall that the session technology in Flask layers a stateful technology on top of the stateless Web.
To start this webapp, use this command within a terminal on Linux or Mac OS X:
$ python3 quick_session.pyor use this command at a command prompt on Windows:
C:> py -3 quick_session.py
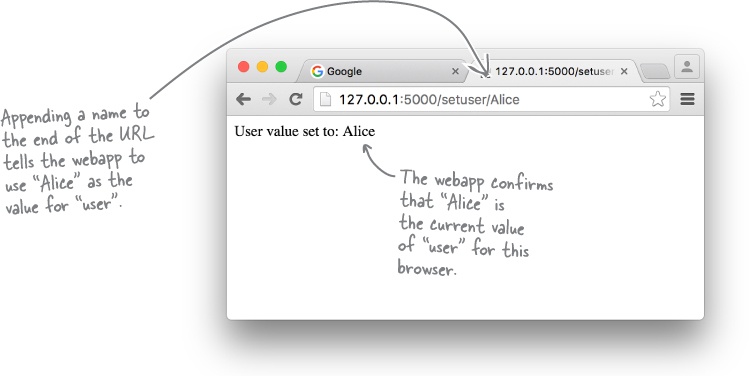
With the quick_session.py webapp up and running, let’s open a Chrome browser and use it to set a value for the user key in session. We do this by typing /setuser/Alice into the location bar, which instructs the webapp to use the value Alice for user:
Next, let’s open up the Opera browser and use it to set the value of user to Bob (if you don’t have access to Opera, use whichever browser is handy, as long as it’s not Chrome):

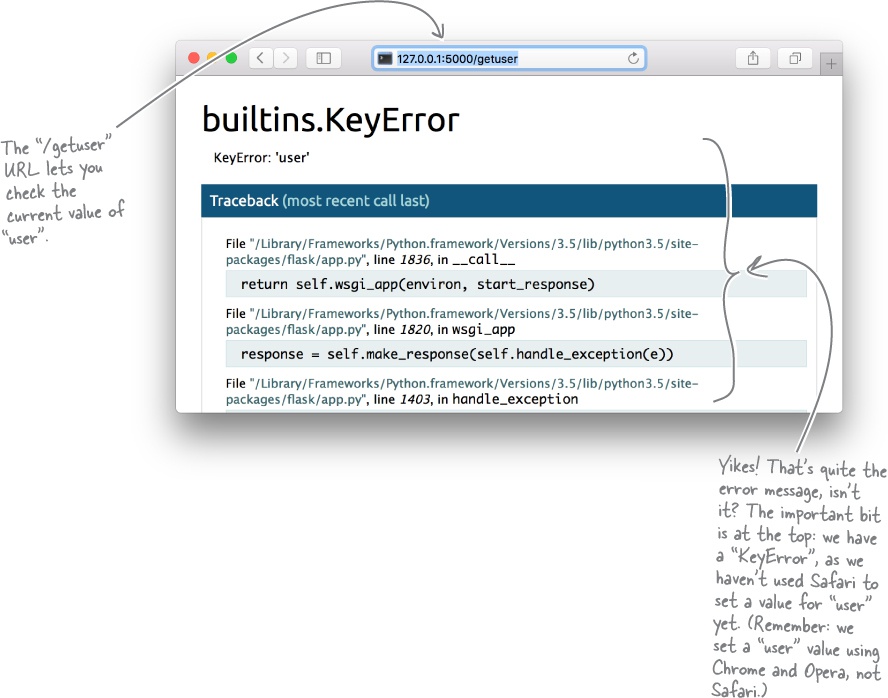
If you open up Safari (or Edge if you are on Windows), and use the webapp’s other URL,
/getuser, you’d expect to retrieve the current value of user
from the webapp. However, when you do this in Safari (or Edge), you’re greeted with a rather
intimidating error message:
Let’s use Safari to set the value of user to Chuck:

Now that we’ve used the three browsers to set values for user, let’s confirm that the webapp (thanks to our use of session) is stopping each browser’s value of user from interfering with any other browser’s data. Even though we’ve just used Safari to set the value of user to Chuck, let’s see what its value is in Opera by using the /getuser URL:

Having confirmed that Opera is showing user’s value as Bob, let’s return to the Chrome browser window and issue the /getuser URL there. As expected, Chrome confirms that, as far as it’s concerned, the value of user is Alice:

We’ve just used Opera and Chrome to access the value of user using the /getuser URL, which just leaves Safari. Here’s what we see when we issue /getuser in Safari, which doesn’t produce an error message this time, as user has a value associated with it now (so, no more KeyError):


No, not quite—it all happens in the webapp.
The use of the session dictionary in the webapp enables the behavior you’re seeing here. By automatically setting a unique cookie within each browser, the webapp (thanks to session) maintains a browser-identifiable value of user for each browser.
From the webapp’s perspective, it’s as if there are multiple values of user in the session dictionary (keyed by cookie). From each browser’s perspective, it’s as if there is only ever one value of user (the one associated with their individual, unique cookie).
Managing Logins with Sessions
Based on our work with quick_session.py, we know we can store browser-specific state in session. No matter how many browsers interact with our webapp, each browser’s server-side data (a.k.a. state) is managed for us by Flask whenever session is used.
Let’s use this new know-how to return to the problem of controlling web access to specific pages within the vsearch4web.py webapp. Recall that we want to get to the point where we can restrict who has access to the /viewlog URL.
Rather than experimenting on our working vsearch4web.py code, let’s put that code to one side for now and work with some other code, which we’ll experiment with in order to work out what we need to do. We’ll return to the vsearch4web.py code once we’ve worked out the best way to approach this. We can then confidently amend the vsearch4web.py code to restrict access to /viewlog.
Here’s the code to yet another Flask-based webapp. As before, take some time to read this code prior to our discussion of it. This is simple_webapp.py:

Let’s Do Login
The simple_webapp.py code is straightforward: all of the URLs are public in that they can be accessed by anyone using a browser.
In addition to the default / URL (which results in the hello function executing), there are three other URLs, /page1, /page2, and /page3 (which invoke similarly named functions when accessed). All of the webapp’s URLs return a specific message to the browser.
As webapps go, this one is really just a shell, but will do for our purposes. We’d like to get to the point where /page1, /page2, and /page3 are only visible to logged-in users, but restricted to everyone else. We’re going to use Flask’s session technology to enable this functionality.
Let’s begin by providing a really simple /login URL. For now, we’re not going to worry about providing an HTML form that asks for a login ID and password. All we’re going to do here is create some code that adjusts session to indicate that a successful login has occurred.

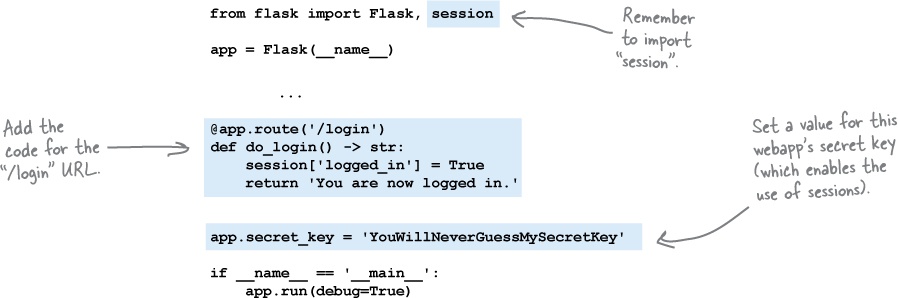
Let’s write the code for the /login URL below. In the space shown, provide code that adjusts session by setting a value for the logged_in key to True. Additionally, have the URL’s function return the “You are now logged in” message to the waiting browser:

In addition to creating the code for the /login URL, you’ll need to make two other changes to the code to enable sessions. Detail what you think these changes are here:
..................................................................................................
..................................................................................................
You were to write the code for the /login URL below. You were to provide code that adjusts session by setting a value for the logged_in key to True. Additionally, you were to have the URL’s function return the “You are now logged in” message to the waiting browser:

In addition to creating the code for the /login URL, you needed to make two other changes to the code to enable sessions. You were to detail what you think these changes were:

Amend the webapp’s code to handle logins
We’re going to hold off on testing this new code until we’ve added another two URLs: /logout and /status. Before you move on, make sure your copy of simple_webapp.py has been amended to include the changes shown below. Note: we’re not showing all of the webapp’s code here, just the new bits (which are highlighted):
Let’s Do Logout and Status Checking
Adding the code for the /logout and /status URLs is our next task.
When it comes to logging out, one strategy is to set the session dictionary’s logged_in key to False. Another strategy is to remove the logged_in key from session altogether. We’re going to go with the second option; the reason why will become clear after we code the /status URL.
Let’s write the code for the /logout URL, which needs to remove the logged_in key from the session dictionary, then return the “You are now logged out” message to the waiting browser. Add your code into the spaces below:

With /logout written, we now turn our attention to /status, which returns one of two messages to the waiting web browser.
The message “You are currently logged in” is returned when logged_in exists as a value in the session dictionary (and, by definition, is set to True).
The message “You are NOT logged in” is returned when the session dictionary doesn’t have a logged_in key. Note that we can’t check logged_in for False, as the /logout URL removes the key from the session dictionary as opposed to changing its value. (We haven’t forgotten that we still need to explain why we’re doing things this way, and we’ll get to the explanation in a while. For now, trust that this is the way you have to code this functionality.)
Let’s write the code for the /status URL in the space below:

You were to write the code for the /logout URL, which needed to remove the logged_in key from the session dictionary, then return the “You are now logged out” message to the waiting browser:

With /logout written, you were to turn your attention to the /status URL, which returns one of two messages to the waiting web browser.
The message “You are currently logged in” is returned when logged_in exists as a value in the session dictionary (and, by definition, is set to True).
The message “You are NOT logged in” is returned when the session dictionary doesn’t have a logged_in key.
You were to write the code for /status in the space below:

Amend the webapp’s code once more
We’re still holding off on testing this new version of the webapp, but here (on the right) is a highlighted version of the code you need to add to your copy of simple_webapp.py.

Make sure you’ve amended your code to match ours before getting to the next Test Drive, which is coming up right after we make good on an earlier promise.
Why Not Check for False?
When you coded the /login URL, you set the logged_in key to True in the session dictionary (which indicated that the browser was logged into the webapp). However, when you coded the /logout URL, the code didn’t set the value associated with the logged_in key to False, as we preferred instead to remove all trace of the logged_in key from the session dictionary. In the code that handled the /status URL, we checked the “login status” by determining whether or not the logged_in key existed in the session dictionary; we didn’t check whether logged_in is False (or True, for that matter). Which begs the question: why does the webapp not use False to indicate “not logged in”?
The answer is subtle, but important, and it has to do with the way dictionaries work in Python. To illustrate the issue, let’s experiment at the >>> prompt and simulate what can happen to the session dictionary when used by the webapp. Be sure to follow along with this session, and carefully read each of the annotations:

The above experimentation shows that it is not possible to check a dictionary for a key’s value until a key/value pairing exists. Trying to do so results in an KeyError. As it’s a good idea to avoid errors like this, the simple_webapp.py code checks for the existence of the logged_in key as proof that the browser’s logged in, as opposed to checking the key’s actual value, thus avoiding the possibility of a KeyError.
Let’s take the simple_webapp.py webapp for a spin to see how well the /login, /logout, and /status URLs perform. As with the last Test Drive, we’re going to test this webapp using more than one browser in order to confirm that each browser maintains its own “login state” on the server. Let’s start the webapp from our operating system’s terminal:
On Linux and Mac OS X: |
|
On Windows: |
|
Let’s fire up Opera and check its initial login status by accessing the /status URL. As expected, the browser is not logged in:

Let’s simulate logging in, by accessing the /login URL. The message changes to confirm that the login was successful:

Now that you are logged in, let’s confirm the status change by accessing the /status URL within Opera. Doing so confirms that the user of the Opera browser is logged in. If you use Chrome to check the status, too, you’ll see that the user of Chrome isn’t logged in, which is exactly what we want (as each user of the webapp—each browser—has its own state maintained by the webapp):

To conclude, let’s access the /logout URL within Opera to tell the webapp that we are logging out of the session:

Although we haven’t asked any of our browser’s users for a login ID or password, the /login, /logout, and /status URLs allow us to simulate what would happen to the webapp’s session dictionary if we were to create the required HTML form, then hook up the form’s data to a backend “credentials” database. The details of how this might happen are very much application-specific, but the basic mechanism (i.e., manipulating session) is the same no matter what a specific webapp might want to do.
Are we now ready to restrict access to the /page1, /page2, and /page3 URLs?
Can We Now Restrict Access to URLs?
Jim: Hey, Frank...what are you stuck on?
Frank: I need to come up with a way to restrict access to the /page1, /page2, and /page3 URLs...
Joe: It can’t be that hard, can it? You’ve already got the code you need in the function that handles /status...
Frank: ...and it knows if a user’s browser is logged in or not, right?
Joe: Yeah, it does. So, all you have to do is copy and paste that checking code from the function that handles /status into each of the URLs you want to restrict, and then you’re home and dry!

Jim: Oh, man! Copy and paste...the web developer’s Achilles’ heel. You really don’t want to copy and paste code like that... it can only lead to problems down the road.
Frank: Of course! CS 101... I’ll create a function with the code from /status, then call that function as needed within the functions that handle the /page1, /page2, and /page3 URLs. Problem solved.
Joe: I like that idea...and I think it’ll work. (I knew there was a reason we sat through all those boring CS lectures.)
Jim: Hang on...not so fast. What you’re suggesting with a function is much better than your copy-and-paste idea, but I’m still not convinced it’s the best way to go here.
Frank and Joe (together, and incredulously): What’s not to like?!?!?
Jim: It bugs me that you’re planning to add code to the functions that handle the /page1, /page2, and /page3 URLs that has nothing to do with what those functions actually do. Granted, you need to check whether a user is logged in before granting access, but adding a function call to do this to every URL doesn’t sit quite right with me...
Frank: So what’s your big idea, then?
Jim: If it were me, I’d create, then use, a decorator.
Joe: Of course! That’s an even better idea. Let’s do that.
Copy-and-Paste Is Rarely a Good Idea
Let’s convince ourselves that the ideas suggested on the last page are not the best way to approach the problem at hand—namely, how best to restrict access to specific web pages.
The first suggestion was to copy and paste some of the code from the function that handles the /status URL (namely, the check_status function). Here’s the code in question:

Here’s what the page1 function currently looks like:

If we copy and paste the highlighted code from check_status into page1, the latter’s code would end up looking like this:

The above code works, but if you were to repeat this copy-and-paste activity for the /page2 and /page3 URLs (as well as any other URLs you were to add to your webapp), you’d quickly create a maintenance nightmare, especially when you consider all the edits you’d have to make should you decide to change how your login-checking code works (by, maybe, checking a submitted user ID and password against data stored in a database).
Put shared code into its own function
When you have code that you need to use in many different places, the classic solution to the maintenance problem inherent in any copy-and-paste “quick fix” is to put the shared code into a function, which is then invoked as needed.
As such a strategy solves the maintenance problem (as the shared code exists in only one place as opposed to being copied and pasted willy-nilly), let’s see what creating a login-checking function does for our webapp.
Creating a Function Helps, But...
Let’s create a new function called check_logged_in, which, when invoked, returns True if the user’s browser is currently logged in, and False otherwise.
It’s not a big job (most of the code is already in check_status); here’s how we’d write this new function:

With this function written, let’s use it in the page1 function instead of that copied and pasted code:

This strategy is a bit better than copy-and-paste, as you can now change how the login process works by making changes to the check_logged_in function. However, to use the check_logged_in function you still have to make similar changes to the page2 and page3 functions (as well as to any new URLs you create), and you do that by copying and pasting this new code from page1 into the other functions... In fact, if you compare what you did to the page1 function on this page with what you did to page1 on the last page, it’s roughly the same amount of work, and it’s still copy-and-paste! Additionally, with both of these “solutions,” the added code is obscuring what page1 actually does.
It would be nice if you could somehow check if the user’s browser is logged in without having to amend any of your existing function’s code (so as not to obscure anything). That way, the code in each of your webapp’s functions can remain directly related to what each function does, and the login status-checking code won’t get in the way. If only there was a way to do this?
As we learned from our three friendly developers—Frank, Joe, and Jim—a few pages back, Python includes a language feature that can help here, and it goes by the name decorator. A decorator allows you to augment an existing function with extra code, and it does this by letting you change the behavior of the existing function without having to change its code.
If you’re reading that last sentence and saying: “What?!?!?”, don’t worry: it does sound strange the first time you hear it. After all, how can you possibly change how a function works without changing the function’s code? Does it even make sense to try?
Let’s find out by learning about decorators.
You’ve Been Using Decorators All Along
You’ve been using decorators for as long as you’ve written webapps with Flask, which you started back in Chapter 5.
Here’s the earliest version of the hello_flask.py webapp from that chapter, which highlights the use of a decorator called @app.route, which comes with Flask. The @app.route decorator is applied to an existing function (hello in this code), and the decorator augments the function it precedes by arranging to call hello whenever the webapp processes the / URL. Decorators are easy to spot; they’re prefixed with the @ symbol:

Note how, as a user of the @app.route decorator, you have no idea how the decorator works its magic. All you’re concerned with is that the decorator does what it promises: links a given URL with a function. All of the nitty-gritty, behind- the-scenes details of how the decorator works are hidden from you.
When you decide to create a decorator, you need to peek under the covers and (much like when you created a context manager in the last chapter) hook into Python’s decorator machinery. There are four things that you need to know and understand to write a decorator:
How to create a function
How to pass a function as an argument to a function
How to return a function from a function
How to process any number and type of function arguments
You’ve been successfully creating and using your own functions since Chapter 4, which means this list of “four things to know” is really only three. Let’s take some time to work through items 2 through 4 from this list as we progress toward writing a decorator of our own.
Pass a Function to a Function
It’s been a while, but way back in Chapter 2 we introduced the notion that everything is an object in Python. Although it may sound counterintuitive, the “everything” includes functions, which means functions are objects, too.
Pass a function to a function. | |
Return a function from a function. | |
Process any number/type of arguments. |
Clearly, when you invoke a function, it runs. However, like everything else in Python, functions are objects, and have an object ID: think of functions as “function objects.”
Take a quick look at the short IDLE session below. A string is assigned to a variable called msg, and then its object ID is reported through a call to the id built-in function (BIF). A small function, called hello, is then defined. The hello function is then passed to the id BIF that reports the function’s object ID. The type BIF then confirms that msg is a string and hello is a function, and finally hello is invoked and prints the current value of msg on screen:

We were a little devious in not drawing your attention to this before we had you look at the above IDLE session, but...did you notice how we passed hello to the id and type BIFs? We didn’t invoke hello; we passed its name to each of the functions as an argument. In doing so, we passed a function to a function.
Functions can take a function as an argument
The calls to id and type above demonstrate that some of Python’s built-in functions accept a function as an argument (or to be more precise: a function object). What a function does with the argument is up to the function. Neither id nor type invokes the function, although it could have. Let’s see how that works.
Invoking a Passed Function
When a function object is passed as an argument to a function, the receiving function can invoke the passed-in function object.
Pass a function to a function. | |
Return a function from a function. | |
Process any number/type of arguments. |
Here’s a small function (called apply) that takes two arguments: a function object and a value. The apply function invokes the function object and passes the value to the invoked function as an argument, returning the results of invoking the function on the value to the calling code:
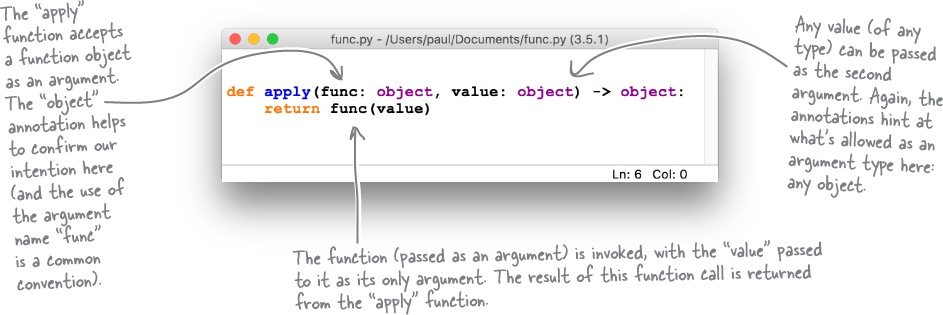
Note how apply’s annotations hint that it accepts any function object together with any value, then returns anything (which is all very generic). A quick test of apply at the >>> prompt confirms that apply works as expected:

If you’re reading this page and wondering when you’d ever need to do something like this, don’t fret: we’ll get to that when we write our decorator. For now, concentrate on understanding that it’s possible to pass a function object to a function, which the latter can then invoke.
Functions Can Be Nested Inside Functions
Usually, when you create a function, you take some existing code and make it reusable by giving it a name, and using the existing code as the function’s suite. This is the most common function use case. However, what sometimes comes as a surprise is that, in Python, the code in a function’s suite can be any code, including code that defines another function (often referred to as a nested or inner function). Even more surprising is that the nested function can be returned from the outer, enclosing function; in effect, what gets returned is a function object. Let’s look at a few examples that demonstrate these other, less common function use cases.
Pass a function to a function. | |
Return a function from a function. | |
Process any number/type of arguments. |
First up is an example that shows a function (called inner) nested inside another function (called outer). It is not possible to invoke inner from anywhere other than within outer’s suite, as inner is local in scope to outer:

When outer is invoked, it runs all the code in its suite: inner is defined, the call to the print BIF in outer is executed, and then the inner function is invoked (which calls the print BIF within inner). Here’s what appears on screen:

When would you ever use this?
Looking at this simple example, you might find it hard to think of a situation where creating a function inside another function would be useful. However, when a function is complex and contains many lines of code, abstracting some of the function’s code into a nested function often makes sense (and can make the enclosing function’s code easier to read).
A more common usage of this technique arranges for the enclosing function to return the nested function as its value, using the return statement. This is what allows you to create a decorator.
So, let’s see what happens when we return a function from a function.
Return a Function from a Function
Our second example is very similar to the first, but for the fact that the outer function no longer invokes inner, but instead returns it. Take a look at the code:
Pass a function to a function. | |
Return a function from a function. | |
Process any number/type of arguments. |

Let’s see what this new version of the outer function does, by returning to the IDLE shell and taking outer for a spin.
Note how we assign the result of invoking outer to a variable, called i in this example. We then use i as if it were a function object—first checking its type by invoking the type BIF, then invoking i as we would any other function (by appending parentheses). When we invoke i, the inner function executes. In effect, i is now an alias for the inner function as created inside outer:

So far, so good. You can now return a function from a function, as well as send a function to a function. You’re nearly ready to put all this together in your quest to create a decorator. There’s just one more thing you need to understand: creating a function that can handle any number and type of arguments. Let’s look at how to do this now.
Accepting a List of Arguments
Imagine you have a requirement to create a function (which we’ll call myfunc in this example) that can be called with any number of arguments. For example, you might call myfunc like this:
Pass a function to a function. | |
Return a function from a function. | |
Process any number/type of arguments. |

or you might call myfunc like this:

or you might call myfunc like this:

In fact, you might call myfunc with any number of arguments, with the proviso that you don’t know ahead of time how many arguments are going to be provided.
As it isn’t possible to define three distinct versions of myfunc to handle each of the three above invocations, the question becomes: is it possible to accept any number of arguments in a function?
Use * to accept an arbitrary list of arguments
Python provides a special notation that allows you to specify that a function can take any number of arguments (where “any number” means “zero or more”). This notation uses the * character to represent any number, and is combined with an argument name (by convention, args is used) to specify that a function can accept an arbitrary list of arguments (even though *args is technically a tuple).
Think of * as meaning “expand to a list of values.”
Here’s a version of myfunc that uses this notation to accept any number of arguments when invoked. If any arguments are provided, myfunc prints their values to the screen:

Processing a List of Arguments
Now that myfunc exists, let’s see if it can handle the example invocations from the last page, namely:
Pass a function to a function. | |
Return a function from a function. | |
Process any number/type of arguments. |
myfunc(10)
myfunc()
myfunc(10, 20, 30, 40, 50, 60, 70)
Here’s another IDLE session that confirms that myfunc is up to the task. No matter how many arguments we supply (including none), myfunc processes them accordingly:

* works on the way in, too
If you provide a list to myfunc as an argument, the list (despite potentially containing many values) is treated as one item (i.e., it’s one list). To instruct the interpreter to expand the list to behave as if each of the list’s items were an individual argument, prefix the list’s name with the * character when invoking the function.
Another short IDLE session demonstrates the difference using * can have:

Accepting a Dictionary of Arguments
When it comes to sending values into functions, it’s also possible to provide the names of the arguments together with their associated values, then rely on the interpreter to match things up accordingly.
Pass a function to a function. | |
Return a function from a function. | |
Process any number/type of arguments. |
You first saw this technique in Chapter 4 with the search4letters function, which—you may recall—expects two argument values, one for phrase and another for letters. When keyword arguments are used, the order in which the arguments are provided to the search4letters function doesn’t matter:

Like with lists, it’s also possible arrange for a function to accept an arbitrary number of keyword arguments—that is, keys with values assigned to them (as with phrase and letters in the above example).
Use ** to accept arbitrary keyword arguments
In addition to the * notation, Python also provides **, which expands to a collection of keyword arguments. Where * uses args as its variable name (by convention), ** uses kwargs, which is short for “keyword arguments.” (Note: you can use names other than args and kwargs within this context, but very few Python programmers do.)
Think of ** as meaning “expand to a dictionary of keys and values.”
Let’s look at another function, called myfunc2, which accepts any number of keyword arguments:

Processing a Dictionary of Arguments
The code within myfunc2’s suite takes the dictionary of arguments and processes them, displaying all the key/value pairings on a single line.
Pass a function to a function. | |
Return a function from a function. | |
Process any number/type of arguments. |
Here’s another IDLE session that demonstrates myfunc2 in action. No matter how many key/value pairings are provided (including none), myfunc2 does the right thing:

** works on the way in, too
You probably guessed this was coming, didn’t you? As with *args, when you use **kwargs it’s also possible to use ** when invoking the myfunc2 function. Rather than demonstrate how this works with myfunc2, we’re going to remind you of a prior usage of this technique from earlier in this book. Back in Chapter 7, when you learned how to use Python’s DB-API, you defined a dictionary of connection characteristics as follows:

When it came time to establish a connection to your waiting MySQL (or MariaDB) database server, you used the dbconfig dictionary as follows. Notice anything about the way the dbconfig argument is specified?

By prefixing the dbconfig argument with **, we tell the interpreter to treat the single dictionary as a collection of keys and their associated values. In effect, it’s as if you invoked connect with four individual keyword arguments, like this:
conn = mysql.connector.connect('host'='127.0.0.1', 'user'='vsearch',
                               'password'='vsearchpasswd', 'database'='vsearchlogDB')
Accepting Any Number and Type of Function Arguments
When creating your own functions, it’s neat that Python lets you accept a list of arguments (using *), in addition to any number of keyword arguments (using **). What’s even neater is that you can combine the two techniques, which lets you create a function that can accept any number and type of arguments.
Pass a function to a function. | |
Return a function from a function. | |
Process any number/type of arguments. |
Here’s a third version of myfunc (which goes by the shockingly imaginative name of myfunc3). This function accepts any list of arguments, any number of keyword arguments, or a combination of both:

This short IDLE session showcases myfunc3:

A Recipe for Creating a Function Decorator
Pass a function to a function. | |
Return a function from a function. | |
Process any number/type of arguments. |
With three items marked in the checklist on the right, you now have an understanding of the Python language features that allow you to create a decorator. All you need to know now is how you take these features and combine them to create the decorator you need.
Just like when you created your own context manager (in the last chapter), creating a decorator conforms to a set of rules or recipe. Recall that a decorator allows you to augment an existing function with extra code, without requiring you to change the existing function’s code (which, we’ll admit, still sounds freaky).
To create a function decorator, you need to know that:
A decorator is a function
In fact, as far as the interpreter is concerned, your decorator is just another function, albeit one that manipulates an existing function. Let’s refer to this existing function as the decorated function from here on in. Having made it this far in this book, you know that creating a function is easy: use Python’s
defkeyword.A decorator takes the decorated function as an argument
A decorator needs to accept the decorated function as an argument. To do this, you simply pass the decorated function as a function object to your decorator. Now that you’ve worked through the last 10 pages, you know that this too is easy: you arrive at a function object by referring to the function without parentheses (i.e., using just the function’s name).
A decorator returns a new function
A decorator returns a new function as its return value. Much like when
outerreturnedinner(a few pages back), your decorator is going to do something similar, except that the function it returns needs to invoke the decorated function. Doing this is—dare we say it?—easy but for one small complication, which is what Step 4 is all about.A decorator maintains the decorated function’s signature
A decorator needs to ensure that the function it returns takes the same number and type of arguments as expected by the decorated function. The number and type of any function’s arguments is known as its signature (as each function’s
defline is unique).
It’s time to grab a pencil and put this information to work creating your first decorator.
Recap: We Need to Restrict Access to Certain URLs

We’ve been working with the simple_webapp.py code, and we need our decorator to check to see whether the user’s browser is logged in or not. If it is logged in, restricted web pages are visible. If the browser isn’t logged in, the webapp should advise the user to log in prior to viewing any restricted pages. We’ll create a decorator to handle this logic. Recall the check_status function, which demonstrates the logic we want our decorator to mimic:

Creating a Function Decorator
To comply with item 1 in our list, you had to create a new function. Remember:
A decorator is a function
In fact, as far as the interpreter is concerned, your decorator is just another function, albeit one that manipulates an existing function. Let’s refer to this existing function as the decorated function from here on in. You know that creating a function is easy: use Python’s
defkeyword.
Complying with item 2 involves ensuring your decorator accepts a function object as an argument. Again, remember:
A decorator takes the decorated function as an argument
Your decorator needs to accept the decorated function as an argument. To do this, you simply pass the decorated function as a function object to your decorator. You arrive at a function object by referring to the function without parentheses (i.e., using the function’s name).
Let’s put your decorator in its own module (so that you can more easily reuse it). Begin by creating a new file called checker.py in your text editor.
You’re going to create a new decorator in checker.py called check_logged_in. In the space below, provide your decorator’s def line. Hint: use func as the name of your function object argument:

We decided to put your decorator in its own module (so that you can more easily reuse it).
You began by creating a new file called checker.py in your text editor.
Your new decorator (in checker.py) is called check_logged_in and, in the space below, you were to provide your decorator’s def line:

That’s almost too easy, isn’t it?
Remember: a decorator is just another function, which takes a function object as an argument (func in the above def line).
Let’s move on to the next item in our “create a decorator” recipe, which is a little more involved (but not by much). Recall what you need your decorator to do:
A decorator returns a new function
Your decorator returns a new function as its return value. Just like when
outerreturnedinner(a few pages back), your decorator is going to do something similar, except that the function it returns needs to invoke the decorated function.
Earlier in this chapter, you met the outer function, which, when invoked, returned the inner function. Here’s outer’s code once more:

Now that you’ve written your decorator’s def line, let’s add some code to its suite. You need to do four things here.
1. Define a nested function called wrapper that is returned by check_logged_in. (You could use any function name here, but, as you’ll see in a bit, wrapper is a pretty good choice.)
2. Within wrapper, add some of the code from your existing check_status function that implements one of two behaviors based on whether the user’s browser is logged in or not. To save you the page-flip, here’s the check_status code once more (with the important bits highlighted):
@app.route('/status')
def check_status() -> str:
    if 'logged_in' in session:
        return 'You are currently logged in.'
    return 'You are NOT logged in.'
3. As per item 3 of our decorator-creating recipe, you need to adjust the nested function’s code so that it invokes the decorated function (as opposed to returning the “You are currently logged in” message).
4. With the nested function written, you need to return its function object from check_logged_in.
Add the required code to check_logged_in’s suite in the spaces provided below:

With your decorator’s def line written, you were to add some code to its suite. You needed to do four things:
1. Define a nested function called wrapper that is returned by check_logged_in.
2. Within wrapper, add some of the code from your existing check_status function that implements one of two behaviors based on whether the user’s browser is logged in or not.
3. As per item 3 of our decorator-creating recipe, adjust the nested function’s code so that it invokes the decorated function (as opposed to returning the “You are currently logged in” message).
4. With the nested function written, return its function object from check_logged_in.
You were to add the required code to check_logged_in’s suite in the spaces provided:

Can you see why the nested function is called “wrapper”?
If you take a moment to study the decorator’s code (so far), you’ll see that the nested function not only invokes the decorated function (stored in func), but also augments it by wrapping extra code around the call. In this case, the extra code is checking to see if the logged_in key exists within your webapp’s session. Critically, if the user’s browser is not logged in, the decorated function is never invoked by wrapper.
The Final Step: Handling Arguments
We are nearly there—the “guts” of the decorator’s code is in place. What remains is to ensure the decorator handles the decorated function’s arguments properly, no matter what they might be. Recall item 4 from the recipe:
A decorator maintains the decorated function’s signature
Your decorator needs to ensure that the function it returns takes the same number and type of arguments as expected by the decorated function.
When a decorator is applied to an existing function, any calls to the existing function are replaced by calls to the function returned by the decorator. As you saw in the solution on the previous page, to comply with item 3 of our decorator-creation recipe, we return a wrapped version of the existing function, which implements extra code as needed. This wrapped version decorates the existing function.
But there’s a problem with this, as doing the wrapping on its own is not enough; the calling characteristics of the decorated function need to be maintained, too. This means, for instance, that if your existing function accepts two arguments, your wrapped function also has to accept two arguments. If you could know ahead of time how many arguments to expect, then you could plan accordingly. Unfortunately, you can’t know this ahead of time because your decorator can be applied to any existing function, which could have—quite literally—any number and type of arguments.
Remember: *args and **kwargs support any number and type of arguments.
What to do? The solution is to go “generic,” and arrange for the wrapper function to support any number and type of arguments. You already know how to do this, as you’ve already seen what *args and **kwargs can do.
Let’s adjust the wrapper function to accept any number and type of arguments. Let’s also ensure that when func is invoked, it uses the same number and type of arguments as were passed to wrapper. Add in the argument code in the spaces provided below:

You were to adjust the wrapper function to accept any number and type of arguments, as well as ensure that, when func is invoked, it uses the same number and type of arguments as were passed to wrapper:

We’re done...or are we?
If you check our decorator-creating recipe, you’d be forgiven for believing that we’re done. We are...almost. There are two issues that we still need to deal with: one has to do with all decorators, whereas the other has to do with this specific one.
Let’s get the specific issue out of the way first. As the check_logged_in decorator is in its own module, we need to ensure that any modules its code refers to are also imported into checker.py. The check_logged_in decorator uses session, which has to be imported from Flask to avoid errors. Handling this is straightforward, as all you need to do is add this import statement to the top of checker.py:
from flask import sessionThe other issue, which affects all decorators, has to do with how functions identify themselves to the interpreter. When decorated, and if due care is not taken, a function can forget its identity, which can lead to problems. The reason why this happens is very technical and a little exotic, and it requires a knowledge of Python’s internals that most people don’t need (or want) to know. Consequently, Python’s standard library comes with a module that handles these details for you (so you need never worry about them). All you have to do is remember to import the required module (functools), then call a single function (wraps).
When creating your own decorators, always import, then use, the “functools” module’s “wraps” function.
Perhaps somewhat ironically, the wraps function is implemented as a decorator, so you don’t actually call it, but rather use it to decorate your wrapper function inside your own decorator. We’ve already gone ahead and done this for you, and you’ll find the code to the completed check_logged_in decorator at the top of the next page.
Your Decorator in All Its Glory
Before continuing, make sure your decorator code exactly matches ours:

Now that the checker.py module contains a completed check_logged_in function, let’s put it to use within simple_webapp.py. Here is the current version of the code to this webapp (which we’re showing here over two columns):
from flask import Flask, session

app = Flask(__name__)

@app.route('/')
def hello() -> str:
    return 'Hello from the simple webapp.'

@app.route('/page1')
def page1() -> str:
    return 'This is page 1.'

@app.route('/page2')
def page2() -> str:
    return 'This is page 2.'

@app.route('/page3')
def page3() -> str:
    return 'This is page 3.'

@app.route('/login')
def do_login() -> str:
    session['logged_in'] = True
    return 'You are now logged in.'

@app.route('/logout')
def do_logout() -> str:
    session.pop('logged_in')
    return 'You are now logged out.'

@app.route('/status')
def check_status() -> str:
    if 'logged_in' in session:
       return 'You are currently logged in.'
    return 'You are NOT logged in.'

app.secret_key = 'YouWillNeverGuess...'

if __name__ == '__main__':
app.run(debug=True)Putting Your Decorator to Work
Adjusting the simple_webapp.py code to use the check_logged_in decorator is not difficult. Here’s a list of what needs to happen:
Import the decorator
The
check_logged_indecorator needs to be imported from thechecker.pymodule. Adding the requiredimportstatement to the top of our webapp’s code does the trick here.Remove any unnecessary code
Now that the
check_logged_indecorator exists, we no longer have any need for thecheck_statusfunction, so it can be removed fromsimple_webapp.py.Use the decorator as required
To use the
check_logged_indecorator, apply it to any of our webapp’s functions using the@syntax.
Here’s the code to simple_webapp.py once more, with the three changes listed above applied. Note how the /page1, /page2, and /page3 URLs now have two decorators associated with them: @app.route (which comes with Flask), and @check_logged_in (which you’ve just created):

To convince ourselves that our login-checking decorator is working as required, let’s take the decorator-enabled version of simple_webapp.py for a spin.
With the webapp running, use a browser to try to access /page1 prior to logging in. After logging in, try to access /page1 again and then, after logging out, try to access the restricted content once more. Let’s see what happens:

The Beauty of Decorators
Take another look at the code for your check_logged_in decorator. Note how it abstracts the logic used to check if a user’s browser is logged in, putting this (potentially complex) code in one place—inside the decorator—and then making it available throughout your code, thanks to the @check_logged_in decorator syntax:

Abstracting code in a decorator makes the code that uses it easier to read. Consider this usage of our decorator on the /page2 URL:

Note how the page2 function’s code is only concerned with what it needs to do: display the /page2 content. In this example, the page2 code is a single, simple statement; it would be harder to read and understand if it also contained the logic required to check whether a user’s browser is logged in or not. Using a decorator to separate out the login-checking code is a big win.
Decorators aren’t freaky; they’re fun.
This “logic abstraction” is one of the reasons the use of decorators is popular in Python. Another is that, if you think about it, in creating the check_logged_in decorator, you’ve managed to write code that augments an existing function with extra code, by changing the behavior of the existing function without changing its code. When it was first introduced earlier in this chapter, this idea was described as “freaky.” But, now that you’ve done it, there’s really nothing to it, is there?
Creating More Decorators
With the process of creating the check_logged_in decorator behind you, you can use its code as the basis of any new decorators you create from here on in.
To make your life easier, here’s a generic code template (in the file tmpl_decorator.py) that you can use as the basis of any new decorators you write:

This code template can be adjusted as needed to suit your needs. All you need to do is give your new decorator an appropriate name, then replace the three comments in the template with your decorator’s specific code.
If it makes sense for your new decorator to invoke the decorated function without returning its results, that’s fine. After all, what you put in your wrapper function is your code, and you are free to do whatever you want to.
Back to Restricting Access to /viewlog

Now that you’ve created a mechanism that lets you restrict access to certain URLs in simple_webapp.py, it’s a no-brainer to apply the same mechanism to any other webapp.
This includes vsearch4web.py, where you had a requirement to restrict access to the /viewlog URL. All you need to do is copy the do_login and do_logout functions from simple_webapp.py into vsearch4web.py, import the checker.py module, and then decorate the view_the_log function with check_logged_in. Granted, you may want to add some sophistication to do_login and do_logout (by, perhaps, checking user credentials against those stored in a database), but—as regards restricting access to certain URLs—the check_logged_in decorator does most of the heavy lifting for you.
What’s Next?
Rather than spend a bunch of pages doing to vsearch4web.py what you’ve just spent a chunk of time doing to simple_webapp.py, we’re going to leave adjusting vsearch4web.py for you to do on your own. At the start of the next chapter, we’ll present an updated version of the vsearch4web.py webapp for you to compare with yours, as our updated code is used to frame the discussion in the next chapter.
To date, all of the code in this book has been written under the assumption that nothing bad ever happens, and nothing ever goes wrong. This was a deliberate strategy on our part, as we wanted to ensure you had a good grasp of Python before getting into topics such as error correction, error avoidance, error detection, exception handling, and the like.
We have now reached the point where we can no longer follow this strategy. The environments within which our code runs are real, and things can (and do) go wrong. Some things are fixable (or avoidable), and some aren’t. If at all possible, you’ll want your code to handle most error situations, only resulting in a crash when something truly exceptional happens that is beyond your control. In the next chapter, we look at various strategies for deciding what’s a reasonable thing to do when stuff goes wrong.
Prior to that, though, here’s a quick review of this chapter’s key points.

When you need to store server-side state within a Flask webapp, use the
sessiondictionary (and don’t forget to set a hard-to-guesssecret_key).You can pass a function as an argument to another function. Using the function’s name (without the parentheses) gives you a function object, which can be manipulated like any other variable.
When you use a function object as an argument to a function, you can have the receiving function invoke the passed-in function object by appending parentheses.
A function can be nested inside an enclosing function’s suite (and is only visible within the enclosing scope).
In addition to accepting a function object as an argument, functions can return a nested function as a return value.
*argsis shorthand for “expand to a list of items.”**kwargsis shorthand for “expand to a dictionary of keys and values.” When you see “kw,” think “keywords.”Both
*and**can also be used “on the way in,” in that a list or keyword collection can be passed into a function as a single (expandable) argument.Using (
*args,**kwargs) as a function signature lets you create functions that accept any number and type of arguments.Using the new function features from this chapter, you learned how to create a function decorator, which changes the behavior of an existing function without the need to change the function’s actual code. This sounds freaky, but is quite a bit of fun (and is very useful, too).

