Appendix A. Installation: Installing Python

First things first: let’s get Python installed on your computer.
Whether you’re running on Windows, Mac OS X, or Linux, Python’s got you covered. How you install it on each of these platforms is specific to how things work on each of these operating systems (we know...a shocker, eh?), and the Python community works hard to provide installers that target all the popular systems. In this short appendix, you’ll be guided through installing Python on your computer.
Install Python 3 on Windows
Unless you (or someone else) has installed the Python interpreter onto your Windows PC, it is unlikely to be preinstalled. Even if it is, let’s install the latest and greatest version of Python 3 into your Windows computer now.
If you already have a version of Python 3 installed, it’ll be upgraded. If you have Python 2 installed, Python 3 will install alongside it (but won’t interfere with your Python 2 in any way). And if you don’t have any version of Python yet, well, you soon will!
Download, then install
Point your browser to www.python.org, and then click the Downloads tab.
Two large buttons will appear, offering the choice of the latest version of Python 3 or Python 2. Click on the Python 3 button. Go ahead and save the file for download when prompted. After a little while, the download will complete. Locate the downloaded file in your Downloads folder (or wherever you saved it), then double-click on the file to start the install.
A standard Windows installation process begins. By and large, you can click on Next at each of the prompts, except for this one (shown below), where you’ll want to pause to make a configuration change to ensure Add Python 3.5 to Path is selected; this ensures Windows can find the interpreter whenever it needs to:

Check Python 3 on Windows
Now that the Python interpreter is installed on your Windows machine, let’s run a few checks to confirm all is OK.
For starters, you should have a new group on your Start menu under All Programs. We’ve included what it looks like on one of the Head First Labs’ Windows 7 machines. Yours should look similar. If it doesn’t, you may need to redo the installation. Windows 8 users (or higher) should also have a new group similar to this.
Let’s examine the items in the Python 3.5 group from the bottom up.

The Python 3.5 Modules Docs option provides access to all of the documentation included with all of the installed modules that are available within your Python system. You’ll be learning lots about modules as you work through this book, so you don’t need to worry about doing anything with this option right now.
The Python 3.5 Manuals option opens the entire set of Python language documentation in the standard Windows help utility. This material is a copy of the Python 3 documentation available on the Web.
The Python 3.5 option fires up a text-based interactive command prompt, >>>, which is used to experiment with code as you write it. We’ll have more to say about the >>> prompt starting from Chapter 1. If you have clicked on this option to try it out and are now at a loss as to what to do, type quit() to escape back to Windows.
The final option, IDLE (Python 3.5), runs the Python integrated development environment, which is called IDLE. This is a very simple IDE that provides access to Python’s >>> prompt, a passable text editor, the Python debugger, and the Python documentation. We’ll be using IDLE a lot in this book, starting in Chapter 1.
It’s Python 3 on Windows, sort of...
Python’s heritage is on Unix and Unix-like systems, and this can sometimes come through when you’re working in Windows. For instance, some software that is assumed to exist by Python isn’t always available by default on Windows, so to get the most out of Python, programmers on Windows often have to install a few extra bits and pieces. Let’s take a moment to install one such bonus piece to demonstrate how these missing bits can be added when needed.
Add to Python 3 on Windows
Sometimes programmers using the Windows version of Python feel like they are being short-changed: some of the features assumed (by Python) on those other platforms are “missing” from Windows.
Thankfully, some enterprising programmers have written third-party modules that can be installed into Python, thus providing the missing functionality. Installing any of these modules involves only a little bit of work at the Windows command prompt.
Geek Bits

The readline library implements a set of functions that provide interactive text- editing facilities (typically at command lines). The pyreadline module provides a Python interface to readline.
As an example, let’s add Python’s implementation of the popular readline functionality to your Windows version of Python. The pyreadline module provides a Python version of readline, effectively plugging this particular hole in any default Windows installation.
Open up a Windows command prompt and follow along. Here, we’re going to use a software installation tool (included in Python 3.5) to install the pyreadline module. The tool is called pip, short for “Python Index Project,” named after the work that spawned pip’s creation.
At the Windows command prompt, type pip install pyreadline:

And with that, pyreadline is installed and ready to go on Windows.
You can now flip back to Chapter 1 to get started with some sample Python code.
Install Python 3 on Mac OS X (macOS)
Python 2 comes preinstalled on Mac OS X by default. But this is no use to us, as we want to use Python 3 instead. Thankfully, when you visit the Python website (http://www.python.org), it is smart enough to work out that you’re using a Mac. Hover your mouse over the Download tab, then click the 3.5.x button to download the Mac installer for Python. Select the latest version of Python 3, download its package, and then install in the usual “Mac way.”

Using a package manager
On Macs, it is also possible to use one of the popular open source package managers, namely Homebrew or MacPorts. If you have never used either of these package managers, feel free to skip this little section and jump over to the top of the next page. If, however, you are already using either of these package managers, here are the commands you need to install Python 3 on your Mac from inside a terminal window:
On Homebrew, type
brew install python3.On MacPorts type
port install python3.
And that’s it: you’re golden. Python 3 is ready for action on Mac OS X—let’s take a look at what gets installed.
Check and Configure Python 3 on Mac OS X
To see if the install succeeded on Mac OS X, click on the Applications icon on your dock, then look for the Python 3 folder.
Click on the Python 3 folder and you’ll see a bunch of icons (below).
The Python 3 folder on Mac OS X
The first option, IDLE, is by far the most useful, and it is how you will interact with Python 3 most of the time while learning the language. Choosing this option opens Python’s integrated development environment called IDLE. This is a very simple IDE that provides access to Python’s >>> interactive prompt, a passable text editor, the Python debugger, and the Python documentation. We’ll be using IDLE a lot in this book.

The Python Documentation.html option opens a local copy of Python’s entire documentation in HTML within your default browser (without requiring you to be online).
The Python Launcher option is automatically run by Mac OS X whenever you double-click on an executable file containing Python code. Although this may be useful for some, at Head First Labs we rarely use it, but it’s still nice to know it’s there if we ever do need it.
The last option, Update Shell Profile.command, updates the configuration files on Mac OS X to ensure the location of the Python interpreter and its associated utilities are correctly added to your operating system’s path. You can click on this option now to run this command, then forget about ever having to run it again—once is enough.
You’re ready to run on Mac OS X
And with that, you’re all set on Mac OS X.
You can now skip back to Chapter 1 and get started.
Install Python 3 on Linux
If you are running a recent distribution of your favorite Linux, the really great news is that you most likely have Python 2 and Python 3 already installed.
Here’s a quick way to ask the Python interpreter to fess up its currently installed version number; open up a command line and type:
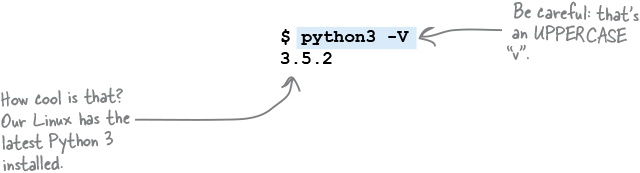
If, after you issue this command, Linux complains that it can’t find python3, you need to install a copy. How you do this depends on the Linux distribution you are running.
If your Linux is one based on the popular Debian or Ubuntu distribution (as is the one we use at Head First Labs), you can use the apt-get utility to install Python 3. Here’s the command to use:
$ sudo apt-get install python3 idle3If you are running a yum-based or rpm-based distribution, use the equivalent command for those systems. Or fire up your favorite Linux GUI and use your distribution’s GUI-based package manager to select python3 and idle3 for installation. On many Linux systems, the Synaptic Package Manager is a popular choice here, as are any number of GUI-based software installers.
After installing Python 3, use the command from the top of this page to check that all is OK.
Be sure to select the “python3” and “idle3” packages for installation on Linux.
No matter which distribution you use, the python3 command gives you access to the Python interpreter at the command line, whereas the idle3 command gives you access to the GUI-based integrated development environment called IDLE. This is a very simple IDE that provides access to Python’s >>> interactive prompt, a passable text editor, the Python debugger, and the Python documentation.
We’ll be using the >>> prompt and IDLE a lot in this book, starting in Chapter 1, which you can flip back to now.