Chapter 2. List Data: Working with Ordered Data

All programs process data, and Python programs are no exception.
In fact, take a look around: data is everywhere. A lot of, if not most, programming is all about data: acquiring data, processing data, understanding data. To work with data effectively, you need somewhere to put your data when processing it. Python shines in this regard, thanks (in no small part) to its inclusion of a handful of widely applicable data structures: lists, dictionaries, tuples, and sets. In this chapter, we’ll preview all four, before spending the majority of this chapter digging deeper into lists (and we’ll deep-dive into the other three in the next chapter). We’re covering these data structures early, as most of what you’ll likely do with Python will revolve around working with data.
Numbers, Strings...and Objects
Working with a single data value in Python works just like you’d expect it to. Assign a value to a variable, and you’re all set. With help from the shell, let’s look at some examples to recall what we learned in the last chapter.
Numbers
Let’s assume that this example has already imported the random module. We then call the random.randint function to generate a random number between 1 and 60, which is then assigned to the wait_time variable. As the generated number is an integer, that’s what type wait_time is in this instance:
>>> wait_time = random.randint(1, 60)
>>> wait_time
26
Note how you didn’t have to tell the interpreter that wait_time is going to contain an integer. We assigned an integer to the variable, and the interpreter took care of the details (note: not all programming languages work this way).
A variable takes on the type of the value assigned.
Strings
If you assign a string to a variable, the same thing happens: the interpreter takes care of the details. Again, we do not need to declare ahead of time that the word variable in this example is going to contain a string:
>>> word = "bottles"
>>> word
'bottles'
This ability to dynamically assign a value to a variable is central to Python’s notion of variables and type. In fact, things are more general than this in that you can assign anything to a variable in Python.
Everything is an object in Python, and any object can be assigned to a variable.
Objects
In Python everything is an object. The means that numbers, strings, functions, modules—everything—is an object. A direct consequence of this is that all objects can be assigned to variables. This has some interesting ramifications, which we’ll start learning about on the next page.
“Everything Is an Object”
Any object can be dynamically assigned to any variable in Python. Which begs the question: what’s an object in Python? The answer: everything is an object.
All data values in Python are objects, even though—on the face of things—“Don’t panic!” is a string and 42 is a number. To Python programmers, “Don’t panic!” is a string object and 42 is a number object. Like in other programming languages, objects can have state (attributes or values) and behavior (methods).

Sort of.
You can certainly program Python in an object-oriented way using classes, objects, instances, and so on (more on all of this later in this book), but you don’t have to. Recall the programs from the last chapter...none of them needed classes. Those programs just contained code, and they worked fine.
Unlike some other programming languages (most notably, Java), you do not need to start with a class when first creating code in Python: you just write the code you need.
Now, having said all that (and just to keep you on your toes), everything in Python behaves as if it is an object derived from some class. In this way, you can think of Python as being more object-based as opposed to purely object-oriented, which means that object-oriented programming is optional in Python.
But...what does all this actually mean?
As everything is an object in Python, any “thing” can be assigned to any variable, and variables can be assigned anything (regardless of what the thing is: a number, a string, a function, a widget...any object). Tuck this away in the back of your brain for now; we’ll return to this theme many times throughout this book.
There’s really not a lot more to storing single data values in variables. Let’s now take a look at Python’s built-in support for storing a collection of values.
Meet the Four Built-in Data Structures
Python comes with four built-in data structures that you can use to hold any collection of objects, and they are list, tuple, dictionary, and set.
Note that by “built-in” we mean that lists, tuples, dictionaries, and sets are always available to your code and they do not need to be imported prior to use: each of these data structures is part of the language.
Over the next few pages, we present an overview of all four of these built-in data structures. You may be tempted to skip over this overview, but please don’t.
If you think you have a pretty good idea what a list is, think again. Python’s list is more similar to what you might think of as an array, as opposed to a linked-list, which is what often comes to mind when programmers hear the word “list.” (If you’re lucky enough not to know what a linked-list is, sit back and be thankful).
Python’s list is the first of two ordered-collection data structures:
List: an ordered mutable collection of objects
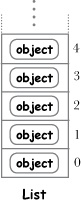
A list in Python is very similar to the notion of an array in other programming languages, in that you can think of a list as being an indexed collection of related objects, with each slot in the list numbered from zero upward.
Unlike arrays in a lot of other programming languages, though, lists are dynamic in Python, in that they can grow (and shrink) on demand. There is no need to predeclare the size of a list prior to using it to store any objects.
Lists are also heterogeneous, in that you do not need to predeclare the type of the object you’re storing—you can mix’n’match objects of different types in the one list if you like.
Lists are mutable, in that you can change a list at any time by adding, removing, or changing objects.
A list is like an array—the objects it stores are ordered sequentially in slots.

Ordered Collections Are Mutable/Immutable
Python’s list is an example of a mutable data structure, in that it can change (or mutate) at runtime. You can grow and shrink a list by adding and removing objects as needed. It’s also possible to change any object stored in any slot. We’ll have lots more to say about lists in a few pages’ time as the remainder of this chapter is devoted to providing a comprehensive introduction to using lists.
When an ordered list-like collection is immutable (that is, it cannot change), it’s called a tuple:
Tuple: an ordered immutable collection of objects
A tuple is an immutable list. This means that once you assign objects to a tuple, the tuple cannot be changed under any circumstance.
It is often useful to think of a tuple as a constant list.
Most new Python programmers scratch their head in bemusement when they first encounter tuples, as it can be hard to work out their purpose. After all, what use is a list that cannot change? It turns out that there are plenty of use cases where you’ll want to ensure that your objects can’t be changed by your (or anyone else’s) code. We’ll return to tuples in the next chapter (as well as later in this book) when we talk about them in a bit more detail, as well as use them.

A tuple is an immutable list.
Lists and tuples are great when you want to present data in an ordered way (such as a list of destinations on a travel itinerary, where the order of destinations is important). But sometimes the order in which you present the data isn’t important. For instance, you might want to store some user’s details (such as their id and password), but you may not care in what order they’re stored (just that they are). With data like this, an alternative to Python’s list/tuple is needed.
An Unordered Data Structure: Dictionary
If keeping your data in a specific order isn’t important to you, but structure is, Python comes with a choice of two unordered data structures: dictionary and set. Let’s look at each in turn, starting with Python’s dictionary.
Dictionary: an unordered set of key/value pairs
Depending on your programming background, you may already know what a dictionary is, but you may know it by another name, such as associative array, map, symbol table, or hash.
Like those other data structures in those other languages, Python’s dictionary allows you to store a collection of key/value pairs. Each unique key has a value associated with it in the dictionary, and dictionaries can have any number of pairs. The values associated with a key can be any object (of any type).
Dictionaries are unordered and mutable. It can be useful to think of Python’s dictionary as a two-columned, multirow data structure. Like lists, dictionaries can grow (and shrink) on demand.

A dictionary stores key/value pairs.
Something to watch out for when using a dictionary is that you cannot rely upon the internal ordering used by the interpreter. Specifically, the order in which you add key/value pairs to a dictionary is not maintained by the interpreter, and has no meaning (to Python). This can stump programmers when they first encounter it, so we’re making you aware of it now so that when we meet it again—and in detail—in the next chapter, you’ll get less of a shock. Rest assured: it is possible to display your dictionary data in a specific order if need be, and we’ll show you how to do that in the next chapter, too.

A Data Structure That Avoids Duplicates: Set
The final built-in data structure is the set, which is great to have at hand when you want to remove duplicates quickly from any other collection. And don’t worry if the mention of sets has you recalling high school math class and breaking out in a cold sweat. Python’s implementation of sets can be used in lots of places.
Set: an unordered set of unique objects
In Python, a set is a handy data structure for remembering a collection of related objects while ensuring none of the objects are duplicated.
The fact that sets let you perform unions, intersections, and differences is an added bonus (especially if you are a math type who loves set theory).
Sets, like lists and dictionaries, can grow (and shrink) as needed. Like dictionaries, sets are unordered, so you cannot make assumptions about the order of the objects in your set. As with tuples and dictionaries, you’ll get to see sets in action in the next chapter.

A set does not allow duplicate objects.
The 80/20 data structure rule of thumb
The four built-in data structures are useful, but they don’t cover every possible data need. However, they do cover a lot of them. It’s the usual story with technologies designed to be generally useful: about 80% of what you need to do is covered, while the other, highly specific, 20% requires you to do more work. Later in this book, you’ll learn how to extend Python to support any bespoke data requirements you may have. However, for now, in the remainder of this chapter and the next, we’re going to concentrate on the 80% of your data needs.
The rest of this chapter is dedicated to exploring how to work with the first of our four built-in data structures: the list. We’ll get to know the remaining three data structures, dictionary, set, and tuple, in the next chapter.
A List Is an Ordered Collection of Objects
When you have a bunch of related objects and you need to put them somewhere in your code, think list. For instance, imagine you have a month’s worth of daily temperature readings; storing these readings in a list makes perfect sense.

Whereas arrays tend to be homogeneous affairs in other programming languages, in that you can have an array of integers, or an array of strings, or an array of temperature readings, Python’s list is less restrictive. You can have a list of objects, and each object can be of a differing type. In addition to being heterogeneous, lists are dynamic: they can grow and shrink as needed.
Before learning how to work with lists, let’s spend some time learning how to spot lists in Python code.
How to spot a list in code
Lists are always enclosed in square brackets, and the objects contained within the list are always separated by a comma.
Recall the odds list from the last chapter, which contained the odd numbers from 0 through 60, as follows:

When a list is created where the objects are assigned to a new list directly in your code (as shown above), Python programmers refer to this as a literal list, in that the list is created and populated in one go.
Lists can be created literally or “grown” in code.
The other way to create and populate a list is to “grow” the list in code, appending objects to the list as the code executes. We’ll see an example of this method later in this chapter.
Let’s look at some literal list examples.
Creating Lists Literally
Our first example creates an empty list by assigning [] to a variable called prices:


Here’s a list of temperatures in degrees Fahrenheit, which is a list of floats:

How about a list of the most famous words in computer programming? Here they are:

Here’s a list of car details. Note how it is OK to store data of mixed types in a list. Recall that a list is “a collection of related objects.” The two strings, one float, and one integer in this example are all Python objects, so they can be stored in a list if needed:

Our two final examples of literal lists exploit the fact that—as in the last example—everything is an object in Python. Like strings, floats, and integers, lists are objects, too. Here’s an example of a list of list objects:
And here’s an example of a literal list of literal lists:

Putting Lists to Work
The literal lists on the last page demonstrate how quickly lists can be created and populated in code. Type in the data, and you’re off and running.
In a page or two, we’ll cover the mechanism that allows you to grow (or shrink) a list while your program executes. After all, there are many situations where you don’t know ahead of time what data you need to store, nor how many objects you’re going to need. In this case, your code has to grow (or “generate”) the list as needed. You’ll learn how to do that in a few pages’ time.
For now, imagine you have a requirement to determine whether a given word contains any of the vowels (that is, the letters a, e, i, o, or u). Can we use Python’s list to help code up a solution to this problem? Let’s see whether we can come up with a solution by experimenting at the shell.
Working with lists
We’ll use the shell to first define a list called vowels, then check to see if each letter in a word is in the vowels list. Let’s define a list of vowels:

With vowels defined, we now need a word to check, so let’s create a variable called word and set it to "Milliways":

Is one object inside another? Check with “in”
If you remember the programs from Chapter 1, you will recall that we used Python’s in operator to check for membership when we needed to ask whether one object was inside another. We can take advantage of in again here:

Let’s use this code as the basis for our working with lists.
Use Your Editor When Working on More Than a Few Lines of Code
In order to learn a bit more about how lists work, let’s take this code and extend it to display each found vowel only once. At the moment, the code displays each vowel more than once on output if the word being searched contains more than one instance of the vowel.

First, let’s copy and paste the code you’ve just typed from the shell into a new IDLE edit window (select File...→New File... from IDLE’s menu). We’re going to be making a series of changes to this code, so moving it into the editor makes perfect sense. As a general rule, when the code we’re experimenting with at the >>> prompt starts to run to more than a few lines, we find it more convenient to use the editor. Save your five lines of code as vowels.py.
When copying code from the shell into the editor, be careful not to include the >>> prompt in the copy, as your code won’t run if you do (the interpreter will throw a syntax error when it encounters >>>).
When you’ve copied your code and saved your file, your IDLE edit window should look like this:


“Growing” a List at Runtime
Our current program displays each found vowel on screen, including any duplicates found. In order to list each unique vowel found (and avoid displaying duplicates), we need to remember any unique vowels that we find, before displaying them on screen. To do this, we need to use a second data structure.

We can’t use the existing vowels list because it exists to let us quickly determine whether the letter we’re currently processing is a vowel. We need a second list that starts out empty, as we’re going to populate it at runtime with any vowels we find.
As we did in the last chapter, let’s experiment at the shell before making any changes to our program code. To create a new, empty list, decide on a new variable name, then assign an empty list to it. Let’s call our second list found. Here we assign an empty list ([]) to found, then use Python’s built-in function len to check how many objects are in a collection:

The “len” built-in function reports on the size of an object.
Lists come with a collection of built-in methods that you can use to manipulate the list’s objects. To invoke a method use the dot-notation syntax: postfix the list’s name with a dot and the method invocation. We’ll meet more methods later in this chapter. For now, let’s use the append method to add an object to the end of the empty list we just created:

Repeated calls to the append method add more objects onto the end of the list:

Lists come with a bunch of built-in methods.
Let’s now look at what’s involved in checking whether a list contains an object.
Checking for Membership with “in”
We already know how to do this. Recall the “Milliways” example from a few pages ago, as well as the odds.py code from the previous chapter, which checked to see whether a calculated minute value was in the odds list:


Is the object “in” or “not in”?
As well as using the in operator to check whether an object is contained within a collection, it is also possible to check whether an object does not exist within a collection using the not in operator combination.
Using not in allows you to append to an existing list only when you know that the object to be added isn’t already part of the list:


Good catch. A set might be better here.
But, we’re going to hold off on using a set until the next chapter. We’ll return to this example when we do. For now, concentrate on learning how a list can be generated at runtime with the append method.
It’s Time to Update Our Code
Now that we know about not in and append, we can change our code with some confidence. Here’s the original code from vowels.py again:


Save a copy of this code as vowels2.py so that we can make our changes to this new version while leaving the original code intact.
We need to add in the creation of an empty found list. Then we need some extra code to populate found at runtime. As we no longer display the found vowels as we find them, another for loop is required to process the letters in found, and this second for loop needs to execute after the first loop (note how the indentation of both loops is aligned below). The new code you need is highlighted:

Let’s make a final tweak to this code to change the line that sets word to “Milliways” to be more generic and more interactive.
Changing the line of code that reads:
word = "Milliways"
to:
word = input("Provide a word to search for vowels: ")instructs the interpreter to prompt your user for a word to search for vowels. The input function is another piece of built-in goodness provided by Python.

With the change at the bottom of the last page applied, and this latest version of your program saved as vowels3.py, let’s take this program for a few spins within IDLE. Remember: to run your program multiple times, you need to return to the IDLE edit window before pressing the F5 key.

Our output confirms that this small program is working as expected, and it even does the right thing when the word contains no vowels. How did you get on when you ran your program in IDLE?
Removing Objects from a List
Lists in Python are just like arrays in other languages, and then some.

The fact that lists can grow dynamically when more space is needed (thanks to the append method) is a huge productivity boon. Like a lot of other things in Python, the interpreter takes care of the details for you. If the list needs more memory, the interpreter dynamically allocates as much memory as needed. Likewise, when a list shrinks, the interpreter dynamically reclaims memory no longer needed by the list.
Other methods exist to help you manipulate lists. Over the next four pages we introduce four of the most useful methods: remove, pop, extend, and insert:
remove: takes an object’s value as its sole argument
The
removemethod removes the first occurrence of a specified data value from a list. If the data value is found in the list, the object that contains it is removed from the list (and the list shrinks in size by one). If the data value is not in the list, the interpreter will raise an error (more on this later):

Popping Objects Off a List
The remove method is great for when you know the value of the object you want to remove. But often it is the case that you want to remove an object from a specific index slot.

For this, Python provides the pop method:
pop: takes an optional index value as its argument
The
popmethod removes and returns an object from an existing list based on the object’s index value. If you invokepopwithout specifying an index value, the last object in the list is removed and returned. If you specify an index value, the object in that location is removed and returned. If a list is empty or you invokepopwith a nonexistent index value, the interpreter raises an error (more on this later).Objects returned by
popcan be assigned to a variable if you so wish, in which case they are retained. However, if the popped object is not assigned to a variable, its memory is reclaimed and the object disappears.

Extending a List with Objects
You already know that append can be used to add a single object to an existing list. Other methods can dynamically add data to a list, too:


Inserting an Object into a List
The append and extend methods get a lot of use, but they are restricted to adding objects onto the end (the righthand side) of an existing list. Sometimes, you’ll want to add to the beginning (the lefthand side) of a list. When this is the case, you’ll want to use the insert method.

insert: takes an index value and an object as its arguments
The
insertmethod inserts an object into an existing list before a specified index value. This lets you insert the object at the start of an existing list or anywhere within the list. It is not possible to insert at the end of the list, as that’s what theappendmethod does:

After all that removing, popping, extending, and inserting, we’ve ended up with the same list we started with a few pages ago: [1, 2, 3, 4].
Note how it’s also possible to use insert to add an object into any slot in an existing list. In the example above, we decided to add an object (the number 1) to the start of the list, but we could just as easily have used any slot number to insert into the list. Let’s look at one final example, which—just for fun—adds a string into the middle of the nums list, thanks to the use of the value 2 as the first argument to insert:

Let’s now gain some experience using these list methods.
What About Using Square Brackets?

Don’t worry, we’re going to get to that in a bit.
The familiar square bracket notation that you know and love from working with arrays in other programming languages does indeed work with Python’s lists. However, before we get around to discussing how, let’s have a bit of fun with some of the list methods that you now know about.

Before you do anything else, take the seven lines of code shown below and type them into a new IDLE edit window. Save the code as panic.py, and execute it (by pressing F5).
Study the messages that appear on screen. Note how the first four lines of code take a string (in phrase), and turn it into a list (in plist), before displaying both phrase and plist on screen.
The other three lines of code take plist and transform it back into a string (in new_phrase) before displaying plist and new_phrase on screen.
Your challenge is to transform the string "Don’t panic!" into the string "on tap" using only the list methods shown thus far in this book. (There’s no hidden meaning in the choice of these two strings: it’s merely a matter of the letters in “on tap” appearing in "Don’t panic!"). At the moment, panic. py displays "Don’t panic!" twice.
Hint: use a for loop when performing any operation multiple times.

It was time for a challenge.
Before you did anything else, you were to take the seven lines of code shown on the previous page and type them into a new IDLE edit window, save the code as panic.py, and execute it (by pressing F5).
Your challenge was to transform the string "Don’t panic!" into the string "on tap" using only the list methods shown thus far in this book. Before your changes, panic.py displayed “Don’t panic!” twice.
The new string (displaying “on tap”) is to be stored in the new_phrase variable.

As there’s a lot going on in this exercise solution, the next two pages explain this code in detail.
What Happened to “plist”?
Let’s pause to consider what actually happened to plist as the code in panic.py executed.

On the left of this page (and the next) is the code from panic.py, which, like every other Python program, is executed from top to bottom. On the right of this page is a visual representation of plist together with some notes about what’s happening. Note how plist dynamically shrinks and grows as the code executes:

We’ve been pausing for a moment to consider what actually happened to plist as the code in panic.py executed.

Based on the execution of the code from the last page, we now have a six-item list with the characters o, n, t, space, p, and a available to us. Let’s keep executing our code:

Lists: What We Know
We’re 20 pages in, so let’s take a little break and review what we’ve learned about lists so far:

Lists are great for storing a collection of related objects. If you have a bunch of similar things that you’d like to treat as one, a list is a great place to put them.
Lists are similar to arrays in other languages. However, unlike arrays in other languages (which tend to be fixed in size), Python’s lists can grow and shrink dynamically as needed.
In code, a list of objects is enclosed in square brackets, and the list objects are separated from each other by a comma.
An empty list is represented like this:
[].The fastest way to check whether an object is in a list is to use Python’s
inoperator, which checks for membership.Growing a list at runtime is possible due to the inclusion of a handful of list methods, which include
append,extend, andinsert.Shrinking a list at runtime is possible due to the inclusion of the
removeandpopmethods.

Yes. Care is always needed.
As working with and manipulating lists in Python is often very convenient, care needs to be taken to ensure the interpreter is doing exactly what you want it to.
A case in point is copying one list to another list. Are you copying the list, or are you copying the objects in the list? Depending on your answer and on what you are trying to do, the interpreter will behave differently. Flip the page to learn what we mean by this.
What Looks Like a Copy, But Isn’t
When it comes to copying an existing list to another one, it’s tempting to use the assignment operator:

So far, so good. That looks like it worked, as the five number objects from first have been copied to second:
Or, have they? Let’s see what happens when we append a new number to second, which seems like a reasonable thing to do, but leads to a problem:

Again, so far, so good—but there’s a bug here. Look what happens when we ask the shell to display the contents of first—the new object is appended to first too!

This is a problem, in that both first and second are pointing to the same data. If you change one list, the other changes, too. This is not good.
How to Copy a Data Structure
If using the assignment operator isn’t the way to copy one list to another, what is? What’s happening is that a reference to the list is shared among first and second.
To solve this problem, lists come with a copy method, which does the right thing. Take a look at how copy works:

With third created (thanks to the copy method), let’s append an object to it, then see what happens:
Don’t use the assignment operator to copy a list; use the “copy” method instead.

Square Brackets Are Everywhere

Python supports the square bracket notation, and then some.
Everyone who has used square brackets with an array in almost any other programming language knows that they can access the first value in an array called names using names[0]. The next value is in names[1], the next in names[2], and so on. Python works this way, too, when it comes to accessing objects in any list.
However, Python extends the notation to improve upon this standardized behavior by supporting negative index values (-1, -2, -3, and so on) as well as a notation to select a range of objects from a list.
Lists: Updating What We Already Know
Before we dive into a description of how Python extends the square bracket notation, let’s add to our list of bullet points:
Lists Extend the Square Bracket Notation
All our talk of Python’s lists being like arrays in other programming languages wasn’t just idle talk. Like other languages, Python starts counting from zero when it comes to numbering index locations, and uses the well-known square bracket notation to access objects in a list.

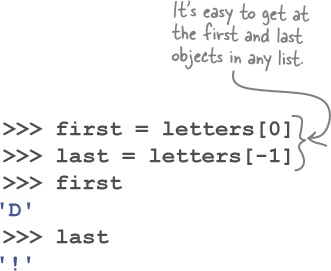
Unlike a lot of other programming languages, Python lets you access the list relative to each end: positive index values count from left to right, whereas negative index values count from right to left:

Let’s see some examples while working at the shell:

As lists grow and shrink while your Python code executes, being able to index into the list using a negative index value is often useful. For instance, using -1 as the index value is always guaranteed to return the last object in the list no matter how big the list is, just as using 0 always returns the first object.
Python’s extensions to the square bracket notation don’t stop with support for negative index values. Lists understand start, stop, and step, too.
Lists Understand Start, Stop, and Step
We first met start, stop, and step in the previous chapter when discussing the three-argument version of the range function:


Recall what start, stop, and step mean when it comes to specifying ranges (and let’s relate them to lists):
The START value lets you control WHERE the range begins.
When used with lists, the start value indicates the starting index value.
The STOP value lets you control WHEN the range ends.
When used with lists, the stop value indicates the index value to stop at, but not include.
The STEP value lets you control HOW the range is generated.
When used with lists, the step value refers to the stride to take.
You can put start, stop, and step inside square brackets
When used with lists, start, stop, and step are specified within the square brackets and are separated from one another by the colon (:) character:

It might seem somewhat counterintuitive, but all three values are optional when used together:
When start is missing, it has a default value of
0.When stop is missing, it takes on the maximum value allowable for the list.
When step is missing, it has a default value of
1.
List Slices in Action
Given the existing list letters from a few pages back, you can specify values for start, stop, and step in any number of ways.

Let’s look at some examples:

Using the start, stop, step slice notation with lists is very powerful (not to mention handy), and you are advised to take some time to understand how these examples work. Be sure to follow along at your >>> prompt, and feel free to experiment with this notation, too.
Starting and Stopping with Lists
Follow along with the examples on this page (and the next) at your >>> prompt and make sure you get the same output as we do.

We start by turning a string into a list of letters:

The newly created list (called booklist above) is then used to select a range of letters from within the list:

Be sure to take time to study this page (and the next) until you’re confident you understand how each example works, and be sure to try out each example within IDLE.
With the last example above, note how the interpreter is happy to use any of the default values for start, stop, and step.
Stepping with Lists
Here are two more examples, which show off the use of step with lists.

The first example selects all the letters, starting from the end of the list (that is, it is selecting in reverse), whereas the second selects every other letter in the list. Note how the step value controls this behavior:

Two final examples confirm that it is possible to start and stop anywhere within the list and select objects. When you do this, the returned data is referred to as a slice. Think of a slice as a fragment of an existing list.
Both of these examples select the letters from booklist that spell the word 'Hitchhiker'. The first selection is joined to show the word 'Hitchhiker', whereas the second displays 'Hitchhiker' in reverse:

A “slice” is a fragment of a list.
Slices are everywhere
The slice notation doesn’t just work with lists. In fact, you’ll find that you can slice any sequence in Python, accessing it with [start:stop:step].
Putting Slices to Work on Lists
Python’s slice notation is a useful extension to the square bracket notation, and it is used in many places throughout the language. You’ll see lots of uses of slices as you continue to work your way through this book.

For now, let’s see Python’s square bracket notation (including the use of slices) in action. We are going to take the panic.py program from earlier and refactor it to use the square bracket notation and slices to achieve what was previously accomplished with list methods.
Before doing the actual work, here’s a quick reminder of what panic.py does.
Converting “Don’t panic!” to “on tap”
This code transforms one string into another by manipulating an existing list using the list methods. Starting with the string "Don’t panic!", this code produced "on tap" after the manipulations:

Here’s the output produced by this program when it runs within IDLE:

Putting Slices to Work on Lists, Continued
It’s time for the actual work. Here’s the panic.py code again, with the code you need to change highlighted:


For this exercise, replace the highlighted code above with new code that takes advantage of Python’s square bracket notation. Note that you can still use list methods where it makes sense. As before, you’re trying to transform "Don’t panic!" into "on tap". Add your code in the space provided and call your new program panic2.py:
  phrase = "Don't panic!"
  plist = list(phrase)
  print(phrase)
  print(plist)
............................................................................................

............................................................................................

............................................................................................

............................................................................................

............................................................................................
  print(plist)
  print(new_phrase)
For this exercise, you were to replace the highlighted code on the previous page with new code that takes advantage of Python’s square bracket notation. Note that you can still use list methods where it makes sense. As before, you’re trying to transform "Don’t panic!" into "on tap". You were to call your new program panic2.py:


That’s a great question.
Some programmers will look at the code in panic2.py and, when comparing it to the code in panic.py, conclude that two lines of code is always better than seven, especially when the output from both programs is the same. Which is a fine measurement of “betterness,” but not really useful in this case.
To see what we mean by this, let’s take a look at the output produced by both programs.

Which Is Better? It Depends...
We executed both panic.py and panic2.py in IDLE to help us determine which of these two programs is “better.”
Take a look at the second-to-last line of output from both programs:

Although both programs conclude by displaying the string "on tap" (having first started with the string "Don’t panic!"), panic2.py does not change plist in any way, whereas panic.py does.
It is worth pausing for a moment to consider this.
Recall our discussion from earlier in this chapter called “What happened to ‘plist’?”. That discussion detailed the steps that converted this list:

into this much shorter list:

All those list manipulations using the pop, remove, extend, and insert methods changed the list, which is fine, as that’s primarily what the list methods are designed to do: change the list. But what about panic2.py?
Slicing a List Is Nondestructive
The list methods used by the panic.py program to convert one string into another were destructive, in that the original state of the list was altered by the code. Slicing a list is nondestructive, as extracting objects from an existing list does not alter it; the original data remains intact.


The slices used by panic2.py are shown here. Note that each extracts data from the list, but does not change it. Here are the two lines of code that do all the heavy lifting, together with a representation of the data each slice extracts:

So...which is better?
Using list methods to manipulate and transform an existing list does just that: it manipulates and transforms the list. The original state of the list is no longer available to your program. Depending on what you’re doing, this may (or may not) be an issue. Using Python’s square bracket notation generally does not alter an existing list, unless you decide to assign a new value to an existing index location. Using slices also results in no changes to the list: the original data remains as it was.
List methods change the state of a list, whereas using square brackets and slices (typically) does not.
Which of these two approaches you decide is “better” depends on what you are trying to do (and it’s perfectly OK not to like either). There is always more than one way to perform a computation, and Python lists are flexible enough to support many ways of interacting with the data you store in them.
We are nearly done with our initial tour of lists. There’s just one more topic to introduce you to at this stage: list iteration.
Python’s “for” Loop Understands Lists
Python’s for loop knows all about lists and, when provided with any list, knows where the start of the list is, how many objects the list contains, and where the end of the list is. You never have to tell the for loop any of this, as it works it out for itself.

An example helps to illustrate. Follow along by opening up a new edit window in IDLE and typing in the code shown below. Save this new program as marvin.py, then press F5 to take it for a spin:

Understanding marvin.py’s code
The first two lines of marvin.py are familiar: assign a string to a variable (called paranoid_android), then turn the string into a list of character objects (assigned to a new variable called letters).

It’s the next statement—the for loop—that we want you to concentrate on.
On each iteration, the for loop arranges to take each object in the letters list and assign them one at a time to another variable, called char. Within the indented loop body char takes on the current value of the object being processed by the for loop. Note that the for loop knows when to start iterating, when to stop iterating, as well as how many objects are in the letters list. You don’t need to worry about any of this: that’s the interpreter’s job.
Python’s “for” Loop Understands Slices
If you use the square bracket notation to select a slice from a list, the for loop “does the right thing” and only iterates over the sliced objects. An update to our most recent program shows this in action. Save a new version of marvin.py as marvin2.py, then change the code to look like that shown below.

Of interest is our use of Python’s multiplication operator (*), which is used to control how many tab characters are printed before each object in the second and third for loop. We use * here to “multiply” how many times we want tab to appear:

Marvin’s Slices in Detail
Let’s take a look at each of the slices in the last program in detail, as this technique appears a lot in Python programs. Below, each line of slice code is presented once more, together with a graphical representation of what’s going on.

Before looking at the three slices, note that the program begins by assigning a string to a variable (called paranoid_android) and converting it to a list (called letters):
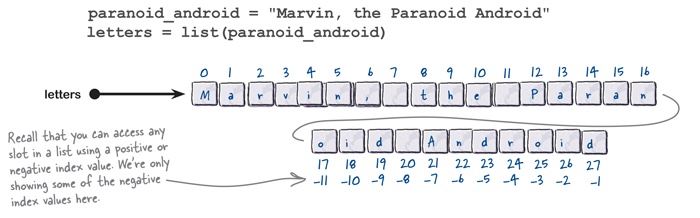
We’ll look at each of the slices from the marvin2.py program and see what they produce. When the interpreter sees the slice specification, it extracts the sliced objects from letters and returns a copy of the objects to the for loop. The original letters list is unaffected by these slices.
The first slice extracts from the start of the list and ends (but doesn’t include) the object in slot 6:

The second slice extracts from the end of the letters list, starting at slot –7 and going to the end of letters:
And finally, the third slice extracts from the middle of the list, starting at slot 12 and including everything up to but not including slot 20:

Lists: Updating What We Know
Now that you’ve seen how lists and for loops interact, let’s quickly review what you’ve learned over the last few pages:
Lists understand the square bracket notation, which can be used to select individual objects from any list.
Like a lot of other programming languages, Python starts counting from zero, so the first object in any list is at index location 0, the second at 1, and so on.
Unlike a lot of other programming languages, Python lets you index into a list from either end. Using –1 selects the last item in the list, –2 the second last, and so on.
Lists also provide slices (or fragments) of a list by supporting the specification of start, stop, and step as part of the square bracket notation.

Lists are used a lot, but...
They are not a data structure panacea. Lists can be used in lots of places; if you have a collection of similar objects that you need to store in a data structure, lists are the perfect choice.
However—and perhaps somewhat counterintuitively—if the data you’re working with exhibits some structure, lists can be a bad choice. We’ll start exploring this problem (and what you can do about it) on the next page.
What’s Wrong with Lists?
When Python programmers find themselves in a situation where they need to store a collection of similar objects, using a list is often the natural choice. After all, we’ve used nothing but lists in this chapter so far.
Recall how lists are great at storing a collection of related letters, such as with the vowels list:
vowels = ['a', 'e', 'i', 'o', 'u']And if the data is a collection of numbers, lists are a great choice, too:
nums = [1, 2, 3, 4, 5]In fact, lists are a great choice when you have a collection of related anythings.
But imagine you need to store data about a person, and the sample data you’ve been given looks something like this:

On the face of things, this data does indeed conform to a structure, in that there are tags on the left and associated data values on the right. So, why not put this data in a list? After all, this data is related to the person, right?
To see why we shouldn’t, let’s look at two ways to store this data using lists (starting on the next page). We are going to be totally upfront here: both of our attempts exhibit problems that make using lists less than ideal for data like this. But, as the journey is often half the fun of getting there, we’re going to try lists anyway.
Our first attempt concentrates on the data values on the right of the napkin, whereas our second attempt uses the tags on the left as well as the associated data values. Have a think about how you’d handle this type of structured data using lists, then flip to the next page to see how our two attempts fared.
When Not to Use Lists
We have our sample data (on the back of a napkin) and we’ve decided to store the data in a list (as that’s all we know at this point in our Python travels).
Our first attempt takes the data values and puts them in a list:
>>> person1 = ['Ford Prefect', 'Male',
'Researcher', 'Betelgeuse Seven']
>>> person1
['Ford Prefect', 'Male', 'Researcher',
'Betelgeuse Seven']
This results in a list of string objects, which works. As shown above, the shell confirms that the data values are now in a list called person1.

But we have a problem, in that we have to remember that the first index location (at index value 0) is the person’s name, the next is the person’s gender (at index value 1), and so on. For a small number of data items, this is not a big deal, but imagine if this data expanded to include many more data values (perhaps to support a profile page on that Facebook-killer you’re been meaning to build). With data like this, using index values to refer to the data in the person1 list is brittle, and best avoided.
Our second attempt adds the tags into the list, so that each data value is preceded by its associated tag. Meet the person2 list:
>>> person2 = ['Name', 'Ford Prefect', 'Gender',
'Male', 'Occupation', 'Researcher', 'Home Planet',
'Betelgeuse Seven']
>>> person2
['Name', 'Ford Prefect', 'Gender', 'Male',
'Occupation', 'Researcher', 'Home Planet',
'Betelgeuse Seven']
This clearly works, but now we no longer have one problem; we have two. Not only do we still have to remember what’s at each index location, but we now have to remember that index values 0, 2, 4, 6, and so on are tags, while index values 1, 3, 5, 7, and so on are data values.
If the data you want to store has an identifiable structure, consider using something other than a list.
Surely there has to be a better way to handle data with a structure like this?
There is, and it involves foregoing the use of lists for structured data like this. We need to use something else, and in Python, that something else is called a dictionary, which we get to in the next chapter.

