Chapter 9. The Context Management Protocol: Hooking into Python’s with Statement

It’s time to take what you’ve just learned and put it to work.
Chapter 7 discussed using a relational database with Python, while Chapter 8 provided an introduction to using classes in your Python code. In this chapter, both of these techniques are combined to produce a context manager that lets us extend the with statement to work with relational database systems. In this chapter, you’ll hook into the with statement by creating a new class, which conforms to Python’s context management protocol.
What’s the Best Way to Share Our Webapp’s Database Code?
During Chapter 7 you created database code in your log_request function that worked, but you had to pause to consider how best to share it. Recall the suggestions from the end of Chapter 7:

At the time, we proposed that each of these suggestions was valid, but believed Python programmers would be unlikely to embrace any of these proposed solutions on their own. We decided that a better strategy was to hook into the context management protocol using the with statement, but in order to do that, you needed to learn a bit about classes. They were the subject of the last chapter. Now that you know how to create a class, it’s time to return to the task at hand: creating a context manager to share your webapp’s database code.
Consider What You’re Trying to Do, Revisited
Below is our database management code from Chapter 7. This code is currently part of our Flask webapp. Recall how this code connected to our MySQL database, saved the details of the web request to the log table, committed any unsaved data, and then disconnected from the database:

How best to create a context manager?
Before getting to the point where you can transform the above code into something that can be used as part of a with statement, let’s discuss how this is achieved by conforming to the context management protocol. Although there is support for creating simple context managers in the standard library (using the contextlib module), creating a class that conforms to the protocol is regarded as the correct approach when you’re using with to control some external object, such as a database connection (as is the case here).
With that in mind, let’s take a look at what’s meant by “conforming to the context management protocol.”
Managing Context with Methods
The context management protocol sounds intimidating and scary, but it’s actually quite simple. It dictates that any class you create must define at least two magic methods: __enter__ and __exit__. This is the protocol. When you adhere to the protocol, your class can hook into the with statement.
A protocol is an agreed procedure (or set of rules) that is to be adhered to.
Dunder “enter” performs setup
When an object is used with a with statement, the interpreter invokes the object’s __enter__ method before the with statement’s suite starts. This provides an opportunity for you to perform any required setup code within dunder enter.
The protocol further states that dunder enter can (but doesn’t have to) return a value to the with statement (you’ll see why this is important in a little bit).
Dunder “exit” does teardown
As soon as the with statement’s suite ends, the interpreter always invokes the object’s __exit__ method. This occurs after the with’s suite terminates, and it provides an opportunity for you to perform any required teardown.
As the code in the with statement’s suite may fail (and raise an exception), dunder exit has to be ready to handle this if it happens. We’ll return to this issue when we create the code for our dunder exit method later in this chapter.
If your class defines dunder “enter” and dunder “exit”, it’s a context manager.
If you create a class that defines __enter__ and __exit__, the class is automatically regarded as a context manager by the interpreter and can, as a consequence, hook into (and be used with) with. In other words, such a class conforms to the context management protocol, and implements a context manager.
(As you know) dunder “init” initializes
In addition to dunder enter and dunder exit, you can add other methods to your class as needed, including defining your own __init__ method. As you know from the last chapter, defining dunder init lets you perform additional object initialization. Dunder init runs before __enter__ (that is, before your context manager’s setup code executes).
It’s not an absolute requirement to define __init__ for your context manager (as __enter__ and __exit__ are all you really need), but it can sometimes be useful to do so, as it lets you separate any initialization activity from any setup activity. When we create a context manager for use with our database connections (later in this chapter), we define __init__ to initialize our database connection credentials. Doing so isn’t absolutely necessary, but we think it helps to keep things nice and tidy, and makes our context manager class code easier to read and understand.
You’ve Already Seen a Context Manager in Action
You first encountered a with statement back in Chapter 6 when you used one to ensure a previously opened file was automatically closed once its associated with statement terminated. Recall how this code opened the todos.txt file, then read and displayed each line in the file one by one, before automatically closing the file (thanks to the fact that open is a context manager):

Let’s take another look at this with statement, highlighting where dunder enter, dunder exit, and dunder init are invoked. We’ve numbered each of the annotations to help you understand the order the dunders execute in. Note that we don’t see the initialization, setup, or teardown code here; we just know (and trust) that those methods run “behind the scenes” when needed:

What’s required from you
Before we get to creating our very own context manager (with the help of a new class), let’s review what the context management protocol expects you to provide in order to hook into the with statement. You must create a class that provides:
an
__init__method to perform initialization (if needed);an
__enter__method to do any setup; andan
__exit__method to do any teardown (a.k.a. tidying-up).
Armed with this knowledge, let’s now create a context manager class, writing these methods one by one, while borrowing from our existing database code as needed.
Create a New Context Manager Class
To get going, we need to give our new class a name. Additionally, let’s put our new class code into its own file, so that we can easily reuse it (remember: when you put Python code in a separate file it becomes a module, which can be imported into other Python programs as required).
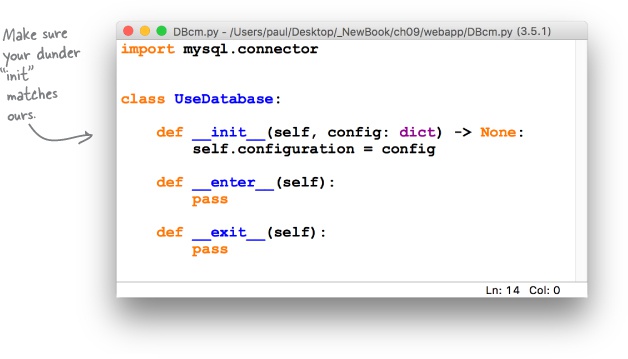
Let’s call our new file DBcm.py (short for database context manager), and let’s call our new class UseDatabase. Be sure to create the DBcm.py file in the same folder that currently contains your webapp code, as it’s your webapp that’s going to import the UseDatabase class (once you’ve written it, that is).
Remember: use CamelCase when naming a class in Python.
Using your favorite editor (or IDLE), create a new edit window, and then save the new, empty file as DBcm.py. We know that in order for our class to conform to the context management protocol it has to:
provide an
__init__method that performs initialization;provide an
__enter__method that includes any setup code; andprovide an
__exit__method that includes any teardown code.
For now, let’s add three “empty” definitions for each of these required methods to our class code. An empty method contains a single pass statement. Here’s the code so far:

Note how at the top of the DBCm.py file we’ve included an import statement, which includes the MySQL Connector functionality (which our new class depends on).
All we have to do now is move the relevant bits from the log_request function into the correct method within the UseDatabase class. Well...when we say we, we actually mean you. It’s time to roll up your sleeves and write some method code.
Initialize the Class with the Database Config
Let’s remind ourselves of how we intend to use the UseDatabase
context manager. Here’s the code from Chapter 7, rewritten to use a with
statement, which itself uses the UseDatabase context manager that you’re
about to write:


Let’s start with the __init__ method, which we’ll use to initialize any attributes in the UseDataBase class. Based on the usage shown above, the dunder init method accepts a single argument, which is a dictionary of connection characteristics called config (which you’ll need to add to the def line below). Let’s arrange for config to be saved as an attribute called configuration. Add the code required to save the dictionary to the configuration attribute to dunder init’s code:

You started with the __init__ method, which was to initialize any attributes in the UseDataBase class. The dunder init method accepts a single argument, which is a dictionary of connection characteristics called config (which you needed to add to the def line below). You were to arrange for config to be saved to an attribute called configuration. You were to add the code required to save the dictionary to the configuration attribute in dunder init’s code:

Perform Setup with Dunder “enter”
The dunder enter method provides a place for you to execute the setup code that needs to be executed before the suite in your with statement runs. Recall the code from the log_request function that handles this setup:

This setup code uses the connection characteristics dictionary to connect to MySQL, then creates a database cursor on the connection (which we’ll need to send commands to the database from our Python code). As this setup code is something you’ll do every time you write code to talk to your database, let’s do this work in your context manager class instead so that you can more easily reuse it.
The dunder enter method (__enter__) needs to use the configuration characteristics stored in self.configuration to connect to the database and create a cursor. Other than the mandatory self argument, dunder enter takes no other arguments, but needs to return the cursor. Complete the code for the method below:

The dunder enter method (__enter__) uses the configuration characteristics stored in self.configuration to connect to the database and create a cursor. Other than the mandatory self argument, dunder enter takes no other arguments, but needs to return the cursor. You were to complete the code for the method below:

Don’t forget to prefix all attributes with “self”
You may be surprised that we designated conn and cursor as attributes in dunder enter (by prefixing each with self). We did this in order to ensure both conn and cursor survive when the method ends, as both variables are needed in the __exit__ method. To ensure this happens, we added the self prefix to both the conn and cursor variables; doing so adds them to the class’s attribute list.
Before you get to writing dunder exit, confirm that your code matches ours:

Perform Teardown with Dunder “exit”
The dunder exit method provides a place for you to execute the teardown code that needs to be run when your with statement terminates. Recall the code from the log_request function that handles teardown:

The teardown code commits any data to the database, then closes the cursor and the connection. This teardown happens every time you interact with the database, so let’s add this code to your context manager class by moving these three lines into dunder exit.
Before you do this, however, you need to know that there’s a complication with dunder exit, which has to do with handling any exceptions that might occur within the with’s suite. When something goes wrong, the interpreter always notifies __exit__ by passing three arguments into the method: exc_type, exc_value, and exc_trace. Your def line needs to take this into account, which is why we’ve added the three arguments to the code below. Having said that, we’re going to ignore this exception-handling mechanism for now, but will return to it in a later chapter when we discuss what can go wrong and how you can handle it (so stay tuned).
The teardown code is where you do your tidying up. For this context manager, tidying up involves ensuring any data is committed to the database prior to closing both the cursor and the connection. Add the code you think you need to the method below.

The teardown code is where you do your tidying up. For this context manager, tidying up involves ensuring any data is committed to the database prior to closing both the cursor and the connection. You were to add the code you think you need to the method below.

Your context manager is re ady for testing
With the dunder exit code written, it’s now time to test your context manager prior to integrating it into your webapp code. As has been our custom, we’ll first test this new code at Python’s shell prompt (the >>>). Before doing this, perform one last check to ensure your code is the same as ours:


There’s not much code here, is there?
Hopefully, you’re looking at the code above and deciding there’s not an awful lot to it. As you’ve successfully moved some of your database handling code into the UseDatabase class, the initialization, setup, and teardown are now handled “behind the scenes” by your context manager. All you have to do is provide the connection characteristics and the SQL query you wish to execute—the context manager does all the rest. Your setup and teardown code is reused as part of the context manager. It’s also clearer what the “meat” of this code is: getting data from the database and processing it. The context manager hides the details of connecting/disconnecting to/from the database (which are always going to be the same), thereby leaving you free to concentrate on what you’re trying to do with your data.
Let’s update your webapp to use your context manager.
Reconsidering Your Webapp Code, 1 of 2
It’s been quite a while since you’ve considered your webapp’s code.
The last time you worked on it (in Chapter 7), you updated the log_request function to save the webapp’s web request to the MySQL database. The reason we started down the path to learning about classes (in Chapter 8) was to determine the best way to share the database code you added to log_request. We now know that the best way (for this situation) is to use the just-written UseDatabase context manager class.
Your webapp’s code is in the “vsearch4web.py” file in your “webapp” folder.
In addition to amending log_request to use the context manager, the other function in the code that we need to amend work with the data in the database is called view_the_log (which currently works with the vsearch.log text file). Before we get to amending both of these functions, let’s remind ourselves of the current state of the webapp’s code (on this page and the next). We’ve highlighted the bits that need to be worked on:


Recalling the “log_request” Function
When it comes to amending the log_request function to use the UseDatabase context manager, a lot of the work has already been done for you (as we showed you the code we were shooting for earlier).
Take a look at log_request once more. At the moment, the database connection characteristics dictionary (dbconfig in the code) is defined within log_request. As you’ll want to use this dictionary in the other function you have to amend (view_the_log), let’s move it out of the log_request’s function so that you can share it with other functions as needed:

Rather than move dbconfig into our webapp’s global space, it would be useful if we could somehow add it to our webapp’s internal configuration.
As luck would have it, Flask (like many other web frameworks) comes with a built-in configuration mechanism: a dictionary (which Flask calls app.config) allows you to adjust some of your webapp’s internal settings. As app.config is a regular Python dictionary, you can add your own keys and values to it as needed, which is what you’ll do for the data in dbconfig.
The rest of log_request’s code can then be amended to use UseDatabase.
Let’s make these changes now.
Amending the “log_request” Function
Now that we’ve applied the changes to our webapp, our code looks like this:

Near the top of the file, we’ve replaced the import mysql.connector statement with an import statement that grabs UseDatabase from our DBcm module. The DBcm.py file itself includes the import mysql.connector statement in its code, hence the removal of import mysql.connector from this file (as we don’t want to import it twice).
We’ve also moved the database connection characteristics dictionary into our webapp’s configuration. And we’ve amended log_request’s code to use our context manager.
After all your work on classes and context managers, you should be able to read and understand the code shown above.
Let’s now move onto amending the view_the_log function. Make sure your webapp code is amended to be exactly like ours above before turning the page.
Recalling the “view_the_log” Function
Let’s take a long, hard look at the code in view_the_log, as it’s been quite a while since you’ve considered it in detail. To recap, the current version of this function extracts the logged data from the vsearch.log text file, turns it into a list of lists (called contents), and then sends the data to a template called viewlog.html:

Here’s what the output looks like when the viewlog.html template is rendered with the data from the contents list of lists. This functionality is currently available to your webapp via the /viewlog URL:

It’s Not Just the Code That Changes
Before diving in and changing the code in view_the_log to use your context manager, let’s pause to consider the data as stored in the log table in your database. When you tested your initial log_request code in Chapter 7, you were able to log into the MySQL console, then check that the data was saved. Recall this MySQL console session from earlier:

If you consider the above data in relation to what’s currently stored in the vsearch.log file, it’s clear that some of the processing view_the_log does is no longer needed, as the data is now stored in a table. Here’s a snippet of what the log data looks like in the vsearch.log file:

Some of the code currently in view_the_log is only there because the log data is currently stored as a collection of long strings (delimited by vertical bars) in the vsearch.log file. That format worked, but we did need to write extra code to make sense of it.
This is not the case with data in the log table, as it is “structured by default.” This should mean you don’t need to perform any additional processing within view_the_log: all you have to do is extract the data from the table, which—happily—is returned to you as a list of tuples (thanks to DB-API’s fetchall method).
On top of this, the data in the log table separates the value for phrase from the value for letters. If you make a small change to your template-rendering code, the output produced can display five columns of data (as opposed to the current four), making what the browser displays even more useful and easier to read.
Amending the “view_the_log” Function
Based on everything discussed on the last few pages, you’ve two things to do to amend your current view_the_log code:
Grab the log data from the database table (as opposed to the file).
Adjust the
titleslist to support five columns (as opposed to four).
If you’re scratching your head and wondering why this small list of amendments doesn’t include adjusting the viewlog.html template, wonder no more: you don’t need to make any changes to that file, as the current template quite happily processes any number of titles and any amount of data you send to it.
Here’s the view_the_log function’s current code, which you are about to amend:

Here’s the SQL query you’ll need
Ahead of the next exercise (where you’ll update the view_the_log function), here’s an SQL query that, when executed, returns all the logged data stored in the webapp’s MySQL database. The data is returned to your Python code from the database as a list of tuples. You’ll need to use this query in the exercise on the next page:
select phrase, letters, ip, browser_string, results
from log
Here’s the view_the_log function, which has to be amended to use the data in the log table. Your job is to provide the missing code. Be sure to read the annotations for hints on what you need to do:


Yep—that was our goal all along.
By moving the log data into a MySQL database, you’ve removed the requirement to create, and then process, a custom text-based file format.
Also, by reusing your context manager, you’ve simplified your interactions with MySQL when working in Python. What’s not to like?

It’s nearly time for one last Test Drive
Before taking this new version of your webapp for a spin, take a moment to confirm that your view_the_log function is the same as ours:

It’s time to take your database-ready webapp for a spin.
Be sure the DBcm.py file is in the same folder as your vsearch4web.py file, then start your webapp in the usual way on your operating system:
Use
python3 vsearch4web.pyon Linux/Mac OS XUse
py -3 vsearch4web.pyon Windows.
Use your browser to go to your webapp’s home page (running at http://127.0.0.1:5000), then enter a handful of searches. Once you’ve confirmed that the search feature is working, use the /viewlog URL to view the contents of your log in your browser window.
Although the searches you enter will very likely differ from ours, here’s what we saw in our browser window, which confirms that everything is working as expected:

This browser output confirms the logged data is being read from the MySQL database when the /viewlog URL is accessed. This means the code in view_the_log is working—which, incidentally, confirms the log_request function is working as expected, too, as it’s putting the log data in the database as a result of every successful search.
Only if you feel the need, take a few moments to log into your MySQL database using the MySQL console to confirm that the data is safely stored in your database server. (Or just trust us: based on what our webapp is displaying above, it is.)
All That Remains...
It’s now time to return to the questions first posed in Chapter 6:
How many requests have been responded to?
What’s the most common list of letters?
Which IP addresses are the requests coming from?
Which browser is being used the most?
Although it is possible to write Python code to answer these questions, we aren’t going to in this case, even though we’ve just spent this and the previous two chapters looking at how Python and databases work together. In our opinion, creating Python code to answer these types of questions is nearly always a bad move...

SQL is definitely the way to go.
These types of “data questions” are best answered by your database technology’s querying mechanism (which, in MySQL, is SQL). As you’ll see on the next page, you’d be unlikely to produce Python code as quickly as writing the SQL queries you need.
Knowing when to use Python and when not to is important, as is knowing what sets Python apart from many other programming technologies. While most mainstream languages support classes and objects, few provide anything close to Python’s context management protocol. (In the next chapter, you’ll meet another feature that sets Python apart from many other languages: function decorators.)
Before we get to the next chapter, let’s take a quick (one page) look at those SQL queries...
Answering the Data Questions
Let’s take our data questions one by one, answering each with the help of some database queries written in SQL.
How many requests have been responded to?
If you’re already a SQL dude (or dudette), you may be scoffing at this question, seeing as it doesn’t really get much simpler. You already know that this most basic of SQL queries displays all the data in a database table:
select * from log;To transform this query into one that reports how many rows of data a table has, pass the * into the SQL function count, as follows:

Which IP addresses are the requests coming from?
The SQL dudes/dudettes out there are probably thinking “that’s almost too easy”:
select distinct ip from log;
Which browser is being used the most?
The SQL query that answers this question is a slight variation on the query that answered the second question:
select browser_string, count(browser_string) as 'count'
from log
group by browser_string
order by count desc
limit 1;
So there you have it: all your pressing questions answered with a few simple SQL queries. Go ahead and try them at your mysql> prompt before starting in on the next chapter.

