Chapter 8. A Little Bit of Class: Abstracting Behavior and State

Classes let you bundle code behavior and state together.
In this chapter, you’re setting your webapp aside while you learn about creating Python classes. You’re doing this in order to get to the point where you can create a context manager with the help of a Python class. As creating and using classes is such a useful thing to know about anyway, we’re dedicating this chapter to them. We won’t cover everything about classes, but we’ll touch on all the bits you’ll need to understand in order to confidently create the context manager your webapp is waiting for. Let’s dive in and see what’s involved.
Hooking into the “with” Statement
At stated at the end of the last chapter, understanding how to hook your setup and teardown code into Python’s with statement is straightforward...assuming you know how to create a Python class.
Despite being well over halfway through this book, you’ve managed to get by without having to define a class. You’ve written useful and reusable code using nothing more than Python’s function machinery. There are other ways to write and organize your code, and object orientation is very popular.
You’re never forced to program exclusively in the object-oriented paradigm when using Python, and the language is flexible when it comes to how you go about writing your code. But, when it comes to hooking into the with statement, doing so through a class is the recommended approach, even though the standard library comes with support for doing something similar without a class (although the standard library’s approach is less widely applicable, so we aren’t going to use it here).
The context management protocol lets you write a class that hooks into the “with” statement.
So, to hook into the with statement, you’ll have to create a class. Once you know how to write classes, you can then create one that implements and adheres to the context management protocol. This protocol is the mechanism (built into Python) that hooks into the with statement.
Let’s learn how to create and use classes in Python, before returning to our context management protocol discussion in the next chapter.
An Object-Oriented Primer
Before we get going with classes, it’s important to note that we don’t intend to cover everything there is to know about classes in Python in this chapter. Our intention is merely to show you enough to enable you to confidently create a class that implements the context management protocol.
Therefore, we won’t discuss some topics that seasoned practitioners of object-oriented programming (OOP) might expect to see here, such as inheritance and polymorphism (even though Python provides support for both). That’s because we’re primarily interested in encapsulation when creating a context manager.
If the jargon in that last paragraph has put you in a blind panic, don’t worry: you can safely read on without knowing what any of that OOP-speak actually means.
On the last page, you learned that you need to create a class in order to hook into the with statement. Before getting to the specifics of how to do that, let’s look at what constitutes a class in Python, writing an example class as we go. Once you understand how to write a class, we’ll return to the problem of hooking into the with statement (in the next chapter).

Don’t be freaked out by all the buzzwords on this page!
If we were to run a competition to determine the page in this book with this most buzzwords on it, this one would win hands-down. Don’t be put off by all the jargon used here, though. If you already know OOP, this should all make sense. If not, the really important bits are shown below. Don’t worry: all this will become clearer as you work through the example on the next few pages.
A class bundles behavior and state
Using a class lets you bundle behavior and state together in an object.
When you hear the word behavior, think function—that is, a chunk of code that does something (or implements a behavior, if you prefer).
When you hear the word state, think variables—that is, a place to store values within a class. When we assert that a class bundles behavior and state together, we’re simply stating that a class packages functions and variables.
The upshot of all of the above is this: if you know what a function is and what variables are, you’re most of the way to understanding what a class is (as well as how to create one).

Classes have methods and attributes
In Python, you define a class behavior by creating a method.
The word method is the OOP name given to a function that’s defined within a class. Just why methods aren’t simply known as class functions has been lost in the mists of time, as has the fact that class variables aren’t referred to as such—they are known by the name attribute.
Creating Objects from Classes
To use a class, you create an object from it (you’ll see an example of this below). This is known as object instantiation. When you hear the word instantiate, think invoke; that is, you invoke a class to create an object.
Perhaps surprisingly, you can create a class that has no state or behavior, yet is still a class as far as Python is concerned. In effect, such a class is empty. Let’s start our class examples with an empty one and take things from there. We’ll work at the interpreter’s >>> prompt, and you’re encouraged to follow along.
We begin by creating an empty class called CountFromBy. We do this by prefixing the class name with the class keyword, then providing the suite of code that implements the class (after the obligatory colon):

“pass” is a valid statement (i.e., it is syntactically correct), but it does nothing. Think of it as an empty statement.
Note how this class’s suite contains the Python keyword pass, which is Python’s empty statement (in that it does nothing). You can use pass in any place the interpreter expects to find actual code. In this case, we aren’t quite ready to fill in the details of the CountFromBy class, so we use pass to avoid any syntax errors that would normally result when we try to create a class without any code in its suite.
Now that the class exists, let’s create two objects from it, one called a and another called b. Note how creating an object from a class looks very much like calling a function:

Objects Share Behavior but Not State
When you create objects from a class, each object shares the class’s coded behaviors (the methods defined in the class), but maintains its own copy of any state (the attributes):

This distinction will make more sense as we flesh out the CountFromBy example.
Defining what we want CountFromBy to do
Let’s now define what we want the CountFromBy class to actually do (as an empty class is rarely useful).
Note: this new “CountFromBy” class doesn’t exist just yet. You’ll create it in a little bit.
Let’s make CountFromBy an incrementing counter. By default, the counter will start at 0 and be incremented (on request) by 1. We’ll also make it possible to provide an alternative starting value and/or amount to increment by. This means you’ll be able to create, for example, a CountFromBy object that starts at 100 and increments by 10.
Let’s preview what the CountFromBy class will be able to do (once we have written its code). By understanding how the class will be used, you’ll be better equipped to understand the CountFromBy code as we write it. Our first example uses the class defaults: start at 0, and increment by 1 on request by calling the increase method. The newly created object is assigned to a new variable, which we’ve called c:

Doing More with CountFromBy
The example usage of CountFromBy at the bottom of the last page demonstrated the default behavior: unless specified, the counter maintained by a CountFromBy object starts at 0 and is incremented by 1. It’s also possible to specify an alternative starting value, as demonstrated in this next example, where the count starts from 100:

As well as specifying the starting value, it’s also possible to specify the amount to increase by, as shown here, where we start at 100 and increment by 10:

In this final example, the counter starts at 0 (the default), but increments by 15. Rather than having to specify (0, 15) as the arguments to the class, this example uses a keyword argument that allows us to specify the amount to increment by, while leaving the starting value at the default (0):

It’s Worth Repeating Ourselves: Objects Share Behavior but Not State
The previous examples created four new CountFromBy objects: c, d, e, and f, each of which has access to the increase method, which is a behavior that’s shared by all objects created from the CountFromBy class. There’s only ever one copy of the increase method’s code, which all these objects use. However, each object maintains its own attribute values. In these examples, that’s the current value of the counter, which is different for each of the objects, as shown here:

Class behavior is shared by each of its objects, whereas state is not. Each object maintains its own state.
Here’s the key point again: the method code is shared, but the attribute data isn’t.
It can be useful to think of a class as a “cookie-cutter template” that is used by a factory to churn out objects that all behave the same, but have their own data.

Invoking a Method: Understand the Details
We stated earlier that a method is a function defined within a class. We also saw examples of a method from CountFromBy being invoked. The increase method is invoked using the familiar dot notation:
It is instructive to consider the code the interpreter actually executes (behind the scenes) when it encounters the above line. Here is the call the interpreter always turns the above line of code into. Note what happens to c:


Yes, it does. But nobody ever does that.
And neither should you, as the Python interpreter does this for you anyway...so why write more code to do something that can be written more succinctly?
Just why the interpreter does this will become clearer as you learn more about how methods work.
Method Invocation: What Actually Happens
At first sight, the interpreter turning c.increase() into CountFromBy.increase(c) may look a little strange, but understanding that this happens helps explain why every method you write takes at least one argument.
It’s OK for methods to take more than one argument, but the first argument always has to exist in order to take the object as an argument (which, in the example from the last page, is c). In fact, it is a well-established practice in the Python programming community to give each method’s first argument a special name: self.
When increase is invoked as c.increase(), you’d imagine the method’s def line should look like this:
def increase():However, defining a method without the mandatory first argument will cause the interpreter to raise an error when your code runs. Consequently, the increase method’s def line actually needs to be written as follows:
def increase(self):When writing code in a class, think of “self” as an alias to the current object.
It is regarded as very bad form to use something other than the name self in your class code, even though the use of self does take a bit of getting used to. (Many other programming languages have a similar notion, although they favor the name this. Python’s self is basically the same idea as this.)
When you invoke a method on an object, Python arranges for the first argument to be the invoking object instance, which is always assigned to each method’s self argument. This fact alone explains why self is so important and also why self needs to be the first argument to every object method you write. When you invoke a method, you don’t need to supply a value for self, as the interpreter does this for you:

Now that you’ve been introduced to the importance of self, let’s take a look at writing the code for the increase method.
Adding a Method to a Class
Let’s create a new file to save our class code into. Create countfromby.py, then add in the class code from earlier in this chapter:
class CountFromBy:
    pass
We’re going to add the increase method to this class, and to do so we’ll remove the pass statement and replace it with increase’s method definition. Before doing this, recall how increase is invoked:

Based on this call, you’d be forgiven for assuming the increase method takes no arguments, as there’s nothing between the parentheses, right? However, this is only half true. As you just learned, the interpreter transforms the above line of code into the following call:
The method code we write needs to take this transformation into consideration. With all of the above in mind, here’s the def line for the increase method that we’d use in this class:

There are no other arguments to the increase method, so we do not need to provide anything other than self on the def line. However, it is vitally important that we include self here, as forgetting to results in syntax errors.
With the def line written, all we need to do now is add some code to increase. Let’s assume that the class maintains two attributes: val, which contains the current value of the current object, and incr, which contains the amount to increment val by every time increase is invoked. Knowing this, you might be tempted to add this incorrect line of code to increase in an attempt to perform the increment:
val += incrBut here’s the correct line of code to add to the increase method:

Why do you think this line of code is correct, whereas the previous was incorrect?
Are You Serious About “self”?

Don’t worry. Getting used to self won’t take long.
We agree that Python’s use of self does look a little weird...at first. However, over time, you’ll get used to it, so much so that you’ll hardly even notice it’s there.
If you completely forget about it and fail to add it to your methods, you’ll know pretty quickly that something is amiss—the interpreter will display a slew of TypeErrors informing you that something is missing, and that something is self.
As to whether or not the use of self makes Python’s class code harder to read...well, we’re not so sure. In our mind, every time we see self used as the first argument to a function, our brains automatically know that we’re looking at a method, not a function. This, for us, is a good thing.
Think of it this way: the use of self indicates that the code you’re reading is a method, as opposed to a function (when self is not used).
The Importance of “self”
The increase method, shown below, prefixes each of the class’s attributes with self within its suite. You were asked to consider why this might be:

You already know that self is assigned the current object by the interpreter when a method is invoked, and that the interpreter expects each method’s first argument to take this into account (so that the assignment can occur).
Now, consider what we already know about each object created from a class: it shares the class’s method code (a.k.a. behavior) with every other object created from the same class, but maintains its own copy of any attribute data (a.k.a. state). It does this by associating the attribute values with the object—that is, with self.
Knowing this, consider this version of the increase method, which, as we said a couple of pages ago, is incorrect:


On the face of things, that last line of code seems innocent enough, as all it does is increment the current value of val by the current value of incr. But consider what happens when this increase method terminates: val and incr, which exist within increase, both go out of scope and consequently are destroyed the moment the method ends.

Whoops. That’s our bad...
We slipped in that statement about scope without much explanation, didn’t we?
In order to understand what has to happen when you refer to attributes in a method, let’s first spend some time understanding what happens to variables used in a function.
Coping with Scoping
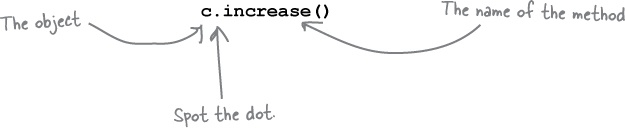
To demonstrate what happens to variables used within a function, let’s experiment at the >>> prompt. Try out the code below as you read it. We’ve numbered the annotations 1 through 8 to guide you as you follow along:
When variables are defined within a function’s suite, they exist while the function runs. That is, the variables are “in scope,” both visible and usable within the function’s suite. However, once the function ends, any variables defined within the function are destroyed—they are “out of scope,” and any resources they used are reclaimed by the interpreter.
This is what happens to the three variables used within the soundbite function, as shown above. The moment the function terminates, insider, outsider, and from_outside cease to exist. Any attempt to refer to them outside the suite of function (a.k.a. outside the function’s scope) results in a NameError.
Prefix Your Attribute Names with “self”
This function behavior described on the last page is fine when you’re dealing with a function that gets invoked, does some work, and then returns a value. You typically don’t care what happens to any variables used within a function, as you’re usually only interested in the function’s return value.
Now that you know what happens to variables when a function ends, it should be clear that this (incorrect) code is likely to cause problems when you attempt to use variables to store and remember attribute values with a class. As methods are functions by another name, neither val nor incr will survive an invocation of the increase method if this is how you code increase:

However, with methods, things are different. The method uses attribute values that belong to an object, and the object’s attributes continue to exist after the method terminates. That is, an object’s attribute values are not destroyed when the method terminates.
In order for an attribute assignment to survive method termination, the attribute value has to be assigned to something that doesn’t get destroyed as soon as the method ends. That something is the current object invoking the method, which is stored in self, which explains why each attribute value needs to be prefixed with self in your method code, as shown here:

The rule is straightforward: if you need to refer to an attribute in your class, you must prefix the attribute name with self. The value in self as an alias that points back to the object invoking the method.

In this context, when you see self, think “this object’s.” So, self.val can be read as “this object’s val.”
Initialize (Attribute) Values Before Use
All of the discussion of the importance of self sidestepped an important issue: how are attributes assigned a starting value? As it stands, the code in the increase method—the correct code, which uses self—fails if you execute it. This failure occurs because in Python you can’t use a variable before it has been assigned a value, no matter where the variable is used.
To demonstrate the seriousness of this issue, consider this short session at the >>> prompt. Note how the first statement fails to execute when either of the variables is undefined:

No matter where you use variables in Python, you have to initialize them with a starting value. The question is: how do we do this for a new object created from a Python class?
If you know OOP, the word “constructor” may be popping into your brain right about now. In other languages, a constructor is a special method that lets you define what happens when an object is first created, and it usually involves both object instantiation and attribute initialization. In Python, object instantiation is handled automatically by the interpreter, so you don’t need to define a constructor to do this. A magic method called __init__ lets you initialize attributes as needed. Let’s take a look at what dunder init can do.
Dunder “init” Initializes Attributes
Cast your mind back to the last chapter, when you used the dir built-in function to display all the details of Flask’s req object. Remember this output?

At the time, we suggested you ignore all those dunders. However, it’s now time to reveal their purpose: the dunders provide hooks into every class’s standard behavior.
Unless you override it, this standard behavior is implemented in a class called object. The object class is built into the interpreter, and every other Python class automatically inherits from it (including yours). This is OOP-speak for stating that the dunder methods provided by object are available to your class to use as is, or to override as needed (by providing your own implementation of them).
You don’t have to override any object methods if you don’t want to. But if, for example, you want to specify what happens when objects created from your class are used with the equality operator (==), then you can write your own code for the __eq__ method. If you want to specify what happens when objects are used with the greater-than operator (>), you can override the __ge__ method. And when you want to initialize the attributes associated with your object, you can use the __init__ method.
The standard dunder methods, available to all classes, are known as “the magic methods.”
As the dunders provided by object are so useful, they’re held in near-mystical reverence by Python programmers. So much so, in fact, that many Python programmers refer to these dunders as the magic methods (as they give the appearance of doing what they do “as if by magic”).
All of this means that if you provide a method in your class with a def line like the one below, the interpreter will call your __init__ method every time you create a new object from your class. Note the inclusion of self as this dunder init’s first argument (as per the rule for all methods in all classes):

Initializing Attributes with Dunder “init”
Let’s add __init__ to our CountFromBy class in order to initialize the objects we create from our class.
For now, let’s add an empty __init__ method that does nothing but pass (we’ll add behavior in just a moment):

We know from the code already in increase that we can access attributes in our class by prefixing their names with self. This means we can use self.val and self.incr to refer to our attributes within __init__, too. However, we want to use __init__ to initialize our class’s attributes (val and incr). The question is: where do these initialization values come from and how do their values get into __init__?
Pass any amount of argument data to dunder “init”
As __init__ is a method, and methods are functions in disguise, you can pass as many argument values as you like to __init__ (or any method, for that matter). All you have to do is give your arguments names. Let’s give the argument that we’ll use to initialize self.val the name v, and use the name i for self.incr.
Let’s add v and i to the def line of our __init__ method, then use the values in dunder init’s suite to initialize our class attributes, as follows:

If we can now somehow arrange for v and i to acquire values, the latest version of __init__ will initialize our class’s attributes. Which raises yet another question: how do we get values into v and i? To help answer this question, we need to try out this version of our class and see what happens. Let’s do that now.

Using the edit window in IDLE, take a moment to update the code in your countfromby.py file to look like that shown below. When you’re done, press F5 to start creating objects at IDLE’s >>> prompt:

Pressing F5 executes the code in the edit window, which imports the CountFromBy class into the interpreter. Look at what happens when we try to create a new object from our CountFromBy class:

This may not have been what you were expecting to see. But take a look at the error message (which is classed as a TypeError), paying particular attention to the message on the TypeError line. The interpreter is telling us that the __init__ method expected to receive two argument values, v and i, but received something else (in this case, nothing). We provided no arguments to the class, but this error message tells us that any arguments provided to the class (when creating a new object) are passed to the __init__ method.
Bearing this in mind, let’s have another go at creating a CountFromBy object.
Let’s return to the >>> prompt, and create another object (called h) that takes two integer values as arguments for v and i:

As you can see above, things work better this time, as the TypeError exception is gone, which means the h object was created successfully. You can access the values of h’s attributes using h.val and h.incr, as well as call the object’s increase method. Only when you try to access the value of h do things get strange again.
What have we learned from this Test Drive?
Understanding CountFromBy’s Representation
When we typed the name of the object into the shell in an attempt to display its current value, the interpreter produced this output:

We described the above output as “strange,” and on first glance, it would certainly appear to be. To understand what this output means, let’s return to IDLE’s shell and create yet another object from CountFromBy, which due to our deeply ingrained unwillingness to rock the boat, we’re calling j.
In the session below, note how the strange message displayed for j is made up of values that are produced when we call certain built-in functions (BIFs). Follow along with the session first, then read on for an explanation of what these BIFs do:

The type BIF displays information on the class the object was created from, reporting (above) that j is a CountFromBy object.
The id BIF displays information on an object’s memory address (which is a unique identifier used by the interpreter to keep track of your objects). What you see on your screen is likely different from what is reported above.
The memory address displayed as part of j’s output is the value of id converted to a hexadecimal number (which is what the hex BIF does). So, the entire message displayed for j is a combination of type’s output, as well as id’s (converted to hexadecimal).
Override dunder “repr” to specify how your objects are represented by the interpreter.
A reasonable question is: why does this happen?
In the absence of you telling the interpreter how you want to represent your objects, the interpreter has to do something, so it does what’s shown above. Thankfully, you can override this default behavior by coding your own __repr__ magic method.
Defining CountFromBy’s Representation
As well as being a magic method, the __repr__ functionality is also available as a built-in function called repr. Here’s part of what the help BIF displays when you ask it to tell you what repr does: “Return the canonical string representation of the object.” In other words, the help BIF is telling you that repr (and by extension, __repr__) needs to return a stringified version of an object.
What this “stringified version of an object” looks like depends on what each individual object does. You can control what happens for your objects by writing a __repr__ method for your class. Let’s do this now for the CountFromBy class.
Begin by adding a new def line to the CountFromBy class for dunder repr, which takes no arguments other than the required self (remember: it’s a method). As is our practice, let’s also add an annotation that lets readers of our code know this method returns a string:

With the def line written, all that remains is to write the code that returns a string representation of a CountFromBy object. For our purposes, all we want to do here is take the value in self.val, which is an integer, and convert it to a string.
Thanks to the str BIF, doing so is straightforward:

When you add this short function to your class, the interpreter uses it whenever it needs to display a CountFromBy object at the >>> prompt. The print BIF also uses dunder repr to display objects.
Before making this change and taking the updated code for a spin, let’s return briefly to another issue that surfaced during the last Test Drive.
Providing Sensible Defaults for CountFromBy
Let’s remind ourselves of the current version of the CountFromBy class’s __init__method:

Recall that when we tried to create a new object from this class without passing values for v and i, we got a TypeError:

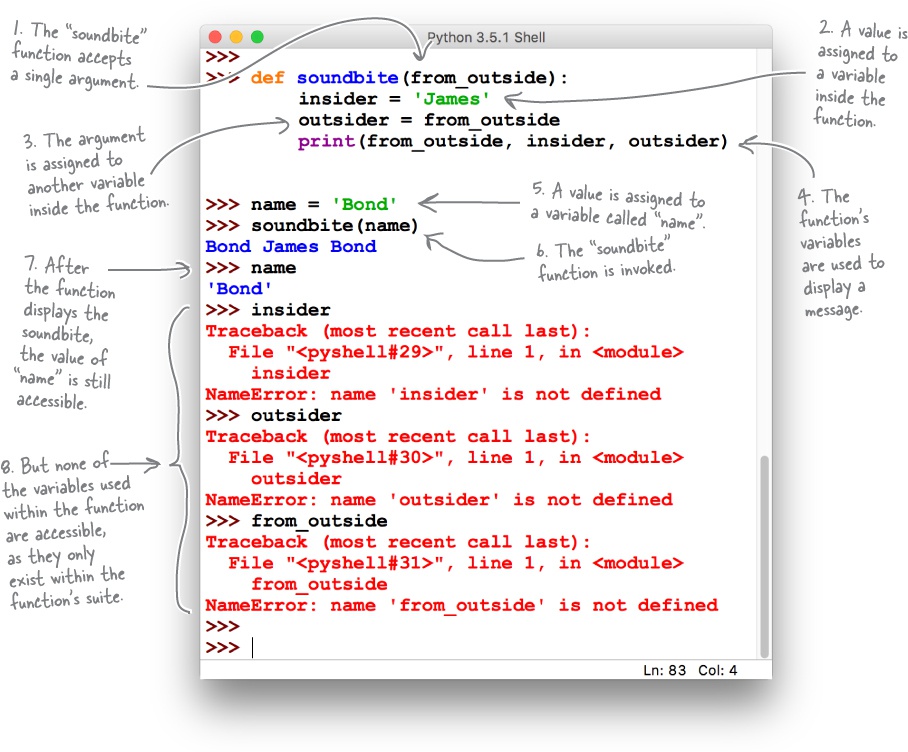
Earlier in this chapter, we specified that we wanted the CountFromBy class to support the following default behavior: the counter will start at 0 and be incremented (on request) by 1. You already know how to provide default values to function arguments, and the same goes for methods, too—assign the default values on the def line:
If you make this small (but important) change to your CountFromBy code, then save the file (before pressing F5 once more), you’ll see that objects can now be created with this default behavior:


Classes: What We Know
With the CountFromBy class behaving as specified earlier in this chapter, let’s review what we now know about classes in Python:

Python classes let you share behavior (a.k.a. methods) and state (a.k.a. attributes).
If you remember that methods are functions, and attributes are variables, you won’t go far wrong.
The
classkeyword introduces a new class in your code.Creating a new object from a class looks very like a function call. Remember: to create an object called
mycountfrom a class calledCountFromBy, you’d use this line of code:mycount = CountFromBy()
When an object is created from a class, the object shares the class’s code with every other object created from the class. However, each object maintains its own copy of the attributes.
You add behaviors to a class by creating methods. A method is a function defined within a class.
To add an attribute to a class, create a variable.
Every method is passed an alias to the current object as its first argument. Python convention insists that this first argument is called
self.Within a method’s suite, referrals to attributes are prefixed with
self, ensuring the attribute’s value survives after the method code ends.The
__init__method is one of the many magic methods provided with all Python classes.Attribute values are initialized by the
__init__method (a.k.a. dunderinit). This method lets you assign starting values to your attributes when a new object is created. Dunderinitreceives a copy of any values passed to the class when an object is created. For example, the values100and10are passed into__init__when this object is created:mycount2 = CountFromBy(100, 10)
Another magic method is
__repr__, which allows you to control how an object appears when displayed at the>>>prompt, as well as when used with theprintBIF.

We wanted to create a context manager.
We know it’s been a while, but the reason we started down this path was to learn enough about classes to enable us to create code that hooks into Python’s context management protocol. If we can hook into the protocol, we can use our webapp’s database code with Python’s with statement, as doing so should make it easier to share the database code, as well as reuse it. Now that you know a bit about classes, you’re ready to get hooked into the context management protocol (in the next chapter).
