9/Working
with Cameras
One of the advantages of using a platform
like the Raspberry Pi for DIY technology
projects is that it supports a wide range of
peripheral devices. Not only can you hook
up a keyboard and mouse, you can also con-
nect accessories like printers, W-iFi adapt-
ers (at least on the first two generations
of Raspberry Pi—the Model 3 and 4 have
their own built-in), thumb drives, additional
memory cards, cameras, and hard drives.
In this chapter, we’re going to show you
a few ways to use a camera in your Rasp-
berry Pi projects.
While not quite as common as a keyboard and mouse, a webcam
is almost a standard peripheral for computers these days. Most
laptops sold have a tiny camera built into the bezel of the display.
And if they don’t have a built-in camera, a USB webcam from a well-
known brand can be purchased for as little as $25. You can even
find webcams for much less if you take a chance on an unknown
brand.
The folks at the Raspberry Pi Foundation have created their own
camera peripheral that is designed to work with Raspberry Pi (Fig-
Working with Cameras 139
GSW_RASPI_4ED_FIN.indd 139GSW_RASPI_4ED_FIN.indd 139 10/28/21 10:54 AM10/28/21 10:54 AM
ure 9-1). Unlike a USB webcam, you’re unlikely to find the official
Raspberry Pi camera module in an office supply store, but you
should be able to buy it wherever Raspberry Pis are sold, for around
$25.
As of this writing, the newest version has a Sony IMX219 8-megapix-
el sensor (compared to the 5-megapixel OmniVision OV5647 sen-
sor of the original camera). In addition, there is a new high-quality
camera available for the Pi, with a 12.3 mega-pixel Sony IMX477
sensor, 7.9mm diagonal image size, and back-illuminated sensor
architecture, with adjustable back focus and support for C- and
CS-mount lenses.
And just in case those aren’t quite cool enough options for you,
you can also pick up an infrared camera—the Pi NoIR camera, with
the same specs as the new version 2. This camera just doesn’t
have an infrared filter attached, so you’re able to capture images
using infrared lighting. Luckily, all of these different cameras use
the same connector and the same code to access, so whichever
version you’re using, the code you see here will work with your
camera.
140 Getting Started with Raspberry Pi
GSW_RASPI_4ED_FIN.indd 140GSW_RASPI_4ED_FIN.indd 140 10/28/21 10:54 AM10/28/21 10:54 AM

Figure 9-1.
Raspberry Pi’s camera module
Unlike a USB webcam, the camera board connects to Raspberry
Pi’s Camera Serial Interface (CSI) connector (Figure 9-2). The rea-
son is this: since the Broadcom chip at the core of the Raspberry Pi
is meant for mobile phones and tablets, the CSI connection is how
a mobile device manufacturer would connect a camera to the chip.
Throughout this chapter, we’ll use the official camera board as our
chief example, but many of the projects and tutorials can also be
done with a USB webcam (Figure 9-3).
Working with Cameras 141
GSW_RASPI_4ED_FIN.indd 141GSW_RASPI_4ED_FIN.indd 141 10/28/21 10:54 AM10/28/21 10:54 AM

Figure 9-2.
Raspberry Pi’s camera serial interface
Figure 9-3.
A typical USB webcam
142 Getting Started with Raspberry Pi
GSW_RASPI_4ED_FIN.indd 142GSW_RASPI_4ED_FIN.indd 142 10/28/21 10:54 AM10/28/21 10:54 AM
Connecting and Testing
the Camera Module
Connecting the official camera module isn’t as straightforward
as connecting a USB device, but once you get it working, it should
be a piece of cake.
Make sure the Raspberry Pi is powered down before
you do this.
Here are the steps you’ll need to take:
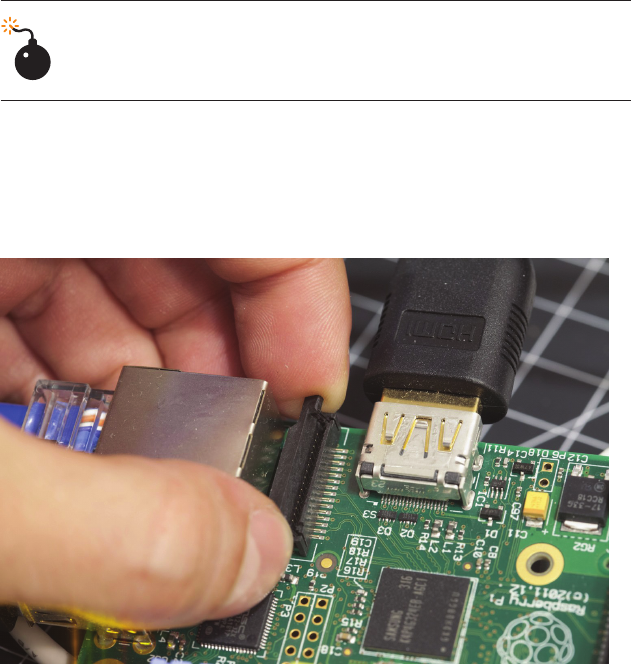
1. Pull up on the edges of the CSI connector, which is right next
to the Ethernet port. A piece of the connector will slide up and
lean back toward the Ethernet port. (See Figure 9-4.)
Figure 9-4.
Opening the camera serial interface connector lock-
ing mechanism
2. Insert the camera module’s ribbon cable into the CSI con-
nector so that its metal contacts are facing away from the USB
ports.
Working with Cameras 143
GSW_RASPI_4ED_FIN.indd 143GSW_RASPI_4ED_FIN.indd 143 10/28/21 10:54 AM10/28/21 10:54 AM
..................Content has been hidden....................
You can't read the all page of ebook, please click here login for view all page.