
3. Hold the ribbon cable into the CSI connector and press the
moving part of the CSI connector down to lock and hold the rib-
bon cable in place. You’ll still see part of the metal contacts on
the ribbon cable.(See Figure 9-5.)
Figure 9-5.
After placing the ribbon cable into the camera serial
interface connector and locking it down, you may still see metal
contacts on the ribbon cable.
4. Power up the Raspberry Pi and open the Configuration tool
from the desktop Menu→Preferences. (See Figure 9-6.)
144 Getting Started with Raspberry Pi
GSW_RASPI_4ED_FIN.indd 144GSW_RASPI_4ED_FIN.indd 144 10/28/21 10:54 AM10/28/21 10:54 AM
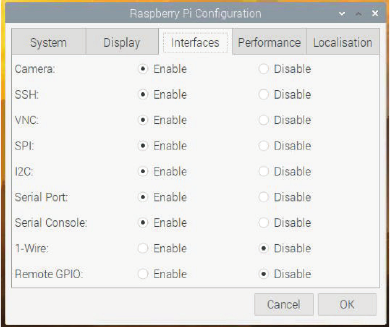
Figure 9-6.
Enabling the camera interface in the Raspberry Pi
configuration tool
5. Click the “Interfaces” tab.
6. Click the option to enable the camera.
7. Click OK and reboot your Raspberry Pi.
8. After you reboot, open a Terminal session and test the cam-
era with:
$ raspistill -o test.jpg
If everything works, you’ll see a preview image from the camera ap-
pear on the screen for a few seconds. After it disappears, a JPEG file
of the captured image will be saved in your current directory. (An
interesting side note here: if you’re connecting to your Pi using the
VNC connection and you run the command shown above in your
terminal, the preview image will
not
appear in your VNC window,
though it
will
appear on the Pi’s main screen, should you have it
connected to a monitor. This is because the raspistill command
is interfacing with a different display than the VNC connection.)
raspistill is a powerful program with a lot of options. To see what’s
possible with it, view all the command-line options by running the
program and piping the output through less:
$ raspi still 2>&1 | less
Working with Cameras 145
GSW_RASPI_4ED_FIN.indd 145GSW_RASPI_4ED_FIN.indd 145 10/28/21 10:54 AM10/28/21 10:54 AM
Use the up and down arrow keys to scroll through the options,
and press q when you want to get back to the command line.
Project: Making a GIF
One of the features of raspistill is that it can take a series of
photos at a specific interval. We can use this feature, along with
the command-line image converting and editing software
Image-
Magick
, to create fun animated GIFs with the Raspberry Pi:
1. First, install ImageMagick:
$ sudo apt-get update
$ sudo apt-get install imagemagick
2. Create a new directory to hold the images you capture and-
switch to that directory:
$ mkdir gif-test
$ cd gif-test
3. With your camera ready, execute raspistill to run for nine
seconds, taking a 640×480 resolution image every three sec-
onds, naming each file with an incrementing filename:
$ raspistill -t 9000 -tl 3000 -o image%02d.jpg -w
640 -h 480
4. Next, input those files into ImageMagick outputting as thefile
test.gif
:
$ convert -delay 15 *.jpgtest .gif
5. Now open the
test.gif
by double-clicking the file within the
desktop environment, and you’ll see the GIF you made!
Capturing Video
There’s also a command-line utility called raspivid to capture video
from the official Raspberry Pi camera module. Try capturing a five-
second video and saving it to a file:
$ raspivid -t 5000 -o video.h264
You can play that file back with:
$ omxplayer video.h264
146 Getting Started with Raspberry Pi
GSW_RASPI_4ED_FIN.indd 146GSW_RASPI_4ED_FIN.indd 146 10/28/21 10:54 AM10/28/21 10:54 AM
which will open the video in the Pi’s preinstalled VLC video
player. And just like raspistill, raspivid is a powerful program
with a lot of options. To see what’s possible with it, view all the
command-line options by running the program and piping the
output through less:
$ raspivid 2>&1 less
Testing USB Webcams
With all the different models of webcams out there, there’s no
guarantee that a camera will work right out of the box. If you’re
purchasing a webcam for use with the Raspberry Pi, search online to
make sure that others have had success with the model that you’re
purchasing. You can also check the webcam section of eLinux.org’s
page of peripherals (elinux.org/RPi_USB_Webcams)
that have been
verified to work with the Raspberry Pi.
Be aware that you may need to connect a powered USB hub to your
Raspberry Pi if you want to connect your webcam in addition to your
keyboard and mouse. The hub must be powered because the Rasp-
berry Pi only lets a limited amount of electrical current through its
USB ports, and it may not be able to provide enough power for your
keyboard, mouse,
and
webcam—especially if you’re using one of
the older models of Pi. A powered USB hub plugs in to the wall and
provides electrical current to the peripherals that connect to it so
that they don’t max out the power on your Raspberry Pi.
If you have a webcam that you’re ready to test out with the Raspberry
Pi, use apt-get in the Terminal to install a simple camera viewing ap
-
plication called luvcview:
$ sudo apt-get install luvcview
After apt-get finishes the installation, run the application by typing
luvcview in a Terminal window while you’re in the desktop environ-
ment. A window will open showing the view of the first video source
it finds in the
/dev
folder, likely
/dev/video0
. Note the frame size
that is printed in the Terminal window. If the video seems a little
choppy, you can fix this by reducing the default size of the video.
For example, if the default video size is 640×480, close luvcview
Working with Cameras 147
GSW_RASPI_4ED_FIN.indd 147GSW_RASPI_4ED_FIN.indd 147 10/28/21 10:54 AM10/28/21 10:54 AM
and reopen it at half the video size by typing the following at the
command line:
$ luvcview -s 320x240
If you still have your Pi camera connected when you connect the
webcam, luvcview will show the Pi camera’s view, since the Picam-
era is the source being pointed to by
/dev/video0
. To test the web-
cam without disconnecting the Pi camera, type luvcview -d /dev/
video1 in the Terminal, and you should see the web-cam’s view-
point.
If you don’t see video coming through, you’ll want to troubleshoot
here before moving on. One way to see what’s wrong is by discon-
necting the webcam, reconnecting it, and running the command
dmesg, which will output diagnostic messages that might give you
some clues as to what’s wrong.
148 Getting Started with Raspberry Pi
GSW_RASPI_4ED_FIN.indd 148GSW_RASPI_4ED_FIN.indd 148 10/28/21 10:54 AM10/28/21 10:54 AM
..................Content has been hidden....................
You can't read the all page of ebook, please click here login for view all page.