Real-time clock
You may want to add a real-time clock chip (like the DS1307)
for logging or keeping time when offline. This is also necessary
should you want to experiment with running a real-time operat-
ing system on the Pi.
Camera module
A $25 Raspberry Pi camera module is available as an official
peripheral. Version 2 of the camera sports an 8MP image sensor
and is capable of recording 1080p video, while the newest ver-
sion has a 12MP sensor. There is also an infrared camera model;
with a few infrared LEDs to “light” the scene, you can take pic-
tures in total darkness. You can also use a USB webcam (more
on this in Chapter 9).
LCD
Most Liquid Crystal Displays can be used via a few connections
on the GPIO header. Look for a TFT (thin-film transistor) display
that can communicate with the Pi using the SPI (Serial Peripheral
Interface) pins on the header. The Raspberry Pi Foundation
also has a touch display that connects to the DSI interface
on the Raspberry Pi.
Soundcards
You’ll probably find that the built-in analog audio is inadequate
for most of your projects. If you want high-quality sound out-
put (or input) from the Pi, you’ll need a soundcard. Many USB
soundcards also work well with the Pi; Behringer’s U-Control
devices are a popular, inexpensive option.
Laptop dock
Several people have modified laptop docks intended for cell-
phones (like the Atrix lapdock) to work as a display/base for the
Raspberry Pi. Some companies like Pi-Top create a laptop-like
device specifically for Raspberry Pi. (As of this writing, the Rasp-
berry Pi 400 is also available, which is a Pi in a laptop form fac-
tor. This design definitely calls for a laptop dock, in my opinion.)
Getting Up and Running 11
GSW_RASPI_4ED_FIN.indd 11GSW_RASPI_4ED_FIN.indd 11 10/28/21 10:53 AM10/28/21 10:53 AM

H ATs
A number of vendors and open hardware folks have released add-on
daughterboards that sit on top of the Pi and connect via the GPIO
header. These boards add capabilities like driving LCDs, motors,
or analog sensor inputs. If you’re familiar with Arduino terminology,
you might call these daughterboards “shields,” but the Raspberry Pi
Foundation calls them HATs (Hardware Attached on Top), see Fig-
ure 1-5. The full specification is available on the Raspberry Pi Foun-
dation’s GitHub page (github.com/raspberrypi/hats).
Figure1-5.
The Sense HAT add-on board includes an LED matrix,
a suite of sensors, and a joystick input. It was designed for the
Raspberry Pis that were sent to the International Space Station.
To share just one example, the Raspberry Pi Foundation makes a HAT
called the Sense HAT, which includes an RGB LED matrix; sensors for
temperature, pressure, and humidity; an accelerometer; a gyroscope;
and a magnetometer. It also has a five-position joystick. It’s the HAT
that was designed for the Raspberry Pis that were sent to the Intern-
tional Space Station as part of the Foundation’s AstroPi program.
12 Getting Started with Raspberry Pi
GSW_RASPI_4ED_FIN.indd 12GSW_RASPI_4ED_FIN.indd 12 10/28/21 10:53 AM10/28/21 10:53 AM
The Case
You may find that you want a case for your Raspberry Pi. The stiff
cables on all sides make it hard to keep the Pi flat, and some of the
components like the SD card slot can be mechanically damaged
even through normal use.
There are a bunch of premade cases available, but there are also a lot
of case designs available to download and fabricate on a laser cutter
or 3D printer. In general, avoid tabbed cases where brittle acrylic is
used at right angles. The layered acrylic of the Pi bow (shop.pimoroni.
com/?q=pibow) is a colorful option (Figure 1-6).
The Raspberry Pi Foundation also creates an official case, which
uses a nice injection-molded design. It has multiple parts that can
be removed to allow access to the GPIO pins and other components.
(Figure 1-7).
It should probably go without saying, but it’s one of those obvious
mistakes you can make sometimes: make sure you don’t put your
Raspberry Pi on a conductive surface. Flip over the board and
look at the bottom; there are a lot of components there and a lot
of solder joints that can be easily shorted. Another reason why it’s
important to case your Pi!
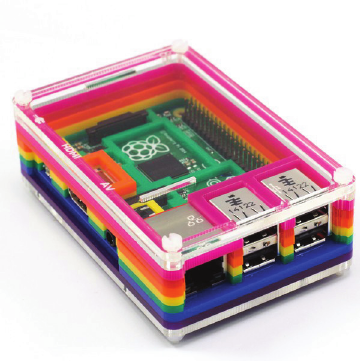
Figure1-6.
The colorful Pibow case from Pimoroni
Getting Up and Running 13
GSW_RASPI_4ED_FIN.indd 13GSW_RASPI_4ED_FIN.indd 13 10/28/21 10:53 AM10/28/21 10:53 AM
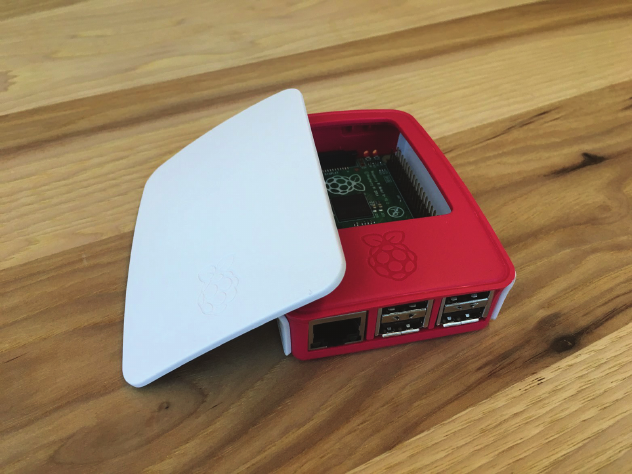
Figure1-7.
With the official Raspberry Pi case, you can remove the
top and sides to access the different parts of the board.
Choose Your Distribution
The Raspberry Pi runs Linux for an operating system. Linux is tech-
nically just the kernel, but an operating system is much more than
that—it’s the total collection of drivers, services, and applications
that makes the OS. A variety of flavors or distributions of the Linux
OS have evolved over the years. Some of the most common on desk-
top computers are Ubuntu, Debian, Fedora, and Arch. Each has its
own communities of users and is tuned for particular applications.
Because the Pi is based on a mobile device chipset, it has different
software requirements than a desktop computer. The Broadcom
processor has some proprietary features that require special “binary
blob” device drivers and code that won’t be included in any standard
Linux distribution. And, while most desktop computers have giga-
bytes of RAM and hundreds of gigabytes of storage, the Pi is more
limited in both regards (though the 8GB of RAM available on the Pi 4
14 Getting Started with Raspberry Pi
GSW_RASPI_4ED_FIN.indd 14GSW_RASPI_4ED_FIN.indd 14 10/28/21 10:53 AM10/28/21 10:53 AM
rival that available on some lower-end desktop computers). Special
Linux distributions that target the Pi have been developed.
In this book, we will concentrate on the official Raspberry Pi OS
distribution, which is based on Debian. Note that though raspbian.
org
still exists, it does not seem to be affiliated with the Raspberry
Pi OS, and is a community site, not operated by the Foundation.
If you’re looking for the official distribution, visit the Raspberry Pi
Foundation’s downloads page (raspberrypi.org). Other specialized
distributions are explored in Chapter 3.
Flash the SD Card
Many vendors sell SD cards with the operating system preinstalled;
for some people, this may be the best way to get started. Even if
it isn’t the latest release, you can easily upgrade once you get the
Pi booted up and on the internet.
The easiest way to get the OS on the microSD card is to use the-
NOOBS tool. Don’t take offense; no one is questioning your com-
puter acumen. NOOBS stands for New Out Of the Box Software
and is a configuration tool that will help install the OS.
You’ll need an SD card (at least 8GB) and reader, then follow these
steps: when you boot up the Pi, you’ll see a configuration screen
with several OS options. Select Raspberry Pi OS and hit the Install
button; that’s all there is to it!
For Advanced Users:
Create Your Own Disk Image
The first thing you’ll need to do is download one of the distributions
from the Raspberry Pi Foundation’s downloads page (www.rasp-
berrypi.org/downloads) or one of the sites in Chapter 3. Note that
you can’t just drag the disk image onto the SD card; you’ll need to
make a bit-for-bit copy of the image. You’ll need a card writer and a
disk image utility; any inexpensive card writer will do. The instruc-
tions vary depending on the OS you’re running. Unzip the image
file (you should end up with a
.img
file), then follow the appropriate
directions described in Appendix A.
Getting Up and Running 15
GSW_RASPI_4ED_FIN.indd 15GSW_RASPI_4ED_FIN.indd 15 10/28/21 10:53 AM10/28/21 10:53 AM
..................Content has been hidden....................
You can't read the all page of ebook, please click here login for view all page.